Making a luxury horse carriage. How to make a carriage from wood
Read also
As everyone knows, a gift made with your own hands is the most unique and original. Besides, how nice it is to give something that has a piece of your soul in it. And how shocked the person to whom such a gift is intended will be. On the Internet there are a lot various crafts for every taste and color. And so you decided for yourself that a carriage made quickly and easily with your own hands would be just such a gift.
The carriage can not only be given as a gift, but also used as decoration festive table or interior. It is not only original, but also functional. It can be used as a vase, box, flashlight or simply as a toy for a child. So what types of carriage crafts are there? The most popular ones include carriages made of felt, plywood, wood, cardboard, paper, wire and pumpkin. The most spectacular gift will be a carriage with flowers. You can make flowers for such a carriage yourself or decorate it with fresh flowers. Below we will conduct several master classes with photo and video instructions.
Master class on making a cardboard carriage with your own hands
To work you will need:
- thick cardboard;
- wooden blocks;
- lace;
- skewers;
- ice cream sticks;
- wide wire, two-core and single-core;
- white acrylic paint;
- screwdriver and screws;
- stationery knife;
- hot glue.
Manufacturing instructions.
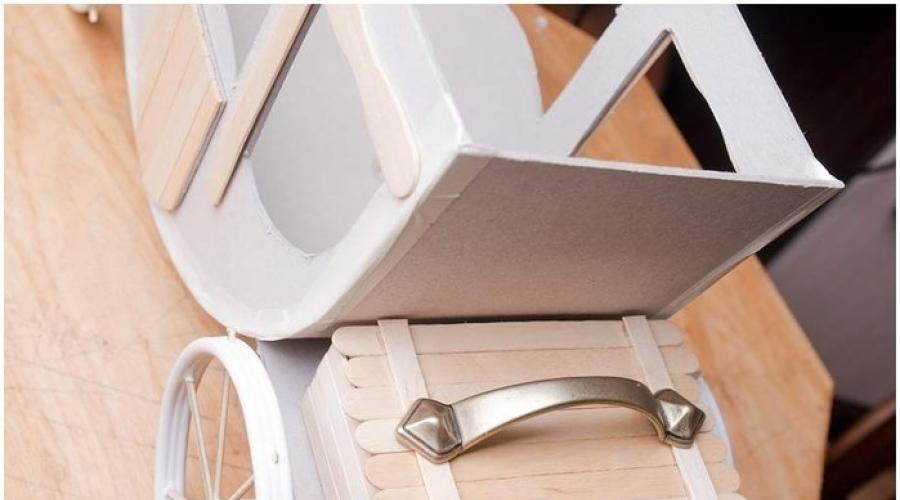
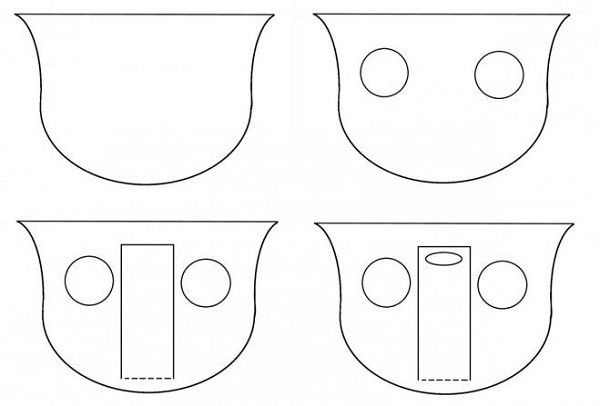
First, we make a diagram of the cabin, transfer it to a thick sheet of cardboard. Stationery knife cut out the blank. To connect the carriage parts, you need to cut strips 14 centimeters long and glue them with hot glue. Using skewers, wire, and wooden blocks we make wheels with a diameter of 10 and 14 centimeters. Using screws, fasten the axles to a wide wire.
We connect the two axles of the carriage with the cabin using screws. We cut out two parts for the doors and decorate them with ice cream sticks. We make parts for the chest, which will be located behind the carriage. We glue them together with hot glue and decorate them with sticks. We glue the finished chest to the carriage.

We prepare the part rectangular shape, which will be the bottom of the carriage, and glue it. To give the bottom of the carriage neatness, we cover the ends of the wire with sticks. To give relief, we decorate the carriage body with napkins. From thin wire and cardboard we make a seat for the coachman. We decorate windows, doors and seats with decorative cord or ribbon. We make benches inside the carriage and cover the cardboard with fabric. We sew pads and place them on benches. We cover the wheels with gold braid. Let's lay out the rug. We decorate the carriage with lace.

We make a roof out of cardboard and cover it acrylic paint and decorate.
Such a spectacular carriage can be used to decorate a wedding table.
We make a carriage from flowers in a step-by-step lesson with a description
To make a flower carriage you will need:
- double and single core wire;
- skewers;
- black corrugated paper;
- penoplex;
- PVA glue;
- glue gun;
- black electrical tape;
- Ruler and pencil;
- wire;
- wire cutters;
- scissors;
- scotch;
- stationery knife.
Instructions:
We make wheels; to do this, we cut four segments from double-core wire: two 28 cm and two 40 cm. We bend the resulting segments in the shape of a circle. We fasten the resulting wheels with tape. From black corrugated paper cut strips and wrap them. Glue the tip of the paper.
From penoplex we cut out a circle with a diameter of two cm. We cut the skewers into sticks 4 cm long and make the spokes of the wheels. We thread the finished knitting needles into the penoplex, having previously lubricated them with glue for better fixation. We connect three skewers with tape and wrap them with corrugation - this is the wheel shaft.
We make a base from two-core wire with rounded ends and wrap it with corrugated paper.

We're making a cabin. To do this, cut five pieces of 55 cm each from single-core wire, wrap each with black electrical tape and dilute it with gold tape. We cut circles of polystyrene foam to fasten the rods. Using an awl and glue gun making a carriage skirt. We collect all the parts and secure them with electrical tape. We hide the tips of the skewers on wheels with beads.
The carriage is almost ready, all that remains is to decorate it. To do this, we cut corrugated petals and create a flower base. To make petals, you need to cut out rectangles of the same size and cut out petals from them. Having made the blanks, you need to use the blunt end of the scissors to draw the wave away from you and stretch the segment, giving it the shape of a petal. Then glue all the petals with hot glue to the foam base. We install the resulting flower into the body.
We arrange the buds. For this you will need organza, round candies, decorative mesh, gold ribbon and tape. Green colour. We insert the finished buds into the foam base. We make flowers and decorate the carriage by inserting them into the base.
We wrap the top of the carriage with paper, and make a fluffy skirt from organza. We make roses from corrugated paper. We decorate the top of the carriage at our discretion.

The carriage is ready. Such original bouquet Any woman will be happy to receive it.
Video lessons on the topic of the article
At the end, we invite you to watch video master classes on making various types carriages
Content:
Despite technical progress, which has long been firmly established in human life, in remote areas of our country they still use horses for farming. These animals often perform draft work to transport goods. From the outside it seems that there is nothing difficult about harnessing a horse, but this is not so. Today, only a few know how to do this correctly.
Only after learning all the intricacies can you learn how to properly harness a horse to a cart, transport loads, plow the land, or simply take a walk in a carriage. Once upon a time in almost every locality there were their own craftsmen who made vehicles. But today, a good crew will have to be bought or made independently, and the first option is preferable to the second.
What types of carts are there?
Don’t think that there are only one or two types of vehicles; everything is much more complicated.
Carriages
This is a cart with a closed body and mandatory springs. This type of crew is the most convenient, comfortable and expensive. The horses are driven by a specially trained person - the coachman, who sits on a box in front of the carriage. It cannot be said that the ride here is comfortable: it is the driver who experiences all the tricks weather conditions. If the carriage is of a simpler type, then it may not have goats, and then the coachman sits on the handle or edge of the cart.
Inside the carriage there are several soft seats and side windows. Through the window located in front, you can give special instructions to the coachman. At the back there are heels, on which stand footmen accompanying a noble person to the ceremonial departure.
Boarding the carriage was carried out using a folding step. It was the footmen who folded back this ladder, helped open the doors and lit the lanterns on the carriage if the trip was carried out after dark.
The number of horses harnessed depended on the lightness of the design. Threes and fours were the most popular. The lightest carriage could be carried by a horse couple. Such a vehicle was a luxury and an indicator of prestige in society. In the absence of a personal carriage, it was necessary to hire a pit cart.
Strollers and tarantasses
The stroller is easy simple a carriage with a reclining top. Its advantage is convenience and mobility. A harness might require a pair or three horses. Particularly wealthy people harnessed six-wheelers. It all depended on the position in society. Phaeton and landau are just types of strollers.
The second type of mobile vehicle was more suitable for road trip. The main ones here distinctive features It was the durable manufacturing materials, not their beauty. And what is the point of carved decoration if the cart breaks down in the middle of the journey? Instead of springs, long springs up to 6 m were used, to which the body was attached. Thanks to them, the shaking on the bumpy road was softened and was much easier for travelers to bear.
What is a britzka
This type wagon refers to a lighter version of the tarantass. There is a folding top. On britzkas, similar to tarantats, they made long trips. There are several types of such carriages: with springs, without them, and postal type. Today, a one-horse harness is often called a chaise.

Gig
This concept includes a horse-drawn carriage equipped with two wheels. The word itself takes its name from the concept of two-wheeled, the first part of which means “two”, and the second - “wheel”. These carriages can be either with springs or without. The gig has a track width of approximately 100 cm, seats there are only two in such a crew. One of the passengers directly controls the horse. The body part is made of boards or plywood, and a shield must be installed in front to prevent dirt from splashing passengers. Directly under the seat you can place a small amount of things or necessary tools.
How to make a horse cart
Before making a vehicle, you need to understand what is special about the cart and what the main elements are. The most main part, of course, - chassis. This includes the front and rear axles, four wheels, and the front part of the frame for installing a platform or body.
Additional means shock-absorbing struts serve. And if the rear axle is made in such a way that it is stationary, then the front axle must turn. This allows you to control horses with greater comfort.
In the next place is a pair of shafts for a single harness or a drawbar for a double harness. Both are attached to the front axle, which allows the front wheels to turn. The main frame is usually made of metal and welding. This is where the entire weight of the crew's cargo will lie.
The cart itself may be wooden. As for the size of the cart, once they were no more than one and a half meters wide, and up to 3 m long. As for the height, everything depended on the goals and size of the horse, most often it did not exceed 1 m.
Materials and tools
- several materials made of durable wood;
- welded frame with metal axles for wheels;
- welding machine;
- 4 wheels;
- metal pipes;
- nails in large quantities;
- hammer;
- additional tools;
- cart drawing.
Work order
Initially, the chassis of the cart is manufactured, which consists of axles for the wheels and a durable welded frame. If you have no experience in welding work, then it is recommended to ask specialists to do this.
The axles and frame are made from metal pipes. Then you need to make a rear axle, which will be stationary, and a front rotating one, where a thick pin is installed. To fasten the entire structure, special washers are used.
Before completing the first stage of work, you need to understand what appearance the vehicle will have. If you plan to harness a pair, you will need a drawbar along with a holder. If they are shafts, they are welded to the front axle and secured with a holder. The shafts are not removed, but move from side to side.

This movement is ensured by the holder. For additional fastening, a bracket and special reinforcement cords are used. You can use a wire that is attached to the front axle and shaft. Then you need to install the wheels, and to make the ride safe, you need to make good brakes on the cart.
This is where work begins on the base of the cart. If you plan to manufacture a platform, then everything is simple. Boards are being cut the right size, are knocked together into a platform and attached to the frame.
For the sides you will need four poles, to which slats are nailed vertically at a slight angle. TO supporting frame you need to attach the sides that will be located on the sides. The sides located at the front and rear are best made removable for more comfortable use of the cart. To make a shaft, you will need wooden blocks of sufficient length.
Rules for harnessing a horse in a Russian harness
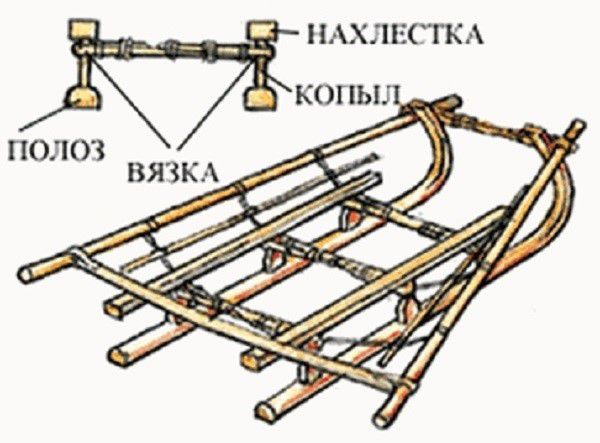
If we talk about the shaft-arc harness, then this particular option belongs to the classics and is purely Russian. Before you start putting the horse into the cart, you need to have an idea of what elements are included in the Russian harness:

- a clamp with a pair of tugs;
- arc;
- saddle;
- saddlemaker;
- abdomen;
- girth;
- rein;
- harness;
- bridle.
If we talk about a horse collar, it is selected individually for each horse. It should be close to the horse's shoulders. A collar that is too large can be slightly narrowed on the inside by sewing felt. But it is absolutely forbidden to wear a small collar. To use a saddle strap, be sure to wear a saddle so that the thin strap cannot rub the skin, because during harnessing it goes through the top of the saddle.
All parts of the harness must fit the horse; harness that is too tight or too loose can lead to injuries and accidents. The same applies to the means of transportation. Before work, it is necessary to check the integrity of the cart and the operation of the brakes.
After everything has been checked, you can harness the horse and it is best to do this under the strict guidance of a specialist. If the harness is put on in the stall, then it all starts with the bridle, if at the junctions, then the bridle is put on at the last moment.

The saddle is placed on the back so that its front part is above the withers. The girth is tightened so that 2 fingers can hardly fit between the horse.
The collar is put on with the pincers up and turned over directly in the narrow part of the horse's neck. Then comes the turn of the harness, which is carefully straightened and placed on the back.
When loading into a cart, it is important to remember that the end of the shaft should be located next to the tugs. The interlace is secured through loops on both sides. Holding the left tack, insert the arch into it, and then move it over the horse's neck. If necessary, the tugs are twisted so that the arc does not jump out of them.
At the next stage, the clamp is tightened so that the clamp pliers come together. If something doesn’t fit, the tugs are adjusted. Here you need to attach the reins in one of two ways, depending on the horse’s performance. Secure the underbelly and gills. The horse harness is completed.
But there is no need to do this based on bare theory. It is better to ask advice from practitioners, otherwise it may end badly.
Horses are versatile farm animals that help their owners cultivate the land and transport goods outside the village. In the latter case, in addition to the horse, a special carriage on wheels, popularly called a “cart,” must be used. Together with the animal, it becomes a horse-drawn vehicle and can be used for movement on public roads. It is for this reason that it will be useful for every farmer to learn about the features of independently creating such a structure.
Scope of use of the cart
The structure of a horse-drawn cart and its design features directly depend on the purpose of use finished product. For example, to transport people on public roads, you will have to install inside the cart comfortable benches and handles, and outside - reflectors. The sides of this design must be quite high to protect passengers from dust and stones flying from under the wheels of passing cars.
If the cart is used only for transporting hay or straw, then its base can be made of lumber, without much concern for the strength of the structure. A good option in this case would be well-dried hardwoods trees (not conifers only). For transportation of large and heavy loads, carts with a strong frame and a metal base mounted on strong wheel supports are suitable. When constructing such a structure, you can use almost any raw material, the main thing is that it meets all the strength requirements.
In some cases, horses can be harnessed to carts intended for horseback riding around the city. Of course, in such situations, the appearance of the structure plays an important role in the choice, so it is desirable that all elements of the cart be made only from quality wood, which has undergone appropriate processing.
Did you know?If you believe the statements of historians, then the first horse appeared about 60 million years ago and weighed only 5 kg with a height of 35 cm. It was this horse that zoologists called Eohippus.
Not bad decorative material also considered plastic, which can be supplemented general form or focus on specific elements of the cart. Separately, we can highlight carts used to harness horses in winter time. Unlike standard wheeled versions, they do not have axles, but this does not prevent them from reaching speeds of about 6 km/h.
Types of horse carts
"Cart" or "cart" - common names for horse-drawn carts with four wheels. They are usually harnessed to horses, but sometimes mules, buffaloes and oxen are used. Most often, the main material for the manufacture of this type of transport is wood, and often the entire structure is placed on the same wooden wheels.
Carriages with rubber pneumatic wheels and shaft harness - more modern version carts with a load capacity of approximately 750 kg. The weight of the cart itself can fluctuate between 250–300 kg, because a lot depends on specific type designs. The main varieties are considered to be the following.
Trolley - a specially equipped cart for transporting people. Its design initially provides seats for passengers and the driver, and can also use handles mounted on inner part sides for greater safety of passengers when moving. The wheels of the trolleys are made only from pneumatic tires, since they also have to ride on hard road surfaces. 
This term is usually understood as a long cart, the front and rear parts of which are connected by long longitudinal boards or beams, with metal sheets laid transversely on them. Drogs do not have a body and in the old days were used as funeral chariots to transport the bodies of the dead to the burial place. Today, this version of the cart is excellent for transporting large loads, including haystacks, of course, if the owner secures them correctly on the surface. 
This type of cart is most often used for transporting heavy loads. Its body is made in the form of a solid wooden base, on which the load is placed, securing it if necessary. The shelf platform can be made of durable wood: in the longitudinal direction, the boards are laid very close to each other, and on the sides they are fastened with transverse, shorter wooden elements. It is advisable to install the entire structure on a strong metal frame with good shock absorption, and use rubber inflatable tires in the form of wheels. 
The carriage is a closed passenger carriage, the design of which includes springs. It can be single-axle (two-wheeled) or biaxial (four-wheeled), more or less mobile, which affects maneuverability. To others distinctive characteristics These types include:
- differences in structural stability;
- capacity of the body part;
- spring type;
- load capacity.
 Based on the type of harness, crews are equipped with a drawbar or shafts. Can be used as wheels wooden elements, but they are more typical for small excursion carriages on the territory of private historical museums, and on other carts they install more comfortable rubber wheels.
 Important!Always calculate in advance the approximate weight of the goods transported in the future, which will help you choose the most suitable suitable materials for making a cart.
How to make a horse cart with your own hands
Different types of carts are easy to find in the public domain, but not all farmers are willing to pay thousands of rubles for them. It is much more profitable to make them yourself, especially if you already have “home construction” skills.
Dimensions and drawings
In the simplest version, a horse-drawn cart will consist of an axle, a frame and attachments of the required size. As for the parameters of the finished product, everything is purely individual and depends on the purpose of the future vehicle. For short trips and transportation of crops, a total length of 2.85–3 m is sufficient, with a width of the hinged part of 1.46 m and an axle width of 1 m. The optimal height of the cart is 1 m, but it is important to take into account the size of the horse and the purpose of using the cart. An approximate diagram of such a product may look like this:

Materials and tools for work
Not all farmers have the opportunity to process wood different ways, therefore, to make your task easier, it is better to prepare in advance metal wheel axles, a welded frame and two pairs of tires (along with rims) from any car as a wheelbase. Additionally, in addition to these, you will also need:
- wooden boards (preferably hardwood);
- metal pipes or profile;
- hammer;
- nails;
- metal corners;
- welding machine and accessories;
- tools for working with wood.
Important! When choosing metal corners give preference to large and thick products, at least 5 mm thick.
Stages of production
The manufacturing process of each individual cart has a number of features and, depending on the materials used, implies completely different actions. However, the general stages of creating a structure with ready-made car tires will look like this:
- Manufacturing of chassis: wheel axles and a durable frame base. It is desirable that these components be completely metal, made of a pipe or profile.
- Creation of a fixed rear and movable front axles, attached to a thick metal pin using washers.
- Making a special mount for the drawbar(if you need a drawbar harness). Shafts (long wooden beams or iron pipes) must move in different sides, simultaneously connecting to the front axle. This possibility is provided by the fastening mechanism.
- Additional fixation of shafts using brackets and their reinforcement with cords(a wire attached to the shaft and the front axle of the cart is perfect for this element).
- Wheel installation(you just need to “put” the prepared car wheels on the existing base and secure them with suitable bolts).
- Creating the base of the cart (body part). Sections of the required length are cut from the prepared boards, after which they are knocked together into a solid platform and attached to the frame. If the cart needs sides, then you can make 4 longitudinal poles on the right side, and attach longitudinal slats on top of them. Solid sidewalls are fixed on the supporting frame, and the back and front parts are closed with removable parts, which will make the process of controlling the harness more convenient.
Video: how to make a horse cart with your own hands
How to harness a horse to a cart
Properly making a cart is only half of the successful completion of the task, because in order to cope with the transportation of people or cargo, you also need to properly harness the horse.
Did you know? Horses have a very well developed sense of touch, and the most “sensitive” organs in this regard are the lips and hooves. With their help, animals perfectly navigate the terrain.
Typically, this process is not particularly complex and its nuances depend more on the type of specific structure, but, in general, The owner needs to focus on the following steps:
- Preparing and cleaning the animal itself, monitoring the condition of individual components of the harness: the horse must be completely healthy, and all harnesses and connecting elements must be strong and intact (even the slightest abrasions on the belts can cause unforeseen problems on the road).
- Adjusting the length and aligning the tugs(if you do not pay due attention to this issue, the harness will bend and the accuracy of the cart’s movement will be impaired).
- Harness set. The underbelly and midriff, connected to a single ring, must be secured to the shaft.
- Horse outfit. Put a collar, a bridle and a nurse on it, only so that the latter is secured at the bottom of the withers (when placed on the back it will be very low, and at the withers it will be too high). Place the collar on the horse, only so that it is first positioned with the pincers facing up, and then it can be lowered onto the neck and turned over as needed (straighten the part if necessary). Now stretch the harness over your neck and straighten it just as well. Connect all existing straps with suitable buckles, tightening them until there is only room for the palm of your hand between these elements and the ischial tuberosities.
- Putting a horse into a shaft, which can be done in different ways. In the simplest version, the animal needs to step over the pole, but if it refuses to do this, then you can try to lead the horse backwards. Some individuals react warily to this maneuver, so if both options are unsuccessful, all that remains is to roll the shafts onto the standing animal. Last option Most suitable for shy and young individuals.
- Arc fastening. Take the product and stand in front of the horse, looking exactly at it. Place the bow against the animal's right leg, and then adjust the length of the tug by twisting it. Place it next to the edge of the shaft, then insert the left edge of the arc into the loop of the tug. The second one needs to be thrown over the shaft and secured so that it comes out fixed in the cutout of the arc, which, in turn, has already taken its place on the horse’s neck. Now go to the second shaft and turn the arc with the notch towards it. Place the tug on the shaft and the loop on the bow. Tighten the clamp well and wrap the soup around the pliers: after connection, they should be placed at right angles to each other.
- Final activities. When the horse is already tied to the left shaft, all that remains is to throw the reins around the animal’s neck, attach the lanyard to the tug (only so that the horse can freely raise its head) and throw the straps over the shafts so that they are securely fixed and do not dangle. Finishing touch- fastening the reins and bit.
Video: how to harness a horse to a cart
With diligence and hard work, there is nothing difficult in making a cart yourself, and you just need to select the most suitable materials, choose wheels and spend a little personal time, the reward for which will be a relatively cheap cart.
A business using retro vehicles is a real goldmine for farmers who keep or breed horses. These amazing animals have not been used for a long time heavy work in the field, however, they can generate additional income by taking tourists along the picturesque streets of the city. In this article we will tell you how to make a carriage with your own hands, drawings are included.
There are several types of horse carts popular in Russia that can be made at home:
- cart;
- sled;
- carriage or carriage.
Let's take a closer look at how to make each of the above vehicles.

Use of horse carts
Let's start with something simple. The cart has long been used in villages as the main means of transportation for several passengers, and also as a device for transporting large cargo. When our grandparents were young, they sometimes met in the city, most often at markets, where peasants brought crops from their gardens or livestock for sale.
Today, such a curiosity can be found very rarely in cities and only in an “elegant” version. A simple, small-sized vehicle is often hitched to ponies in parks to give children rides.

A horse carriage is perfect as transport for a rustic wedding.
Any vehicle, be it a sleigh, a carriage or a cart, will not move without a horse. It is important to know how to harness a horse correctly - because it determines whether the animal will be comfortable in the harness, and, therefore, its performance. Let's figure out what a harness consists of and what harnessing rules exist.
Required tools and materials
In the process of making a cart, you will need the following tools and materials:

Making a cart
The design of a simple cart is divided into several main elements:
- frame;
- hanging part.
Let's consider the manufacture of each of the components.

Making an axis
| Step | Description |
|---|---|
| Strong wood is usually used as a material for making carts. So, first of all, prepare a meter wooden beam, the width and height of which are equal to each other and amount to 10 centimeters. Be sure to check that the wood used for the axle does not rot or crumble. Poor quality material can lead to unexpected breakdown of the cart, and as a result, injury to the passenger and horse. |
| Determine how much of the timber will be on the bottom of the cart. Mill a groove along the entire bottom of the wooden piece; it is needed to install the metal axle inside. Then drill a hole exactly in the middle of the piece of wood, going all the way through. The hole diameter is 20 millimeters. During the assembly of the cart, a kingpin is installed in it - a special metal pin with parameters M20x200. |
| Now you need to make flat metal circles with a diameter of 30 centimeters. As source material use centimeter metal sheets. In the middle of each “pancake”, cut a hole with a diameter of 22 millimeters. The resulting parts will take on the role of a rotating device; in two of them it is necessary to make additional mounting holes. |
| Coming from the bottom of the beam, insert the kingpin into the middle hole. We fix it on each side and install a metal axis and flat circles into the beam. Congratulations, you have just designed the front axle of your future cart yourself. |


The axle for the rear of the cart is made similarly to the front, but without using a kingpin and a metal “pancake” in the design.
Making a frame
| Step | Description |
|---|---|
| To construct the frame, use a second wooden beam, the length of which is 3 meters. The width and height of the part correspond to the previous parameters and are 10x10 centimeters. |
| At one end of the prepared part we attach the previously assembled rotating mechanism, at the other we install another wooden beam, which is 10 centimeters wide, 10 centimeters high and 3 centimeters long. Then we attach the rear axle part to the frame. A small block compensates for the level of distance between the axles and is necessary for the proper functioning of the vehicle. |
| It is necessary to give the resulting wooden structure rigidity. For this purpose, use boards that are 5 centimeters wide, 13 centimeters high and 2.515 meters long. Giving products the required form and parameters, track the exact correspondence of the received and required sizes. |


Mounted part
| Step | Description |
|---|---|
| The hinged part primarily includes the bottom of our cart. It is assembled from a set of boards, with a width of 2.5 centimeters, a height of 10 centimeters and a length of 50 centimeters. They are superimposed on the frame frame and boards that give rigidity and are bolted to the middle beam. |
| We fasten two long boards along the edges of the assembled bottom. The width of each board is 2.5 centimeters, height – 10 centimeters and length – 2.8 meters. |
| From a sheet of high-quality plywood we cut out the ends of the future cart, the thickness of which will be approximately 2-3 centimeters. We securely attach the parts to assembled frame. Then we screw two sanded, wide boards to both ends on each side. |


So, we have a real, strong cart. Decorate it with additional details and turn it into a fairy-tale carriage.
One of essential elements the harness is a collar. It was he who at one time made it possible to improve the performance characteristics of horses and transport not only people, but also heavy loads. Read in what a clamp consists of, what types of clamps there are and how to choose the right one for your horse.

Using a carriage
Now let's move on to a more complex version of a horse carriage - an elegant carriage or carriage. This type of retro transport is far from rural romance, as the emphasis is on its elegant appearance. A very popular transport not only for city horseback rides for couples in love, but also for weddings, where it can act as key element a themed photo zone for newlyweds and guests.

Necessary materials
In order for you to get a strong and beautiful carriage, you need to prepare following materials and tools:
- wooden beams;
- moisture-resistant plywood;
- bolts and nuts;
- clamps;
- plastic;
- foam;
- fabric for upholstery of crew elements;
- persistent paint and varnish liquids for building materials;
- glue;
- drill;
- jigsaw;
- sandpaper;
- circular saw;
- roulette;
- file.
Making a carriage body from plywood with your own hands
As a material for the body of the future carriage, choose moisture-resistant plywood for outdoor products. Mark the future elements of the carriage body on sheets of plywood using a black marker.
It should be said that the parameters of the carriage depend on the desired shape and size, however, even the smallest cabin for two people will be about 1200 millimeters in length and width and 1600 millimeters in height.
Start cutting out the shapes according to the applied markings using a disk electric saw. As a result of sawing, you should have four parts. Make two of them a little smaller than the remaining ones. We will connect them with larger parts in order to later support the back and front walls of the carriage on something.
After you receive the blanks, use a jigsaw to carefully cut out holes for windows and doors. In order for the jigsaw to easily enter the plywood sheet, drill small holes with a drill at the site of the future entry of the blade.

Let's connect larger and smaller pieces together using construction glue and bolts tightened with outside. Allow the glue between the panels to dry and cure before tightening the bolts. To do this, squeeze them with clamps and leave them for a while.

Let's start cutting out the floor and ceiling of the carriage. Ceiling panel made of plywood can also be 9 millimeters, but the bottom should be made of durable and thick fabric.
These elements are fastened to the side parts of the carriage using spacers - it’s smoother this way. The components of the cart should be glued construction glue, and also screw together with bolts.

If you decide to make a large crew for several people, add additional stiffeners. They can be made of wood or metal.
Step 5
Once the floor and ceiling of the carriage are attached, measure the resulting distance between the walls, as well as the distance from the floor to the ceiling. This will give you the parameters of the rear and front walls of the vehicle. If desired, cut out small windows in them or leave the canvas intact. It is preferable to make a window in the front wall so that while using the carriage, passengers do not have to convey directions to the coachman along the route through the side window, raising their voices.

To make the fastening edges of the carriage bend easily, make cuts along the entire length of the edge at small intervals.
Video - How to make a carriage
Making a frame
Now that the body is ready, let's move on to making the frame.
The size of this element of the carriage is determined based on the dimensions of the body. The components of the frame should be cut out from a thick sheet of plywood, at least 21 millimeters wide. Two parts of the frame are cut from it, similar to the form shown in the figure.

After cutting is done, treat the surface of the parts sandpaper to give smoothness.
Note! The body must fit snugly into the frame recess. Carry out cutting carefully. If you accidentally cut off an extra centimeter, don’t skimp and make a new part.

Let's start making the luggage part of the crew. For each side part of the frame, we cut out the lining according to the presented drawing. Use the drawing of the manufactured frame as a guide to the shape. The material for the sides is also thick plywood.

Once the sides are made, secure them to the inside of the frame using bolts or glue. You can use these construction tools comprehensively.
The part for the bottom of the rear of the cart is cut out from the remains of plywood, one side of it should be beveled at an angle of 45 degrees, as shown in the figure.

Using a drill, we make holes in the side parts. This must be done at an angle of 90 degrees. To make it even, use a special bracket.
Then replace the bottom of the carriage and fit it onto the frame using an equal number of screws for each side.

Do not forget to glue the joints of the parts to give the structure additional strength. To make gluing as effective as possible, tighten the parts with clamps.
Now we prepare the coachman's place. It is produced by analogy with the luggage compartment floor. A part is cut out of a sheet of plywood, on which parallel cuts are made approximately 6 millimeters deep. A second sheet is glued to it at an angle, the size ideally fitting inside the carriage frame. After the glue has dried, screw the sheets together with a few screws.
Then we make a footrest from sawn plywood boards. We glue the boards with their side parts to each other and install them in place.

Step 5
We are preparing the seat itself for the cab driver. Here the flight of your imagination is not limited by anything. First, we make the “skeleton” of the future chair, focusing on the drawing, and then we put plywood boards on the frame. Bottom part The seats can be made wide to make sitting comfortable.

Making a coachman's seat is the most simple part process
To make the design look more impressive, install carved armrests.

Step 6
Let's start creating windows and door curtains. Thin, transparent plastic acts as window plates. This material is sold in rolls.
Interesting advice. To straighten rolled plastic, place it in boiling water and straighten it on a flat surface.
We cut out the frame for the window and glue the plastic on the inside. You can also secure it with screws.
After the windows are ready, we install them in the corresponding slots of the body and glue the frames. The result should be a design similar to that shown in the figure.

It is better to take purchased metal handles and hinges for the door, since the carriage will be used mercilessly.
Step 7
Fabric upholstery is done using construction stapler. For a carriage in which people will ride, it is better to buy eco-leather, since its wear resistance is higher than other available materials. However, some details interior decoration can be covered with velvet fabric.


We present to you comparison table advantages and disadvantages of eco-leather.
As you can see, all the shortcomings of the material are mainly related to aesthetic characteristics. WITH practical point In my opinion, eco-leather is best suited for upholstery of the interior of a carriage.
Step 8
What you do at the stage of decorating the carriage depends only on you. The main thing is not to forget to equip the crew inside with a comfortable sofa, which you can also assemble yourself and upholster with a suitable fabric.
Be sure to take care of the exterior decoration of the cart. Add carved elements made of plywood throughout the entire body, do not forget about the roof and frame. If you make a lattice for the roof, you can place a real living flower bed on top. This will add charm to the carriage and attract a crowd of tourists.
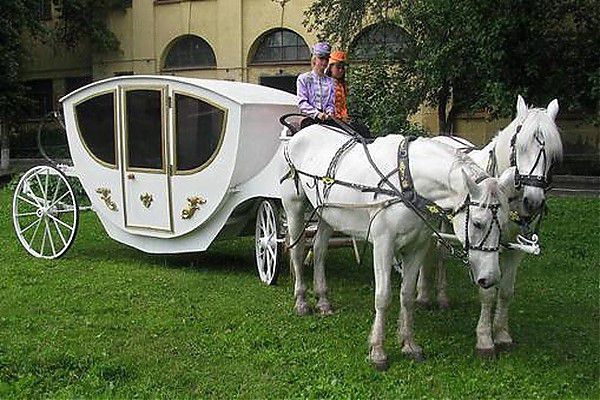
The carriage is a spectacular retro transport, popular among tourists
You can paint the carriage body with plywood paint, which is available in absolutely any color on the market. Here approximate list painting works:
- surface grinding;
- primer using an acrylic base;
- drying the layer;
- puttying;
- drying putty;
- re-grinding;
- primer;
- soil drying;
- coloring.
How to make wheels for a carriage
Wooden carriage wheels are also easy to make yourself. Their components are:
- rim made of segments;
- sawn hubs;
- metal bandages;
- bearing bushings.
| Step | Description |
|---|---|
| The wheel rim is made of an even number of segments, absolutely identical. Usually there are only seven of them. A socket for a tenon is made from the back of the rim, and a tenon is cut out from the front. A groove must be cut across the base of each tenon to allow air to escape from the groove. A recess is cut out in the middle of each segment, and holes are drilled from the sides, passing through. The rim is assembled according to the “groove-socket” pattern. |
| Let's start making the hub. For such a part you will need a single piece good wood. The part is machined similarly to the drawing shown in the figure. Then we prepare a bandage for the resulting part. It is made from metal tubes cut into rings. The inner diameter of the ring corresponds to the outer diameter of the round part of the hub. After warming up the ring, put it on top of the round part of the hub, press in the bushings and let it cool. |
| Now let's start making knitting needles. The shape of the products can be any, the main thing is to follow the basic principles. We cut grooves along the tenons of the knitting needle so that air can escape freely from the sockets. |
| We assemble the wheel and install the bandage on top of its rim. Such a bandage is prepared from strips of cut metal plates, at least 4 millimeters thick. The width of one strip is equal to the width of the wheel rim. Metal fastening is carried out by drilling holes in the surfaces and tightening the screws. |


It should be noted that old-style wooden wheels do not have many advantages. Despite the metal bands, their wear resistance leaves much to be desired.
Some craftsmen advise using rubber tires for carriages, for example, those intended for a motorcycle. This will not only make the carriage ride softer, but also provide long term crew services.
Video - Making your own wooden carriage wheel
Using the sled
A winter version of the carriage is a sleigh. Sleigh rides are a real curiosity and are especially popular in Russia due to the long winters of unprecedented beauty.
These sleighs are harnessed with one, two or three horses, which will take you into a real winter fairy tale. But to prevent the fairy tale from turning into a cold nightmare next to the broken carriage, it is necessary to correctly construct the structure.
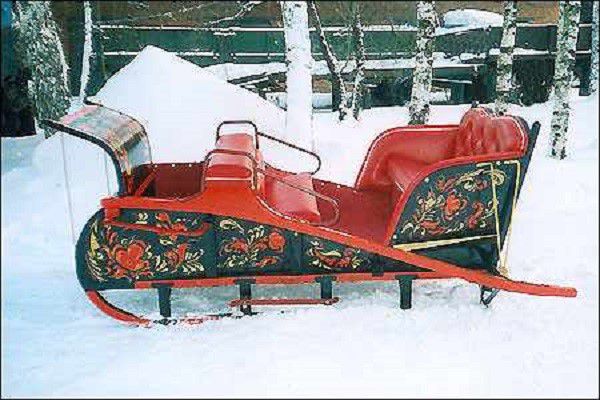
Sleigh - a spectacular winter means of transportation
Materials for production
To make a sled with your own hands we will need the following materials and tools:
- steel pipes with a diameter of 2.5-5 centimeters;
- sheet metal;
- profiles for making corners;
- wooden boards;
- plywood;
- paints for wood and metal;
- varnish for covering street surfaces;
- welding machine;
- jigsaw and other metalwork tools.
Making runners
It is best to use pipes from of stainless steel, since the sled will be used in extreme conditions of the Russian winter with its weather changes.
The length of the pipes must be greater than the length of the intended sleigh, since we will bend them on both sides to turn them into runners. For bending use special tool. If you don’t have it in your construction arsenal, use a trick: fill the pipes with sand, heat it and start bending.

We make racks and crossbars. The first parts are needed so that the sled does not sag under heavy load, the second - to make the structure a single frame structure.
For the manufacture of over-reinforced elements, thin steel pipes, at least 2.5 centimeters in diameter, are used. Install racks on each side of the future sled and weld them securely along with the crossbars and runners.
After the frame is welded, also make so-called fillies, 10 centimeters long, from small steel pipes. Only 12 pieces. Weld them evenly on each side of the vehicle. Afterwards, cut out small plates from metal sheets and attach them to the sled. We use them to attach the shafts.
The sleigh body is made similarly to the carriage body, but is made open. Simply put, half of the carriage body is made and beautifully decorated with decor, then paint and varnish are applied.
Today it is popular to cast the body of a sleigh from metal, but this work is more painstaking and time-consuming. To make the task easier, cut out a frame from plywood and strengthen it by sheathing it with metal sheets.

Let's sum it up
The tourism business in our homeland has always flourished, because many guests from abroad dream of seeing its vast expanses and appreciating the beauty of its cities. If animal husbandry turns out to be your calling, you can also make a profit from the tourism segment by making fashionable retro vehicles with your own hands.
You won’t have to offer your services to tourists. As soon as they see a luxurious carriage or a romantic country cart with a horse and coachman, there will be no end to those who want to take a ride.

You can purchase elements for building a carriage at construction stores any city and town. Remember, the key to success is persistence. Good luck to you!
Basically, the cart was molded from what was available.
the base is a bridge from 412 Muscovite with springs, just as a minus there were no earrings so I had to think about how to attach the two-wheel drive to the frame. Used stainless pipe passing into the holes of the springs.
gig as a whole
the left side with a wing, without wings... it will completely flood.

shaft mounting I used a pipe of a suitable diameter, welded it to the frame and drilled a through hole, secured it with a 12mm bolt and installed a nut with a nylon ring.

back view. I didn’t cut the bridge, I was afraid I wouldn’t weld the arch and lose rigidity, but I’ll probably cut it..(we recently crossed a ford.. it’s very difficult for a mare to pull the bridge through the silt..((() and my bridge is upside down - so the frame stands higher.

The springs are on a pipe welded at both ends to the frame; they were not secured in any way to the toe-in, but the toe-in does not occur.

springs to the bridge

starboard. the wings are mounted on fittings secured in several places on the wing and on the frame. For the wings I used sheet iron, not thin, but I can’t say how many mm (I didn’t measure it) the plus is that it’s difficult to bend them when you’re riding a gig somewhere in the forest and catching young growth or dead wood..

I put a conveyor belt on the edge of the shaft, better than any Kohano strap or similar disaster.

The harness is an ordinary Russian arc. with proper tightening of the seat and underbelly, there is practically no pitching, but if possible, you can leave the shock absorbers from the bridge and attach the springs through the earrings.
It’s better to cut the bridge - it will significantly lighten the structure, but be sure to weld an arc or a U-shaped pipe so that there is no wheel alignment.. IMHO

There is a storage area under the seat where you can safely throw cartridges or put a gun in a case, or even small game.
Another minus is a simple wooden bench, you need to use either a blanket or skins, I’m using a blanket myself, I haven’t made the skins, and I have an idea to upholster it with goat and badger skins.. it will be warm and nice.
The seat and back are centered in such a way that the seated person exerts virtually no pressure through the shafts on the horse's back.