Making clinker tiles at home. Concrete tiles: a brief excursion. Manufacturing technology for concrete façade tiles
Facade tiles are one of the most reliable and popular exterior finishing options. They make it from sand-cement mixture, so the material is environmentally friendly. Thanks to simple installation technology facade tiles it can be used not only to decorate the facade. The material is also suitable for finishing basements and balconies. Among the variety of types and textures, you can easily choose the appropriate option.

This material is only used for exterior finishing buildings or their individual elements. Therefore, it has the following set of technical characteristics:
- Resistance to mechanical stress, pinpoint impacts, scratches.
- Wear resistance. Maintains original properties for a long time appearance, does not become moldy.
- Waterproof. Due to the minimal number of pores, the material does not allow water to pass through.
- Low temperature resistance.
- Unaffected by ultraviolet radiation, does not fade in the sun.
Average life time facade tiles – from 50 years or more.

Types of facing tiles
Any option can be used for finishing facades. Each of them has its own distinctive properties.
Table 1. Classification of facade tiles.
| Name | Materials | Peculiarities |
|---|---|---|
| Made from natural stone | The raw materials are natural materials | It weighs a lot, so it requires special care during installation. It looks solid and has a unique pattern, but if you need to replace one or more elements, it will not be easy to find a tile that is similar in color |
| Porcelain tiles | A mixture of quartz, clay and spar | It looks like natural stone and is cheaper. Easily withstands moisture and temperature changes |
| Concrete | Made from concrete and coated with special paint | Imitates any surface - marble, stone, brick. Suitable only for warm climates because it is not resistant to temperature changes |
| Clinker | Clay, dyes | It is fired in a special oven at 1200°C. Features increased wear resistance |
| Agglomerate | A mixture of quartz and synthetic additives | It is obtained by plasma-vacuum sintering. It has increased strength, but is lighter than brick and stone. Not suitable for load-bearing function |
Any of these varieties can be mounted with your own hands. To do this, it is necessary to carry out preparatory work:
- clean the surface from debris and dust;
- level the walls - apply a layer of plaster up to 2 cm;
- wait for the plaster to dry and wipe the surface with a special brush.
Advice! For greater reliability, you can use reinforcing mesh. It is installed during the process of plastering the walls.
Price for decorative stone
Decorative rock
Options for manufacturing facade tiles
It is not necessary to buy facade tiles. If there is special equipment and necessary knowledge, material you can make it yourself. Then you can develop your own unique samples and experiment with the composition. But it is better not to violate the basic proportions and production technology so that the product turns out with good set characteristics. There are two ways to make finishing material at home.

Vibrocasting
For this purpose, the most affordable option of raw materials is used - concrete. To prepare the composition you will need:
- Portland cement;
- sand;
- fine crushed stone;
- slaked lime or synthetic plasticizer.
Important! If you do not add a plasticizer to the solution, it will not be frost-resistant or water-repellent.
Manufacturing procedure:
- Kneaded concrete solution.
- Concrete mass is poured into forms. You can use plastic or wooden molds, but the most optimal material for this is polyurethane, with which you can convey the texture of the tile down to the smallest detail.
- Blanks are installed onto the vibrating table platform, it is connected to the network.
- Air and material are removed from the molds compacted and set out to dry.
To give the tile the desired shade, you can add dye into concrete at the mixing stage. But there is a more economical option - painting the inner surface of the mold before pouring it with the solution.
Vibration pressing
Suitable for all varieties finishing material, but most often used for making clinker tiles. Allows you to increase the density of the material without using a large volume of liquid. Polyurethane molds are used for filling.

Clinker tiles are made as follows:
- Modifiers are added to the clay mass.
- The solution is placed in a special machine with a vibropress.
- In it, the mass is compressed under pressure, and blanks are formed from it.
- After the clay has dried, the workpieces are fired at a temperature 1300 degrees.
The result is a material that is highly resistant to damage, reducing the need for repairs to a minimum. After dismantling, such tiles can be used again.
Video - Production of facade tiles at home
Installation methods
There are two options for laying facing tiles - dry and wet.
Dry installation
Its second name is ventilated facade. With this mounting option, additional thermal insulation of the building is created. This method is considered the most expensive And reliable. The dry version is more suitable for laying porcelain tiles, but it can also be used for installing other types of materials.

Its design includes the following elements:
- aluminum profile;
- brackets;
- membrane;
- insulation;
- facade tiles.
It is better to use as insulation non-flammable material – mineral wool. Installation is carried out in a certain order:
- Using a level it is done wall marking. You need to draw two vertical lines and one horizontal.
- Drilled with a drill holes for anchor bolts. Brackets are installed under the profile.
- On the wall insulation is fixed. A special membrane made of non-woven materials is placed on top of it.
- The frame is being installed from metal profile. It is fixed with rivets. The distance between the profiles should be equal to the length of the tile.
- In profile holes are made for tile clamps. They are attached to the frame using rivets.
- Mounted facing tiles. First the bottom row, and then the top rows.
Note! If the facade tiles already have factory fastening plates, they are attached to the profile using self-tapping screws.

Price for porcelain tiles
Porcelain tiles
Wet installation of tiles
A special mixture is used to fix the tiles. The adhesive solution is made on a cement-sand base. It is better to take it from the same manufacturer as the tiles. This method is more suitable for ceramic tiles.

Required tools:
- notched spatula;
- mallet;
- adhesive solution;
- Master OK;
- level;
- plumb line;
- mooring cord.
Important! For wet method Styling is only suitable in sunny weather. In this case, the air temperature should be within +5-25 degrees.
The installation process consists of several stages:
- Alignment surfaces, eliminating defects.
- Wall covering primer.
- Kneading adhesive solution.
- Application mixtures on the wall. To prevent the solution from drying out, the surface should be covered with 2-3 tiles, no more.
- Distribution glue on the back of the tile.
- Laying down tiles in the corners. Cladding the main part of the wall. The rows must be horizontal. They are aligned using a mooring cord.
- Compliance seam width within 6-12 mm. Leveling the tiles by tapping them with a mallet.
Excess glue is wiped off with a piece of dry cloth. If all work is done in accordance with the instructions, the tiles will last a long time.

How to sew seams - step by step instructions
They are filled with a solution to bind all the elements into a single whole. This also promotes enhanced sealing of seams. After this procedure, the facade looks noble, and the finishing is less exposed to the aggressive influence of the external environment. Grouting is performed in several stages. Each of them has its own characteristics.
Step 1. Moisturize the seams. Before starting work, you need to wait until completely dry solution – from 10 to 15 days. If you start unstitching the seams ahead of schedule, this will negatively affect the strength of the finish.
Attention! The water that is part of the adhesive mixture will not find a way out and will destroy façade from the inside. This is especially dangerous for regions with extremely low air temperatures in winter.
Working with seams begins with moistening them. A sprayer is used for this. Wetting with water improves adhesion between surfaces. It is necessary to moisten the seams in all directions - both horizontally and vertically.

Step 2. Mixing the solution. A mixture based on lime and cement has good plasticity. It is easy to level and distribute work surface. Cement in its pure form is not suitable for this. It can only be used with the addition of plasticizers to ensure normal hardening of the mixture.

Construction mixer price
Construction mixer
To prepare the solution you will need the following components:
- cement - 1 bucket;
- slaked lime - 1 bucket;
- sand - 5 buckets.
Instead of lime, you can use a liquid plasticizer. The solution is mixed in a certain order:
- Add water in small portions. Regular tap water will do.
- Stir the mixture continuously until it becomes homogeneous and has a consistency similar to wet sand, which sticks together well if crushed.
- The finished mixture is used for 2 hours. Then the solution hardens and becomes unsuitable for work. Even if you dilute it with water, it will not help improve adhesion between surfaces.
If you don’t want to prepare the mixture yourself, you can buy a ready-made one. Then it is used in accordance with the instructions that come with it.

Note! The strength of the solution depends not only on compliance with the technology of mixing it. This is also affected by the base on which the mixture is applied. It should be clean and smooth.
Step 3. Filling the seams. The moistened surface is filled with the prepared solution. This is done as follows:
- The composition is drawn onto a spatula.
- Using a trowel, the mixture is pushed into the open seam.
- Compact the seam. To do this, iron it with a trowel with slight pressure.
Composition consumption for thick tiles from 8 to 12 mm will be within 4-5 kg per 1 sq.m. During operation, part of the grout mixture crumbles. To save money, it is better to lay clean plastic film on the floor. The crumbled solution can be carefully collected and used for its intended purpose.

Prices for a sealant gun
Caulking gun
Step 4. Clean and moisten the seams. After compacting, you need to remove any remaining mortar from the tiles. To do this, carefully sweep the finish with a soft bristle brush or soft brush.
Advice! Movements are performed diagonally. Then you can easily remove the excess mixture without damaging the seams.
After this, the seams are sprayed with water from a sprayer. This helps prevent the mortar from drying out prematurely and cracking.

Video - How to grout seams on hand-molded clinker tiles
Laying clinker facade tiles
Clinker tiles are a material increased strength. But in order for it to last for a long time, it is necessary to follow the technology of working with it. Installation of finishing material takes place in stages.
Preparatory activities
As a base for finishing, you can use plaster or reinforced concrete with increased frost resistance. There are special requirements for the foundation:
- perfect smoothness;
- good load-bearing capacity;
- absence of cracks, voids and poorly secured parts;
- absolute cleanliness - no dirt, greasy stains, bitumen mastic.
There must be a layer waterproofing to prevent moisture penetration and destruction of the facade. If there are weak places on the base that crumble, they are removed. All unevenness is leveled using plaster no later than 3 days before installation.

Important! Additionally, thermal insulation can be installed. Then the heat will not spread throughout external environment, pathogenic microorganisms and fungi will not penetrate into the house. At the same time, heating costs in the cold season will be reduced by almost half.
Mixing glue
For this purpose, it is most convenient to use a mechanical mixer. Prepare cement mortar M-500 and sand in the ratio 1:3 . Add water to this mixture in small portions and mix until the mass becomes plastic and homogeneous.
You can also use a ready-made solution, but the scope of its application must correspond to the planned construction work. This adhesive is most often applied to the tile itself, so you should not leave it on it. inside important notes or calculations.

Attention! You cannot apply too much adhesive mixture at once, otherwise the mass will weather or dry out. Excess mortar is removed immediately before it hardens.
Laying features
Before starting the installation process, the materials must be removed from the packaging and mixed so that there are no sharp deviations in color. Only slight differences in shades are acceptable.
You can start laying only in good weather - at a temperature within +5-30 degrees and no rain. If it is too hot outside or the precipitation continues, and work needs to be continued urgently, you can install a shelter in the form of an awning and a background.

Advice! If thermal panels with clinker coating are used, they can be installed at any weather conditions. This will not affect the quality of the finish.
The process of laying clinker tiles occurs in a certain order:
- Wall surface moisturized water from a spray bottle.
- On her applied mortar thick 3-4 cm. The solution is leveled using a lath.
- Approximate marking tile placement.
- Above fits finishing material. The width of the seam should be no more than 12 mm.
- Installation of tiles begins with the design of areas around windows and doors. After this, they proceed to the corners of the building. To facilitate the installation process, you can use a special tile - corner, which emphasizes the lines of the walls and looks natural.
- Surface sprayed water and covered with polyethylene to ensure uniform drying of the mixture.
Note! For ease of installation, the walls can be divided into conventional squares with a side 1m. If the contours of the tile do not fit into this figure, it can be cut with a saw.”

To ensure that the facade decoration looks harmonious and is durable, it is recommended to adhere to the following tips:
- tiles of saturated and dark shades laid out in the lower part of the facade - at a height up to 6 m from the foundation;
- dark colors increase the overheating of the building, so it should be no more than 20% from the total area of the tile;
- For grouting you can use a ready-made color mixture that matches the tone of the finishing material;
- before applying the solution, the surface of the walls is better coat with primer and wait for it to dry completely;
- It is advisable to lay clinker in rows, starting from the bottom of the facade;
- if it is attached to the walls insulation, it is covered on top with a reinforcing mixture or fiberglass;
- if after sealing the seams there is a lot of dirt left, it is removed with a stream of water under high pressure, and for especially advanced cases they use special substances.
Also, pay attention to our article on the topic - where we discussed the installation technology in detail.
Facade tiles are becoming more and more popular, and the installation process is not very labor-intensive. Even a beginner can cope with this if he takes into account the installation technology. To make the finish look impressive, perform protective function and retained heat inside the building longer, you need to be careful about its installation.
It includes:
- cement;
- sand;


The tiles are attached to concrete surfaces or with dowel nails. Tiles are attached to log and plank walls and frames, as well as those made of timber, using self-tapping wood screws.

If you plan to install the tiles yourself, it is best to choose this method of cladding. Firstly, such cladding can imitate various types of stone and brickwork. However, unlike concrete facade tiles, they will be significantly cheaper, you can fix them quickly and easily, and the coating will look no worse.
- plain;
- iridescent;


Components for the production of concrete tiles
It includes:
- cement;
- sand;
- mineral powder - a cement substitute made from ash, ground slag, stone crushing waste, etc., introduced into concrete in a volume of 5-20% to give the concrete special properties (heat resistance, different colors and etc.);
- plasticizing additives - used to increase the mobility of the concrete mixture;
- stabilizing additives - to prevent separation of the concrete mixture;
- water-retaining additives - to reduce water separation.

Manufacturing technology for concrete façade tiles
The main method for producing facade concrete tiles with low porosity is vibration casting. The prepared concrete mixture is placed in plastic forms mounted on a vibrating table and completely compacted under the influence of high frequency vibration. Then the plastic forms are transferred to racks and covered plastic film to prevent moisture loss and are kept for a day. Next, the finished tiles are removed from the plastic molds and transported to the warehouse.
Using this technology, it is possible to obtain tiles with both matte and glossy surfaces, without pores or other defects. The use of high-quality coloring pigments makes it possible to obtain tiles painted in rich colors that do not lose their brightness for many years. You can read the material about.
Advantages and disadvantages of concrete facade tiles
All building materials have both advantages and disadvantages.
The advantages of concrete tiles include:
- the mass of facade tiles is relatively light, which not only reduces the load on the structure of the structure, but also makes it possible to implement exterior finishing on your own;
- it is similar to stone, not only visually, but the natural aging process of these materials is also practically indistinguishable in appearance;
- Since the surface of the tile is hard, it withstands the effects of precipitation well and is resistant to mechanical damage, i.e. will serve for a long time if installed correctly and timely maintenance;
- to fasten concrete tiles, you do not need a special spacer layer; they can be mounted on walls made of various materials, adhere well to adhesives.
- Concrete façade tiles are cut with a simple chisel (cutter), although cutting requires less labor and gives better results circular saw.

However, concrete tiles also have disadvantages:
- It is better not to use this tile in cold climates, since not all manufacturers guarantee the stability of its properties in the presence of freeze/thaw cycles;
- Sometimes, even during the normal manufacturing process, the edge of a concrete tile is uneven or an unnecessary edge is formed on its edges. And although they can be easily removed with a circular saw or cutter, installation labor costs increase.

Dry method of installing concrete facade tiles
Important! The dry method is intended for tiling brick, concrete and wooden surfaces without using any adhesives or solutions. Among other things, the work described can be done at any time of the year.
The tiles are attached to concrete or brick facades dowel-nails. Tiles are attached to log and plank walls and frames, as well as those made of timber, using self-tapping wood screws.

If you plan to install the tiles yourself, it is best to choose this method of cladding. Firstly, such cladding can imitate various types of stone and brickwork. However, unlike facing bricks Concrete facade tiles will be significantly cheaper, you can fix them quickly and easily, and the coating will look no worse.
Painting of façade concrete tiles for dry laying is carried out during their manufacture. In this case, the product is painted completely in its volume, and not just on external surfaces. Therefore, fading of colored concrete tiles under the influence of ultraviolet radiation is excluded.
These tiles can have almost any color:
- plain;
- iridescent;
- imitating the surface of granite, marble, malachite, amber, etc.
Properties of facade tiles (video)
Wet method of installing concrete facade tiles
For achievement good quality cladding façade walls it is necessary that they are even. If there are irregularities, it is recommended to plaster the walls.
The installation process includes the following steps:
- Before installing the tiles, the surfaces of the facade walls and the back sides of the tiles should be moistened with water using a paint brush.
- The façade should be faced starting from the plinth, which is the base of the facade walls of the house and creates a transition to the areas of the earth's surface adjacent to the house - sidewalk, driveway, lawn. It is better to make the color of the plinth cladding darker than that of the wall cladding, then it will look more monumental. In order to maintain the same level along the entire perimeter of the house when cladding the base, nail down the bottom of the base starting bar, strictly set according to the level (preferably laser). It is on the starting bar that the first row of tiles is laid out. Install the tiles starting from the corners from bottom to top.
- To apply a 0.5 cm layer of tile adhesive to the surface of the walls, use a smooth spatula. Next, level the glue with a notched trowel with teeth 4–6 mm high.
- A 0.4–0.6 cm layer of adhesive is applied to the back of the tiles with a notched trowel.
- Next, using gentle movements and turns, the tiles are pressed against the wall surface until the glue comes out at the joints between the tiles.
Correct and professional execution wall cladding will significantly extend the life of the house facade. Therefore, before you start installing facade tiles, study the technology of this work, or better yet, watch it with your own eyes or at least on a video on the Internet.


Concrete is a universal and practical material that is used for interior decoration and finishing of street surfaces. It is made from sand, cement, if necessary, pigment and water, using vibration casting or vibration pressing of various shapes. The area for using this product is very wide, but it is not always possible to afford it in terms of price; in this case, you can make the tiles yourself. To obtain high-quality material, you need special forms; you can buy them, or you can make them yourself. We read and learn to do it ourselves.
As a rule, polyurethane is used for casting; silicone molds are also popular, but they are not very durable, and plastic is not quite similar to natural stone. And yet, these materials help to make the most suitable product in terms of quality and appearance. There are different methods for making facade tiles; only one is suitable for home use - vibration casting.
The most popular forms were:
- Under the brick;
- Torn stone;
- Slate;
- Dolomite.

A huge range of products allows for individual design solutions. The first stage of the work is the production of the actual molds for the further product, after which we dilute the solution, proceed directly to pouring into the molds, and the last final step is removing the product.
It is worth knowing that laying finished facade tiles or stone requires certain measurements and calculations, and you also need to process the forms themselves.
When the concrete tiles are ready, they can be immediately used for finishing facades, or packed for storage. In addition, it is worth paying attention to some important points. Firstly, we must not forget that the correctly chosen form alone is not enough; it is necessary to strictly follow the technology of its manufacture. Such work should be carried out at a certain temperature, fluctuating around 15-30 ᵒC, this is necessary to eliminate excess oxygen in the solution and ensure high-quality solidification. Secondly, this is compliance with safety precautions; such work must be carried out in strict compliance with safety standards; eyes must be protected and gloves must be worn. It is important to have good ventilation in the room.
Do-it-yourself production of facing tiles
Cladding tiles or fake diamond, is essentially an element of decorative facing stone(terracotta tiles). If we talk in simple words about production at home, then a liquid solution, already colored in a color palette, is poured into molds.
The tile is taken out of the mold, the material is ready, but only after it has completely hardened.
In the process of improvement, the following types of finishing can be distinguished: interior - on a gypsum base, exterior - on a cement base. The main thing is not to forget that a large part of success is the selection of quality components, as well as reducing the use of water, this will result in a more solid product.

All production can be divided into 3 stages:
- Preparation of tools and raw materials;
- Preparation of the form;
- Making stone.
The production of facing tiles should be done in the warm season, for example, in summer, but the product should be dried away from sun rays, protected from rain and wind. Having a certain set of equipment will only be beneficial; to the basic ones you can add a concrete mixer, a vibrating table, a mixer for mixing and a drying cabinet. There is nothing complicated in manufacturing using a simplified algorithm; by following certain rules and paying attention to the quality of the products used, you can make decent facing tiles with your own hands.
Types of stone-look facade tiles
At one time in Western Europe There was a search for a material that was not inferior in its properties to stone, so by firing and pressing clay with brick, this product was obtained. The meaning of the word tile has its roots in German, and literally translates as “brick”. Factory clinker tiles have a durable composition, thanks to heat treatment and is only a type of ceramics, having its own advantages over it.
It is quite easy to make yourself, its technology is simple, and as a budget option it works well.
Initially, you need to prepare a model of the product itself from plasticine, coated with sealant and wait for it to dry. Afterwards, a solution of gypsum, sand and cement is prepared, color is added, the ingredients are mixed and poured into molds. 15 minutes are enough for the product to be ready, and in order to prevent it from crumbling and smearing, it should be treated with a primer. It is worth keeping in mind that a product made by yourself will have different characteristics from its factory counterpart. The versatility of the material is surprising; its choice is limited only by the preferences and capabilities of homeowners.

There are several types:
- Under natural stone;
- Clinker tiles;
- Under ordinary brick.
Houses made of natural stone look very catchy and beautiful; this material has all the advantages, such as durability, strength, and a presentable appearance. But, there is one big disadvantage - the cost.
What are concrete facade tiles
Nowadays, they have learned to produce material similar to real stone, and very successfully. Now the technology for producing concrete facade tiles is not inferior in its characteristics, on the contrary, it is even attractive in price.
When introducing certain components into the concrete composition, finished material the necessary properties are provided:
- Water resistance;
- Frost resistance;
- Strength.

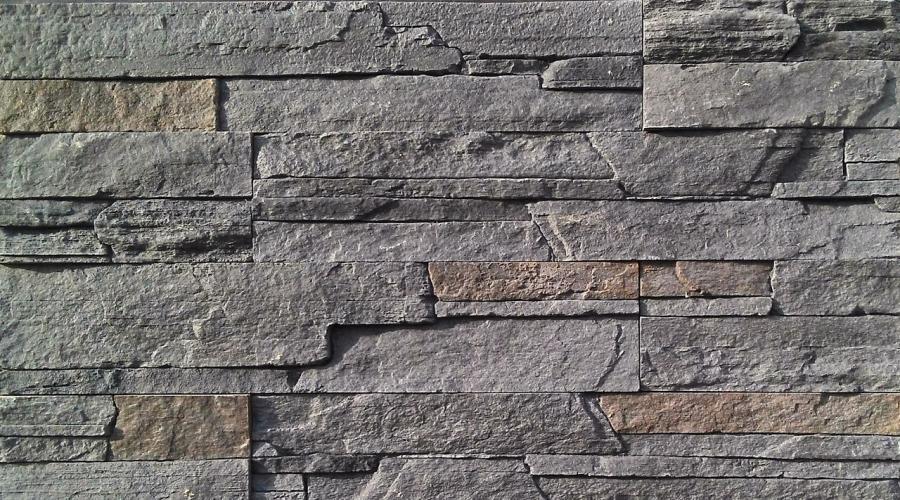
To improve these indicators, in modern industry All kinds of additives and additives are used. Essentially, concrete tiles look like brick or stone, laid in several rows with an offset, similar to some kind of mosaic, the edge is torn.
It is also worth paying attention to the fact that not all walls are suitable for using decor; everything here is decided by the choice of material and other factors.
For such walls, facade tiles with metal fastenings. It is worth remembering that there are few ways to attach exterior finishing; facade tiles are mounted either on a frame base with clamps, or glued, or screwed directly to the wall.
Handmade clinker tiles
Laying under brick does not differ significantly from laying conventional ceramics. Regardless of the application surface, it must be cleaned of dirt and properly primed. It is also necessary to take a responsible approach to the choice of glue, because it must absorb moisture well and be resistant to frost. It is worth paying attention to the treatment of the seams between the tiles; they must be properly sealed.

If we break down all the work step by step, it looks something like this:
- Surface preparation;
- Marking;
- Adhesive solution;
- Laying tiles;
- Seam processing.
The properties of clinker are very attractive; the tiles are resistant to cold, durable, easy to maintain, have a low level of water absorption, and are resistant to mechanical stress. This big row pros. Homemade tiles It is in no way inferior in quality to the factory alternative. In addition, such a house will look very solid and attractive, and its facade will not lose its appearance for a long time.
How to make facade tiles with your own hands (video)
To summarize, it can be noted that, in principle, almost any material can be made with your own hands and no worse than it is done in factory production. The main thing is to follow safety rules, not to violate technology and to approach the choice of materials responsibly, and then you can get a result that will please you long years reliability, decorate with your individuality and will not burden your wallet.
19138 0
Facade cladding with tiles successfully competes with painting, so the demand for durable, aesthetic facade tiles is great. Based on demand, manufacturers offer various types of high-quality cladding, differing in material, format and color, but the material you like is not always affordable. In this situation, it is possible to reduce the cost of finishing the facade by making facade tiles with your own hands.
You don't need large rooms to make tiles
Selecting molds for casting tiles
In an enterprise environment, façade tiles are produced using methods of which only one is suitable for home use – vibration casting. It should be taken into account that the prices for high-quality molds are quite high, the turnover of molds for casting facade tiles is up to 1500 cycles, so it makes no sense to buy them for the production of 5-10 square meters of finishing. But, if the amount of cladding work is significant, the cost of purchasing molds or making them yourself from polymer materials will provide significant savings Money.
The use of primitive homemade molds from scrap materials when casting, although it is a less expensive option for performing the work, does not guarantee the aesthetics of the finish.

Silicone molds can withstand a huge number of castings
Molds for casting tiles are divided into 3 types based on the material used:
- silicone;
- plastic;
- polyurethane.
Of the listed types, polyurethane molds are suitable for making facade tiles at home, since silicone molds are fragile, and products made from plastic molds do not resemble natural stone due to their glossy surface.
The process of manufacturing facade tiles using the vibration casting method consists of the following stages:
- Making molds.
- Preparation of the solution.
- Pouring the solution into molds.
- Removing products.
Let's take a closer look at these stages.

Making a mold for tiles from wood is the easiest way
Manufacturing of polyurethane molds for facade tiles
First of all, you need to decide what kind of tile the facade will be finished with, think about its size, format and configuration of the front surface. Rational decision There will be a temporary borrowing from a professional workshop of several samples of natural stone products, which it is decided to imitate. These samples will be used as templates when making molds with your own hands.

Molds for making polyurethane tiles
Material for making molds
To make the molds themselves, you need to purchase a two-component polyurethane casting compound, for example, Nomakon-TM KPTD-1, Formosil or Poly. These compositions, prepared in the right proportions with a hardener and poured into the formwork, turn into a durable elastic product that is resistant to mechanical damage, vibration, chemicals, low temperatures and humidity.

Production of formwork for the form and installation of the matrix
As a base for the formwork, use a piece of plexiglass slightly larger than more area stone and place the sample on it face up. The excess of the stone above the base level is measured and the outline of the future formwork is drawn around the sample at a distance of 2-3 cm with a marker.
The stone is removed from the base and silicone sealant“For aquariums” a rectangular formwork made by hand from the same plexiglass is attached to the plexiglass along the drawn contour. The height of the formwork should be 1.5-2 cm greater than the height of the sample. Then the sample is set in place, the joint between the stone and the base is covered with the same silicone and the product is allowed to dry for a day.

Mold for pouring a fence slab
If the sample material has high porosity, then its surface is covered with thin layer a solution of paraffin in kerosene or white spirit in a ratio of 1:2, which will act as an anti-adhesive separator and facilitate the removal of the matrix from the hardened polyurethane mass. The separator needs an hour to dry.
Preparing the filling solution
After the glue has dried, begin preparing the polyurethane mass for pouring.
In two separate dry and clean containers the required proportion cast required quantities polymer and hardener. Then pour them into a third dry and clean container and mix thoroughly with your hands, touching the walls of the container.
When working with the components of the compound, you should use protective clothing, gloves and goggles, avoiding direct contact of the polymer with the body. If the solution gets on your skin, wash it off immediately running water With detergent!
Before filling the formwork with the compound, you need to dry brush the matrix with a thin layer of polyurethane to reduce the number of air bubbles that form on the surface of the sample when adding the bulk of the mixture.
One of the corners of the base is raised, and the filling of the formwork with polymer begins from the lower corner, while simultaneously introducing the composition and lowering the raised corner. When the base is in a horizontal position, the thickness of the polyurethane layer above the top point of the matrix should be 2-3 cm.
The compound, depending on the type, hardens in about a day, after which the matrix is removed.
Matrix extraction
A day after pouring, the formwork is dismantled, cutting stationery knife silicone bonding areas. The matrix in polyurethane is turned over with its back side up and the degree of curing of the polymer is assessed, since final hardening may take up to three days. If the compound has not completely hardened, the stone is left in it until the solution is completely set.

Several dies can be made at the same time to produce tiles of different shapes
The frozen polyurethane mold is carefully separated from the surface of the matrix with your own hands, trying not to damage the surface texture, which follows the structure of the stone.
To ensure that the facade decoration is not primitive or monotonous, it is necessary to make at least 5 forms using different matrices.
Preparation of mortar for molding tiles
There are many recipes for preparing mortar, but cement-based compositions are widely used. To produce the main component for pouring into molds, the following technology can be used:
2 parts of sand are mixed with one part of water for 1-2 minutes, after which 4 parts of cement and 2 parts of water are added and mixed for 2-3 minutes. Then 8 parts of sand and one part of water are gradually added to the solution and mixed, after which dye is added to the mixture in an amount of no more than 4-5% of the total volume of the batch. Using white M500 cement instead of the usual gray Portland cement will result in tiles with richer tones.
When making facade tiles with your own hands, they also use fillers from fine chips of natural stone (granite, marble, limestone), which increase the strength characteristics of the products and the similarity with the finish. natural stone. To do this, out of 8 parts of sand, when mixing, 4 parts are replaced with crumbs.
Molding of facade tiles
The forms are placed on a working vibrating table and filled with the finished solution using a trowel - a narrow mason's trowel. If the solution does not include natural crumb fillers and dye, then pigment is first added to the molds with a layer of 1-1.5 cm, after which they are gradually filled flush with the edges with the main composition. This allows you to get a tile with a front surface uniformly painted to a depth of 1.5-2 cm.
Considering the high cost of a vibrating table and the laboriousness of making it yourself, when molding tiles you can do without it. If you install a sheet of steel or chipboard (chipboard) on two supports, and place polyurethane forms on it, then the mixture can be compacted in the forms by tapping the sheet from below with a hammer.
After compacting the mold, being careful not to deform it, transfer it to a horizontal surface for two days. During this time, the products are not moved or touched.
Exposure of molds and products to direct sunlight and high temperatures is unacceptable, as this reduces the strength of the tiles and the turnover of polyurethane molds.
Removing products from molds
To properly remove the cliche with the product, place it in a container with water at a temperature of 40-60 degrees for several minutes to increase the elasticity of the polymer. The tiles are removed by hand, tapping the polyurethane with a rubber hammer, and until completely cured, they are laid in one layer in a cool place for 7-10 days.
Conclusion
For significant volumes of finishing work this technology provides significant savings in money, and the quality of hand-made facing material, although inferior industrial designs, quite high.
- Semi-dry pressing method
These technologies differ in the method of molding clay products.
In the first method, a somewhat moistened source material is pressed on special equipment, after which the molded product is placed in a firing oven without pre-drying. The product obtained in this way has a low density, which significantly reduces its strength. But, this production technology makes it possible to obtain clinker with low thermal conductivity, which in many cases is valued more than resistance to mechanical stress.
It is this temperature that ensures the transition source material into stronger physical states. It should also be said that the main component of the cost of clinker tiles is energy resources; energy consumption for such firing is 4 times higher than the requirement for conventional processing of clay products.


09/11/2013 at 17:09
- Materials and equipment
- Production technology
- Wall decoration
Every owner of a country property wants his house to be not only durable, warm and cozy, but also to look attractive from the outside. For finishing external walls There are many beautiful and durable materials available at home. These are facade tiles, vinyl, plastic, metal, polymer and insulating facade panels, fiber cement and porcelain stoneware slabs various sizes, colors and textures. They can be attached to walls either with self-tapping screws or mounted on special glue. Facade panels, although their price is low, require certain skills and the involvement of specialists for their installation. The optimal solution For finishing the walls of the house there will be facade tiles. Its installation on the wall does not require the involvement of specialists or specific construction equipment.

To date construction stores offer for sale various types of facade tiles, which are distinguished by a wide variety of colors and unexpected design solutions. In these stores you can purchase, among other things, plastic molds for them. The Forteza panel differs most interesting performance and design. These products are clinker facade tiles, made in the form of blocks. Despite the affordable prices, in order to cover the entire house with facade tiles, you will need a considerable amount of money, which not everyone has.
Modern technologies can significantly reduce the cost of cladding a private house.
It is quite possible to make tiles with your own hands at home, and you do not need special production equipment for this.
Materials and equipment
To make tiles with your own hands, you do not need industrial-sized premises. This work can be organized in a barn, garage or even outside under a canopy. Tiles can be made from various materials. So, the basis for production can be the following types of material:
- Concrete.
- Starting putty.
- Alabaster.
- Gypsum.
- Clay.
At home, it is preferable to produce facade tiles using vibration casting technology. Clinker tiles, despite their obvious quality and strength, require firing. This requires special equipment, which is incompatible with savings.
The solution that is poured into molds may contain various fillers that give the finished product a certain appearance and properties.
The following materials can be used as a solution filler:
- Sand.
- Small shells.
- Plasticizers.
- Dyes.
- Glitter.
- Glass chips.
Considering that there will be no load on the tiles, the main task in its production will be to get rid of air bubbles, which can cause cracking and destruction in extreme cold.

Based on this, you will need the following tools and equipment to produce facade tiles with your own hands:
- vibrating table;
- concrete mixer;
- hammer drill with mixer;
- trowel;
- wide spatula;
- trays for molds made of plastic;
- old bathtub or plastic water tank with a capacity of 100 liters;
- form;
- drying cabinet for placing forms.
If the home owner is not in a big hurry, then to make the solution there is no need to purchase a concrete mixer, but prepare the solution in small portions of 10-12 liters in buckets using a hammer drill with an attachment. The vibrating table is quite convenient equipment for the production of facade tiles. But given its cost, you can either make an analogue yourself, or vibrate manually.
Production technology
Work on the production of facade tiles should be carried out at temperatures from +15°C to +30°C. This temperature range contributes to the highest quality hardening of the solution. To comply with safety precautions, you must wear safety glasses and gloves. The room in which production is carried out must be well ventilated. First of all, the forms are prepared. They are installed on a vibrating table or on the surface of a regular table. Inner surface lubricated vegetable oil or liquid soap.
Business: production of clinker bricks and tiles
This will make it easier to separate the tiles from the mold. After this, a solution is prepared for pouring into molds.

Preparation of the solution
Solution recipes may vary. In the case of preparing cement tiles, the technology is as follows: pour 1 part sand and 0.5 parts water into a concrete mixer (bucket) and mix for 1 minute. Then 2 parts of cement and 1 part of water are added. After stirring for 2-3 minutes, add 4 parts sand and 0.5 parts water. The solution is mixed. It should not be liquid, but resemble a modeling solution. When the solution has reached the desired consistency, dye is added. After 1-2 minutes of stirring, the solution is ready.
Laying out the mortar and hardening period
The next step is to lay out the solution into separate forms. This is done on a working vibrating table. The solution is gradually added with a trowel and distributed between the individual forms with a wide spatula. All this time the form is subject to vibration. You can easily see air bubbles coming to the surface. When all separate forms filled, their general leveling is carried out with a wide spatula. At the same time, the solution is removed along the sides of the mold. The mold is then placed on a pallet in a drying cabinet or on a rack. Holes for self-tapping screws can be provided in the forms.
The hardening period lasts 2 days. All this time the forms are not disturbed. Next, the form is lowered into a bath with warm water temperature from +40°С to +60°С. After removing the mold from the water, the tiles are removed from it. This is done by hand or by tapping with a rubber hammer. The tile is ready. It will be suitable for mounting on the wall in 7-10 days.

Wall decoration
Installing facade tiles on the wall is not difficult. Vertical and horizontal frame elements are attached to the wall using self-tapping screws. The tiles are secured to the frame using clamps and self-tapping screws. Between the frame elements you can lay slabs of mineral basalt wool. This will significantly insulate the house. After this, sequentially screwing the clamps to the frame with self-tapping screws, the cladding of the house is mounted from home-made facade tiles.
If one or more tiles break, such a facade will be easy to repair. To do this, you should have several dozen facade tiles in stock. They need to be stored indoors or under a canopy.
to his unique qualities clinker tiles depend on manufacturing technology, which makes it possible to obtain such material from ordinary clay. The technology for producing clinker tiles was developed several centuries ago, and today there are practically no changes in it, although the equipment used has been significantly improved.
What are clinker tiles made from?
In the manufacture of clinker tiles, the following is used: natural material, like clay, natural dyes can be used to vary the color range. Get quality product is possible only if you use clay that has minimal amount impurities and is refractory. Deposits of such material are available in a few countries, which is why we can single out a number of states in whose territory enterprises operate for the production of high-quality clinker. These include Germany, the Netherlands, Poland, Spain and a number of other European countries.
Basic clinker production technologies
IN industrial production Two technologies for manufacturing clinker tiles are used:
- Semi-dry pressing method
- Extrusion technology for the production of clinker tiles
These technologies differ in the method of molding clay products. In the first method, a somewhat moistened source material is pressed on special equipment, after which the molded product is placed in a firing oven without pre-drying. The product obtained in this way has a low density, which significantly reduces its strength. But, this production technology makes it possible to obtain clinker with low thermal conductivity, which in many cases is valued more than resistance to mechanical stress.
Extrusion technology involves the use of a special device - an extruder. Essentially, this is a large auger grinder through which wet, plastic clay is passed. After grinding the material, molding is performed using a special, most often vacuum press. The resulting workpiece is pre-dried and only after that is sent to the kiln for firing. This is how most clinker materials are produced, they differ high density, which provides high strength, resistance to abrasion and other types of mechanical and chemical influences.
The main feature of production, what distinguishes clinker tiles, is the firing technology high temperatures. Ordinary clay products are exposed to temperatures of about 800-900 degrees. In clinker production, kilns are used whose operating temperature is 1100-1450 degrees.
It is this temperature that ensures the transition of the starting material to stronger physical states.
Production and manufacturers of clinker tiles as a universal facing material
It should also be said that the main component of the cost of clinker tiles is energy resources; energy consumption for such firing is 4 times higher than the requirement for conventional processing of clay products.
Equipment for clinker production
The production of high-quality clinker tiles is impossible without the use of special equipment. To provide quality production line should include:
- Extruder (with appropriate technology).
- Equipment for molding and pressing. Apply various designs pressing equipment, most often these are vacuum, belt, lever and rotary models.
- Pre-drying chambers are now mostly electric; they vary in power and volume of loaded material.
- The main equipment for the production of clinker tiles is, of course, a kiln. Serious enterprises use so-called tunnel kilns, a time when clinker was produced in small ovens with the use of coal has already passed. Although such devices can be found in small private factories for the production of clinker products, this is mostly an exception.
A tunnel oven is a structure 150 or more meters long. It is equipped with a heating source, which is an open fire. Blanks of clinker elements are placed in special trolleys, which move at low speed through the kiln. Thanks to this, gradual heating, firing and cooling of the clay occurs. Furnaces of this type operate in continuous mode maintaining a constant temperature required for high-quality firing products.
The production of clinker tiles requires significant energy costs; in addition, the delivery of material for production is also expensive due to the geography of high-quality clay deposits. All this has a significant impact on the pricing of the final product. But the increased price of clinker is more than offset by its performance qualities, which makes its use quite popular in various areas of the construction industry.
09/11/2013 at 17:09
Making facade tiles with your own hands
 Making facade tiles with your own hands is one of the options that is used to save money. For this production you need:
- Buy and prepare molds for tiles;
- Purchase and assemble a vibrating table;
- Mix the mixture for making;
- Form a shape on the vibrating table;
- Keep the products directly in the molds for several days;
- Make formwork of finished tiles;
- Use ready-made tiles as intended.
Do not forget that before filling the molds with the mixture, they should be treated with an antiseptic or anti-stick compound.
In such conditions, you can reduce the cost of the facing material, but the façade tiles themselves will most likely be far from ideal.
Stages of manufacturing facade tiles
Quarry jobs
Work on the extraction of material, its transportation and storage.
The process of making clinker tiles
To increase elasticity and improve molding properties, the material is kept soaked and frozen under conditions open air about a year.
Treatment
To mechanical restoration processing of the material was carried out successfully and clay processing machines are used with high quality. They are needed for processing and separating excess inclusions.
Molding
The following methods are used for molding: casting, semi-dry pressing, plastic molding.
Drying
Drying is carried out so that the molded facing tiles do not crack during firing and shrink evenly.
Burning
The final stage is the firing process, during which the structure of the facade tiles and its technical properties are formed.
The video below shows how facade tiles are made with your own hands.
What are facade tiles made of?
To create facing tiles, both clay and concrete mixtures are used. For concrete mixtures, the vibration casting method is relevant. This method allows you to obtain concrete tiles with a low level of porosity. This technology makes it possible to use crushed stone, sand, plasticizers, cement, pigment and standard equipment for home production as raw materials: a concrete mixer and a vibrating platform.
Plastic molds are suitable for making artificial stone from gypsum and concrete. However, it should be remembered that it is impossible to make molds from plastic that will absolutely repeat natural stone, since subsequently you will not be able to remove the plaster or concrete stone from the plastic mold.
Forms for facade (cladding) tiles.
Concrete tiles: a short excursion
Molds for the production of concrete tiles
We offer plastic molds for facade tiles at manufacturer's price. When producing molds for facing tiles, we use ABS plastic 2 mm thick. Products made in ABS forms acquire an aesthetic appearance, strength and wear resistance, which is especially important for exterior finishing.
Our catalog presents the most popular tile shapes: façade stone(fake diamond) various types, brick-like tiles, wood, sandstone and other materials. We can also produce products according to your individual design, of any complexity and geometry, in any volume.
Our molds for tile production can withstand up to 200 concrete pours, while the manufactured products have an impeccable appearance and do not require additional external processing. Durable, wear-resistant, but light and convenient forms of facade tiles allow you to speed up the production process, and the resulting quality product easier to sell and costs 40-60% more.
If you want to buy forms of facade tiles, but did not find the required models in the catalog - contact us. We will advise you on our products and produce the products you need.
- Tile mold No. 1
- "Puzzle brick"
- 640x445x20 mm
- 4.32 pcs/m2
- ABS 2.2 mm - 520 RUR/piece
- Tile mold No. 2
- Facade "Sandstone"
- 510x480x18 mm
- 4.1 pcs./m2
- ABS 2.2 mm -450 RUR/piece
- Tile mold No. 3
- "The brick is smooth"
- 500x500x18 mm
- 4 pcs/m2
- ABS 2.2 mm - 450 RUR/piece
- Tile mold No. 4
- "Large brick"
- 500x500x18 mm
- 4 pcs/m2
- ABS 2.2 mm - 450 RUR/piece
- Tile mold No. 5
- Facade "Old masonry"
- 500x500x18 mm
- 4 pcs/m2
- ABS 2.2 mm - 450 RUR/piece
- Tile mold No. 6
- Facade "Booth"
- 500x500x18 mm
- 4 pcs/m2
- ABS 2.2 mm - 450 RUR/piece
- Tile mold No. 7
- Facade "Cracked stone"
- 500x500x18 mm
- 4 pcs/m2
- ABS 2.2 mm - 450 RUR/piece
- Tile mold No. 8
- “Cracked brick” facade
- 500x500x18 mm
- 4 pcs/m2
- ABS 2.2 mm - 450 RUR/piece
- Tile mold No. 9
- "Antique brick 1"
- 500x500x18 mm
- 4 pcs/m2
- ABS 2.2 mm - 450 RUR/piece
- Tile mold No. 10
- "Antique Brick 2"
- 500x500x20 mm
- 4 pcs/m2
- ABS 2.2 mm - 450 RUR/piece
- Tile mold No. 11
- Facade “Smooth stone”
- 500x250x16 mm
- 8 pcs/m2
- ABS 2.2 mm - 210 RUR/piece
- Tile mold No. 12
- "Torn Stone"
- 500x250x16 mm
- 8 pcs/m2
- ABS 2.2 mm - 240 RUR/piece
- Tile mold No. 13
- Manhattan facade
- 500x500x20 mm
- 4 pcs/m2
- ABS 2.2 mm -450 RUR/piece
- Tile mold No. 14
- "Stone siding"
- 600x200x20/10 mm
- 8.3 pcs/m2
- ABS 2.2 mm - 400 rub/piece
- Tile mold No. 15
- "The brick is smooth"
- 1000x500x18 mm
- 2 pcs/m2
- ABS 2 mm - 650 rub/piece
- Tile mold No. 16
- "Brick Bassoon"
- 1000x500x20 mm
- ABS 2 mm -650 RUR/piece
- Tile mold No. 17
- "Smooth puzzle brick"
- 640x445x20 mm
- 4.32 pcs/m2
- ABS 2.2 mm - 520 RUR/piece
- Tile mold No. 18
- "Three boards"
- 900x445x20 mm
- 2.2 pcs/m2
- ABS 2.2 mm - 600 rub/piece
- Tile mold No. 19
- "Brick puzzle block"
- 1125x500x40 mm
- 1.77 pcs/m2
- ABS 2.2 mm - 820 RUR/piece
- Tile mold No. 20
- Molding for openings
- 500x90x50 mm
- ABS 2.2 mm - 500 RUR/set
- Tile mold No. 21
- Wave
- 1000x500x20 mm
- 2 pcs/m2
- ABS 2.2 mm - 650 RUR/piece
- Tile mold No. 22
- Clinker brick
- 1000x500x20 mm
- 2 pcs/m2
- ABS 2.2 mm - 650 RUR/piece
- Tile mold No. 23
- Sandstone
- 1000x500x20 mm
- 2 pcs/m2
- ABS 2.2 mm - 650 RUR/piece
- Tile mold No. 24
- Smooth
- 120x60x2 /4.5 cm
- 1.39 pcs/m2
- ABS 2.2 mm - 850 rub/piece
- Tile mold No. 25
- Smooth
- 60x30x2 cm
- 2.78 pcs/m2
- ABS 2.2 mm - 450 RUR/piece
- Pano form No. 31
- 1020x340x25 mm
- ABS plastic 2mm
- Price: 680 rub/piece
- Pano form No. 32
- 1020x340x25 mm
- ABS plastic 2mm
- Price: 680 rub/piece
Technological features
When choosing ABS forms for facade tiles, pay attention to how ready-made ones will be joined cladding panels. There are forms with a groove lock, which creates fewer problems when sealing seams, but adds difficulties when removing formwork and transporting tiles (more waste). Rectangular ABS forms are easier to manufacture and are practically not damaged during transportation, but they require effort and time when sealing seams, since the joints have to be puttied to give the building façade an aesthetic appearance.
Ready-made facade panels are attached to the wall with glue and special anchors, for which some of our forms have markings for holes.
Making paving slabs with your own hands at home

The production of paving slabs using vibration casting technology is an interesting home business with small investments. This business idea has 2 main advantages: 1 good profitability, 2 the production process itself is exciting (you want to work more and more).
You don't need self-motivation to exceed production plans. If you adhere to all the rules of technology, then the entire production process resembles a game. The tiles are made so simply, quickly and beautifully that it is impossible to tear yourself away. The more you "play", the more you earn. This is probably an ideal business with elements of gamification.
He doesn't require high costs Moreover, its profitability is above 100%.
Paving slabs are a building material that has stable demand and the longest active sales season. After all, tiles are laid even at temperatures below zero. Moreover, this business has no production waste. Defective products can be recycled. This is a very important advantage.
Organization of home tile production

This business idea is optimized for home business and is not difficult to implement with minimal investment. Stages of organizing a manufacturing business at home:
- We make the vibrating table with our own hands (the diagram is shown below).
- We also make polyurethane molds ourselves ( detailed description in a business idea).
- Concrete mixer for 130 l. It’s better to buy (this is the most expensive equipment in this business).
- cement grade A-Sh-400 (higher quality is possible, don’t skimp on cement!);
- dropout;
- pigment dye;
- plasticizer C-3 liquid (an analogue or substitute is possible, most importantly it is of high quality);
- water.
Additional tools:
- bucket 10 l.;
- collection shovel;
- trowel;
- latex gloves.
To make the entire production process feel like a game, we need to prepare everything correctly without any compromises. Let's consider the basic stages of production:
- Preparation of semi-dry colored concrete for vibratory casting.
- Vibratory casting of paving slabs and curbs in molds.
- Daily exposure and stripping.
Mix for making paving slabs

Before starting work, you should moisten the walls of the concrete mixer with two buckets of water. After wetting the walls with plain water for 2 minutes, pour out all the water from the concrete mixer. This technique will allow us to better knead semi-dry concrete mixture. In addition, the concrete will not stick much to the walls of the mixer and it will be easy to clean after use.
Production stages in detail. Proportions of mixture components for the manufacture of colored paving slabs and borders.
Colored semi-dry concrete for vibratory casting. Recipe for preparing a composition of colored semi-dry concrete:
- buckets of cement A-Sh-400;
- buckets of water;
- dropout buckets;
- 200g. pigment dye;
- plasticizer in accordance with the instructions for use indicated on the canister (different manufacturers of plasticizers dilute with different concentrations).
First we prepare the pigment dye. It must be at least 2% of the volume in the mixture for the color to be truly high-quality. Dilute it in a separate container with water 1:10 (200 ml of dye 2 liters of water). Mix thoroughly using a mixer. If the dye powder is poorly diluted with water, it will not only give a poor color, but also form lumps of shells in the structure of cast concrete products. They will have to be discarded and sent for recycling.
When preparing semi-dry colored concrete, it is very important to strictly adhere to the ratio of all components and mix them thoroughly in a concrete mixer. If there is 30% more water than normal, then the strength finished product will fall 2 TIMES!
Too much dye has a negative impact on strength. In general, the presence of dye negatively affects strength, so colored tiles should be made in 2 layers ( upper layer- with dye, and the bottom one without).
This technique will not only increase the strength of thin concrete products, but will also reduce dye costs by 2 TIMES! This significant savings after all, this component is the most expensive in this mixture. Such savings significantly affect the cost of paving slabs. Moreover, the color quality remains at the same level.
Add plasticizer for paving slabs C-3. Thanks to the plasticizer, concrete plasticity properties are improved at the micro level, which are needed to create complex shapes. The quality of the plasticizer can be easily checked by making a separate test composition and increasing its dose 10 times. Then plasticine is obtained from concrete. This clearly shows what is happening at the micro level. But the plasticizer brings several other benefits. Firstly, tiles made with a plasticizer will dry faster and are ready for stripping within a day (without a plasticizer after 5 days). The plasticizer also gives strength to concrete products. It is important that it is of high quality.
Pour 2 buckets of water (20 liters) into a concrete mixer. We start the concrete mixer and add 3 of the same buckets of cement. Stir until a homogeneous suspension is formed. Then add the pre-prepared dye. Next we add screenings - 4 buckets. Follow all these tips in order of steps. After all, semi-dry concrete mixture is very difficult to mix well. Semi-dry concrete for vibratory casting - ready!
Technology for the production of thin-walled concrete products

Vibratory casting technology for paving slabs:
- We lay out the polyurethane molds on the vibrating table. Polyurethane is neutral to concrete, which cannot be said when speaking about plastic. Polyurethane molds do not need to be washed (which will save the production cycle time by 2 TIMES!). It is more durable, and concrete products made in it acquire a glossy effect (with a very smooth surface). Polyurethane products can be poured with your own hands at home.
- Semi-dry concrete is poured using a construction trowel. When all the forming containers are filled, the vibrating table is turned on. Under the influence of vibration, liquid is pushed out of semi-dry concrete and the concrete already takes on an elastic form (in appearance it somewhat resembles a vein). When you look at this process, it seems as if a stone is turning into water. The vibration should continue until a milky foam begins to form in the center of each mold. This takes about 3-4 minutes. Then turn off the vibration and, to make sure that everything is done correctly, turn one of the forms over. The contents must not fall out. This is how low-liquid concrete is compacted. Accordingly, the strength of such a concrete product is very high.
- Paving slabs should be placed for curing and drying in a room protected from moisture and sun. In a day it is ready for stripping.
After stripping, we wipe the container and repeat this creative process in a repeat cycle.
DIY vibration table

We manufacture a working vibrating table for the production of paving slabs and other thin-walled concrete products using vibratory casting technology. For this we need:
- Sheet of metal with a thickness of 5mm and dimensions of 1.5m. x 1m. for making tabletops.
- Squares with a thickness of 3mm, side dimensions 5cm x 5cm.
- Springs – 4 pcs. with an outer diameter of 5cm and an inner diameter of 4.5cm. The coil pitch is approximately the same as that of motorcycle shock absorber springs. But the height of the springs is no more than 8 cm.
- Pipe sections – 4 pcs. to create bowls for springs. Their dimensions: internal diameter - 5.2 cm, height - 3-4 cm.
- Electric sandpaper with a power of 1 kW. with two white emery stones (stone diameter 10-15 cm, thickness 2-3 cm) on the through shaft and with protective covers.
- A galvanized sheet (10cm x 50cm) and two large bolts with countersunk heads (diameter 10mm, length 10cm with fine thread step 1), to secure the emery to the table.
- Two counterweights (diameter 12 cm, thickness 2 cm). They should be secured to the through shaft of the sandpaper and covered with protective covers.
- Toggle switch, cable and plug.
We assemble all the parts into a whole device, as shown in the schematic diagram. 2 holes are drilled in the center of the tabletop for mounting an electric motor with counterweights on the bottom side. From the bottom, using a welding machine, cups are welded at the four corners opposite the table legs. The lower part of the table is made from squares - the legs, which are connected to each other for strength. Springs are attached to the legs, onto which cups with a tabletop are placed.
Making and laying facade tiles with your own hands: step-by-step instructions
An electric sander with a power of 1 kW is screwed onto the underside of the table using a galvanized sheet (which acts as a clamp). It also creates vibration due to the rotation of the weight with an offset center. The farther from the center, the stronger the vibration.
A homemade vibrating table will cost several times less than a factory one. But its capabilities are quite sufficient for home production.
When loading the table with forms of concrete, it is important not to overload it and take into account that the less weight is on the table, the higher the vibration. The level of vibration must be such that the concrete in the forms does not bounce off their walls.
Attention! The vibration weight must be securely fixed to the emery shaft. Safety comes first!
Too much or too little vibration negatively affects the quality of products. In the center homemade table there will be particularly low vibration. While in places where springs are installed, vibration may be increased due to accumulation. Therefore, a homemade vibrating table should not be loaded on 100% of the surface. When laying out the forms, do not place them in the center or in the corners. Thus, the table will be loaded at approximately 70%, and the vibration in the molds will be uniform.
Most importantly, do not forget to follow safety precautions!
DIY molds for paving slabs

Polyurethane molds have a number of advantages over plastic.
Polyurethane is absolutely neutral to concrete. This eliminates the need for plastic mold release agents. But the main advantage of polyurethane molds is the elimination of a labor-intensive process such as washing each vessel.
Regular plastic containers must be washed each time before vibration casting. This takes up the largest part of the work time. In home production, washing plastic molds will reduce productivity by 2 TIMES! Polyurethane molds only need to be wiped with a slightly damp cloth.
To pour polyurethane molds yourself you need to:
- a collapsible box that will act as formwork;
- finished concrete product (tiles, border, sill, etc.);
- release agent that is neutral to polyurethane;
- components A and B for preparing the polyurethane itself.
Step-by-step description of cold casting of polyurethane molds at home:
- Preparing a product that will act as a sample model for the mold. The sample model and formwork should be thoroughly wiped and dried. Then apply a release agent evenly with a brush to the surface of the model and the formwork. The layer of release agent should be so thin that it is possible to transfer the structure of the decorative pattern to the form (for complex patterns, the separator can be heated with a hairdryer after application to increase the efficiency of transferring the relief). Then let the grease dry for about 10 minutes.
- Preparation of liquid polyurethane before casting the mold. Using an electronic laboratory scale, we weigh the components (polyol part A) and (isocyanate part B) for mixing in a 1:1 ratio. The temperature of the components should be room temperature plus 21-24 degrees. When mixing, it is better to use containers with the same volume of ingredients. For 2 to 4 minutes, mix with a mixer at medium speed, rotating counterclockwise to prevent the formation of air bubbles.
- Filling the formwork with liquid polyurethane. After mixing, we have no more than 10 minutes to qualitatively fill the formwork while the “lifetime” of the compound continues (the process of transition from liquid state into a gel). Advice: it is better to fill it from one corner so that the polyurethane evenly covers the surface of the sample model like a flow of volcanic lava before filling it to the required level in the formwork.
- Stripping. After casting, the product should not be disturbed for 24 hours. And after 24 hours, stripping must be done very carefully so as not to damage the still fresh form. The resulting mold can be used no earlier than after 4 days, so that the mold gains its maximum strength and lasts several hundred shaping cycles.
Advantages of figured paving elements

Paving slabs are the most rational covering for areas for a number of main reasons:
- Mobility. The tiles can be removed and moved to another location. Can be replaced in parts if damaged during use. For example, the appearance of greasy stains from car oil, etc.
- Health safety. The tiles do not emit a toxic odor in the heat like asphalt.
- Strength. The tiles are not pierced by plants, as in asphalt. It does not crack under the influence of temperature changes like poured concrete.
- Aesthetics and beauty. Thanks to creative ideas, an entire technology has been created in landscape design FEM ( curly elements paving). From different colors and shapes of thin-walled concrete products, you can make entire masterpieces.
- Affordable price per square meter.
There are many other minor advantages in FEM coating (water absorption between joints, high-quality load distribution on the surface, etc.). The list goes on and on. But this is enough to evaluate the benefits of this building material and its demand in the construction market in the long term.