Waterproofing material for the floor. Types of floor waterproofing: materials and the most common technologies. Roll materials are
In order to prevent dampness from entering the room from the basement or to protect the floor from water in the kitchen space, in the bathrooms, waterproofing is installed, which is placed under the screed.
The construction market offers a huge selection of material that isolates the floor from moisture. For example:
- liquid glass - is a coating material;
- pasting waterproofing under a warm floor - roll materials are used.
Consider different types of waterproofing, the technology of its use, and how to properly produce it.
Some apartment owners do not consider it necessary to waterproof the floor in the apartment. But there are reasons why you need to protect the floor.
There are force majeure situations when a lot of water gets on the floor, and only high-quality waterproofing can save the floors from damage.
Which of the residents of high-rise buildings is not familiar with the situation when the neighbors from above flood the apartment. And although the neighbor does not have malicious intent, the incident can spoil the relationship for a long time.
If we consider a private building, then waterproofing will not allow moisture and vapor to enter the room from the basement. This is especially important if the house is located on a site with close contact with groundwater.
If you do not carry out high-quality waterproofing of the floor, then there will be increased humidity in the room.
Floor waterproofing - what types exist
There are three types of floor insulation before arranging the screed. They differ in technology and materials:
- Coating - oxidized bitumen, which includes organic and inorganic additives, such as:
- latex;
- plasticizers;
- rubber crumb.
This material is made in such a composition to increase fluidity when applied to the coating. After complete hardening, the waterproofing covers the surface with an elastic and durable film that does not allow water to pass through.
Liquid glass, bitumen and polymer mastics - a coating material with high adhesion.
Coating waterproofing not only provides good protection for floors and slabs, but also serves as a reinforcing frame under the screed.
- Pasting - using materials in rolls. As part of the waterproofing composition - polymers, fiberglass and reinforcement. Recently, manufacturers have begun to produce self-adhesive roll materials.
It should be noted that in this situation, for better adhesion of the composition with concrete, a burner is used, which warms up the insulation.
- Combined, it is used if the room has high humidity, kitchens, bathrooms. Such waterproofing of the floor, for a warm floor, perfectly protects the floors, and, accordingly, your neighbors from below from moisture.
The use of materials of the first and second types of insulation is envisaged, which is produced in several layers.
Insulating materials
There are many types of materials. The area of use and properties are different, so before purchasing, you need to read the manual from the manufacturer.
Roll materials are:
- Hydroisol;
- Rubyroid;
- Isoplast;
- Filisol.
Sold in the form of rolls, the material is very durable and is not afraid of mechanical stress.
This material can be used on any type of floor. The advantage of roll insulation is ease of use and low cost.
There are two ways to fasten rolled insulation:
- on bitumen or polymer mastic;
- heating the material with an open flame using a burner.
Paint insulation
This name is used because such waterproofing is applied under a warm floor by applying it to the surface with a brush or roller. It has two application methods - hot and cold.
For example, water glass is applied cold, and hardens under the influence of air, this is facilitated by special hardeners added to the composition.
All bitumen-based liquid waterproofing requires preheating to a fluid state. Bitumen is applied on a plane and when cooled creates a waterproof film.
When treating the floor with insulating mixtures, it is worth smearing the walls adjacent to it, to a height of 30 cm. This is especially true for wet rooms.

Bulk insulators
The material is quite in demand and easy to use, its only drawback is the cost. But thanks to this waterproofing, a monolithic surface is formed on the floor, completely isolated.
The application is quite simple, the mixture is diluted to the desired consistency, poured onto the floor and leveled with a special spiked roller.
Having considered the types of waterproofing, you can begin to work.
Installation steps
All the technologies listed above require certain tools and a specific approach. But before laying the waterproofing, we prepare the surface.
Foundation preparation:
- clean from visible dirt, dust, debris;
- seal with cement mortar all cracks, seams and joints of floors, including the junction of the wall and floor;
- fasten a damper tape around the perimeter of the room to the bottom of the wall;
- apply a deep penetration impregnation, while not forgetting to treat the surface with an antifungal compound.
The primer is applied in two layers, but it is possible to prime the surface with concrete contact, which will give the insulating layer greater strength and tightness.
If redevelopment is planned, then it must be done before the start of work on waterproofing the floor.
Roll insulation deck
Roll waterproofing is laid in several stages:
- It is necessary to carefully level the surface on which the material will lie. It is better to use a self-leveling floor. It is sold in bulk bags. It must be diluted with the right amount of water (see on the package). Pour the base and level with a spiked roller.
Only after that, a polymer mastic or bitumen emulsion is applied to the prepared floor. If there is not a lot of adhesive, then it will be enough to apply diagonal stripes over the entire surface.
- The insulation roll needs to be heated and rolled out along one of the walls. Then we heat the edge of the material that is adjacent to the wall with a building hair dryer, and bend it onto the wall with an overlap of 20 centimeters.
- The next sheet of insulation should overlap the previous one by 15 centimeters. As soon as the entire surface of the floor is covered with flooring, we begin to coat the seams between the sheets, with mastic.
- Once the seams are missed, you need to take a gas burner and warm up the material well, which will soften and stick tightly to the surface.
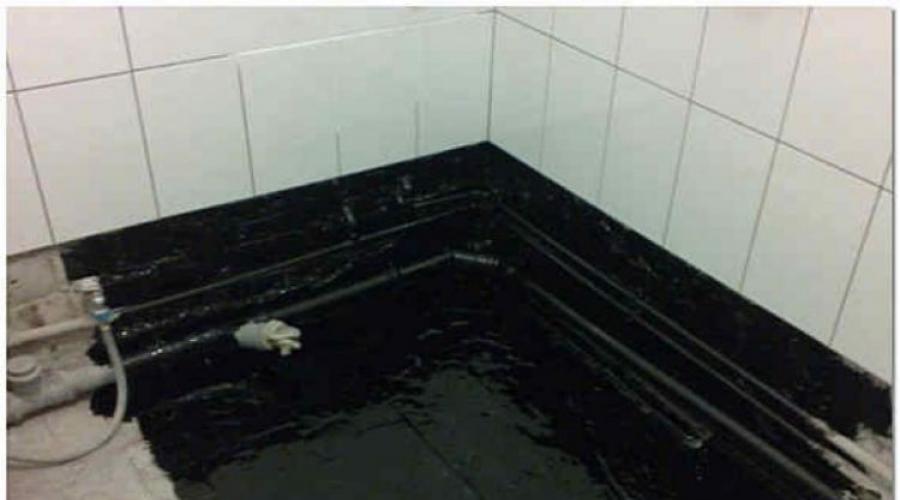
When working on the installation of rolled waterproofing, fire safety must be observed, since this material is made on the basis of bitumen, and it is combustible.
If the insulation is carried out in a humid room, then it is better to apply the material in 3 layers, which are superimposed across each other.
Installation of coating waterproofing
There is nothing complicated in this method, just pick up a roller or brush. Insulation begins to be applied from the wall opposite the exit. First of all, we coat all the walls to a height of 25-30 centimeters around the entire perimeter of the room, and then go to the floor.
It is desirable to process the entire surface in one go. Polymer mastic and liquid glass are applied to the floor immediately after opening the package, they do not require heat treatment.
With bituminous compounds, this technique will not work, since it needs to be warmed up well for application. We take the mastic and transfer it to a metal container, which we heat with a gas burner or a blowtorch. Make sure that open flames do not touch the material, as it may ignite.
Apply these compounds in 3-5 layers. Each subsequent layer is applied after the previous one has completely dried.
Underfloor heating waterproofing
Many install underfloor heating in the apartment. In this situation, waterproofing a warm floor covering is required:
- apply a layer of insulation to the base;
- pour concrete screed;
- install a warm floor;
- pour a layer of self-leveling floor;
- install the final floor covering.
The methods described above will help you correctly choose not only the right material for waterproofing, but also properly mount it.
Waterproofing the floor in the bathroom, materials for which a large assortment can be found today in any hardware store, is a mandatory procedure before finishing work and installing plumbing.
The bathroom is the wettest room in both a private house and an apartment, therefore, no matter what material they are made of, they need high-quality waterproofing, otherwise leaks may occur at the junctions of walls and floors during the operation of the room, at the points where engineering communications pass through the floors . Not only that, there is a great risk of flooding the premises located below. As you know, moisture, getting into a closed space, inevitably contributes to the formation of mold and fungus, which begin to gradually destroy the structure of the floor and walls, lead to a persistent unpleasant smell of dampness, and can cause a number of diseases in people living in an apartment.
The main types of waterproofing floors
There are many varieties of waterproofing materials made on various bases and in various forms. To choose the most suitable option, you should consider in advance their characteristics and the technology of working with them.
So, according to the type of application, waterproofing is divided into the following types:
- Coating.
- Okleyechnaya.
- Impregnation.
- Cast.
- Plaster.
It is difficult to say which of these waterproofings is better for the bathroom floor, since even among experts there is no consensus on this matter. The choice of material and technology of its laying is made taking into account the characteristics of the surface, which should be waterproofed and the allotted time to complete the work.
Coating type waterproofing
 Compositions for coating (painting) waterproofing - the easiest to use
 Coating compositions for waterproofing are produced on different bases and can be:
- Water-based, acrylic-based;
- Bituminous rubber;
- Bitumen-polymer;
- Cement-polymer;
- polyurethane;
Bitumen-based formulations are produced with additives from various fillers and organic solvents. Fillers make mastics more elastic, as they are used as plasticizers, crumb rubber or latex.
Mastics have excellent adhesion and can be applied to both concrete and wood surfaces.
It should be noted that bitumen-based materials have a number of disadvantages, which include:
- possible cracking and chipping as a result of temperature fluctuations;
— biological corrosion;
- an unpleasant smell during the waterproofing work.
But, in spite of these shortcomings of coating compositions, they are most often used to isolate the floor in the bathroom, as this is the most affordable way to create protection against moisture penetration.
The cost of coating waterproofing mastics is quite affordable, but its service life is no more than five to six years.
Materials made on the basis of polymers have practically no negative qualities, therefore they can be used without fear.
The advantages of coating compositions include the ease of applying the material to the floor surface and the lower part of the walls, as well as to the corners and joints with a conventional brush.

Material consumption depends on the initial quality waterproofed surface and number of layers. Usually the recommended amount per 1 m² area is indicated by the manufacturer of the composition.
How is coating (painting) waterproofing applied?
There is nothing complicated in the device of this type of waterproofing - the main thing is to do all the work carefully and adhere to the developed technology.

If the coating composition is purchased in dry form, then the technology for its manufacture can be found on the packaging. The mixture must necessarily have a homogeneous state. If a liquid component is included in the dry composition, then it is first mixed with water and only after that it is poured into the dry mass and mixed into a pasty mastic. Such waterproofing is called two-component. When the mixture is ready, you need to immediately proceed to work.
- The first thing to do before applying any coating is to thoroughly clean the surface of fine dust and larger debris. The work is carried out with a vacuum cleaner.

- Further, it is necessary to remove absorbed greasy stains or paint residues from the surfaces, if there are any, clean them off to “healthy” concrete. The same is done with loose areas where erosion of the concrete slab is noticeable. After cleaning, dust and debris are again cleaned.
- The next step is the application (deep penetration composition). The primer can be poured onto floors and spread with a roller.

Corners and surfaces around the outlet of pipes in the wall and drain in the floor must be treated with a primer composition using a brush so as not to leave untreated areas. After the first layer of the solution dries, another one is applied.
- Next, you can proceed to the application of the waterproofing composition. Work begins with mastic covering the corners and all joints of the floor and wall, pipe passages through the ceilings.
- On the freshly applied sealing tape is laid on the mastic. It is glued with an uncured composition to the walls and floor, so that the joint between them is completely closed, which is always a weak point in case of leaks. A prerequisite is that the tape must be completely straightened, not have waves, kinks, folds, voids under it are unacceptable.

When joining the strips, the overlap must be at least 50 ÷ 70 mm (during the initial laying, the overlap must be smeared with mastic.).
In the bathroom, not only the joints of the floor and walls are processed in the same way, but the corners of the walls, to a height of at least 150 ÷ 200 mm.
Another layer of waterproofing mastic is applied over the tape.

- Next, it is necessary to stick sealing membranes around the points of water supply and drainage, that is, branch pipes or sleeves emerging from walls and floors with communications laid through them.
 Particular attention - waterproofing near pipes, holes, sleeves in the ceiling, etc.
 - Then the entire remaining surface of the bathroom floor and walls is covered with waterproofing mastic to a height of 150 ÷ 200 mm.
By the way, qualified craftsmen recommend not to spare the material and apply the composition at least 500 ÷ 700 mm from the floor, especially around the bathtub and washbasin - this will protect the walls from from dampness and mold growth.
 Do not spare the material and at the same time insulate the walls near the bathroom and sink
 Mastic, when applied to the floor surface, does not smear thinly - it should lay down in a thick uniform layer of the same thickness, about 2 mm.
- Waterproofing is carried out, if necessary, in two or even three layers. Education not allowed uncovered mastic"islands". Each of the layers is applied in a perpendicular direction relative to the previous, already dried layer, about five to six hours later.
- When the work on waterproofing the floor is completed, you can start finishing only after a day.
At the end of the section - an example of the implementation of coating waterproofing in the bathroom.
Prices for coating waterproofing
Coating waterproofing
Video: bathroom waterproofing master work
Plaster waterproofing
Plaster waterproofing also belongs to the coating type, but it must be distinguished separately, since materials that differ from the rest in their composition are used for work.
Plaster mixtures include components such as gypsum, cement and polymers. If the bitumen used for waterproofing the floor, at a temperature of 0 degrees, begins to lose its elasticity, becomes brittle, and cracks can form on it, then temperature drops are not terrible for plaster compositions.
There are many plaster waterproofing mixtures of various manufacturers on sale. Particularly popular are the compositions of the Knauf and Ceresit companies.
- For example, the KNAUF FLACHENDICHT waterproofing composition includes a component such as synthesized latex, which gives the material a special elasticity. Therefore, the layer applied to the surface, after polymerization, retains its qualities at temperatures from - 18 to + 55 ° С.
This composition after kneading does not require heating, and is applied to the surface immediately.
- Another option for high-quality plaster waterproofing is a mixture of the Ceresit CR -65 brand, which has excellent adhesion to surfaces, provided that it is applied to a surface treated with a primer.
 One of the most popular compositions is Hydroizol Ceresit CR-65
 Plaster mixtures are also applied with a brush or roller. The joints of the planes must be glued with sealing tape. It is advisable to choose all materials from one manufacturer - they are fully adapted to each other.
Prices for plaster waterproofing
Plaster waterproofing
Gluing waterproofing
This method of protecting floors from moisture penetration can be called the most effective, but it will be somewhat more difficult to properly lay materials than with coating compositions. The most popular materials for pasting waterproofing are: roofing material, isoplast, ecoflex, iselast, mostoplast, technonikol, hydroisol.

The materials are not affected by temperature changes, and if they are installed correctly, according to existing technologies, they will protect the floor surface for many years.
Waterproofing is made in the form of sheets or rolls of waterproof material with good elasticity. But, despite this, it is not easy to lay them on their own in difficult places, for example, in the corners of a room.
Two types of pasting materials are made. One of them is placed on on the worn adhesive, others are self-adhesive.
For installation of the first type, bituminous mastic is most often used as an adhesive base. On self-adhesive sheets, in principle, the same mastic is applied to the back surface and protected by a special film, which is removed only during installation.
by the most widespread until recently, the type of pasting waterproofing was an ordinary roofing material, but with the advent of more advanced materials, it is used less and less. Modern types can have a polymer or bitumen base, so they differ somewhat in their characteristics.
- Polymeric material is films and membranes made from vulcanized rubber. Most often they are already covered with an adhesive composition.

They are favorably distinguished by:
- small thickness;
— long service life;
- excellent mechanical strength;
- no shrinkage;
- resistance to vibration.
- Bitumen-based waterproofing is used much more often, as it is more affordable. Such materials, for example, include waterproofing, made on the basis of fiberglass impregnated with bitumen, and the plasticizer makes it resistant to cracking and gives it flexibility. This material is not subject to biodegradation and the occurrence of mold on it.
It can be produced in one- and two-sided version.
 Double sided material suitable for multi-layer coating
 Double-sided material differs from one-sided by the presence of a polymer protective film on both sides - it melts when exposed to high temperatures during installation. This material is used in the event that a multi-layer waterproofing coating is arranged.
The one-sided material is equipped with a protective coating consisting of mineral chips. - it is usually used for the external coating of a soft roof.

Glue waterproofing is used not only for concrete coatings, but also for wooden flooring, on which it is laid without melting - on bituminous mastic.
Laying adhesive waterproofing
The surface of the bathroom floor before laying the gluing material must be prepared more carefully than when applying coating compositions to it - this nuance must be observed in order to create long-term and reliable floor protection.
The work is carried out in the following order:
- Bathroom floors should not have even small protrusions, so they must be removed. If necessary, the surface is leveled with compounds. Then the floor is well dried and cleaned of dust.
- Further, the floor surface and the lower part of the walls are covered with primers, which should also dry well.
- Then, on the surface of the floor and walls, a layer of mastic with a thickness of about 2 mm is applied to a height of 200 mm. Mastic can be on a rubber or polymer-bitumen basis.
- Next comes the waterproofing sticker. The first canvas, which will be found on the wall, is laid with a bend, but is first glued to the floor surface, and then to the wall.
The mastic is heated until softened with a gas burner. The surface is covered with a waterproofing sheet, which is then rolled with a roller.

The next canvas is laid on the already laid waterproofing strip with an overlap of 80 ÷ 100 mm. Then come the third and subsequent strips.
- If it is planned to lay the material in two layers, then mastic is applied again on top of the first and waterproofing is laid. The second layer is laid in such a way that the middle of the canvases is at the junctions of the strips of the lower layer, then completely overlaps them.
The installation process of techno-nicol takes place in the same way, but its advantage lies in the fact that the bituminous layer is already present on the material. When laying, it remains only to heat it until the protective polymer film melts and roll it to the surface with a roller. It is very important not to overheat the material, as the waterproofing will become brittle from this, and its service life will be significantly reduced.
Hot laying is not a very good idea, since in small enclosed spaces it is recommended to avoid working with a burner. When heated, the waterproofing material and mastic emit a sharp and persistent odor, which is rather poorly weathered. In addition, working independently with a burner without proper experience is quite dangerous, but if it is already decided to stick waterproofing in this way, then it is better to entrust this process to specialists.
To perform the work yourself, it is better to use self-adhesive canvases that do not require the use of a burner - this installation is also called the “cold” method. For such a coating, the concrete floor must be treated with a primer - a special compound made on a bitumen basis.

Using it, you can create an almost seamless hermetic coating, since the sheets overlapped by 100 mm are tightly glued together. Before fastening them, the protective film is removed from the adhesive layer, and the canvas is immediately pressed against the already laid waterproofing sheet.
When using gluing material, special attention should be paid to water pipes and water drain holes. For them, holes are cut out in the waterproofing, where rubber seals are inserted. The places of contact are coated with polyurethane or silicone sealant.

Cast waterproofing
Cast waterproofing can also be made from different materials. As the name implies, the installation of these compounds on the surface occurs by spilling them in cold or hot form.
Hot waterproofing
Hot waterproofing can be asphalt-polymer and asphalt. Consumables for it are hot bitumen, asphalt concrete and pitch. This material shows good performance - elasticity, high resistance to bending, strength and reliability.
Materials are poured on the surface, where work was carried out in advance to seal the seams with sealants and mastics.
This type of waterproofing is almost never used for bathrooms in apartments - they are more suitable for the same rooms, equipped in private homes.
Hot waterproofing installation
To properly perform hot waterproofing, you need to proceed in the following order:
- The floor surface must be thoroughly cleaned from various contaminants that could remain from the repair work.
- The detected cracks, as well as the joints of the planes, are filled with sealing compounds.
- After that, the floor must be well dried - infrared heaters, gas burners and other fairly powerful devices are often used for this.
- Priming is in progress. For this type of waterproofing, hot bitumen is used as a primer.

- After that, the primed working surface around the perimeter is separated by formwork. It is necessary if waterproof only part of the room is needed.
- Warmed up waterproofing mass - temperature its heating is indicated on the packaging.
- The hot composition is carefully poured onto the surface, evenly distributed over it with a doctor blade and left until completely solidified.
- If necessary, several layers of waterproofing are poured, but each subsequent one - only after the previous one has completely dried.
Cold cast waterproofing
Cold types of waterproofing include materials such as "liquid" rubber and "liquid" glass. The technology for working with these compounds is similar, but their components differ significantly.
"Liquid rubber
This waterproofing material is made from bitumen and polymer additives, which make the resulting emulsion more wear-resistant and resistant to external influences.
 Liquid rubber packaging
 As a fixer for bitumen-polymer mixtures, calcium chloride is used, which reduces the density of the material, which makes it possible to install "liquid rubber" by spraying. The fixing agent is diluted with water in proportions of 1:10 before being added to the emulsion, and then the final composition is mixed.
Prices for liquid rubber Apiflex
Sprayed liquid rubber Apiflex
In order for the coating to be successful, it is necessary to adhere to the technology, prepare the base well for it and perform work at a temperature not lower than + 3 ÷5 °С.
"Liquid" rubber is produced in different consistencies, which allows it to be applied to surfaces in various ways:
- The bulk laying method is the most popular, as it does not require special equipment, while the composition fills all the small cracks and creates an even, smooth coating.
- Spraying is a more complex method, as it requires special equipment and skills to work with it. With the correct application of waterproofing by spraying, it turns out to be of better quality than when using other methods, since the composition is supplied under pressure and fills not only cracks, but also microscopic pores of the base.
- Painting (coating) technology is the most accessible of all three existing ones. The application differs little from the usual coating insulation, which has already been mentioned above. For painting application, waterproofing is produced in the form of a paste or solution.
After processing the floor with “liquid” rubber, a hermetic elastic film should form on the surface, which will reliably protect the floor from moisture.
The table shows the main characteristics of this material:
| Material parameters | Indicators |
|---|---|
| Tensile strength (MPa) | 2E-3 |
| Elongation at break (%) | 1500 |
| Adhesion strength with concrete surface (MPa) | 1 |
| Density (kg/m³) | 1000÷1100 |
| Amount of non-volatile substances (%) | 57÷65 |
| Curing time of the composition after its application (hours) | 24 |
| Maximum water absorption in the first 24 hours, % | 0.5 |
| Water permeability at a pressure of 0.01 MPa in 24 hours | No wet spot |
| The average consumption of the main component in the manufacture of floor covering material is 1 mm, in dry residue kg/m² | 1.61 |
Technical and operational characteristics of different brands may vary slightly. But due to the fact that all the components of "liquid" rubber are environmentally friendly, they do not emit harmful fumes during operation, they are safe for humans.
The positive qualities of all types of "liquid" rubber can be called:
- High degree of adhesion to various surfaces.
- Chemical resistance.
- Possibility of applying waterproofing on the old cleaned floor.
- Formation of a continuous seamless surface.
- High elasticity and strength of the material.
 A clear example of the high elasticity and strength of "liquid rubber"
 - Endurance with temperature changes.
- The composition is odorless during installation, therefore it is suitable for waterproofing indoors.
- Long service life.
How to apply "liquid" rubber
It makes no sense to describe working with a coating type of “liquid rubber” - it is no different from ordinary coating waterproofing. In order not to repeat ourselves, it is worth considering only the technology of spraying and spilling a waterproofing composition.
The first step is to t t Radiation surface preparation. It is carried out in the same way as for any type of waterproofing. The main condition is the evenness of the floor surface, without protruding fragments, and its cleanliness.
Before applying all types of "liquid" rubber, surfaces must also be primed. As a primer, a similar the composition of the polymer-bitumen solution, which will not only create excellent adhesion for the coating, but also enhance its waterproofing properties. The primer is applied with a roller or brush.
The next step, after the soil has completely dried, is the application of the waterproofing material. Spraying "liquid" rubber is carried out using special equipment. Tanks with a bitumen-polymer composition and with fixative - solution calcium chloride. Both components are fed into the sprayer at once, which are mixed and applied to the surface under pressure, forming an elastic membrane with a thickness of 2 ÷ 3 mm. This process is usually entrusted to specialists who have the necessary apparatus and experience with it.
 The process of spraying "liquid rubber"
 The pouring method consists in pouring the finished material on the floor surface and distributing it with a spiked roller, spatula or doctor blade. Waterproofing is applied not only on the surface of the floor, but also, as in previous cases, on the lower part of the wall and around the pipes of the water pipes.
The approximate consumption of this material per 1 m² is 2.8 ÷ 3 liters. Complete drying of the coating occurs after two days. After this time, you can proceed to further work on the device floor.
"Liquid glass"
Knowing the characteristics and technology of applying various waterproofing materials, it will be easier to choose one that fits in all respects and becomes available for independent work.
In the life and life of a modern person, water is everywhere, which is why high-quality and properly carried out waterproofing of the floor is so important. Cleaning, laundry, personal hygiene, cooking… The list is endless. When floods occur, buildings, structures, load-bearing structures suffer from a large amount of water.
Excess moisture also negatively affects finishing materials, ceilings, partitions. There may be the appearance and active development of fungi, mold, corrosion processes that reduce the life of metal structures. This explains the importance of waterproofing in residential buildings, apartments, especially in rooms such as kitchens, bathrooms, and toilets.
Floors in the apartment and features of their waterproofing
Floor waterproofing
If a person builds a private house on his own, then an apartment is usually purchased from a developer or a private person, a person does not directly participate in its creation and decoration. Buying an apartment on the secondary market involves a repair, and a major one, with the dismantling of the floors to the base of concrete or wood. Experts give some practical advice on how to waterproof and ensure normal living conditions:
- dismantling of floors in rooms with high humidity must be carried out to the very foundation. And no matter what finishing materials are present there;
- then the floor is leveled with a special self-spreading mixture or repair compound. If desired, you can use expensive waterproofing, but this is impractical. As for self-leveling floors or roll coatings, they are applied to the most leveled surface;
- in case redevelopment is planned, it is necessary to remove unnecessary partitions, and then proceed with the processing of the floor. Waterproofing the floor in the bathroom involves the creation of an airtight and continuous coating, which is applied by a continuous method. Partitions will interfere with this;
- it is not necessary to produce partial waterproofing in order to save money. There will be practically no benefit from it, since the water will flow into the untreated areas and do its job;
- it is recommended to set the floor level in rooms such as kitchen and bathroom, bathroom, lower than the level of other rooms. This creates an impenetrable flood zone. It is appropriate to install a solid curb or steps that will become a kind of barrier to water.

Roll waterproofing
Floor waterproofing materials
There is a huge amount of described materials on the construction market, which are suitable for creating insulation in the house. The most requested of them are:
- mastics, coating agents;
- pasting or roll insulation;
- intended for isolation of plaster;
- bulk mixtures;
- penetrating mixtures;
- bulk mixtures;
- spray-on polymers.
In the case of independent work, it is better to choose plastering or coating options. An order of magnitude more difficult and more difficult to process is rolled insulation, which must be connected and laid in a special way. If, nevertheless, the choice is made in favor of the penetrating component, you can work with it at home, but you must strictly adhere to the rules outlined in the instructions.
If it is supposed to waterproof the floor screed, then it is better to choose bulk compositions. They are represented by special small granules - reacting with water, they turn into a gel-like paste and prevent moisture leakage.

self-leveling floor
Self-leveling or 3D floors, as well as spray-type polymer coatings are difficult to work with, it is better to entrust their creation and finishing to specialists.
Often, floor tiles are used as waterproofing, but they are a common finishing material. Tiles, even if they are connected with silicone grout, do not guarantee complete insulation, and in the event of a flood, moisture will quickly pass to the neighbors.
Roll waterproofing and the principle of creation
The device of this waterproofing involves the following steps. First of all, the working surface is leveled, it is necessary to minimize the presence of voids and potholes between the material used and the concrete base. The best option would be to use the appropriate leveling component.
The floor is cleaned of dirt, dust, to create better adhesion it should be primed. The purchased mixture is diluted with plain water and gently poured onto the surface. Processing with a spiked roller will prevent the formation of bubbles inside the layer, provide high-quality insulation with your own hands.
The described waterproofing is usually laid from gluing materials, the adhesion of which is provided by adhesives or bituminous mastic. When working with polymer mastic, it is better to use fiberglass, polyisobutylene or PVC film. To work with bituminous mastic, brizol, hydrostekloizol, hydroizol, in general, all coatings containing bitumen, are intended.

The principle of waterproofing the floor
A bituminous emulsion is applied to the prepared dry and clean floor in the apartment. Typically, such a composition is made on the basis of water, and throughout the entire operational period does not emit harmful impurities into the environment (residential premises). A primer is applied to the emulsion, two layers of which must intersect for better adhesion.
Joints and corners are mounted on the slightly dried first layer of primer, which are applied using a special construction tape, which is sunk into the material with gentle movements. When applying the second layer, these elements are processed especially carefully. application of special protective components.
When the primer layer is ready, you can start applying roll waterproofing. If the material is a self-adhesive carpet, it is simply laid on the surface and pressed against it. Working with conventional roll materials will require the use of a building hair dryer and a burner. With the help of a burner, the material is heated from the outside and quickly pressed to the floor. Particularly well it is necessary to melt the places of overlap and press them well.
Be sure to create an overlap up to 30 cm high. As for the corners, they are finished with special patches and sealed.
At the end of all the above points, a sealed and monolithic coating is formed, which is characterized by excellent adhesion to the surface. Immediately after the adhesive has completely dried or the bitumen has cooled down, you can create a floor screed.
Coating waterproofing - a proven method of protection
If the question is acute, how to waterproof the floor, you can stop at the coating material. Its use does not require preliminary perfect leveling of the floor. All kinds of sprayers, a burner, and other expensive and professional equipment will not be needed in the process of work. This moisture protection option is the simplest and most commonly used.
The working surface is cleaned, then it is treated with a primer. To achieve the best result, the corners and the resulting joints must be treated with sealing tape. The next step is the formation of mastic, the concentration of which should correspond to thick sour cream. The main rule says that you need to slowly introduce the powder into the water, and not vice versa. The resulting substance is applied to the work surface and the lower part of the wall using a construction brush of convenient size. It must be thoroughly rubbed so that puddles do not form. When the first layer dries slightly, it must be moistened, and create a second layer in a perpendicular direction to the first. The instruction assumes the creation of protection against moisture in 3-5 layers. Their number depends on how uneven the work surface was.
Waterproof materials, what else are they?
In terms of practicality and reliability, nothing can compare with bulk insulation. Its main and main disadvantage is the high cost, which can sometimes just go wild. But again, its quality justifies the stated price.
Positive properties are liquid waterproofing for the floor, as well as penetrating compounds. Their prices are more affordable, the service life is long. Such insulations are distinguished by ease of application, they are allowed to be applied to walls and floors, on top of the screed or under it.
What is the best material to choose for finishing your home is a personal matter for each person. The main thing is to make high-quality waterproofing, and not to hope that a flood will never happen, and pipes and plumbing will always remain in good condition. Protection from moisture will be needed not only in the event of a flood. In everyday life, water often gets on the walls and floor from wet feet in the bathroom; when drying clothes, it accumulates on the walls, what can we say about an overflowing bathroom or a clogged washstand drain. In the off-season, when it rains heavily outside, the hallway of a house or apartment generally suffers greatly from moisture. That is why high-quality and reliable floor waterproofing is so important.
It will help ensure comfortable living, as well as save you from costly repairs to the neighbor's apartment below in the event of a flood. If desired, you can independently waterproof the floor in the room. But for this you will need to study a lot of information in order to choose the right working waterproofing material.
When starting a major overhaul in an apartment, people should start with a competent arrangement of the lower flooring. Before laying a new floor covering, a concrete screed is made. It is impossible to do it without carrying out separate works. After all, waterproofing the floor in the apartment before the screed is a crucial preparatory stage in the repair. This process prevents the appearance of moisture and dampness in the house.
Waterproofing before the screed is a mandatory stepThe importance of floor waterproofing before screed
Many people believe that waterproofing the floor before screed is not very important, and neglect this step in the repair. But with her, the house becomes comfortable and cozy. Since it is she who will save your home from getting excess moisture.
The lack of waterproofing of the floor before the screed will contribute to the entry of dampness from the first floors into your home. And for people living on the lower floors and above the basements, they simply cannot do without it. After all, all the dampness from the basement will constantly seep into your home. Because of this, mold and fungus will settle in your home.
 Without waterproofing, all moisture will get into your apartment
 The presence of waterproofing will provide:
high protection of housing from extraneous dampness;
good protection of the inhabitants of the lower floors from leaks;
higher strength of the building;
high-quality application of the screed and ease of laying the decorative coating.
It is necessary to make waterproofing not only in damp rooms, but throughout the apartment. If you make partial insulation, then it will not be able to protect the whole house.
 Do waterproofing in all rooms for maximum protection
 Features of waterproofing in private houses and city apartments
Floor waterproofing can be done in several common ways. If this procedure is carried out in rooms where there is no basement, a pillow of sand and gravel can be built here.
A layer of gravel and sand is poured onto the floor.
All this is rammed.
Sand is poured on top.
 A pillow of sand and gravel will prevent moisture from entering the apartment
 This cushion will prevent water seepage from the soil. But it won't save you from water vapor. Therefore, in addition, you will also have to make film insulation. And waterproofing the floor in the apartment is a simpler procedure. There is no need to make a layer of sand and gravel. And you can immediately start laying the selected waterproof barrier.
Starting laying the floor hydro-barrier in the apartment, level the surface with building mixtures. Rooms with high levels of humidity need additional wall protection.
 Before laying the waterproofing, the surface should be leveled.
 Varieties of waterproofing in the apartment
When making a concrete screed, decide on the type of waterproofing. They are provided by manufacturers in a wide range. These include:
- roll materials;
- perforated film;
– liquid solutions;
- dry plaster;
- penetrating mixtures.
 Penetrating waterproofing in action
 Each individual type has its positive aspects. Depending on the type of waterproofing you choose, the method of applying it also depends. It could be:
- spreading;
- spraying;
- pouring;
- smearing;
- pasting.
 Each type of waterproofing has its own advantages.
 Starting to arrange the hydro-barrier, carefully prepare the surface. Carry out the following work.
Completely clean the room of dust, dirt and debris and remove all objects and things from it.
Level the surfaces with special mixtures.
Prepare all the necessary tools that you will need in the workflow.
Rolled waterproofing
Roll materials perfectly repel water and are often used during repair work. Ruberoid belongs to them. But you can accomplish your task with the help of modern membranes. This is the most affordable way in terms of price, which is easy and simple to use. To install roll waterproofing, you will need to perform the following steps.
Spread the roll on a horizontal surface in several layers. At the joints, do not forget to overlap.
The rolled material should go onto the walls 15 cm from the floor.
Carefully fold the material around the corners.
For effective protection, the joints are smeared with mastic.
 Roll waterproofing is the most affordable in terms of price
 Liquid waterproofing in the apartment
Liquid coating hydroprotection is done using mastic or bitumen. The coating mixture is applied in two or three layers. In this case, you do not need to use special skills in construction or have professional equipment. Homeowners can use both dry mixes that must be diluted with water, and ready-made liquid formulations.
 Particular attention should be paid to the corners, they collect a lot of moisture.
 Before starting the workflow, remove everything from the horizontal surface.
Treat the surfaces with a primer.
Tape all corners and joints with special tape. This will prevent moisture from seeping into problem areas.
 This type of waterproofing does not require special skills.
 If bitumen-rubber mixtures or bitumen-polymer mixtures are used as liquid waterproofing, then repair work will please you with ease and convenience. Liquid coating mixtures do not need to be preheated. And the working process itself can take place at a fairly low temperature. Bituminous pastes will serve as good insulation and replace the concrete screed.
It is necessary to apply the coating mixture in layers about 35 mm high. This can be done with a brush or roller. But trying too hard and rubbing the liquid mixture into the bottom coat is not necessary. After the first layer has hardened, feel free to apply the second and subsequent layers. Three layers of such waterproofing in an apartment is enough. After the liquid mixture has completely solidified, you can proceed to pouring the concrete screed. But you can do without it.
Film insulation and features of its installation
Waterproofing with a film is widely used in apartments and houses. It provides a good waterproof coating. The screed will protect the housing from steam and excess moisture, and the floors - from the flow of water.
The film must be laid out on the surface carefully so as not to damage it. Waterproofing the floor of an apartment with a perforated film is the best and cheapest option. The material itself can be brown, black or gray in color. It should contain many cells. By type of variety, the waterproofing film is divided into: flat and perforated. Perforated material is more suitable for laying on vertical surfaces.
 Film waterproofing should be overlapped
 To make the waterproofing layer strong and reliable, fold the film in two layers. It is best to glue the plastic film with construction tape. Before starting work, thoroughly vacuum the room so that there are no sharp objects under the film that could damage it.
If you want to get a seamless surface, paper is placed on the joint of the film and treated with a hot iron on top. Do not forget to overlap for a better result. After laying the film, a cement-sand mixture is applied to the surface. Don't forget to check the floor level. Once the screed is completely dry, cut off the excess film.
Features of penetrating mixtures
Penetrating mixtures have appeared on the market recently, but have already become popular among consumers. Such waterproofing is very resistant to moisture and effective. In this case, modern polymer solutions are used.
Their feature is that they penetrate deep into the concrete and fill its pores. If you make a thin layer of a penetrating mixture on top of the finished screed, the protection will double.
The cost of modern materials
The cost of waterproofing materials can be different. This factor is influenced by the online store chosen by the buyer, the manufacturer and the type of insulation itself. The most affordable in terms of price are: perforated films, membranes and roofing material. Although they are harder to work with. Rolled materials need strong heating, therefore they require special equipment - a gas burner. And with the film you need to work very carefully so as not to tear it.
More modern hydrobarriers include liquid, dry and penetrating mixtures. They cost a little more, but are considered effective and versatile. Buyers can find out the specific cost of waterproofing in the price list of the selected online store. Here you can get advice from online consultants. Experienced specialists will help you choose a product, make a purchase, select a payment option and delivery of products that is convenient for the customer.
Process and stages of work
But no matter what material you choose, all work is carried out in a certain order.

 Before laying the final floor covering, it is necessary to carry out a primer
 A competent and responsible approach to this workflow will show good results. With good floor waterproofing, you don't have to worry about anything. These works will preserve the integrity of the floor covering and prevent dampness, fungi, and corrosion from entering the room. Saving on the arrangement of waterproofing is not worth it. It will fully justify itself in the process of operation.
Video: Do-it-yourself repair. Waterproofing in the apartment. How not to flood your neighbors
Video: How to waterproof the floor
In construction, special attention is paid to the correct flooring. In rooms with high humidity, a waterproofing layer is required. Its main task is to protect not only internal floors, but also external finishes from moisture. It guarantees a long service life of the laid materials and safety for the life and health of all household members. Mandatory floor waterproofing in bath rooms and in all houses located in a humid climate zone.
There are many ways to protect floors from moisture penetration. Each of them differs in the material used for waterproofing, as well as the method of mounting into the floors. What is the best method to choose? How to lay moisture resistant material? Let's consider the methods in more detail.
Paint or coating waterproofing
Floor protection by staining is considered the most affordable method. Lacquer is applied to the base with a sprayer, brush or roller. Bitumen or polymer liquid is used as a coating.
Waterproofing mastic allows you to create a dense monolithic coating that will protect well from moisture. It is easy to apply to any surface. Thanks to the liquid texture, it is easy to treat hard-to-reach places with mastic. All work is carried out quickly, there is no need to wait for the material to be ready or prepare the base for painting, which is very convenient.

The disadvantage of this method is the fragility of the coating. Bituminous or polymeric waterproofing begins to lose its properties over time. Cracks appear on the surface.
The maximum duration of its operation is 5 years.
Execution of works
How to make floor waterproofing with a do-it-yourself painting method?
Before waterproofing, all grease smudges should be removed from the base of the floors. Rust areas are thoroughly cleaned. Then bituminous mastic is applied in several layers - this will serve as a primer layer. After complete drying, the surface is painted using an improvised tool: a roller or a thick brush. This method is most often used for do-it-yourself waterproofing of wooden floors. In rooms with increased humidity (in the bathroom or steam room), all walls are painted an additional 30 cm with mastic.

The latest developments have made it possible to create more durable mixtures that can significantly increase the service life of materials: synthetic polymers, bitumen-polymer and bitumen-rubber mastics.
Cast floor protection
One of the most popular ways to protect flooring from moisture is to fill it. Usually waterproof mastics are used for it. Floor waterproofing materials are applied in a continuous layer over the entire surface.
There are two filling methods:

- hot;
- cold.
The material is applied on a monolithic solid base - a concrete floor. Mastic is placed on it in several stages (layer thickness from 5 cm) or mortar (thickness from 15 cm). All this is covered with a cement mixture.
Pasting insulation
This method of protecting the coating from moisture is carried out by gluing sheets. Coating with roofing felt, bitumen, polymers is carried out with strong heating - from 45 ° C to 55 ° C. Mastic is first applied to the surface.

Waterproofing the floor with gluing material does not differ in strength and durability. It is easily damaged by heavy objects. But you can significantly increase the life of the roofing material.
The flooring will last longer if pasting with sheets is carried out in several layers, while all joints must be carefully glued.
The disadvantages of this material is the difficulty of installation in a limited space.

In a small room it is inconvenient to use a burner to glue the sheets together. Also, when heated, an unpleasant odor is released.
Waterproofing device by pasting method
The floor surface must be cleaned and prepared. Then mastic is applied with a thickness of 1.5 mm. Such a coating adheres well to concrete and waterproofing sheet. Before gluing, they must be leveled. For this, the canvases are spread out for a day.

How to lay waterproofing sheets on floors? The material is pre-cut to the size of the surface on which it spreads. In order not to confuse segments of canvases, it is recommended to mark them with chalk.
What are the sheets glued to? They are smeared with bitumen, as well as the floor surface. After that, they are overlapped (about 1 cm). Places of swelling are cut and carefully smoothed with a spatula.

The sheets are glued together when heated with a burner.
This method is successfully used in rooms subjected to strong mechanical stress. Waterproofing material is poured into special moisture-proof containers. Before this, formwork is being built.

What is preferable to fill, what is the best material?
Usually, the cavities are filled with bentonite, which, when interacting with water, takes on the consistency of a gel. It is evenly distributed over the surface and does not let water through.
The material must be well compacted, then the top layer must be plastered.
The disadvantage of backfill waterproofing floors is the complexity of installation. Before filling it is necessary to build the formwork. Also the cost of materials is high.
Impregnation waterproofing of all floor slabs is an effective method of protection that is easy to do with your own hands. For this, special materials are used - varnishes on a polymer and bitumen basis. Special mixtures of active chemicals are also created with the addition of fine sand and cement. They impregnate porous materials (concrete, limestone blocks, asbestos-cement sheets) and, when hardened, form a moisture-resistant surface.

Concrete is able to absorb these materials up to 60 cm deep with a waterproofing layer thickness of up to 3 mm. The impregnation becomes part of the object and perfectly protects it from moisture.
The undoubted advantage of these mixtures is that the waterproofing of the floor can be performed at any time: both at the construction stage and after its completion. The impregnated material is highly resistant to harsh weather and chemicals.

The lack of material is insignificant in comparison with the highlighted advantages - when processing old concrete with a waterproofing composition, it should be properly prepared. Fresh base does not require any preparatory action.
Waterproofing with plaster is a multi-layer floor covering with a cement and polymer composition. Before applying the next layer, the previous one is allowed to dry for 10 minutes.

Plaster is not very suitable for rooms subject to low temperatures. The material deteriorates, cracks form on it.
Therefore, compositions are applied over the plaster layer to prevent the harmful effects of cold temperatures.
Performing waterproofing works with plaster
The surface is carefully prepared before applying the materials. The floor is waterproofed with a plaster mixture only on a clean and dry base.
Then make a cement-sand screed. The mixture is prepared at the rate of 1:2. All this is left to dry completely. After that, the same composition is applied in several layers with an interval of 10 minutes for drying.
On the first day, the plaster must be periodically moistened with a sprayer (up to 2-3 times). Over the next week, repeat this procedure a few more times. During the first two days, the plaster will be damp, so it should not be subjected to any mechanical stress. After complete drying, you can not be afraid to damage the coating and proceed to further work.