Flexible tiles: do-it-yourself installation with step-by-step photos. How to lay flexible tiles yourself Installation of flexible tiles step by step instructions
Read also
It’s worth starting a conversation about this type of material by highlighting it benefits in front of others building materials for arranging the roof. One of the main advantages is its insignificant weight, as well as the ability to choose the one you need for installation size. It is for this reason that it becomes possible to install flexible tiles yourself.
Reason for choice flexible tiles is the presence of a roof with minimum slope 1:5.
This material can only be installed under certain conditions. weather conditions, namely air temperature not lower than five degrees. Observe this rule necessary to preserve the properties of the material, namely shingles– a sheet on which the “tiles” are attached.
Installation of shingle sheets can be produced using various means. Such means include nails and the adhesive layer of tile sheets. At temperatures below five degrees, the adhesive layer does not adhere to the base on which it is applied. Sealed coating in in this case is not created.
Also, at low temperatures, tile sheets become very fragile, and working with them becomes quite problematic.
If there is a need to install flexible tiles during the cold season, it is necessary to build a dome over the roof that will be heated. In this case, installation of tiles is possible.
Structure of flexible tiles
Used for the manufacture of soft tiles fiberglass(in some cases cellulose). To create the base of the tiles, fiberglass treated with bitumen. Then several more layers are applied to the base, which include bitumen of an oxidized-modified configuration, and polymer additives are also added to it.
Such additives give the tiles certain properties: strength, resistance to deformation and flexibility.
In addition to the two main layers, shingles on top process protective layer . It can be mineral chips or basalt granulate. With the help of a protective layer, the tiles are given properties that protect them from climatic influences.
She is given various color shades. To enable fastening of the tiles, an adhesive layer is applied to them, which is protected with a film before use.
Mainly self-adhesive shingles has a hexagonal shape.
Advantages of flexible tiles
The most important advantage of flexible tiles is the fact that they suitable for roofing various shapes and configurations.
The buyer also has the opportunity to choose a material with a wide variety of colors and shapes. There are three modifications of the material: diamond-shaped, hexagonal and classic - rectangular.
The great advantage of flexible tiles is their excellent sound absorption, when this cannot be said about other materials, they are more often called “musical”. Besides, roofing tiles difficult to ignite, which is also its obvious advantage.
TO good property material can also be attributed to the fact that the tiles are sufficient easy to install. It can also be installed at fairly large temperature differences.
Material is good adapted to hail, wind and rain.
The advantages of flexible tiles undoubtedly include:
- small amount of waste upon completion of installation;
- fungal growths do not form on flexible tiles;
- good protection from moisture;
- the material does not require additional painting;
- ease of repair work, replaceability individual elements roofs;
- light weight of the material.
- can be purchased for a relatively inexpensive price
Calculation of roofing material
When calculating the quantity required material To install a roof covering with your own hands, it is necessary to take into account the amount of waste generated and with this condition, calculations must be carried out with a reserve. The amount of waste directly depends on the configuration of the roof on which the tiles will be installed.
Preparing to lay flexible tiles with your own hands
Before you start installing flexible tiles, you must lay the foundation. Used as a basis particle board, boards or moisture-resistant plywood. If a board is chosen for the base, then it is best to use a planed one, or better if it is tongue-and-groove.
Important: with a board thickness of 2 centimeters, the pitch of the rafters should be 6 meters. When laying, the joints of the material must coincide with the rafters.
Before starting work you must treat the roof with an antiseptic. It should be smooth and rigid.
To carry out the installation of tiles you will need:
- Underlay carpet - any material based on bitumen, in rolls (used for new roofs). Roofing felt, which was used previously (for old roofs).
- Carpet for the valley - the material is necessary for processing joints and abutments.
- Sealant and mastic.
- Knife and hair dryer.
- Construction planks.
- Nails (roofing and galvanized).
When all the necessary tools are available, you can proceed to the preparatory work: 
- Consolidation vapor barrier film from the attic side. The film is attached using wooden planks to the rafter ribs.
- Insulation is laid on the outside of the roof; wooden beams, which are attached to the rafters.
- A film is placed on top of the insulation to protect against wind, and it is secured with a counter beam. The sheathing will subsequently be attached to this beam.
- OSB, plywood and board are laid on top of the film. Fastening is done using nails or screws with a wide head.
Installation requirements
The main thing that needs to be taken into account when laying flexible tiles, even on the roof of a house, even on the roof of a gazebo, is presence of a level base. If there are any irregularities, they will stand out on the roof once installation is complete. And in some cases, it is in these places that cracks and leaks can form.
Important: tiles cannot be laid on concrete.
Initially, a waterproofing carpet is laid. It is better if it is laid in horizontal directions. It is necessary to start laying it from the bottom of the roof. A valley carpet is best if it is made of a material without joints.
Instructions for installing flexible tiles: nine basic steps:
First stage– this is preparatory work with the foundation, which was mentioned earlier.
To do this, use a material with a uniform surface; this material is secured using nails. Humidity of this material should not exceed twenty percent of its own weight. The boards should not be less than two spans, which are located between the supports. They need to be fastened to the support places. It is also necessary to calculate the possible deformation of the boards and leave a gap between them.
Second phase– setting the gap for ventilation – gap necessary element construction and further installation of the roof. Its size should be large enough, at least five centimeters. The gap should be located as high as possible on the roof surface, and the hole into which air will be sucked in is at the bottom.
Creating ventilation on the roof is necessary for:
- eliminating moisture in internal materials: sheathing, insulation and roofing;
- preventing the formation of ice and icicles on the roof;
- maintaining a low temperature inside the roof summer time of the year.
The more correct and better the ventilation is, the longer the roof will last.
Third stage– installation of the lining layer.
For this purpose, special roofing insulating material is used. It must be laid over the entire roof area. It is worth starting the installation from the very bottom of the roof, and moving upward, an overlap is made on the material. The overlap should be at least 10 centimeters.
Along the edges, the material is fixed using nails, the interval between them is 20 centimeters.
On roofs with a slope of more than 18, lining material can only be installed at the ridge and end of the roof, as well as around pipes and joints.
Fourth– installation of metal cornice strips is carried out to protect the edge of the sheathing from moisture. For this purpose, install 
The edge of the material is fixed using roofing nails (steps of 10 centimeters).
Fifth step– installation of metal gable strips is carried out at the end of the roof; gable strips are installed to protect the sheathing. The overlap of the planks should be at least two centimeters.
Sixth– installation of a valley carpet – improves the water resistance of the roof. This coating matches the color of the selected roofing tile.
Seventh– installation of cornice tiles. Initially mounted cornice tiles along the eaves. This is done using its pecking base. Laying is done end-to-end. It is necessary to retreat 2 centimeters from the bend cornice strip. Then you need to nail the tiles. This must be done close to the perforation site, so that the fastening points will then be covered by the next row of tiles.
Eighth step– installation of tiles.
Important: in order to avoid color differences, it is necessary to use tiles from five packages at a time.
The tiles are installed from the center of the eaves overhang and towards the end. Before fixing the tiles, remove protective film. Each piece of tile is nailed with four nails. At
On a large roof slope, it is necessary to increase the number of nails to six. 
When installing the first row of tiles, one condition must be met. It is necessary that it extends one centimeter onto the eaves tiles.
The tiles have petals. They serve to close the joints with the previous row. During further installation, the rows are mounted according to a different pattern, namely: the joints should not be closed, but should be at the same level or higher than the previous row
Ninth step– installation of junctions.
In order to make small passages through the roof, rubber seals are used. Places where heating occurs, namely near pipes, must be insulated. A triangular strip is nailed at the junction and then mounted underlay carpet, all seams and overlaps are coated with glue.
All vertical joints are processed using the same technology.
Ways to care for roofing tiles
- In order for the coating to last for a long time, it is necessary to check its technical condition twice a year.
- It is necessary to equip the roof with free drainage for water. Drains and gutters should be cleaned regularly.
- Using a soft brush, debris is removed from the roof; this must be done regularly.
- In winter, snow removal from the roof is necessary only in cases of emergency, if the snow layer is more than twenty centimeters. Do not remove ice from the roof using sharp objects.
- If a breakdown is detected, repairs must be made immediately so that the destruction does not take on a larger scale. During repair work, it is necessary to protect the coating from the impact of walking.
Popular manufacturers: TechnoNIKOL, Deca, Shinglaz, etc.
The technology for laying soft tiles assumes that the shingles are fastened only in sunny weather. Under no circumstances should you heat it with burners. As a last resort, it is permissible to glue the tiles with bitumen glue and try to warm them up attic space, or the roofing itself using a construction hair dryer.
Materials and tools
For installation you will need:
- sealant or roofing mastic;
- construction strips for fixing junction points, cornice and front;
- regular galvanized and special roofing nails;
- knife for cutting shingles;
- construction hairdryer
Stages of preparatory work

Before covering the roof with soft tiles, the roof must be properly prepared.
- A roofing pie is formed.
- A rigid and level base made of plywood, high-quality boards or OSB boards, which are pre-impregnated with an antiseptic.
- Under the tiles, put a lining carpet made of old roofing felt, if the roof is being repaired, or any rolled bitumen material. It is carefully nailed in places where the roof joins other architectural elements, in places where the slope breaks, along the front overhang and cornice, in the valleys and along the ridge. When the slope of the roof slopes is more than 20 degrees, the material is nailed over the entire surface in increments of 15-20 cm. At the joints and overlaps of the carpet sheets, it is treated with sealant or bitumen mastic.
- A drip line (eaves strip) is nailed on top of the carpet, which will protect the sheathing structure from moisture. If, due to the architectural features of the roof and structure, it is not possible to nail it down, cornice strip wrapped under the sheathing and secured with nails every 5 cm.
- Before laying soft tiles along the gable, end strips are also nailed down to protect the sheathing and help drain moisture down from the ridge.
- Next in line are ridge-eaves shingle strips. The shingle strips are nailed end-to-end at a distance of about 2.5 cm from the edge. The joints are coated with bitumen mastic and the free edges of the strips are glued to it.
- Next, they usually pay attention to the installation of the drain, in particular, installing brackets that will subsequently support its elements.
- Separately, in places adjacent to walls, other slopes, ventilation pipes and other structures, in niches and other places where moisture is likely to accumulate, an additional waterproofing valley carpet is also created from bituminous materials. It is nailed with galvanized nails at intervals of 10 cm, and the edges are coated with waterproof glue or mastic.

It is known that flexible tiles may differ in color depending not only on the batch, but also on the packaging. An important point is the need to use sheets from only one pack on each roof slope, or to sequentially take material from all packages at once so that differences are not noticeable. Subsequently, the color of the coating will be adjusted under the sun and become more uniform.
Laying soft tiles begins from the bottom of the central part of the roof slope. The protective film is removed from the adhesive part of the sheet and it is pressed tightly to the place of fixation. The upper part is additionally fixed with four nails. In this case, you need to retreat 4-5 cm from the cornice-ridge strip. With its petals, the shingles of the tile should completely cover its perforation. Along the edge of the pediment, the material is trimmed and glued with mastic.
An equally important stage is laying the covering in places near the ventilation. chimney and other structures. The base under the tiles in this place is treated with mastic. A corresponding hole is cut in the shingle according to the dimensions of the adjacent structure. It is fixed in place. If necessary, the base is lubricated with mastic again.

It is somewhat more difficult to lay tiles near the chimney. First, slats are nailed in this place in the form right triangle. Its right angle should be facing the pipe. A lining carpet is laid in advance around the pipe itself, and at overlapping joints it is coated with mastic.
Installation of soft tiles near the chimney pipe is carried out according to the following algorithm:
- the upper edge of the sheet is pressed against the pipe, placing it on a pre-prepared rail;
- a valley carpet is laid on top of the tile sheet;
- some of the sheets are lifted onto the pipe to a strand height of 30 cm, and the other is glued to a height of about 20 cm and nailed to the roof;
- the carpet on the pipe is covered with a junction strip or a metal apron;
- all seams are carefully treated with sealant;
- if necessary, if the roof slope is steep enough and the pipe is large, you can build an additional gutter to drain water from the chimney area.
The final stage of installation of flexible tiles
The remaining sections are covered with overlapping shingles so that the petals of the next one cover the places where the previous one is attached to the nails.
One more important stage At the end of the work, the ridge strip will be secured. It is divided into two equal parts along the perforation and laid on the ridge. Two nails are nailed on each side of the tile. The overlap should be at least 5 cm.
A good solution would be to lay an aerator strip, which will ensure good ventilation roof space. To create a ridge aerator, slots are cut on both sides of the strip, which are subsequently covered with aerator tape.
Professional installation of flexible tiles can be done with your own hands. If the technology is followed, the service life of the coating will be at least 35 years. If the roof is subjected to periodic inspection and minor repairs are made in a timely manner, its durability will increase by at least another 10 years.
If you are working with a soft roof, it is important to perform the installation correctly. This is the only way the coating will serve you for a long and reliable service. Flexible tiles are a popular representative soft roof, which we will talk about. Interestingly, each manufacturer has its own instructions for installing roofing.
However, speaking in general, the principle and rules for installing flexible tiles are the same. Let's look at the entire process, from start to finish.
Some features of the material
I would like to note that flexible tiles have their own characteristics. What kind of material is this? It refers to a soft roof based on bitumen. Since the material is flexible, it requires a continuous sheathing. It is clear that it will cost you much more. But a roof covered with flexible tiles has many advantages:
- high heat resistance, frost resistance and wind resistance;
- excellent resistance to temperature fluctuations;
- she is not afraid of precipitation and UV rays;
- behind long years the color will not change;
- the roof will be silent.

As you can see, there are many advantages. But for all of them to be real in practice, the technology of laying flexible tiles is important. This is exactly what we will talk about.
Working conditions and features
According to the instructions, you need to work with bitumen materials at temperatures above 5 ˚C. If it is lower, then the shingles become harder and may crumble. In addition, each can be connected to the base not only through metal fasteners, but also through a self-adhesive layer that is located at the bottom of the shingles. By heating the material with UV rays, high adhesion and water resistance of the finished flooring will be ensured. The shingles are properly glued both to the prepared base and to each other. That's why you need to work at above-zero temperatures.

If you work in cold weather, the connection will not be so strong. When there is no way out, a hot-air burner or, more simply, a hair dryer will come to the rescue. Another option is to lay the tiles on bitumen mastic.
Note! When working in cool weather, the tiles should be kept in a closed, warm room for about a day. And if you are forced to work in completely freezing temperatures, then it’s done on the roof closed space from a frame, which is covered with polyethylene film. The finished “room” needs to be insulated with a heat gun.
Installation of flexible tiles
Base
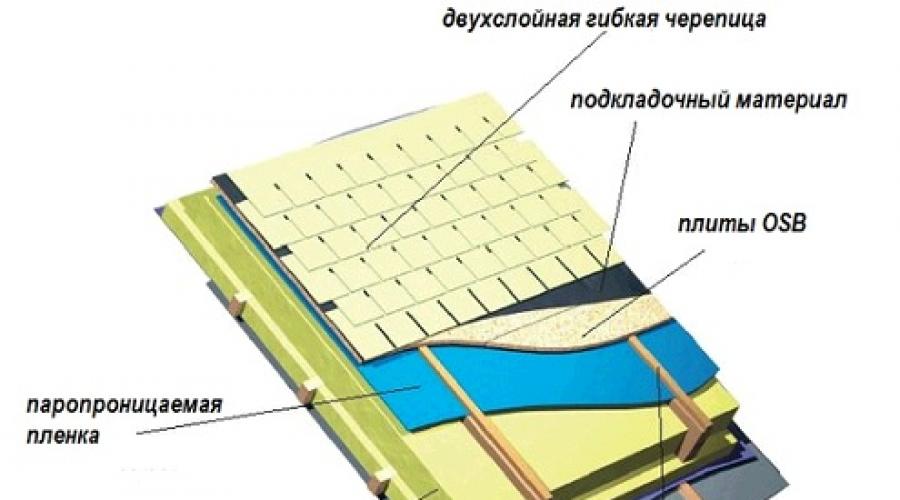
As mentioned earlier, the basis for flexible tiles will be a rafter system covered with a continuous sheathing. To ensure correct roofing pie, a vapor barrier is fixed inside the attic to the rafters. Outside you need to lay insulation and cover it all with a layer of waterproofing. In parallel, slats are placed on the rafters themselves, which will play the role of a counter-lattice.

But, preparatory work it doesn't end there. Installation of flexible tiles must be done on a solid surface. It can be made from tongue-and-groove boards, planks, plywood sheets or OSB boards. It is important that the wood humidity is not more than 20%. It will be better if you make two layers of sheathing for flexible tiles. The sheathing is placed onto the counter-lattice at a certain pitch. And now solid slabs will be installed on it.

You need to start working from the bottom, moving up. The sheets are stuffed in a checkerboard pattern. Sheets or boards need to be joined on a support. To ensure a ventilation channel, it is important to do expansion joint between the plates. Its width is no more than 1 cm (usually 3 mm is enough). After all, it is important to properly ventilate such a roofing cake, in which flexible tiles dominate. The diagram below shows what the right technology installation

Lining layer
To properly lay shingles, you need to use underlayment material. Piece bitumen coating is recommended for use on pitched roof, the angle of inclination of which is not less than 12˚. With a slope angle of 12-30˚, the entire surface of the finished continuous sheathing a special moisture-resistant lining is attached. If the angle of inclination is more than 30˚, the waterproofing material is installed:
- in the valleys;
- in places where the roof is adjacent to the wall;
- above chimney pipes;
- along the perimeter of the skylights;
- along the cornice;
- above the ventilation slopes.

Thus, a roof made of flexible tiles will be protected from moisture in places where ice and snow accumulate the most.
Installation of the lining depends on the type. For example, a composite lining made of film and bitumen filler does not need to be fixed with anything, since it has a self-adhesive layer. It is enough to remove the film, spread it on the flooring and roll it over. But polyester-based material is fixed with bitumen mastic. And nails are placed on the sides and top, every 20 cm.

Note! The nail heads must then be treated with mastic.
The lining layer is made of rolled material, which must be laid parallel to the ridge. The overlap should be 10 cm in length and 20 cm in width.
Installation of planks
To protect the sheathing from water, the installation of gable and cornice strips is required. Drip rails (eaves strips) are mounted on top of the lining layer. The overlap is at least 20 cm. Fastening elements are located at a distance of 10 cm from each other, in a zigzag, and not in a straight line.

When the slats are installed on the slopes, you can lay a waterproofing carpet on the valleys. Its color should match the color of the flexible tiles. It must be secured with nails, 10 cm apart.
Laying flexible tiles
Now it's time to install flexible tiles. All the preparatory work has been done, little remains. You need to start the process with eaves tiles (one of the elements of a soft roof). If this is not included in the kit, you need to cut even strips from the shingles, removing the petals. After that, gluing is done on the cornice, at a distance of 2 cm from the overhang. The same goes for gables.

Before laying shingles, it is recommended to make markings indicating the location of the rows of shingles. So, you can lay them parallel to the cornice, without bevels. Important nuance- flexible tiles are laid in the middle of the eaves overhang. Further shingles are laid to the left and right of the initial one. You need to remove the film before gluing, not before. The elements are firmly pressed against the covering, and for additional fixation, 4 nails are used per shingle.

Note! At an angle of 45˚, it is better when there are 6 nails.
The first row of tiles should be positioned so that Bottom part The shingles were 1-1.5 cm higher than the lower edge of the eaves. The sheets should be laid so that the petals of the flexible tiles could cover the joint of the eaves shingles. As for the other rows, each petal should be located above the cutout of the layer below or on that line, as shown in the photo.

The sheets that are adjacent to the gable plank must be cut exactly along the edge, and the edges must be glued with bitumen mastic. It is necessary to coat the shingles by 10 cm.

Advice! To avoid damaging the bottom layer of material when cutting off the edges, place a piece of plywood or other board underneath.
Installation of the valley
The valley is the most vulnerable part of the roof, because a joint is formed there. In order for the roof to last for a long time, the valley must be done correctly. Before laying flexible tiles, the valley is covered with an additional waterproofing lining. Sheets of flexible tiles need to be fused onto this lining. construction hairdryer or fix it with bitumen-polymer mastic.

It is better to start equipping the valley with the slope that has a gentle angle of inclination or a shorter length.
So, on the opposite slope, which is parallel to the valley axis, draw a line. The distance of the strip from the valley axis is 30 cm. Sheets of flexible tiles that reach the line from the first slope must be cut along the line and secured with mastic or a hot air gun. In this way, all sheets that enter from a gentle slope are fixed. Now a line is drawn on this slope at a distance of 10 cm from the axis of the valley. Cut the sheets that reach the line from the other slope along this line. Finally, trim the top corners by 60˚.

All that remains is to complete the ridge covering and everything is ready. Additionally, check out the video describing detailed instructions installation
Conclusion
By adhering to this technology, you can make high-quality roofing coverings from flexible tiles that will last for many years. What they look like ready-made houses with tiled roofs, as seen in the photo.


A reliable, inexpensive and easy-to-install roof is one of the most cherished wishes of the developer. Simplicity, the possibility of arrangement with your own hands without the help of third parties - all the parameters distinguish the laying of soft tiles. Available technology, affordable cost of material, no need to use special skills and tools make laying out easier. And we will tell you how to install soft tiles with your own hands.
Preliminary calculation of the material, additional elements, and fasteners is the key to high-quality installation of the roofing carpet. Approximate costs such:
- The number of shingles in a box can vary: from 1.5 to 3 m2. It all depends on the size of the elements (including overlap). All parameters are indicated on the box; the material should be purchased with a margin of 5-7%.
- Mastic in quantity: 200 g/m2 for the valley carpet, 100 g/m2 for the ends, 750 g/m2 for junctions, nodes.
- Nails 30 mm long, galvanized with a 3 mm shaft and a 9 mm head in an amount of 80 g/m2.
All calculations are averaged standard. Tools you will also need:
- Knife for edging bitumen shingles, substrate;
- Tin scissors (or others) for cutting planks;
- Hammer for fasteners;
- Brush for bitumen mastic.
Advice! If laying flexible tiles with your own hands is done in the cold season, a burner will be useful for heating the bitumen layer. Despite the possibility of carrying out work down to -5..-7 degrees, it is better to install the roofing carpet in warm, dry, not very hot and windless weather. In cold weather, the flexibility of shingles decreases, the risk of cracking increases, and in extreme heat, bituminous materials heat up excessively and melt.
Roofing pie for flexible tiles

A large stage of work begins with the installation of a roofing pie for soft tiles. Depending on its purpose, the attic can be warm or cold. The purpose of the roof space affects the arrangement of the roofing pie, however, the part above the rafters is always the same:
- layer of waterproofing material;
- bars with a thickness of 30 mm;
- sheathing in the form of a continuous flooring.
Important! Additional elements: junction strips, eaves overhangs, pediment strips are made of special steel.
Laying out waterproofing

Membrane materials can be one-, two-, three-layer.
- Single layer waterproofing- an affordable and cheap option that fulfills the task of preventing moisture from entering the room and not preventing fumes from escaping outside.
- Two- and three-layer materials– more durable and practical. They have an absorbent layer that absorbs condensation, as well as a layer that strengthens the material, which gives greater tensile strength.
Advice! Three-layer waterproofing membranes are indicated in the case of mineral wool insulation. The material is afraid of getting wet and with an increase in humidity even by 10% it loses 56-60% of its quality characteristics. In the case of arranging a cold attic, it is better to use a two-layer membrane fabric: the price is slightly more expensive than a single-layer one, but the strength is much higher.
Advice! If the slope angle is more than 18 °, waterproofing membranes should be placed parallel to the end and eaves planes. Connection points have an increased risk of leaks, so the laying is carried out with an overlap. The same is true in the ridge area. If necessary, the ridge area is covered with another lining carpet. The work is carried out from the bottom up, fastening is carried out with nails with an increased head size. The fastening pitch is 20 cm.
Ventilation
Ventilation of a roof made of soft tiles is usually arranged using a ridge. It is laid out on a ribbed profile. In case of insufficiency this method, ventilation elements are laid on the roof surface. This is the name given to profiles with ribs located at a distance of 20 mm from each other. The structures are attached to the base with nails.
Lathing and flooring

Immediately after laying the waterproofing, sheathing strips are placed on top. Thick timber elements create the necessary ventilation gap. Lathing is made from timber timber coniferous species. The thickness of the elements is at least 30 mm; before installation, the wood is treated with impregnations against rotting and fire.
Important! The length of the boards for sheathing is a distance equal to two spans of rafters. Fastening is carried out above the rafter legs.
Do-it-yourself installation of flexible tiles is carried out on a continuous flooring. It is made from OSB3, sheets of moisture-resistant plywood, tongue-and-groove or edged boards 25 mm thick, with a moisture content not exceeding 20%.
Important! The laying out of solid elements is carried out with gaps - compensators for thermal expansion of the material. For plywood or OSB the gap width is 3 mm, for boards 1-5 mm. Sheet dies are attached using the method of spacing the seams so that the joints are not continuous. Fastening with self-tapping screws or rough nails.
Arranging a deck next to chimneys more than 0.5 m wide often requires the construction of a mini-roof. After installing the flooring, it is necessary to check the evenness of the surface of the covering, the dimensional parameters - the slope must be perfectly adjusted.
Laying flexible tiles

When purchasing a product, you should carefully review the instructions from the manufacturer. It must indicate how to lay flexible tiles. Often it is enough to follow the step-by-step instructions to complete roofing correct, but familiarizing yourself with the procedure in advance helps to allocate time.
Advice! Installation bitumen shingles Requires caution: no bending or creasing. You should not walk on the surface unless necessary.
Now the installation technology:
- Strengthen the overhang. A drip strip is installed to protect the structure of the rafters and sheathing from moisture. Place one edge of the drip line on the flooring, and cover the overhang with the other. Fastening with galvanized nails. Step 200-250 mm, checkerboard order, laying with an overlap of 30 mm. The gaps are coated with bitumen mastic and sealant.
- Attach hooks for drainage pipes.
- Lay a waterproofing carpet. The adhesive bottom side facilitates the installation process. Start from the valley section. An overlap of at least 0.5 m is left from the point of inflection in both directions. It is better to do without joints, but if necessary, leave an overlap of 150 mm. Laying from bottom to top, the joint is pre-treated with bitumen-based mastic. Along eaves overhang free remainder of waterproofing material 0.6 m.
Advice! Before laying, the waterproofing carpet is rolled out, trimmed, then the protective film is removed and only then glued to the backing. Additional fixation along the edges with stainless steel nails will help secure the sheet of material more firmly. The points of joints and overlaps are additionally sealed with bitumen mastic and crimped.
- Carpet lining. The product also comes in the form of a roll with an adhesive backing protected by a paper layer. The layout option depends on the profile of the selected shingles, the shape of the roof, and the angle of the slope. If you choose a covering type Jazz, Trio, an underlay carpet is required. If the roof slope is 12-18 °, the lining is installed along the entire perimeter of the roof. Installation should be done from below, overlaps are at least 150-200 mm, joints must be sealed. The upper edge is additionally secured with galvanized nails. If the slope angle is from 18°, a lining is needed in places of kinks, at the points where the pediment line adjoins the wall panels.
- Pediment strip needed for arranging side cuts. The additional element already has the required form, mounted on the lining or waterproofing deck and secured with nails at 150 mm intervals.

Advice! When starting to lay out shingles, it is better to first mark the slope. Mesh markings will help place the roofing material, taking into account alignment and joints. It’s easier and more even to make markings with regular paint cord.
- The first strip of shingles, as a rule, ridge-cornice or ordinary row with trimmed petals. The sheet is laid out on the edge of the slope so that one edge of the shingle touches the gable strip. The lower edge of the shingle should lie on the drip edge with a distance of 150 mm from the fold of the additional element. Fastening in the corners with a gap from the edge of 20-30 mm.
Advice! Often sheets in bundles have some differences in background color. To ensure that the laid shingles are not very different, you should open several packs in advance and lay out the elements alternately.
- How to lay ordinary soft tiles? The first shingle does not reach the edge of the starting strip 10 mm, the sheet is fixed with nails (except adhesive base). The number of fasteners for a slope of 12-45 ° steepness per sheet is 4 pieces, and at the junction points of two sheets, nails are driven so that the head “covers” the edges of both shingles. If the slope angle is greater than 45°, fasteners are driven into each sheet.
After the installation of the tiles along the slopes with your own hands is completed, all that remains is to design the valley and gables. Flexible roofing has a lot of advantages, one of them is the quick arrangement of the most difficult areas. The roof in the valley area is arranged as follows:
- Mark the area where nails cannot be driven in (300 mm from the midpoint of the valley), mark the boundaries of the additional gutter - this is approximately 5-15 cm in both directions.
- Now drive the fasteners of ordinary tiles as close as possible to the line beyond which fasteners are no longer allowed.
- Trim the shingles along the gutter installation line.
- To prevent water from leaking under the edge of the material, the corners of the material are trimmed (4-5 cm each), the loose edge is attached to bitumen mastic.
Laying roofing material along the gables is not difficult: the side shingles are cut with a distance of 10 mm to the ribs. Top corner trim like the valley elements: diagonally 4-5 cm. Place the edges of the tiles on bitumen mastic and fix them with nails.
Installation of bitumen shingles on a ridge has its own characteristics: a gap is cut along the ridge element, not reaching the ribs of 300 mm. The installation of shingles is carried out before the start of the slot, after which the additional element (ridge profile) is mounted. A long skate may require several profiles, this is normal. Fastening with nails, laying is carried out end-to-end, the mating points are coated with bitumen.
Important! On the ridge, a downwind installation is carried out; the flexible tiles are laid out towards the wind, with an overlap of at least 30-50 mm.
Installing a soft roof is not difficult, especially if you follow the technological details of the process and make an accurate preliminary calculation. The work is carried out on a dry, sunny day without wind or intense heat. If you need clarification, watch a video from professionals: do-it-yourself flexible tile installation.
Soft roofing is a term that combines a number of flexible roofing materials with excellent consumer properties. Its piece and roll varieties perfectly protect the house from atmospheric “misfortunes” and effectively decorate the exterior. They weigh little, do not require effort in cutting and fastening. Among the advantages is the ability to lay the coating yourself.
For an ideal result, it is not necessary to have the skills of a roofer. You need skill, patience, tools and information about how the technology of laying a soft roof differs from other methods and how to properly install a roof.
Materials from the soft group roofing coverings They are modified versions of the good old roofing felt. The new developments borrow from their predecessor flexibility and lightness, which rightfully top the list of advantages. They have retained unshakable water-repellent properties, thanks to which the wooden base and rafter system last longer. The composition has been improved, due to which the period of flawless operation of the materials has increased threefold.
Based on the installation method, the class of soft roofing coverings is divided into three types:
- Roll materials, supplied in the format corresponding to the name. These include bituminous descendants of roofing felt and new representatives, such as polymer membranes. Roll coverings are laid in strips. Bituminous materials fastened by fusing, polymer ones - by partial or complete gluing. With their help, they are mainly used to equip flat and gently sloping roofs with slopes up to 3º, permissible up to 9º. Rolls are in demand mostly in industrial construction;
- Roofing mastics, supplied ready-made or cold to be reheated. Sprayed or applied in a thick layer on flat roofs, resulting in monolithic coating no seams. Reinforcing mesh is used for strengthening. The scope of application is limited to flat roofs.
- Bituminous shingles, supplied in flexible shingle tiles. Essentially, it is an improved roofing felt material, cut into relatively small sheets. The edge of the shingles is decorated with figured petals to imitate the ceramic prototype. The back side is equipped with an adhesive strip for attaching to wooden base. Glued individually. Additionally, roofing nails or self-tapping screws are driven into each shingle. From heating the bitumen roof sun rays the tiles are sintered and transformed into a continuous roofing shell.

In private low-rise construction, the piece variety is actively in demand, because flat and low pitched roofs above one- or two-story residential buildings are built extremely rarely. Domestic buildings have a “flat” fate, but not every owner will decide to buy membranes and mastics for the roof of a barn. This means that we will pay attention to the installation of the most popular bitumen shingles.

Step-by-step installation of bitumen shingles
Piece flexible material cover roofs of any steepness and degree of architectural complexity. True, bitumen shingles are not recommended for roofing if the slope angle is less than 11.3º. The material is produced by numerous manufacturers. Each of them strives to communicate their own products unique qualities and properties useful for the stacker.
Despite some differences, the technology for installing a soft roof follows the same scheme. There are small nuances, but they are not important.

Rules for preparing the base
Flexibility is an advantage and disadvantage of bitumen coating. On the one hand, it allows you to significantly speed up the process. After all, it takes a little time and a minimum of effort to form junctions, drill pipes, and arrange valleys and cornices. On the other hand, due to the flexibility of the material, a continuous sheathing is required so that the bending shingles rest entirely on a solid, level base.
You can build a continuous sheathing before installing a soft roof:
- from OSB-3 boards, recommended based on budget cost and sufficient strength;
- from sheets of moisture-resistant plywood marked FSF;
- from tongue-and-groove or edged boards, the humidity of which should not be less than 20%.
The sheet material is laid in staggered patterns such as brickwork. It is important that there are no cross-shaped joints. It is necessary that the weak areas where the slabs join are evenly distributed over the counter-lattice. Gaps of 2-3mm should be left in the seams, required for free movement. rafter system during temperature fluctuations.

The boardwalk is installed parallel to the roof overhangs. Also take a running start if the length of the board is not enough for the slope. The place where two boards meet on the slope should be supported by a counter-lattice beam, and four nails should be driven into it. Ordinary boards are secured with two nails on both sides. They must be laid so that there is a gap of 3-5mm between the longitudinal elements. Before work edged boards sorted. Those that are thicker should be distributed at the base of the slope, those that are lighter should be sent to the top.
Ventilation is the key to impeccable service
The excellent water-repellent properties of the bitumen coating are due to the tiny number of pores that can allow moisture and air to pass through. A reliable hydro-barrier works in both directions. Inside roofing structure Raindrops do not penetrate, but steam does not escape. If vapors do not have a clear path, condensation will accumulate on wooden roof trusses and sheathing. Those. a fungus will develop, which will cause strong roof I'll have to say goodbye.
For the sake of long-term, impeccable service, it is necessary to establish a system roof ventilation, including:
- vents designed for air flow in the eaves area. In addition to the influx, they must ensure the free movement of air from bottom to top along the planes of the slopes. The products are open channels, formed by lathing and counter-lattice;
- ventilation gap between bitumen roofing and insulation laid on top of the vapor barrier. Designed for washing the insulation with air flow;
- holes in the upper zone of the roofing pie. These can be either the ends of the slopes that are not closed at the top, or specially designed vents with a plastic trunk that resembles a miniature chimney pipe.
Ventilation must be arranged in such a way as to prevent the formation of air pockets in the under-roof space.

Laying insulating carpet
Without exception, all manufacturers of asphalt shingles strongly recommend laying an additional waterproofing carpet before installing shingles. The list of materials suitable for carpet is usually indicated in the instructions. The products specified or similar in characteristics are approved for use.
Replacement is highly undesirable, because a composition incompatible with the coating will prevent the bitumen layers from joining into a monolith and will contribute to swelling. Polyethylene excluded. Ruberoid too, because the service life flexible roofing more. It is unreasonable to lay less durable material under a coating designed for 15-30 years of operation.

The technology for laying an insulating carpet under flexible tiles includes two options, depending on the steepness of the roof:
- Installation of a continuous carpet on pitched roofs with an angle of inclination from 11.3º/12º to 18º. Roll waterproofing laid in strips, starting from the overhang, moving towards the ridge. Each strip laid on top must overlap the previous strip with its own ten cm. If it is necessary to join two sections in one row, they are laid with an overlap of 15 cm. The overlap is carefully, but without fanaticism, coated with bitumen mastic. The insulation strips are attached to the base with roofing nails every 20-25cm. Strips of barrier water-repellent protection are laid on top of the continuous carpet in valleys and overhangs, as well as around roof junctions. Then the ridge and convex corners of the roof are equipped with the original insulating material;
- Laying partial insulation on pitched roofs with a slope of 18º or more. In this case, the valleys and overhangs are protected with bitumen-polymer material, and only the edges of the gables, ridge and other convex corners are covered with strips of insulating carpet. Insulation, as in the previous case, is used to border the intersections of the roof with communication pipes and roof connections. The width of the bitumen-polymer barrier along the overhangs is 50 cm, in the valleys it is 1 m, so that each of the protected slopes has 50 cm. When laying around junctions and pipes, the insulating strip is partially placed on the walls so that the material covers 20-30 cm of the vertical surface.
The installation of a flexible roof with partial waterproofing is allowed by manufacturers, but there are no ardent supporters of this method among them. Naturally, on steep slopes Less precipitation is retained, but the circumstances are different: ice, slanting rain, etc. It's better to play it safe.

The bitumen-polymer carpet for valleys is selected to match the tiles. A slight deviation from the color of the coating is allowed if there is a desire to emphasize the lines of open grooves. It is advisable that the valleys be covered with a continuous strip of barrier insulation. But if joining of two pieces cannot be avoided, it is better to arrange it in the upper part of the roof with an overlap of 15-20 cm. There is the least load. The overlap must be coated with bitumen mastic.

Protection of gables and eaves
The roof perimeter is equipped metal strips. They are needed to protect weakened areas of the sheathing from moisture and as roof design elements. The planks are laid edgewise on the edge of gables and overhangs. The edge line should coincide with the roof outline line. Fasten with roofing nails in a zigzag pattern every 10-15 cm.
If there is a need to join two planks, they are laid with an overlap of 3-5 cm, at least 2 cm. Gable strips cover the corners of the roof with cornices. In places of end and joining overlaps, fasteners are hammered in after 2-3 cm.

Most flexible roofing manufacturers recommend installing both types metal protection on top of the underlay carpet. However, the developers of the Shinglas brand recommend placing the cornice strips under the carpet, and the pediment strips on top of it. Before installing gable and cornice strips on a plank sheathing, they also advise first nailing a block and then attaching metal protection to it.

Formation of passages through the roof
Chimneys crossing the roof, communication risers, antennas, and private ventilation openings require special arrangement. They pose a potential hazard in the form of open path for water leaks. Therefore, before installing the covering of the place roof penetration covered with sealing devices or systems. Among them:
- Rubber seals designed to cover small diameter points. Holes for antenna, for example;
- Polymer passage elements used to equip roof intersections with sewerage and ventilation risers. They are produced specifically for arranging roofs. The passages are simply attached with nails to the continuous sheathing. Bituminous shingles are laid on top, which are actually trimmed around the passage and fixed with bitumen mastic;
- Plastic adapters for your own roof ventilation. Cover the holes with vents, ridge element with channels for evaporation removal, perforated devices for cornices.

The rules for arranging passages for large chimneys should be considered separately. In addition to the threat of leaks, they are also a fire hazard. Chimneys are sealed in several stages:
- the walls of the pipe are protected with parts cut from asbestos-cement slabs according to its actual dimensions;
- A triangular strip treated with a fire retardant is installed around the perimeter of the pipe. To make it, you can split the block diagonally. A baseboard is suitable for replacement. The chimney plank is not attached to the sheathing! It must be fixed on the walls of the pipe;
- lay flexible tiles, placing the shingles on the strip;
- Parts are cut out from the valley carpet according to the dimensions of the pipe with the installed strip. The width of the parts is at least 50 cm. The patterns are attached with a 30-centimeter overlap to the pipe walls using glue or bitumen mastic. First, glue the front part, then the sides, and finally the back. The lower edge is placed on top of the laid tiles, the upper edge is inserted into a groove on the pipe wall;
- Finally, the multilayer insulation system is secured by installing a metal apron and treating the joints with silicone sealant.
There is a simpler and cheap way: the parts of the insulating lining of the pipe are cut not from carpet, but directly from galvanized metal. Then half of the work steps will disappear by themselves.


Wall junctions are sealed using a similar method. Only there is no need to install asbestos-cement protection, and the protected surfaces must be plastered and treated with a primer before installation.

Rules for laying eaves shingles
In order to create guidelines for the installer, it is better to first mark the roof with coated construction lace. Horizontal lines are applied in increments equal to five rows of flexible tiles. Verticals are struck in increments of one shingle.
After preparing and marking the roofing surface, you can safely begin laying flexible tiles, following the algorithm:
- The first to be installed is the cornice row of tiles on the overhang. You can take a special ridge-eaves tile or cut out the starting element yourself by trimming the petals of ordinary ordinary tiles. You need to step back 0.8-1 cm from the edge of the metal cornice strip and glue the cornice shingles. For gluing, you need to remove the protective tape from the adhesive layer and coat the remaining areas with mastic;
- the laid eaves tiles are secured with roofing nails in increments equal to the width of the petal. When driving in, the wide head of the hardware must be strictly parallel to the surface of the continuous sheathing. Distortions are unacceptable. Hammer the nails at a distance of 2-3cm from the top edge of the shingles. The fixation points must overlap the next row of roofing;
- The first row of flexible tiles is laid. It’s better to start from the center of the slope to make it easier to align horizontally. You should retreat 1-2cm from the bottom line of the starting row and glue it using the already proven method. Nail with four nails at a distance of 2-3cm from the groove between the petals;
- It’s also more convenient to start installing the second row from the middle. But the shingles must be moved so that the tab is above the groove of the first row of shingles and the attachment points are completely covered;
- The upper corner of the tiles laid next to the pediment is cut in the form of an equilateral triangle with sides of 1.5-2 cm. pruning is needed to remove water.

You can continue laying shingles by linear principle, i.e. laying down completely whole line, in sequence. You can use the pyramidal method with “building up” from the middle of the slope to the edges or diagonally.

Two ways to construct a valley
Two methods have been developed to form a valley:
- Open gutter device. Row tiles are laid to the valley axis on both adjacent slopes. Only the nails stop driving at a distance of 30cm from the axis. After laying the coated cord, valley lines are marked on the slopes, along which the coating is carefully trimmed. The width of the valley is from 5 to 15 cm. To prevent damage to the soft roof during cutting, a board is placed under the tiles. The corners of the tiles located near the valley are trimmed to remove water, then the back side of the covering elements is coated with mastic and glued.
- Closed gutter device. The tiles are laid first on the slope with the smallest slope so that approximately 30 cm of material is located on the adjacent slope. The shingles are secured at the top with nails. Afterwards, the second slope is covered, then a line is beaten on it, 3-5 cm away from the axis, along which cutting is carried out. The corners of the tiles are cut to remove water, and then the cut loose elements are glued to the mastic.

The nuances of laying tiles on a ridge
Upon completion of the installation of the tiles on the slopes, they begin to arrange the ridge. Ventilation ducts the body of the sheathing must be left open, so a gap of 0.5-2 cm is left between the tops of the slopes. To ensure ventilation, the ridge is equipped with a plastic aerator. It is not very attractive, so for the sake of aesthetics it is decorated with universal ridge-eaves tiles or shingles cut from shingles.
No particular difficulties were found in the construction of a soft roof. Eat technological features. If you strictly follow them, you can easily do the installation yourself with excellent results.