DIY cultivator cutters dimensions. How to make a crow's feet cutter with your own hands: drawings and diagrams. Homemade cutters for a walk-behind tractor - equipment manufacturing procedure
Read also
The walk-behind tractor is a full-fledged assistant where manual labor in the field or in the garden takes too much time and requires a lot of physical effort. Today, a small-sized unit can be found in almost every yard or household, it is such a useful “thing”. Indeed, the range of tasks that can be easily performed is quite wide, including all kinds of land cultivation, cultivation of beds and even harvesting. And the presence of additional hook-on attachments only enhances the capabilities of the miniature tractor. One of the most effective purchases can be “crow’s feet” for a walk-behind tractor.
Why do walk-behind tractors need crow's feet?
One of the main functions of a walk-behind tractor in a field or garden is high-quality plowing of the land in the area under further landing or sowing. To implement this, cutters are used - the main working element of the walk-behind tractor. This is the name given to the axis on which knives of various configurations are mounted. When rotating around an axis, these knives seem to cut the ground, thereby plowing it. Due to this, cutters are also called soil cutters. When working on a site, not only the soil, but also the plants growing in it can be trimmed. Thus, the cutters plow the soil and also fight weeds.
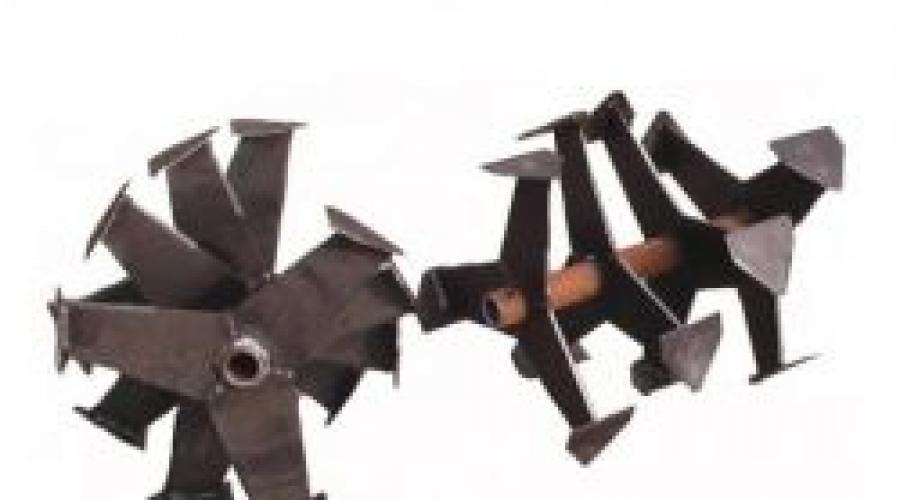
There are several types of cutters. The most common are saber-shaped, with speaking form knives. Typically this is collapsible design. The “crow’s feet” attachment to the walk-behind tractor, on the contrary, does not disassemble into parts, but has a cast configuration. They are made from carbon steel. main feature“crow's feet” - the triangular shape of the ends of the knives, which ensures sufficient crumbling and mixing of the soil. This continuous configuration is due to the need for strength when working on hard ground, virgin soil, and its cultivation. This can be considered areas where the soil has large clods.
Features of plowing with crow's feet using a walk-behind tractor
Basically, the described attachment is used for plowing a potato plot, when it is necessary to remove large clods of soil or prevent the development of . By the way, gardeners note the fact that weeds are perfectly wrapped around the crow’s feet, but they are not cut down. In this regard, when talking about whether it is necessary to sharpen crow’s feet on a walk-behind tractor, we can recommend performing this procedure. The fact is that manufacturers do not sharpen the edges of the knives of this attachment. After sharpening, you will notice that medium-sized weeds are easier to chop, and working on hard ground is much easier.
How to choose crow's feet cutters?
When choosing this important component of a walk-behind tractor, first of all, it is important to pay attention to the size of the “crow’s feet” for the walk-behind tractor. This is more about matching the diameter of the axis of the landing shaft nozzle to the model of your unit. They are produced in sizes 30 mm and 25 mm. Moreover, three rows of three knives are installed on cutters with a diameter of 25 mm. Such products are suitable for walk-behind tractors such as “Texas”, “Neva”, “Caiman”, “Mole” and others. Models  "crow's feet" with an axis diameter of 30 mm are selected for walk-behind tractors such as "Cascade", "Salyut", "Caiman Vario", "Master Yard" and others. This product has not three, but four rows of knives. Moreover, the width of the treated surface is increased.
Another criterion that you should pay attention to when selecting crow’s feet cutters for a walk-behind tractor is outside diameter, which, accordingly, determines the depth of plowing. The larger this diameter, the deeper the knives can cut into the soil. Meanwhile, the quality of the crow's feet must be at the same level, otherwise metal breakdown cannot be avoided.
The walk-behind tractor has long taken its place in small agricultural mechanization. Compact dimensions, maneuverability, the ability to install replaceable modules made it popular both in the village and in country farms. Land cultivation is one of the main purposes of this equipment. In turn, cutters for cultivation are the most popular module that is installed on a walk-behind tractor. Such elements are sold separately from power block, and relatively inexpensive.
But if you have the necessary skills and knowledge, a tillage cutter can be made with your own hands. It should be noted that some homemade products are much superior in quality and functionality to their factory counterparts.
Types of cutters for walk-behind tractors
Structurally, a soil tiller is a set of tillage knives placed on a rotating axis. This module consists of two parts, which are installed on the wheel drive shafts on both sides of the power unit. Thanks to this arrangement, the walk-behind tractor is able to move independently during cultivation.
You can also distinguish the type of walk-behind tractor with mounted cutters, rotational movement which is attached to the power take-off shaft. The module is located behind the power unit and is not involved in the movement. Motoblocks such as MTZ, Neva, Foreman, Sich, Agro are produced in various modifications, with or without a power take-off shaft.
There are practically no differences in the manufacture of both mounted and conventional cutters. But for a milling cutter with independent rotation, a module is additionally manufactured with a drive from the power take-off shaft and a two-way angular gearbox.
Active (saber)
Knife blocks on such cutters consist of four cutting elements located 90˚ from each other. There can be 2, 3 or more such blocks on one side of the drive. The number of knives and the width of the module depend on the weight of the walk-behind tractor and its power.
The knives are curved strips of durable alloy steel. For self-production in the presence of heat treatment followed by hardening, spring steel type 50KhGFA has proven itself well. The bends of the knives have alternately different directions.

The design of the active cutter allows cultivation in areas with stones and roots without the danger of breaking the knives. But it is advisable to use this type of equipment on light cultivated soils.
"Crow's Feet"
The cutting elements of such cutters are made in the form of a triangle from durable steel located at the end of the rack. This location was the reason for the appearance of such an extravagant name.
As in the case of active cutters, the width and number of blade blocks is determined by the weight and power of the motor cultivator. The number of cutting elements located around the circumference in the knife block is from 4 or more. An increase in the number of knives implies better grinding of the soil, but the power of the power unit will also need increased power.
These types of cutters are designed for processing heavy types of soil and virgin lands. The presence of branched root systems in the soil leads to frequent clogging of the module.
Both types of tillage cutters have their advantages and disadvantages. When choosing an option for self-production, it is necessary to take into account the structure of the soil, the required degree of soil grinding, the layout and power of the power unit, the complexity and manufacturing method.
Manufacturing of soil milling machines "crow's feet"

Milling cutters of this type began to be widely used in the mid-80s of the last century. This was due to the development of homemade small mechanization while. From then until now this design has fully proven its right to exist. Structurally, this module can be divided into several main elements, which are manufactured separately and carry different functionality.
Drive sleeve
It is advisable to start making a soil cutter from this element. Since the bushing is subjected to heavy loads, it is manufactured using lathe with a wall thickness of at least 5 mm, optimally 7-8 mm. The internal hole on one side is machined so that the cutter fits freely onto the shaft without excessive play, a tolerance of approximately 0.5 mm.
On the other side, a groove is made to fit the axial pipe with a depth of 30-40 mm. This will allow you to get an axially aligned connection without any problems. A hole is drilled for the fixing pin.
Axial pipe with flanges
This element is manufactured in collapsible and non-collapsible versions to choose from. But there is one feature in favor of the collapsible option - the ability to install additional block knives or vice versa. How the cutter will behave will be finally revealed only after testing and, as often happens with homemade products, the result does not always meet expectations. For production they are used standard pipesÆ25-32 mm.

When making a collapsible version, it is necessary to machine connecting bushings, which are inserted halfway into the axial pipe and secured through the holes with rivets or electric welding. The protruding part will serve as a connection for a similar element.
A flange is welded onto the axial pipe for fastening the knife stands. It can be turned on a lathe, or it can be made from strips of metal with a thickness of at least 5 mm.
Holes are drilled in the flange for a bolted or riveted connection to the posts. Connecting this unit by electric welding is undesirable due to increased loads.
The length of the tube is selected depending on the location and width of the cutting elements. The number of blanks must correspond to the number of knife blocks. Two blocks are manufactured with drive bushings.
Cutting element (knife)
It is made of durable, non-fragile steel type 65-70G, 3-5 mm thick. Triangular shape The blade is considered optimal for the least resistance when entering the ground.
Homemade workers often use the triangular cutting element of a segment mower as a knife. Since the steel of the strut and segment has different composition, welding must be done after tempering followed by hardening. Milling cutters with such knives are used on clean work areas. For heavy, virgin soils, it is recommended to make cutting elements from thicker steel, which will make it possible to make a high-quality welded joint.
As practice shows, optimal width knives 50-80 mm. At large sizes increased soil resistance is created.
Cutting element stand
It is most optimal to use the same steel that was used in the manufacture of knives, but it is quite possible to use strong, alloyed steels with lower physical and technical characteristics.
The houndstooth stand is made from a straight or edge-curved strip. It is advisable to sharpen the edge that is in direct contact with the ground.
Holes are drilled in the rack for mounting on the flange of the axial pipe. The cutting elements are welded and then hardened.
Knife block

By connecting the blade stands and axial tubes, an interchangeable modular cutting element is obtained. Only two blocks with welded-on drive bushings remain individual.
With appropriate qualifications and availability necessary equipment making this element will not be difficult. To avoid damage to materials and to prevent unnecessary movements, it is advisable to draw up before production detailed drawing or use a ready-made one.
How to assemble an active cutter

This type of homemade soil-cultivating equipment is most common due to its simpler manufacturing technology. With this arrangement, the cutting element and the stand are one piece and are made from a single piece of high-strength steel strip.
Before the stage " axial tube with a flange" the process is identical to the manufacture of a houndstooth cutter for a walk-behind tractor. For this reason, we will consider the manufacture of directly cutting elements.
When heated, the pre-sharpened strip bends 90˚. The length of the bent part usually does not exceed 80 mm. It is advisable to combine cooling of the workpiece with its tempering for comfortable drilling of mounting holes. Upon completion, the axial pipe is hardened and installed on the flange.
When cultivating the soil with any type of milling cultivator, some scattering of the soil results, which makes it a little difficult to determine the boundary between processed and untreated soil. To avoid these problems, marking discs are installed on the edges of the cutter.
Crow's feet cutters for walk-behind tractors are usually included in the factory supply along with the unit itself. But they are not universal. Some types of work cannot be performed with their help. Many walk-behind tractor owners make crow's feet with their own hands.
Purpose of cutters for walk-behind tractor
Regardless of type, cutters are designed to perform agricultural work:
- loosening and leveling the soil;
- crushing earth clods;
- mixing soil layers;
- mixing fertilizers;
- destroying weeds.
Initially, only universal collapsible cutters with saber-shaped knives were included with walk-behind tractors. They coped with almost all types of work on soft soils.
Crow's feet for walk-behind tractors have appeared recently. This non-separable device has proven itself effectively when processing hard soils due to its unique shape and mechanical strength of the material and the entire structure. What sets them apart from saber cutters is that they pull out weeds by the roots.
 They are often used to cultivate areas during the first frost to destroy weed seedlings and wintering insect pests.
Disadvantages of industrial crow's feet cutters:
- The roots and stems of weeds are constantly wrapped around them. Since the cutter has a non-separable design, cleaning it after cultivation will be problematic.
- Often, cutters are made from poor quality material, so they often break during operation.
How to make homemade cutters with your own hands
If the cutters are worn out or there is a need to upgrade the cultivator, for example, to increase or decrease the depth and width of cultivation, you can make them yourself.
In many cases, such an improvement makes it possible to improve the quality of tillage and complete the work faster.
The design of these parts is simple, so you can make them yourself.
The easiest way to design homemade cutters Do-it-yourself crow's feet for a walk-behind tractor - study the design of industrial cutters and make your own necessary changes.
It should be noted that when the crow's feet cutter is made by hand, the drawings for different types walk-behind tractors are developed individually.
The picture shows classic version 4-row industrial cutter.
Essential elements:
- Sleeve. To make it, you will need a pipe with a diameter of 50 mm and a wall thickness of at least 4 mm.
- Flange. Made from steel sheet thickness 5-15 mm. It can be shaped like a circle, but it is easier to make it in the shape of a square.
- Knife stand. Material - steel corner with shelves 63x40 mm. Can be used car springs. Often the stand is made of steel strip. This is the most cheap option, but also the most unreliable. During operation, the stand plays the role of a vertical plane cutter.
- The far left knife.
- Medium knife.
Knives are made of tool steel. Many craftsmen use car springs to make knives. Knife shapes can vary significantly. Their sharpening angle is usually 45°. During operation, knives become dull, so they need to be sharpened periodically.
Using a welding machine, the knives are welded to the posts, the posts to the flanges, and the flanges to the bushing. This is how a non-demountable structure is assembled. Some craftsmen prefer bolted connections. This design is less reliable, but makes it easy to remove and change the racks. A collapsible cutter is easier to clean from dirt and weeds wrapped around it.
One of the disadvantages of crow's feet is that they become very deep during operation, which is not always necessary. There is additional force on the walk-behind tractor engine, and the operator gets tired. To reduce the depth, wheels are installed on the axle on both sides, acting as limiters.
In this case, only upper layer soil. This processing method is very convenient for heavily overgrown and turfy soils. After the first pass, the turf is destroyed. Then the wheels are removed and re-cultivation is carried out to the required depth.
If the crow's feet cutters are made by hand, the drawings are carefully thought out and the materials are selected correctly, then they are not inferior in quality to industrial ones.
When making a crow's foot cutter with your own hands, the drawings are prepared after determining the type of structure:
- with 3 rows (axis diameter 25 mm);
- with 4 rows (axis diameter 30 mm).
Design elements
Before making a cutter for a walk-behind tractor with your own hands, study the design diagram. The product is installed on a walk-behind tractor or a walk-behind cultivator with the appropriate axle diameter. The downside of the cutter is the lack of sharp edges and weeds getting wrapped around the blades. If necessary, install on a self-made structure additional elements. You can independently make a tool with solid and non-separable “crow’s feet”.
To make the shaped parts of a cutter for a walk-behind tractor with your own hands, you will need forging equipment. Special attention Experts recommend paying attention to the assembly of the structure. Otherwise, the axis of the walk-behind tractor will be damaged. During installation of the product, the direction of rotation of the teeth is taken into account.

The crow's feet structure is assembled from elements with a diameter of up to 500 mm. Such size restrictions allow the tool to penetrate the soil 260 mm. Knives homemade design must enter the ground consistently, without jerking or hitting. To ensure that the product can be used for a long time, experts advise adhering to certain rules. When starting the unit, the crow's feet are placed above the ground. Then the revolutions are started, slowly lowering the blades into the ground.
To do simple design, use:
- metal pipe with a diameter of less than 42 mm;
- welding machine;
- parts used for digging up soil;
- Bulgarian
Car springs can be used as plowing elements. The blades are adjusted according to parameters and bent in the desired direction. Using a welding machine, the elements are attached to the pipe with various sides. Blades are sharpened in the direction of their movement. The resulting structure is fixed to the walk-behind tractor. If irregularities in the operation of the unit are detected, it will need to be removed and adjusted.

A saber cutter is capable of performing almost all types of work due to the shape of its blades.
In order for the equipment to plow the ground and destroy weeds at the same time, experts recommend making a soil tiller. This tool is used in spring for sowing. Unlike crow's feet, the soil structure is presented in the form of bent sabers, which are fixed to the shaft in in the right order. In this case, the shaft rotation speed is 200 rpm. The tool is installed on the back of the equipment. The operation of the unit depends on the power take-off shaft.
The crow's foot cutter for a mini-tractor is presented in the form of a rotating shaft with blades. Due to the drive, the structure is immersed in the soil, lifting and shifting it. The width of each blade should not exceed 100 cm, weight is 16 kg, rotation speed is 2-5 km/h, length is 38 cm, height is 38 cm. Using such a tool, a farmer can make beds and loosen the soil.
The blades for the device are made of steel 12 mm thick. Additionally, the material undergoes thermal hardening and high-frequency current treatment. Knots and connections are installed as rigidly as possible. Experts recommend using the PK-1.6 pick-up stacker as a gearbox. A non-separable cutter has higher strength than a collapsible tool. For processing clay soil It is recommended to make 2 crow's feet cutters. The same applies to early tillage.
To change the depth of the blade, an adjustable coulter is made.
This durable plate is welded to the walk-behind tractor vertically. The final tillage depth is directly affected by the diameter of the tool.
Conclusion on the topic
The saber-shaped legs provide safe work on a walk-behind tractor. When hitting a tree root, the tool lifts it. At the same time, soil cultivation continues. If you make a straight cutter, it will catch on a stone or other obstacle, knocking over the walk-behind tractor. The operator may lose his balance.
To ensure that the crow's feet penetrate the soil smoothly, it is recommended to attach them to plastic. The last elements are welded to the shafts at a certain angle. This method of manufacturing and assembling the cutter has a positive effect on the transmission of the walk-behind tractor. Knives can be made of carbon steel or springs.
Other structural elements are made of steel ST-25, 20 and 10. These grades are easily welding work. If the diameter of the structure is 25 mm, then such cutters are installed on the Texas, Krot, Neva motor-cultivator.” Four-row analogues are mounted on the Salyut, Farmer, and Cascade walk-behind tractors. At self-production cutters must have experience and skills in working with welding machine. When fixing elements, it is recommended to follow safety precautions (use a welding helmet).
A tiller for a walk-behind tractor is used to destroy weeds, intensively crumble soil, mix soil layers, level the field surface and wrap fertilizers. Milling cutters are used especially effectively when heavy, waterlogged soils are processed, silty layers are developed, hummocks are cut off, and meadows and pastures are improved.
Soil mill for walk-behind tractor
A tiller for a walk-behind tractor is used during the pre-sowing period in the spring, after moldboard cultivation. It is not recommended to use cutters on light soils to avoid spattering.
Externally, rototillers are similar to bent knives or sabers, which are attached to the shaft in a certain order. The shaft rotation speed reaches 200 rpm. It is hung on the back of the walk-behind tractor. The operation of the rototiller depends on the power take-off shaft. More best result the cutter gives while increasing the speed of movement.
Diagram and device of a cutter for a walk-behind tractor
Thanks to their saber-shaped shape, cutters for walk-behind tractors are safe to use. If the walk-behind tractor hits a root or stone, the cutters lift it like a car wheel, while continuing processing. If the cutters are straight, then they can catch on an obstacle and overturn the walk-behind tractor. The consequence may be the operator losing balance and possibly falling onto the cutters.

The knives are attached to plates, which are welded to the shafts at various angles. Thanks to this, the cutters enter the soil smoothly, one at a time. This has a positive effect on the transmission of the walk-behind tractor. Carbon steel is used to make knives. If you have access to a forge, using a spring, you can make such knives. For the manufacture of other parts, the following steel grades are used: St-25, St-20, St-10, which are easy to weld.
Soil milling machines with crow's feet for walk-behind tractors
To give greater strength to the cutters, they are made of steel, all-welded and non-separable. These cutters are called crow's foot cutters for walk-behind tractors. They are successfully and effectively used when working with hard soil. They are installed on almost any motor-cultivator or walk-behind tractor.

The main thing is that the axle diameter is correct. Crow's foot cutters are ideally used if you have hard ground to plow it “for potatoes.” They are also used to prevent garden pests(wireworm or Colorado potato beetle) or for quick plowing of the garden.

Crow's feet cutters are divided into 3 and 4 rows. If the axis diameter is 25 mm, 3-row cutters are used for motor cultivators Texas, Krot, Caiman, Neva, and 4-row cutters are used for walk-behind tractors Farmer, Salyut, Favorit. If the axis diameter is 30 mm, 4-row cutters are used for walk-behind tractors Cascade, Pubert, Master Yard, Neva.
Do-it-yourself active cutter for a walk-behind tractor
Typically, an active cutter for a walk-behind tractor is sold complete with the walk-behind tractor. But sometimes you need to get the job done using specialized cutters that are not sold anywhere. In this case, you need to make cutters for the walk-behind tractor yourself.

In this case, you can go two ways: make the cutter yourself or order production from a master. The first option is quite labor-intensive. But a little time and money will be spent on manufacturing the cutter, as well as the cost of materials.
The second option has a number of advantages: the master has all necessary tools and materials, and as a result the cutter will be more practical.

First you need to think about the functionality and design of the cutter. To do this, you should familiarize yourself with the analogues. To achieve maximum functionality and safety, all design details must be taken into account. If this is not taken into account, the cutter will not do necessary work, and all the work to make it will be a waste of time.
Ready necessary materials necessary after the drawings have been prepared. If the cutter design contains figured or pobedite elements, their production is ordered in the workshop. And other elements are bought in the store or those that are available are used.

After all the parts are made, it is necessary to assemble a normally working cutter, which not everyone can do. Assembly must proceed strictly according to the drawings, without any deviations in the design. Otherwise, the cutter will constantly move to the side, which will greatly complicate the work.
After the cutter is assembled, you need to test its operation. If the need arises, we alter the cutter so that it does the required job.
Drawing of cutters for walk-behind tractor


 Motoblock Agros and homemade products for it
 How to make lugs for a walk-behind tractor with your own hands, photo description and dimensions
 Let's do homemade all-terrain vehicle from walk-behind tractor photo, video
 How to make a homemade gearbox for a walk-behind tractor, photos and drawings
 DIY seeder for walk-behind tractor
 Attachment for walk-behind tractor snowmobile description and reviews
 Let's do homemade caterpillars on the walk-behind tractor: photos, videos, recommendations
 How to make a pneumatic walker from a walk-behind tractor, instructions, photos