Drawings of a dormer window of a triangular shape. Dormer windows on the roof: their purpose and types of structures. Plaster mesh installation
Read also
It is quite possible to make a dormer window with your own hands, the main thing is to decide on its type and location. Installation includes a complex technology, so it is important to do everything point by point. What is the purpose of such structures on the roofs of houses? They will be a wonderful decorative architectural element - firstly, and secondly, if you decide to make a cozy room out of the attic, then window openings are necessary. Especially often you can find houses with an unusually designed roof in Europe - they love to experiment with design.
Dormer windows maintain the temperature and humidity conditions of the attic, and they are also beautiful decorative elements.
Everyone can make such a design on their own, however, up to a certain level of complexity. Some types of structures can only be built by specialists, so you can start with a simplified version.
If you are not a specialist in the construction part, then you can make a regular dormer with a flat roof. The installation process in this case can be divided into 3 stages:
- Make holes in the roof for windows.
- Adjust the frame to fit the hole.
- Install the window.
What is the difference between a skylight and a skylight?

Frame and device of the dormer window.
The difference is primarily in their design. The window opening is the shape of a house, decorated with a glass facade, as well as side walls located vertically relative to the top of the building.
Attic structures are mounted in the roof of the house. That is, a special hole for the frame is made on the surface of the roof. Such a window is a detail of the upper part of the building, so it must be reliable and resistant to all kinds of precipitation.
What is the purpose of windows? First of all, it is the lighting of the space of the inner part of the room (attic or living room). Further, it should be remembered that it serves to ventilate the house from the inside. In some cases, the dormer window can play the role of an exit to the roof, so that installation work can be carried out. And finally, people make a decorative element out of them, which will emphasize the interior of the building.
Windows come in various shapes, which determines the level of complexity of their installation. There are oval, round, square, rectangular dormers. However, despite the variety of forms, they are built using the same technology.

According to the shape of the roof window, the following types are found:
- quadrangular structures with a pitched roof;
- rectangular windows with a gable roof;
- flat roof windows;
- hip type windows;
- panoramic design with a roof in the form of a trapezoid;
- transparent window;
- semicircular.
Back to index
How to make a dormer window: installation technology
Any installation work begins with a plan. You must put on paper all the details of the upcoming work: from the necessary tool to the shape of the structure. Windows can hide any flaws in the house, so their appearance must be impeccable.

The first stage of work is based on the choice of the window shape. As you know, each of the above designs has an individual mounting technology. Which to choose? To do this, you need to familiarize yourself with the features of the installation. For example, flat roof windows are accompanied by the installation of additional elements. They are gutters that are used for drainage. That is, the angle of the roof under the window is taken in the range from 5 to 15 °. The work has many nuances that are observed strictly according to the instructions. However, a window opening of this form is considered the simplest option.
Such roof decorations in the form of a quadrangle with a shed or gable roof differ from windows with a flat roof only in the angle of inclination. It is usually over 15°. The rest of the design is similar. Despite the peculiar design, this form is used quite rarely.
Another type of dormer window is especially popular. The triangular shape is considered the most beneficial. In this case, the line of contact between the roof and the frame of the future dormer window is much smaller compared to other types of structures. But it is the presence of dormer windows in the form of a triangle that provides for the penetration of moisture into the roof space. However, such a roof element of a similar shape will greatly facilitate the work process itself: there will be no need to do additional installation of waterproofing.
One of the disadvantages of such a window opening is the poor illumination of the inside of the building. Experts have also solved this problem: they propose to move the front part of the window in line with the wall of the house.
The triangular design is practical and convenient.
You will find such a window on almost every roof of a private house or cottage. The difference between such a structure is the absence of side walls. Instead, the roof slopes, which are located under the window, perform the function. One of the main advantages of such work is ease of installation, since, as already described above, you do not have to spend a lot of time on waterproofing measures. This happens due to a decrease in the number of joints with the roof.
Back to index
Some nuances and features
So, before you get started, you should consider the following:

Schemes of frames of rectangular dormer windows.
- First, make a sketch of the window in natural scale, not forgetting about the binding to the roof.
- In order not to make a mistake with the width, consider the distance between the rafter beams.
- However, work is not recommended to start without the approval of the respective stations. This applies to those who live in multi-storey buildings.
After obtaining permission and preparing a construction plan, you can purchase tools and fixtures. You need to have available:
- Timber (dimensions: 10 × 5).
- Nails (you will need several types - 100 mm, 75 mm and 50 mm).
- Plywood (a lining can be a substitute).
- Square.
- Construction transporter.
- A hacksaw for cutting wood.
- Roulette.
- Chisel.
- Vice.
- Film made of polyethylene.
- A window that can be ordered from the respective company.
Dormer windows are most often equipped in the roof to ensure ventilation of the attic, attic space. At the same time, they are one of the design elements of the roof, building.
Dormer windows (dormer windows) on the roof, a design, the drawings of which may differ, in general terms, are a glass frame, equipped in the roofing plane. Due to the large number of design solutions for such windows, each building has its own original style, individual appearance.
In this article
Varieties, design features, use of dormer windows
Such window structures are mainly provided for pitched roof structures. Attic (inclined) products, in addition to ventilation, are designed to create natural lighting in a living room, equipped directly under the roof of the house.
The first window structures mounted on the roof were intended exclusively for ventilation of the attic. Today, when attics began to be converted into living rooms, dormer windows perform additional functions:
- They provide an opportunity to get to the surface of pitched roofs.
- They serve to ventilate the attic, attic space, provide them with natural light.
- In small attics with a low roof, dormer windows provide an opportunity to increase space. If the walls start from the floor, at the same time the approach to the window openings is facilitated.
- Attic options give the roof a special appeal, unusualness, and also allow you to make the original layout of the living space under the roof.

Varieties of dormer window designs
The type of the dormer window is selected depending on the design features of the roof itself:

Application
- The main function of dormer windows is to ventilate non-residential attic spaces in order to prevent rotting of the wooden elements of the roof structure.
- They are also used as an emergency exit, for repair work on the roof.
- If the attic is converted into a living room, then dormer windows are used for natural daylight. According to experts, such openings transmit less light, unlike skylights (side walls prevent the penetration of sunlight into the room).

Roof window options
Inspection windows can be mounted on almost any type of roof: single, gable, broken, etc. There are many options for combining roof structures with window openings of different sizes, geometric parameters. You can place them both on the very surface of the roof and on the pediment. 
- When choosing a dormer window for a flat roof, the design in the drawing should take into account the need to equip the drain with additional gutters. The slope of the roof in this case should be at a slope of about 5-15º.
- Quadrangular window structures for one-, gable roofs are structurally similar to products for a flat roof, but the roof slopes must be at a slope of 15º or more.
- Triangular options are often used for roofs of cottages, country houses. Here the slopes replace the side walls. In such a situation, during installation, fewer joints are obtained, respectively, less light enters the attic (mansard) room.
- Round windows are quite attractive, they give the general appearance of the structure unusual.
- An interesting option is a skylight. It differs in appearance, its own performance characteristics. As a result, the building becomes visually much lighter, more airy, a large amount of natural light penetrates into the room.
- Attic options can be attached between the rafters. They are applied at a slope of a slope of 15-20º. But they create a barrier to the water flow, so their device is characterized by sufficient complexity. It is almost impossible to make such a window structure on your own, so it is better to order specialists.

Construction of standard dormer windows
The traditional option is a superstructure on the roof, reminiscent of a small house. At the same time, a rough calculation of the parameters is made according to the attic illumination technology. Products are mounted only without disturbing the beam system, therefore several windows are usually arranged between the beams. They are made of glass, louvered.
When arranging window structures based on blinds, the opening can be combined with the ventilation system. For normal ventilation of the attic in a natural way, it is enough that the temperature difference between the street and the room is 5-10º. If the difference is greater, then condensate appears more intensively, which requires the use of additional material in the "roofing cake", which is able to regulate the level of humidity.

Roof dormer windows, two types of construction
- Shed structures for flat roofs, the slope of the slope is about 15º. The water flow is directed to the window opening. This is a simple design, but in this case, a significant overhang of the roof over the house is required to prevent water from flowing.
- Gable designs of dormer windows are more complex. Here it is necessary to correctly calculate the docking angles of the roof. But, if all seams are properly sealed, the water flow will be distributed more efficiently. Products of a dome or radius design look solid - these are also options for gable windows.
In order not to disturb the harmony of the roof project, materials similar to roofing are used for the production of roof windows. At the same time, their installation is carried out both during the construction of a new roof, but also during the repair of the old one.

Construction, installation of the frame
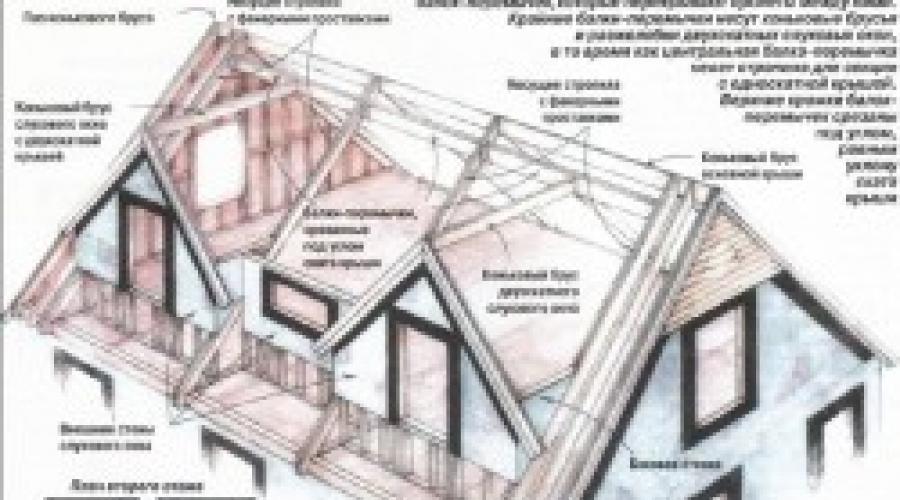
Installation begins with the creation of a frame, on which it will subsequently be attached. But it is not considered a separate component, but is designed as a component of the overall frame of the roof structure, which is based on a ridge beam and a rafter system.
Recommendation. In the areas for arranging dormer windows, the rafters are significantly strengthened (double, triple rafter legs are installed). This is necessary to increase the rigidity of the structure as a whole, according to the safety of its operation.
Installation technology

- The lower rafters, in accordance with building codes, are cut flush with the plane of the main structure.
- Installation of double lintel beams, which are mounted between double rafters. In order to prevent a decrease in the strength characteristics of the structure, tie-in into the rafters is not allowed.
- During the installation of the roof ridge beams, the pediment frames are checked for verticality.
- A pair of rafter legs is cut out according to a template, then they are fixed to the gables of window structures.
- The frame is sheathed with waterproof construction plywood.

- It is necessary to cut out a section of the roofing cake very carefully so as not to damage the waterproofing material of the main roof structure.
- It is better to finish the walls with steel siding, which is able to provide not only a solid appearance, but also reliable protection from precipitation and wind loads.
- All joints, joints of structural elements must be treated with sealant.
- It is forbidden to make tie-ins, otherwise the strength of the supporting structure will decrease. You can use only nails, staples, overhead parts (corners, metal tapes).
- For the manufacture of a frame structure, materials and dimensions are used, which are determined by the project drawing. It is not recommended to save on dimensions - this may adversely affect the finished structure, which during operation may not withstand snow and wind loads.
- If the roof area allows, window openings can be placed in several rows.
- The higher the viewing window is installed, the better the attic room will be illuminated.
- For the construction of the frame, it is necessary to use only high-quality wood: well-dried, treated with special protective compounds.
Conclusion
When equipping dormer windows, it is important to harmoniously fit them into the concept of the building itself. The same roofing slopes, repeating decorative components, the same type of material for the roof change the appearance of the building as a whole, give it solidity and attractiveness.
Dormer windows on the roof are designed for ventilation and providing natural light to attics and attics. In some cases, their installation is justified from an aesthetic point of view. This article provides information about the design of dormer windows and the rules for their installation.
The design and appearance of dormer (dormer) windows may vary.
Designers suggest installing windows:
- with a pediment lying in the same plane with the outer wall of the lower tier and side walls;
- with a pediment in the same plane as the outer wall, but without side walls;
- with a pediment located deeper than the plane of the outer wall of the building and with side walls.
In addition, there are: single and gable windows, hip construction, arched (with a different radius of curvature), built-in, flat (French). For clarity, your attention to various types of dormer windows on the roof (photo).
Important: the design of the dormer window must comply with the overall concept of the building.

About the design of triangular dormer windows
The most widespread structures are in the form of a triangle with roof slopes installed at a large (about 65 degrees) angle. The triangular roof dormer has the following features.
- The gable wall of the dormer window is not recessed into the roof, but is located in the same plane with the outer wall of the building.
- The dormer window is installed exactly above the window of the lower tier. Thanks to this, the building in this part looks organic.
- Due to the steepness of the roof slopes above the window, the usable attic area practically does not increase.
- Thanks to the dormer window, the facade of the building, as well as the roof space, looks original.
- Sufficient height of the space under the roof in the place where the dormer window is installed on the roof, the size of the frame allows you to make it large. This is important to ensure proper ventilation and lighting of the attic.
- The roof above the dormer is connected to the main roof with a groove, which eliminates the need to seal the side walls of the roof superstructure.

Design features of dormer windows
Regardless of the design and construction of dormer windows, their installation is carried out in accordance with the rules of SNiP. This is necessary to ensure the strength and tightness of the structure.
The main requirements of regulatory documents are as follows.
- The slope angle of the slope of the main roof must be at least 35 degrees.
- The superstructure is constructed strictly at the distance set in the project from the outer wall of the building.
- The minimum allowable size of drop-down sashes is 800×600 mm, which implies a window size of 1200×800 mm.
- In the case of installing a hip-type window with a quadrangular opening, its plane should not coincide with the main wall of the building.
Roof window installation: step-by-step instructions
First of all, it is necessary to build the frame of the roof of the building. For this you need to do:
- device of gables;
- installation of rafters and ridge timber;
- reinforce the rafter legs, between which the dormer window will be arranged, with additional bars: this is necessary in order to properly distribute the load.
Installation of dormer windows on the roof should begin with the installation of supports. Their role will be played by the side walls, which are a continuation of the outer walls of the building. The height of the supporting walls is about 1.5 m. They rest on the floor beams of the lower tier. After the supporting elements are installed, it is possible to fasten the horizontally located parts of the frame of the dormer window.
Further actions are carried out in the following sequence.
- The ends of the rafter legs protruding beyond the sheathing of the outer wall are cut off. This is necessary so that the pediment of the dormer window is located in the same plane with the outer wall.
- At one level, at the location of the ridge beam of the planned dormer window, a jumper is attached between the reinforced rafter legs. For this, overhead metal brackets are used, since the insertion of the jumper can weaken the structure.
- Before fixing the ridge beam, using a level, check the verticality of the front parts of the frame of the dormer window. After that, a ridge beam is installed.
- According to the template, rafters are made for the gables of the main roof above the dormer window.
- Gables are sheathed with sheets of OSB boards or moisture-resistant plywood. It should be located in the same plane with the facing material of the house.

Installation of dormer windows
In order to join the slopes of dormer windows installed at an angle of about 65 degrees with the slopes of the rest of the roof, the slope of which is less (for example, 40 degrees), it is necessary to use non-standard valleys. This can be done in the following way.
- The upper part of the roof of the dormer window is arranged with the help of slanted rafters, which are supported by sprigs (short rafters) set at an angle of 65 degrees.
- The length of the grooved rafter and its other dimensions are determined, as well as the angles between the beam, the ridge and the side wall.
Roof dormer drawings
- With the help of a plumb line on the floor, a projection of the center of the intersection of the ridge beam of the dormer window with the groove is created. After that, a full projection of the groove and the ridge beam is performed. Measure the angle formed by the projection lines.
- Under the measured angle, the lower end of the groove beam is sawn down. As a result, it will precisely dock with the wall of the opening.
- Pull the cord between the corner of the side wall and the ridge. Measure the angle at which the upper end of the beam is cut. The distance between the points will be equal to the length of the gutter rafter.
- The projection of the rafter beam is displayed on the upper beam located at the side wall. Determine the dimensions of the lower cut of the beam.
- Using the measurement results, a workpiece is made: the part is cut to the required length and the end edges are prepared by cutting them at the required angles. After that, the beam is fixed in place.
Important: for the manufacture of shortened rafters, you should use a universal template, with which it is easier to cut out the necessary blanks.

Roof dormer: construction of the lower part
The lower part of the window when installing a soft roof can be built using a groove of a simpler design. The gutter beam is fixed above the roof sheathing, and the rafters of the gable roof of the window rest against it. This stage is more convenient to perform after sheathing the roof of the entire house with OSB boards or moisture-resistant plywood. The design will be stronger if the installation of sheet material begins on the side walls of the dormer windows.
In order to determine the mounting location of the support beam and its parameters, the following is necessary:
- from the edge of the rafter beam to the outer side of the pediment, a paint strip cord is pulled and a line is beaten off;
- along the length of the resulting line, a part is sawn off for the manufacture of a support beam;
- the outer side edge is sawn off at an angle of 64 degrees and fastened along the marked line.
For the manufacture of rafters of the lower part of the slope, you should use a template, adjusting the length and shape of the ends in place during installation.
Upon completion of the installation of the dormer window, the roof and sides are sheathed with sheets of moisture-resistant plywood or OSB. Work begins from above, laying sheets along the line of the ridge. As a facing material, sheet metal, bituminous tiles, metal tiles and ceramic tiles are used.

In conclusion, a video about the features of tiled dormers.
Readers, hello! I rarely watch TV in the mornings, but today I woke up at dawn, got enough sleep, decided to see what was going on in the world.
Immediately struck by the abundance of windows on the roofs. Why dormers are created on the roof and I will tell you in this article.
Why do we need dormer windows, is it possible to do without them, and in general, what is a dormer window?
Such questions often arise during the construction of hipped roofs, the answers to which are sometimes not so clear even from specialist builders as to realize the true need for a dormer window.
A birdhouse or dormer window is a small structural element (window) of mansard or attic roofs. This window has a lot of original names: a rooster, a train, a bull's eye, a bat, a gnome's house, a lucarnia, a dormer.
At first, the window was designed only for the purpose of ventilation of the attic space, but over time it began to serve as a natural source of light in the attic, and acquired its functional and decorative value.
Natural lighting of the attic floor determines the location of the dormer window - the south direction. Since the main purpose of the "home for the gnome" is to obtain high-quality ventilation and lighting, such an architectural element is never located on the north side.
As already mentioned above, the main function of the dormer window- This is to ensure sufficient ventilation of the attic. But what happens if you ignore the design recommendations and do not install at least a ventilation duct:
- Even with high-quality interfloor thermal insulation, heat loss to the attic space is inevitable. This heat cools sharply in the attic and falls out in the form of condensate, which, with a lack of ventilation, affects its accumulation.
- The lack of lighting provokes the accelerated formation of mold and fungus, not to mention such unpleasant creatures. Therefore, even a very clean owner of the house, in the absence of a dormer window in the attic, will constantly manifest unpleasant factors.
Justification of the need for a dormer from the point of view of physics and the basics of construction: The roof is the weakest element of the building, strong wind constantly tries to destroy it and when the roof structure is rigid enough, the wind tries to lift it.
The question arises: "How is it?"
A strong wind, due to the speed of the air flow, causes a vacuum above the roof, and under the roof without a dormer window, the pressure does not change. Therefore, the roof, like a balloon, is trying to rise, and, accordingly, the higher the wind speed, the more this phenomenon manifests itself.
Note!
Even with the heavy weight of the roof and its secure attachment to the walls, vibration necessarily appears, which negatively affects the entire structure.
From the point of view of practical construction in inclement weather conditions, the dormer window is a kind of overpressure valve, i.e. a strong wind current will knock out the glass faster, thereby balancing the pressure, than it will lift the entire roof.
Construction of traditional dormer windows
- The classic manifestation of a dormer window is a roofing superstructure in the form of a small house. Moreover, a rough calculation of the size of the dormer window is carried out according to the rules of illumination of the room.
- Since dormer windows are necessarily installed without disturbing or changing the beam structure, most often several windows are built in the gaps between the beams.
- Dormer windows are made both glazed and simply louvered, and the window opening is often combined with a ventilation system based on louvers. Sufficient ventilation of the attic space is considered to be a temperature drop of 5-10 degrees relative to the street.
With a larger temperature difference, the manifestation of condensate will be more pronounced, which will require the use of materials capable of regulating humidity in the roof.
Structurally, dormer windows are mainly of two types:
Shed- the roof is made flat with a roof slope of about 15 degrees, which creates a rainfall runoff towards the window.
This design is distinguished by its ease of manufacture, but for greater reliability from leakage, it is necessary to carry out a sufficient overhang of the roof over the house itself, which looks slightly comical from the side (a big hat on a small head).
gable auditory structures are more difficult to manufacture due to the need to organize the correct joining of the roof parts at different angles. But under the condition of high-quality sealing, the seams are more practical (the flow of water is better distributed) and visually more logical.
As a kind of gable dormer window design, a radius or domed roof is often made, which looks more solid.
For the manufacture of dormer window structures, so that the harmony of architecture is not disturbed, similar materials are used with the roof. Moreover, the installation of dormer windows is useful, both on newly constructed roofs and on those requiring repair.
source: http://postroimka-dom.ru

Comfort, beautiful design, sufficient supply ventilation, illumination of the room - these are the tasks that dormer windows solve.
The room under the roof is often not only technical, but also residential.
Therefore, the requirements for the installation of facade windows are very high. The roof window is a kind of visiting card of the building.
Made in the required style, they complete the roof structure and make the building recognizable among others.
Fashion for the appearance of the window has changed, at different times dormers from lush and pretentious, as, for example, in the Middle Ages, to completely simple and inconspicuous in the early seventies of the last century.
Nowadays, dormer and dormer windows have, despite the similarity of functions, completely different design features from each other. A roof window is, as a rule, a frame with glass inscribed in the plane of the roof.
Modern building technologies have led to a huge variety of shapes and other design features to the taste of the customer.
Dormer window device classification
The dormer window device according to the design of the roof slope can be classified as follows:
- flat;
- quadrangular single slope;
- quadrangular gable;
- triangular;
- semicircular;
- panoramic, in the form of a trapezoid;
- completely glass, the so-called "lantern".
Architectural features of triangular dormer windows
Triangular dormer windows with roof slopes of a large angle of inclination are widely used in modern buildings. The pediment of such a window is in the same plane as the pediment of the entire building.
The installation of a triangular window is carried out in such a way that its axial lines coincide with the axial lines of the windows of the walls of the building itself, which makes it possible to perceive the dormer window as a harmonious element, skillfully inscribed in the entire building.
The steepness of the roof slopes does not allow to increase the volume of the attic, but solves other problems, such as the storm sewer of the building.
The advantage of dormer windows of this type is the simplicity of solving the issue of waterproofing the side walls. The slope of such a window descends to the roof of the building to the groove, while solving the issue of tightness of both the window and the entire roof of the building as a whole.
Construction and installation of the dormer window frame
The device of dormer windows according to the project begins with the installation of the frame, on which the dormer window itself is attached.
Of course, the frame of the dormer window is by no means a separate element; it is assembled together with the frame of the roof of the entire building. The base of the roof consists of rafter legs and a ridge beam.
Helpful advice!
Between the rafters, in places where dormer windows are installed, there is a significant strengthening of the structure, double and triple rafters are provided. This is due to the solution of safety and structural rigidity issues.
Technologies have been developed to ensure the correct installation of dormer windows.
Schematically, the installation technology of dormer windows can be stated as follows:
- According to GOST 1250681, the lower rafter legs must be cut flush with the plane of the main building
- Installation and fastening of double lintel beams installed between double rafter legs. In order to avoid reducing the strength of the structure, it is not allowed to cut them in and cut into the body of the rafter beams
- Alignment of the verticality of the gable frames when installing ridge beams
dormer window. The next stage of installation is fixing the ridge bars in place - A pair of rafters is cut out according to the template, with their subsequent fastening to the gables of the dormers
- It is necessary to sew up the frame with sheets of waterproof construction plywood
source: http://stroyara.ru
Expanding space
The device in the roof of the dormer window is one of the effective methods for improving the appearance of the house, lighting the attic space and its ventilation. And the most important thing is that with the help of these windows you can create additional useful living space.
If the height of your attic does not meet the requirements of SNiP (on an area of \u200b\u200bmore than half it must be at least 2.25 meters from a clean floor to ceiling), the installation of a dormer window will help expand the space in your house if necessary.
Even small ones, they add usable space and visually expand the attic. In appearance, dormer windows resemble a small house, consisting of walls, a window and a roof.
As expected, they fit into the overall style of the house and have similar window outlines, roof slopes, finishes and architectural details. Often the dormer window intersects with the roof at its highest point - this is the level of the ridge at the main roof.
Since a dormer window can significantly change the overall look of a home, its proportions should be well thought out. A well-designed dormer will be, as usual, large enough to justify all the costs of its installation.
However, the dormer window should not spoil the architectural integrity of your home, this can happen when it turns out to be very cumbersome.
Note!
It is better to place about two or three small dormer windows wisely along the roof, it will look much better than one huge one.
Dormer window placement options
A dormer can have almost as many configurations and shapes as there are architectural styles. But basically there are only two of them - single-sided and double-sided.
Single dormer window
The simplest form of a dormer window. It has a flat roof, with a slope slightly less than that of the main roof. It will be much easier to arrange such a window than another dormer window, and the construction itself will be more cost-effective.
This relationship is due to the fact that it gives more headroom than a gable dormer window of the same width.
The slope angle of the roof on a shed dormer window does not depend on the slope of the roof of the building itself. When solving a specific problem, it must be remembered that the smaller the slope of the roof slope of the dormer window, the more space there will be above your head.
And as a result, the usable area directly inside the building will increase. The only thing to consider when designing a slope is to ensure proper rainwater runoff.
When the slope decreases, the types of roofing material that you can use to cover the building are limited.
Conventional felt or fiberglass roof tiles require a minimum slope of 25% (25 centimeters of vertical drop per 100 centimeters of horizontal purlin). Wooden tiles are not recommended for use with a slope of less than 30%.
A roof with a slope of less than 25% usually requires a special roofing material; such as rolled asphalt covered with seamless rubber roll roofing or hot tar.
double dormer window
A gable dormer window can be with a pointed or rounded roof, and rainfall flows from it on both sides of the window.
A gable dormer window is a complex structure, and its construction, as a rule, requires more expenditures than the construction of a single-pitched dormer window.
Helpful advice!
It is worth remembering that the roof with this design seriously reduces the height of the ceiling, and most of the area that we get when building a dormer window will not constitute a usable living area.
Dormer window construction
When constructing a dormer window, it is necessary to remove part of the roof and roof decking, and then file a series of rafter legs to create an opening. When gluing window parts, you can use drywall glue.
Before starting these works, the rafter legs should be carefully secured with temporary supports. All these works must be scheduled for those days when the weather is warm, dry.
With all this, it is also necessary to provide for a temporary shelter of the opening in the roof before starting work. Often, plastic sheets are used for such purposes, which are temporarily fixed on the roof.
source: http://stroybower.ru

Everyone knows the name of the dormer window, but few people know why it is called that.
In the explanatory dictionary of Vladimir Dahl, this term is placed in the article “Rumor”, next to the words “hole”, “opening” and “for hearing”.
Continuing a series of interpretations, the scientist wrote down "rumor in the roof" and "dormer window".
Curiously, in the same article by Dahl, the expression “rumors are carried by the wind” is given. Previously, such windows were placed in the servants' rooms, and their name is quite linked with evening gatherings and snatches of conversation carried by the wind.
There is another legend associated with the Moscow Manege, which was built in 1817 in honor of the victory over Napoleonic France. On the construction of the Manege, an artel of a serf named Rumors was employed.
Initially, the roof of the Manezh, like the pediments, was without windows and the attic was not ventilated. During the intense heat, the attic became hot, and the expanded air deformed the ceiling of the building and the roof.
The incident was reported to Emperor Alexander I, and the roof had to be urgently redone. Rumors found a way out, and placed a large number of windows on the slopes for ventilation, after which they were called by the name of the artisan - auditory.
Another function of the windows was to reduce the load on the ceiling. The beams could not withstand the weight of the huge span and sagged. A strong draft created a zone of low pressure above the ceiling, due to which the load on the beams decreased.
Nowadays, dormer windows are widely used in the construction of pitched roofs and perform three functions: access to the roof, ventilation and lighting of the attic.
The four types of dormer windows are best known:
- with a three-pitched roof;
- with a gable roof;
- with a flat roof;
- circular.
The design of the roofs of the dormer windows is carried out according to the general rules. Roofing materials ondulin, metal tiles, and others can be used as a coating.
The frames of the dormer windows are mounted in the same plane with the walls and are diverse. The most common frames with rectangular and arc (circular) openings.
Another name for dormer windows is "lucarna", which in French means a dormer window. In recent years, attics have become very popular and it is possible that soon the term "dormer" will remain only in old books.
On the roofs of modern country houses, you can find original structures that look like a birdhouse, a variety of shapes allows you to decorate the roof in an unusual and beautiful way. This design is called a dormer window.
Auditory are called window openings located on the roof of houses, in attic rooms. They first appeared at the beginning of the 19th century, already in the second half, attic structures were invented, which are somewhat different from auditory ones. These are the ones that are currently the most popular.
Attic structures are created in an inclined area, in connection with this, they provide more lighting, despite the fact that they take up no more space on the roof than auditory ones. The device of dormer-windows is simpler.
Dormer windows of a triangular design are most widespread, their roof slopes are steeper. At the same time, the front wall of this design is located on the same plane with the outer walls, directly above the usual window opening. This allows you to create a harmonious facade, the design does not stand out, forming a single whole with the walls of the house itself.
Scope and functions
Dormer windows are most often created on pitched roofs. Inclined ones are used to create natural lighting of interior spaces located directly under the roof. They are also called attic.
Initially, these elements were created in order to be able to ventilate the attic space.
Currently, when attic spaces are increasingly being used, their functions have expanded slightly:
- On pitched roofs they allow you to get on the roof, ventilate the room and organize natural lighting in the attic.
- In small attics, where the roof is located quite low, they allow you to increase the usable space. Especially when the walls start right from the floor of the attic or attic. At the same time, access to windows is facilitated.
- Roof with dormers looks attractive and unusual. Their organization allows you to originally plan the room under the roof.
Design

There are 4 options for the design of auditory structures:
- Antidormer- a structure that is located within the roof slope is built into the roof. Due to which there is a decrease in the useful area of \u200b\u200bthe attic. This option is simple to implement, does not require additional costs for materials and increased waterproofing. However, it is not very popular.
- Dormer- is located above the roof slope. There are many options for a device of this design, it requires additional reinforcement of the roof elements and the creation of high-quality waterproofing. This design method is the most common.
- In a gable wall. The window is organized in the same plane with the facade, the end wall is used, which has the shape of a triangle. At the same time, the device does not require the creation of additional structures, which facilitates its installation. Entrance to the attic through this window is free - outside the building, you can climb the ladder.
- slanted window created in attic rooms, designs and shapes can be different: rectangular, round, triangular. They are located in the plane of the roof itself.
- Clerestory- the window is completely made of glass, which allows you to create the most effective natural lighting of the internal under-roof space. Most often, such structures are used in industrial buildings.
SNiP
There are certain requirements for the design and installation of dormer windows, which are specified in SNiPs. Norms and rules allow us to ensure maximum reliability of the structure, its durability and safety.
Key points:
- Installation can be done only if the slope of the roof slope has an angle of at least 35 degrees.
- Their location must be created at a certain distance relative to the outer wall of the building.
- Minimum leaf dimensions set within the following limits: 0.6 * 0.8 meters.
- Hip roof facade, on which the opening is installed, should not be a continuation of the outer wall.
Facing, according to GOST, can be performed with the following materials:
- sheet metal;
- copper;
- tiles;
If the opening is larger than the established dimensions, the design of the balcony is allowed, which allows you to give the building a special elegance. Luncarna windows have side walls and are, as a rule, designed in a glazed façade.
Types of structures

Currently, building technologies are actively developing. Thanks to this, there are more and more design options for openings.
But the most common types are:
- Constructions in a gable roof.
- Inclined(attic).
- Clerestory.
- Dormer. Depending on the type of roof, there are subspecies of this type:
- triangular and quadrangular;
- single-sided and double-sided;
- trapezoidal;
- hip;
- panoramic (from separate segments, created on a trapezoidal roof);
- flat;
- arched;
- Antidormer.
Design

The frame is mounted according to this scheme.
Creating a project for the construction of a roof with dormers is a must. In the design process, it is necessary to take into account some mandatory nuances.
There are certain rules for the placement of structures, non-compliance with which, as practice shows, leads to problems during the operation of the roof:
- They can not be placed near the ridge, eaves, and also close to the gables.
- If multiple openings are created, then the distance between them must be maintained at least 0.8 meters. This will allow you to freely carry out preventive inspections of the roof, prevents the accumulation of snow on the roof.
The location and shape of these elements is chosen according to the personal preference of the property owner, the choice may be due to fashion trends in the real estate market, as well as the main goal that is pursued when creating window openings on the roof - they will be used practically or only as decorative elements.
Advice! This architectural element complicates the construction of the roof. The level of complexity will depend on the type of window design chosen, the roofing material. It is better to entrust the construction of a roof with dormers to professional roofers.
An exact drawing of such an element must be reproduced on paper. To do this, all measurements are carefully made. The number and dimensions directly depend on the area of \u200b\u200bthe under-roof space.
The basic rule to consider when calculating is the following:
If you sum up the width of all window openings that are created on the roof, the total amount should be greater than the length of the attic divided in half.
Windows can be in one or two rows. The lower edge can be at least 0.8 meters from the level of the attic floor, and the location of the upper edge depends on the height in the room.
DIY construction technology
The construction of a roof with these elements should be approached with all responsibility:
- A sketch is created to scale. The width of the opening, equal to the distance between the rafters, will be ideal.
- If such a roof is placed in a multi-storey building, permission is required.
For installation you will need:
- nails of different sizes;
- triangle and protractor;
- roulette;
- vise;
- hacksaw;
- chisel;
- film;
- timber (more often used material measuring 10 * 5 centimeters);
- window (it is better to buy one that does not require complex maintenance);
To create a standard dormer, you need to go through certain steps.
 The work plan is as follows:
- Plot where work is carried out should be protected.
- Under working hole bridges are created.
- Warning signs posted below, indicating that dangerous work is underway.
- Frame is being built window opening.
- Installation in progress window.
Hole creation:
- Two beamers are cut out of the beam that are placed between the beams. They are fixed on both sides with nails.
- Two more beams are cut off to create reinforcement, they are placed between the extreme beams, for this a vice is used. We also nail them.
Creation of a reinforced structure for corner risers:
- A piece of timber is cut off for the lower support. Its length should be equal to the width of the hearing aid + 20 centimeters. Attach it from below, parallel to the sub-beam, directly to the floor. He must protrude to the limits of the beamer on both sides in equal parts.
- Two more pieces (for one and the other side) are cut off a little longer than the distance between the roof and the floor. Marks are made on them at the locations of the reinforcing beams. At these marks, the beam is cut off.
Corner post installed:

- Measure two beams, the size should slightly exceed the height of the future window. Each of them is nailed in two places - to the reinforcing beam and to the support located below.
- Upper reinforcement structure is mounted on a reinforcing beam, at the same time, it is pressed close to the rack passing in the corner, then it is nailed to this rack. For strengthening, you need to use a vice. The lower structure is attached in the same way. Work is done on both sides in order.
Corner posts are aligned:
- The beam is cut off width to the depth of the window, adding 25 centimeters. One end is applied to the beam, the second - to the corner structure. The horizontalness is checked, after which the beam is cut along the bottom of the segment at the point of contact with the rack and reinforcing beam.
The upper bar is installed and the ceiling of the structure is made out:
- A bar is measured with a length equal to the distance between the ends of the outer corner posts. It is installed on the sections of the racks and fixed with nails. And the ceiling on the side becomes a bar, which was used to align the corner posts.
Creating a window sill:

- Measure the clearance between the posts, a beam is taken 2 centimeters more than this distance. Grooves for the window sill are cut out in the corner posts, the depth is 1 centimeter. These areas need to be well cleaned.
- Next, the window sill is inserted into the prepared grooves and fastened with nails. The window sill is fixed with two more segments, which are also nailed.
- From the side of the roof, transverse ceiling beams are attached. There are only three of them, the length is equal to the distance along the inner edges of the beams on the sides. They are fastened in steps of 40 centimeters to the side ceilings. Then the side racks are nailed at the same interval. It remains only to sheathe the structure.
Roof installation:
- The number of slats for the roof is calculated as follows: the width of the roof is divided into 30 centimeters. The bars of the obtained length are cut off. Departing from the ends by a centimeter, a line is drawn diagonally on each element. These lines are cut.
- Tapered planks are installed flat side down, the wide end looks towards the house, and the narrow end is laid on the side ceiling. In turn, all the strips are attached, the distance between them is 2.5 centimeters. On top of this structure, plywood or chipboard is fixed.
- It remains to nail the covering boards and turn the roof around the window, treat the cracks with a sealant from moisture, fix the drip bar. Then the window is installed.