DIY wooden step ladder. Do-it-yourself wooden stepladder: drawings, diagram. How to make a stepladder from wood with your own hands? Drawing of a wooden ladder stepladder
Read also
You don't know how to get to high ceiling or harvest from big tree? In such cases, an ordinary stepladder can help out. However, not everyone has such a device in their home. There is no need to run straight to the store to get it. After all, this instruction will tell you how to make a wooden stepladder with your own hands. It's not as difficult as it might seem at first glance.
Types of stepladders
There are a wide variety of portable ladders available in the market. They differ from each other in height, design features, and materials.
Stepladders are made from various materials, including made of wood
When making stepladders use:
- tree;
- metal (iron, steel);
- aluminum alloys.
Wooden construction is considered the simplest, but not very practical. Under influence climatic conditions wood loses its appearance and properties, which does not in the best possible way affects the product.
Metal stepladders are strong and durable. They are inconvenient to use because they weigh a lot and take up a lot of space due to their size.
Aluminum products are the most the best option. They are reliable, small-sized and lightweight.
If we take the design as the basis for the classification, then a folding staircase can be represented by several types:
- a simple stepladder made of timber;
- step-chair;
- multifunctional transformable staircase.
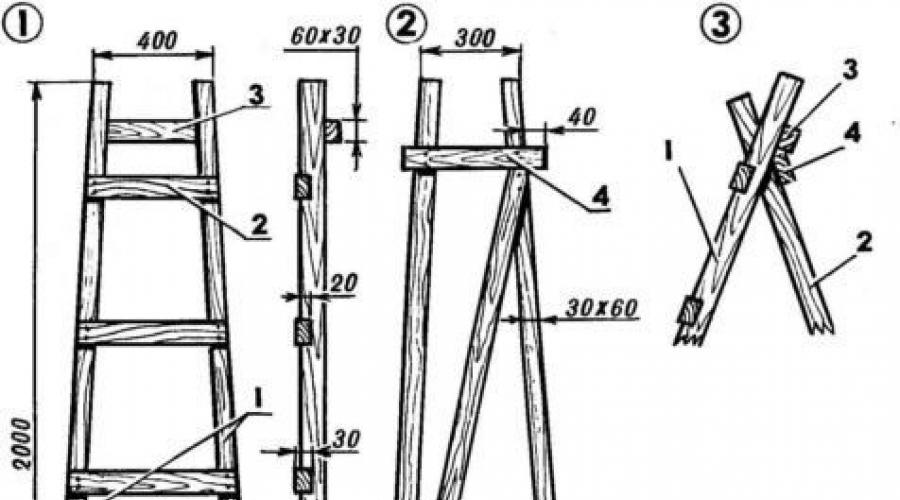
A simple stepladder made of timber
To make an ordinary garden staircase, you will need 4 beams 2 m long with a cross section of 60x40 mm for support posts, as well as about 14 meters of timber with a cross section of 60x30 mm for steps and crossbars.
 1 – support pillars; 2 – steps; 3 – crossbars and jib; 4 – limiter.
 Steps and crossbars must be of the following dimensions:
- 59 cm (2 units);
- 54.5 cm;
- 50 cm;
- 45.5 cm;
- 41 cm (3 units).
Marks should be placed on the two support bars in the places where the steps will be attached. The lowest mark is located 10 cm from the edge. The interval between the remaining marks is 40 cm. Then, taking into account the markings, five grooves with a depth of 1.5 cm are made.

Having finished preparatory work, let's start assembling the main part of the structure. To do this, we place the support posts with the grooves up and align them so that the distance between the upper edges is 40 cm, and between the lower edges - 60 cm. The steps are inserted into the grooves and fixed with self-tapping screws. An additional crossbar is attached to the reverse side.
In order for the ladder to stand, it is necessary to make a support. Since it does not have steps, the support posts are connected to each other by two crossbars: upper and lower. The design is additionally equipped with a jib. When making a support, it is important to maintain a distance of 30 cm between the upper ends of the stand.
The final stage is connecting the two parts. In relation to the main part, the support is placed so that its upper edges are between the last step and the additional crossbar.
This design does not require fasteners from above. And the lower ends of the ladder can easily be moved to the required distance.
This type of staircase is very compact and does not require large space for storage. Thanks to its attractive appearance it can easily be considered an element of the interior of your apartment.


 Option with reclining backrest. General form and drawings.
 When assembling the structure, you need to be extremely careful and observe all the dimensions indicated in the drawing. In properly assembled structures, parts move freely and do not interfere with each other.
The wooden ladder stool can be equipped with an additional locking fastener that secures the device in the desired position.
Multifunctional transformable staircase
A design that, with a slight movement of the hand, turns from a stepladder into a table for eating, a gazebo, or a bed. This versatility will make life in the country much easier.
 Transformable staircase diagram
 To make support posts for stepladders, take boards 1.5 m long, 6 cm thick, 18 cm wide. The grooves for the steps are selected in them. The support is supplemented with a crossbar, which can be rearranged into specially drilled additional holes.
A distinctive feature of the folding design is the hinged connections. The edges of the supports are cut down at the desired angle. Thrust boards are attached to the top ends, and the bottom edges are connected with a piano loop.
The transformer can be used by adults and children. So, kids use it as a stand for drawing. To secure paper sheets, the design includes a plywood shield.
A stepladder can easily be turned into a table by installing a plywood panel for the table top. You can also make a gazebo out of it or ironing board.
Making a simple stepladder with your own hands
If this is your first time picking up a tool to build a sliding stepladder with your own hands from wood, you need to thoroughly prepare. First of all, arm yourself with the necessary equipment: a hacksaw, a chisel, a tape measure, a pencil, drills, an electric drill, a hammer.
We determine the configuration and dimensions
The process of making a wooden stepladder with your own hands begins with a drawing, for the preparation of which you need to know the dimensions of the structure and its constituent elements. In addition, the sequence of actions is important. Therefore, strict adherence step by step instructions- recipe for success.
Considering that the stepladder is used primarily at home, it is not necessary to complex calculations. The optimal linear length of the stairs is 150 – 170 cm. It is enough for a person of average height to reach from the penultimate step to the ceiling of living and utility rooms.
 Determining the height of the structure
 Structures of the same height are suitable for work in the garden: for harvesting fruit trees, growing in your dacha, or pruning branches. Making stepladders large sizes irrational. They are inconvenient to handle, heavy, and require increased consumption of lumber.
Tread sizes
Since on portable ladder work is being carried out, it should be as convenient and reliable as possible. It is necessary for the person standing on it to feel confident. And this directly depends on the size of the tread. The minimum step width is 0.3 m. If the ladder structure is equipped with a working platform on top, then this figure can be increased to 0.45 m.

The working platform is made of two boards, the dimensions of which are in the range of 42×40 cm. staircase design it doesn't attach.
Number and length of steps
How many steps should be included in the design, everyone determines for himself. When deciding the issue, you need to proceed, first of all, from whether it will be convenient for you to go down and up it.
When calculating, do not forget to take into account the height of the stairs, its steepness and the distance between steps (from 20 to 30 cm). When making calculations, it is difficult to obtain an even number of steps. In such cases, craftsmen recommend reducing the distance between the first step and the cut of the stringers, or between the penultimate one and the platform at the top.
A folding ladder is shaped like a pyramid, so each step at the top gets progressively shorter. For comfortable ascent and descent, the length of the lower tread is 60 cm, the upper tread is at least 35-40 cm.
 Optimal sizes for stepladder
 Determining the material
The reliability of the structure and its service life depend on the raw materials from which it is made.
Wood quality
The stepladder must withstand heavy loads: the weight of a person, tools and various devices. Therefore, strict requirements are imposed on the quality of wood. The most important of them is the absence of defects: chips, cracks, rot.
In addition, the wood used for construction cannot be poorly dried. Acceptable level humidity is no more than 12%. If it is higher, the material should be dried in a well-ventilated area, avoiding direct hit the sun's rays on her. Using excessively damp wood will lead to deformation and destruction of the product after some time.
What section of timber to choose
The cross-section of the beam, even with very long stringers, is 4×4, 6×6 or 3×5 cm. This will not greatly affect the weight of the structure, and the reliability of the staircase is guaranteed. Talk about specific exact dimensions and types of lumber makes sense when the dimensions of the structure are known.
Additional components
A wooden stepladder can be improved by adding individual elements:
- Metal spokes for more reliable fixation of steps. They are inserted under the step into special holes and secured with nuts and bolts. The length of the knitting needles depends on the dimensions of the tread and the thickness of the stringers. As for the diameter, it must be at least 8 mm. Otherwise, they will begin to bend under load. Sometimes powerful screws are used instead of knitting needles.
 Spokes raise permissible load that the steps can withstand
 Protecting the floor from scratches and preventing slipping are the main tasks of the “shoes”
 In addition, the design can be supplemented with hooks for buckets and other accessories for tools. It all depends on your needs, imagination and desire.
Material processing
Any wood products require additional processing. Wooden stairs are no exception. Experts advise sanding all parts that will be touched by human hands. WITH smooth surface products, you do not risk driving a splinter under your skin.
To increase service life wooden stairs-stepladders, you need to take care of them. Maintenance refers to the treatment of the structure by special means which will protect her from the influences environment.

Therefore, before assembling the structural elements into a single whole, they must be impregnated with stain. Being an antiseptic, it prevents wood from rotting and protects it from mold.
The finished staircase must be treated with drying oil and several layers of paint or varnish applied on top. All these procedures will not only extend the life of your structure, but also give it a pleasant appearance.
A stepladder is very useful device for household needs. Without it, it is difficult to finish the ceiling and upper parts of the walls when performing repairs, remove dust from a high cabinet, wash the outside and inside of the cottage windows, and trim trees.
Despite the low cost, many people prefer to make the design themselves. The article will tell you their types and features, as well as how to assemble a stepladder from wood with your own hands.

Stepladders are a type of structure that has the outline of the letters “L” or “A”. Such options in working condition are stable isosceles triangle, with sides ordinary stairs and supporting frame.
The rubberized tips that fit on the legs give the structure greater stability. Alternative option models are stairs located on both sides.
Design Features:
- The presence of an upper platform or safety tape in the center, which ensures the stability of the structure;
- The legs can be equipped with a traverse, which is a wide bar that fixes them in pairs in one plane;
- The longest length of a wooden stepladder is 5 meters;
- Wood reacts to temperature changes;
The main types of structures are presented in the table:
| Type of stepladder | Peculiarities |
|
|
A mini-option, otherwise called a stool or stepladder-chair. Design Features:
|
|
|
This is a ladder with a platform for placing a person and a support block fixed on top of it. According to GOST, if the height of the working platform is more than 1.3 m from the ground surface, it must be equipped with fences - a side or railings. |
|
|
Design Features:
The cost of such stepladders is low and their production requires less material. |
|
|
The double-sided version also has steps on the opposite side, which provides several advantages:
|
|
|
The design includes two support beams or rails and steps. Models are made of great height and are equipped with handrails or platforms. Can be foldable. Product Features:
|
|
|
The product contains at least one additional block, fully or partially retractable, depending on the model. Peculiarities:
|
|
|
This universal type, which adapts to specific operating conditions. Can be used as split structures. A popular type of model is a transforming stepladder, which is also used as a platform. In this case, assembly and changing the shape are carried out after releasing the latches, which are buttons or pawls next to the hinges. |
|
|
The mobile view resembles a one-sided split design. Their purpose is identical. These ladders have small wheels on the support side. Peculiarities:
|


Options for choosing a stepladder
For household purposes, in your home, most often, a stable stepladder, which can be two-section or universal, is sufficient. When choosing, you should take into account the purpose of use and the material for making stairs.
Wooden stepladders are distinguished by their naturalness and lightness, but they require certain conditions when used and stored in rooms where there will be moderate humidity and not too large temperature changes.
When purchasing a ladder, you should pay attention to:
- On its load capacity, which is indicated on the marking;
Advice: When using the device, for safety reasons, do not exceed maximum load offered by the manufacturer.
- Per height parameter. It must be borne in mind that manufacturers often indicate 120 cm more. For correct definition size of the product, you need to specify the height to the top step;
- For cost, which depends on the material used to manufacture the product, the manufacturer’s company, size, functionality and the availability of additional equipment.


Materials for making stepladders
For long term use with maximum convenience, a wooden staircase must not only be assembled with high quality, but also treated with paints and varnishes and anti-corrosion compounds, if there are metal parts.
Tip: When using metal elements, preference should be given to parts made of stainless steel.
Before you make a wooden stepladder with your own hands, 2.4 meters high, you need to purchase the following materials:
- The beams have a cross-section of 60x60 mm, a total length of 14 meters. This is the main load-bearing part of the future stepladder; its choice must be made as carefully as possible. Only first-class wood from oak, ash, hornbeam, cedar, and pine is suitable for this. The materials should not have knots, chips, rot, or other defects that impair the quality of the timber, and therefore reduce the safety of the product during operation.
- Beam 25x25 mm, for making a platform intended for placing tools when performing work, and steps. Special requirements no material is required, the main thing is that it holds firmly on the stepladder and prevents slipping.
- Board 25x25 mm, minimum 2 meters. It is used to make the platform and provide strength for the rear pillars.
- There are 2 long bolts, 16 mm in diameter, they will serve as axes for installing the ladder into the working position.
- M16 nuts – 4 pieces.
- Nails 90 mm long, approximately 40 pieces, with a minimum diameter of 5 mm.
- Belts with carabiners, 1.5 meters long - 2 pieces, to ensure the safety of work and prevent the stepladder from diverging.
- Paints and varnishes. You should purchase waterproof paint and apply it to a pre-primed surface.
Advice: You should not skimp on materials - your safety, the durability of the product and the ease of use of the stepladder depend on the strength of the structure.


Manufacturing of structural elements
To quickly and correctly make a staircase with your own hands, you need to develop a drawing or at least a sketch of it.


To work you will need:
- Wood hacksaw;
- Meter ruler or tape measure;
- Square;
- Electric drill;
- Locksmith's hammer.
A wooden stepladder is made with your own hands in the following sequence:
- Four elements for the bowstring are cut from the timber. Two - to support the steps, two - for the supporting part of the stepladder;
- Grooves are made on two bowstrings, the depth of which is 2 cm and the height of 2.5 cm across the entire width of the beam. The center of the first upper groove should be located at a distance of 12.5 cm from the top of the bowstring. The rest are cut in increments of 290 mm;
- Three grooves of the same dimensions are made in the support posts for jumpers. One is placed at the height of the first step of the stepladder, the second at the level of the top, and one in the center;
- The edges of the racks located on top are rounded, sharp corners are removed;
- The lower ends are cut at an angle so that the wooden stepladder is as stable as possible, and are covered with rubber;
- The steps are made according to the drawing. In each of them, spikes are made on both sides, with a diameter of 25 mm and a length of 20 mm.
Assembling the stairs
Instructions for assembling a stepladder:
- Steps are inserted into the grooves of the racks. To do this, it is better to first lubricate the tenons with wood glue;
Advice: The grooves in the bowstrings should be made so that the tenons of the steps fit into them very tightly, which will prevent the structure from becoming loose.
- The spikes of the steps are hammered into the grooves of the racks. After installing all the steps, they are secured at the end of the string with nails;
- When assembling a stepladder from boards instead of bars, the steps are slightly different. In this case, grooves are not made due to the small thickness of the board. The steps are attached to steel corners with wide shelves screwed to bowstrings;
- To increase reliability and durability, the bowstrings of the working part are additionally fastened with pins. In this case, holes are drilled under the grooves. After installing the steps, studs are inserted into the holes and tightened with bolts on both sides;
- After assembling the supporting and working parts, they are connected to each other by hinges with hinges or brackets;
- Lastly, at the bottom of the stepladder, a fixing chain is attached, which will prevent the supporting and working parts from moving too far apart.
To better imagine how wooden stepladders are assembled, you should carefully watch the video in this article.


Making a simple stepladder
Simple wooden stepladders are made from the following materials:
- Beam with a section of 60×40 mm for support posts - 4 pieces, 2 m long;
- For steps and crossbars, the following lengths of bars must be prepared:
- 59 cm - 2 pcs.;
- 54.5 cm;
- 50 cm;
- 45.5 cm;
- 41 cm - 3 pcs.;
- For the sole of the stepladder - a board or rubber tips, for the bottom of the racks.
- The same markings are applied to the support posts for attaching the steps, with a step between steps of 40 cm. In this case, the lowest one is no less than 100 mm from the edge of the post;
- According to the markings, grooves are made 15 mm deep;
- To assemble the main part, the support posts are placed with the grooves up and aligned so that a distance of 40 cm is maintained between the upper ends and 60 cm between the lower ends;
- The steps are inserted into grooves and secured with nails or self-tapping screws;
- On back side an additional crossbar is attached at the top;
- There are no steps on the support, so the supports for it are connected by crossbars only at the bottom and at the top;
- For structural rigidity, a jib is installed;
- Both parts are connected to each other. The support is installed in such a way that its “horns” are between the last step and the additional crossbar installed on the main part. In this case, fastening at the top is not required, and the lower ends are moved back to the required distance, which will allow you to choose the most stable position.


Finishing the structure
Wooden stairs and stepladders must be additionally processed.
Tip: Everyone wooden parts structures must be polished and treated with special compounds.
The order of processing of products is as follows:
- All parts in contact with human hands are sanded with sandpaper. This is necessary to eliminate the possibility of getting a splinter when using a stepladder;
- Surfaces affected by mold are cleaned. You can simplify the grinding process by using a special tool;
- To improve the resistance of the stepladder to impact external environment, all its elements are impregnated special composition- stain. This product is an antiseptic that prevents wood from rotting and mold. Staining of structural parts is carried out before assembly. This will increase its service life;
- After assembling the product, it is better to soak it in drying oil and then coat it with paint or varnish. The finished wooden stepladder is shown in the photo.


What and how to make a wooden stepladder with your own hands is up to everyone to decide for themselves. But you should always remember that this device should not only be beautiful, but most importantly, durable and safe when performing work.
IN household very often you need to hang curtains or get to a dusty chandelier. A stepladder, which you can make yourself at home from wood, will help you with this. However, you will first need to familiarize yourself with all the technologies for carrying out this type of work, and also acquire the right tools and materials.
Tools and materials
If you decide to make a stepladder from wood, then you will definitely need a hacksaw for wood with teeth 3 mm thick. You will also need a tape measure, a square and a simple pencil. In addition to the above, you will have to find in your arsenal a hammer, drills, a screwdriver and a sheet of medium-grit sandpaper. Drills must be made specifically for wood, the diameter of which is 12 and 3 millimeters, and the length of the working part is 50 mm. We use self-tapping screws as fasteners; they must also be made specifically for wood. 4 M10 bolts, 120 millimeters long, will come in handy. For them you will need to purchase or find nuts and washers (4) in the amount of eight pieces.
Before making a wooden stepladder, it is necessary to prepare special chains, which will later act as clamps. The length of such a chain should be 50 centimeters. All chain links must be made of wire 1.5-2 millimeters thick, and the length of the link should be no more than 1 centimeter. You will also need 4 semicircular brackets to secure the chain.
Working with parts
 To make a wooden stepladder with your own hands, it is recommended to use a special beam that has been well dried beforehand. The racks and crossbars will be made from it. The cross-section of such a beam should be 40 by 70 millimeters. If you are using lumber that was purchased a long time ago, be sure to make sure that there are no defects on it and that the surface is perfectly flat. The presence of even one small knot may negatively affect the quality of the entire structure. The color of the wood should not have any extraneous gray or dark brown inclusions. An ideal choice will become yellowish.
Ladders and supports are the two main parts that will have future design. They are connected using hinges, which are made using bolts and washers. The crossbars and racks are fastened together with self-tapping screws. Also, the crossbars must be sawed down by 3 centimeters, and 20 mm grooves must be made in the racks. Before installation, these elements should be lubricated with PVA glue at the joints for higher strength of the wooden stepladder. Experts recommend using special wood glue, but in the absence of one, using PVA would be a good option.

Carrying out the assembly
Making a wooden staircase DIY work must necessarily be accompanied by careful processing of wood parts with sandpaper. This procedure will allow you to do everything correctly, as technology requires. Only after this it will be possible to start assembling wooden blanks with your own hands. After assembly, wait several hours until the glue is completely dry.
It is recommended to paint the surface of the structure using oil paint, having previously primed it. After this, we connect the ladder to the support using bolts. The final stage will be fixing the structure using chains and staples. This will make it almost impossible for the staircase elements to diverge in different sides and will give the structure enormous reliability.
An alternative to a homemade stepladder
 Before you make a garden To build a wooden stepladder with your own hands, you need to decide what structures it will consist of. For example, it can be made like a stool. In this case garden staircase consists of parts: ladder, connecting rails, support post and a seat. If you want to make the dimensions the way professionals recommend making them, then the following information for you.
Step between string and support post should be about 60 centimeters. Please note that this value is equivalent to the maximum. Also, the height of the seat will be equal to 60 centimeters, and its dimensions should be 30 by 50 cm. For normal operation, three steps should be enough, located at a distance of 20 centimeters from each other. The distance from the bottom step to the floor and from the seat to the top step should also be 20 cm.
Subtleties of work
To make the seat you will need two base slats, as well as five transverse slats. Before fastening the slats together, be sure to sand the wood with medium-grit sandpaper. Stepping back from the edge of the base slats 5 centimeters, make a mark for making the cutter. This will help strengthen it on the base slats cross beams, with the help of which you can make a seat.
During production homemade stairs It is best to make a special drawing in advance. This drawing is easy to navigate during construction, and without it it’s easy to get confused. Place the steps horizontally on the drawing, while flight of stairs fixed at a certain angle. The grooves for the steps should be made at an angle. To accurately calculate the degree of angle, assemble the structure on the surface without using slats or steps. When making grooves for steps, try to make them smaller than the thickness of the workpiece itself.
Additional amenities
 In order to work, in which you will use a wooden stepladder has become easier and more convenient, you can make additional parts for wooden structure. For example, a pair of hooks nailed to the end of a long element will allow you not to hold a heavy bucket with harvest in your hands when working in the garden. You just hang the container, in which you collect the crop on this hook and your hands are immediately freed, which increases the efficiency and speed of the work.
You can also make a wide step at the very top of the stairs so that you can place a bucket or can of paint on it, and in cases when you need to reach higher, stand on it with both feet. However, in this case, it is worth equipping the ladder with a special handle that you can hold on to with your hands for greater safety.

Thus, a properly made stepladder can be used for almost any type of work involving heights: in an apartment or in a garden. The aluminum staircase options offered by manufacturers do not evoke a feeling of reliability and stability, while the wooden one is quite the opposite, and besides, it will be cheaper.
DIY stepladder
All photos from the article
Any home owner, plasterer, painter and gardener invited to work sometimes need a basic device - a stepladder. Our task is to figure out how to make a stepladder out of wood with your own hands.

General principles for making wooden stepladders
It is a simple and convenient design, including a ladder and a support leg. The dimensions of the structure are selected based on the objectives, common sense and ease of use.
When posing the question of how to make a stepladder from wood yourself, the options for fastening the steps are of great importance.
- The racks, otherwise called stringers or bowstrings, are laid on the ribs, after which the crossbars are attached to them using nails or self-tapping screws. The result is a dilapidated structure that holds a moderately well-fed teenager.
- Grooves are cut into the bowstrings, the structure is connected with the same parts - the stepladder becomes stronger due to the redistribution of loads. Such a stepladder can support a 100-kilogram child.
- Through grooves are cut into the stringer racks, a rigid structure is assembled - a tightly built specialist with a heavy suitcase filled with tools can work on it.
Advice! When making a stepladder, you need to take into account, because solid or glued beams of alder, oak or ash prepared for further use manifest themselves over time and in different weather conditions differently.
A variety of self-made wooden stepladders
Classic design
No matter what design features and manufacturing materials differ from factory stepladders famous manufacturers, but still there is nothing better than an ordinary wooden ladder with a stop, made with your own hands. It is cheaper, more convenient, and, most importantly, more reliable. Below are instructions for its manufacture, preceded by a list of necessary materials.
Specification
- Using disk circular saw the boards, the price of which, by the way, is quite affordable in any region of the country, are divided in half in the longitudinal direction, after which the resulting parts are processed with a plane and sandpaper. They are then sawn transversely into blanks for the posts, the lengths of which are 2.77 and 3.00 m. From smaller bars for future steps, crossbars of different lengths are cut: 0.66, 0.63, 0.60, 0.54, 0.52, 0.49, 0.46 m and an additional 2 crossbars, which will represent the support of the structure .

DIY stepladder drawings made of wood - one of the simplest solutions
- On the surfaces of long staircase posts, grooves measuring 25x35 mm are drawn on the wider side - it is after selecting the material from the given contours that the steps will be inserted into them. The geometric center of the first figure is located at a distance of 0.20 m from the upper end of the beam: each subsequent one, starting from the indicated one, is located in increments of 0.33 m in the downward direction. The same contours of the grooves are marked on the thrust bars of the stepladder - from top to bottom at a distance of 25 mm and 0.83 m.
- From this point, as a rule, no one asks the question - how to make a stepladder out of wood, not before - using a hammer and a chisel, the windows are hollowed out along the intended contours, while the walls of the opening must be absolutely even.
- On the bars prepared for the steps and having the smallest and longest lengths, the contours of future spikes 60 mm long are drawn. It is along the notches on 4 sides that a hacksaw is used to make shallow transverse cuts deep into the body of the workpiece. Then the same manipulations are performed from the ends in the longitudinal direction until the mortises are connected and tenons are formed, which, if necessary, are adjusted with a knife.
- The upper and lower steps are inserted into the cut out openings of the racks, after which they are only secured with short nails with the prospect of easy dismantling. Then the planks are numbered, their sides are marked for ease of future installation, and tenons are cut out on all other steps according to the same pattern. The future homemade wooden stepladder is again marked with a pencil in key places for the same purpose - for ease of assembly.
- 2 fixing bars are inserted into the grooves on the structure stop, and the connection must be tight - without gaps, and the steps are driven into the racks with springy blows using a mallet. Using pliers, the nails are removed from the outer steps, after which the staircase is pre-assembled. When carrying out this work, it is necessary skillfully and in in the right places tap with a wood hammer, remembering to use a knife for precise adjustment.

- The staircase is disassembled again and painted, but the areas with numbering and marking of the sides, which are natural, are left on this moment untouched. After this procedure, the stepladder is left alone for some time until the paint dries.
- Through holes with a diameter of 7 mm are made in the racks of the ladder and the stop to fix the steps.
- From handy wood material using a hammer and a knife or an ax, pegs measuring 7.0 x 1.0 cm are roughly cut, from which dowels with a diameter of 8 mm are planed. These homemade wooden parts are smeared with glue - wood glue or PVA - and hammered into the mounting holes. After the glue has set, the protruding ends of the dowels and steps are cut off with a hacksaw.

- Angles and plates are screwed to the upper parts of the ladder and the stop, respectively, after which they are connected with bolts. All that remains is to finish painting the reasonably missed areas of the stepladder in due time.
Transformable chair
Sometimes in the house you need to change a burnt out light bulb or reach the top of a cabinet. In this case, using an ordinary high stepladder will, you see, be quite inconvenient.
To carry out simple work at low heights, a stepladder is made - a do-it-yourself wooden chair, which has a multifunctional purpose.

- To complete the work you will need: boards (board) or plywood 20 mm thick, paint material, electric jigsaw, drill, screwdriver, sandpaper, mallet, brush, PVA glue, screws, wood dowels, hinges. Using pre-created paper patterns, blanks are cut out of boards or plywood, in which holes are made for dowels or grooves, tenons and recesses are cut out. Surfaces are sanded and impregnated with compounds with moisture-proof properties.
- Wood dowels are glued with wood glue or PVA, after which they are driven into the finished holes on the back, seat and steps using a mallet. Self-tapping screws are used to strengthen the structure. Hinges are installed and fixed in pre-made recesses.
- The surfaces of the stepladder are re-sanded, especially in areas of re-treatment, and then covered with stain and varnish or drying oil and paint.

Another one homemade design— children's stepladder-podium
Advice! To avoid damaging clothing, the heads of the screws must be completely recessed into the pre-countersunk holes.
conclusions
As part of the article, we looked at several of the simplest and most accessible structures for manufacturing. By creatively processing them, you can get as beautiful and exclusive products as you like.
In the video presented in this article you will find Additional information on this topic. Good luck!
This mobile version of the staircase has a lot of advantages when compared with various stationary analogues. The stepladder can be used anywhere and for anything (processing the ceiling or walls, replacing a light bulb, harvesting fruit), conveniently transported (for example, to the dacha and back) and stored, since this folding design is quite compact and will not take up much space even in a small room. apartment.
Taking into account the fact that the household set of tools, as a rule, is not very diverse, the easiest way to make a stepladder with your own hands is from wood, as the material that is most flexible in terms of cutting and processing.
Do-it-yourself production a priori implies an element of creativity, that is, a free interpretation of various practical advice, If certain provisions not specifically stated. If the nuances of making a stepladder become clear, then it will not be difficult to draw up your own drawing and assemble a folding ladder based on it. And the choice of wood (by species, length of blanks, cross-section) and other materials is at your own discretion.

From the author's point of view, this stage even more important than the workflow itself. If a person does not know (even more so, does not know how) how to properly cut and process lumber, what is needed for drilling them, the specifics of choosing a tool for various technological operations(the list of questions can be continued), he will never undertake to make anything with his own hands. As they say, if “it’s not given, then...”. Therefore, this particular point requires more detailed consideration.
Drawing up a drawing
Folding stairs are manufactured for various purposes. If it is intended for use in a large room (hangar, warehouse or something similar), then its dimensions should be impressive. Here you need to consider whether a person can not only reach the very top rack, but also put something else on it or remove it.

Height
Since do-it-yourself stepladders are assembled mainly for household use, no need to produce any complex calculations To understand, the optimal linear length of a prefabricated staircase is 1.5 - 1.7 m. Perhaps someone thinks differently, so it is appropriate to argue. Taking into account the height of residential (and most utility) premises + the average height of a person, this is quite enough to reach the ceiling even when standing on the penultimate step.
The same applies to work in the garden. Pruning of fruit trees varies depending on the type, but is recommended maximum height their crowns are from 2.5 to 3.5 m. This applies to apple trees, cherries, plums, pears, that is, everything that grows in our dachas and local areas. Therefore, it makes no sense to make a large stepladder with your own hands. This includes increased consumption of lumber, increased weight, and inconvenience of reinstallation alone - there are plenty of disadvantages to a massive prefabricated staircase.

Tread
For stationary stairs its size is recommended based on size 45. The specificity of using a stepladder is that it is not intended for moving people, but for working on it. That is, a combination of convenience and safety when performing some operations at height. Therefore, the tread (that is, the width of the step) should not be less than 30 cm. If the design of the stepladder includes upper platform, then you can increase this parameter to 40 - 45.

When making a stepladder with your own hands, you can use bars rather than boards for the steps. Here is one of such designs.

Number of steps
You will have to determine this yourself. In the first place is the convenience of climbing (descending) a stepladder. As a rule, the distance between steps is selected within 25±5 cm. Here the total height should be taken into account folding stairs, as well as the angle at which her “legs” move apart (that is, the steepness). In most cases, the calculation process does not produce an integer number of steps. The way out is simple - reduce the interval between the first and lower cut of the stringers or the penultimate one and the working platform. If you take all this into account, marking is not difficult.
Step length
For a stepladder, it changes in the direction of decreasing along the height of the stairs. This design is assembled in the form of a pyramid with a truncated top. Therefore, the recommended length of steps (cm) is from 55 (lower) to 35 (upper). This is quite enough to make it convenient to climb up and down the stepladder.

Selection of materials
Wood type
Here it is worth considering not only the specifics of using the stepladder, but also where it is supposed to be stored. For example, if it is needed only for a house, and there is no way to put such a staircase in a storage room, then for an apartment you can make it so that it becomes an element general interior. For example, assemble it according to this scheme.

When folded, the stepladder turns into a comfortable and original chair. In this case, it makes sense to choose more expensive wood. Or a breed with good texture, which after certain treatment (varnish) will take on a wonderful appearance.


Here are some more good design options for folding mini-stairs. They definitely won’t become a hindrance in any room, but on the contrary, they will only decorate it and bring an element of originality.

For a stepladder that is stored somewhere, it makes no difference what kind of wood is used. If such a ladder is intended primarily for work outside the building (on local area, dacha), then you should focus on coniferous species, as they are more resistant to rotting. Optimally, taking into account the combination of strength, durability and price - pine.

Quality
A stepladder is a load-bearing structure. The weight of a person, some tools and devices - all this requires special reliability of the “clamshell”. Therefore, wood with significant defects in the form of cracks and chips is clearly not suitable for folding stairs.

Degree of drying
It's short here. If the tree is not dry enough (with a high percentage of humidity), then you shouldn’t make anything out of it with your own hands, not just a stepladder. No matter how competently it is assembled, through certain time he will simply “lead” her. Using such a ladder is quite risky.

Linear parameters of workpieces
Even with maximum length For stringers, a beam with a cross section of 4 x 4, 3 x 5 or 6 x 6 is sufficient. This will not particularly affect the weight, and the strength of the stepladder will be ensured. When choosing a board, you can limit yourself to samples of 15 or 20. Again, when determining the type of lumber, you should focus on the dimensions of the stairs, so it makes no sense to definitely recommend specific sizes.
Accessories
Spokes
Their length is determined based on the size of the upper steps and the total thickness of the stringers. But the diameter is at least 8 mm, otherwise such axes will gradually bend.
"Boots"
It is advisable to put shoes on the lower ends of the stringers, even if the stepladder is made with your own hands only for gardening work. Indoors - even more so, otherwise scratches cannot be avoided on the floors. What to use? Since the material will be subject to increased abrasion, then optimal choice- RTI. Felt and the like for stepladders is not The best decision, since this ladder is a mobile option and is constantly moved from place to place.
Another thing is what tires to take? If it is a soft variety, then it will wear out quickly, although in terms of stability it is preferable, since it will partially “smooth out” the unevenness of the base. Hard rubber is more durable, but installing a stepladder with such “shoes” uneven surface somewhat more complicated.
Everything else - fastening elements (screws, corners, hinges, plates), glue, cord (connecting chain) will not be difficult to select independently, depending on the design features folding ladder.
Typical drawings of various stepladders

The nuances of making a stepladder with your own hands
For someone who is used to doing everything with their own hands, explaining how and with what to select wood, the specifics of the articulation of structural elements of a staircase is just a waste of time. Assemble a good stepladder according to the finished drawing home handyman not difficult. But there are a number of aspects worth paying attention to.

In the process of marking stringers to determine where to install the steps, you also need to mark the drilling points. To ensure strength, in some cases it is desirable these structural elements reinforce with metal knitting needles. As a last resort, use powerful screws.
The fastening of the “shoes” also has its own specifics. Firstly, the lower cuts of the stringers need to be slightly rounded. This will increase the convenience of installing the stepladder anywhere and reduce the wear of the heel material (sticker). Secondly, it is necessary to correctly determine the method of fixing the “shoes”. If the rubber rubber is sufficiently elastic, then self-tapping screws can be used. When screwed in tightly, their heads will “sink” into the rubber and will not leave scratches on the floor. But since the dimensions of such fasteners are small, they can tear rubber goods quite quickly. Therefore, be sure to place a washer under the head.
In the case of using hard rubber rubber - only glue fitting. It will not be possible to press the head into such rubber, therefore, it will no longer be the legs of the stepladder that will scratch the floor, but the fastener itself. You can do it like this, from scrap materials.

It is advisable to attach a pair of hooks to the side parts of the stringers (at the top, closer to the site). On them you can hang a bucket of paint, dishes for collecting fruits, a bag of tools, and the like. It is obvious that a stepladder with such devices will be much more convenient to use. It’s a good idea to secure at least one piece of pipe at the top. Better - plastic. The result is a practical case in which you can place a hammer, a long screwdriver or anything else you constantly need in your work.

To ensure that the “legs” of the stepladder do not accidentally move apart while a person is on it, a so-called “limiter” is attached to approximately ½ of the height of the stringers. Home craftsmen often neglect this device, but an installed cord (chain or long hook) in most cases protects against falling from a mini-ladder.
In principle, it is not difficult to make a stepladder with your own hands according to any drawing. The main thing is to take into account all the nuances of its further use and select the correct sizes of all elements.
Good luck in designing and assembling a folding ladder yourself!