We make an original table for a summer cottage outside with our own hands. DIY garden table: let’s do it together. Detailed lesson with photos How to make a table and chairs for the country house
Read also
Is such a building on personal plot or in the garden, where you can relax with the whole family and invite friends.
But arrangement is not only about giving aesthetic appearance the building itself.
It is important to organize and inner space.
The role of the gazebo in the design of the cottage
The gazebo has special role in dacha design. In addition to his functional purpose, it must be in harmony not only with the surrounding buildings, but also with the landscape of the site.
It would be good if all the facades of buildings on a personal plot, including the gazebo, were finished with the same material. Gazebos whose roof is an exact copy roofs of the house.
But even such a room is unthinkable without internal content, the main element of which is the table.
You can make a good table yourself
You don’t have to buy a ready-made table for the gazebo, because you can make it yourself.
This option is preferable. As a result, you will receive a piece of furniture that you not only need, but also fits perfectly in size and shape.
No need for this great experience V construction work And special tools. Simple skills and a small set of tools are enough.
Wood is the best choice for making a table. Its main advantage is its long service life, visual appeal and naturalness.
Such a table will become a worthy element of the overall design of the cottage.
Creating a Project and Drawing
At this stage you need to create detail drawing future table.
Self-tapping screws and fasteners made from of stainless steel. Be sure to use wood impregnation, which will protect the table from rot and fungus.
Development of a 3D drawing of a garden table in AutoCad.
Step by step instructions
Do garden table you can do it yourself by following this master class.
It is necessary to prepare all tools and materials for work in advance. On preparatory stage process the wooden surface and select boards according to thickness.
Then four boards measuring 15x70 cm are laid in a row and connected with thin wooden planks. And the end parts are covered on both sides with boards measuring 15x60 cm, which are fixed using special metal plates.
This results in a smooth wooden surface.

Rectangular top frame box
For the preparation of top harness make a box. For this you can use boards measuring 10x91 and 10x46 cm. First you need to make a base rectangular shape from long boards.
After this, stiffening ribs are installed on its surface, fixing them with self-tapping screws. It is important to install them at equal distances.

Support box
Preparing the lower frame
It consists of 2 parts, made in the form of the letter “P”. They are attached to each other using a long wooden plank. U-shaped elements are represented by two legs connected to each other by a bar.
Each support leg is made from four bars measuring 4x4 cm. After both parts are made, they are fastened to each other with a strip, the length of which is 10x99 cm.

To make it more convenient, turn the tabletop over and place it on the ground. Do the same with the frame.
Suitable as fastening elements metal corners and self-tapping screws that provide reliable connection structural elements.

Connecting the tabletop to the frame
We treat surfaces
All wooden surfaces must be carefully treated using a special protective compound.
He will give reliable protection from exposure to moisture and insects.

Varnish impregnation
Wooden table
Wood is the most environmentally friendly and pliable material.
A wooden garden table can be round, square or rectangular. Irregular shaped models are also popular.
If you plan to make it yourself, the tabletop may consist of narrow boards or slats.
The table also looks good from wooden cuts, which can be done in several ways:
- connect the cuts to each other with a tongue-and-groove joint or staples, forming a flat surface;
- secure the cuts to some kind of base.
The finished surface is sanded and varnished. The gaps between the boards can be coated with epoxy resin.
Sand ready product and cover it with a protective compound.
To give the surface desired shade, you can use stain or special impregnation with pigment. Such a piece of furniture can be placed not only in the gazebo, but also on open space in the garden.
For more information on how to make a table for a gazebo made of wood, watch the video:
Pallets are used as a basis
Designers actively use to create furniture wooden pallets. This technique allows you to create an original stylistic solution.
Existing ideas can be used to implement the following solutions:
- models on a stand;
- on wheels;
- with lid;
- with glass top.
It is not necessary to buy a ready-made table. You can make it yourself using pallets.

Such tables themselves are not difficult to manufacture. To do this, you first need to find or buy a pallet. You can find it in one of the large hardware stores. Then you need to saw off a part of suitable size and screw the wheels to it.
You can put an MDF panel or glass on top. You can also buy them at one of the hardware stores. The finished table must be treated with impregnation.
If you want to change its color, use a stain of a suitable shade. This completes the production of a table from a pallet.
Such a piece of furniture will look organic not only in the gazebo, but also under open air on a personal plot. And the design, complemented by wheels, is mobile and inexpensive.
From scrap materials
Many designers use any available materials to make a table. Such a piece of furniture allows you not only to decorate the interior space of a house or apartment, but will also look organically on a personal plot, in a gazebo or garden.

Ordinary stumps decorated with mosaics look original. Larger stumps can be used for quality original table. And smaller stumps are suitable for use as unusual stools.
Any tile left after renovation is suitable for decoration. It is split into small pieces, which are attached to the surface using cement mortar or tile adhesive.
Originality lies in you creative approach. Similar designs often turn into a real work of art.

Tabletop in mosaic
An old table that has fallen into disrepair can also be decorated with mosaics. This will update the countertop. To do this, first remove old paint from the legs, sand them and cover them with one or two layers of new paint.
Then they sand the tabletop and glue the mosaic to it. You can apply grout on top, which will protect the surface from the adverse effects of the external environment.
You can also use a wooden spool for winding cable as a table. To do this, it is enough to process it and paint it in a suitable shade. But it can be further decorated.
The resulting piece of furniture will become more convenient if wheels are attached to its lower part. In this case, you can easily move it around the site.
Also, many people have inherited tables. Usually they are not used, as they require serious modification. At the right approach they can be used as garden furniture or placed in a gazebo.
If you inherited forged table, you can simply restore or replace the old countertop.

Wrought iron furniture for the gazebo
For those who have weaving skills and sufficient perseverance, wicker garden furniture made from wicker is suitable. You can make such furniture yourself.
But if you like wickerwork and don't want to make it, go to a big box store. Here you can buy tables made of wicker or rattan, as well as artificial fibers.
If there is a lot of metal left on your site, and you know how to work with a welding machine, you can make beautiful table for a garden or gazebo.
If you have the necessary skills, you will get an openwork and original product, which will be one of a kind.
But before you start using it, do not forget to treat all metal surfaces with an anti-corrosion agent.
If you plan to paint the table, you can coat its surfaces with a special primer and apply a finishing coat of paint. The most suitable materials for countertops are wood or glass.
You can use a more interesting approach. Finish simple table top mosaics or pebbles of the same height. Then cover the surface with glass according to the size of the resulting tabletop.

Whatever table you choose for the gazebo or your garden, the main thing is that it is in harmony with the surrounding landscape and the interior of the gazebo. And a thing made with your own hands will delight you with its uniqueness and originality for a long time.
To make it more convenient to stay in a recreation area, gazebo or dining area in the garden, you can make a table for your dacha with your own hands. It is also useful for work: replanting flowers or sowing seeds in a seedling box, sorting herbs or mushrooms at the table. No need to buy in store plastic products, if you can independently assemble a country table from wood or scrap materials.
Building a table for a summer house is very necessary work, and using wood as the main material will help make it durable and light.
How to make a wooden table?
First you need to determine the dimensions of the product depending on the area in which it is planned to be placed. There should be enough space left in the gazebo or seating area so that you can move freely around the table and place chairs or benches. Bulky furniture does not fit well into the interior of the gazebo or summer kitchen, therefore the main requirement for it is harmonious dimensions. But a wooden table placed on an open lawn can be large enough to accommodate everyone.
To make furniture for a gazebo or kitchen you will need:

Figure 1. Leg mounting diagram wooden table.
- 5x5 block or ready-made figured balusters;
- board 2.5-3 cm thick;
- screws, furniture corner;
- screwdriver, drill;
- hacksaw or electric saw;
- plane;
- measuring instrument, construction square;
- furniture varnish, brush.
Before assembly, all parts of the future piece of furniture must be processed with a grinder or plane and sandpaper. Parts prepared for the table must be smoothly sanded on all sides.
Making a table begins with assembling the frame for the tabletop. This is a structure of 2 longitudinal and 2 transverse boards on which the legs are attached. The legs can be made from a regular block by slightly planing the lower end of each section with a plane and chamfering. If purchased in hardware store turned balusters for stairs, then you can create a table with curly legs for an interior in the style of shabby chic or Provence. Optimal height– about 75 cm for dining table, but for furniture with a different purpose it can be selected at will.
When assembling the frame, it is necessary to take into account that the tabletop should protrude beyond it by about 3-4 cm around the entire perimeter. Therefore, if you purchased ready-made panels for a tabletop of a certain size, the frame must be calculated so that its length and width from one outer corner to the other are 6-8 cm less than the same dimensions of the tabletop.
Assembly is carried out in several stages:

Figure 2. Scheme of strengthening the folding table.
- Fasten the legs in pairs using crossbars. Fastening can be done as shown in Fig. 1. At the same time, screw the screws under acute angle to the plane of the crossbars from the wrong side. To prevent the board from splitting, you must first make holes into which the fasteners will then pass. The ends can be additionally lubricated with wood glue for joint strength.
- Install the long sides of the underframe in the same way, connecting 2 pairs of legs together. Fastening to the boards can be done differently (using a steel angle, attaching it to inner surface boards and bars or balusters with self-tapping screws). Another way is to fasten the block on the plane of the board, aligning its ends with external corners legs Then the boards of the long sides need to be placed on the block and the end, screwing the screws into the leg through the holes in the plane.
The table top can also be attached to the base. different ways: on a corner, corner rail, self-tapping screws. In the first case, you will need to screw the corners from the inside of the underframe and tabletop so that one side of them is on the leg or board of the frame, and the other is on the panel of the tabletop. To attach to a corner rail, you need to screw 3x3 cm pieces of timber onto internal sides frame boards. Secure the tabletop to the rail by screwing self-tapping screws through the holes in the block. The length of the screws must be selected so that they do not go through outside countertops. The easiest way is to drill holes on the front side of the shield and screw self-tapping screws through them into the end of the leg.
After assembly, all visible traces from screwing in the screws should be filled with putty and sanded after drying. Eliminate cracks and other defects on the surface of table parts in the same way. Coat the finished product with furniture varnish in one layer. After the varnish has dried, sand it with fine sandpaper and carefully remove dust. Apply 2 more layers of varnish, allowing to dry.
Return to contents
How to make a folding desktop for a summer house?
If the table is not needed every day, but is used only from time to time, it can be made folding.

Figure 3. Diagram of a table with cross-shaped legs.
For such furniture it is not necessary to purchase expensive wood; you can make do with improvised means and make it from wooden pallet. In addition to this, you will need:
- small loops;
- self-tapping screws with a hook head or eye bolts – 5 pcs.;
- metal chains or strong cord;
- screws, screwdriver;
- sandpaper.
Strengthen this folding table(Fig. 2) can be directly on the wall wooden structure or gazebos. You can use an additional shield on which you can hang working tools.
For manufacturing you will need a pallet with carefully sanded surfaces. Secure one side of the loop to the ends of the planks adjacent to the wall or panel and attach the pallet to the vertical. To hold the tabletop, screw 2 eye bolts into it and the shield, fasten chains or a strong decorative cord to the rings.
To hold the tabletop upright when the table is not needed, you need to fasten a short piece of chain or a loop of cord in the middle of the side farthest from the wall. Screw in a self-tapping screw with a ring or a hook in the appropriate place on the shield.
How to make a table for the dacha. DIY garden table and benches. We will talk about installing a new table with benches in the garden at the dacha. To unite the family, it was decided to install a new table through collective efforts. The old wooden table according to the quickly erected scheme was no longer suitable; it had to be renewed every 5-7 years. In the construction of the table and benches, new and traditional Construction Materials- metal and wood. The table turned out to be reliable and compared to previous versions it will last a long time. Detailed step-by-step instructions with photos and videos are provided.
How to make a table with benches with your own hands

The design of the table was developed through collective efforts, taking into account material opportunities, skills and availability of tools. The table is done and the choice of design option is probably no longer worth discussing. The old table was made of wood. Raw pillars were buried in the ground in the open air and boards for benches and tabletops were attached to them. The lifespan of the pillars is 5-7 years depending on the thickness; the boards last up to 10-12 years. The table and benches were actively used from April to early October. Table and benches all year round exposed to precipitation in the form of snow and rain. New table made on metal frame, and the flooring of the table and benches is made of boards. The boards are dismantled in October and put away in a protected place, and in the spring they are fixed back to the frame. In this way, the life of the flooring and the entire table is extended. For critics, I want to say that there is a resting place under a canopy in the garden ( ).

 Pile "Yuventa"
Materials for the construction of tables and benches:
- Six Yuventa screw piles for installing a fence, 2400 mm long, head section 50x50 mm;
- 10 — 12 edged boards 2000 mm long with a cross section of 150×50 mm, to speed up the work it is better to purchase planed ones, pay attention to the thickness of the boards - it should be the same;
- square metal pipe 60×60 mm, 4 m long;
- metal corner with shelf 40-5o mm, length 3.5 m;
- metal paint 1 liter;
- yacht varnish 1-4 liters;
- paint brush;
- solvent for paint and varnish 0.5-1 l;
- self-tapping screws for fastening boards 50 pieces;
- cement, sand
Tool for building table structure:
- Welding inverter;
- a circular saw;
- laser level, tape measure, bubble level;
- electric plane;
- grinding machine with cutting and cleaning discs;
- screwdriver with a set of drills and bits.
Instructions for making a table with benches with your own hands


A drawing was prepared to install the table. See photo. The table width was chosen to be 1100 mm (6 boards 150 mm wide and one 200 mm wide). When changing the width of the table, pay attention to the distance between the bench and table posts.
- The place for installing the table was chosen a long time ago, under the crowns of apple trees and next to artificial pond with fish. On site, pegs mark the places where the piles will be installed.
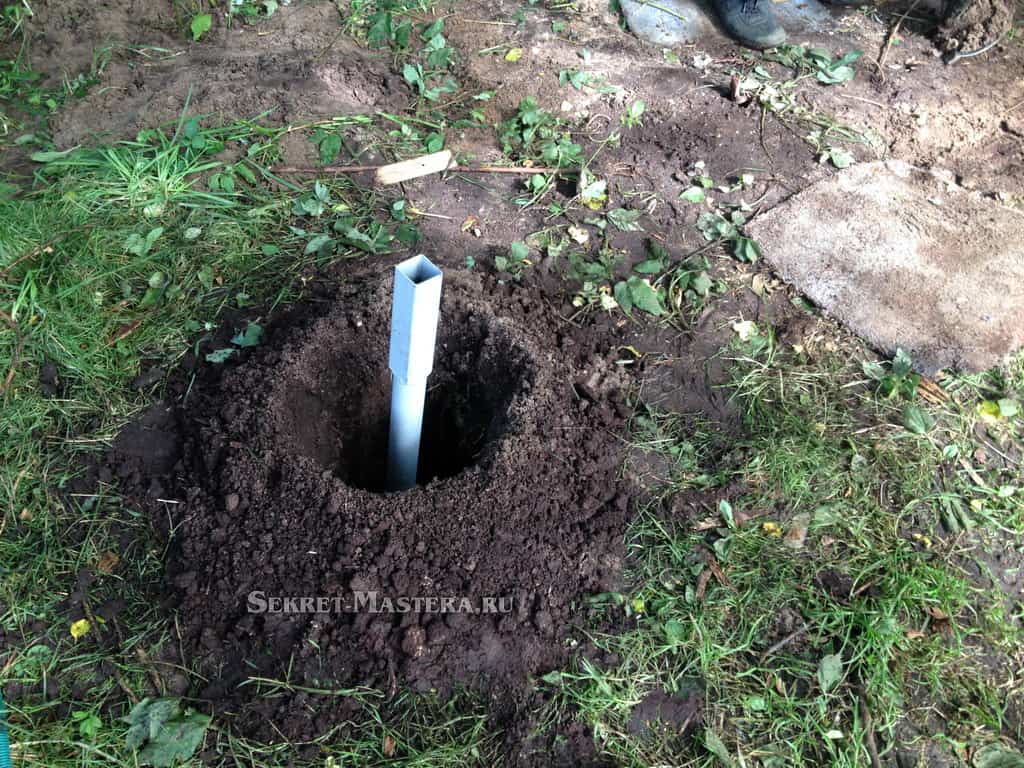
- We install Yuventa piles. To do this, a device for wrapping was made from a piece of 60x60 mm pipe. See photos and videos. In view of the features of my area, which are described in detail during construction on sandy soil, we had to make recesses for each pile. Without this recess, the pile would collapse before it was fully tightened. The recess is made petrol hole drill
. The recesses for the bench piles are dug at right angles. And for two table piles at a certain angle towards each other. This was done deliberately to make the table more stable.

 Digging a hole with a motor drill
 "Iuventa" piles for the table
 - Driving of the Yuventa piles took place according to standard scheme. Watch the video. Be sure to control your efforts so as not to destroy the pile before it is fully tightened. In my case it was collective work. When tightening, you must try to comply with the intended locations of the pile and their inclination. Small errors in accuracy can be compensated for during subsequent assembly. See the details of the work at video example
.


 The Yuventa pile is twisted
 - After tightening the pit piles covered with sand in layers with humidification and compaction.
- For long service piles the internal space of the pile is necessary, has been applied small mechanization. After concreting, we close the heads from exposure to precipitation and allow the concrete to harden. The piles must be cleaned of contamination immediately.

 Concreting piles
 - Slice square pipes 60x60 mm into 4 pieces of 550 mm and 2 pieces of 900 mm.
- We insert the pipes into the pile heads at a distance of 10-20 mm from the ground.
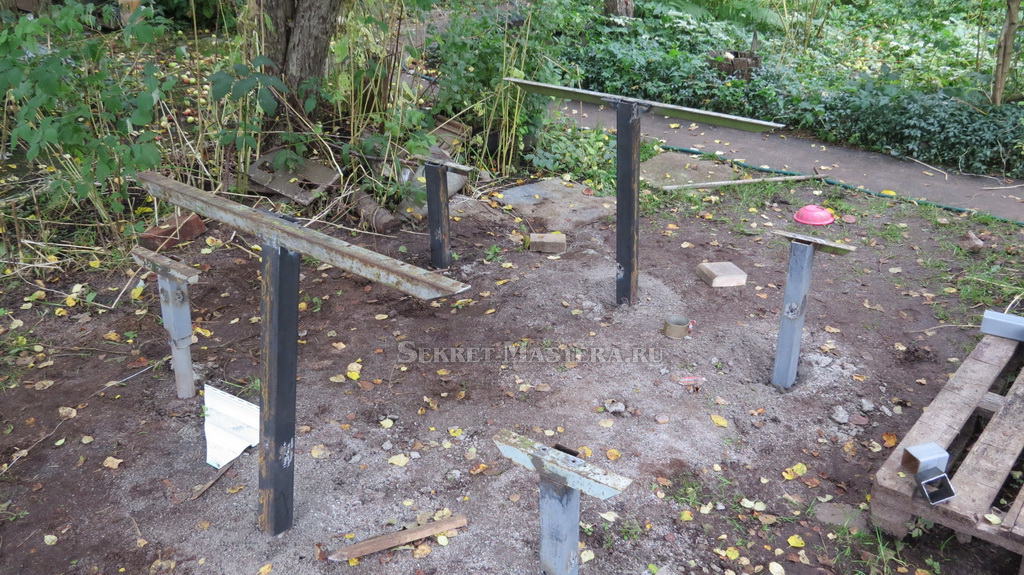
- We weld 60×60 mm pipes onto the ends, using installation gap we eliminate inaccuracies in pile installation. Try to install the bench posts strictly vertically, and the table posts coaxial to each other. Welding was carried out at 6-8 points at the points of contact between the head and the stand. Immediately clean the welding areas from scale.

 The posts are welded to the piles
 - mark the pipe cutting lines. Do it exactly. The cutting level from the ground surface for bench posts is 500 mm, table posts are 760 mm.
- Using a grinder with a cutting disc, we cut the posts according to the markings. You need to cut carefully and precisely. The surface of each cut must be horizontal. Corners will be installed and welded to the ends of the racks.


- We cut the corners. The size of the corners for attaching the bench boards is 250-300 mm, you only need 4 pieces. The table will require two corners of 1000-1100 mm each (determined by the selected table width). The edges of the corners in vertical plane are cut into a cone, and all edges are rounded. The surface must be smooth and free of burrs.
- We weld the corners to our racks, controlling the horizontal plane of the shelf along two axes using bubble level. Just in case, gussets were welded to reinforce the welding site to the rack. When welding the corners of the benches, you can slightly shift the center of the welding of the corner to compensate for errors in installing the pile (the distance of the table stand from the bench stand).

 Welding corners
 Corners are welded to the posts
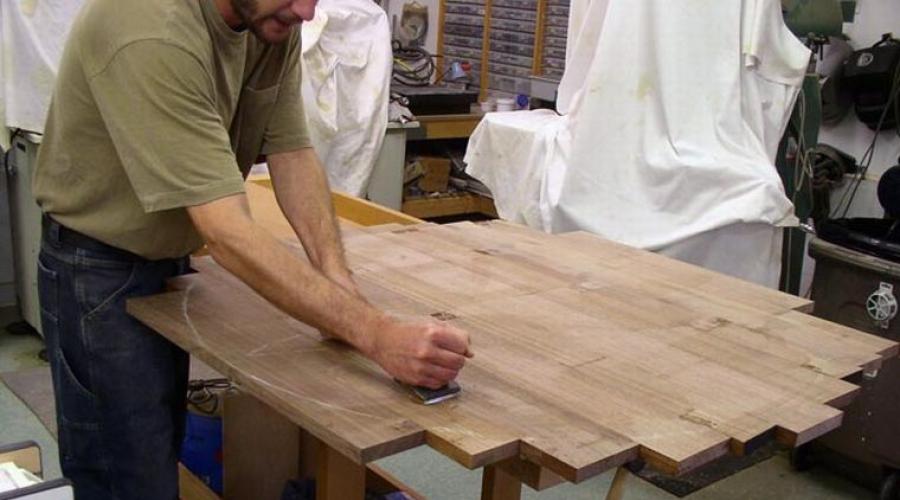
 - I used boards for the table and benches from construction scraps frame house. The boards were not planed. Therefore, half a day was devoted to partial planing and sanding of the boards.
- We try on the boards and place them on the corners. The boards of the benches should be parallel to the boards of the table. The boards are marked for subsequent assembly. The position of the boards at the corners is also marked.

 Trying on boards
 - We mark holes in the corners for the screws for fastening the boards. A total of 14 holes for the corner of the table and 4 holes for the corner of the bench. We drill holes.

 Drilling holes in the corner
 Holes on the corner of the bench
 Holes in the corner of the table
 - The boards are impregnated with an antiseptic and, after drying, covered with paint or varnish. I coated the boards with yacht varnish.


- At the same time as varnishing the boards, the posts and corners are painted protective paint. To prevent water from getting inside the racks, plugs are made ( polyurethane foam) at the ends of the pipes.
Table for summer cottage- not just a piece of furniture, it is a ritual place where all household members invariably gather. In the summer, no one wants to go indoors to drink tea or have lunch. On fresh air and the appetite is better, and the food tastes better. In order not to drag furniture from home for gatherings, you can do outdoor table for the dacha with your own hands, at the same time taking care of the benches.
garden table with built-in bench
A country table does not imply a complex design, so assembling it will not be a problem even remote from carpentry and creative works personalities. We will present to you several very simple and at the same time original ideas its creation, perhaps something from what we have proposed will become a decoration for your site.
Material for country table
DIY garden table: interesting ideas
Conclusion
Photo gallery - DIY garden table:

the garden table must be durable
Outdoor furniture is subjected to serious testing, so it must be made from durable materials. Specifically for the table you can take:
- Stone.
- Tree.
- Metal.
- Available materials.
The tables from the latter look especially interesting. But first things first.
Wooden table

outdoor dining furniture set
Selecting material Special attention pay attention to the type of wood. There are different boards and boards and, in our case, not all are suitable for use. Pliable and easy to work with conifers, alas, will not fit. In addition to the fact that they need special impregnation, because they are too fire hazardous, the resin they release will spoil the tablecloth and dishes.
The necessary elements must be looked for among the blanks from hardwood. On the tabletop you need to put boards 30-50 mm thick. For added strength, they are stuffed onto a frame. The legs of the structure can be saddled straight or X-shaped. It is important to process all the details well so that there is no danger of driving a splinter while wiping the table. It is mandatory to treat the finished product with protective impregnations.

folding wooden table at the dacha with your own hands
In order to make a table “for centuries”, cover it with varnish, and do this, as they say, without sparing the brush. The composition must be literally rubbed into the wood, and this will only be possible if you slightly heat it in a water bath. Varnish coating make three layers.
Stone table

a round table and benches made of stone will last for decades
You want to do monolithic structure that amazes the imagination and creates a special mood for meals - try working with stone. You can create this type of table for your garden with your own hands or buy a finished product. Stores offer granite and marble options V wide range. There you can also select benches made of similar material to go with them.

to inspire life in old table, it is enough to tile the countertop
It will not be cheap, but if you really want to have such a luxury in the garden as a stone table, try to make it cheaper. Lay out the bases of the benches and table yourself. This will work quite well for this:
- Flagstone.
- Brick.
- Modern blocks.
- An ordinary cobblestone.

table made of stump, lined with stone
It will be much easier to fit these materials into the overall concept of the garden and combine them with existing buildings. It is quite possible to take it on the tabletop, seats and backrests fake diamond. The composition will not lose its view from this.
Metal tables
Those who are “friendly” with hardware and have it on hand welding machine, you may be interested in the option metal furniture. The products are elegant and aesthetic, with openwork decorative inserts. Metal table it will also need to be protected from premature destruction. This is done by priming the metal before final painting.

round garden table with stone countertop and curly metal legs
Forged tables will satisfy the needs of respectable owners, but it is unrealistic to make them with your own hands. Such designs are ordered by professionals. Forging requires the conditions of a forge. However, considering that products of this type can be wonderfully combined with wood, stone, glass, you can only purchase a forged base for the table and complete it with a tabletop yourself.
DIY garden table: interesting ideas

Styling the table and chairs to look like a mushroom meadow will create some zest in the landscape design summer cottage
If you are determined to work on creating a country table yourself and are ready to make it non-standard, look at the “unnecessary” things available in every shed. Perhaps among them there are items that can become consumables for creativity.
Assorted assortment
No less practical option For a country table, along with wooden, metal, rattan, and stone products, there is a “hodgepodge” of all sorts of things. This creation will become a multi-colored “character” of your garden and will never go unnoticed. What is it made from? You will not believe! Your starting materials will be:
- Broken flower stand.
- Metal barrel lid.
- Scraps of colored plastic or round glass.

timber set
Take a piece of paper and try to draw a circular pattern on it in the spirit of Moroccan style. Enlarge your creation to the required size. A photocopier will help you do this quickly.
We place the resulting blank under glass and draw lines with a copper outline. Let it dry for a day or a little less. The manufacturer indicates the recommended drying time.

it is enough to decorate the sides of benches and chairs with wheels to get an original garden furniture for the dacha
Now it’s time to paint the marked glass with stained glass paints. The main thing here is that the colors are located evenly within the area allocated to them. If you have never worked with specific paints, it makes sense to practice on a separate piece of glass in order to understand how much you need to use for high-quality painting of fragments. The completed painting must also be thoroughly dried.
The finished glass can be additionally decorated with elements drawn with a copper outline.
Cover the lid of the barrel with white paint, which will hide traces of rust, and proceed to preparing the main part of the tabletop.

garden table made from a basket of firewood
The metal part of the flower stand, which will serve as a supportDIY garden tableneeds to be primed and painted acrylic paint copper color and partially patinated.
Once the footboard is ready, seal the areas where it touches the glass with window sealant. This is necessary for its better fastening.
Now the final stage. Put all the pieces together: arrange glass table top into the lid and place the composition on the stand.
It may not be very comfortable to dine at such a table, but drinking coffee in the cool of the evening will be very pleasant.

By decorating an ordinary tree stump with a mosaic, you can get original table IR
Pallet models
After construction country house you probably have at least a few pallets left on which packaged bricks or building mixtures. You don’t even suspect what a lifesaver this is for decorating your dacha. With their help, the table will be ready in a few hours, and it will look such that it will not be a shame to place it not only in the garden, but also in home interior. In this case, note that you will not even incur any special financial costs.

garden table made from pallets
A table for a garden, made with your own hands from pallets, can be constructed in several ways. For example, for the most simple option you will need:
- Screwdriver.
- Brushes.
- Sandpaper.
- Swivel wheels.
- Colored antiseptic stain.
- Screws.

mobile table for a garden made from pallets
First of all, start sanding the pallet. At the first stage of removing the rough layer, use coarse-grained sandpaper; fine-grained sandpaper will be needed for final processing. If you have a grinder in use that comes with a grinding wheel, use it instead of rolls of sandpaper. This will speed up the preparation process.

master class on making a table for a garden with your own hands
Turn the tray over and attach small casters to the bottom. This is done using ordinary screws. For greater reliability of fastening, place under the last washers, which can be removed from similar screws used for working with metal tiles. Don't ignore this advice. The wheel bases have enough large holes, and a screw without a backing will not be able to properly fix the part to the wooden surface.

step-by-step process of making a table
Now all that remains is to open the finished product with a wax-containing antiseptic. If you want to highlight the structure of the wood, use a transparent composition. To add color you will need a stain. You can style the table:
- under oak;
- larch;
- rosewood;
- nut;
- pine
A low wide table would be appropriate on the veranda, in attic room, bathhouse interior.

without additional processing the table will last at least two seasons
If you want to make your summer recreation area more comfortable, make not just a table from pallets, but a whole set of country furniture, complementing it with permanently fixed benches. Such a kit can be made portable and, if necessary, moved from the barbecue, say, to the pool or to the pergola.

bright table made of pallets for the whole family
A creative option for a country setting would be a pallet transformed into a tabletop and equipped with vintage legs left over from an old chest of drawers, table, or cabinet. This detail needs to be highlighted in a contrasting color.
You can use such furniture in the bedroom, gazebo, or on the terrace.
Reel table

Vertical planks allow you to place various items
“The coil itself is heavy, but it’s easy to construct a lightweight version from it table for the dacha and again, do it yourself »
Cable reel too excellent material for creating country house design. Look at it – it’s almost a finished table! A little decor and it's ready to use. The easiest way to decorate a reel is with twisted twine. To do this, simply wrap it tightly around its trunk. The upper disk of the structure is sanded and varnished. If you want to add functionality to the product, install vertical slats around the circumference. They can also be decorated with rope. With the advent of crossbars, you can store the necessary items under the table.

reel table with umbrella mount
The coil itself is heavy, but it’s easy to use it to construct a lightweight version of a table for a summer house and, again, do it yourself. You will only need the top disk from the product, which will act as a tabletop. The frame frame for its installation can be made of metal.
If in a shady garden there is a stump of suitable height and strength, then it can also be converted into an impromptu table using a reel disk. This idea will be good not only for a playground, it can also be rationally used when organizing a relaxation corner for adults. By sawing a wooden disk in half, you can assemble original chairs, which can also be placed on stump legs. This will make a nice garden set.

a table made from a reel can be decorated with any pattern
Wood table?
Why not? This brutal option can decorate a barbecue area or even a living room. Work is nothing at all. Finding the old thick log, saturate it with stain and level it bottom part, giving the product stability.

table on wheels made of stump
Equally simple to manufacture and attractive in design mobile table from hemp. By the way, its functionality can be expanded if you are not too lazy to sew a foam seat on it, which will allow you to easily transform the structure into a comfortable pouf.
Not in short supply at the dacha and chopped firewood. Using them, it’s also not a problem to quickly build a comfortable table design for your garden with your own hands. Assemble a flat base and secure the split timber into the tabletop with a strap tie. Put it all down and enjoy communing with primeval nature to the fullest.

table for a living room from an old log
Garden composition made of tires
Take your time to get rid of old tires. With them you can make a magnificent landscape decor with extended functionality: use the table not just as a table, and the pouf next to it not only as a pouf, but also create a place inside them for gardening tools, For example.

table and chairs are made in one designer style from old tires
Paint the tires in a color acceptable to you, dry them, fold them into a column, holding the elements together silicone sealant or other suitable composition.
Now work on the table top and seat. It’s a good idea to make the first one from durable plastic or cut it out of wood. For the pouf, also cut out a plywood disk of slightly smaller diameter than the tires, glue foam rubber to it and cover it with fabric. The removable parts are ready.
Cooking table

mobile table made from old quartz with a wooden tabletop
Did you find grandma's brew in the bins? Fabulous! Let's transform it into a mobile storage table. We equip the bottom with wheels, and for the upper part we assemble a tabletop from boards. Having cut the boards to size, we assemble them together into transverse strips, the length of which should correspond to the diameter of the weld. This will help the tabletop stay firmly in place and not move to the side or tip over at the slightest load. There will be enough space inside the makeshift table to organize a minibar.
Using the same principle, you can convert empty boxes, barrels, etc. into useful items.

original table with large metal wheels instead of legs and built-in benches
Conclusion
As you can see, assembling a garden table with your own hands is a very exciting and absolutely not labor-intensive activity. Here, even beginners will not have to be afraid of ruining something, because the work will be done with items and elements that are initially unsuitable for direct use. Try your hand at something that is unfamiliar to you. Perhaps the final results will become an incentive not to stop there, but to go further. From the presented materials you can make many more unusual and useful things in your country life!
Photo gallery - DIY garden table:


If you dream of having a pleasant time in your garden plot, then you simply need big table, which can accommodate a group of your friends and family. Moreover, you can do it with your own hands, spending very little time on it. In some cases you may need a helper, sometimes an extra pair of hands won't hurt.
This article is a detailed step by step instructions making a wooden table for a summer residence.
Materials:
- A - Legs: 5x10 cm bars, 106 cm long (2 pcs.), 43 cm long (2 pcs.) and 56 cm long (2 pcs.);
- B - Frame: bars 5x10 cm, length 87 cm (2 pcs.);
- C - Tabletop: boards 5×15 cm, length 180 cm (6 pcs.);
- D - Tabletop base: boards 5x15 cm, length 87 cm (2 pcs.), bars 5x10 cm, length 62 cm (2 pcs.).
The first stage of the project is making the table legs. Saw off the bars required sizes. To speed up the process, you can use circular saw. Smooth the edges of the bars and cut lines with sandpaper.
Connect the bars to form an X-shaped structure and fasten them with 60 mm self-tapping screws, not forgetting to pre-drill the guide holes. Lubricate the joints with glue. Make sure there are no cracks or gaps.
Fasten each pair of legs with a horizontal block, using 60 mm self-tapping screws for this purpose. Cut off the ends of the bars as shown in the figure.
Place the boards intended for making the tabletop on a flat surface. We advise you to place pieces of 6 mm plywood between them, this will create uniform gaps. Place the assembled table sides on the tabletop and secure them by screwing in the self-tapping screws at an angle of 90 mm. Before fixing, make sure the legs and table top are perpendicular using a spirit level.
Place sawn pieces of 5x15 cm boards on the underside of the tabletop and secure them with 60 mm self-tapping screws.
Saw off the ends of the bars, which will serve as supports reinforcing the structure, at an angle of 45º. Place the supports in their place and secure them using 90 mm self-tapping screws screwed in at an angle.
And finally, last but not least: check that the heads of the screws do not protrude above the wooden surface, and fill all cracks and holes with wood putty.
Tip: To protect wood surfaces from the damaging effects of atmospheric moisture, cover them with several layers of exterior paint or stain.
Table with benches. Instructions with drawings
Materials:
- A - Legs: bars 5x10 cm, length 95 cm (4 pcs.);
- B - Crossbars: bars 5×10 cm, length 160 cm (2 pcs.);
- C - Fastening the tabletop: 5×10 cm bars, 75 cm long (5 pcs.);
- D - Inclined supports: bars 5×10 cm, length 84 cm (2 pcs.);
- E - Tabletop: boards 5x10 cm, length 180 cm (14 pcs.).
You should start by making the legs. Since the legs of this table will be inclined, the ends of the 100 cm long bars should be cut at an angle of 30º. Connect the elements with 90 mm bolts.
Make sure the surface you are working on is fairly level. The mounted sides of the table must be identical, only in this case can you hope for an excellent final result.
When the sides of the table are ready, you can start making wooden table top. We recommend that you knock it together on the ground (floor), and then attach it to the legs using self-tapping screws.
Tip: Don't forget to make sure the side walls of the table are vertical using a spirit level, otherwise the end result of your work is unlikely to satisfy you.
Rigidly fix the entire structure using inclined supports. Their ends should first be cut at an angle of 26º.
Now all that remains is to build the benches. Saw off the boards the right size, place them on both sides of the table and, having previously drilled several guide holes at a distance of at least 1 cm from the edges, secure them with self-tapping screws.
Tip: To ensure that the seat boards are evenly distributed, place nails or pieces of plywood between them before attaching them. Thanks to this little trick, all the gaps will be the same.
At the end of the work, pay attention to small but very important touches. Fill all cracks and holes with wood putty. After the putty has dried, sand the wood surfaces with medium-grit sandpaper.
Tip: Be sure to apply several coats of paint or stain to protect wood surfaces from exposure to water and sunlight.
Round table. We do it at the dacha on our own
Materials:
- A - Base: 5×10 cm block 102.5 cm long (1 piece) and 47 cm long (2 pieces), 2.5×10 cm block 9 cm long (4 pieces);
- B - Stands: bars 10×10 cm, length 60 cm (4 pcs.);
- C - Tabletop base: 5x10 cm bars 82.5 cm long (1 pc.) and 52.5 cm long (2 pcs.), 2.5x10 cm bars 47.5 cm long (4 pcs.) and 60 cm long (2 pcs.) ;
- D - Tabletop: boards 2.5×15 cm, length 195 cm (9 pcs.).
The first stage of the project is to create the table base. To connect its constituent elements, use waterproof glue and self-tapping screws. Make sure that the corners formed by the bars being connected are straight. To protect the assembled table base from rotting under the influence of rainwater, place it on small stands made from scrap 2.5x10 cm boards.
Now you need to attach four posts made from square bars to the base. Before fixing, make sure they are vertical using a spirit level. The height of the legs may differ from that proposed by us, in in this case You should first of all focus on your own needs.
The most difficult stage of the project is making the countertop. Place the boards on flat surface and mark the center of the square. Secure one end of a 60 cm strip at this point. Rotate the other end of the staff to mark the outline of the circle. A jigsaw with a sharp blade will allow you to make circular cuts at a high professional level.
After cutting the boards of the future tabletop, we recommend that you fasten them together waterproof glue and additionally secure with several clamps. Attach the bars that serve as the base of the tabletop, as shown in the picture (yellow elements should be made from 5x10 cm bars, green ones from 2.5x10 cm bars).
Tip: To attach the bars to the tabletop, use waterproof glue and galvanized screws (30 mm self-tapping screws for fastening 2.5x10 cm bars and 50 mm for fastening 5x10 cm bars).
After the glue has dried, you should attach the legs to the base of the tabletop using 90 mm self-tapping screws, having previously drilled pilot holes. Use a spirit level to check the perpendicularity of the legs and tabletop.
To ensure that the result of your work corresponds to the highest professional level, make sure that the screw heads are recessed deep enough. Cover all cracks and holes with wood putty, and after it dries, sand the surface with sandpaper.
Tip: Apply several coats of exterior paint or stain to protect the table from moisture damage. To ensure that the base stands are also untouched by water, place the table on concrete surface and seal them hermetically.
Now you know how to make a picnic table yourself. You just have to put in a little effort, which will subsequently be rewarded with enthusiastic exclamations from friends and pleasant summer evenings spent with your family at a large table.