How to replace a Karcher at home. How to make a high pressure washer with your own hands. Do-it-yourself high-pressure car wash - basic elements
Do you know that if your car is more accustomed to a high-pressure car wash, you can also provide it with such luxury with your own hands without special stations?
Features of a high pressure car wash
Why are most special stations equipped with this type of washing? This is due, first of all, to the fact that with the help of this device You can wash the body, underbody, and suspension without much effort. Home positive feature The advantage of a high-pressure car wash is that a directed jet of liquid easily and effectively washes away dirt from the surface of an object. This jet occurs as a result of the operation of a high-performance pump, and is formed by a special tip.
Such a device will be useful not only for, but also for various household needs. So the intention to acquire your own system will solve many everyday problems, especially if you have a plot of land with spacious house. At least cleaning street communications and paths will happen many times faster. There are many stores that sell this type products, but it’s much more pleasant to make a high-pressure car wash with your own hands. Moreover, this process is not particularly difficult.
Do-it-yourself high-pressure car wash - basic elements
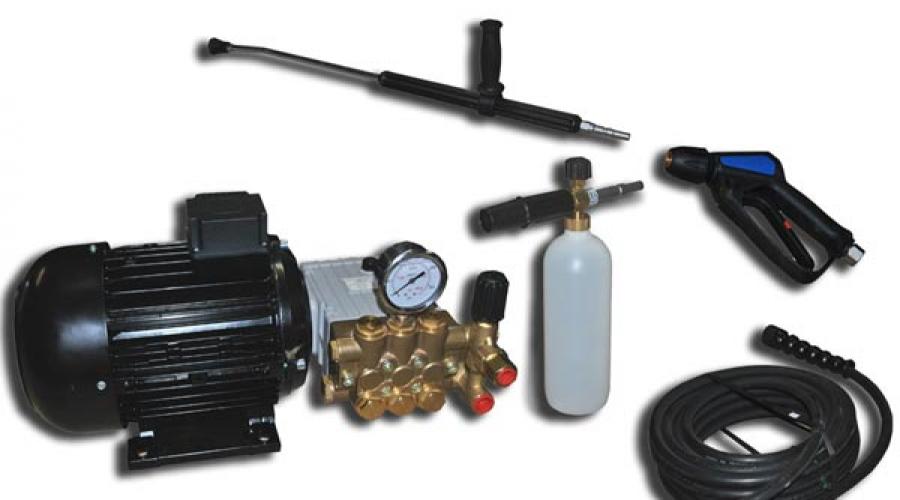
The first thing you need to do is purchase all the parts that you will need to assemble the device. The most important and expensive part of a car wash is the pump. It must be highly productive. In addition, such a pump must develop a pressure of up to 100-200 bar. When choosing this part of the system, it is very important to pay attention to what materials it is made of. Most best option the working part of the pump should look like this: the pistons are made of durable metals or from durable ceramics, the block heads are cast from brass, and the liners of the crank mechanism must be provided large area supports.

Sometimes, to save money, a car wash is assembled from a compressor; such a system is, of course, faster to make with your own hands, and the compressor in this situation performs the functions of a water pump.
One more important detail is an electric motor. For a home car wash, it is best to use a 220-watt electric motor, that is, single-phase. This type of connection is safe and saves a lot of money. cash. Some car wash designs require the presence of condensers and a single-stage gearbox. These items may make the device easier to use and also increase its service life, but they are not required.

Collecting additional elements for a car wash
When creating a car wash with your own hands, you will also need a coupling. This element connects the pump and the electric motor. For high pressure washer the best option will use a “soft” coupling, since it is able to compensate for the misalignment of the shafts along the axis. In addition, this type of coupling plays the role of a fuse in case the pump or gearbox jams.

An important element in the design is the water container. After all, in order for the pump to operate smoothly and uninterruptedly, it must receive a certain volume of water. Most often, a tank is used as a container, which is connected to water supply network. At the outlet, a special fine mesh, which performs the functions of a filter. This is necessary to prevent dirt from getting into the pump and disrupting its operation. The washing effect can be significantly improved if you add it to the tank. detergent.
IN modern world Almost every family has a car for personal use. At the same time, not every car enthusiast can use a garage as a place to store useful things. It is quite obvious that all cars, without exception, sooner or later require external cleaning. Sometimes, light, superficial. And to do this, you don’t need to stand in line at a car wash or spend money on purchasing a washing machine. In order to save time and money, you can make a mini-wash with your own hands: always carry it in the trunk and use it as needed in any secluded place.
Materials for work:
1. Plastic canister with two necks for draining – 1 pc.;
2. Filling hose for a washing machine (length – 2 m) – 1 pc.;
3. Watering gun on a telescopic rod – 1 pc.;
4. Quick-release fitting – 1 pc.;
5. Valve for tubeless wheels (spool valve) – 1 pc.;
6. Rubber gasket (inner diameter 15 mm, outer diameter – 24 mm) – 1 pc.;
7. Coupling – 1 pc.;
8. Screwdriver, thick drill, feather drill with a diameter of 22 mm, silicone sealant or rubber glue, automobile compressor.
Stages of work:
First stage: install the air inlet.
Having collected the necessary components, remove the cap from the drain neck of the plastic canister. Important: in the future, when using a mini-wash, the canister will need to be placed on its side, with the filler hole down (for direct release of water under pressure), so we leave the lid of this hole for the junction with the hose. Use a thick drill to make a hole in the removed cover.


We apply along the side of the valve for tubeless wheels (in colloquial speech - spool) silicone sealant.

We insert the valve into the hole in the lid, press it carefully, and dry it.

After the sealant has hardened, screw the lid onto drainer canisters.

Second stage: installing a water outlet.
Remove the cap from the second hole of the canister. Using a feather drill, we make a hole in it corresponding to the diameter of the coupling.


Insert into drilled hole coupling.

To secure the coupling more firmly, spray the joint with the lid with silicone sealant and dry it.

From one end (preferably curved) inlet hose For washing machine cut off the nut and its fastening.

The mount itself is in further work not useful, but fasten it with a nut reverse side coupling, after applying silicone sealant to it.


After drying the sealant, screw the cap onto the opening of the canister.

Third stage: connect the hose to the watering gun.
The use of a washing machine inlet hose is due to its ability to withstand high water pressure. We thread the cut part of the hose into the nut of the quick-release fitting.

We fasten the section of the hose in the quick-release fitting (it is clamped with a special fastener).

We twist the main fitting and its nut.

We screw the fitting onto the watering gun on the rod.


Stage four: connect the hose to the canister.
To prevent air from escaping when water is supplied under pressure, insert into the second nut of the inlet hose required diameter rubber gasket.
Are you tired of washing your car? Then there are two options: use the services of a paid stationary car wash or make the process of washing the car simple and interesting even in cold weather.
If you have a lot of money, then use the first option or buy a Karcher mini-wash.
The procedure becomes so pleasant that you will want to wash your car every day - just pour a few liters into the sink warm water with auto-shampoo, insert the plug into the cigarette lighter and press the button in the brush handle.
Design of a homemade mini car wash with an operating voltage of 12 volts, i.e. can operate both from the vehicle’s on-board network, for example a cigarette lighter, and from a household electrical network through a rectifier with a 12-volt output.
Details for manufacturing homemade car wash can be purchased at any Auto Parts store or auto market. This is a washer motor from a “9”, “Volga” or another car, it can be used, as long as it works, a brush for a hose for washing a car, a “cigarette lighter” plug, two 3 m long hoses with diameters of 6 and 10 mm, a micro button (switch), a two-core electrical wire 5-6 m long, a brass M8 bolt with a nut and washer, six galvanized self-tapping screws d4x12 mm, two polyethylene canisters with a capacity of 10 liters (you can also use them in any container you like) and some sealant. You select the container according to the optimal principle - the size of the car wash - the amount of water for washing.
Car wash device shown in the figure. The wires and a thin hose are first inserted into the d10 mm hose, then it is threaded into the pre-cut hole in the canister and secured with a sleeve. The receiving tube is also attached to the washer motor.
A switch or button is installed on the brush, which can be glued inside the handle. It can be decorated with a piece of corrugated hose d25 mm. The lower ends of the wire are also connected according to the diagram.

Canisters from purchased drinking water are quite suitable.
One of the canisters is cut as shown in the photo. A “second bottom” is formed with a shuttle for winding the power wire and the rotary cover.

Bottom view of the canister before installing the “second bottom” with the attached washer motor. A piece of corrugated plastic hose must be placed over the brush handle before assembly.

To supply water to the brush, you need to press the micro button hidden inside the handle. It is not necessary to keep it pressed all the time, short presses (30-50 s) with breaks of 15-20 s are enough
The washer motor is secured with a clamp made from a strip of plastic from the same canister using a brass M8 bolt with a nut and washer, placing it on the sealant. Plastic bushings onto which the hoses are placed - any suitable tubes from the bodies of felt-tip pens, markers or ballpoint pens.
After unsoldering the wires, the “second bottom” is put on and secured with self-tapping screws.
Then the rotary cover is also attached. Exploitation homemade car wash showed that polyethylene fits the self-tapping screw so tightly that additional sealing of the connection is not required. The same can be said about the bushings to which the connecting hoses are attached.

After the car is washed, the brush hose is retracted inside the canister through the neck, the wire is wound onto the shuttle and closed with a rotating lid.
In winter, at temperatures below 0°C, if the washer is stored in an unheated garage or car trunk, the water from the canister should be drained completely.

To the "advantages" of this simple DIY car wash You can add mobility, no connection to 220 Volts and problems with water supply. The car wash is autonomous - I drove to a deserted place, washed it in about 15 minutes and the car was clean and my nerves were fine.
Wash your car as often as possible, ideally every week.
Do not wash or treat the vehicle under direct sun rays. On a heated surface, the preparations dry out very quickly, resulting in streaks.
Don't save water. Abundant dousing washes away loose dirt and sand. If you rub a sponge over them, you can scratch the surface. The final rinse should be generous, otherwise streaks may appear.
It is better to wash the car with a hose, adjusting the jet pressure. With enormous pressure, areas of the underbody, wheel arches and wheels are washed.
Inspect the brush or sponge for any remaining sand. If they have sand left over from the preparatory wash, it can scratch the coating.
Do not pull the hose through the body. Pulling a hose through a painted surface can bring sand onto the surface and cause scratches to form.
Do not use household detergents, especially dishwashing detergents, instead of special car shampoos. The brutal chemicals contained in them to effectively dissolve fat can stain the car's paintwork and cause corrosion by penetrating microcracks in the enamel.
For different car care operations it is necessary to use separate products and devices. For example, towels that may have been exposed to compounds containing silicone should not be used to clean glass. And it is completely unacceptable to wipe the body with a cloth that has been used to apply grinding pastes or other abrasive compounds.
Do not use extra effort- it can destroy paintwork.
To wash a new car, shampoo can be used immediately: the paintwork is already quite hardened. But, if you purchased a car directly from an assembly line, it is better to refrain from washing with shampoo and only wash the body for the first 2-3 weeks warm water. As for new repair coatings, shampoo can only be used three months after application.
Car shampoo contains wax to clean the car while at the same time creating a shiny, waxy layer of protection. Car shampoo based on paraffins and solvents with a high wax content provides shine and wax protection to the body for several weeks.
A car wash brush should be soft, with shaggy ends of synthetic bristles. For washing large vehicles (buses, trucks) It is comfortable to use a brush with a long or folding telescopic handle.
After washing the car, water must be removed from the surface of the body in order to prevent the drops from drying and causing stains and stains. To do this, use small towels made of natural fibers, usually terry, or suede, which, unlike fabric, does not leave fibers and threads on the car.
Natural suede - specially tanned leather, soft and elastic - no matter how annoying it may sound, over time it loses its elasticity and when dry it becomes like a piece of board, although it continues to absorb water, only it must be previously soaked and wrung out. Artificial suede does not have such a defect; it is made from natural production waste. In addition, it is more durable and less expensive. Even cheaper than artificial suede is synthetic suede (made of polyvinyl chloride). Some of its types have proven themselves better than natural suede; they also absorb more water. Artificial and natural suede must be dried before storage, but synthetic suede can be stored with moisture.
In the modern world, every family has a car, and not just one. Whether domestic or foreign - they all require ongoing care. A spare part has gone bad - you need to replace it, a tire has a flat - you need to pump it up, a window breaks - you need to put in a new one. And, of course, you definitely need to wash your car. Car washing is needed not only to keep the car clean. If you don't wash it, you can earn a fine from workers. state inspection security traffic. If you don’t wash it, the paint underneath the dirt stain will soon wear off and the body will begin to rust. If you don't wash the inside of your car, it can be dangerous. various diseases respiratory tract and allergies.
Considering all the above nuances, the conclusion suggests itself: car washing is a mandatory procedure for any car.
Do-it-yourself homemade Karcher - the best option for washing a car
Choosing a method for washing your favorite car is up to the car owner himself. Someone can pick up a rag and a bucket, someone can go to a car wash. But perfect option- this is to make a homemade Karcher. It can be done by investing a certain amount of money, or it can be done from improvised means without investing in it.
Of course, a homemade Karcher will differ from a branded one, but it will fulfill its main purpose.
Advantages homemade device: low price, compactness, ability to wash dirt out of any crevice, autonomy, does not require electrical supply, you can always take it with you.
How to make a homemade Karcher?
There are many ways to do it.
First way. The main mechanism of the future Karcher is taken - the compressor. It can be taken from any equipment that is no longer used on the farm. The mechanism is connected to the fitting using a hose. A brush is taken and attached to it in order to regulate the power of water supply. The brush and tap are also attached using a hose. When fastening, you will need to use rubber gaskets, FUM tape, and hermetic glue. The hose, on the other hand, is fixed in a container into which more than ten liters of water can be poured. The simplest homemade Karcher compressor is ready for use. You can make a more automated method that will connect to the electrical outlet or the cigarette lighter in the car.
 Second way. Take a canister into which you can pour more than twenty liters of water. A compressor from the car is connected to the inlet brass nipple from the tire. The hose is attached to a gun (you can purchase it at any garden store). The hose length is at least six meters. Diameter 16 mm. Rubber flaps, clamps and nuts are used for fastening.
The effectiveness of a homemade Karcher
The efficiency of a Karcher depends directly on the selected engine (compressor). It must supply high water pressure, otherwise the production of a home sink will run haywire. A homemade Karcher must consist of a durable body made of metal or thick plastic.
The choice of brush for the hose varies: from hard to soft. Rollers and sprayers can be used.
 In any case, it is not advisable to use a homemade Karcher for more than three hours. Since this can lead to its early failure.
Branded equipment under the Karcher brand allows you to wash your car at home without visiting a service center. It is expensive and pays for itself in a few years. If you make a Karcher with your own hands, you can save a lot of money. In addition, you will be able to take care of your car at a time convenient for you.
When making crafts, you need to provide her with:
- High performance;
- High water pressure at the outlet;
- Purification of water from microparticles, iron elements, chemical substances which may damage the vehicle.
On preparatory stage you should stock up on: a pump; single-phase electric motor operating from 220 V; soft coupling for connecting the motor and pump; reinforced hose (you need a special one that can withstand high blood pressure); switch; nozzles; clamps; plug; two-core flexible wires that connect power to the pump.
The pump can be, for example, an external type electric fuel pump taken from a car. But in order to make a reliable homemade Karcher, it is better to spend money and purchase a high-performance plunger pump capable of providing a pressure of 200 bar.

The craft cannot be made without: a gun with a nozzle, which regulates the water pressure at the outlet; 20-liter water canister (a filter mesh and cleaning liquid is attached to it); frame necessary for fastening all elements of the Karcher (made from pipes); sealant used to seal all joints; a set of quick-release connections for a hose (consists of a threaded fitting, adapter coupling, connector).
Karcher's work requires car shampoo. It is poured into a canister and used to wash dirt off the car.

The structure is assembled in the following sequence: the container is equipped with a filter and a hose; install an electric motor and pump; a regulator is installed on the last one; They connect everything with a hose to which the gun and nozzles are attached.
A self-made Karcher works like this: turn on the pump; it sucks water from the canister and creates pressure in the outlet hose; press the trigger of the gun, which leads to the release of liquid from the nozzle under high pressure.
The procedure for assembling a Karcher: in the lid of a 20-liter canister, make a hole for the fitting size of the nipple and attach it with inside; in the lower part of the canister, on its inner side, through a pre-arranged hole, attach the coupling to silicone sealant; a fitting is installed on the coupling; put the cover in place; connect the pump; increase the pressure inside the canister by covering the outlet of the fitting with your finger; connect the hose at one end to the canister, the other to the gun; the canister is filled to the top with water, slightly pumped with air; press the trigger of the gun, after which water comes out of the nozzle under pressure.
The described craft has a work cycle of no more than 20 minutes. Afterwards it should be turned off, re-filled with water and pumped in air.
In the modern world, almost every family has a car for personal use. At the same time, not every car enthusiast can use a garage as a place to store useful things. It is quite obvious that all cars, without exception, sooner or later require external cleaning. Sometimes, light, superficial. And to do this, you don’t need to stand in line at a car wash or spend money on purchasing a washing machine. In order to save time and money, you can make a mini-wash with your own hands: always carry it in the trunk and use it as needed in any secluded place.
Materials for work:
1. Plastic canister with two necks for draining – 1 pc.;
2. Filling hose for a washing machine (length – 2 m) – 1 pc.;
3. Watering gun on a telescopic rod – 1 pc.;
4. Quick-release fitting – 1 pc.;
5. Valve for tubeless wheels (spool valve) – 1 pc.;
6. Rubber gasket (inner diameter 15 mm, outer diameter – 24 mm) – 1 pc.;
7. Coupling – 1 pc.;
8. Screwdriver, thick drill, feather drill with a diameter of 22 mm, silicone sealant or rubber glue, automobile compressor.
Stages of work:
First stage: install the air inlet.
Having collected the necessary components, remove the cap from the drain neck of the plastic canister. Important: in the future, when using a mini-wash, the canister will need to be placed on its side, with the filler hole down (for direct release of water under pressure), so we leave the lid of this hole for the junction with the hose. Use a thick drill to make a hole in the removed cover.


We apply silicone sealant along the side of the valve for tubeless wheels (colloquially - spool).

We insert the valve into the hole in the lid, press it carefully, and dry it.

After the sealant has hardened, screw the lid onto the drain hole of the canister.

Second stage: installing a water outlet.
Remove the cap from the second hole of the canister. Using a feather drill, we make a hole in it corresponding to the diameter of the coupling.


Insert the coupling into the drilled hole.

To secure the coupling more firmly, spray the joint with the lid with silicone sealant and dry it.

At one end (preferably a curved one) of the inlet hose for the washing machine, cut off the nut and its fastening.

The fastening itself will not be useful in further work, but we use a nut to secure the back side of the coupling, having previously applied silicone sealant to it.


After drying the sealant, screw the cap onto the opening of the canister.

Third stage: connect the hose to the watering gun.
The use of a washing machine inlet hose is due to its ability to withstand high water pressure. We thread the cut part of the hose into the nut of the quick-release fitting.

We fasten the section of the hose in the quick-release fitting (it is clamped with a special fastener).

We twist the main fitting and its nut.

We screw the fitting onto the watering gun on the rod.


Stage four: connect the hose to the canister.
To prevent air from escaping when water is supplied under pressure, insert a rubber gasket of the required diameter into the second nut of the inlet hose.
In the modern world, every family has a car, and not just one. Whether domestic or foreign, they all require constant care. A spare part has gone bad - you need to replace it, a tire has a flat - you need to pump it up, a window breaks - you need to put in a new one. And, of course, you definitely need to wash your car. Car washing is needed not only to keep the car clean. If you don't wash it, you can earn a fine from employees of the state road safety inspection. If you don’t wash it, the paint underneath the dirt stain will soon wear off and the body will begin to rust. If you do not wash the interior of your car, this can lead to various respiratory diseases and allergies.
Considering all the above nuances, the conclusion suggests itself: car washing is a mandatory procedure for any car.
Do-it-yourself homemade Karcher - the best option for washing a car
Choosing a method for washing your favorite car is up to the car owner himself. Someone can pick up a rag and a bucket, someone can go to a car wash. But the ideal option is to make a homemade Karcher. It can be done by investing a certain amount of money, or it can be done from improvised means without investing in it.
Of course, a homemade Karcher will differ from a branded one, but it will fulfill its main purpose.
Advantages of a homemade device: low price, compactness, ability to wash dirt out of any crevice, autonomy, does not require electrical power, you can always take it with you.
Karcher?
There are many ways to do it.
First way. The main mechanism of the future Karcher is taken - the compressor. It can be taken from any equipment that is no longer used on the farm. The mechanism is connected to the fitting using a hose. A brush is taken and attached to it in order to regulate the power of water supply. The brush and tap are also attached using a hose. When fastening, you will need to use rubber gaskets, FUM tape, and hermetic glue. The hose, on the other hand, is fixed in a container into which more than ten liters of water can be poured. The simplest homemade Karcher compressor is ready for use. You can make a more automated method that will connect to the electrical outlet or the cigarette lighter in the car.

Second way. Take a canister into which you can pour more than twenty liters of water. A compressor from the car is connected to the inlet brass nipple from the tire. The hose is attached to a gun (you can purchase it at any garden store). The hose length is at least six meters. Diameter 16 mm. Rubber flaps, clamps and nuts are used for fastening.
The effectiveness of a homemade Karcher
The efficiency of a Karcher depends directly on the selected engine (compressor). It must supply high water pressure, otherwise the production of a home sink will run haywire. A homemade Karcher must consist of a durable body made of metal or thick plastic.
The choice of brush for the hose varies: from hard to soft. Rollers and sprayers can be used.

In any case, it is not advisable to use a homemade Karcher for more than three hours. Since this can lead to its early failure.
Many car enthusiasts today prefer high-pressure washers to a regular rag when washing their cars. The fact is that washing provides more gentle cleaning of the paintwork. There is no need to wash the car with a sponge or cloth. A directed jet of water allows you to not only knock dust off the body, but also eliminate enough heavy pollution. Considering that there is plenty of dirt on our roads at any time of the year, we can safely talk about saving money when operating such devices.
Unfortunately, good car washes they are not cheap. Not all car enthusiasts can afford to buy them. Therefore, creating your own high-pressure washer seems to be quite an interesting option.
How to choose a mini washer?
All mini-washes should be divided into 2 groups: professional and household.
Professional car washes
Professional devices are different increased reliability and excellent performance. But they are not available to everyone, as they are very expensive. And there is no need to talk about their compactness. The average weight of such devices is close to 100 kg. Even though they are mounted on wheels, they are not at all easy to move. The main advantage of professional AEDs lies in their characteristics:

Professional car washes can work without interruption for a long time.
Despite the attractive functionality, such devices are a specific product, and ordinary car enthusiasts almost never buy them. To ordinary people household mini-washers are sufficient.
Household AEDs
Household mini-washers can be used not only for washing car bodies, but also for solving the following problems:
- Clearing clogged drains.
- Cleaning garden tools.
- Cleaning local area from construction waste.
- Cleaning garden paths.
- Cleaning walls, house facades and fences.
All household high-pressure car washes are divided into subgroups according to following criteria: water temperature, type of food, power.
Household mini-washers can receive heated water from outside or heat it themselves. Unheated devices are slightly less expensive than heated devices.
Depending on the type of power supply, household high-pressure car washes come in petrol and electric.
Devices with gasoline engines are considered close to professional car washes. That's why they cost accordingly. The cheapest gas-powered car wash will cost the buyer $600. The most expensive one sells for $5,000. It is not surprising that they are not popular in our country.
Domestic high pressure car washes With electric motor – the choice of a simple car enthusiast. Based on their power, such devices can be divided into 3 groups:

Choosing a mini-wash
When choosing a household AED, The following parameters should be taken into account:
- Performance.
- Pressure.
- Pump material.
Plastic pumps do not last long and are installed in inexpensive, low-performance devices that can be used to wash a bicycle, motorcycle or garden cart. It is not enough to wash a car. More precisely, with the help of such a car wash you can wash your car, but it will take a lot of time due to its low productivity.
The car can be easily washed using AED with brass or silumin pump. This household appliances middle class. Their performance and pressure are sufficient to wash any passenger car. Essentially this is the best choice for household use.
Of course, if a car enthusiast has extra money, he can buy a household high-pressure car wash upper class, but for the average car enthusiast this is a luxury.
If you don’t have the money to buy an AED or simply don’t want to part with a large sum, then you can make a high-pressure car wash with your own hands.
First you need to prepare necessary details. First of all, choose a pump. It must meet the following requirements:

To secure the pump in the housing of a homemade AED, you will need a coupling. It is best to choose a soft model, as it will compensate for the misalignment of the shafts along the axes.
Let's not forget about water containers. This could be a large canister or barrel. It is advisable that the container has water supply. Be sure to install a filter at the outlet of the container. It will protect the pump from sand and other contaminants.
High pressure hose with a gun equipped with a nozzle that creates a working jet.
We hide the pump in a separate container and connect it through fittings to the main container with water and a hose with a gun. At the outlet of the pump we install a regulator with a closed By - pass.
Water container and pump container can be installed on a frame made of lightweight hollow pipes. The frame itself can be placed on support wheels for ease of use.
All that remains is to supply power to the pump, which will begin pumping water from the main container through a hose with a gun.
Assembling a mini-wash with your own hands, do not forget to ground the device. Before starting, make sure that everything electrical components The sinks are reliably isolated from water.
During operation homemade apparatus The AED should regularly check the security of all fasteners and tighten them if necessary. Try not to load the device to the maximum, as this will lead to rapid wear of the pump. Besides, overpressure The paintwork on the body can be easily damaged.
As you can see, making a homemade Karcher is not difficult. But although such a device will be mobile, it can still be used only where there is electrical network at 220 volts. What if you need to wash your car while on the road? To do this, you can make a mini Karcher powered by a cigarette lighter.
To create it we will need:

We make a hole in the lid of the canister and insert the fungus from the wheel into it. The entire structure is reliably sealed.
We also make a hole in the bottom of the canister and install a fitting to which we attach a hose with a gun at the end. We connect the hose from the compressor to the fungus in the lid.
The simplest sink is ready for use. All that remains is to pour water into the canister, close the lid and turn on the compressor. It will provide the necessary pressure of the water jet at the outlet of the gun.
Of course, this mini Karcher cannot boast of high pressure, but it is quite enough to knock down road dust or wash off detergent from the car body while parked.
landscapenik.com
In the modern world, almost every family has a car for personal use. At the same time, not every car enthusiast can use a garage as a place to store useful things. It is quite obvious that all cars, without exception, sooner or later require external cleaning. Sometimes, light, superficial. And to do this, you don’t need to stand in line at a car wash or spend money on purchasing a washing machine. In order to save time and money, you can make a mini-wash with your own hands: always carry it in the trunk and use it as needed in any secluded place.
Materials for work:
1. Plastic canister with two necks for draining – 1 pc.;
2. Filling hose for a washing machine (length – 2 m) – 1 pc.;
3. Watering gun on a telescopic rod – 1 pc.;
4. Quick-release fitting – 1 pc.;
5. Valve for tubeless wheels (spool valve) – 1 pc.;
6. Rubber gasket (inner diameter 15 mm, outer diameter – 24 mm) – 1 pc.;
7. Coupling – 1 pc.;
8. Screwdriver, thick drill, feather drill with a diameter of 22 mm, silicone sealant or rubber glue, automobile compressor.
Stages of work:
First stage: install the air inlet.
Having collected the necessary components, remove the cap from the drain neck of the plastic canister. Important: in the future, when using a mini-wash, the canister will need to be placed on its side, with the filler hole down (for direct release of water under pressure), so we leave the lid of this hole for the junction with the hose. Use a thick drill to make a hole in the removed cover.
We apply silicone sealant along the side of the valve for tubeless wheels (colloquially - spool).
We insert the valve into the hole in the lid, press it carefully, and dry it.
After the sealant has hardened, screw the lid onto the drain hole of the canister.
Second stage: installing a water outlet.
Remove the cap from the second hole of the canister. Using a feather drill, we make a hole in it corresponding to the diameter of the coupling.
Insert the coupling into the drilled hole.
To secure the coupling more firmly, spray the joint with the lid with silicone sealant and dry it.
At one end (preferably a curved one) of the inlet hose for the washing machine, cut off the nut and its fastening.
The fastening itself will not be useful in further work, but we use a nut to secure the back side of the coupling, having previously applied silicone sealant to it.
After drying the sealant, screw the cap onto the opening of the canister.
Third stage: connect the hose to the watering gun.
The use of a washing machine inlet hose is due to its ability to withstand high water pressure. We thread the cut part of the hose into the nut of the quick-release fitting.
We fasten the section of the hose in the quick-release fitting (it is clamped with a special fastener).
We twist the main fitting and its nut.
We screw the fitting onto the watering gun on the rod.
Stage four: connect the hose to the canister.
To prevent air from escaping when water is supplied under pressure, insert a rubber gasket of the required diameter into the second nut of the inlet hose.
Screw the nut onto the quick-release fitting.
Mini-wash is ready!
Fifth stage: putting the sink into operation.
Pour water into the canister.
Connect to the valve Automobile compressor and pump up the air (about 1 atmosphere, the main thing is not to overdo it in pumping - it can inflate or rupture the canister).
We press the start button on the watering gun and my favorite car.
This mini-wash is easy to use, requires little water, takes up little space and can be used in miniature space. In addition to the car, washing will help with cleaning windows. country house, bicycle, boat, stroller, etc.
sdelaysam-svoimirukami.ru
Features of a high pressure car wash
Why are most special stations equipped with this type of washing? This is due, first of all, to the fact that with the help of this device you can wash the body, underbody, suspension, engine and engine compartment without making much effort. The main positive feature of a high-pressure car wash is that a directed jet of liquid easily and effectively washes away dirt from the surface of an object. This jet occurs as a result of the operation of a high-performance pump, and is formed by a special tip.

Such a device will be useful not only for washing cars, but also for various household needs. So the intention to acquire your own system will solve many everyday problems, especially if you have a plot of land with a spacious house at your disposal. At least cleaning street communications and paths will happen many times faster. There are many stores that sell this type of product, but it is much more pleasant to make a high-pressure car wash with your own hands. Moreover, this process is not particularly complicated.

Do-it-yourself high-pressure car wash - basic elements
The first thing you need to do is purchase all the parts that you will need to assemble the device. The most important and expensive part of a car wash is the pump. It must be highly productive. In addition, such a pump must develop a pressure of up to 100-200 bar. When choosing this part of the system, it is very important to pay attention to what materials it is made of. The most optimal version of the working part of the pump should look like this: the pistons are made of durable metals or durable ceramics, the block heads are cast from brass, and the liners of the crank mechanism need to be provided with a large support area.

Sometimes, to save money, a car wash is assembled from a compressor; such a system is, of course, faster to make with your own hands, and the compressor in this situation performs the functions of a water pump.
Another important part is the electric motor. For a home car wash, it is best to use a 220-watt electric motor, that is, single-phase. This type of connection is safe and significantly saves money. Some car wash designs require the presence of condensers and a single-stage gearbox. These items may make the device easier to use and also increase its service life, but they are not required.

carnovato.ru
I'm tired of waving a rag and washing it in spring and autumn cold water I don't really want to. I’ve been wanting to buy a Karcher 5 for a long time, but when I looked at the price, I was a little dumbfounded and thought I should have bought it 3 years ago, it cost 12 thousand then, now it’s 19 thousand. I watched a video of the owners of the device, the pressure dropped, then it goes jerkily, then I need to change the repair kit for the rings , then the valve needs to be cleaned or something else, everyone says that the quality has deteriorated much. Figuring that I had thrown away a lot of money and then, God forbid, it breaks, I decided that I would refuse the purchase. But it needs to be washed. I had a water pump in my bins, I thought that if I ran it through it, maybe something would work out? On the internet for homemade Karchers there is only a Chinese pump running on 12 volts, which is of no use. There are homemade ones, but they are made for sinks from a brushless motor and a plunger pump. On the Internet, the cost of a plunger pump starts from 20 thousand. It’s easier to buy a Karcher. There is no more information on the internet. I decided to try and assemble it, maybe it will work fine.
The pump itself
From the fire extinguisher, pressure is supplied from the compressor from the refrigerator. On the inner tube in the fire extinguisher in the upper part there is a 1 mm hole for mixing active foam with air, at the outlet of the fire extinguisher there is a mesh made of an iron sponge for washing dishes and a nozzle on the hose with a choice of jets, in my opinion it’s called fog, I tried to do it myself, but that’s not it.
I pump up the compressor while I set up the equipment to 8 atm and turn it off. There is enough foam to process - the receiver pressure of 18 liters drops from 8 atmospheres to 4 and that is enough.
I’m not saying that it’s a replacement for a Karcher, but to get by for a while, so to speak, but for now I’m saving up money for a normal car wash, maybe not even a Karcher but a Shtil or something else. Recommend something similar to Karcher 5, but cheaper.
www.drive2.com
Washing device
The main component of the sink (or Karcher) is the engine, which creates required pressure water. A pump or motor will do (you don’t have to buy a new one, take a working one from an old car), the motor is built into the body of the sink and must be connected to a power source. For the body of the sink (body), choose durable material, thick plastic or metal. Even if you purchase a wear-resistant case, it is better not to use the sink for more than three hours at a time. This will put the washer out of action soon.
Hose attachments are available to facilitate the cleaning process - brushes of varying hardness, soft rollers, standard sprayers. If you purchase a couple of attachments, you can expand the functions of your sink by using it as an automatic mop or steam cleaner (you need to equip the sink with a heater).

Internal pressure
The higher the pressure inside the housing, the stronger the stream of water gushing from the hose, which means the dirt comes off easier. Set the pressure carefully, because water can simply break a fragile car part or glass and leave dents. Manufacturers set the pressure at 150-170 bar, but 100 bar is enough to clean the car.
If the contamination cannot be cleaned with a jet of water, purchase a special nozzle for the hose, a turbo cutter. It will help wash tires, wheels, and remove dirt accumulated in the cracks. You can use the mini-wash both outside and inside the car. If you are using a turbo cutter, you will need a pressure of 160 bar.

Electric pump
Before purchasing and using a pump when designing a sink, read how to choose the right device.
The material of the pump determines its wear resistance. A bad option is a plastic pump; it will soon fail if you use it for more than 20 minutes at a time. Expensive but reliable pumps are made of brass because it does not corrode. These pumps are rarely found in commercial car washes.
How to use the mini-wash
To wash worked properly, follow these recommendations.
- Be sure to check the operation of the washer before you start using it, this will save your time and health.
- Clean and change the filter installed in the car wash after each use.
- If the washer uses electricity to operate and the source is unstable, provide it with a battery.
- Do not let children use the sink.
- If repairs are necessary, do not hesitate to carry them out. Replace damaged sink components.
- Update the device gaskets.
- Protect your sink from temperature changes.
How to make a Karcher yourself
Although car washes have achieved wide application, their price is high. So, if you want to do the sink yourself, you will be needed:
- canister;
- irrigation hose with gun;
- pump;
- union;
- canister lid;
- tubeless wheel fungus;
- rubber gasket;
- coupling.

These are the components of the future car wash. Materials that will come in handy during the manufacturing process:
- drill;
- sealant.
First stage. Selection of components.
The required volume of the canister depends on you and the purposes for which you will use the washer: a five-liter canister is enough for a passenger car. Drivers carry a car wash in their luggage, so choose a body based on both volume and dimensions.
The irrigation hose must be strong and flexible and should not be twisted or broken. Hoses with nylon braid are considered durable. A hose consisting of several layers is more reliable. Don't skimp on this component. The only requirement for the gun is that it must hold tightly to the hose.

The pump can be foot-operated or automatic. We won't need the high power of this pump, so don't buy an expensive one. Use automatic pump much more convenient than a foot pump, since you don’t have to constantly drag the pump from place to place and perform extra work foot. However, the cost of the pump plays a decisive role; an automatic one is three times more expensive.
Choose the fitting and coupling at your discretion, the main thing is that they are in close contact with each other. It is preferable to purchase both the fitting and the coupling from the same material (plastic or metal).
Second phase. Preparing the canister.
Drill a hole in the canister that is the right size for your coupling. Insert a coupling with a screwed-in fitting into this hole. Secure the structure with sealant so that the coupling does not pop out during operation, and the required pressure is maintained in the canister.

Third stage. Cover assembly.
The lid needs to be strong, solid and suitable for the canister. To prevent air from escaping from the canister, attach a rubber gasket to the bottom of the lid. Then make a hole in it and insert the tubeless tire fungus into it.
Fourth stage. Assembly of the structure. Additional functions.
Screw the lid on the canister tightly, connect the cord from the pump to the fungus, attach the free edge of the hose to the hole made in the canister using a fitting. Homemade sink ready. The principle of operation of such a washer is simple: using a pump, air is pumped into a canister of water (the canister is not filled to the brim with water). Create pressure up to 0.3 bar or higher if your canister can handle it. Under the influence of pressure, water streams out of the gun when you press the handle.
If you will use the sink during the cold season, equip your sink with a special burner for heating the water. For these purposes, you will need a larger canister; it will lose mobility, but with the help hot water The car is cleaned of heavily dried dirt.

Provide a power source for the washer. If the washer runs on fuel (gasoline or diesel fuel), then there will be no problems with moving it. When planning an electric car wash, make sure you have a working and accessible source of electricity. In this case, you are unlikely to be able to freely transport the sink from place to place, but you will not have to spend money on expensive fuel.
Decide in advance what you are using the sink for. If you want to clean the windows of a house or the wheels of a car, then a compact, mobile washer on wheels and with a long hose will suit you. When using a sink on a production scale, you will not need its ability to move, so it is better to design a stationary sink. It connects directly to the water supply. If the need arises, set up automatic water supply to save money.
While you can save on water consumption, you cannot save on purchasing sink components. To prevent the item from becoming dirty after washing, purchase special filters. You don't need an expensive filter to purify the water to drinkable condition. A filter is needed to purify the water, at least from debris that will disable the sink.

You can even make money by designing a pressure washer if you open a car wash. The main thing is that the sink you make works. Using the washer, you can clean bicycles, mopeds, cars, freight transport and their components.
How to make a Karcher powered by a cigarette lighter
This sink design does not require any costs. Below are instructions for creating a more complex model:
Us you will need:
- windshield washer motor;
- irrigation hose with gun;
- cigarette lighter (motor power supply), cigarette lighter plug;
- two hoses 3 meters long, one hose must fit freely into the other;
- corrugated hose with a diameter of 25-30 millimeters;
- switch;
- M8 bolt, washer and nut;
- two plastic canisters(volume 10 liters);
- 6 self-tapping screws;
- two-wire electrical wire 5-7 meters long;
- plastic sleeve;
- power cable;
- brush for washing a car.
Additional materials:
- sealant;
- drill.
First stage. Creating a hose.
We make a small hole in the bottom of one of the canisters. A thinner hose (up to 6 millimeters) and a two-core wire are placed inside a thick hose (diameter 10 millimeters or more). Then the hoses we have fastened are inserted into the opening of the canister. A plastic sleeve is inserted into the free end of the hose. Next, a thin hose is attached to the washer motor, and the wires are also connected to the motor.

Second phase. Creating a canister with a double bottom.
The second canister is cut approximately in the middle in order to subsequently make a second bottom with a shuttle out of it. The motor is fixed to the second bottom of the canister; for these purposes, a homemade clamp is used, which can be made from the remains of a cut canister. For this we need an M8 bolt and a little sealant.
The wires are also secured using self-tapping screws and sealant. Then they connect, again using self-tapping screws, the body of the structure: the second bottom and the hinged lid.

Third stage. Completion.
Using the power cord, the wires are connected to the cigarette lighter. A hole is made in the brush for the button, the switch is secured. The brush itself is mounted on the edge of the hose with a plastic sleeve. Use the attached diagrams in your work to better understand the text.
couo.ru
Manufacturing technology
In what order should the parts be connected? First, install the container and filter, then attach the hose, mount the pump, then the motor and regulator, fasten it with the hose, use the gun and nozzles.
The principle of operation of such a mini-wash with your own hands is as follows: you turn on the pump, water begins to flow from the canister into the hose, then you further press the trigger of the gun, and a thin stream escapes from it under the force of pressure.
You can also use a tubeless tire nipple and a knife with a sharp tip.
- Make a hole in the lid of the container using the sharp end of a knife; the hole should be smaller than the fitting diameter of the nipple.
- Insert the nipple from the inside.
- Make a hole for the coupling-connector at the bottom of the canister; it should be smooth without protrusions or seams.
- Insert the coupling using the wire into the canister through the hole.
- Apply silicone sealant to the joint.
- Take the fitting and screw it to the coupling.
- Wait for the sealant to dry.
- Next you need to screw on the lid. Important: wait again completely dry sealant.
- Connect the pump.
- Be sure to plug the fitting with your finger and increase the pressure in the container.
- Use the connector to fit the hose.
- One end of the hose must be connected to the canister, and the other to the watering gun.
- Fill the canister almost completely with water and pump air inside. Please note: do not overinflate the canister with air, as it will expand under the influence and force of pressure. If you have a large-volume canister, prepare special clamps in advance that will prevent excess pressure and swelling of the tank.
- Press the trigger of the gun to cause water to flow out under pressure. Select required type jets on the gun.
vivoz-gbo.ru
I'm tired of waving a rag, and in spring and autumn I don't really want to wash with cold water. And so I decided to buy a Karcher 5, but when I looked at the price, I was a little dumbfounded and thought I should have bought it 3 years ago, it cost 12 thousand then, now it’s 19 thousand. I watched the video of the owners of the device, then the pressure dropped, then it goes jerkily, then I need If you need to change the repair kit for the rings, then the valve needs to be cleaned or something else, everyone says that the quality has deteriorated much. Figuring that I had thrown away a lot of money and then, God forbid, it breaks, I decided that I would refuse the purchase. But it needs to be washed. I had a water pump in my bins, I thought that if I ran it through it, maybe something would work out? On the internet for homemade Karchers there is only a Chinese pump running on 12 volts, which is of no use. There are homemade ones, but they are made for sinks from a brushless motor and a plunger pump. On the Internet, the cost of a plunger pump starts from 20 thousand. It’s easier to buy a Karcher. There is no more information on the internet. I decided to try and assemble it, maybe it will work fine.
Pump 60/35 power 600 W, lift height 35 m and capacity 60 liters per minute. I understand that it is not for such purposes, and the output in this case will have completely different characteristics. And the most a big problem that with such work the engine may overheat due to high resistance, but after working for six months while the flight is normal, after washing 1 car the engine temperature reaches 43 degrees, which is considered normal.
The pump itself
Connected to a water supply system on which a flask with a filter is installed, the pressure in the water supply system is 2.5 atmospheres. From the pump comes a 16 mm rubber hose, 8 meters long, at the end of which is a polypropylene ball valve (I don’t close it without turning off the pump!). At the end of the polypropylene pipe there is a ½ plug with a slot.
I plan to connect an automatic system from the compressor so that when the tap is closed the motor turns off, but I probably won’t finish it, but maybe in the summer I will.
Regarding the outlet pressure. I can’t say with numbers, but I had a Karcher 5 and of course I couldn’t reach it, but I also had some kind of Korean sink in Leruamerlen, there was an exhibition type there that you could try out - there was a container made of transparent plastic and you could put a jet in there, so here you go my device feels like more hand takes it back than that one. And that one had a characteristic of 90 bar and naturally adjusted the handle to max. My device sweeps away large dirt, of course, and leaves traces on small dirt, but not as clearly as a Karcher, but active foam does its job and the car comes out clean, after wiping there are small traces of dirt on the rag, but this is also observed after Karcher, you still can’t wash off all the dirt if you don’t rub.
In terms of costs, there was a pump (I bought it about 3 years ago for circulating water in the heating system for cleaning with chemical reagents, it cost about 3800 rubles, now it’s probably become more expensive. I bought a good rubber reinforced hose 8 meters for 1300 rubles. Fittings for the pump about 800 rubles. hose from the water supply to the pump for 32 mm, about 600 rubles. The rest was about 6 thousand rubles.
Regarding the foam generator, it was already like this
From the fire extinguisher, pressure is supplied from the compressor from the refrigerator. While I’m setting up the equipment, I pump it up to 8 atm and turn it off. There is enough foam to process - the receiver pressure of 18 liters drops from 8 atmospheres to 4 and that is enough.
Does anyone have any thoughts on this device? Can it be replaced if there is no money for a normal Karcher? Or maybe someone can tell us about their homemade products?