How to coat plaster before wallpapering. How to treat walls before wallpapering. What should the surface be like?
Read also
It depends on how well the wall surface is prepared for decorative finishing (wallpaper, decorative plaster, tiles, painting) depends on the final result and the service life of the repair. Many people know about the need for preparation concrete walls to wallpapering, but few know how to do it correctly in order to avoid the disastrous results of their work, which will ultimately result in additional expenses time, effort and finances.
The main arguments for preparing concrete walls before wallpapering are the following:
First stage of preparation
The preparation of concrete walls depends on whether there is an old coating on them, or whether the walls have never been decorated.
Preparation for old wall coverings
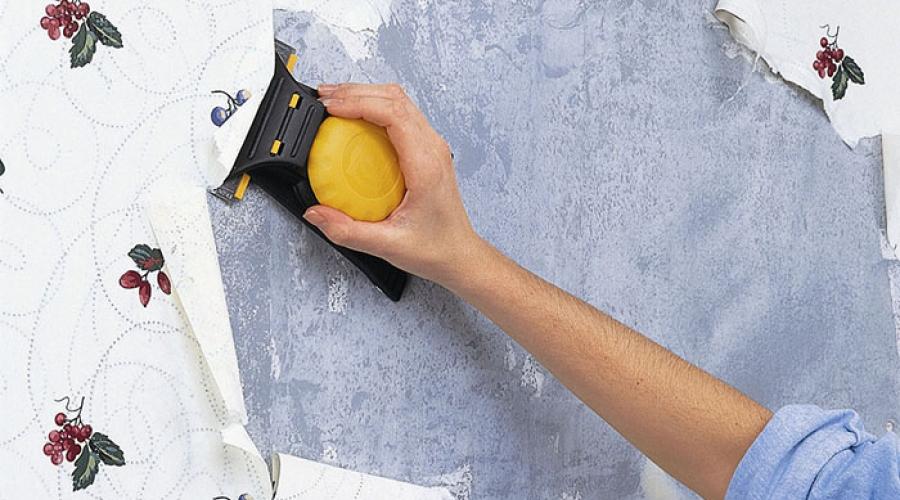
The very first stage in carrying out preparatory work for wallpapering is dismantling the old covering. If you do not dismantle the old wallpaper, further measures to prepare the surface will not make sense.
The old wallpaper needs to be softened. If the previous wallpaper was paper, it should be wetted with a soap solution and wallpaper glue added. On vinyl or non-woven wallpaper, you need to make cuts in order to get to the paper base, which should soften the soap solution. After the wallpaper has softened, it should be removed with a metal spatula. If they are difficult to remove, you should moisten them again with soapy water. 
If the wall was painted with enamel or oil paint, it should be cleaned with coarse sandpaper. Water-based paint can be removed in the same way as paper wallpaper using a spatula.
If the previous wall finishing was plaster, you need to ensure its integrity by tapping for the presence of voids. Empty places are removed and plastered; if there are many such places, it is better to remove the entire layer and plaster the surface again.
Preparing walls in a new building
Before preparing the walls for wallpapering in a new building, you should rough finishing, which, in turn, consists of several stages:

Elimination of uneven walls can be done using plaster mesh. To achieve maximum adhesion of the plaster to the surface, notches are made on a smooth concrete wall with a hammer drill.
Stage two: primer
After completing the first stage, the preparation of the walls continues with their primer. It is needed to fasten surface layer walls, penetrating deep into plaster or concrete. The wall surface begins to absorb moisture worse, which improves the quality of its coating. In addition, the primer removes dust, cleaning the surface. It must be remembered that the preparation of concrete at each stage must be accompanied by priming.
The primer is applied using a roller or brush until a white foam forms. If it absorbs quickly, additional layers are applied. After the primer has dried, the wall is rough leveled.
Stage three: putty

After the primer has dried, the preparation of the walls continues by eliminating irregularities, defects, and cracks. It is necessary to achieve the maximum flat surface. Before applying the putty, you need to make sure that there are no fasteners or fittings left in the wall, which will show up as rust through the wallpaper in the future. Areas where the reinforcement is exposed must be puttied with special care. In order not to leave noticeable streaks, it is necessary to use a spatula first in vertical position, then in horizontal. To obtain a better and more uniform coating, it is recommended to use a wide spatula 30-40 cm and hold it at an angle of 25-30 degrees relative to the wall. To putty corners, use an angle spatula.
Final preparation
Final preparation of the walls includes sanding the putty surface metal mesh or sandpaper for minor irregularities after completely dry putty, and final priming until completely dry required quantity layers. 
This preparation of concrete walls is carried out by gluing paper, vinyl, non-woven wallpaper.
Preparation for liquid wallpaper
When preparing for liquid wallpaper, a perfectly flat surface is required, while when gluing non-woven wallpaper, some wall irregularities may become invisible. Preparing concrete walls for decorative plaster and liquid wallpaper is similar, but liquid wallpaper requires less time. It is no different from preparing for gluing regular wallpaper, in addition, liquids tend to pull stains and stains from concrete surfaces, so the walls must be coated by special means and several primer layers. 
For concrete walls, such a product is gypsum. It protects the adhesive contained in liquid wallpaper, allowing it to reliably stick to the concrete surface. Gypsum clogs all small irregularities and pores; it can also be sanded. After it dries, the surface is primed and covered with white water paint to ensure that liquid wallpaper does not lose its color. Painting on concrete and plaster is ineffective - only on gypsum putty. Finally, a strengthening primer is applied to bond the liquid wallpaper and the wall surface. Liquid wallpaper is applied with a spatula in the same way as decorative plaster.
Preparation for painting
When preparing a concrete wall for painting, it must be cleaned of any coating that has been applied and anything that may prevent an even layer of putty from laying down. All chips and cracks are repaired, then the concrete for painting is sanded with sandpaper. To prime a concrete surface for painting, you need special primer mixtures deep penetration, preventing swelling and peeling of paint. Get high-quality painting surfaces can only be painted after applying several layers of primer. Painting of concrete should be done after complete removal dust using a roller. Correct painting carried out starting from the top of the wall.
Preparation for tiles

Preparing a concrete surface for tiles is practically no different from other types of coatings. The preparation steps for tiles are the same as described above. The advantage of the work, which will save time, is that there is no need to level the wall under the tiles to a perfectly level state - it is enough to only get rid of significant irregularities. The exception to this is preparation for mosaic tiles with a paper base, which is pasted like wallpaper - it requires a well-plastered surface. If the walls are smooth, the tiles are laid with tile adhesive or cement mortar, if not, then padding of the plaster mesh is additionally used.
After removing the old coating, the plaster is tapped for voids for repair. After this, the surface under the tile is treated with an antifungal primer; this is especially important if tiling a bathroom or toilet. Floor tiles in these rooms it is necessary to treat with waterproofing.
Fungus and mold can form in absolutely every apartment or house, which negatively affect human health. It is very important to know how to treat a wall against mold and mildew in order to give a more aesthetic appearance to the room and prevent the development of diseases.
Main types of fungi
Before deciding how to treat a wall against mold and mildew, you need to know what types of fungi there are. There are quite a few types of them. The most common among them are:
- moldy;
- blue fungi;
- decay fungi.
At big defeat If wall surfaces are free of mold, the room is completely disinfected by using a sprayed disinfectant. This product penetrates into microcracks, completely eliminating fungi and mold even under wallpaper.
Folk remedies for eliminating mold and fungi
Many people are interested in how to treat a wall against mold and mildew with folk remedies, since many of the chemicals used can be very dangerous to human health. Among the most popular folk remedies you need to highlight the following:
- bleaching powder;
- hydrogen peroxide;
- solution copper sulfate.
A solution of bleach is considered a good solution. To do this, you need to dilute 200 g of lime in 1 liter of water. In addition, it is advisable to additionally use fungicides included in the adhesive compositions.

If the mold has spread to the plaster layer, then hydrogen peroxide must be used for treatment. Also good remedy Copper sulfate is considered to be used to eliminate mold and fungi. To prepare the liquid, you need to dissolve 100 g of vitriol in 10 liters of water. The solution must be applied to the surface of the walls using a brush or spray.
How to get rid of mold and mildew forever?
Having found out the reason for the formation of mold in the apartment, you can choose an antimicrobial agent. Before treating walls against fungus, you need to carefully check the adhesion of the plaster to the base. A dull sound may indicate that there is a cavity under the plaster, which leads to the spread of mold. All plaster must be removed from this area and the putty must be reapplied.
Then you need to apply an antiseptic composition to the treated surface using a sprayer, brush, or roller. The product is evenly distributed throughout the infected area.
Prevention of fungi and mold formation
Most often, fungus forms in rooms with poor ventilation. In the bathroom, a favorite place for mold and mildew is in the seams between the tiles. You need to fight fungus on the walls in the bathroom by stabilizing humidity and temperature, which does not require tightly closing the door. If ventilation is not good enough, you need to install an additional fan.
The cause of mold formation can be cold and drafts. In this case, it is worth carrying out external insulation. To remove fungus and mold, you need to perform antiseptic treatment and subsequent waterproofing.
Unfortunately, mold and mildew on the walls are not such a rarity in our houses and apartments. Mold and mildew most often form in rooms where everything is available for their growth. the necessary conditions- dampness and warmth. Very often they develop on walls covered with wallpaper, spoiling the entire interior with their appearance.
Their appearance is always big trouble, because it is very difficult to get rid of these unwanted neighbors, so the question of how to treat the walls against fungus and mold before wallpapering is not an idle one.
Spoiled aesthetics and more
 Dark spots of fungus will appear in the future on the wallpaper
 Penetrating deep building materials, they begin their destructive activities. Dark spots on wallpaper, gray-green stains on the walls, an unpleasant slimy or shaggy surface of the affected areas are unlikely to add aesthetics to your interior.
At the same time, being in the vicinity of such representatives also does not bode well for the health of the apartment’s inhabitants - allergies, asthma and other diseases can be caused by these tiny living organisms.
Their distinctive feature is their reproduction by spores. Spreading with dust throughout the house, these spores fill all its corners. Getting on the skin, mucous membranes or in Airways, they become a source of allergens and toxins.
As a result, after mold and mildew appear in a house, all its inhabitants may sooner or later become patients of an allergist, dermatologist or ENT specialist.
Causes of fungus
 main reason infection - dampness
 Mold and mildew, which often plague our homes, are close relatives of the common forest mushrooms that many of us love to collect.
The mycelium itself is located deep in the nutrient layer, and what we see from the outside are only its fruiting bodies that appear during ripening - for the spread of spores.
If for forest mycelium the nutrient base is soil, then for “house mushrooms” this role is played by construction materials.
 Moreover, the fungus is extremely unpretentious and can equally well grow on wood, brick, concrete, drywall, etc.
The only condition necessary for the growth of mycelium is high humidity and above-zero temperatures.
And the higher the humidity and room temperature, the better conditions for rapid growth of microscopic fungi.
Before you begin to fight them, you should find out and eliminate the cause of excessive dampness. Without this, any attempts to get rid of unwanted neighbors will be doomed to failure.
Create favorable conditions mold may develop on wallpaper for several reasons:
 Fresh air must circulate
 To check whether they function at all, just hold them close to ventilation grille a lit match or candle.
By the vibration of the flame, it will be possible to immediately determine whether there is air flow in the system, as well as its intensity. If there is no air movement, then most likely the system is clogged or blocked somewhere.
 Low-quality windows do not provide ventilation
 Often the cause of condensation accumulation in a room is low-quality plastic windows. In pursuit of savings, homeowners purchase economy-class windows made from a cheap profile that does not provide special valves for gas exchange in the room.
As a result, the room is simply sealed: the accumulating moisture has nowhere to go, and it settles on internal surfaces in the form of tiny condensate.
The situation is aggravated by an insufficiently powerful ventilation system and walls made of moisture-proof materials.
Moisture penetration from the roof or basement
 Dampness can also enter the room from outside. For example, if there is a leaking roof or insufficient waterproofing of the floors between the living room and the basement.
Accumulating under the wallpaper, dampness becomes a favorable environment for the development of fungus.
To eliminate this problem, first of all, you should repair the roof or improve the waterproofing of the floor. There are ways.
Non-compliance with construction technologies
 A variety of violations of building regulations can cause walls to become damp. This could be an application for interior decoration walls of materials with waterproofing properties, as well as:
- Pasting walls with water-repellent materials, such as roofing felt or plastic film.
- Using vapor-proof materials as insulation - polystyrene foam, penofol, penoplex, etc.
- Wallpapering walls with non-woven wallpaper.
After all the immediate causes of mold have been eliminated, you can begin to fight the fungus.
Wall treatment products
 The simplest solution for fungus is lime
 To combat fungal infections of structural surfaces, it has been developed whole line special drugs. In addition, there are a number of home recipes that allow you to clean the wall of mold and mildew.

You can find it in construction supermarkets the widest range factory-made antiseptic and bactericidal agents designed to combat fungal infections of building structures.
The table provides a list of the most common drugs produced domestically and imported.

 The drugs listed above can be used both to combat an existing source of mold, and as a preventive measure. All antifungal treatment walls are made in several stages.
Surface preparation
Before applying antiseptic to the wall, it should be properly prepared. First of all, it is necessary to remove all finishing from the affected areas - old wallpaper, plaster, putty down to the bare wall.
Old finishing material, infected with fungus, should be disposed of in a trash can, carefully collecting it. The fact is that fungal spores are very tenacious and, if construction waste is not properly disposed of, can again cause its development.
 All coatings must be stripped off before processing.
 To remove the old finish, you can use any available tools: a spatula, a hammer, a chisel, an old hatchet, etc. To make old wallpaper come off easier, they should be thoroughly moistened with warm water and left for half an hour.
We also completely dismantle and dispose of plaster permeated with mycelium. After the wall is completely free of interior decoration, you should carefully inspect it. If it is damp to the touch, you will need to dry it thoroughly using a heat gun or construction hair dryer.
 Treat the walls twice
 After this, we treat it with antiseptic solutions. They can be applied normally paint brush, sponge or roller. For greater efficiency, this process should be performed twice - the second layer is applied after the first has completely dried.
After the supporting base has been thoroughly treated with an antifungal solution, restoration can begin. decorative finishing. The wall is primed and plastered, while Special attention should be given to the joints old plaster with the new one.
They must first be cleaned of dust and loose particles. Also the edge of the old plaster mortar need to be thoroughly soaked with primer for better adhesion to the fresh solution. For instructions on how to get rid of fungus, watch this video:
After the freshly applied plaster has dried sufficiently, its surface should again be treated twice with antiseptics to avoid a “relapse”. Then you can start gluing new wallpaper.
Wallpapering
 If you have removed the old coating in only one place affected by fungus, then to restore the decorative finishing coating you will have to purchase similar wallpaper and combine the design. However, it should be borne in mind that such restoration work does not guarantee success.
Freshly pasted wallpaper will still stand out from the old ones with its richer and brighter colors. This is not so significant if the area being repaired is usually hidden behind massive furniture - a cabinet or “wall”. But even in this case, the dissonance between the old and new wallpaper is insignificant only until you decide to rearrange the room, therefore, when repairing fungus-affected areas of the wall, it is recommended to completely remove the old wallpaper and replace it with new ones.
Before gluing new wallpaper, the entire cleaned wall should also be treated with antifungal agents, taking this opportunity. So to speak, “to avoid” - for preventive purposes, since mold and mildew spores can remain viable for many years.
 For wallpapering, you can choose glue with the addition of fungicides
 Only after carrying out a multi-stage and very labor-intensive procedure can you get rid of the fungus with a high, but not 100% certainty, so you should always remember that it is much easier to prevent a fungus than to destroy it.
During construction and finishing works Please comply with building regulations. Pay special attention to such serious phenomena as a leaking roof, damp walls, non-working ventilation and correct them in a timely manner.
Wallpapering, which seems like a simple and straightforward task, turns out to be a rather complex process that requires careful preparation. Treating the walls before gluing wallpaper is a mandatory stage of finishing work, providing the canvas with reliable adhesion to the walls and protection from possible cracking.
According to experienced plasterers, perfectly smooth walls do not exist in nature. When manufacturing, installing or changing decor, pieces inevitably break off from the walls, and the depressions formed at the site of the chips must be repaired before applying new finishing materials.
Humidity is another factor to consider when conducting repair work. High humidity indoors can provoke the appearance of mold fungi, which pose a danger to people in the room. The presence of mold requires additional processing walls before decorating with wallpaper.
Correctly carried out wall treatment allows you to obtain a perfectly flat surface, which will greatly facilitate the process of wallpapering, regardless of its brand, and will also significantly extend its service life. In addition, when finishing prepared surfaces, significantly less glue and paint are consumed.
What are the walls treated with?
Wall treatment technology directly depends on the existing problems. It is enough to cover entire walls with shallow cracks with primer and putty. Sometimes, to improve adhesion between the wall and the wallpaper, a bleach solution is used, which is applied before priming as a disinfectant. This solution is prepared from 1 liter of water and 200 g of lime. All ingredients are thoroughly mixed until the lime is completely dissolved.

Preparation of walls affected by mold includes several stages:
- Eliminating the causes of mold. Increased humidity in the room is the result of poor ventilation or mistakes made by the builders during the construction of the building. Installation of super tight plastic windows, sealing cracks and cracks are the first steps towards eliminating mold.
- Removal of old finishing materials.
- Cleaning the wall from existing mold colonies.
- Treat fungus-affected areas with sandpaper.
- Applying fungicides such as hydrogen peroxide, bleach solution or copper sulfate. The latter is obtained by dissolving 100 g of vitriol in 10 liters of water. All fungicides are considered toxic, so when working with these liquids it is necessary to use gloves, goggles and a respirator, and also periodically ventilate the area being treated. To completely destroy mold, it is recommended to repeat the fungicidal treatment 4-5 times with a six-hour interval between procedures.
How to properly prepare walls
Preparing walls for wallpapering includes several mandatory stages. First, the old finish is removed. Remove regular ones paper wallpaper it won't be difficult. To do this, just wet them warm water and wait for it to be absorbed. This trick will not only make it easier to remove the old finish, but will also prevent clouds of dust from rising into the air when cleaning the walls with a metal spatula.

Coating from oil paint remove using soap solution and sandpaper. Mineral paint is removed as follows: thin layer wash off with a brush, and thick ones are removed with a metal scraper. Enamel paint dissolve with soap or soda solution. The dispersion paint will have to be scraped off with a spatula.
If necessary, the cleaned wall is treated with a fungicide. Note that antifungal substances are included in some brands of wallpaper glue, which is advisable to use to prevent the appearance of colonies of pathogenic microorganisms.
For priming walls, special liquid mixtures are used that differ in composition and depth of penetration. Distinguish the following types primer materials:
- Universal.
- Alkyd, intended exclusively for wooden structures.
- Perchlorovinyl, used for processing concrete and brick structures.
- Homemade, obtained from diluted wallpaper glue.
On final stage walls are processed and they are leveled. To do this, irregularities are marked on the pre-primed surface, to which special attention must be paid. These areas include bumps, depressions, chips and cracks. After eliminating the defects, the wall is puttied. A wall that has undergone this treatment is considered ready for further decoration with wallpaper or paint.
To ensure that the wallpaper does not peel off the walls and maintain a presentable appearance for a long time, you need to: preparatory work. Proper removal of previous coatings, treatment antiseptics and primers, applying several layers of putty - all this increases the strength of the surface, as well as adhesion to paper webs. It is necessary to strictly follow the advice and recommendations of the masters, otherwise in a couple of months everything will have to be redone.
Why is wall treatment carried out?
It is extremely rare to find perfectly smooth surfaces in an apartment. Even in a new building there are some defects, while the foundations on which canvases were previously glued are a rather sad sight. When changing the decorative layer, small pieces of concrete break off. It is imperative to treat the walls before gluing wallpaper, otherwise such defective areas will subsequently cause bubbles to appear and peeling of the coating on paper, non-woven or vinyl based.
Even if the apartment is new and the owners are completely satisfied with the walls, treatment may be required due to high humidity. This applies to areas such as toilets, kitchens and bathrooms. Increased level moisture in rooms contributes to the emergence and spread of entire colonies of harmful microorganisms such as mold and fungi. The presence of these pests negatively affects the appearance of the paintings, in addition, they pose a threat to human health.
Having processed it correctly concrete bases following the recommendations and instructions experienced craftsmen, the apartment owner will receive smooth and smooth walls. Thanks to this, the pasting process itself will be significantly simplified, and the wallpaper will last much longer. This will also save money, since significantly less glue is applied to the prepared surfaces.
Multi-stage work should help achieve such properties of the concrete layer as:
- High level of strength - this characteristic affects the durability of decorative coatings. Otherwise, over time, there will be a need for additional restoration work, which takes a lot of effort and money.
- Cleanliness of the base - vinyl, non-woven and paper based can only be applied to clean substrates, so all previous layers must be removed.
- Smoothness and evenness - some people mistakenly believe that wallpapering walls allows you to hide unevenness and defects. But you can hide them only with the help of special solutions - plaster and putty.
- High adhesion - this indicator is achieved by applying a primer. The mixture is necessary to remove numerous small pores, which contributes to better fixation of the canvases.
Properly executed processing of concrete walls provides a strong and reliable base for finishing, which will not be difficult to stick and will have a wonderful appearance for a long time.
Removing old wallpaper is the most difficult and time-consuming stage
Preparation for treating walls before wallpapering at the initial stage includes dismantling the previous decorative layer, if any. The process is complicated because old coatings are difficult to remove. According to the advice of experts, the base can be wetted with water and left for a while. After this, all that remains is to carefully pry up the paper at the joint and tear off strip by strip. Ideal for work construction spatula small sizes, which will greatly simplify layer removal.

If there are remnants of previous coatings on the surfaces, including whitewash, paint, old newspapers, then these must also be carefully removed. Again, you will need a spatula, but you need to use it extremely carefully so as not to damage the base itself. The more scratches and chips a metal scraper leaves, the more putty and primer you will have to do in the future.
Colonies of mold and mildew found under old decor deserve special attention. It is imperative to get rid of them by treating them with additional solutions. Professional fungicides or other similar ones are best suited chemicals. Even if there are places of rust and water stains, it is also recommended to carefully treat them with the indicated compounds.
The maximum effect of antiseptics will be if the composition is applied in several layers. This allows you to completely destroy pests and prevent the possibility of their reappearance.
To save money, you can prepare your own mixture that copes well with microorganisms. This will require 200 grams lime mortar and 1 liter clean water. After thoroughly stirring the resulting liquid to a homogeneous consistency, it is applied to the infected areas. To increase the effect, it is recommended to add lime even to the glue that will be used to impregnate the walls.

Leveling walls and correcting imperfections with plaster
Apply a decorative coating to the defective surface with big amount No scratches or cracks. The slightest cracks and chips need to be repaired, although this takes extra time. For these purposes, the walls will need to be first plastered and then puttied.
At their core, both operations are similar. But each of them has certain differences:
- 1. Plaster - this composition is applied in cases where significant defects need to be repaired. These are various cement-containing substances that include strengthening additives.
- 2. Puttying is carried out in order to give maximum level smoothness. The solution is made on the basis of gypsum. If plastering is not always carried out, especially for new apartments where the walls are more or less free from defects, then it is impossible to do without putty.
Plastering is an optional step, but highly desirable. . The product is packaged in paper bags weighing approximately 25 kg. The packaging contains all the information necessary for diluting and mixing the solution. After preparing the mixture, you can begin to work. To do this, you will need two spatulas - the main wide instrument, which is directly used, and the overlay, through which the solution is applied to the main spatula.

Chips and other defects are repaired with careful, smooth movements from top to bottom. If there are any significant bulges that interfere with the work, they can be removed with a hammer drill or a regular hammer.
Much more difficulties are caused by plastering littered walls, when the error in vertical plane between top and bottom reaches several centimeters. In this case, it will take a lot of time, effort and, of course, solution.
Wall processing in this case includes plumb lines, beacons and a level. The first beacon is installed on the most flat area of the surface, while the next one must be placed in the place of the greatest deviation. By stretching the thread between two beacons, you can make several additional marks in the form of beacons along the resulting line. With help building level All marks must be placed in the same plane.
The plaster is applied in 1 layer, but if cracks or potholes are noticeable after drying, it is recommended to perform the entire procedure at least one more time until all defects are removed.
Finishing – puttying and priming
Before wallpapering the walls, all that remains is to putty and prime. Modern mixtures made on the basis of gypsum boast remarkable adhesive properties, which only increases the effect of the primer. Applying putty helps create a smooth and even surface of a white, uniform color. If you glue the canvases onto such a base, the concrete will not show through even on light and white decorative coatings.

Instructions for working with putty are as follows:
- All proportions, as in the case of plaster, are indicated on the product packaging. By adding required quantity dry matter and water, mixing is carried out in a special container. To speed up the process, it is better to use a construction mixer.
- The solution dries very quickly, so you should not prepare too much of the mixture, otherwise it will become unusable.
- The putty is applied with a wide spatula in a circular motion onto the wall. The size of one layer should not exceed 4 mm.
- To increase the effect of the essence, it is recommended to apply several layers, but only after the previous ones have completely dried.
- The greatest difficulty is caused by the finishing layer, since it must be done perfectly so that there are no scratches or other marks from the spatula.
- After drying, all that remains is to carefully go over it with fine-grain sandpaper to get rid of the smallest protrusions and potholes.
The final stage is priming the treated surface. This procedure is always performed before applying wallpaper or painting, and on any base - gypsum surface, drywall, concrete. Primer mixtures create the thinnest film, which holds small particles together. Thanks to this property, the level of adhesion of the coating increases and it becomes possible to prevent cracking of the putty concrete layer.

The range of primers is quite large; the most popular is the acrylic deep penetration preparation. Such compositions are applied to the walls in several layers using a regular brush or roller with a pile of no more than 1 cm. concrete surface In this way, the apartment owner will ensure the durability, reliability, strength and quality of the wallpaper being glued.