Paper butterflies on the ceiling. How to make butterflies on the wall with your own hands. Butterfly wall compositions
Crafts on the wall in the form of butterflies will help to refresh a boring and plain wall. They are used as a symbol of summer, lightness and freedom. Butterflies can be made from almost any material. Butterflies on the wall are a great way to decorate a room. They bring elegance and lightness to the room.
What style are butterflies on the wall suitable for?
Butterflies on the wall are made as a panel, fixed on one or more walls of the room. They can, fabrics and many other materials. Depending on the correct method of manufacturing and designing the panel is selected.
They can be attached to the wall arbitrarily or make a panel. You can also create paintings.
The lighter the material from which you make applications, the more they will resemble real ones. With a light breeze, their wings will rustle, creating an imitation of flight.
Moths are suitable for decorating a room of almost any style, but winged insects will look best in styles:
.It is very important that the color of the moths is combined with the color scheme of the room. Do not make bright red or green insects for a room decorated in beige tones.
They should also differ in color from the wall so as not to merge with it. For example, white moths would be out of place on a white or light gray wall. Successful combinations are:
The main rule is that the moths on the wall should stand out and at the same time be combined, and not seem like an extra decoration.
Preparing to create applications
Before creating a picture with moths, you need to consider how they will be located, what size they will be and what material they will be made of. You can find ready-made panels on the Internet and get an idea from there, after which you should start making a stencil.
Moths should not be located in one place, also, the distance between them should be different to make the composition look interesting. You can attach butterflies in the form of a whirlwind or arrange them randomly on the wall.
After that, you need to select the material for manufacturing and purchase stencils. It is advisable to have several stencils of different sizes to make the composition look more interesting. You can stencil cut on paper, vinyl, or any other suitable material.
Light moths can be cut from:
Making butterflies out of paper is not difficult, but you will have to tinker with the fabric.
Paper
Paper is suitable for those people who do not want to spend money on expensive material and time for manufacturing. It is very easy to make such moths on a stencil, but they have a drawback - applications are easy to damage.
Even small children can cut out of paper. You can also use colored paper, draw antennae, eyes and veins for moths. Such an application is inexpensive, and the whole family can cut it out.
Paper butterflies can be cut out of old magazines, as well as coloring pages and cut out along the contour. It is not necessary to make panels in one color scheme - the more different colors, the more interesting.
Butterflies made of paper can be glued to the middle, and then when the wind blows, they will sway. Such insects can be planted on glue, adhesive tape, or attached with a pushpin.
Cardboard
Cardboard crafts will be a little stronger than paper crafts, but will no longer be so light as to sway in the wind. You can stick rhinestones, sparkles and attach decorations on them, and unlike paper ones, cardboard moths will withstand it.
Wings can be made more voluminous or rounded. If the cardboard is dense, it must be lightly sprinkled with water, bent, sent under a press and dried. After drying, the decoration will take the desired shape.
You need to fix the cardboard more firmly, as it is heavier than paper. Do not attach it to tape or a pin - the butterfly may fall. It is better to use glue or double-sided tape.
Vinyl film
Vinyl film is a self-adhesive material, so it is ideal for application pasted on the wall. The film has a smooth glossy finish, shimmers in the light. Bright moths made of vinyl film will help to freshen up the room.
It's easy to cut, and you don't have to worry about how the stickers are attached to the wall. You just need to remove the protective layer from the film and stick it in the right place.
Advice
If you want the wings of a moth to move in the wind, the protective film must be removed only at the fold of the wings. Leave the film on the wings.
Textile
Fabric moths are perfect for liquid plain wallpaper, drapery or other soft finishing fabric. Moths will make the room more comfortable, improving the atmosphere in it.
The fabric should not be wrinkled, you need to iron it before cutting. It is recommended to attach with glue.
wall mount
The fastening material depends on the material from which the moths are made. For example, glue is suitable for paper, while foam is suitable for lightweight materials. Butterflies can also be attached to threads, hanging from the ceiling.
Glue
You can use pva glue or a gun. It is not recommended to use a pencil, as it does not hold the material well, especially the heavy one. Glue should be used on walls that are not afraid to get dirty.
It is better to apply glue to the fold of the wings, so the moth will look more like a real one.
If you apply glue to all wings, make sure that it does not protrude beyond the edges.. It is important to use quality glue, as it may not hold butterflies well or leave unsightly marks on the wallpaper.
pins
Unlike glue, pins leave little damage to the wall. You can also attach insects to a cork board. The pins are suitable for walls made of plastic panels, ordinary or cork wood, and drywall.
It is necessary to select pins with a head that is suitable in color and shape. You can purchase pins with heads in the form of different figures or with sparkles.
Before you stick a pin with a butterfly impaled on it into the wall, you need to glue the application to the pin with Moment glue. If you attach butterflies to wallpaper, then bend the end of the pin halfway at a right angle. So the design will be fixed in the wall in a natural way.
Styrofoam
To glue the moth on the foam, you need to spread a piece on both sides and attach the moth to the wall for it. Applications made of heavy materials are not recommended to be planted on such a mount, as the foam may not withstand. Only paper and cardboard crafts are suitable.
Threads
In order not to spoil the wall, you can hang butterflies by thread from the ceiling. It is recommended to hang butterflies on threads of different lengths. You can use both colored threads and transparent fishing line. The main thing is that the thread must withstand decorations.
Glowing butterflies
To create the effect of glowing butterflies, you need to attach butterflies to a white wall, and next to it there should be a table with a table lamp. To make such a composition, you will need:
- Stencil.
- Phosphor paint in several colors.
- The pencils.
- Sponge.
- Brushes, preferably a palette.
- Glue (preferably spray).
Materials can be purchased at a specialized stationery store. To make a composition you need:
- Attach the stencils to the wall using glue. You can also secure them with pins.
- Cut the sponge into small pieces and attach to the handle of the brushes (you can apply paint with a regular sponge).
- Apply paint inside the stencils. If you want to make the moth colorful, it is recommended to mix the colors in the palette.
- When the paint dries, you need to carefully remove the stencils, turn on the lamp and enjoy the beautiful composition on the wall.
To make the composition look more interesting, moths should be of different sizes and shapes. Stencils on the wall are placed at different angles and in different places.
Crafts from colored paper
To make beautiful butterflies out of colored paper, you need:
- Printer.
- Thick paper in desired colors.
- White paper.
- Pencil.
- Cardboard (the density should allow it to be bent).
- Glue.
- Scissors.
After preparing all the materials, you need to start creating crafts:
- Print the image templates on white paper and cut them out. Prepare more templates in case some don't work the first time. It is better if the templates are different in size.
- Attach the templates to the cardboard, circle with a simple pencil, then cut out. If you can, print the pictures directly on cardboard.
- Trace around the cardboard templates on the back of the colored paper and cut them out. Fold the paper in half so that the butterflies are voluminous.
- Apply glue to the fold, unbend the moth and press it against the wall with your finger. After a while, spread the wings of the craft.
VIDEO: DIY colored butterflies - easy and simple
Colored butterflies in two counts
You can stick butterflies on the wall in a mess, or in one direction (in this case, all insects should be of different sizes).
Beautiful and a lot - looks like a masterpiece
origami butterflies
Origami is a great solution for family crafts. Such moths will look original and unusual thanks to voluminous wings.
For such a butterfly you need:
- Newspaper or old magazine.
- Any paint (for example, gouache).
- The wire is thin.
- Pliers.
- Pencil.
- Scissors.
- Ruler.
Having prepared the materials necessary for crafts, you can get to work:
- Cut out squares of 4 by 4 cm or 5 by 5 cm from the sheets.
- Fold the paper in half twice.
- Fold the resulting square diagonally in two different directions.
- Fold the paper inside in folds to get a triangle.
- Bend the two ends of the top layer to the top.
- Turn the triangle over to the other side and bend the corner up so that it goes beyond the torso of the craft.
- Bend the resulting triangle to the other side and glue it to the base.
- Paint the ends of the wings with different paint.
- Make a butterfly body and antennae out of wire.
- Expand the butterfly with a scarlet triangle up, bend its wings and give them any shape.
- Dip the wire frame in glue and attach to the craft.
- Fix the insect on the wall in any reliable way.
VIDEO: Origami butterflies - no easier
paper butterflies
Volumetric craft for beginners
Vinyl crafts
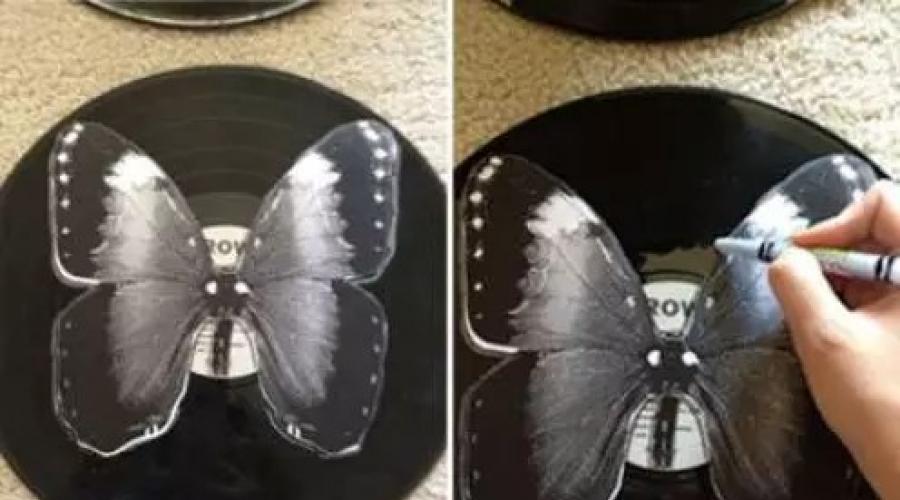
Creating butterflies is a simple task if you do everything clearly and according to the instructions. To do this, you need to purchase the necessary material:
- Old vinyl records.
- Crayons of two colors - black and white (you can use colored pencils instead).
- Butterfly patterns.
- Scissors.
From vinyl records - looks original
Templates should preferably be cardboard. After preparing everything you need, you can start creating the applications themselves:
- Mark the middle of the template on the plate. With a white chalk or pencil, outline the outline of the plate, and with black - the sticker, which is located in the middle of the plate.
- Take a baking sheet, cover it with foil, put a plate on the foil. Preheat the oven to 400 degrees, put a baking sheet there. Immediately remove the baking sheet with the plate, as it quickly begins to deform, after about 45 seconds.
- Use sharp scissors to cut the butterfly out of the plate. If it hardens again during cutting, it must be placed back in the oven. vinyl cools very quickly, so you need to cut not only carefully, but also quickly. You may need to heat the template several times.
- When the insect is cut out, it must be bent in half;
- When the butterfly is completely cool, you can glue it to the wall.

Surely many would like to modify or simply update the look of their home. Most often, the transformation of an apartment involves repairs, at least cosmetic. However, with a creative approach, you can give the room and apartment a new look and without tedious and costly repairs. It is enough to recall such a magnificent way of decor as creating a panel. And last but not least, a simple option for decorating walls with butterflies can help.
With a little diligence and effort, you can easily give a stunning look to familiar walls. Having familiarized yourself with the main points of decorating the walls, and choosing the right application for yourself, you can fix the butterflies on the wall with your own hands.
What is a butterfly decoration?
This type of decor is an application or, more correctly, a panel of butterflies, made of various sheet materials and fixed in elegant applications on all walls or on any one. There are many ways to make and fix butterflies on the walls, and the final result and the effect that this decoration will produce will depend on how to do it.
Just imagine that on your wall, for example, from the center, a whole whirlwind of butterflies of various sizes and colors scatters. They spin in a round dance and flutter their colorful wings. All this, of course, will please the eye, and attract the attention of others. Naturally, these are not real butterflies, and not even dried ones.
Video: examples of interior design with butterflies
Butterflies of various sizes and shapes, as well as colors, cut from a suitable material, are used to decorate the walls. A lot depends on how to approach the issue of implementing such an enchanting spectacle. If you choose hard cardboard for making butterflies, then you can try and give them a wide variety of shapes and positions, they will be durable and will not lose their shape. If you choose light fibrous paper or film and fix the butterflies only in the middle, then they will flap their wings from any movement of air, from which the spectacle will only improve.
Where to begin?

Butterfly stencil examples
First of all, it is worth deciding on the form of the future application. If your own ideas do not seem as spectacular as you would like, you can always search the net and find suitable options for ready-made applications. After that, you can proceed to the choice of colors and shapes of butterflies. Each apartment is decorated in its own way. It is necessary to choose the most suitable color option for the future decoration so that it best fits into the existing interior. Do not forget that the butterflies should be bright and noticeable against the walls or ceiling, and not merge with them into one spot.
Form should also be considered separately. There is, of course, the opportunity to purchase ready-made stickers in the form of multi-colored butterflies of the desired palette, which are full on order on the Internet. Their form can be both the most intricate and primitively simple. However, now we are talking about the option of a completely independent execution of the scenery. And this is precisely the main advice for novice masters. It is necessary, using any image editing or drawing program that you understand, to create a sketch of future butterflies. According to the sketch, templates of different sizes will then be made for cutting butterflies from the required material. In principle, you can even do it by hand on plain paper or tracing paper.

You should not chase grace by increasing the number of ruffles and bends on butterfly wings. Remember that later all this will have to be carefully cut out with scissors or a scalpel with a template.
Advice: It is best to get away from the strict symmetry of butterflies. So try not to mirror the right and left wings, but draw them in slightly different sizes, literally by a little. This will add some dynamism and volume to the final look of the application, regardless of how they are attached to the wall.
You should also not go too far with the last advice, after all, everything should be in moderation.
Once the sketch is ready, you can proceed to the next steps. After the format of the future decoration has been determined and it is known how and in what quantity the butterflies will be fixed, it is possible to multiply the prepared butterfly pattern in several sizes and print it. After that, butterfly stencils are made. It is best to impose a printout on a sheet of cardboard and cut out the inside along the contour.
One of the options to decorate the walls with butterflies is origami. In this case, there is no need to cut butterflies, you just need to learn how to assemble origami. It's simple enough. There are many ready-made lessons on the master class of forming a wide variety of origami, so this should not be a problem. Below we consider the features of fastening and distribution of such figures on the wall.

An example of the formation of butterflies for decorating a wall using the origami technique
We form a common picture
As mentioned earlier, you can choose the shape of the overall picture by looking at various options posted on the Internet, or you can come up with it yourself. It can be either a swirl image or a scattering of butterflies in suitable places so that they are combined with the existing pattern or pattern on the wallpaper, decorative plaster or other material that decorates the walls of your room. You can imagine everything in the form of a flock of butterflies that tend to fly from one side of the room to another, or to distribute them in small groups over the surface. Even a small cluster in the form of a heart or a flower will already greatly decorate the situation.
As soon as the idea has matured, it is necessary to fix it first on paper, and then on the wall. To do this, use either a pencil or a piece of chalk, with thin lines mark the main lines along which the butterflies will be fixed. The main thing is not to direct the lines too much, so that they do not subsequently catch the eye and do not spoil the view.

Material selection
You can cut butterflies from a wide variety of materials:
- paper;
- cardboard;
- film;
- vinyl self-adhesive film;
- the cloth.
Paper
Each of these materials has its own advantages. Paper can be decorated in any way possible, and butterflies are the easiest to cut out of it. In addition, it is not so important how much paper is needed in the end, it is the cheapest. You can use colored paper, which you can buy at any office supply store. If there is no desire to make butterflies of the same color, you can completely turn your eyes towards the already read glossy magazines with pictures. The result is colorful and colorful butterflies. Alternatively, after that you can arrange them according to the prevailing colors and use this when forming a picture on the wall.
The paper version can be easily mounted on the wall in any of the possible ways. Fully glued paper butterflies will not protrude significantly above the level of the wall, and those that are attached at a distance and from the wall will be able to flutter their wings from air currents.
Cardboard
Butterflies cut out of cardboard will be much stronger and more reliable. Although it will be more difficult to cut them, you can shape them however you want. Cardboard will easily take the desired shape and keep it. You can not only bend the wings or their parts, but also make them rounded. To do this, it is enough to slightly wet the cardboard and bend it as required with the help of a load. After drying, it will remain exactly as it should be. Due to the fact that the cardboard is much heavier, then it will have to be fixed somewhat more reliably.

The original version - butterflies from vinyl records
Film
Thick polyethylene film of various colors and a special self-adhesive vinyl film are ideal for decorating walls. They can be glossy, from which the butterflies will not only delight in shape and color, but also sparkle, shimmer, depending on the lighting in the room. Cutting butterflies from film is quite simple, just like from thin cardboard. An ordinary color film can be fixed in the same way as paper, and there will be no problems with a vinyl film at all, just peel off the protective layer and stick the cut-out butterfly in the right place on the wall. In order for the butterfly to be able to twitch its wings, it is enough to remove the protective layer not from the entire butterfly, but only in the central part, in the form of a strip.
Textile
The fabric can be perfect if plain liquid wallpaper, drapery or just any base that is soft to the touch or look is used on the walls. Butterflies cut out of fabric will also have a “warm” look, thus not violating the design created initially, only improving it.
It is better to attach fabric blanks, of course, completely to glue. However, it is possible to form a three-dimensional picture. For this, PVA glue diluted with water or a soap solution is used. The second option is only suitable for very thin fabrics. As with cardboard, it is enough to soak the fabric cut according to the template in the solution and let it dry in the desired shape.
We fix the scenery
In order to keep the prepared butterflies on the wall, you can use one of the following options:
Glue
Fully or partially glued butterflies will stick firmly to the wall. You can use both ordinary PVA and wallpaper glue. The main thing is not to overdo it with him so that he does not protrude beyond the edges of the butterflies. This is the easiest way to decorate a wall with butterflies.
pins
You can use a variety of pins. As an additional element of decoration, you can choose pins with beautiful heads in the form of a variety of jewelry or just small balls like pearls. In materials such as plastic or wooden lining, pins will enter without problems, the same applies to cork and even drywall.
If the walls are covered with wallpaper, then you can do it differently. Using pliers or pliers, bend the tip of a pin about 1-2 cm long at an angle of 90 degrees. After that, the bent part is brought under the wallpaper, and thus the butterfly is fixed. It is easiest to glue the pins to the butterfly itself with Moment glue.

Styrofoam pieces
On one side of the piece, glue the butterfly on the glue, and on the other side to the wall. The option is bad only because the foam itself is not a very durable material, and if it breaks, then it will be difficult to remove the rest from the wall.
Hang on threads
This option is best suited when using origami. With thin threads or a colorless fishing line, butterflies are hung from a cornice under the ceiling or directly to the ceiling. This method allows you to fully form three-dimensional solutions.
Finally
This way of decorating walls, although it takes a lot of time to implement and perseverance, however, will undoubtedly bring a lot of new bright emotions into your life. Any design of the interior decoration of the apartment can be diversified with the help of butterfly applications on the walls and ceiling. Choose the option that suits you and start this exciting creative process.
Video: butterfly wall decor master class
(No ratings yet)
Discussion:
We have already pasted little animals in the kitchen, now we will make butterflies in the nursery! The child is already at the age when you want to do everything yourself. And decorating a room with homemade butterflies is both interesting and useful!
I love butterflies everywhere! When they did repairs in the kitchen, I really wanted to choose a tile with butterflies, but my husband was categorically against it. Said it would look badass. Your article helped to find a compromise. WE made stencils and cut out several butterflies from self-adhesive film. And they pleased me and my husband, they do not mazolat eyes. Now I'm fluttering around the kitchen like a butterfly !!))
I decided to make this decor in my office at work. My profession is creative and it seems to me that such a choice of design is most welcome. There were some doubts about the choice of colors. My choice for a creamy golden combination. It turned out just magical, and there is where to draw inspiration))
For a long time I planned to make the wall decor with butterflies, I really liked the idea of volumetric figures, there was a problem in choosing the material, I wanted to make one color, in lilac tones, but, as luck would have it, I could not find colored paper of the same color, then I bought wallpaper, with a small and completely inconspicuous pattern, but in the exact gamut that suited me perfectly. I made a lot of butterflies of different sizes using a stencil, and glued it to the wall in the form of a double heart with glue, now we have love in all its manifestations in the bedroom.))
Volumetric animals were made into the room of the younger brother (cartoon - they are symmetrical - bunnies, bears, chanterelles, etc.). It came out great and looked great. But the kid tore everything off very quickly, there were stains on the wallpaper. We are waiting for it to grow up to stick it again.
So be careful if you have small children in your apartment. I really want an app for myself, but have not yet decided which one I like.
we are doing repairs, I am persuading my husband to buy voluminous dragonflies. says draw a sketch, we'll see. and there are so many interesting ideas! apparently, the paper bought for dragonflies will go to waste - I will implement something new! a creative person can not be stopped! I want everything at once! =))
This is a great idea to do wall decor with your own hands! For example, I did this (although they were not butterflies, but flowers): I beautifully cut out tulips from a magazine (from a page with multi-colored text). Separate stems and separate buds. It turned out just great. It was a gift for my mom, who just loves tulips). In the same way (magazine clippings), you can create a stylish interior in your apartment with your own hands.
By clicking the "Add comment" button, I agree to the site.
In the decor, paper butterflies are deservedly in high demand, as they allow you to get a decent solution for most situations in a short time and at minimal cost.
Of course, if you want to make the perfect decor option, you will have to choose the right paper and materials, you will need to work on ensuring that the shape of the product is correct, without oblique and uneven lines and sections, but, in any case, it is much more affordable and simple. an option that allows you to create interesting products with your own hands and not spend additional funds on decor.

Choosing a Butterfly
On the net, if you search, you can find photos of paper butterflies in such shapes and colors that your head will spin - on the Internet there are thousands of photographs of a very different plan, on which you can look at how the butterfly looks, what materials it is made of and why it was made that way and not otherwise.

That is, with the help of the banal Internet, you get a large catalog of options, it remains only to choose for what purposes you want to collect this decor product, what costs you expect and how much time you have to do it all productively.


For adults and children
For example, if you just decided to spend time with your child and want to load it with manual work, then you can choose simpler options. It is difficult for a child to understand the technical features of a butterfly, but if you give a simple option, then figurative thinking will develop, the child will begin to better understand colors and shapes, we will begin to think logically, and so on.

Plus, if possible, it is better to choose a butterfly model that can be made without the use of scissors or cutting tools, there are also many such options, the connections are made with glue or thread, so you don’t need to cut anything, which will save your child from accidental damage with scissors or paper.

If you decide to make a butterfly for room decor and you are no longer a child, but a completely adult person, then you can look at more interesting options for butterflies, choose the right materials and spend some time creating a design element.

Fortunately, on the same Internet, there are options for the most complex butterflies for decoration - you can decorate walls, furniture, paintings, ceilings, chandeliers and other lighting fixtures, you can even make a lampshade for a floor lamp or pendant lamp even with a certain choice of materials, your choice is very and very decent, it remains only to decide what exactly you want to do and for what purposes.


Quilling - for strong nerves and dexterous hands
A very interesting technique for creating paper butterflies is quilling. If you do not know how to make a paper butterfly as beautiful as possible, then look at this option. In the case of quilling, a butterfly is created from several strips of colored paper, moreover, it is colored on both sides. It is necessary to cut the paper in even lines of the same width, then fold them into rings of different diameters and make even identical wings for a butterfly from them.

Naturally, this process requires some skill - cutting paper into even strips is quite problematic, plus dazzling them is very problematic, you need to carefully glue each strip and align it so that nothing sticks out and visually the wings seem the same. It's really difficult, but there are certain tricks.

You can find a paper butterfly template online and cut all the details according to this pattern, and then practice gluing the parts. As practice has shown, literally from the third or fifth butterfly it turns out to cut the parts more or less evenly, plus learn how to glue the parts correctly, without folded paper and other defects.

After a lot of work and selection of suitable color options, you will get a fairly attractive butterfly that will fit perfectly into the interior of most rooms.

Butterfly species
There are other options for butterflies - openwork, when something like a snowflake is cut out of paper, only the shape is different, there are garlands of paper butterflies, there is even a special origami technique so that you can practice creating paper products of various shapes and sizes.

To work with paper as efficiently as possible, you should try all the options - certain styles, like openwork butterflies, are great for learning how to work with scissors and cut out small details with a blade, but this is a task for an adult, of course, and if you want to keep your child entertained, then look at origami - very interesting, does not require the use of additional tools, and for a certain age it will be an ideal activity - developing, interesting and not requiring large expenses, which is also very, very pleasant.


Useful properties of working with paper
It has long been known that paper origami improves fine motor skills of the hands, improves visual images, imaginative thinking and memory, plus this is a great relaxing activity for the brain - you move away from the outside world and do only needlework, this is a great advantage.

The rest of the options for working with paper involve cutting paper and gluing, so this is a task for the older generation, which should definitely be taken into account - origami is interesting for children, but cutting paper with scissors is dangerous and not entirely reasonable. Good luck in your endeavors!

Photo of paper butterflies


The appearance of the room is boring, but there is no money and energy for high-quality repairs. A fairly common problem for many people. But there is a way out of this problem - you can replace textiles and decor elements. This is a relatively quick and economical way to add variety to the familiar look of your home.
One of these elements can be butterflies for decoration. They will bring lightness to any interior.

Butterflies for decor can be created from various materials. Due to this, outwardly they can differ from each other and make a difference in the decorative design of the premises.
It is recommended to make a couple of trial decorative butterflies to get a better idea of how they will fit into the look of the home. Let us dwell in more detail on the materials that are used to create butterflies for decoration.

Material for creating butterflies for decoration
colored paper
The most popular option is paper. This is the cheapest material for creating butterflies and at the same time simple. There are several ways to make paper butterflies.

If you want to stick the product completely on the walls, then you only need to paint the front side of the butterfly.

When the butterflies are involved in a three-dimensional composition, then the paper should be used double-sided, where both sides have a certain color.

Indeed, if a butterfly has an unpainted, albeit wrong, side, then this significantly spoils the overall impression of the composition.
corrugated paper
In addition to colored paper, corrugated paper is often used. This creates a slightly different effect. Butterflies for decor are airy, light and translucent wings like real insects. With the help of corrugated paper, butterflies are very voluminous.

In addition, old magazines, pieces of wallpaper, special napkins and other printed materials can be used to create butterflies.

Indeed, a huge variety of butterflies can be created from paper. And if you also tint the paper, combine the use of several types of paper, then the place for fantasy is truly limitless.

Cardboard
The next type of material for decoration is cardboard. When creating butterflies, cardboard is used, which is not very dense. Distinguish between colored and double-sided cardboard. With the help of cardboard, a voluminous decor is created.

This is not surprising, since the butterflies for decor, which are made of cardboard, hold the created shape better. And in order to bend the wings of a cardboard butterfly, you do not need to use any special knowledge and abilities.
Cardboard is the main material for making template butterflies, which are typical for mass-produced products.

For this, a butterfly stencil is used. The result is a large number of decorative items that are similar in appearance and size.

At the same time, a minimum amount of time is spent on their creation. Of course, a stencil for cutting a butterfly is an outlet for many lovers to bring comfort to their homes.
Having a butterfly stencil on the wall, you can decorate your home with a fabric decor element. Unlike the previous options, the fabric gives the butterflies extra rigidity.


Butterfly production technology for decoration
You should start your acquaintance with butterflies for decor from the very basics - contour butterflies. To create them, you need colored paper. You can also use cardboard, old newspapers.

Initially, a blank is created for creating butterflies - a butterfly stencil for cutting out of paper. We come up with an image of a butterfly, which we then want to place at home. Then we transfer the created butterfly silhouette to thick paper, and then cut it out.


The use of butterflies for decor of various sizes seems to be advantageous. This gives the impression of a variability of the environment, where each butterfly is individual in its own way.

Butterflies can be attached both to ordinary glue and to double-sided. When placing butterflies for decoration on curtains, sewing pins will be used.


In general, we can say that you can create a wall composition from small butterflies for decoration, but larger butterflies can “take root” on curtains.

Butterfly stencil photo


If now there is no money for a new renovation, but you want to embellish the apartment, this can be done using home-made panels, stencils or other accessories. In this article we will tell you how you can make wall decor with your own hands by decorating them with butterflies, as in the photo. It won't take long, but the effect will be very beautiful, it will look especially good in the bedroom or nursery.
This type of decor is the application of drawings on the walls. Stencils can be either drawn by hand or printed according to special blanks, and then cut out. In fact, there are many ways to decorate the interior with a stencil. Let's talk about the main options.
Thanks to lighting and free fastening, a volume effect is created
It turns out especially beautifully if the butterflies are of different sizes and are not placed randomly, but in the form of a pattern, or are used for zoning a room. On the video you can see examples of the use of butterflies in the interior:
Let's start manufacturing
First of all, you need to decide on the form of the future application. If you draw poorly, then it doesn’t matter - you can download and print ready-made examples of stencils with butterflies. Of course, they also buy ready-made stickers, but we do everything with our own hands, so even if you don’t have a printer, you can order a stencil printout in the photo workshop. Well, if you -
If you are a born designer, you can easily draw butterflies on paper.
Butterfly stencils (click to enlarge): 


Advice! If you need large drawings, you need to look for them in vector format, then after printing you will not see stretched pixels.
Then we will decide on the color - to make monochrome silhouettes, or to paint. If you choose too many colors for the wings, the result may turn out to be motley and disappoint you. Try to match the colors to your interior, while the decorations should be contrasting so as not to blend into the background.
Methods and materials for manufacturing
You can decorate walls from almost any material at hand. The following methods are the most popular.
- Paper. The most accessible way. You can print it out, decorate it yourself, and cut out any curls the easiest way. The main advantage is the low price of the material. The paper can be easily attached to the wall in any way, and the butterfly wings move well from air currents. If you get tired of decorating the walls with butterflies, then you can easily remove it without regretting the time and money spent.
- Cardboard. Decorations cut out of it will be many times stronger than paper ones. It is more difficult to cut roundings, but then the cardboard will be able to take the desired shape of the wings. If you wet it and put it under a press, then after drying the cardboard will retain this shape. In this way, you can make some butterflies with raised wings.
- Self-adhesive film. You can find a thick film of polyethylene or vinyl in different colors with a glossy surface.
Advice! To achieve the desired effect, you can combine various methods. Use decor of different colors and sizes, from different materials, mix with other pictures. For example, butterflies will look great in combination with flowers, dragonflies, birds, grass.

- Textile. Perfect if you want to decorate curtains or walls with a soft finish.

- Tin. Original butterflies are obtained from tin. If you want to surprise your guests, make butterflies from this material. When cutting, be careful not to cut your fingers. If you have small children, keep butterflies out of their reach.

- Wallpaper. If you are sure that such a pattern will not get bored, then you can purchase wallpaper with butterflies for the walls. This option is perfect for the corridor, hallway, kitchen, nursery, bedroom. If you decide to use this method, read our article on.
- Dye. Having made a stencil, you can easily apply a drawing with paint on the wall. The disadvantage is that you will only get a monotonous silhouette.

- A chandelier with butterflies is also a good option, which looks very impressive due to the backlight. It can be made with your own hands from a lampshade from an old lamp. First, paint it in a suitable color, and then glue the butterflies, which can be painted with acrylic paints, add LEDs, rhinestones to them. Also, thin chains and wire decorated with beads are used for fastening.
- Origami butterflies. In this case, you do not need to cut paper, but you need to be able to assemble origami. It is not very difficult, the main thing is to do one thing, and the rest will go automatically. The main advantage of this option is that you can make a three-dimensional composition.

How to decorate walls with luminous butterflies
To decorate the walls with luminous butterflies, you will need stencils, fluorescent paint (several colors), brushes and glue. Having fixed the stencils with glue on the wall, we apply paint. We are waiting for it to dry completely, remove the stencils, turn off the light and admire the luminous butterflies! 
Butterfly decoration in the form of a picture
If you are hesitant to glue or paint butterflies on the walls, the ideal solution would be to place the butterflies in the form of a picture. Butterflies are cut out of any material convenient for you, and hung on the wall in a frame. If the picture is under glass, dust will not settle on the butterflies and the fragile elements of crafts will not be affected. 
We form the overall composition

To get the maximum effect, you need to choose the optimal location of the butterflies on the wall. This can be done in many ways: in the form of a swirl, a heart, a flower, a tree, at the head of the bed, or randomly in suitable places. To accurately repeat the desired contour, first make a barely noticeable marking on the wall with a pencil, which you can then erase.
Fixing the decoration

To securely fasten the decoration elements, you can use one of the methods.
- Glue using ordinary PVA or wallpaper glue. It is important not to allow it to stain the front part. The easiest and most affordable way. To make the wings flutter in the air, glue the butterflies onto a small piece of Styrofoam.
- The pin mount is suitable for fixing to plastic panels, wallpaper and fabric. After removal, the pins will leave almost no traces.
- Hang on threads, chains, wire. It is best to use this method for mounting on the ceiling or chandelier.
- Attach with double sided tape.
Summarize
As you can see, butterflies on the wall can be a great decoration that will add romance and spring mood to your home. Thus, you can pleasantly surprise your soulmate, while enjoying the process. Choose the best option for yourself, and start manufacturing!