Replacing heating batteries. Installing batteries in an apartment is a job accessible to a non-professional. Drawings of how to install aluminum radiators in a room
Read also
Replacing heating radiators yourself or even installing heating radiators from scratch is not so much a complicated process as it is a painstaking one. What a plumber can do in a couple of hours may take an amateur several days. However, do-it-yourself work will stimulate new achievements, save a considerable amount of money and may even bring pleasure, especially if you prepare for the process in advance and provide for all the subtleties.
When is the best time to install batteries?
The installation of heating radiators, unless it is an emergency, of course, should take place in the off-season. The centralized heating is turned off in the spring; within a few days - a couple of weeks, the utilities drain the water from the system and will only recharge it in the fall. In general, the time to install radiators is from April to October.

In a house with its own heating or an apartment in which there is always water in the system, work on installing batteries should begin with emptying the heating system. At the same time, you can think about what batteries you need to buy.
It is important! If you are going to install new batteries in place of old ones, then you need to choose those that are identical in size to the previous ones. And for the parts that will be needed during installation, it is also important what kind of heating system in the house is one-pipe or two-pipe.
How to choose batteries?
There are four metals from which heating radiators are made:
- Pure cast iron.
- High quality steel.
- Aluminum.
- Connection of steel (copper) and aluminum.
To say that any battery will be ideal is wrong.
Cast iron batteries
This is the heaviest metal with a fairly high heat transfer. Cast iron takes longer to warm up than other metals, but also retains heat longer. most often typesetting. One section weighs 10 kilograms (in Soviet models - 12). The cost of one section is 500 – 600 rubles. However, a designer model may also have a price in dollar terms, indicated by three or even four digits.

The minimum thermal power of one cast iron section is 150 W. Working pressure is 15 Atm. To heat a room with an area of 15 m2, with a standard ceiling height and one double-glazed window, you need to buy about 10 cast iron sections. Information on how to more correctly calculate the number of battery sections will be provided in the subsection below.
The indisputable advantage of cast iron as a battery metal is that it can withstand coolant temperatures of up to 150 °C and is unpretentious to the composition of the water that will be in the battery.

The disadvantages of cast iron batteries are that they are very heavy and will have to be painted periodically.
Read a detailed review on our website.
Aluminum batteries
Manufacturers claim that aluminum radiators are the most common.
- The main advantage of aluminum is its excellent ability to conduct heat.
- The second advantage is that the most unusual designs of heating batteries are made from aluminum.
- And one last thing. Relatively inexpensive price.
Aluminum radiators have the highest thermal output. The power of one section is 192 W, the operating pressure is 16 Atm. This means that the aluminum battery heats up very quickly.

However, there are also disadvantages. Aluminum battery:
- Sensitive to pressure changes in the system. Experts say that with a sharp increase in pressure, an aluminum radiator may burst.
- Requires only purified, softened water. Increased acidity of the liquid leads to faster internal corrosion of the metal.
In general, aluminum radiators are best installed where the quality of the supply water is monitored.
Steel batteries
Steel radiators are not made in the form of sections; they are most often square or rectangular panels. The working pressure here is low - no higher than 8.7 Atm. The power of some manufacturers is stated to be within 20 W. Steel radiators are best used not for central heating.

Advantages of steel batteries:
- Although small in size, they have high heat transfer. This means that a small battery will warm up a large room very quickly.
- For high-quality heating of the room, the system should not have a very high coolant temperature.
These two advantages are balanced by disadvantages.

Attention! Steel radiators rust quickly. They cannot be installed in rooms with high humidity. To prevent excessive corrosion, in a system where there are steel radiators, there must be shut-off valves for draining water in the off-season.
Bimetallic radiators
The combination of metals can be like this:
- Steel and aluminum.
- Copper and aluminum.
The steel or copper core (this is the inside of the battery) heats up quickly and transfers heat to the aluminum (the battery body is made of it). The connection of two metals significantly improves the thermal performance of the radiator. The power of the bimetallic radiator is 185 W. If the internal part is made of copper, then the rated power should be 200 W.

Advantages:
- Chemical resistance to coolant.
- Increased strength.
- Light weight.
- High heat dissipation.
Flaws:
- High price.
Having decided on the price and quality for which you are willing to pay, it is worth calculating the required number of radiators.
Calculation of the number of sections for high-quality heating
A comfortable temperature for human life is 18 °C (unless, of course, you are lucky enough to live in Ukraine, where due to the lack of gas it is reduced to 14 °C). This temperature regime can be maintained as follows: per 1 m2 of area that is heated, there should be 100 watts of heating radiator power.

The required number of battery sections for a comfortable temperature is calculated using the following formula:
S * 100 / P, where
S = room area
P = power of one heating section.
The area of the room is 15 m2, the power of one section of the cast iron battery is 150 W. Means,
15 * 100 / 150 = 10
In total, to heat one room you need 10 sections of a cast iron battery.

Table: example of the number of radiator sections depending on the area of the room
It is necessary to apply certain coefficients that take into account:
- Ceiling height.
- Availability of double glazed windows.
- Number of floors (upper and lower floors have the highest coefficient).
- Number of windows in the room.
- Has insulation been done?
- Where is the room? It is important whether it is angular.
For example, coefficient (K1), which depends on the quality of the windows:
— K1 = 0.85. This is a triple glazed unit.
— K1 = 1. This indicator is for double glazed windows.
— K1 = 1.27. Conventional windows with double glazing and possibly wooden frames.
The K2 coefficient depends on the walls.
K2 = 0.85. New walls with insulation
K2 = 1. Brick walls and insulation.
K2 = 1.27. Panel house with walls without insulation.

Table of required heat supply radiator power
Calculation. To obtain the number of sections, divide the data from the table by the power of one section of the selected radiator (kW).
This is an incomplete list of coefficients. But the ratio of digital indicators and, for example, ceiling height or heating quality is the same as in the examples given above. Each of the coefficients is multiplied by the initial number of radiator sections. Ultimately, the result is a battery that will actually heat the space.
Installing a heating radiator
After the literature has been read, advice from experienced people has been received, the size of the radiators and the number of sections in them have been determined, the order has been made and the car with batteries is already on the way, it’s time to prepare what you will not be able to install without.
Preparatory stage
Almost always, batteries are located under the windows. If access to this part of the room is difficult, you need to free up as much space as possible. Move aside the cabinets, put away the TV, take down the curtains.
You need to know this! If you have to remove old batteries, then in any case, at least a little water will leak out of them. It will not be clean, like from a spring, and the likelihood that the water will stain the floor covering with rust is very high. Therefore, it is better to remove carpets and rugs before replacing batteries. And cover the laminate and parquet with a thick film.
When installing batteries you will need:
- Bypass (if the heating system is single-pipe).
- Adapters.
- Couplings.
- Nipples.
- Corners.
- Mayevsky cranes.

Mayevsky valve - for releasing air from radiators, opens using a special key or screwdriver
Sealant, winding, sealing tape, and adjustable wrenches will also not interfere with the work. The remaining parts need to be purchased based on what kind of wiring is installed in the room.
Types of heating wiring
There are 5 main types of wiring:


Radiator connection diagram options
Now you need to choose the right distance from the wall and window sill for each battery.
Distances to wall and window sill
In addition to the fact that all nuts and valves must be tightened tightly (without overdoing it), it is also important to fulfill the following conditions:
- There should be at least 5, and preferably 10–15, centimeters from the top of the battery to the window sill.
- A distance of at least 10–12 centimeters must be maintained from the bottom of the battery to the floor.
- There should be at least 5 centimeters from the radiator to the wall.

Compliance with these rules will allow hot air to circulate better and rise up unhindered.
The efficiency of the heating system of an apartment or private house depends not only on the power of the heat sources. Correct installation of heating radiators will reduce the cost of heating a room, make it more productive and improve the microclimate.
Regardless of what system you use, whether autonomous or centralized, where the radiator will be located - in an apartment or house, the rules for installing heating radiators are the same. There are three options for radiator placement:
Types of heating systems
There are three options for radiator connection systems - serial, single-pipe, two-pipe and collector (parallel). They differ in wiring diagram. Depending on what system is installed, it is necessary to select the type of batteries. It is important to remember that incorrect connection of heating radiators leads to a decrease.
Correct installation of heating radiators in a niche
It happens that in apartment buildings there is a niche for old cast iron radiators. This method of installing heating batteries is ineffective, but sometimes there are no other options. Therefore, let's consider it too.
- The distance between the side and rear walls of the niche to the radiator should be at least 5 cm.
- Air access from below should not be difficult, as well as its exit from above. The distance from the bottom and top of the radiator to the walls should be more than 10 cm.
Decorative lattice should promote convection. An overlay made of diagonal strips is best suited. It is better not to cover the gap in the lower part of the radiator with a grille to ensure optimal air convection.
If the niche is made in a parapet located along the wall, it is better to cover its upper part with a decorative lattice rather than a solid overlay.
The battery in the niche under the window should be located so that there is a distance to the window sill. It should be twice as large as the window sill protrudes from the wall. For example, if the window sill extends 15 cm beyond the wall, the distance from it to the niche should be 10 cm.
Read also:
How to properly recess batteries into the wall without heat loss
The radiator in the niche under the window must be positioned so as to ensure good air convection. There should be at least 10 cm between its top and the edge of the niche.

How to properly install a battery under a window
The greatest heat loss occurs through windows. Therefore, correct installation of the battery under the window is especially important.
- The radiator must be located exactly in the middle of the window - so it will cut off cold air and will not allow it to spread throughout the apartment.
- The installation height of the radiator from the floor should be 5-10 cm. If the gap is larger, a layer of cold air will form. If less, it will be difficult to clean under the battery.
- The distance from the wall should be at least 5 cm so as not to impede air convection. Otherwise, the battery will heat the wall of the building and not the room.
If the radiator is equipped with air cutoffs (see photo), the distance from it to the window sill should be more than 5 cm. If the window sill is wide and protrudes beyond the radiator, for every 1 cm of this difference you need to add 2 cm to the gap between it and the battery.

For radiators without an air cutter, the minimum distance to the window sill is 10 cm plus 3 cm for every 1 cm of protrusion. Installing heating radiators under the window close to the window sill will interfere with air convection. And this will lead to a decrease in heat transfer.
Any heating system is a rather complex “organism” in which each of the “organs” performs a strictly assigned role. And one of the most important elements is heat exchange devices - they are entrusted with the final task of transferring thermal energy to the premises of the house. This role can be provided by conventional radiators, convectors of open or hidden installation, and increasingly popular water floor heating systems - pipe circuits laid in accordance with certain rules.
You might be interested in information about what it is
This publication will focus on heating radiators. Let’s not get distracted by their diversity, design and technical characteristics: our portal has enough comprehensive information on these topics. Now we are interested in another set of questions: connecting heating radiators, wiring diagrams, installation of batteries. Correct installation of heat exchange devices, rational use of the technical capabilities inherent in them is the key to the efficiency of the entire heating system. Even the most expensive modern radiator will have low returns if you do not listen to the recommendations for its installation.
What should you consider when choosing radiator piping schemes?
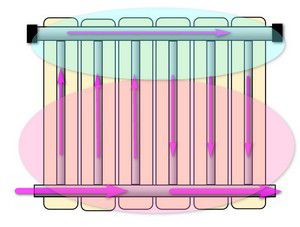
If you take a simplified look at most heating radiators, their hydraulic design is a fairly simple, understandable diagram. These are two horizontal collectors that are connected to each other by vertical jumper channels through which the coolant moves. This entire system is either made of metal, which provides the necessary high heat transfer (a striking example -), or is “clad” in a special casing, the design of which provides for a maximum contact area with air (for example, bimetallic radiators).

1 – Upper collector;
2 – Lower collector;
3 – Vertical channels in radiator sections;
4 – Heat exchange housing (casing) of the radiator.
Both collectors, upper and lower, have outputs on both sides (respectively, in the diagram, the upper pair B1-B2, and the lower pair B3-B4). It is clear that when connecting a radiator to the pipes of the heating circuit, only two of the four outputs are connected, and the remaining two are muted. And the operating efficiency of the installed battery largely depends on the connection diagram, that is, on the relative position of the coolant supply pipe and the return outlet.
And first of all, when planning the installation of radiators, the owner must understand exactly what kind of heating system is operating or will be created in his house or apartment. That is, he must clearly understand where the coolant is coming from and in which direction its flow is directed.
Single pipe heating system
In multi-storey buildings, a single-pipe system is most often used. In this scheme, each radiator is, as it were, inserted into a “break” in a single pipe through which both the coolant is supplied and its discharge towards the “return” is carried out.

The coolant passes sequentially through all the radiators installed in the riser, gradually wasting heat. It is clear that in the initial section of the riser its temperature will always be higher - this must also be taken into account when planning the installation of radiators.
One more point is important here. Such a single-pipe system of an apartment building can be organized according to the principle of upper and lower supply.
- On the left (item 1) the top supply is shown - the coolant is transferred through a straight pipe to the top point of the riser, and then sequentially passes through all the radiators on the floors. This means that the flow direction is from top to bottom.
- In order to simplify the system and save consumables, another scheme is often organized - with bottom feed (item 2). In this case, radiators are installed in the same series on the pipe ascending to the upper floor as on the pipe going down. This means that the direction of coolant flow in these “branches” of one loop changes to the opposite. Obviously, the temperature difference in the first and last radiator of such a circuit will be even more noticeable.
It is important to understand this issue - on which pipe of such a single-pipe system is your radiator installed - the optimal insertion pattern depends on the direction of flow.
A mandatory condition for piping a radiator in a single-pipe riser is a bypass
The name “bypass,” which is not entirely clear to some, refers to a jumper connecting the pipes connecting the radiator to the riser in a single-pipe system. Why it is needed, what rules are followed when installing it - read in the special publication of our portal.
The single-pipe system is also widely used in private one-story houses, if only for reasons of saving materials for its installation. In this case, it is easier for the owner to understand the direction of the coolant flow, that is, from which side it will supply to the radiator, and from which side it will exit.

Advantages and disadvantages of a single-pipe heating system
While attractive due to the simplicity of its design, such a system is still somewhat alarming due to the difficulty of ensuring uniform heating on different radiators in the house wiring. Read what is important to know about how to install it yourself in a separate publication on our portal.
Two-pipe system
Already based on the name, it becomes clear that each of the radiators in such a scheme “rests” on two pipes – separately on the supply and “return”.
If you look at the two-pipe wiring diagram in a multi-story building, you will immediately see the differences.

It is clear that the dependence of the heating temperature on the location of the radiator in the heating system is minimized. The direction of flow is determined only by the relative position of the pipes embedded in the risers. The only thing you need to know is which specific riser serves as the supply and which is the “return” - but this, as a rule, is easily determined even by the temperature of the pipe.
Some apartment residents may be misled by the presence of two risers, in which the system will not cease to be one-pipe. Look at the illustration below:

On the left, although there seem to be two risers, a single-pipe system is shown. The coolant is simply supplied from the top through one pipe. But on the right is a typical case of two different risers - supply and return.
Dependence of the efficiency of the radiator on the scheme of its insertion into the system
Why was all that said? what is posted in the previous sections of the article? But the fact is that the heat transfer of the heating radiator very seriously depends on the relative position of the supply and return pipes.
| Scheme of inserting a radiator into the circuit | Coolant flow direction |
|---|---|
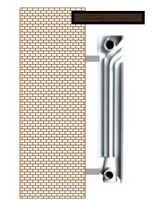
| Diagonal two-way radiator connection, with supply from above | |
 |  |
| This scheme is considered the most effective. In principle, it is this that is taken as the basis when calculating the heat transfer of a specific radiator model, that is, the power of the battery for such a connection is taken as one. The coolant, without encountering any resistance, completely passes through the upper collector, through all vertical channels, ensuring maximum heat transfer. The entire radiator heats up evenly over its entire area. | |
 |  |
| This type of scheme is one of the most common in heating systems of multi-storey buildings, as it is the most compact in conditions of vertical risers. It is used on risers with a top supply of coolant, as well as on return and downstream ones - with a bottom supply. Quite effective for small radiators. However, if the number of sections is large, then heating may be uneven. The kinetic energy of the flow becomes insufficient to distribute the coolant to the very end of the upper supply manifold - the liquid tends to pass along the path of least resistance, that is, through the vertical channels closest to the entrance. Thus, in the part of the battery farthest from the entrance, stagnant zones cannot be excluded, which will be much colder than the opposite ones. When calculating the system, it is usually assumed that even with the optimal length of the battery, its overall heat transfer efficiency is reduced by 3–5%. Well, with long radiators, such a scheme becomes ineffective or will require some optimization (this will be discussed below) / | |
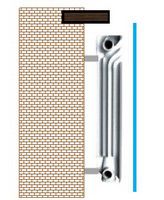
| One-sided radiator connection with top supply | |
 |  |
| The scheme is similar to the previous one, and in many ways repeats and even enhances its inherent disadvantages. It is used in the same risers of single-pipe systems, but only in schemes with bottom supply - on the ascending pipe, so the coolant is supplied from below. Losses in total heat transfer with such a connection can be even higher - up to 20÷22%. This is due to the fact that the closure of the coolant movement through the nearby vertical channels will also be facilitated by the difference in density - the hot liquid tends upward, and therefore passes more difficultly to the remote edge of the lower supply manifold of the radiator. Sometimes this is the only connection option. The losses are compensated to some extent by the fact that in the rising pipe the overall temperature level of the coolant is always higher. The scheme can be optimized by installing special devices. | |
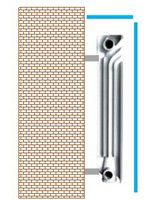
| Two-way connection with bottom connection of both connections | |
 |  |
| The bottom connection, or as it is often called the “saddle” connection, is extremely popular in autonomous systems of private houses due to the wide possibilities of hiding the heating circuit pipes under the decorative floor surface or making them as invisible as possible. However, in terms of heat transfer, such a scheme is far from optimal, and possible efficiency losses are estimated at 10–15%. The most accessible path for the coolant in this case is the lower collector, and distribution through vertical channels is largely due to the difference in density. As a result, the upper part of the heating battery can warm up significantly less than the lower part. There are certain methods and means to reduce this disadvantage to a minimum. | |
| Diagonal two-way radiator connection, with supply from below | |
 |  |
| Despite the apparent similarity with the first, most optimal scheme, the difference between them is very large. Efficiency losses with such a connection reach up to 20%. This is explained quite simply. The coolant has no incentive to freely penetrate into the far section of the lower supply manifold of the radiator - due to the difference in density, it selects the vertical channels closest to the entrance to the battery. As a result, with the top heated sufficiently evenly, stagnation very often forms in the lower corner opposite the one I enter, that is, the temperature of the battery surface in this area will be lower. Such a scheme is used extremely rarely in practice - it is even difficult to imagine a situation when it is absolutely necessary to resort to it, rejecting other, more optimal solutions. | |
The table deliberately does not mention the bottom one-way battery connection. This is a controversial issue, as many radiators that offer the possibility of such an insertion have special adapters that essentially turn the bottom connection into one of the options discussed in the table. In addition, even for ordinary radiators, you can purchase additional equipment, in which the lower one-sided connection will be structurally modified to another, more optimal option.
It must be said that there are also more “exotic” insertion schemes, for example, for vertical radiators of great height - some models from this series require a two-way connection with both connections from above. But the very design of such batteries is thought out in such a way that the heat transfer from them is maximum.
Dependence of the heat transfer efficiency of a radiator on its installation location in the room
In addition to the connection diagram of radiators to the heating circuit pipes, the efficiency of these heat exchange devices is seriously affected by the location of their installation.
First of all, certain rules for placing a radiator on the wall in relation to adjacent structures and interior elements of the room must be observed.
The most typical location of the radiator is under the window opening. In addition to the general heat transfer, the upward convection flow creates a kind of “thermal curtain” that prevents the free penetration of colder air from the windows.

- The radiator in this place will show maximum efficiency if its total length is about 75% of the width of the window opening. In this case, you must try to install the battery exactly in the center of the window, with a minimum deviation not exceeding 20 mm in one direction or another.
- The distance from the bottom plane of the window sill (or other obstacle located above - a shelf, horizontal wall of a niche, etc.) should be about 100 mm. In any case, it should never be less than 75% of the depth of the radiator itself. Otherwise, an insurmountable barrier to convection currents is created, and the battery efficiency drops sharply.
- The height of the lower edge of the radiator above the floor surface should also be about 100÷120 mm. With a clearance of less than 100 mm, firstly, considerable difficulties are artificially created in carrying out regular cleaning under the battery (and this is a traditional place for the accumulation of dust carried by convection air currents). And secondly, convection itself will be difficult. At the same time, “lifting” the radiator too high, with a clearance from the floor surface of 150 mm or more, is also completely useless, since this leads to uneven distribution of heat in the room: a pronounced cold layer may remain in the area bordering the floor surface air.
- Finally, the radiator must be positioned at least 20 mm away from the wall using brackets. Reducing this clearance is a disruption of normal air convection, and in addition, clearly visible dust traces may soon appear on the wall.
These are guidelines that should be followed. However, for some radiators there are also manufacturer-developed recommendations for linear installation parameters - they are indicated in the product operating manuals.

It is probably unnecessary to explain that a radiator located openly on the wall will show much higher heat transfer than one that is completely or partially covered by certain interior items. Even a window sill that is too wide can already reduce heating efficiency by several percent. And if you consider that many owners cannot do without thick curtains on the windows, or, for the sake of interior design, try to cover up unsightly radiators with the help of facade decorative screens or even completely closed covers, then the calculated power of the batteries may not be enough to fully heat the room.

Heat transfer losses, depending on the features of installing the heating radiator on the walls, are shown in the table below.
| Illustration | The influence of the shown placement on the heat transfer of the radiator |
|---|---|
 | The radiator is located completely open on the wall, or installed under the window sill, which covers no more than 75% of the depth of the battery. In this case, both main heat transfer paths – convection and thermal radiation – are completely preserved. Efficiency can be taken as one. |
 | A window sill or shelf completely covers the radiator from above. For infrared radiation this does not matter, but the convection flow already encounters a serious obstacle. Losses can be estimated at 3 ÷ 5% of the total thermal power of the battery. |
 | In this case, there is not a window sill or shelf on top, but the upper wall of a wall niche. At first glance, everything is the same, but the losses are already somewhat greater - up to 7 ÷ 8%, since part of the energy will be wasted on heating the very heat-intensive wall material. |
 | The radiator on the front part is covered with a decorative screen, but there is sufficient clearance for air convection. The loss is precisely in thermal infrared radiation, which especially affects the efficiency of cast iron and bimetallic batteries. Heat transfer losses with this installation reach 10÷12%. |
 | The heating radiator is completely covered with a decorative casing on all sides. It is clear that in such a casing there are grilles or slot-like openings for air circulation, but both convection and direct thermal radiation are sharply reduced. Losses can reach up to 20 - 25% of the calculated battery power. |
So, it is obvious that owners are free to change some of the nuances of installing heating radiators in order to increase the efficiency of heat transfer. However, sometimes space is so limited that you have to put up with existing conditions regarding both the location of the heating circuit pipes and the free space on the surface of the walls. Another option is that the desire to hide the batteries from view prevails over common sense, and installing screens or decorative covers is a done deal. This means, in any case, you will have to make adjustments to the total power of the radiators in order to guarantee that the required level of heating is achieved in the room. The calculator below will help you make the appropriate adjustments correctly.
High-quality heating is the key to a favorable climate in the house and the absence of cold weather even in the most severe frosts. Therefore, if you have an old and ineffective radiator in your apartment or cottage, then it is worth replacing it. At first glance, this seems to be a very complex job, accessible only to specialized specialists with significant experience. But with the right attitude and the availability of some tools, installing heating radiators with your own hands does not pose a serious problem.
Rules for battery location and connection diagrams
In addition to the characteristics, it is very important that one of the factors affecting the efficiency of the heating system is the choice of the right location for the product. True, in most cases it is predetermined in advance - the new battery will most likely stand in place of the old cast-iron one, which has been there since the building was built. But still, here are some recommendations for proper placement of the radiator.

Firstly, it is advisable to place the battery under a window. The fact is that it is a “bridge” through which the cold from the street enters the apartment or cottage. The presence of a radiator under the window forms a kind of “thermal curtain” that interferes with the process described above. In this case, the battery should be placed strictly in the middle of the window, and, preferably, occupy up to 70-80% of its width. You can see what it is and how to install it on our page.
Secondly, there should be at least 80-120 mm from the floor to the radiator. If it is less, it will be inconvenient to clean under the battery; a huge amount of dust and debris will accumulate there. And if the radiator is located higher, a certain amount of cold air will collect under it, which requires heating and, as a result, worsens the operation of the heating system. In addition, too short a distance to the windowsill negatively affects the battery efficiency.
Thirdly, a distance of 2.5-3 cm is allowed between the back of the radiator and the wall. If it is smaller, the processes of convection and movement of warm air flows are disrupted, and, as a result, the battery works less efficiently and wastes some of the heat.

Table. Standard connection diagrams for heating batteries.
| Name | Description |
|---|---|
| Due to the specific location of heating system risers in residential buildings, this type of battery connection scheme is the most common. Quite easy to implement, the efficiency of the radiator is average. The main disadvantages of this connection method are visible pipes and inability to accommodate batteries with a large number of sections. |
| The second most common radiator connection diagram. The main advantage is the uniform circulation of water throughout the battery, and, as a result, high operating efficiency. |
| A similar scheme is often used in country houses - many cottage owners prefer to hide heating communications under the floor so that they do not spoil the appearance of the room. But at the same time, the bottom connection of the radiator is 12-15% less efficient than the diagonal one. |


Video - Replacing heating radiators in winter
Installing a heating battery with your own hands - step-by-step instructions
Let's consider the process of installing a bimetallic battery connected laterally to a single-pipe heating system. It is worth saying that in this case the work was carried out in a building where the temperature in the radiators was relatively low, because the supply and bypass were made of metal-plastic pipes. Before you begin installing the battery yourself, familiarize yourself with the structure and characteristics of the heating system in your home. For your apartment or cottage, connecting pipes may need to be made from materials that are more resistant to high temperatures.

Let's divide the process of installing a heating battery with our own hands into several separate stages:
- dismantling the old radiator;
- installation of a new bypass and shut-off valves;
- installing the battery and connecting it to the connection.
Preparing for work. Removing the old battery
Do-it-yourself installation of a heating battery begins with preparing the tools and dismantling the old radiator. In this example, we will be talking about a standard cast iron product, which still heats many apartments. How to install , You can read in our article.
Step 1. Bring home a new battery. Unpack it, check if everything you bought is there. Also inspect the radiator itself to see if it has any damage or defects.

Step 2. Cut the packaging of the new battery into two equal parts. Use one as a backing for the radiator - this way you won’t scratch it on the floor covering. Place the second part of the package behind the heating riser - when dismantling using a grinder, a sheet of cardboard will protect the wall from contamination.


Step 3. Prepare everything you need to dismantle the old and install a new radiator - fittings, taps, pipes, tools. Determine for yourself what should be located where - searching for something necessary for installation, but lost in the clutter, can significantly slow down the work of replacing the battery.

Step 4. Remove the three-way valve connecting the heating riser, bypass and supply line. First, loosen it with an adjustable wrench. If water starts to drip, immediately screw everything back in - most likely, the riser was not closed properly. And if everything is in order, continue working on dismantling the crane.


Step 5. Next, disconnect the old battery and line from the riser. First, unscrew the nut on the thread strip. Then determine how far this thread can be cut so that you can then mount a tee connecting the inlet, bypass and riser without any problems.


Advice! In some cases, old paint applied to the nut and connection of the riser to the bypass and liner may interfere with operation. You can remove it using a regular knife with a retractable blade or a metal brush.
Step 6. Remove the battery from its mounts.


Step 7 Using a grinder, trim according to the previously determined mark on the threads connecting the heating riser to the battery.


Step 8 Remove the old battery and take it to a place where it will not interfere with further work. Given the high weight of the cast iron radiator, if possible, do this in tandem with someone else.

Step 9 Remove the old battery mounts from the wall. If they hold particularly tightly, use a hammer and chisel.


The house’s own boiler room provides year-round coziness and comfort: You can turn on the heat supply at any time in the cold summer, and turn it off when the weather warms up in the spring.
Independence from the whims of utilities and heating supply schedules with CHP is an undeniable advantage of the autonomous system of a private home.
Requirements for the location of the radiator in a private house

Radiators need to be installed in places of greatest heat loss in the house (window openings and entrance doors).
As a rule, heating appliances are installed under each window of the home and in the hallway on the wall, next to the front door of the house, as a thermal curtain and dryer for wet things.
For maximum heat transfer from the heating device, there are the following optimal distances from the radiator:
- To the floor 8-12 cm;
- to the window sill 9-11 cm;
- to the wall 5-6 cm;
- radiator protrusion beyond the window sill 3-5 cm(so that the heat from the radiator warms the window unit).
Requirements for wall and floor construction:
- Wall on which the heating device will be mounted, must be plastered.
- When attaching to a plasterboard wall in it previously install a reinforcing frame made of timber.
- Floor mounts for radiator installed on the finished floor.
Installation Tool:
- Drill or hammer drill,
- Drill 10 mm,
- Hammer,
- Screwdriver for screwing self-tapping screws when using corner brackets,
- Construction level with spirit level or laser,
- Pencil,
- Roulette,
- Radiator spanner made of plastic,
- Key for American.
Connection diagrams
The radiator has holes at the ends for connecting pipes supplying coolant to the radiator and discharging it (return). Exist the following connection diagrams:
Lateral

The coolant supply pipe is connected to the upper hole at the end of the radiator. The coolant passes through all sections from top to bottom and is discharged through a return line connected to the lower hole at the same end.
It is installed in the upper hole at the other end Mayevsky valve for bleeding off excess air. A plug is placed in the remaining lower hole.
- It is used in apartments with a single-pipe coolant supply system.
- Radiator length no more than 1 m(heat loss increases with the number of sections).
Diagonal
The coolant supply is through the upper hole on one side, the return outlet is through the lower hole on the other side of the radiator. The coolant flows diagonally from top to bottom.
- Effective heat transfer with any number of sections.
- Allows connect several radiators in series.
Lower and saddle
The supply pipe enters the lower hole on one side, the return pipe exits through the lower hole on the other side of the heating device.

Photo 1. Bottom heating radiator connection diagram: pipes pass between the floor and the radiator.
- Used for hidden pipes in the floor.
- Thermal efficiency is 30% lower than diagonal(coolant stagnation in the upper part of the radiator).
Reference! Most often in private houses heating pipes laid along the wall between the radiator and the floor. Near the radiator, upward bends are made with a diagonal connection.
Accessories for installing a heating battery
To install the battery, you need a number of components.
Installation kit
Comprises two fittings with right-hand thread, two fittings with left-hand thread, plugs, Mayevsky crane, three brackets and three dowels.
Futorki ( adapters 1 - ½ inches) are screwed into the radiator holes into which the direct outlet and return are supplied. On the right side of the radiator there is a right-hand thread (screwing the fitting clockwise), on the left there is a left-hand thread (counterclockwise). A Mayevsky tap is placed in the upper right hole, and a plug is placed in the remaining hole.

Photo 2. A set of four fittings with right and left threads is required for mounting the radiator.
You might also be interested in:
Plumbing flax and sealant paste
Flax is used for thread packages. When exposed to water, it swells and seals gaps in threaded connections.
Unipak sealant paste seals flax in threads, protects it from rotting, facilitates screwing of bushings.
Shut-off valves
Ball valves are used to shut off pipes and are placed on the supply pipe. A control valve is installed on the return line. The connecting part of the tap or valve is an American type - a detachable connection with a union nut. Consists of two parts. Part of the American with external thread 1/2” screws into the inner hole of the radiator liner.
The American one makes it easy to connect the radiator to the tap and remove it.
Marking the wall for brackets
Marking algorithm for radiators up to 10 sections. Two brackets at the top along the edges, one at the bottom in the middle.
- Measure window opening length, mark on the wall midpoint(under the windowsill).
- Swipe from marked point vertical line down to the floor.
- Mark point (A) on a vertical line at a distance of 10 cm from the windowsill.
- Conduct horizontal line through the marked point (A).
- Measure the distance on the radiator between the fastening points of the upper brackets.

Photo 3. Selecting a place on the wall where the radiator will be located, determining the method of fastening the upper brackets.
- Place segments of length on both sides of point (A) on a horizontal line, equal to half the distance on the radiator.
- Set aside on the center vertical line a segment from point (A) down 50 cm long - place installation of the bottom bracket.
- Drill holes for the brackets. Keep the drill strictly horizontal so that the drill in the wall does not go sideways.
- Hammer the dowels, screw in the brackets to the required distance from the wall.
Radiator assembly process

Important! Do not wrap flax on the thread itself! The flax acts as a gasket between the casing and the end of the battery. Do not use silicone to lubricate flax. Silicone prevents the flax from swelling in water and sealing the joint.
Correct battery installation
The heating radiator is being installed in several stages.
American sleeve packing

Installation
- Install the American in the hole of the foot, tighten by hand until it stops, avoiding distortion.
- Insert the American key and begin to carefully tighten the bushing. The bushing should tighten with a noticeable force, but without jamming.
- After the bushing is fully tightened to the full length of the thread Clean the installation site from excess paste with a napkin.
How to install the device on the brackets?
- Visit the radiator on installed brackets.
- Adjust the position of the brackets, bending them vertically, achieving a tight fit of the radiator on the upper and lower brackets without play.
Harness
- Place its counterpart on the faucet or valve strictly axially to the American bushing.
- Tighten the union nut by hand until it stops.
- Perform installation of pipe bend piping and shut-off and control valves at the location of the radiator.
Important! Do not put flax under the union nut! The American connection is sealed by a rubber ring at the end of the bushing. Do not overtighten the union nut! It would be correct to make a power reserve so that the nut can be tightened.