A fence made of wood and metal picket fence. Making a metal or wooden fence from a picket fence Do-it-yourself wooden picket fence

Read also
Garden fencing or summer cottages are needed in order to prevent any unwanted entry into the territory of his possessions by the owner, to protect against thieves and hooligans. One of the main functions of fences is also to define the boundaries of property owned by the owners. A picket fence made entirely of metal parts will serve as a reliable barrier and decoration of the estate. It will not be difficult to install such a structure yourself, because all the main parts are manufactured in production and are available for free sale.
The main advantages of a picket fence
Wooden slats for building fences have been used for a long time; it was inexpensive, so everything was built from wood. The development of industry and the improvement of the well-being of citizens makes it possible today to build fences from more durable, durable material. The tree has become more expensive, and aesthetic views people have changed some things.
The population owning country houses and dachas, metal fences became popular. In favor of fences from metal picket fence many factors say:
- decorative appearance - uniform coloring (any colors), compliance exact dimensions, textured profile, rolling of the upper ends of the planks (rounding or other artistic trimming);
- high strength and durability - metal strips do not rot like wood, they are more resistant to rain and snow, all metal is processed in production anti-corrosion coating, which eliminates the need for painting long years, such a fence will last at least 30 years;
- affordable price - in different regions, which is natural, the cost may differ, we will not talk about it specifically, but it must be said that compared to other types of materials (brick), metal has become much cheaper and more accessible;
- installation time - all lightweight design, does not require much physical effort to assemble, no special skills are needed (as with brickwork), one person with the help of a helper can install a fence 100 meters long within 2 days.
Attention! Before you start building a picket fence, correctly calculate the number of support posts and slats. If you have difficulty with this issue, check out the video that tells you how to do it correctly.
Recommendations and step-by-step (step-by-step) instructions for installing a fence
In any construction, a clear orientation is needed in the sequence of work. At installation work related to the installation of a picket fence, you must adhere to the following order:
- Correctly calculate the amount of material required: support pillars (round or square), length cross beams rectangular section, vertical metal strips, fasteners.
- Dig holes for the posts or drill them to a depth of 1-1.5 m, prepare cement to strengthen the posts if the soil in the area is loose.
- Purchase ready-made fence components in a specialized store or order directly from a workshop that produces them.
The preparatory work is completed, you can begin assembly. We start by installing the pillars. Pour a layer of coarse or small crushed stone into the prepared (drilled) holes and install the posts using a building level. At this stage, if the supports are to be concreted, fill them with mortar; if not, then fill them with crushed stone and earth and compact them thoroughly.
Advice. Further installation if concreting was carried out support posts, should be carried out only on the next day, so that concrete mortar managed to grab it properly. The upper parts of the racks must be covered from possible rain with moisture-proof material.
Basic fence assembly
The first stage of assembling the fence is the installation of a frame for attaching metal strips; it consists of upper and lower crossbars:
- using welding or bolts, the lower crossbars are installed at a height of 30 cm from the ground level;
- the upper logs are reinforced 50 cm below the top edge of the pillars.
The second stage is to attach the picket fence to the frame:
- mark (make marks with a marker) places on the transverse joists for uniform distribution of picket fence strips;
- The planks are fastened in the designated places with two bolts at the bottom, two at the top, to the corresponding logs.
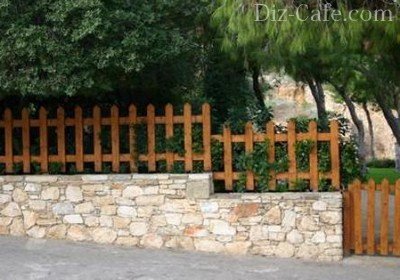
What will be the step between the fence slats is an individual question; each owner, based on his interests, determines it independently. According to average indicators, the distance is 5 cm, but it can be either more (10 cm) or less (2 cm). The fence can be solid, without gaps, one-sided or two-sided. When the pickets are arranged in 2 rows with a pitch of 8 cm, the fence will be almost blank.
In summer cottages where plants require good lighting, it is recommended to create an increased gap between the picket fence. This will also help significantly reduce the cost of purchasing fencing material.
The height of the picket fence according to the European standard is 150, 180 and 200 centimeters, but individual order carried out at a specialized enterprise, the length of the strips can be any. Painting and special anti-corrosion coating are also carried out at the request of the customer; they can be single- or double-sided.
There are many things that the owner of the estate needs to do or summer cottage, a lot of money is spent on this. Doing some of this work yourself is not only beneficial for saving money family budget, but brings the owner moral satisfaction, self-confidence, and pride in himself. The family will be proud that this wonderful picket fence was made by their father, husband, that is, the head of the family.
Metal picket fence: video
Continuous or through fencing made of wooden slats widely used for fencing houses and summer cottages. A wooden picket fence has many advantages: its production requires minimal costs, and if repairs are necessary, it can be done as quickly as possible.
Required materials and tools:
roulette, building level, strong twine;shovel or drill;
metal pipes or wooden logs for making supports;
transverse logs (veins) made of metal or durable timber coniferous species 50x100 mm (for every 30 m of fence you will need 10 supports and 20 three-meter veins);
fence;
Sand, cement, crushed stone for pouring metal supports ny pillars;
hacksaw with medium teeth;
axe, hammer;
chisel with a wide blade;
plane;
screwdriver;
mounting brackets and bolts for attaching crossbars to racks;
self-tapping screws or galvanized nails;
sandpaper for sanding wood;
drying oil, paint and brush for painting.
Installation of support pillars
To make the fence even, the soil should be carefully leveled. Before leveling, the area where the construction of the fence is planned is cleared, and trees and bushes are uprooted. The roots of many plants (poplar, willow, rose hips, etc.) are quite tenacious, so even small cuttings should be removed. Otherwise, after a couple of years, the remaining roots may produce abundant growth and damage the hedge.1. Along the perimeter of the site, in the place of future supports, gates and gates, small pegs, between which a string is stretched. To ensure that the fence is perfectly level, before you begin installing the support posts, you should measure their location several times using a building level.

A string is stretched along the perimeter of the fence
Advice. When wet, wood becomes heavier, which significantly increases the load on supports and joists, so they must be made of sufficiently strong wood or metal.
2. The standard interval between supports is 2.5-3 m. This distance will be enough to support the entire span. The distance between the supports should be equal to the length of the transverse joists, taking into account the indentation for the fastening.
3. At the location of the supports, use a shovel or drill to make holes 70-100 cm deep (this figure depends on the type of soil). Fill the bottom of the pit with a layer of 20 cm broken brick, stones or gravel, then sand. This “pillow” is thoroughly spilled with water and compacted.
4. Wooden logs cleared of bark and knots. To protect against dampness and insects, the part that will be underground should be burned at the stake or treated blowtorch. Wood can also be impregnated with bitumen.
5. Wooden supports should not be poured with mortar - they will rot very quickly in concrete. They are installed in pre-prepared holes and covered with crushed stone and sand. In this case, each layer of such backfill is spilled with water and compacted.
Advice. Since the main load will fall on the pillars and veins, it is better to make them from metal. They should be thoroughly cleaned of rust and coated with any anti-corrosion solution. Places that will be in the ground should be treated especially carefully.

Installation of metal supports
6. Support posts must be installed strictly vertically. To do this, use a building level.

Aligning the supports
7. Once the supports are aligned, they are secured using spacers. Next it is poured concrete mortar with the addition of crushed stone. Its proportions depend on the brand of cement.
Important! All subsequent work is carried out only after the solution has set (at least 1-2 days).
8. To ensure that the height of the fence is the same along the entire perimeter, after installing the first and last pillar, a nail is driven on top of them, and a string is stretched between them, which will serve as a guide for other supports.

A string is stretched between the supports
Fixing the picket fence
1. B wooden pillars grooves are prepared (two for each pillar) with a depth of 30 cm. Their location is measured by the building level.2. A vein is inserted into each groove and secured to the post using self-tapping screws (a more durable option) or nails. In this way, all the pillars are tied.

Attaching the log
Advice. When using metal supports, rust can quickly appear in the places where the veins (logs) are welded to the posts, so it is better to fasten them with mounting brackets and bolts. Using staples purchased from a store or made yourself from strips of metal, you can attach and wooden joists.
Attaching the support to a wooden core using a bracket
3. Standard length picket fence 1.25 m. When using boards non-standard sizes they are cut to the required length.
4. The outer pickets are attached first, and they should be located exactly 90° relative to the vein. To protect the boards from rotting, their lower end should be placed at a distance 5 cm from the ground. Next, the remaining boards are attached.

Fixing the picket fence
Advice. To avoid splitting, pickets, screws or nails should not be placed along the same line. To prevent the ends from sticking out, you should not attach them too close to the edge.
5. Distance between pickets may be arbitrary. They can be attached either as a continuous sheet or with a slight indentation from each other. However, for the fence to look aesthetically pleasing, these indentations must be the same along the entire length of the fence.
Advice. When installing a continuous fence, to prevent deformation due to changes in humidity, the boards should be fastened with a small gap.

The boards are attached with a small gap
Painting and decorating the fence
To prevent the wood from absorbing too much paint, before painting it is coated with drying oil and allowed to dry. For painting use any frost-resistant paints, stains or decorative varnishes.Decorating a picket fence is easy. For example, you can cut its upper part at a certain angle, make it semicircular, or, combining the length of the picket fence, decorate the top of the fence with a zigzag or ladder. The cut ends are sanded or scraped. Pickets sawed at a certain angle not only look more original, but absorb less moisture: it rolls off its surface.
Any decorative elements of the fence are cut out according to the template from plywood using jigsaw. They can be made separately and then attached to separate sections of the fence.

Types of picket fences


Options for decorating a picket fence
Video: Installing a picket fence with your own hands
In Russia, wood has long been widely used as building material. They build from it log houses, window frames, interior items, kitchen utensils. This natural material allows you to create an atmosphere of internal comfort and coziness. A wooden picket fence is one of the most popular types of fencing in suburban construction, which is simply indispensable when arranging a site in rustic style. Such a fence, on the one hand, outlines the boundaries of the site for us, and on the other, its territory is not obscured.
Picket fences can be given any height, shape, color, and even clearance distances, thanks to which they acquire original look and yours appearance complement the design of the suburban area.
A wooden picket fence is used as a reliable fence personal plot, an element of territory zoning, decorative framing of beds and flower beds
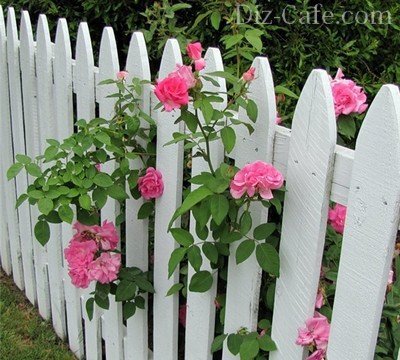
Stems with flowers, filling the gaps in the gaps between the vertical slats, give the fence a more attractive appearance
The continued popularity of this type of fencing is explained by a number of its parameters and properties, the main ones being:
- Versatility. Wooden fences fit perfectly into any landscape. They go well with any other bases, organically fitting into an interior made of stone or brick, concrete or metal.
- Easy to install. Any summer resident or owner can install a picket fence independently. country house without resorting to the services of professional craftsmen.
- Ease of care. Caring for the fence consists only of timely painting of the surface and eliminating defects that may arise during operation as a result of mechanical stress and seasonal precipitation.
- Reliability. A high wooden fence will serve not only decorative element landscape design, but also reliable protection owners of the site.
One of the advantages of a picket fence, compared to a traditional solid fence, is the ability to plant plants right at its base.
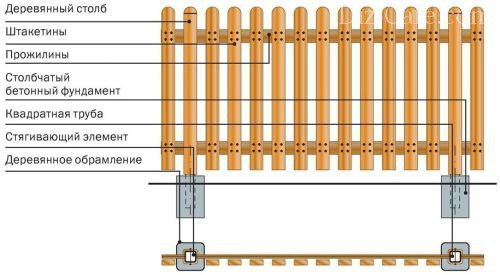
- Support pillars. They can be made of metal pipes or thick beams.
- Picket fences. Narrow slats are made from edged or planed boards.
- Veins. Cross bars, placed horizontally between the support pillars, 2-2.5 meters long, are made from bars with a cross-section of 40 mm.
When choosing a material to make a picket fence, you can go in two ways: purchase a ready-made picket fence or make it yourself from boards. The first method saves time. Ready fence can be installed on the day of purchase. But significant drawback low-quality raw wood can serve as the basis for a picket fence, which during operation will “drive” the fence. When choosing the second path, the owner will need to make an effort to spend several days making all the elements of the fence. But as a result, he will have a picket fence that fully corresponds to his ideas and wishes.

If the material is not sufficiently dried, it is necessary to use special dryers for wood, because natural conditions drying can take several seasons
The service of drying wood, as well as cutting crossbars and pickets, can be ordered at a place where wood products are manufactured. When preparing the material yourself, you must carefully file down and sand all the tops.

Design options for the tops of a wooden picket fence
The lower part of the wooden support posts must be coated with hot varnish. This will prevent wood from rotting and extend the life of the structure.
Installation and installation of fencing
The installation of a picket fence is carried out according to the same principle as the construction of other types of fencing. First of all, the direction of the future fence is determined. It must be freed from weeds, bushes and tree branches that will interfere with construction. Then beacons are stretched in the cleared area and a place for the pillars is marked along the stretched cord. The distance between the pillars should not exceed three meters. Otherwise, long spans between supports may cause the crossbars to sag under the weight of the pickets.
Support pillars can be installed directly into the ground, but to create more robust construction It is better to construct them using cement-sand mortar.
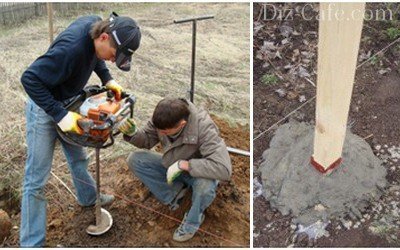
To install the posts, you will need to dig a hole using a drill, the depth of which is determined by the height of the fence. On average, a depth of 1.3 m is sufficient
The posts are installed on a 20 cm gravel cushion, which helps prevent the support from being squeezed out when the soil freezes. Vertically fixed columns are covered alternately with layers of concrete and soil mortar.
After installing the posts along the line of the fence, you can install veins between them. In principle, there are two ways to install a fence: with the first, the crossbars are first attached between the posts, and then a picket fence is nailed to them, and with the second, the spans are assembled separately and fixed to the supports using blocks.
The first picket is attached vertically, and the rest are aligned according to a T-shaped template, in which the width of the leg of the letter “t” is equal to the pitch of the pickets, and are nailed
On average, the distance between the pickets is equal to the width of the boards themselves. You can secure the crossbars to wooden support posts using self-tapping screws, bolts or regular nails. The veins are attached to the metal posts using a specially welded corner for attaching the timber.
Finishing and decorating the fence
The finished fence leaves only other negatively influencing factors.
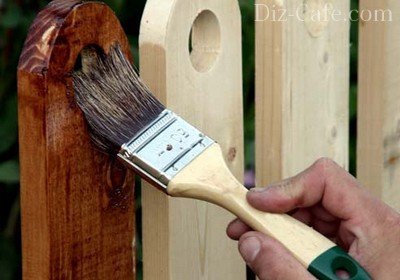
It is necessary to repair all cracks and chips with putty compounds, saturate the picket fence with an antiseptic, and then cover it with varnish, stain or paint.
Film-forming agents do not adhere well to freshly planed boards and do not last long. To “roughen” the surface of the wood, you can sand it with medium-grain sandpaper.
Stain is an excellent preservative that protects wood from the development of microorganisms and mold
The varnish will protect the wood from moisture. Using stain and clear varnish, you can also imitate various breeds tree.
Eurostalker - relatively the new kind fencing of houses and summer cottages, which is galvanized metal strips made of corrugated sheets, coated with colored polymer for protection and beauty. This type of fence is inexpensive, can be installed quickly, and lasts for more than 30 years. The demand for Euro picket fence is explained by its main qualities: aesthetic appeal, durability, affordable price.
How much does a euro picket fence cost: materials plus labor
Average linear meter will cost from one thousand rubles including installation work. If you install a picket fence yourself, its installation will cost less. The price of a fence depends on several factors:
- type of euro picket fence - depends on the manufacturer’s brand, workmanship, coating thickness;
- bar height - from 1.5 to 2 m;
- the width of the pickets and the distance between them, which affects the number of strips per 1 linear line. m of fencing.
We calculate the amount of material for the fence
It’s easy to make a fence from Euro picket fence yourself. Before purchasing components, you will need to calculate their quantity. You will need:
- Euro picket fence;
- load-bearing support pillars, usually a corrugated pipe with a cross section of 60*60 mm is used for these purposes;
- frame transverse logs - corrugated pipe 40*20 mm;
- fastening - self-tapping screws 4 pcs. per one plank (two for the upper joist and 2 for the lower).
To determine the specific number of strips you need to know several rules for installing a picket fence.
The total length of the fence is measured along the perimeter of the area to be fenced.
From the general indicators, it is necessary to subtract the length of the gates and wickets (their total length is summed up).

The number of support pillars is calculated taking into account that the distance between them is 2.5 m, using the following formula:
Number of posts = (length of perimeter fence - length of gates and wickets) / distance between posts (2.5 m).
Added to this indicator required quantity pillars for installing gates (wickets).
The number of slats is calculated using the formula:
Number of Euro pickets = length of fence / (width of strip + width of gap between strips).
If you plan to install a picket fence on both sides, then this number is multiplied by 2.
Poles made of profile pipes for fences
If as supporting elements decided to use professional pipe and not to do brick pillars, then it can be of any type - with a round or square cross-section, 60*60 or 80*80 mm, with a wall thickness of 2 or 4 mm.

Euro picket fence, unlike solid corrugated sheeting, does not create windage, power and wind loads less, so the requirements for support pillars are not so stringent. In most cases, their concreting into the ground is not required.
Installing support pillars
Installing a picket fence with your own hands begins with installing the posts. Step-by-step instruction The process looks like this.
Drilling(digging) wells 1.1-1.5 m deep.
Pole installation. It is better to strengthen the bottom of the hole by placing hard stones. Fill the hole with gravel and compact it with earth.

DIY metal picket fence. Photo step by step
Concreting required only if the soil is loose, sandy (or at the request of the owner to enhance strength).

Install rain protection on top of the supports - plastic plugs.
Installation of transverse joists, fastening of Euro picket fences
If the pillars were concreted, then the procedure for securing the transverse frame joists will begin only the next day. The transverse lower and upper logs are a frame for installing a European picket fence. Their installation is possible in any sequence: first the upper ones, and then the lower ones, or vice versa. The cross members are welded or secured with self-tapping screws. You will need the following set of tools: level, tape measure, marking pencil, screwdriver. The step-by-step instructions for working are as follows.

Installation upper transverse joists at a distance of 50 cm from the top edge support pillar. The horizontality of the cross member is controlled using a level.


How to make a fence from a metal picket fence with your own hands. Photo step by step
Installation lower cross members level at a distance of 30 cm from the ground surface.


After frame mounted, begin to attach the picket strips to it. Each plank is attached to the joist with 4 self-tapping screws: 2 in the upper and 2 in the lower transverse joist.

Euro picket fence. How to do

Euro picket fence. Photo


Distance between picket fences. Types of pickets
The distance between the European picket bars determines the degree of openness of the fence. It can be from 2 to 10 cm. The average is 5 cm. With a double-sided arrangement of the Euro picket fence, a step of 8 cm is taken on each side - in this case, with a strip width of 11.8 mm, an almost blank fence is obtained.
Advice. On garden plot or between vegetable gardens more light is required, so the gap between the euro-fence is made larger.

DIY metal picket fence. Photo
According to the type of top covering, the Euro picket fence is produced with polymer layer or powder coating (this is a more durable option and is not susceptible to scratches). Painting can be one- or two-sided. Based on the method of processing the edges, a distinction is made between planks with curved edges (rolled) and non-rolled ones. The shape of the relief and the top edge may also vary. All differences and decorative “excesses” affect the price of the material.
Height of a European picket fence
The standard length of European picket fence slats is 1.5, 1.8 and 2 m. The height of the fence is determined by the owner of the site depending on his needs - if the task is to hide the territory from prying eyes, then it is advisable to choose 2 m long slats and make a double-sided blind fence. For open garden plots, a fence height of 1.5 and 1.8 m with a large gap between individual slats is acceptable.

Advantages of a euro picket fence
Euro picket fence is a promising material with many advantages:
- wear resistance- the fence will last from 30 years and above without changing its appearance;
- unpretentiousness maintenance - the fence does not require painting, does not rot, so no repair or replacement of elements is needed;
- ease of installation- the fence can be installed independently in 1-2 days;
- neat appearance;
- low cost- This is one of the most inexpensive and durable materials.

Metal, wooden or even plastic narrow strips from which a fence can be assembled are usually called a picket fence. However, despite such a “generalized” name, fences made from them can ultimately turn out to be very diverse. And, of course, even a beginner can easily cope with such work, since making a picket fence is quite easy. Especially if you know a couple of nuances.
Supports
Any fence is usually divided into sections, which are supported on supports buried in the ground. If the fence is heavy (for example, made of brick), then it should not only have supports buried and concreted into the ground, but real strip foundation. You should do the same in situations where there are winds in your area. strong winds(capable of knocking over a poorly secured fence) or there are dogs on the property (yours or a neighbor’s) that love to make “undermines.”
When making a picket fence with your own hands, you can choose as a support: metal pipe(including profile - square or rectangular section), and wooden beam(at least 5x5 centimeters in size) or a concreted asbestos-cement pipe. Typically, the supports are made of the same material as the fence itself (the only exception is asbestos-cement pipes, which are best combined with a wooden picket fence).

Metal supports can be driven into the ground by first drilling a hole in it to a depth of at least 50 centimeters (its diameter must exceed the cross-section of the support). After driving metal pole the space around it should be filled with gravel and compacted.
A wooden beam, when used as a support, should be treated in the lower part bitumen mastic, then wrap it in roofing felt and only after that concrete it, immersing it at least 50-70 centimeters into a hole dug in the ground.
Supports made from asbestos-cement pipes should also be concreted to the same depth. Remember that an empty pipe is quite fragile, so after installing the fence, concrete should be poured into it.
Frame

The picket fence strips will not stay in the fence on their own - they need a frame that will connect adjacent supports to each other. If the supports are metal, then the frame is made of the same material (mainly from profile pipe small section). The frame itself consists of two or three horizontally laid elements, to which the picket strips will later be attached.
For wooden supports, the frame is made of timber with a cross-section of 4x4 or 5x5 centimeters or from boards no more than 10 centimeters wide and no less than 2 centimeters thick.

It is customary to install to supports made of asbestos-cement pipes metal carcass. For these purposes, holes are made in them through which small pieces are passed. metal fittings. Then the frame strips are welded to them on both sides.
Securing the picket fence

The picket fence is attached to the horizontal slats of the frame in approximately the same way for all types of slats material:
- Measure the width of your existing picket fence strips and the distance between the supports. Calculate what the distance should be between separate elements picket fence so that the fence looks solid and not like a leaky sieve.
- Determine the shape of the top edge of your fence. Since it will be quite difficult to make a fence from a curved picket fence after you have secured all the straight elements, take care to give the necessary bend to the picket fence in advance. Most often they use the shape of a convex semicircle (within one section of the fence), however, Feng Shui experts (if you suddenly decide to listen to their advice) recommend giving the fence sections the appearance of a concave semicircle (“bowl”), the “duty” of which is to attract everything you need: from money to family well-being.
- Install the supports for the future fence. If you concreted them, then wait until the concrete has completely hardened so that the entire structure does not tilt under the weight of the picket fence.
- Attach the frame for the picket fence in the form of horizontal strips to the supports. Metal elements It is better to fasten them together by welding, and wooden ones with self-tapping screws.
- Paint the supports and frame (after securing the picket fence, this will be quite difficult to do).
- Paint the picket fence if necessary.
- Attach planks with the same spacing in all sections of the fence to the horizontal elements of its frame. The picket fence should not touch the ground, especially if it is made of wood. fasten wooden planks should be done using self-tapping screws.
- If you want to make the fence as invisible as possible, place pickets on both sides of the horizontal frame slats in a checkerboard pattern. In this case, the step between the individual pickets should be 2 centimeters less than their width.
Video
Instructions for making a fence from a European picket fence: