DIY wooden tool box. How to make a tool box: choose a shape and a drawing for making it yourself. What is a tool box for?
Read also
Any repair requires special tools. And the instrument loves order. As a minimum organization of the workplace, a tool box is needed. Similar designs are sold in stores, but it will be easier and more convenient to make a tool box with your own hands.
Today, a huge number of organizers have been invented. Let's look at the most popular options:
- Portable box. An ordinary wooden box without a lid with a handle. It's easy and convenient to carry tools without a motor on a long handle: hammer, screwdrivers, awls, open-end wrenches and adjustable wrenches. But such an organizer will always be a mess, since it is impossible to somehow organize the workspace of such a box. An obvious advantage is the ease of manufacture. A more complex tool like an electric drill or a screwdriver cannot be stored in such an organizer.
- Drawer with departments. The same wooden box can be made with separation of departments. In small sections it is easy to place various types of fasteners: bolts, screws, nuts, etc. Such an organizer can be either with a handle to make it easier to carry, or stationary. But most often the stationary version is performed. The organizer can be extended upward, then the drawer will take the form of a chest of drawers, with many compartments. You can also put power tools in such a place, although this is highly undesirable. The problem is that in order for such a box to support a heavy tool, you need to use thick-walled boards. Even thick plywood will no longer work, as it will begin to sag under the weight of the tools. Therefore, it is better to use a box on a frame to store the entire set of tools.
- Box on a frame with wheels. The main stiffening ribs of such an organizer are made of metal corners. And as shelves, boards are assembled or thick plywood is used. This approach makes the box extremely stable. As a rule, wheels are welded to it for convenient movement in space. A reel with an extension cord can be attached to the box on wheels to make working with a power tool easier.
- Fabric organizer. A fabric organizer is a good option for an apartment. A basic set of open-end wrenches, screwdrivers, pliers and a hammer can easily fit here. The organizer itself is a piece of fabric with pockets, which is rolled up after use and put away in the closet. In addition to the small number of compartments, the disadvantage of such an organizer is its short service life. The fabric quickly becomes dirty and begins to tear. Even purchased products do not have a long service life; homemade devices, as a rule, “live” even less.
- Unusual models. It would be surprising if none of the masters began to invent all sorts of unusual models. Depending on the available materials, the place where the toolbox will be located and the composition of these tools, everyone can choose the basic version of the organizer and change it to suit themselves.
Design principle and materials of manufacture
Before making a structure, you need to clearly decide for yourself several questions about the future product. By choosing your own option at each point, you can get the design principle.
- The first question is the composition of the tools. If there is a large amount of fastening materials available, then it is worth making a separate department for them. This immediately discards the option with a fabric organizer, since the fasteners will simply break through the walls. It is important to have a power tool. If the tools include a drill, screwdriver, hammer drill and other tools of this kind, then a single box will not work. For such an organizer you will have to make a large number of compartments for each of the tools.
- The second criterion is the ability to move the organizer. He comes out of the first one. If the tools include only the most basic set, then it is better to make the box portable. This will allow you to keep the instrument in your apartment. In addition, it is convenient to bring the tools directly to the place of work. The stationary organizer is convenient due to its spaciousness. Here you can place everything you need, from simple tools to a grinder and an electric saw.
- The next and final question is the materials used. Plywood cannot support the weight of heavy tools, but it is suitable for creating the top shelves of a stationary organizer. It is best to use boards. This is a material that is fairly easy to fasten and is strong enough to withstand the weight of heavy tools. To give additional rigidity to the box, metal corners are used. Using a metal frame, you can create a fairly stable structure and even put it on wheels for easy movement in space.
Instructions and steps for making a tool box
A step-by-step analysis of the manufacture of basic versions of boxes will help you create your own unique project. In each of the options, you can add additional compartments, use existing materials instead of those specified, and also make any other changes within the design.
The simplest portable box
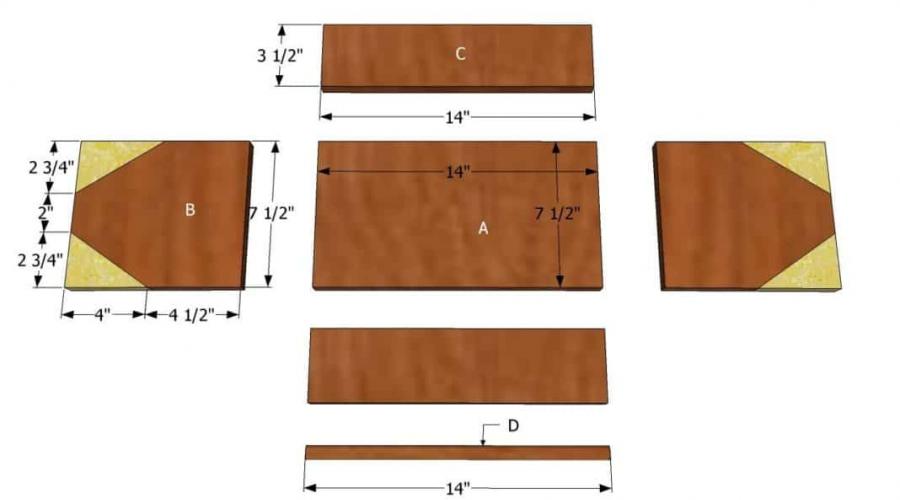
The simplest portable box was invented back in the Soviet era. It is quite simple to make. There are no compartments for fasteners, but you can make them yourself. The box itself is an open box with a triangular top and crossbar.
There is a tray in the upper part of the structure for small items. There are two mounting options for the box. The parts can be glued on or self-tapping screws can be used. Any board can be used as material. The handle of a shovel or other metal or wooden piece with a round cross-section will fit under the handle. The main thing is that the future box is comfortable to hold in your hand.

You can use thick plywood instead of boards. All parts need to be cut out; it is advisable to sand the edges with coarse sandpaper. Then, by driving self-tapping screws at the intersection of the parts, fasten all the elements. There is nothing complicated about this; the full cycle of making a box will take less than 2 hours. After the organizer is ready, it is advisable to coat it with paint or varnish. Inside, you can make a division using additional partitions, dividing the box into sections.
For small items, you can make a separate section, or you can attach a tray to the top of the drawer. The tray is an open rectangular gutter, which is also attached with self-tapping screws.
Tool box on wheels
A toolbox on wheels is a more complex storage system. It can be used to hide heavy power tools. At the same time, the organizer can also accommodate fasteners with the rest of the set of small and medium-sized tools.
Before making a box, you need to estimate the dimensions of the project. First of all, decide on the number of boxes. Keep in mind that you cannot put more than 1-2 electric tools in one drawer. Taking into account the dimensions of the drill or hammer drill, you need to select the depth of the boxes. It is possible to provide open shelves for a welding machine and other large equipment.
Another point that you need to decide is the number of drawers in width. As a rule, the design has only one drawer in width, so it is easier to assemble all the elements together. Only the number of drawers in length and their depth change. After assembling the parts, each box is divided into separate storage areas. But if there are too many tools, then the organizer may turn out to be too high, which is very inconvenient. Therefore, for such storage places it is possible to provide a width of two drawers, but between them an additional frame of metal corners is required as a stiffener. It is advisable to make handles on top in the form of curved metal pipes or welded corners. Handles are necessary for easy movement of the organizer.
The material you will need is metal corners as the basis of the structure and plywood as filler. Boards will also work, but they will take up a lot of usable space.
Once the number of drawers has been determined, you can calculate the length and width of the future organizer. The corners are fastened together by welding. The seam should be neat, on the outside of the box. The scale must be knocked off with a hammer. Once the frame is ready, you can immediately weld wheels onto it for moving.
If the organizer is more than 1 drawer wide, you will need more than 4 wheels: 6 or 8 for 2 and 3 drawers, respectively.
The boxes are assembled separately on the floor, after which fasteners from the corners are welded under them, where the boxes are installed. The boxes should be as large as possible; division into sections is done later, immediately across the entire depth of the box using pieces of plywood. You can make your own compartment for each type of tools and fasteners. It all depends only on the preferences of the future owner.
The metal box for tools has a long service life and is convenient for long-distance transportation. To make a box you will need a caliper and a tape measure for measurements, welding and a sheet of metal. It is advisable to use as little welding as possible; most of the bending should be done using an anvil and hammer.
First you need to estimate the required volume of the box, put the parts on the sheet and cut along the lines. After this, bend the box and weld the necessary seams. The handle is attached to the drawer with bolts. The resulting design will be in many ways similar to the first wooden version. In order to create additional space for storing tools, you need to attach guides to the bottom for a metal box, which can also be made by welding.
You can make several boxes, securing them with rivets, as shown in the figure. This will make the box more compact and practical. Allows you to store a large number of necessary small items and tools.

Interesting ideas for tool repositories
There are a lot of interesting ideas for tool storage. Let's look at the most popular options:
- Wall cabinet. The slatted cabinet is built above the workbench. It is convenient to store various kinds of keys and tools that may be needed when working at a workbench. In an apartment, such storage is not very convenient, but if the plan includes a wardrobe, then you can hang a wardrobe in it. All tools are stored here in a suspended state, so it is not possible to use the cabinet for storing power tools.
- Box with inserts. Inserts refer to regular pieces of pipe built into a wooden box. It is convenient to insert pliers, blades, wire cutters and other tools with long handles into the scraps.
- Shapes cut out in foam. This is an option for the most pedantic users. A strict shape is cut into a sheet of paralon for each tool, into which the stored tool ideally fits. The foam itself can be placed on any horizontal surface.
There is nothing difficult about making a tool box with your own hands. The main thing is to clearly imagine the end result and the requirements. The most important requirement for an organizer is user convenience. It is better to make a box from what is at hand in order to reduce the cost of the design as much as possible.
A large and convenient toolbox is the dream of any craftsman. This is understandable, because in such storage you can compactly put all your tools. Today they are not so expensive, so one of the options is to purchase them in a store or create such a masterpiece yourself. Which option will be acceptable for you? Of course, the purchased one has certain dimensions, but there may be many more tools than can fit in it. But one way or another, you will have to put up with it or run to the store again and buy a new one. It’s a completely different matter to do it yourself: select the right material and calculate it for all the available tools and even with the future. Comfortable? Most likely, you will agree with this argument. Therefore, in this article we will talk about how to make such a box yourself at home.
What should HE be like?
If this is a home box, then it can be a regular box with a handle. Well, if you, for example, are a plumber, then it is clear that you will need a box that is more functional, spacious and durable. The organizer will successfully fulfill this role. However, in this article, as an example, we will consider a simple home option - a box with a handle. So, we will assume that we have decided on the type of box where we will keep all the tools we need, or almost all.
Where do we start? First, let's select the material. It could be plywood, wood or even metal, then we will make the calculations. Only after this can you begin to draw up a detailed drawing. This can be done in the classic way, that is, on whatman paper using a well-sharpened pencil, ruler, compass, square, etc.


The non-classical method is using a special computer program. “Autocad” and “Compass” are precisely “sharpened” to make a professional, accurate drawing. The advantage of such programs is that they will help you avoid errors in calculations and, moreover, you have the opportunity to see in advance what you will get from all this.
These programs will only serve you well if you have certain skills in working with them.
The material has been selected, and now for manufacturing it remains to assemble all the tools that we will need. Of course, the types of tools are individual. It all depends on what kind of box you want. They are also different. But, one way or another, there are universal tools. They are always needed. This is the measuring tool:
- fasteners;
- hammer;
- screwdriver.
Let's start production

We take traditional material - edged softwood boards. As for processing, this is the simplest and most affordable material, which also has good strength properties.
As planned, it will be a wooden box, and our task now is to materialize the drawing itself into material. For this task we will need a ruler and a pencil. After this, we mark the material and use a hacksaw or jigsaw to cut out the component parts of the product. If we planned a regular non-closing option, then we need to make five planes: four walls and a bottom.

When assembling, it is usually better to use wood glue. The joints must be cleaned, and only then glue must be applied, after which we firmly press the parts together. Be sure to let the glue dry completely.
After this operation, we can further strengthen the box with fasteners - self-tapping screws. Secured. Now you need to make a handle. This could be an ordinary wooden strip, which we need to nail or screw to the upper edges of the side elements.


Organizer
Following the principle “from simple to complex,” let’s now talk about the organizer. It is clear that in the open-top box, which was described above, you can put large tools: a hand saw, a hammer, a mallet and much, much more.
Where do you put the little things? There are all sorts of screws, bolts, nuts, etc. These small fasteners tend to get lost or not be there exactly at the moment when they are especially needed. This is where we need an organizer.

As already noted, this type of box by its design is the most functional in operation. What is he? This is kind of like a box on a box, or rather, many drawers in one section for storing not only medium-sized tools, but also all sorts of small things. Of course, at first glance, it may seem that making such a structure would not be easy. But it only seems. Difficulties mainly arise in the manufacture of the sliding mechanism. Everything else is much easier to do. Now in more detail about the manufacturing technology.
- We start by making the main body. It must be open and deep so that we can place various medium-sized tools (hammers, wrenches, etc.) in it. We can say that the design of this main body is quite simple, but in essence it is an ordinary box that can be divided into several sections using vertical planes.
- The next stage is the production of 4 smaller boxes. You probably noticed that the number of these sections is even, and we mentally divide them into pairs, trying to adhere to the dimensions of their lower large brother when manufacturing. They will be installed on top of each other. One pair of boxes (top) will have lids. They will either be folding on piano hinges, or retractable like a Soviet school pencil case.
- Now all that remains is to connect these boxes together. We will do this using metal connecting strips. We will need 6 pieces. On one side, as well as on the other side, we hook one plate at a time (short) to connect the two lower boxes - small and large. Two more plates (long) will connect all the boxes together. And finally, the longest bar will serve as a handle, and at the same time connect the two upper floors of the organizer. As you can see, there is nothing complicated here, and the sliding mechanism is extremely simplified, as is shown in the example of a metal organizer - the principle is the same.
Making a metal case for tools

Let's talk now about a homemade metal case. Don't immediately conclude that this is impossible. Of course, only an experienced mechanic can make an organizer out of metal on his own if he has special tools and the appropriate material. Factory-made metal boxes are usually made of lightweight metals such as aluminum so that the box itself is not heavy. Working with aluminum at home is difficult.

In principle, a metal box is a strong word. Rather, an ordinary box will be made of metal. The material needed to make such a box is ordinary soft galvanized steel (about 0.3 mm thick). The tools we need are:
- square;
- caliper (marking);
- sharpened small core or marker;
- ruler;
- hammer;
- anvil (wide metal bar);
- file;
- pliers.
Then everything follows the same scenario: drawing, marking. The most interesting thing is that all this can be done directly on a galvanized sheet using a sharply sharpened core (or marker), however you like. We then mark with a marker on the metal those places that we will have to remove.

After this, we proceed to trimming using metal scissors.

After cutting off all the excess, we get this complex geometric figure (“winged rectangle”).

Now let's work a little as blacksmiths. For this task, we have an anvil, and, tapping with a hammer, we carefully bend the edges of our workpiece. It is better to do this not chaotically, but in a certain order.

First we bend one side, and then we bend the other.

Now the side panels take turns.

After this, we will begin bending the protruding petals. They will make the structure itself more rigid, and it will not “play.”

We can use pliers to wrap the protruding parts on the top of the box.
After such manipulations, you should carefully go over the entire product with a hammer, straightening it.
In this case, it turned out to be a small box. But using this principle, you can make a similar one - larger, and in the end you will get a metal tool box like this.

So, if you want, everything is possible.
We hope that this article will be useful to you, dear readers. If your tools are organized, then complement it by making a regular tool box. If your tools do not have a permanent “place of residence,” then think about building a two- or even three-story “transformable house” for it. Try to do this, and your tool will always be in place, and you yourself will be pleased to use a product you made yourself in your household.
Video
This video shows how you can make a toolbox from scrap materials:
See how you can make tool organizer cases yourself:
There are many professions that use different types of tools. Most often, tool boxes are purchased to store them, but sometimes it’s easier to make high-quality storage with your own hands
 If you are interested in this or that type of craft, and you don’t sit at home with your hands folded, naturally, you collect a fairly large number of tools. To ensure that your tools are always at hand and securely stored, they need to be provided with a safety system in the form of a separate closed space called a box for storing tools. In addition to safety, the use of such a box will greatly help in your work, since the contents will be neatly sorted into compartments and in the future you can find the necessary device “blindly”. This device is also needed by car owners, or rather by owners of trucks and gazelles. The box must be well secured in the car. This means that when making it with your own hands, you need to think carefully about where it will be located in the car and how to secure it there.
Decide on two criteria:
- Will you only store tools in it, or do you also need it for ease of transportation?
- What sizes of tools do you plan to store in it?
Classification of boxes
Based on body material:
- plastic – light in weight, convenient to use and for transportation;
- metal - much heavier than plastic, but at the same time much stronger, more stable, have a more rigid structure, cannot be large in size due to the heaviness of the metal;
- galvanized metal-plastic – lightweight, durable and spacious, suitable for both storing and transporting professional tools. But all these advantages also determine the corresponding price - it can range from $150 to $500 and above.
- wooden - the most affordable material for making a tool box. Moreover, it is easier to make it with your own hands from this material, or rather from plywood 10 16 or 18 mm.
By type of stored instruments:
- hand tools - as a rule, they are represented by one large compartment for large tools (screwdrivers, hammers, wrenches) and 2-3 small ones for smaller tools;

- An electric tool is a case that is functionally designed to store and move a specific power tool. Most often it has one main compartment for the device itself and several recesses for equipment.
- organizers are boxes designed to accommodate a large number of tools of various sizes. They have many compartments; models with modular partitions, which can be rearranged from one place to another for the convenience of the owner, deserve attention.
- professional tools are a special type of case with specific mounting locations for specific tools that are more resistant to falls and adverse environmental conditions.
- non-professional tools - are boxes of both small and quite large sizes with many compartments and niches for various kinds of tools, often these are cases in the form of bags.
There are many tool box manufacturing companies such as stanley,fit– American companies, keter– no less popular Israeli company, Spanish company tayg, German Croft and many others, differing in quality and price of products.
As an alternative to all these companies, there is the opportunity to make a tool box with your own hands. In this way, you can save on cost and get a very competitive option that meets exactly your requirements.
Types of boxes
DIY tool boxes are mostly made from wood and come in a variety of shapes. Popular and easy to make boxes are the classic “basket” shape. in second and third place - a box in the shape of a chest - a container, and in the form of a case.
 |
 |
 |
Materials for making a tool box
- wooden boards 15-25 mm thick
- round wooden rod of the required length
- self-tapping screws, wood glue, sandpaper for cleaning surfaces
- set of tools – grinder, electric drill, jigsaw, screwdriver
- measuring tools - ruler
- screwdriver, hammer
Manufacturing stages

Using this technology, it is possible to produce boxes of more complex designs, creating the required number of compartments and niches using partitions.
Using the same technology, it is possible to produce a closed box, which is more reliable and convenient for transporting tools.
Additional steps in making a box with a lid
For self-production of the now popular transformable boxes You'll have to rack your brains more, but it's quite possible to implement this idea.
To do this, using computer programs, you need to develop the design you want, and a set of necessary elements that can be purchased in special stores will help you bring it into reality. The number and complexity of the selected elements depends on your requirements for the box. Assembly can be done on a wooden base using aluminum strips and angles. Fastening is done using rivets.
If you are a purposeful and creative person, then the process making a tool box will not be difficult, but when you see the fruits of this labor, you will increase your self-esteem and save budget funds.
Every man who does something in his home with his own hands knows that over time the number of tools used increases and sometimes it is difficult to keep them compactly enough in one place. In addition, if it comes to carrying or transporting them, this will also create certain problems. However, there is a way out and it is undoubtedly a tool box.

So, in any hardware store, as a rule, you can find not only materials and tools, but also boxes for storing them, as related products. You can, of course, buy it, but it will certainly be much more pleasant for any craftsman to use a tool storage box made with his own hands as another proof of his skill. And the initial stage of production should be making a decision as to which particular box is needed in a particular case.

For example, if we are talking about home use from time to time, then you can get by with a simple option, which is essentially a box with a handle, and if you frequently use a fairly large number of tools, for example, due to official duties, then it would be quite appropriate to use a large one drawer organizer. The decision must be made individually and when it is made, you can proceed to production.
Manufacturing stages

When it comes to making a tool box, you need to know that this process can be divided into several stages.
- Planning. At this stage, it is necessary to make preliminary calculations of the materials that will be required and draw up a detailed drawing of the future box. The drawing can be done either in the usual way, that is, using drawing tools, or using special computer programs, in which you can even see the approximate result of all actions.

- Preparation of necessary materials. It is necessary to prepare a sufficient number of materials and tools intended for use. In each specific case, this set will be individual, but it will hardly be possible to do without measuring tools, fasteners, carpentry and plumbing tools, such as a hacksaw and a hammer.
- Manufacturing. At this stage, as you might guess, the actual production of the box takes place. Here it is necessary to go into a little more detail.
Making a tool box

As an example of how to make a tool box, we offer a simple version for consideration. It will be a medium-sized box equipped with a carrying handle. In principle, a variety of materials can be used as manufacturing materials. Metal, plywood, and even plastic may be suitable. You need to decide what to use based on personal preferences, but traditionally, edged softwood boards are used for these purposes, as the easiest to process and affordable material with fairly good qualities.

So, to make a wooden tool box, you first need to transfer a pre-made drawing onto the material. To do this, you can use a ruler and pencil. After this work is done, you need to cut out the components of the future box using a hacksaw or jigsaw. In this case, we are talking about a simple version without a lid, so you should get 5 components. That is, 4 walls and the bottom of the box. The dimensions of these elements must be determined based on what is necessary in each specific case.
After the components are made, they must be fastened together.
The joints must be carefully processed and cleaned, after which wood glue is applied to them, and the parts are firmly pressed against each other. In this form, the already shaped box is left until the glue dries completely.
After this happens, in order to achieve the greatest strength of the product, it is necessary to additionally pierce the joints of the elements with nails or twist them with self-tapping screws. Once this work is completed, attach a handle to the drawer. To do this, you can take a simple wooden strip and screw or nail it to the box. This refers to the upper edges of the end walls of the box.

At this point, the main stages of making a tool box can be considered complete. As an addition, you can further process the finished product using sandpaper of various dispersions and cover it with varnish or an impregnating composition, such as stain, to protect the wood from moisture.
In conclusion, it is worth saying that this option on how to make a tool box is the simplest, due to which any beginner can make it. As time passes, other versions may and most likely will be made, but the first toolbox you own will certainly be remembered.
Video
This video is about making a tool box.
Last year I started purchasing precision computing instruments and decided to build a box in which I could store them. Being pressed for time, I decided that instead of working with my hands, I would cut all the parts using a laser.


These instructions are for assembling a very durable DIY plywood toolbox, consisting of 9 compartments. Pull-out shelves are designed in such a way that they are locked in the drawer and cannot be pulled out completely, so you won’t be able to pull out and drop a shelf with an expensive tool, damaging it.
A lock can be built in to secure the drawers or to lock the top compartment. This tool organizer has withstood a year of rough handling as it moves between my apartment and a local workshop.
Step 1: Materials
Wood:
- 2 sheets of Baltic birch 150*150 cm and 0.6 cm thick
- 1 sheet of Baltic birch 30*38 cm and 0.15 cm thick
- Satin polyurethane varnish
Metal products:
- 4 screws per 1.3 cm
Foam earbuds:
Step 2: A few design notes


For better protection, the box uses double-layer walls. While all internal parts are made from 0.6 cm Baltic birch, all external walls are made of double-layer. This allowed dust protection to be built into the top compartment, as well as a front wall to be added to cover all shelves during transport. In the instructions, the inner layer that holds all the shelves will be called the inner casing, and the outer layer, coated with urethane, will be called the outer casing.
Also pay attention to the notes embedded in the photos. Almost every photo has notes to help you understand how the box is made. These should help you a lot in understanding how to properly glue and assemble the parts.
Step 3: Laser cutting parts


The attached files contain all the necessary projects for cutting: *.ai files for Illustrator and *.dxf files. All wooden parts are cut from 0.6 cm thick Baltic birch. All parts were cut using a 150W GWeike LC6090 laser cutter with the power set to 80% at 10 mm/s. I also lightly sanded all the front and interior surfaces with 220 grit sandpaper. Pay attention to the sanding and your drawers will slide out much easier.
Files
Step 4: Assembling the Inner Case


First we will assemble the inner housing. Start by making sure everything fits together, and make sure you understand how everything fits together. Depending on the glue you use, the assembly can be completed very quickly. There is no need to generously lubricate everything with glue - just drop one drop of glue on each tooth. Excessive glue will only cause trouble in the future when you have to clean it off.
First, assemble the two top shelves, which will contain three drawers. Glue the dividers to the shelves and then glue the entire structure to the back panel of the inner cabinet. Then attach the three remaining shelf sections to the back panel. You can then attach the side panels of the inner case.
The easiest way to do this is if the glue on all the shelves is still wet, or at least movable. Finally, you can attach the bottom panel of the inner case and the front panel that runs across the top of the inner case (it forms the front of the top compartment). Use lots of clamps to hold all the pieces together while the glue dries.
Remove any excess glue from all joints before proceeding. Any lumps of dried glue will make it difficult or even impossible to insert the drawers when we get to this step. It's easiest to remove the glue while it's still soft, I usually remove it with a chisel or square file.
Sand the wood to remove any glue exposed on the outside of the cabinet. Also make sure that all the teeth are recessed into each other and do not protrude. This is necessary so that nothing gets in the way when we connect the outer and inner housings.
Step 5: Assembling the Drawers


Show 4 more images


The assembly of the drawers is obvious. Sand the outer surface so they can easily fit into the inner housing. Please note that on the back of each drawer there is a small hole approximately 1mm thick. Small drawers have one hole, and large ones have two. The holes mark the location where you want to install the locking mechanism.
The circular mechanisms are cut from the back of the case to preserve the wood material. The locking mechanisms will hold the drawer in the box and you will not be able to remove it completely if you drop the equipment on the floor. Screw a small screw (4 pieces, approximately 1.3 cm long) through the back of the drawer into the locking mechanism. Tighten the screw enough that you can easily rotate the locking mechanism from a horizontal unlocked position to a vertical locked position.
This will allow you to easily lock the drawer in the box without having to take everything apart. The attached video shows how the drawers are locked in the inner casing.
Step 6: Assembling the lid


Assemble the inner housing cover and let it dry. The outer cover can then be assembled on top of the inner lid. Check that all the pieces are the right size and lay them out for gluing and quick assembly. Assemble the outer cover on top of the inner cover, apply glue to the surface of the inner cover so that both surfaces are firmly glued.
If you can’t assemble things quickly, use glue that takes longer to dry, so you won’t ruin your workpiece. After gluing the two layers together, I placed the lid over the inner body and made sure that the lid fit well and did not require any additional processing.
Step 7: Assembling the Outer Case


The outer casing is glued on top of the inner casing. Apply glue to the back and sides of the outer case, and also apply glue to the inner case. Note that the outer case is taller - the extra space at the bottom will be used for front panel storage. To determine the height for the inner housing, install the cover and make sure the outer and inner housings fit well.
There will be two panels at the base of the box. The inner panel has a long hole that secures the front panel in place. Glue the inner panel to the outer one and quickly glue the entire structure to the inner/outer body.
After everything is dry, put the drawers back in place. If necessary, sand the edges of the drawers - they will move more smoothly. Finish the step by sanding the front of the drawer so that all the drawers and shelves are smooth and even.
Step 8: Assembling the Front Panel


First, place the inner front panel in place and use the holes in it as guides to install the drawer handles. Then glue the two front panels together. You can install them in a drawer to align them with each other. Then carefully remove the glued panel and, if necessary, clamp it in a vice.
Once the glue has dried, sand the panel until it fits well. You can also round the bottom of the panel using sandpaper or a plane. This rounding will make it easier to insert the panel when you close the drawer.
After assembly, I discovered that the drawer handles were a little long and did not allow the front panel to sit flush against the drawers, so I had to cut them down a bit.
Now that everything is put together, sand the outside of the drawer to give it a neat look.
Step 9: Attach the Metal Pieces and Finish the Look of the Drawer


To install the lid, I used a piano hinge. The loop was too long so I cut it to fit the box. On top I screwed a handle from a Fender guitar amplifier. There were 4 fasteners screwed on the sides. Here I went a little overboard, since two fasteners on the front panel would have been enough (but if you are going to use the box to carry a heavy tool, then it is better to screw on 4 fasteners). The side handles were screwed on with short screws - this way I didn't touch the internal drawers. Brass corners were installed on the corners of the box; they will protect the wood from damage.
The lock is a regular lock from a desk drawer. I bent the tab of the lock so that it hooked onto the bracket screwed to the inside of the drawer. Lastly, I screwed a bottle opener onto the side because you never know when you'll need one. Once all these parts are installed, unscrew them to complete the wood treatment.
I applied 4 coats of satin polyurethane varnish. Allow the varnish to dry after each application and lightly buff it with 220 grit sandpaper. I only varnished the outside of the box, leaving the inside of the wood completely untouched.
Now put everything back together and think about what you want to put in your drawer.
Step 10: Optional. Cutting shapes in foam


NOTE: Foam used in movement boxes is a highly controversial topic. The main problem is that it can release neoprene, which can cause deterioration and rusting of appliances. Therefore, think about what devices and tools will be in your drawer and perhaps replace the foam with foam rubber. Also, if you want to cut holes in the foam using a laser, remember that it is flammable! To make it easier to get the tool out, make gaps between it and the foam of about 2 cm.