Growing oyster mushrooms in a summer cottage. Growing oyster mushrooms in a garden plot. Sowing methods. Caring for a mushroom plantation. Placing stumps with oyster mushrooms in the garden
Do you know that in the West, oyster mushrooms are called “oyster” mushrooms for their elegant, special taste, and they are considered an expensive delicacy. And in Japanese restaurants, dishes made from oyster mushrooms are more expensive than those made from their “national” shiitake mushroom. And the technology of growing oyster mushrooms in an unnatural growing environment was invented in Nazi Germany, all because Hitler was extremely fond of these mushrooms and wanted to eat them fresh all year round, and not just during their natural autumn growth on stumps and tree trunks. If you adore oyster mushrooms, growing them at home is not difficult, and anyone can do it, because for this you do not need to have special premises or have a detailed understanding of the science of mushrooms. If you follow our guide, success is guaranteed.

Oyster mushrooms (scientific name Plerotus) are distinguished by the delicate taste of delicious meat and, in addition to the standard set of vitamins, they contain a very rare vitamin D2, which is responsible for the constant absorption of calcium and phosphorus. This vitamin is prescribed as part of a complex for the treatment and prevention of osteoporosis in children with poor growth. Moreover, this vitamin easily dissolves cholesterol plaques, which is why oyster mushrooms are so valued by the Japanese. And, by the way, they actually do not suffer from cardiovascular diseases and are not susceptible to obesity. Plus, the iodine content in mushrooms is similar to that in sea fish. Another great plus: 100 grams of oyster mushrooms are only 38 calories, in other words, it is a 100% dietary product.
Step-by-step instructions on how to grow oyster mushrooms at home and in the country
There is a technology designed to make it possible to grow these mushrooms at home. It is successfully used by many people, giving them the opportunity to enjoy mushrooms and not spend a lot of money on buying them.
Step 1. Mycelium

So, in order to grow oyster mushrooms at home or in the country if it is visited in winter, first of all you need to purchase planting material - mycelium. This substance can be purchased at any enterprise that is engaged in the industrial cultivation of mushrooms. Mycelium can also be purchased online. Then the material will be delivered directly to your home.
If you are inexperienced in this matter, you do not need to purchase mycelium in significant quantities. But even so, a kilogram will be absolutely enough to grow three to four kilograms of mushrooms. Purchased mycelium should be stored at a temperature of 2-3 degrees Celsius. That’s why it is placed in the refrigerator where vegetables are stored.
Step 2. Substrate preparation

The second step will be preparing the substrate for planting mushrooms. Wheat or barley straw, buckwheat husks, sunflower husks and corn cobs are considered the best raw materials for this. Planting mycelium in sawdust or tree shavings will not be very productive. And growing mushrooms itself will be difficult and labor-intensive.
The raw materials must be taken clean and free of mold. For planting, you need ten kilograms of material crushed into fractions. The prepared substrate undergoes a disinfection procedure using a thermal method. This not only prevents the appearance of harmful insects, but also moisturizes the raw materials. It is immersed in water and boiled for two hours. The soft substrate is boiled for no more than one hour. Then the water must be drained and the material cooled to a temperature of 28 degrees. It should be slightly damp so that water does not drain when it is compressed.
Step 3. Mushroom blocks - what are they?

After this you need to create mushroom blocks. To grow oyster mushrooms, use plastic bags with a volume of five kilograms. Two bags will be enough for this amount of mycelium.
Before laying out the substrate, the bags are sterilized. First, they are washed with warm water, then placed for two hours in a solution of one percent bleach.
Raw materials for planting and mycelium are placed in prepared bags, alternating layers. Half a centimeter of mycelium is laid out on six centimeters of substrate. The top layer must be made from planting materials. The tightly tied bag is perforated. In the filled bags, you need to make cuts of two centimeters in size. Holes are made in a checkerboard pattern every fifteen centimeters.
Ready mushroom blocks are placed in a special place where mushrooms can be grown. At this point, the incubation phase begins. Its duration is two weeks.
At this stage, oyster mushrooms need special care. The temperature regime for keeping mushroom blocks should be within 19-23 degrees Celsius. In addition, you need to systematically ventilate the room to prevent insects from entering.
Step 4. Care

In the first days, the temperature of the planting materials will increase sharply. It is extremely important to prevent it from overheating, because this can cause the mycelium to die. The maximum permissible temperature of raw materials is 30 degrees. To reduce it, you need to use a fan. It is placed opposite the mushroom blocks.
At this stage of mycelium development there is no need for lighting. After five days, you can observe how they grow, wrapping their threads around the planting materials. Within ten days the mycelium will completely fill the block. It will turn into a dense white mass with a characteristic mushroom smell.
Step 5. First fruiting - how to properly care?

Fruiting time is the most interesting stage in the process of growing these mushrooms. If it comes, it means everything was done correctly. But at this stage, caring for the mycelium is not complete.
After the incubation period has passed, myceliums need:
- Reducing the room temperature to 12-15 degrees Celsius.
- Fluorescent lamps provide eight hours of illumination.
- Increasing air humidity levels up to 90%.
- Frequent ventilation - at least four times a day.
Humidity can be increased by spraying the walls and floor of the room. The mycelium should not be wetted. If they are provided with all the above conditions, then very soon the young rudiments of mushrooms will appear through the cuts. The fruiting period of these mushrooms is no more than two weeks. Oyster mushroom caps have been increasing significantly in recent days. This is exactly the time when you can harvest. It is not advisable to cut mushrooms. They need to be unscrewed from the substrate.
Step 5. Second and subsequent fruitings - how to properly prepare?
After the first harvest has been harvested, the room needs to be well ventilated and wait for them to ripen again. This will be in about fifteen days. At the same time, mushroom blocks must be kept under the same conditions. From one such planting you can harvest up to four harvests of oyster mushrooms. The first two harvests will be the most productive. They make up seventy-five percent of the total volume of mushrooms.
After the last, fourth harvest has been harvested, the mycelium must be replaced. They are used as top dressing in garden plots.
It turns out that growing oyster mushrooms the hard way is not at all difficult. Although for many this process will seem labor-intensive and overwhelming. In this case, you can resort to another option. Purchase of ready-made mycelium in blocks from enterprises engaged in mushroom growing. In addition to this, you receive detailed instructions on growing oyster mushrooms at home and in the garden. You will only need to place the bags in a special place and create the necessary conditions for them.

This is a longer method of growing mushrooms on the site. The costs of its implementation will be insignificant. True, the harvest will only be seasonal, because it directly depends on weather conditions and climate.
Preparation of stumps begins in winter - from the end of January. Stumps must be selected with a healthy surface, free of mold, and stored in a dry place. Before adding planting material, the logs are soaked in water for three days, thus creating an increased level of humidity, which is extremely important for the establishment of mycelium. The removal of stumps with mycelium into the garden is carried out no earlier than in May, when the threat of the last frost has passed.
Mycelium can be sown in several ways:
- Holes up to six centimeters deep and about ten millimeters in diameter are made on the stumps. Mycelium is poured into them and sealed tightly with tape or moss. For such cultivation, mycelium in grains is used. If these are sticks, then they are inserted into the holes and sealed with plasticine.
- A three-centimeter thick disk is cut from the log, a layer of mycelium is placed on the end of the hemp and covered with the disk. To ensure firm fixation, the disc is nailed.
- You can make a pyramid from stumps. The end of each chock must be covered with a two-centimeter layer of planting material.
- After sowing, the stumps need to be placed in the cellar. The temperature of their content should be fifteen degrees. When using the first two methods, the logs can be laid horizontally on top of each other, then covered with burlap or film.
If the third method is used to lay the mycelium - a pyramid of chocks, then they are placed in a vertical position in two or three rows. The voids formed between them and the top are covered with moistened sawdust. Then wrap it tightly with film to retain moisture.

The logs located in the cellar will remain in this position for three months - until the month of May. They need systematic ventilation and air humidification. Their readiness for planting in open ground will be indicated by a dense white coating on the surface.
Transplantation into the garden is carried out in May. Fruiting of mycelium can only be successful in a shaded place. Therefore, stumps can be placed under densely leafy trees.
Wet leaves are placed in dug holes, then logs are planted. The depth of their embedding should be no more than fifteen centimeters. The stumps are planted at a distance of half a meter from each other.
Subsequent care consists of systematically moistening the soil around the stumps. Mushrooms will appear on stumps in late summer and early autumn. If the mushroom season is warm, the harvest can be harvested until the end of November.
Wintering
With the arrival of winter, the logs need to be covered with leaves, straw or spruce branches. A mycelium equipped in this way will produce generous harvests of mushrooms for several years. The most productive years will be the second and third years.
Bottom line
Mushroom growing is an extremely interesting and exciting activity. Growing oyster mushrooms at home is a successful and profitable business. You can even create a business from this, since restaurants are very willing to buy these mushrooms. The main thing is to show interest and patience, and then the result will exceed all your expectations.
We wish you success and good harvests!
Growing oyster mushrooms does not require the need to be a specialist in mycology (the science of mushrooms), you just need to follow the instructions compiled by the editors of the site. All the instructions are quite simple, they will not be difficult to follow, provided there is great desire on your part.
Growing methods
Growing oyster mushrooms is so simple that almost anyone who sets out to harvest the crop will have success. Following the recommendations and instructions, using available materials, you can collect up to 3 kg of mushrooms from 1 kg of mycelium. To do this, you will need a room for planting, for growth, high-quality mycelium and substrate.

The technology for growing oyster mushrooms is divided into two types:
- extensive(growing in natural conditions at minimal cost);
- intensive(growing under artificial conditions).
Both methods have their pros and cons. The disadvantage of the first method is its seasonality and dependence on weather conditions. The disadvantage of the second is the need for capital investment and the availability of specially equipped premises to maintain the necessary microclimate. The advantage of the extensive method is its low costs, and the intensive method - the yield does not depend on the season, fast ripening times, the possibility of earning money and return on investment.
Growing oyster mushrooms
Unfortunately, many summer residents do not even suspect that mushrooms can not only be bought in stores or collected in the forest, they can also be grown at home, without spending a lot of money and effort on it. Only recently has this activity gained deserved attention, but often beginners do not know how to grow oyster mushrooms at home, and they do not know where to get information.

Thus, enthusiasm quickly fades away. Today we bring to your attention everything you need to know about growing oyster mushrooms, photo and video materials that will be very useful and interesting.
In an intensive way
This method involves growing mushrooms in artificial conditions. The goal of the mushroom grower is to provide a climate that will be most suitable for the growth of oyster mushrooms.

Preparation of mycelium
You can buy ready-made mycelium in a store. For the first growing experience, you should not purchase a lot of material - one kilogram is enough.

Mycelium selection:
- buy from trusted sellers;
- look at the color: the mycelium should be white, with inclusions of orange and yellow (there should be no black or green spots);
- carefully read the information on the box (type, shelf life, fruiting speed);
- check the temperature level of the bag with mycelium: it should not exceed twenty C;
- take a sniff: the bag should not emit an ammonia smell.
On the eve of insertion into the substrate, the mycelium is removed from the refrigerator, heated in a warm room to the ambient temperature of the substrate (so that it does not die from thermal shock) and crushed.
Important! All activities with mycelium are carried out in disinfected conditions. The work surface and room are disinfected, and the mushroom grower wears gloves.
Substrate preparation
The amount of substrate should be ten kilograms of material per kilogram of mycelium. Any plant waste is suitable for the substrate: barley or wheat straw; chopped leaves, cobs and stalks of corn; sunflower seed husks; buckwheat husk; wood sawdust.

To disinfect the substrate and saturate it with moisture, treat the material with water or steam. After cooling, the substrate is crushed into pieces four to five cm in size.
Mycelium bookmark
The substrate is placed in polyethylene, selecting bags so that the result is approximately five kilograms of raw material in one bag. Disinfect the bags in advance - first you need to rinse them, and then soak them for an hour in a 1-2% bleach solution. Once this treatment is completed, begin filling the bags with substrate. Every five to six centimeters of raw material, place the mycelium in a bag in a layer of about half a centimeter. Fill the bags to the top in layers, so that the final layer contains the substrate.

It is also possible to simply mix the substrate and mycelium so that the mycelium forms three to five percent of the single mass for mycelium from our manufacturers and 1.6−2.5 percent for mycelium from a European manufacturer. Bags are filled with this mixture and then compacted tightly.
Having tied the bag, it is necessary to make perforations along its entire outer side in a checkerboard pattern. Let the gap between the holes or slits, the size of which be one or two centimeters, be ten to fifteen centimeters.
Incubation
Incubation takes ten to twenty days. At this time, guarantee a favorable local climate for the mushrooms:

- humidity in the room - seventy to eighty%;
- room temperature - no more than twenty-five C;
- the temperature level inside the bags is no more than thirty C, otherwise the mushrooms will not sprout;
- reduce the temperature using fans, but do not ventilate it under any circumstances;
- Do wet cleaning daily.
If everything is done correctly, after three to four days you will see that white threads of the mycelium begin to spread across the substrate. After ten to twenty days, the mycelium will grow throughout the bag. It will get a whitish color and a specific mushroom aroma. Incubation is complete and the fruiting period begins.
Fruiting
At the end of the incubation period, drag the bags with mycelium into the fruiting room.

Important! The cultivation site should be located far from a residential building. Growing mushrooms release spores, which are a powerful allergen.
Mushrooms need a favorable microclimate:
- temperature level - no more than ten to fifteen C;
- indoor humidity - ninety to ninety-five%;
- lighting with natural light lamps - ten to twelve hours a day;
- place a humidifier in the room;
- irrigate the floor and walls with liquid, but in such a way that it does not reach the mycelium;
- Ventilate the area every six to eight hours.
After the caps appear, the mushrooms require daily irrigation. Once or twice a day, spray moisture from above so that it flows down the caps of the oyster mushrooms. During this period, be especially careful about ventilating the room: due to dampness, the mushrooms can rot.
Harvesting
After 1.5 months, the mycelium will delight you with fruits. After the removal of the first mushrooms, new ones form in two to three weeks. The mycelium can bear fruit up to four times, but seventy-five% of the harvest will occur specifically in the first two waves. To prevent the mycelium from rotting, the mushroom clumps must be twisted out without leaving stems in the substrate.

At the end of harvesting, sort out the substrate, remove rotten elements from it and place it back in bags. With proper care, the mycelium bears fruit for up to six months. After the fourth harvest, dispose of the substrate or use it as garden fertilizer.
In an extensive way
If you cannot obtain the proper substrate, buy a suitable room, or create the conditions necessary for mushrooms to bear fruit, you can grow oyster mushrooms using the extensive method. It involves growing mushrooms outdoors on logs or stumps.

This method is also good for a beginner, as it requires a minimum of financial investments and labor costs. Its flaw is that such cultivation is influenced by the climate of the place; in other words, such cultivation of oyster mushrooms is characterized by seasonality.
Preparation of logs
They begin to prepare hemp and logs at the end of winter. If there are stumps in the garden left as a result of cutting down trees, you can grow oyster mushrooms on them, but such stumps are sown during a time when the air temperature is above zero (April-May). If there are no such stumps, take trimmings of thirty to fifty centimeters in size and fifteen to thirty centimeters in diameter from ash, aspen, beech and other deciduous trees.

Only healthy wood that is not infected with mold is suitable for growing mushrooms. Typically, logs are soaked in water for a couple of days - this way the wood will become moist enough for mycelium to form in it. However, if the wood is not dry, then there is no need to soak it.
Sowing mycelium
Sowing mycelium onto logs is possible using several methods:

- Place the mycelium in the cracks in the stumps. The logs are pierced or sawed, creating holes five to six centimeters deep and approximately one centimeter in diameter. It is recommended to distribute these holes on the stumps in a checkerboard pattern. If the mycelium is grain, it must be poured into the holes, then covered with moss or sealed with adhesive tape. If the mycelium is represented by sticks, they are wedged into the holes and then sealed with plasticine.
- Apply mycelium to the end of the log. It is necessary to saw off a disk two to three centimeters thick from the hemp. Cover the end of the remaining stump with mycelium, place the sawn-off disk on top, then secure with nails.
- Make columns from logs. One hundred to one hundred and fifty grams of mycelium is placed on the end of the log (the layer will be approximately one to two centimeters), then a second log is placed, on which the mycelium is again poured. Then lay the third log and sprinkle it with mycelium again. This way you can make columns one and a half to two meters high. For greater stability, the logs used must have a relatively large diameter (more than twenty centimeters).
Having sowed the mycelium on the logs, they are placed in a place where the temperature level is maintained at about + fifteen degrees, leaving for two or three months. This could be a basement or a shed that can be constantly ventilated. If the first two methods were used for sowing, then the logs are laid lying one on top of the other, and then covered with burlap or perforated film.
With the latter method of sowing, logs are placed vertically in several rows, filling the spaces between them with wet straw or sawdust. The sides of such columns are also covered with film or burlap in order to maintain sufficiently high humidity inside.
Planting logs
After a white coating has formed on the stumps, they must be planted in the ground in a shaded area. As a rule, this is done towards the end of spring. Holes are dug in the soil, and wet sawdust or wet leaves are placed at the bottom.

The stumps are arranged in rows so that there is a gap of thirty-five to fifty centimeters between the logs. The cuttings are immersed in the soil to about ten to fifteen centimeters. Then, in case of dry weather, you need to carefully water the soil around the stumps.
Harvesting
The first oyster mushrooms begin to form in August. If autumn turns out to be protracted, then the harvest can be harvested until November. In the winter, the stumps are covered with leaves or straw. Similarly, they can be covered with spruce branches.

You can get a mushroom harvest from such a stump plantation for up to 5 years. At the same time, the greatest fruiting of oyster mushrooms on stumps is recorded in the second and third years.
Conclusion
Growing oyster mushrooms at home is quite easy if you know the main rules and principles. Tree stumps in this case are the best base for growing. Wood retains moisture well and can supply the crop with the necessary substances. You can harvest oyster mushrooms in the fall in the garden in accordance with the life cycle of the mushroom, or all year round in a heated greenhouse.

If desired, the mushroom can be used as an assistant in eliminating unnecessary stumps in the garden. Over the course of several years, the mycelium will repeatedly produce a fresh product and also destroy the wood. How to plant oyster mushrooms and how to grow oyster mushrooms on stumps at home is decided by each farmer himself, but we have given several methods and examples of successful cultivation of this mushroom.
When considering these mushrooms as a source of income, you need to take into account that growing oyster mushrooms is characterized by certain advantages and disadvantages. The advantages include the following factors:
- You can grow mushrooms in a heated room all year round;
- The duration of the production cycle is no more than two months;
- Production can be made waste-free by selling used compost;
- Starting a business does not require large investments;
- You can grow mushrooms not only in rural areas, but also in the city;
- The business is easily scalable - one person can start with 200-300 mushroom blocks, and later hire staff and expand production.
The main disadvantage of a business growing oyster mushrooms is the difficulty in selling large quantities of products. It is necessary to pay great attention to organizing sales in order to be able to sell several tons of mushrooms every two months. However, this can be avoided if you sow mushroom blocks not at the same time, but at some interval - for example, no more than 20% of the total quantity per week: in this case, production will turn from cyclical to continuous.
Unfortunately, the neighbor insisted on an aspen log. Why aspen? I think because aspen wood is soft, and the mycelium should penetrate it. Fortunately, such a log was found. A high-voltage line was laid along the forest belt and trees in the way were cut down. There the husband borrowed the log. At home, he sawed it into four logs about 30 centimeters long. Then we soaked them in water for 2 days. At the end of the garden we have dug a ditch to drain excess water - melt and rain. We soaked the logs in it. Periodically, water had to be added to the ditch, as it was quickly absorbed, and the logs had to be turned over. In the future, the wet logs had to be “planted” in a shady place in the garden. We found this under an old cherry tree. Special literature recommends drilling or sawing holes in the wood to introduce mycelium, but we did not do this. We simply dug holes about ten centimeters deep for each log and filled them thoroughly with water. When it was absorbed, mycelium was poured into the bottom of each hole. Blocks of wood were placed on top, covering their lower part with earth. 
To prevent them from drying out, since the summer was dry, they periodically sprayed the logs with water, watering the ground around them. In addition, the sides of the logs were wrapped with plastic film. 
At the end of summer we took it down because heavy rains began. There was enough moisture. The first mushrooms appeared in September, when the temperature dropped to 8-14 degrees. Unfortunately, there weren't many of them. The maximum harvest of oyster mushrooms can only be obtained in the third year. The type of tree also affects the yield. On soft-leaved trees it is lower than on hard-leaved trees. At the beginning of October, mushrooms appeared on some logs again; I will soon be harvesting a new crop. Of course, now is the “silent hunting” season; the forest is full of various mushrooms. However, oyster mushrooms grown by myself are more valuable to me.
Not all mushroom lovers have the opportunity to go out into the forest for a “silent hunt.” But that doesn't mean there aren't ways to enjoy your favorite treat. It turns out that you can not only collect mushrooms in the forest, but also grow them yourself. Growing oyster mushrooms on stumps is considered particularly promising. Moreover, many do this not only for themselves, but also for sale, building a small, not too expensive business.
What is oyster mushroom?
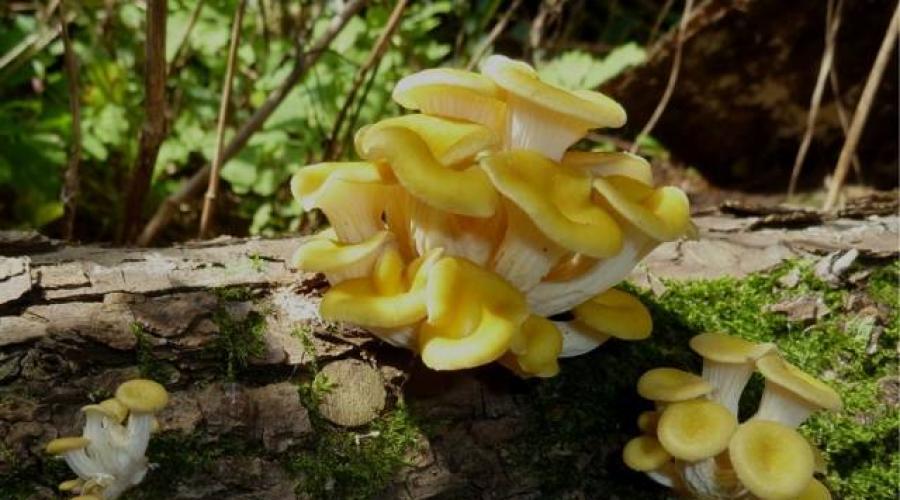
Oyster mushroom belongs to the edible mushrooms from the large Oyster family. The mushroom cannot be called small, since the cap of a young specimen is about five centimeters, and that of a mature specimen is up to 30 cm. Initially, the shape of the cap is convex, and its edge is curled. As it matures, it becomes flatter, acquiring a funnel shape, and the edge becomes wavy. While the mushroom is young, its cap is brownish-gray in color; over time, it becomes ash-gray, sometimes even a purple tint can be seen. But an overripe mushroom fades, becomes whitish, in some cases slightly gray or yellowish.
A little history
Growing oyster mushrooms on stumps began more than two hundred years ago. This method was invented in Germany. Artificial plantations of unpretentious mushrooms have enjoyed great success. Today, “domesticated” oyster mushrooms grow on all continents of the planet. Experts offer two ways to obtain a high yield:
- Open plantation or extensive method in which cultivation takes place outdoors using wood logs (stumps).
- Indoors, the so-called intensive method, using special nutrient mixtures made from corn waste, sawdust, bran and straw.

Since cultivation attempts today are increasingly being made by amateur gardeners who want to get oyster mushrooms on their plots, open cultivation on stumps can be considered the best option. In this case, you will not have to spend additional funds on the construction or rental of premises or the creation of the necessary microclimate.
What do you need to grow mushrooms?
To equip a small plantation, it is necessary to select the required number of wood logs. It is best to cut them from hardwood. The length of each piece should be from 25 to 30 cm. Growing oyster mushrooms on stumps requires that the wood trimmings be at least 15 cm in diameter. The productivity of the plantation depends on this.
You will also need mycelium, which can be purchased or made from pieces of mushroom tissue. This process is not complicated, but requires certain knowledge and skills.
Technology for growing oyster mushrooms on stumps
If you take up the project in the country, then select a shaded area. It’s good when tall crops are planted nearby or there is a small outbuilding. Oyster mushrooms do not like open areas, drafts and bright sun. On the site, prepare holes in which the stumps will be installed.

Pour boiled wheat into the hole (about 200 g for each stump). 400 g of mycelium is placed at the bottom of each hole, a stump is placed on top, and the entire structure is slightly compacted.
Before using dry stumps, they are soaked for several days to keep the wood moist. Soaking time, depending on the diameter of the stump, can range from 3 days to 2 weeks. At one end of each log, deep cuts are made or holes are drilled. Mycelium is also poured into these holes.
Growing oyster mushrooms on stumps begins in mid-spring or late summer. In the first case, fruiting will begin in the summer, and in the second - in the fall.
Need for watering
In the open air, an area planted with oyster mushrooms is moistened by rain and dew. But this is not always enough. If there is little precipitation, then it is necessary to additionally moisten the soil around the stumps. The soil should not be allowed to dry out.
Oyster mushroom harvest
The sprouted mycelium covers the stumps with a white coating. In the first year, each mycelium produces about 1 kg of harvest. In the second year, the yield is higher; the mycelium can produce 2-2.5 kg of oyster mushrooms.
This type of mushroom grows in small families. Harvest by carefully trimming the entire bunch. In this case, you must not damage the mycelium, otherwise there will be no more mushrooms in this place. You should not cut out part of the family, otherwise the rest of the mushrooms may dry out. Fruiting of the mycelium continues for several years until the stump on which it grows finally dries out.

The optimal temperature for ripening oyster mushrooms is 15-20 °C. If it gets colder, the stumps can be covered with a thick layer of dry leaves or hay. If necessary, stumps with mycelium are wrapped in agrofibre and transferred to the basement or greenhouse. This way, hobbyists can optimize the process of obtaining oyster mushrooms. Growing at home on stumps, such as in basements, extends harvest time.