Pattern for the cover of the entire Fiskars shovel. Homemade case for a small sapper shovel. Impressions from the product
Read also
I'm a quitter!
I am ballast for us!
But suddenly the counselor said,
What shovels for everyone
He will distribute
But he won’t give me a shovel.
…
This is how someone else will love work,
When the shovel is taken away.
Agniya Barto
I have a shovel, it's called Bison.
A little bigger and worse than the MPL, the steel rings, bought two years ago at a flea market for 180 rubles.
I soaked the handle with flaxseed, screwed in a new self-tapping screw, and sharpened it.
I used it periodically, I seem to be happy with everything...
But not everyone is happy.
What did I carry the shovel in? Delov: he wrapped it in a rag and even in a backpack. But it began to seem to me that this was somehow uncivilized, like disrespect for such a useful tool as a shovel. And as I thought this, preparing the shovel for the next season, my hands began to itch.
This is the result of this scabies that I will demonstrate right now.
Materials:
1. The same thick tarpaulin, with stains
2.Nylon sling of different widths and thicknesses
3. Fastex clasp
4. Glue “Moment-1”
5.Nylon threads
Work order:
1. First I made a model from an unnecessary rag, sewed it, tried it on, corrected the mistakes
2. Based on the layout, I cut out a blank for the case, cut a hole for the handle
3. I glued and sewed on pieces of thick, wide sling to strengthen particularly stressed areas
4.Sewed loops for hanging on the belt
5.Sewed the cover from the inside out, turned it right side out
6.Sewed fastex
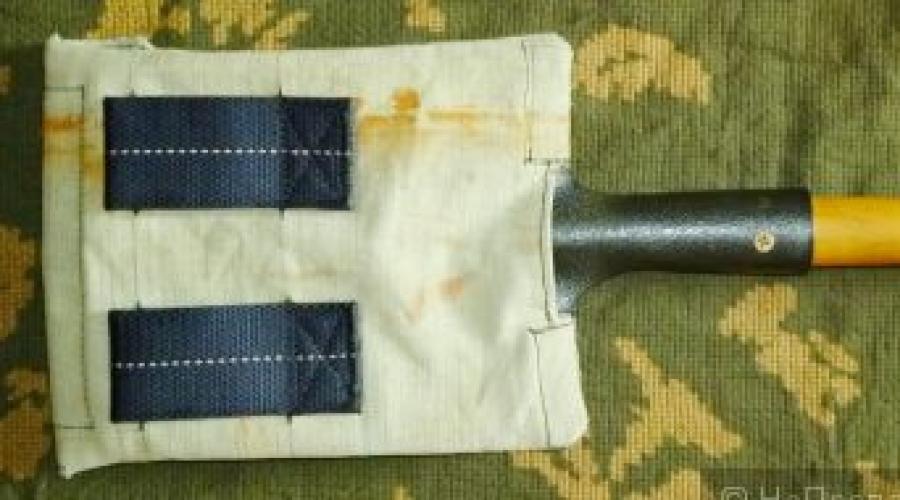
Impressions from the product:
It was made roughly and clumsily, like all my homemade products, but it was durable. I decided not to give a damn about the rust stains that cannot be washed off, not about the exhibition, especially since the stains do not affect the functionality. The shovel is a bit too big to carry on a belt, but tolerable. The shovel is held securely in the case and does not dangle. Now it’s convenient to carry it in a backpack, and there’s no shame in taking it out, and if you need it, you can hang it on your belt. Spade liked the case.
Perhaps my experience will be useful to someone.
And now the photo:


_____________________________________
Thank you for attention.
I will be happy to answer your questions.
The days of treasure hunters are back. “Black” and “green” search engines look for artifacts from past eras, devoting all their free time to this activity. All in the hope of finding a treasure trove of coins or a cache of weapons. You can't judge - times are difficult. It is better, if possible, to help.
One of the main tools of searchers is shovels from the Finnish company Fiskars with very sharp blades that are difficult to dull.
When transporting them with an open blade, you can injure yourself or fellow travelers, especially in public transport. Wrapping it in rags is also not a solution, and it’s not aesthetically pleasing either.
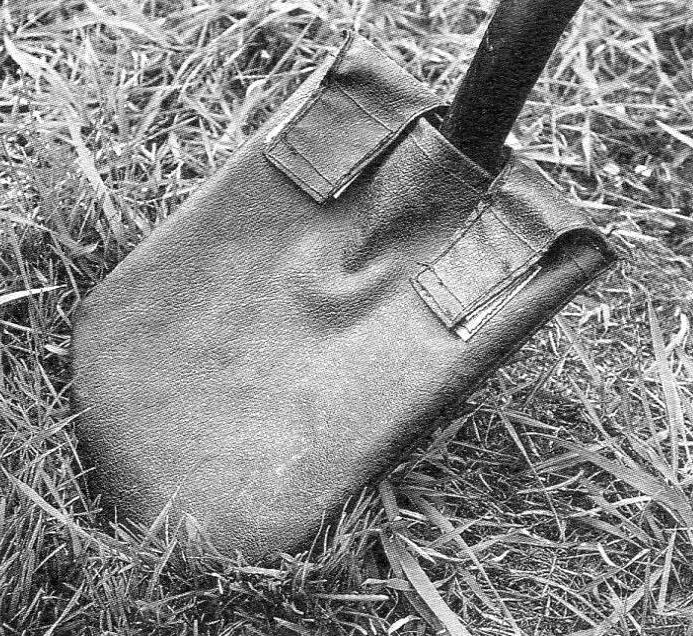
I propose to make and put on a shovel blade a simple cover made of leatherette (or better yet, from genuine leather, it is stronger, can withstand cuts, or from pieces).

1 – front part; 2 – back part; 3 – fluffy Velcro (2 pcs.); 4 – seams; 5 – burdock Velcro fastener (2 pcs.)
The pattern of the cover is created simply - trace the outline of the shovel on paper, add seam allowances to it and cut it out with scissors.
It is better to sew on a sewing machine for thick materials or, if possible, contact a tent or shoe workshop.
First, on the back of the case, sew the fastener ears around the perimeter.
Then sew Velcro fasteners to the front and back parts of the cover according to the drawing: on the “ears” - fluffy parts, on the front - burdock.

Finally, sew both halves together. Now the case is ready. All that remains is to put the blade of the shovel into it and fasten the ears.
Reliable and convenient! Tested in practice.
Other material options are teza, tarpaulin.
An additional option for the product is to use the case as a belt bag for finds if necessary.
A. MATVEYCHUK, Zavodoukovsk, Tyumen region.
(function(w, d, n, s, t) ( w[n] = w[n] || ; w[n].push(function() ( Ya.Context.AdvManager.render(( blockId: "R-A -261686-3", renderTo: "yandex_rtb_R-A-261686-3", async: true )); )); t = d.getElementsByTagName("script"); s = d.createElement("script"); s .type = "text/javascript"; s.src = "//an.yandex.ru/system/context.js"; s.async = true; , this.document, "yandexContextAsyncCallbacks");
Hello everyone) Happy New Year to everyone! While looking through old photos on my phone, I came across pictures of the process of creating a cover for a shovel. So I decided to describe this process here. If you need a case for a fiskarik or sapperka, but don’t want to spend money on a purchase, then this article is for you.
First, let's find a thick, durable fabric that would be enough for a shovel. You will need chalk or soap, scissors. And of course, a sewing machine.
We measure the required amount of fabric both in length and width. It is necessary that the fabric folded in half is slightly wider than the shovel; if you do not make a reserve, then the shovel will not fit into the case. Well, we’ll make some extra space in length for the ears, which will serve as fasteners. For them we will need Velcro, buttons, buttons, etc. We outline the lower edge of the bayonet. There should be an arc.
(function(w, d, n, s, t) ( w[n] = w[n] || ; w[n].push(function() ( Ya.Context.AdvManager.render(( blockId: "R-A -261686-2", renderTo: "yandex_rtb_R-A-261686-2", async: true )); )); t = d.getElementsByTagName("script"); s = d.createElement("script"); s .type = "text/javascript"; s.src = "//an.yandex.ru/system/context.js"; s.async = true; , this.document, "yandexContextAsyncCallbacks");
Did you measure and mark everything? We sit down at the sewing machine and sew the side of the cover and the bottom. After sewing, we cut off the excess fabric from the bottom and turn the cover inside out, with the seams inward. Now you can put the shovel in the case and measure the ears, cut a gap for the handle. To make the accessory look cultural, we bend the edges and stitch it. Now is the time to measure and sew fasteners so that the shovel sits tightly in the case and the earth does not fall out of it.

That's it, the case is ready.

Thus, we saved 200-400 rubles and spent only half an hour of free time on production. My case has served the whole season flawlessly and there are no visible scuffs or holes on it. And the shovel in my backpack always stood with the bayonet pointing up). I also apologize for the quality of the photos, they were taken for myself =)
VK.Widgets.Subscribe("vk_subscribe", (), 55813284);
(function(w, d, n, s, t) ( w[n] = w[n] || ; w[n].push(function() ( Ya.Context.AdvManager.render(( blockId: "R-A -261686-5", renderTo: "yandex_rtb_R-A-261686-5", async: true )); )); t = d.getElementsByTagName("script"); s = d.createElement("script"); s .type = "text/javascript"; s.src = "//an.yandex.ru/system/context.js"; s.async = true; , this.document, "yandexContextAsyncCallbacks");