All the subtleties of applying facade plaster on foam plastic. Styrofoam facade plaster which one to choose Exterior foam plastic plaster
Read also
No matter how wonderful and effective the foam insulation is, its durability under climatic attacks is relatively small, today experts estimate the period of degradation and decay of the foam at a maximum of 18 months. The best way to save your work and warm the house is to apply facade plaster over foam plastic. Such protection will allow you to save the foam insulation of the house, even if the finishing and plastering work was carried out with minimal experience and skills.
What is the best way to cover the foam from the sun
There are many commercials and advice from unfortunate experts that polystyrene is not afraid of water and frost, does not react to air humidity, and its only drawback is solar ultraviolet. In such "tips" it is proposed not to lay plaster on foam, but to close it with a screen of masking mesh and a thin layer of reinforcing glue until better times.
This cannot be done, if it is planned to finish the facade of the house with foam plastic and plaster, then the entire range of work must be completed in a maximum of one season, and best of all, in two to three weeks, no more. Styrofoam does not provide an airtight layer without plaster, even when laid on a good mineral glue and a primed surface of the walls of the house, it retains heat, but allows water vapor to pass through.
The sequence of work when finishing the facade with foam plastic and plaster is as follows:
- The surface of the walls of the building is primed. If the layer of plaster on the brick is relatively fresh and does not stain the hands, then the primer may not be done, but the feasibility of such savings is small;
- Stick foam sheets on foam or facade adhesive mass;
- Lay a reinforcing sublayer of protective glue with a fiberglass mesh on the foam;
- Align the corners of the walls and slopes on the windows;
- Lay a leveling sublayer of plaster;
- Wipe and clean the base, finish the finished surface of the walls with decorative plaster.
Advice! If force majeure does not allow to complete the entire scope of work and lay the protective trim on the foam insulation layer, at least lay the mesh with a reinforcing adhesive layer and apply a deep penetration primer with an acrylic base to the dried surface.
Anyway, before plastering the foam from the outside, in the future it will be necessary to apply a deep penetration primer, this operation cannot be dispensed with. It does not affect the properties of the foam, since it is water-based, and it can be very good to protect the facade surface lined with foam from water and the sun. But such protection will not replace a full-fledged plaster coating, its durability is at most 6-9 months, just before the next construction season.
The process of applying a protective sublayer to the foam is considered one of the most difficult and important stages. In this case, it is impossible to save on materials and work, otherwise cracks will appear when finishing the facade with foam plastic plaster. Therefore, initially, let's recall the glue and mesh for applying protective plaster.
Materials for performing facade plaster
Construction and finishing work is always a cost, and sometimes a lot. It is quite difficult to count and purchase exactly according to the estimate several types of various plaster mixtures and adhesive compositions, as experienced craftsmen do. Therefore, there is a certain temptation to simplify your life when laying facade plaster on foam insulation.

On the market you can find a fairly large number of ready-made adhesives. Well-known brands Ceresit, Chrysel, which is simpler - Stolit, Master produce both universal and specialized adhesive acrylic-cement compositions. The former are cheaper, but it is better not to use them. Therefore, to equip the reinforcing layer under the facade plaster for foam plastic, we select the following materials:
- Special adhesive for arranging a reinforcing layer of plaster on polystyrene boards. No adhesives for ceramics or foam stickers on the walls, this is a completely different material;
- Fiberglass mesh with a density of 150-160 g / m 2 for an alkaline environment. Such a facade mesh has a special protective coating that improves the adhesion of the fibers to the adhesive mass.
The adhesive itself for arranging the reinforcing layer due to additives is characterized by a pronounced alkaline reaction, this allows the adhesive mass to adhere well to the facade walls lined with foam plastic. Any other adhesive mass practically does not stick or sticks very poorly to the surface of the pressed polystyrene beads.
Protective cladding technology
The procedure for laying out the reinforcing layer can be started almost immediately after blowing the cracks with foam and drying the putty spots at the points of installation of plastic fungi along the foam facade. It is clear that before plastering the foam, the surface must be lightly sanded with a grater in order to improve the adhesion of the adhesive mass of the reinforcing plaster layer with polystyrene foam.

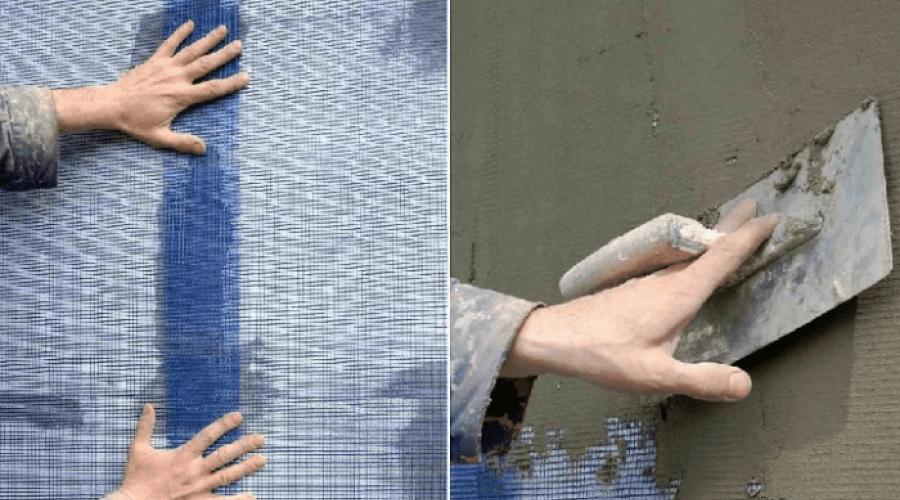
We glue the mesh on the foam plastic under the facade plaster accurately and correctly
Immediately about the technique of laying the reinforcing mesh. In fact, facade plaster is obtained from three layers, the weight of the coating on the foam is quite large. Styrofoam can be deformed, and if the mesh is not laid correctly, cracks will definitely appear on the plaster. Conversely, a well-placed reinforcing sandwich of glue and mesh is able to hold even the heaviest types of facade plasters on the foam surface.
The most common mesh laying technique is as follows:
- From a common roll, individual mesh sheets are cut along the height of the facade walls with a small margin of 5-7 cm;
- An adhesive mass with a thickness of 3-4 mm is applied to the surface of the foam plastic, a width slightly larger than the size of the web. The gluing of the facade surface starts from top to bottom, immediately apply half the height of the run;
- The canvas is laid on the adhesive layer applied to the foam, and pressed into the thickness with a wide spatula. It is necessary to put pressure on the facade surface slightly, rather to stretch and level the canvas;
- The last stage is the laying of the adhesive mass on the laid grid. To stick the second part of the canvas, just tuck the mesh, fix it on the foam with a pin and do all the same operations. The entire mesh must be hidden under the reinforcing adhesive base of the facade plaster.
The next canvas is laid with an overlap of at least 5 cm, after which it is covered with adhesive material and carefully sanded - leveled with a wide spatula. Upon completion of the laying of the reinforcing plaster, the facade surface should look absolutely even and flat, without protruding defects from the foam.

Finishing corners and slopes with a reinforcing layer
In any house, there are quite a few problem areas where facade plaster experiences additional loads, these are the corners and slopes of windows. In addition, the foam at the corners usually “plays” slightly, so the corner zones have to be strengthened, the easiest way to do this is by laying an additional layer of mesh or installing plastic perforated corners under the facade plaster.

The inner corners of the walls are always reinforced by laying an additional patch. To do this, the reinforcing mesh for plaster is always brought a little further than the corner line, by about 7-10 cm. After grouting the canvas with an adhesive mass, an additional tape is cut out of the mesh, applied to the corner and glued on the foam with a double layer of adhesive mass. So that no traces of the reinforcing tape remain on the reinforcing sublayer, which can ruin the decorative finish, the plaster is once again passed with a wide spatula.
It is extremely important to reinforce the plaster on the foam on the slopes of the windows. The technique of laying glue on the mesh is similar to the previous case, but there is a nuance - small pieces of the canvas, especially for plastering horizontal slopes, must be attached to the insulation with brackets.
The outer corners of the façade surface must always be reinforced with a perforated corner profile. The corner edges of the insulation sheets are too weak to hold the ideal outer corner profile on the facade plaster. The profile is installed under the facade plaster in this way. On the line of the corner with a wide spatula, the adhesive mass is applied with an even strip 15-20 mm wide on both sides. The corner profile is pressed into the plaster, and the side sheets are rubbed with a spatula to the adhesive base.
It is best to install a corner profile before plastering the foam, with further adjustment and alignment of the facade plaster layer, it will be much easier to work. Moreover, it is easier to install all the small facade details before plastering the foam than to suffer in the process of applying the plaster.
More detailed instructions for finishing the facade with foam plastic and plaster are shown in the video
Leveling layer
The second stage is the alignment of the reinforcing layer with the laid mesh. This must be done, as the facade decor on foam without alignment will look very uneven. If the surface of the walls is primed for painting or similar finishing with facade decor, then the house will lose its entire appearance. A couple of days are taken to dry the reinforced reinforcing sublayer.

The first operation is grouting the surface of the reinforcing plaster with a liquid adhesive mass. With a wide spatula, a leveling sublayer of the facade finish is applied to the walls. The glue is the same, but the consistency is liquid, so as not to load the insulation with additional weight of the finish. After a day, a thin leveling sublayer will dry, and you can proceed to the rough finish of the facade surface.
No matter how hard the masters try, small traces and even subtle contours from foam and mesh remain on the leveling layer, which must be rubbed with sandpaper. Usually they use emery - “hundred”, pasted on a wooden bar. It is impossible to put off the grout, in a week or two the rough plaster sublayer will become hard, like concrete. In addition, the risk of abrasive penetration of the finishing material to the insulation increases.

The detailed process of leveling facade plaster laid on foam insulation is shown in the video
Conclusion
The stucco finish, laid on foam plastic, practically does not differ in appearance from the cement-sand layer on brick or cinder block walls. The last stage, as a rule, involves laying a decorative facade finish. It all depends on the wishes of the owners, for example, in many cases, in order to reduce costs, the leveling plaster sublayer is not covered with decor, but simply covered with a deep penetration primer. You can return to the issue of decorative finishes in a year or two or three. Moreover, it will already be clear how the insulation from expanded polystyrene behaves, and whether corrections are needed.
The issue of external wall insulation, both in the private sector and in apartment buildings, is gaining more and more relevance every year. More and more owners prefer to spend money on external insulation once than to pay huge utility bills every year. Choosing between a range of materials for external insulation, more and more stop at polystyrene. This building material has many advantages: a high level of heat retention, low cost, ease of installation. However, when working with the material, protection from environmental influences should not be neglected. And plastering will give maximum security to the foam.

It is about this method, as the most optimal, for protecting your, or rather its external insulation, that you will learn in more detail. You will also be presented with the technology of applying a plaster layer on the foam, and the features of working with the material.
If the decision has already been made, and out of the whole variety of materials for insulation, you have settled on foam plastic, or on its close relative - foam plastic, you need to consider its protection from external destroyers from the environment: moisture, sunlight, ultraviolet, high and low temperatures. And we will protect by the method of plastering.

To understand the whole process, as well as the necessary materials, you need to know what stages it includes:
- Preparation of plaster mortar.
- Plaster mesh and its attachment to the surface.
- Grinding work on the grid for plastering.
- Surface leveling layer.
- Trowel work on the leveling layer.
- Surface primer.
- Final work.
If you understand in detail each stage of the work, then you can understand for yourself that the process, although long and laborious, can be divided into several days. This is especially true for beginners who are just trying their hand at plastering. A little training and the hands themselves will know what to do, and you just have to enjoy the process. In addition, this is a great option to save money on attracting a team of professionals to the work, which will perform plastering no worse than you, but will ask for a large amount for it.

To work with polystyrene materials, which include polystyrene and the like, it is necessary to use ready-made mixtures specially designed for such work. Different firms producing dry building mixtures have several options for such mixtures in their assortment. Also, depending on the manufacturer, the price and quality will fluctuate. Over the years, such a company as Ceresit and Ecomix has successfully established itself. You can use mixtures of these companies or choose cheaper options. But when saving on mixtures, it is worth remembering that the final quality of the work performed depends on the quality of the material. Consider also the fact that you should not use mixtures from different companies in one area of work, they may differ in structure and color.
It is very convenient to choose a mixture that is versatile. It can be used both as an adhesive material for attaching the foam to the wall, and as a layer of protection. There are companies that have two types of mixtures in their assortment: separately for mounting the plate and separately for protection. When purchasing materials, do not be lazy and read what is indicated on the package, this mixture may not suit you.

The mixture, which is universal, is used for mounting a special grid to the wall for plastering, as well as for other plastering work. The material is consumed quite strongly, so for large volumes it is necessary to stock up on several bags. To apply one square meter of plaster mesh, you need up to four kilograms of the mixture, and to level the wall you need six kilograms per square.
By itself, the method of preparing the mixture is quite simple and is often indicated on the package. All instructions must be followed to obtain the highest quality material. To fix the mesh for plastering, it is best to use a mixture not of the density recommended by the manufacturer, but a little less often. When a leveling layer is applied, the consistency should be completely liquid, practically draining from the working tool.
In principle, everything is pretty clear with the technology for preparing a solution for plaster. Now you can get down to business and glue the mesh for plastering, because it is she who acts as the main layer in order to apply plaster.
Before proceeding with the plastering of the main insulating material - polystyrene foam, care should be taken that the leveling mixture and the plaster itself have a reliable adhesion to the work surface. Styrofoam itself does not have good grasping properties, if plaster is applied to it, it will at least crack, and at most it will disappear altogether, and then all the work and costs will go down the drain. To avoid this, it is necessary to use a plaster mesh.

What grid should you choose? If you work with external insulation, then material for facade work is suitable for you. Such a mesh is distinguished by its density, and the denser the mesh, the better the layer of plaster lays down. However, there is a small nuance, if the mesh is too dense, then it is quite difficult to work with corners. It is best to take a grid for plastering with a density of 140-160 grams per square meter. Another tip for beginner finishers: it is best to take the mesh that is resistant to alkali, due to the fact that the basis of the plaster mixture is cement.
Where to start installing the mesh for plastering - the correct answer is from the corners. And not only corners, but also slopes, both windows and doors, are glued in the first place.
The process of gluing the mesh on the corners:
- The mesh for plastering, which is intended for installation in a corner, is a strip with a width of 30 centimeters. The length of the mesh will depend on the surface to be treated. If these are slopes, then we focus on their length, if the corner of the house is about one meter.
- Next, you need to make an inflection in the middle of the grid. This is necessary in order to give a certain rigidity even after the pressure from the mesh is gone.
- Then you need to arm yourself with a spatula, and use it to apply the plastering mixture to the necessary part: be it a corner or a slope or a doorway. The layer of the applied mixture should be quite thin and not exceed three millimeters.
- After applying the mixture to the corners or slopes, you need to attach the plaster mesh, press it with a spatula and smooth it away from the corner and to the bottom.

When the work with the corners is completed, you can start gluing the mesh for plaster on the walls. Please note that it is necessary to leave parts of the corners not glued, they will be used at the time of joining.
- The mesh for plastering, it is sold in rolls, must be cut into pieces, the length of which is not more than one meter. Installation takes place in separate pieces due to the fact that the universal mixture dries fairly quickly.
- The prepared wall must be covered with a universal mixture, the dimensions of the covered part are approximately 1 meter by 90 centimeters. We need 10 centimeters that are left in order to glue the joints. The mixture is best applied with a small spatula, about 35 centimeters, and a layer thickness of about three millimeters.
- Further, as in working with an angle, it is necessary to lay a grid for plastering against the wall and press it down with a spatula. Fasten it to the wall with smoothing movements, movements from the center and to the edges, also from above and to the bottom. The mesh itself is almost completely immersed in the plaster mixture, you can completely cover the mesh with the mixture, for this you need to apply it a little on the spatula while pressing down.
- So it is necessary to do with each vertical strip, gradually shifting to the side. Please note that the mesh is overlapped for the purpose of further processing of the joints. The same docking occurs in corner places.
When the installation process of the plastering grid is completed, the resulting layer must be wiped off. This can be done using an ordinary grater, it can be plastic or wooden and is sold at any hardware store. Sandpaper is used as a trowel.
Do not start grouting immediately after attaching the mesh. Let the work surface dry thoroughly. If you are doing repairs in the warm season, then it will take only a few hours, if this is the autumn period, when it is damp and humid, then it is better to wait a day, or even more.

The grouting process is simple and even a teenager can handle it. With light efforts, the working surface is processed in a circular motion. It is best to do it counterclockwise. If wet pieces get on the sandpaper, it should be replaced.
Applying a leveling layer
The next step on the way to reliable and high-quality wall insulation with foam plastic is applying a leveling layer. As a mixture, you can use a universal mixture for plastering walls. It should be remembered that the leveling layer must be applied only to the pre-wiped surface.

- Arm yourself with a wide spatula, it is better if it is more than 35 centimeters, it is necessary to apply a mixture to its surface for leveling. You can do this with a smaller spatula.
- Carefully, with smooth and confident movements, you need to apply the mixture with a spatula to the wall. If the grouting of the surface was of high quality, then you will have enough layer to level the surface up to three millimeters thick.
- It is better to move the joining of the leveling layer away from those places where the mesh joins, so the seams will be less noticeable and of better quality.
Troweling the leveling layer
Nothing new was invented for these works, so we overwrite the layer for alignment according to the same principle as we overwritten the grid. It is also worth remembering that all grouting work occurs only on a dried surface. However, remember that it is best not to let the leveling layer dry out, otherwise you will have to rub it with special efforts. The best period for grouting is from 1-4 days.
How to understand that overwriting a layer for leveling is enough? It's very simple, rely on your eyesight. When you notice that the layer is quite even and smooth, you can move on to the next section. After grouting the leveling layer, you already have a finished surface, which involves finishing work, for example, applying decorative plaster or texture.
Facade decoration with foam plastic and plaster video
Surface primer
Quite often, inexperienced or novice craftsmen neglect such a stage as a primer, and in vain. The process itself is not only low-cost in financial terms, but also in time, and the benefits from it are invaluable. Initially, the primer absorbs all residual materials after grouting, which reduces the absorption of the surface of the applied materials. You can also use an antifungal primer, it will save you from wetting the walls and the appearance of mold, and the finish itself on the primed surface lies better.
The primer is applied to the surface with a short-nap roller; foam rubber can also be used. It is necessary to work carefully avoiding the formation of streaks. Next, wait until the soil is absorbed and dried, after which you can proceed to the decorative finish.

Decorative plaster is especially popular, it is it that is most used for decoration. It must be applied to a well-primed work surface after complete drying.
The process of applying decorative plaster:
- Again, we arm ourselves with a spatula and use it to apply the plaster mixture. It is very important to ensure that the layer applied to the surface is the same in all its areas. Also, the thickness of the layer depends on the grain size of the plaster: the larger it is, the denser and thicker the layer is applied.
- When the layer is applied, it is necessary to form the texture of the plaster. To do this, you can use various special rollers or improvised materials. You can make bark beetle plaster, it looks very interesting and is done quite simply.
- After creating the texture of the plaster, it is necessary to leave it to dry completely, after which you can start painting the surface.
Watch a useful video: How to insulate a house with foam. All stages
Now you know all the features of working with foam insulation, as well as its plastering technology. A fairly simple and incredibly reliable way to insulate your own.
Styrofoam as a heater is used very often. But he needs protection from external factors, otherwise such thermal insulation will not last long. Styrofoam plaster can cope well with this task, which will create not only protection, but also significantly increase the service life.
Facade "pie"
Is it possible to plaster foam and why do it?
Styrofoam is popular not only because of its low cost, but also because it can retain its performance properties for a long time. He is not afraid of temperature changes and easily interacts with precipitation.
But with regular interaction with the environment, the process of destruction of the structure begins, as the material dries up. Therefore, plastering foam will help solve a number of the following problematic issues:
- Protection. An additional outer layer is created, which will be the first to take all mechanical damage. Also, the plaster will become a barrier to the damaging effects of ultraviolet radiation.
- Moisture barrier. Despite the fact that the foam is not afraid of water, it dries out for a long time. In addition, dampness significantly lowers the thermal insulation threshold and makes it more brittle.
- Increases the level of fire safety. Modern plaster has such a composition that in case of fire it will not become “food” for fire, which means that the fire will not spread.
 Creating the final drawing
 All these issues are easy to solve if you plaster the foam. But you must first decide on the mixture in order to get the proper result.
The choice of plaster
After we figured out whether it is possible to putty the foam, it's time to proceed directly to the selection of the mixture itself. The protective coating for foam must have good density and resistance to mechanical stress. The plaster mixture must have a high level of adhesion, since the foam itself has a fairly smooth surface. On the other hand, the vapor permeability parameter does not play a special role here, since the insulation itself has a low rate for this property.
There are several types of plasters - for fixing insulation, leveling and universal. If all the work is done by hand, then it is better to stop at the last option. Universal mixtures can be used at any stage of finishing. If two separate mixtures are purchased, then the following proportions must be observed: glue - 4 kg per 1 sq.m., plaster - 6 kg per 1 sq.m.
You can also putty with a cement-sand mixture, but it will only partially protect the foam. Therefore, it is better not to save money, but to choose more expensive compounds that will not crack in 2-3 years. Among special plasters there are those that contain certain additives. It is best to opt for:
- Mineral plasters. The basis includes white cement, lime hydrate and mineral chips. On sale there is a dry powder that needs to be diluted with water. This type is characterized by good resistance to precipitation, temperature extremes, as well as good adhesion to the surface. But for the sake of justice, it is worth saying that these plasters have a service life of up to 10 years, after which they require updating.
- Acrylic plasters. This is a plastic mixture that is created on the basis of acrylic resin. The composition also includes mineral binders, which significantly increase the operational properties of the coating. This option, due to its plasticity, is not afraid of cracking, is not afraid of seasonal changes in temperature, and also easily absorbs moisture. Depending on the manufacturer, acrylic plaster can last from 15 to 25 years, so it is recommended to use it for outdoor work. But among the shortcomings, it is worth noting not only the high cost, but also the tendency to burn out.
Among professional builders, such firms as Ceresit, Stolit, Osnovit, Knauf, Ecomix are especially popular.
 Mineral and acrylic plaster
 Advice! To plaster the foam, you need to use two types of mixture - adhesive, which will become a reinforcing layer, and leveling. It is recommended to use products from the same manufacturer. Thus, a uniform coating and the same service life are ensured.
When choosing a color and material, it is worth considering some features:
- plaster must be with a higher vapor permeability than foam;
- to process areas of the house that have a higher load (cornices, plinth, parapet, areas of elevation changes, etc.), you will need a mixture with enhanced water-repellent properties;
- the richer the color, the higher the likelihood that it will quickly fade under the influence of sunlight.
All these points should be taken into account when choosing a plaster.
Styrofoam plastering process: stages of work
There are several steps to follow. But first you need to prepare the tools: a grater for plaster, a drill with a mixer, a paint grid, a building level, sandpaper for grouting, a spatula and a trowel. Of the consumables, you will need a plaster mixture, a primer, decorative plaster (mineral or acrylic). Now you can transgress to the works themselves.
 Styrofoam plastering: stages of work
 Base Leveling
Before you putty the foam base, you need to carry out some preparation. Initially, you need to level the level of all joints between the panels, for which a rule or a wide spatula is used. Such drops should be eliminated first, since it will not be possible to eliminate this defect with the help of mixtures.
Joints are removed with mounting foam. Such material allows to achieve maximum tightness. As soon as the foam dries, its excess is cut off with a clerical knife. After that, the surface is cleaned of dirt and passed several times with a spiked roller. Thus, the adhesion of materials is increased and the mixture will better lie down on the foam.
 Sealing joints and seams
 Solution preparation
For beginner builders, it is better to pay attention to universal mixtures (glue-plaster). Such a solution is used both for fixing the foam on the wall, and for plastering. Ecomix and Ceresit companies have proven themselves excellently.
For processing 1 sq.m. surface requires approximately 4 kg of the mixture. Each package contains instructions from the manufacturer. For this stage, any plastic or metal container is used, and the stirring itself is best done using a drill with a “mixer” nozzle. This will allow you to create not only a homogeneous consistency of the solution, but also significantly save time and effort on kneading.
Advice! Professional craftsmen recommend preparing a solution of a more liquid consistency for gluing a reinforcing mesh than that indicated in the instructions. This will allow you to process all the pores on the foam, and hence increase the adhesion of materials.
Plaster mesh installation
In order for the plaster to hold securely on the foam, a reinforcing mesh is pre-mounted on it. Such a layer provides protection against cracking, provides additional strengthening of the surface.
It is best to purchase dense nets, as they hold the mixture more securely. The best option is considered to be a mesh with a density of 130-160 g / sq.m., in addition, it must be resistant to alkali, which is present in mixtures.
But you need to know how to properly apply such material to corners. The work has the following sequence:
- the mesh is cut into strips of 1 m, with a width of 30 cm;
- exactly in the middle of the segment, an inflection is made, with which the tape will be put into the corner;
- using a wide spatula, the solution is applied at an angle in accordance with the length of the tape, but at the same time, the mixture is treated with an additional 5 cm on each side in width to form an overlap;
- the segment is superimposed on the treated surface and smoothed with a spatula (direction - from top to bottom and from the center to the edges).
 External corner processing
 The remaining sections of the walls are processed in a similar way. Since the mixture dries quickly, it is recommended to apply it in small areas - 90x100cm. A mesh is applied over the mixture and processed with a spatula so that it is buried in the solution. If this does not happen, then it is allowed to apply more putty on top. Installation of the mesh is carried out with an overlap.
grouting stage
Each putty has its own drying time, which is indicated by the manufacturer on the package - in summer 3-4 hours, in winter - 20-24 hours. Using sandpaper or a plastic float, treat all surfaces.
The grout is carried out in a circular motion - counterclockwise. If the sandpaper gets into the area with a dry mixture, you will need to immediately change the paper.
 Surface grinding
 Priming and leveling
Next, you need to prepare the surface for the finish coat. To do this, you can use two different mixtures or one universal. But in the first case, before priming the surface of the foam, you need to level it.
The process will require the following steps:
- with a spatula (width 35 cm), the solution is applied to the walls - with high-quality grouting of the walls, a layer of 2 mm will be enough;
- as soon as the layer is completely dry, the surface is polished - it is recommended to proceed to this stage 3-4 days after puttying;
- then, using a foam rubber or fleecy (short pile) roller, a primer is applied, which will increase the adhesion of materials - it is best to use a mixture with antifungal properties in order to increase the protection of the walls.
decorative trim
For outdoor work, there are special facade plasters, which are designed taking into account that they will regularly experience temperature changes and the effects of climate change. Each manufacturer adds binders and additional components to the composition, on which the performance properties of the plaster depend in the future. Therefore, before puttingtying the foam, it is necessary to familiarize yourself with the filling of the selected mixture and correlate it with the climatic features of the region.
 Applying the final layer
 Decorative plaster is applied as follows:
- a solution is being prepared - if you have to work with a large area, then it is best to prepare in portions so that the mixture does not have time to harden (it is not recommended to re-dilute the plaster);
- the plaster is applied in two layers, each of which should not be thicker than 4 cm - a new layer is applied only after the previous one has dried;
- as soon as the mixture is half dry, proceed to grouting - at this stage, they begin to form a pattern on the surface.
 Finishing plaster painting
 Important! The choice of tool depends on the planned structure. For this, a specially shaped roller is used. But the texture can also be created with improvised means, for example, with a notched trowel.
In order for the final stage to be of high quality, it is necessary to perform all the work under certain weather conditions: temperature in the range from 5 to 25 degrees, with humidity not more than 65-70%. At the same time, it is desirable that there is no strong wind outside.
Plastering foam plastic is not such a difficult task, which it is quite possible to do it yourself. The main thing is to choose the right materials and follow all stages of the process.
Having insulated the facade of the house, the owner is always faced with the unpresentable appearance of the insulation itself.
Since most often used as thermal insulation Styrofoam or penoplex, that is, a good way to help get rid of this problem is facade plaster on foam plastic. The application of any decorative layer will protect the insulation layer from the negative effects of the external environment.
INSULATION and PLASTERING WITH FOAM PLASTIC walls with your own hands
How to properly insulate and plaster a wall with your own hands. In this video we'll show you how to...
Protective functions of plaster
If foam or foam plastic is chosen as a heater, then with constant exposure to moisture and the sun, the material will eventually become very fragile and become unusable. Also, everyone knows that this material can be easily damaged mechanically, that is, broken, scratched or pierced.
It is almost impossible to somehow fix these damages, you need to replace the whole area. If foam plaster is used, then it performs a number of protective functions, so that the insulation will last a very long time. A properly finished facade with plaster acts as a barrier against:
- The appearance of holes and dents due to mechanical damage.
- Exposure to high humidity.
- Sudden changes in temperature, as well as from prolonged exposure to heat or freezing.
- Fires. Styrofoam is highly flammable, but plaster will increase the level of fire safety.
How to choose plaster
In order to protect the insulation material, manufacturers suggest using special formulations designed for application to foam.

There are only two types of them - these are acrylic and cement-sand. Which is better the first or second facade plaster on expanded polystyrene, we will now figure it out.
Cement-sand
If we talk about the price, then cement-sand mixtures are much cheaper. And, of course, the most popular. But an attractive price does not give a long result.
Such a coating will last only 2-3 years and then the integrity of the layer will begin to collapse, as a result of which the insulation will suffer from the external environment.
In order not to have to re-install the heat-insulating layer, it is necessary to re-plaster it beforehand, removing the unsuitable coating. It must also be said that cement-sand mixtures are gray. To give a more presentable appearance to the coating, you need to use staining.
Acrylic
Acrylic mixes are much more expensive, but they will last much longer. In addition, they fit well on the base, you can choose already painted mixtures and at the same time you can make not only a smooth coating, but give it an interesting texture, for example, bark beetle, lamb or rain.
Given all the advantages and disadvantages of plaster mixtures, it should be said that it is better to choose acrylic as a decorative finish. They will last much longer and look much more attractive.
Training
After insulating the facade with foam, you need to carefully examine all the joints. If there are gaps somewhere, they must be closed with mounting foam or sealant. This will protect against the penetration of cold. In addition, you should pay attention to how even the coating turned out.
How to plaster the facade on foam plastic? To check this, you should apply the building level or rule. If there are irregularities, they must be eliminated.
The foam itself is a very smooth material and any mixtures or adhesives do not fit well on it. In order to increase the adhesive properties, special primers or a regular spiked roller can be used. The tool will make small holes in the base, and the applied solution will penetrate into them and be securely fixed.
If a primer is used, then before applying it, it is necessary to clean the base from dust and dirt that may settle during installation.
Do you need reinforcing mesh?
Even if the foam is prepared for applying the mortar with a primer, the plaster mixture is still not applied directly to it. In order to get a more reliable coating, a reinforcing fiberglass mesh is used.

It is optimal to choose a mesh with a density of 130/160 g/m2. Styrofoam plaster will fit well on such a reinforcing canvas, but it is difficult to work with it when finishing corners.
How to plaster
All work begins with cutting the grid for the corners. If slopes are processed, then the length of the mesh should correspond to the length of the slope, while the width is 30 cm. For the corners of the house, 1 meter will be measured.
This length is much easier to work with. The width is the same as for slopes.
Having prepared the solution according to the recipe indicated on the package, you can start plastering.
Do-it-yourself foam plastic plastering starts from the corner, and so let's get started:
- With a small spatula, apply the solution to a large spatula. Then apply the solution to the wall. The length of the strip must correspond to the length of the reinforcing mesh. How to plaster a wall on foam plastic video? The width at the same time on one wall will be equal to half the width of the grid plus 5-10 cm.
- The reinforcing mesh is bent in half in width and applied to the solution.
- We take a wide spatula and, smoothing the mesh, immerse it in the solution. The reinforcing element must completely penetrate the plaster solution. If the previously applied layer is not enough, then it is applied additionally on top of the mesh. The spatula must be moved from top to bottom and from the corner. This will create a more even surface.
- Further on the wall, applying another solution, which will be slightly larger in size than the next piece of mesh.
- Each subsequent segment of the reinforcing mesh is superimposed on the previous one by 5 cm.
- Everything is leveled and smoothed with a wide spatula. This is done throughout the area.
Stages of grouting and puttying
After finishing of the facade on the foam plastic is applied over the entire area, it must be left until completely dry. After waiting a certain time, how long the mixture will dry, usually manufacturers indicate on the packaging, you can start grouting.
This stage is necessary in order to obtain a sufficiently flat surface. For grouting, you can use sandpaper or special plastic floats. The device is moved counterclockwise.
Without missing a single section, minor flaws are removed.
Next, move on to putty. This procedure will make surface perfectly even and will hide the slight roughness that may remain after grouting. If the previous stage was done with high quality, then a finishing putty with a thickness of 2 mm will be enough.
After the putty has dried, it also needs to be rubbed. As a result of these actions, you will get a good, even surface that can already be painted. Painting of plaster is carried out with paint for concrete for outdoor use.
If you do not like this method of finishing the facade, you can choose decorative plaster.
Additional Information:
- moisture is not absorbed into the insulation boards, so all the water from the facade remains inside the finishing layer;
- the expansion coefficient of (temperature) foam plastic does not correspond to this indicator for plaster mixtures, therefore, due to temperature differences, the coating applied to the plates may crack and fall off;
- the surface of the insulation is smooth, dense, irregularities and micropores are almost absent, which makes it difficult for the solution to adhere to it.
If the material is too smooth, it is roughened
You need to start work with the design of corners, door and window openings. It is necessary to take a reinforcing mesh and cut off a fragment from it 30 cm wide and equal to the length of the slope, if we are talking about openings. For corners, the length should be 1 m. Then you need to bend the mesh so that its edges touch, and iron the bend. This is done so that the product retains its shape.
Using a spatula, glue or a universal mixture is applied to the foam, after which the reinforcing mesh is pressed against it. Is it possible to plaster on foam plastic with sand-cement mortar? For tighter contact between the product and the wall, iron the mesh with a spatula. It is important to ensure that the mesh does not deviate anywhere from the surface to be plastered and sinks into the solution to the same depth.
Then you can start pasting the main surfaces.
You can purchase ready-made mixes for foam plaster. The products of Ecomix and Ceresit companies have proven themselves well. At one site of construction work, it is recommended to use mixtures of one company.
The best option is to choose a universal solution (glue-plaster for foam), which is suitable for attaching the insulation to the wall and for arranging the protective layer.
Tile adhesive, preferably CERESIT CM-11, is mixed in a bucket and for this it is filled with water by 1/3, and then the powder is poured in (try not to fill the bucket to the very top - let at least 5-7 cm remain). For mixing, use a slow-speed drill with a putty mixer (not for paint) and beat for 5-7 minutes, and then let it stand for 5 minutes.
There are several steps to follow. But first you need to prepare the tools: a grater for plaster, a drill with a mixer, a paint grid, a building level, sandpaper for grouting, a spatula and a trowel. Of the consumables, you will need a plaster mixture, a primer, decorative plaster (mineral or acrylic).
Now you can transgress to the works themselves.
It would seem that it is quite easy to figure out how to plaster and wipe the foam plastic, and this operation can be done either with your own hands, or you can hire a construction team at a reasonable price. In both cases, do not make basic mistakes - buy only specialized mixtures for polystyrene foam, do not save on foam fasteners. If you are determined to do all the work yourself, watch the training videos.
In the process of facade insulation, expanded polystyrene is mounted on the outside of the building. Insulation boards are glued to the walls using an adhesive solution for PPS, and then fixed with dish-shaped (mushroom) dowels. To protect and preserve the properties, the surface of the heat-insulating layer must be closed from ultraviolet radiation, temperature changes and other atmospheric influences (wind, precipitation, etc.). One of the best ways to protect Styrofoam finishes is plastering .
This type of coating is stronger and more durable than others, moreover, it has a large selection of options. Plaster is perfect for both protection and decoration of the facade.
After the finish has hardened, the coating is polished. If there is no need for decorative processing, then the walls are lined with colorless varnish and the work with the foam can be considered finished. As a substitute for varnish, you can use paint for outdoor procedures.
The mass of expanded polystyrene is 98% filled with air. Due to this, the foam has high thermal insulation and soundproofing. In addition, the foam is an unusually light material. In construction, polymer plates are used to insulate walls both outside and inside buildings.
The insulation is very fragile and is “afraid” of ultraviolet radiation. Insulation cladding needs a protective coating. Styrofoam plaster is used as such a layer. This article will answer the questions: how to plaster foam and how best to do it.
What is Styrofoam plastered for?
 Facade plastering will protect the material from mechanical damage
 The polymer solves a number of problems:
- Protects the surface from accidental mechanical impacts.
- The finish acts as a barrier to the penetration of moisture into the polymer. With a long stay in a humid environment, the foam, saturated with moisture, loses its heat-insulating qualities.
- Finishing blocks the access of ultraviolet rays to the surface of the polymer. Under the influence of UV radiation, the structure of the material is destroyed.
- In the event of a fire, the foam becomes an obstacle to the further spread of fire. The polymer burns only when exposed to very high temperatures.
Varieties of plaster for foam
 Dry mixes must be kneaded by yourself
 Styrofoam plaster differs from standard compositions. Finishing mixture is sold dry in paper bags. Stucco walls are prepared on foam plastic by diluting the dry mixture with water.
Finishing mixtures according to their purpose are divided into two types:
- facade;
- for interior work.
facade
For plastering foam outside, special compositions are used, which include various frost-resistant and moisture-proof additives. Styrofoam plaster for the facade is divided into two types:
- mineral;
- acrylic.
mineral
 The basis of the mineral mixture is cement, gypsum and sand.
Such a composition of external use attracts a fairly low price.
It should be noted that with the slightest deviation from the coating technology, the plaster may crack and collapse in places in 2-3 years.
Acrylic
 Acrylic blends are suitable for creating decorative finishes
 Acrylic coating for has high adhesive and protective properties. On the basis of the acrylic mixture, decorative coatings are formed.
Finishing mixtures are well painted in different colors, which allows you to decorate the facades of buildings in a wide range of colors.
Styrofoam interior plaster
 The coating for interior work does not need to add frost-resistant and especially moisture-resistant ingredients, so the mixture is much cheaper than the facade coating.
Just like the facade finish, the interior plaster has a mineral and acrylic base.
If suddenly inside the room the plastering of the foam plastic was done with a facade composition, then this will not do any harm. Otherwise, when the plastered walls are covered with an interior agent, the finish layer will quickly collapse.
Preparatory work
 Needle roller will help create an interesting texture
 Before plastering the foam, you need to prepare the surface of the polystyrene foam boards. This requires the following tools and materials:
- container for the preparation of plaster;
- drill with a screw nozzle;
- reinforcing mesh;
- grout with sandpaper;
- a set of spatulas;
- dry plaster mixture;
- primer.
Expanded polystyrene is a material with low adhesion. The needle roller creates a mesh on the surface of the insulation, consisting of punctures to a depth of 8 mm. This increases the adhesion of putty with polystyrene foam. For more information about what the facade is, see this video:
After the putty layer dries, the foam is plastered.
Plastering of polystyrene boards
 Plaster is produced on a reinforcing mesh
 Styrofoam plastering is carried out as follows:

Undried fragments of the coating quickly clog the abrasive, so you must make sure that the plaster is completely dry and only then proceed with the grouting work.
Styrofoam finishing
 To create an invoice, use special tools
 The finished surface of the walls can be painted. Most often, the finishing layer of the lining of the insulation is made of decorative plaster. The way to plaster the foam with a decorative composition is quite simple.
The decorative layer is formed with different tools: a roller with a relief pattern, brushes of different sizes or a porous sponge.

Such methods of applying decorative finishes are acceptable both for interior walls and for the facade. For more details on finishing, see this video:
When finishing the facade of expanded polystyrene "under a fur coat" toriver sand, gravel, slag and even granite chips are mixed with plaster mortar. Pigments of the desired color are added to the mixture. On the primed surface of the foam plastic, a plaster mortar is thrown with a trowel. Thanks to solid inclusions, the facade of the building acquires a relief surface.