DIY drawings for bees. How to make a beehive for bees yourself: what assembly schemes exist? Evidence requirements for bees
Read also
When you hear the word “apiary,” you see rows of cute, colorful bee houses—hives—in front of your eyes, among which eternal workers are busily scurrying about. Even a novice beekeeper can make such houses for bees, so we suggest you find out how to build a beehive with your own hands at the dacha using videos and drawings.
DIY bee hive: drawings
Externally, the hive is a box, in which special attention should be paid to the roof and bottom, since they provide warmth and comfort inside the hive. Its size depends on the number of frames and selected drawings. The components of a hive are called the body, compartments, cover and magazine. The hive body consists of walls made according to the drawings. One hive can consist of several buildings. There are recesses inside the walls for installing frames. The entrance is a hole through which a bee flies into the hive, located in the wall.
Bee hive design diagram
The magazine is an optional element, but in the drawings it is a short body. It is installed during honey collection or if the bee colony is weak. The roof liner, as the name suggests, needs to be made under the roof and is used to install insulation, or you can place a feeder in it.

DIY hive drawings
The bottom is located at the bottom of the body and can be removable or non-removable, it all depends on the drawings according to which you want to make evidence with your own hands. A hive with a removable bottom is much more convenient when caring for bees. The ceiling retains internal heat in the hive, so it must be properly assembled from thin planks.
The roof is one of the main parts of the hive and protects the bees from atmospheric influences. It can be made to any shape and drawings, but it should be taken into account that a flat roof is more convenient for transportation. Ventilation holes are also required in the roof.
The frame is made of beams at the top and bottom, slats on the sides and a dividing partition, and is attached to special hangers. To obtain comb honey, use sectional frames with wire and foundation stretched inside. Spruce should be used for the frame.

Hive drawing with 12 frames
The feeder is used to feed the bees with sugar syrup in the spring and autumn. It can be installed at the top or inside the hive, it all depends on the drawings. If it is necessary to separate two families living in the same hive, insert boards are used.
Depending on the size of the frame, hives are:
- Narrow-high. If the height is greater than the breadth.
- Low-wide - if the width is greater than the height.
- Square shape - if the sides of the frame are equal.
What can you make a hive from at home with your own hands?
If earlier hives in the country were built exclusively from wood, then in modern conditions the choice of what they can be made from has expanded significantly. Wooden boards should be chosen from coniferous species: cedar, fir, spruce. Deciduous trees include aspen, poplar, and linden.

Photo of a modular cabinet hive
Wood is a breathable material and regulates the temperature inside the hive, but has the disadvantage of increasing the moisture level. One of the most successful materials for making a hive according to drawings is plywood. It is durable, environmentally friendly, and stores heat very well. To ensure that a plywood hive lasts a long time, its walls are insulated with polystyrene foam and the roof is covered with acrylic paint. It’s not difficult to make such a house for bees in the country.

Photo of the original bee hive
An inexpensive option for building a hive is polystyrene foam. Its advantages include good heat retention and lightness, while its disadvantages include fragility and fragility.
Craftsmen also use foam plastic to build hives according to selected drawings. Bees feel comfortable in it, but to prevent weathering it needs to be coated with paint.

Photo of a polystyrene foam hive
One of the durable materials is polyurethane foam, which is not susceptible to fungus, moisture, microbes, does not rot, and does not react to solvents. The disadvantage is that it does not allow air to pass through from the inside, so it is necessary to consider a ventilation system in the drawings. Another durable and unaffected material is polycarbonate.
Interesting video: A hive made of Plywood and Polystyrene foam with a replaceable bottom. With your own hands
Once the type of hive has been selected and its dimensions have been determined, you can carefully examine the drawing or diagram in order to clearly understand the structure of the hive and the sequence of work. After studying the drawing, all the parts of the hive are cut out and you can start assembling. The side walls are connected using a groove method and reinforced with self-tapping screws or liquid nails.

Photo of a do-it-yourself hive made of plywood
All parts are tightly connected so that there are no gaps. If desired, the sides of the hive can be equipped with handles, which will make it easier to move. To protect bees from too cold winters, you can install a low-power heater inside the hive.
Knowing how to make a beehive for bees with your own hands using drawings and videos, you will be able to equip a full-fledged apiary and engage in beekeeping at a professional level. Use the materials at hand to build evidence at the dacha, then
If you don’t want to spend a lot of money on purchasing ready-made hives, or you are going to build something exclusive and suitable only for you, you can always try making a hive with your own hands. H The drawings in this article will help you with this!
Each beekeeper works according to his own methodology, gives preference to certain types of hives, uses various methods of maintaining an apiary, and knows the most suitable insulation options for his area and type of hives. It is very important to choose the right hive, which will turn beekeeping from a troublesome task into a fun hobby. You can familiarize yourself with the structure and drawings of all known types of hives; choose depending on your taste preferences and the preferences of your bees!
The Dadan-Blatt hive is the most popular. Making it yourself is very simple, the main thing is to know the correct dimensions and strictly adhere to what the images of the hives indicate. To make it, it is best to choose wood species that do not contain resinous substances; willow or linden are suitable for this. In extreme cases, you can use pine or spruce boards. To make it you will need a universal woodworking machine, tools, glue and paint.
Preparation of material
The first step is to process the wood and cut it into boards 40 mm thick. They will be used to make the bottom and body of our hive. After this, grooves are cut out in the board, which will connect the walls of the evidence. To connect, you can use a “cutter”; the channels are cut 5x10 mm in the middle of the junction of the boards. Then you need to make thin planks with dimensions of 18x4 mm.
Walls and bottom
To connect the boards into one board, the cut grooves and strips need to be covered with PVA glue and connected tightly. At the exit you will receive 4 shields for the walls and 1 for the bottom. Using glue and nails, connect all the shields into a single structure, this will be Dadan’s single-hull hive. After that, cover it with paint or emulsion for wood processing. All that remains is to drill the tapholes and make the roof!
Roof
To make a roof and liner, you will need a board with a thickness of 15 mm. It will need to be covered with waterproof material and painted. Don't forget to drill some 15mm holes for ventilation.
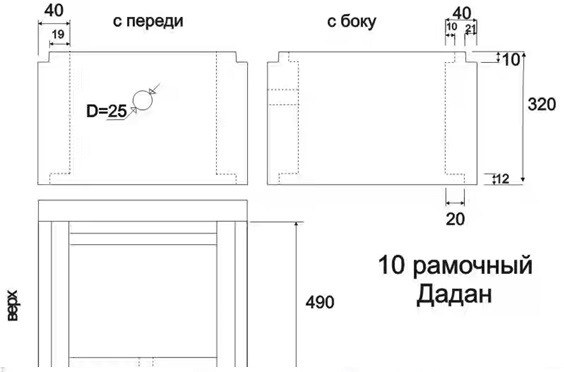
Dimensions
- Internal - 450x450x320;
- folds for frames - 11x20;
- folds for cases and magazines - 10x14.
- side panels - 480x320x40;
- front shield - 530x320x40;
- rear shield - 530x320x40.
Blueprints

Boa
The Boa hive is compact, lightweight, easy to work with and transport. Bees feel great in this design, and produce no less products than in standard evidence. The Boa constrictor itself consists of a combined bottom, 10 bodies and a lid.
Making (Video)
Dimensions
- internal dimensions of the case - 335x300x135 mm;
- front/back wall - 30 mm;
- side walls - 20 mm;
- slats for frames - 5 mm thick;
- upper/lower slats - 25 mm wide;
- side rails - 35 mm wide;
- cut on the top rail - 2x27 mm;
- frame height - 110 mm;
- frame width - 28 mm;
- roof lining boards - 8 mm in height and 20 mm in thickness;
- air cushion under the lid - 30 mm thick;
- bars for tying the bottom - 110 mm in height;
- side bars - 20 mm;
- front and rear bars - 30 mm;
- the tap hole in the front strapping bar is 335 mm in length;
- folds for frames - 15 mm.
Blueprints

Cebro
The Tsebro hive is a stationary double-walled multi-body hive that does not use double-sided insulation. Contains a socket housing for 14 frames, two magazine housings for 10 frames, 2 magazine housings for 5 frames. Dadan-Blatt frames with dimensions 430x300 are used. Magazine cases are placed in the Cebro hive through the side wall-door into the hive. This design is closed using a hinged lid. The lid itself is hinged on the back wall of the hive and can be equipped with a lock or lock.
At the bottom there is a valve or a hinged hatch, and also a removable tray, which makes it easier to collect waste. On the upper entrance there is a removable arrival verandah with windproof glass, which can be easily removed.
Drawing

Varre
Frame
The case is made elementary - it’s an ordinary box with 8 rulers. The distance between them is 12 mm. At the joints, the boards are connected directly, because the tenon/groove joint makes the body very rigid. Bars for making handles are used with dimensions of 300x20x20 mm. They are first glued and then fixed with 3 nails. Usually the upper edge of the handles is beveled to make it easier for rainwater to drain away.
Liner
A special feature of the Varre hive is the size of the roof cover. It should be 5 mm smaller than the body itself. This greatly simplifies the work of the beekeeper, since the roof can be removed very easily in this way. The gap is increased to 10 mm. Usually the liner is filled with moss, straw, leaves or shavings. Be sure to attach a canvas made of thick material to its bottom side to secure the contents.
Roof
Ventilation should be provided on the roof to diffuse sunlight. A covering cover is placed inside the liner. Roof boards should not exceed 20 mm in thickness.
Bottom
Bottom boards are also used with a thickness of 20 mm. Like the liner, it should be 2 mm narrower on all sides than the bodies themselves. This will protect from rain at the joints.
Blueprints


Pioneer
The Pioneer has only two walls - the side and the front. The front wall consists of nine glass windows and ten entrances (slotted). The side wall is equipped with guides for cassettes. There are 10 frames for each wall. These types of structures are used to support large families. The cassettes are equipped with double glazing and a ventilation system. A special device allows you to open and close the tapholes. Beginning beekeepers are very pleased with this type of hive.
The hive drawings will help you become familiar with the dimensions of the parts.
Blueprints

Farrara
Farrara are multi-hull designs on low-wide frames. It has become widespread in many countries, although we know little about it. Due to the large number of frames and cases, it will be very expensive to produce such evidence. Its cost is its main drawback. The design of the hive is unique; it consists of four buildings (or more) with 12 frames each, a bottom, a roof and a roof.
The bee hive drawing will tell you the correct dimensions to follow.
Blueprints

Ruta
The peculiarities of the Ruth hive are that the extensions and the nesting body are the same in size. When making such evidence, be sure to use the drawings; the diagram of the unique hive of the Dadan-Blatt model will be useful; you just need to change the height of the nesting body. In order for the brood to develop normally, make two housings for it; due to the large free space, the queen will increase egg production. The diaphragm, which is placed between the bodies, helps to form layers. The upper part is used to accommodate the layering, the lower part is for the family.
Blueprints

Made from polystyrene foam
This is a very convenient option for hives both in manufacturing and for use. Making it yourself takes little time, does not require special skills and equipment, and is cheaper than making it from wood. Expanded polystyrene in the form of plates can be purchased at any hardware store. All you need is a pen, a ruler, a utility knife, Titan glue and a screwdriver with self-tapping screws. The manufacturing process is very simple: outline the blanks according to the drawings, cut them with a knife, glue them and secure them with self-tapping screws.
Blueprints

 1-front wall; 4-back wall; 2,3 - side walls.
Alpine
The Alpine hive is equipped with buildings: from 3 to 6, their number depends on the time of year and on the strength of the families. You can initially make three buildings, and then add more as needed. Ulik has only one entrance and there are no dividing grilles or ventilation holes. The model for such evidence was...you won’t believe it...a hollow! The feeder is located on the ceiling and prevents condensation from forming. The insulating roof protects the bees from overheating. The Alpine hive is very easy to make, easy to work with, moreover, it is very cheap, and its frames show the highest occupancy rate due to their optimal dimensions.
Blueprints


Japanese
Such hives are very convenient and easy to manufacture. The design is very simple - several buildings with a height of one hundred to two hundred mm, and an internal diameter of up to 300 mm. Unlike conventional hives, this one does not require frames at all. The body houses a special cross that secures the honeycombs and prevents them from falling. Ulik is equipped with only a lower entrance.
Blueprints

Sun lounger
The hive bed in the classic version with 20 frames consists of a body, a large lid, two compartments, and a magazine. In appearance it resembles an oblong box; its bottom and roof are very dense. You can buy such a model in a store, make it to order, or make it yourself. You can find information about the detailed production of such evidence models on our website in thematic articles, but for now we recommend that you familiarize yourself with the drawings.
Blueprints

Ukrainian
The Ukrainian lounger consists of a bottom, which is integral with the body, the body itself with a capacity of 20 frames, a roof and the frame itself. Each wall of the case is 40 mm thick. Details of the manufacture of the walls and parts of such a lounger are discussed on our website. You can see the dimensions in the picture.
Blueprints

Multihull
The main advantages of multi-body structures are ease of use, ease of manufacture, low price and high results. Bees feel comfortable in them and do not lack free space. Depending on the time of year, you can remove or add buildings. The entire evidence consists of a series of housings, a roof, a detachable bottom, a stand, a dividing grid and entrance liners. There are also many other small details that help make the beekeeper’s work easier.
Drawing

Double-hull
As the name suggests, this type of evidence consists of two spacious buildings. The double-hull unit is perfect for places where the main bribe during honey collection is very high. Strong bee colonies are usually placed in these two-hull hives, since weak ones will not take root in it, or will produce very little bee products. Typically, such hives have a removable bottom to make it easier to maintain. Very often the tapholes are located only on the lower compartment. The lid is made flat and thin.
Blueprints

Sixteen frame
The sixteen-frame model differs only...yes, in the presence of additional frames. They are very convenient for novice beekeepers, as they allow you to grow a fairly strong colony. The store extension contains honey. The thickness of the front and rear walls is 40 mm, the bottom and side walls are 30 mm. There are two entrances. All measurements and details can be found in the pictures.
Blueprints


Fourteen frame/ twelve frame/ ten frame
Fourteen-, twelve- and ten-frame evidence differ in the number of frames; in their structure they are almost identical. Some people simply find it more convenient to work with a large number of frames at their disposal, others are used to fewer. Choose for yourself!
Blueprints

14-frame

12-frame

Kuznetsov's universal hive
This universal Kuznetsov hive includes such parts as: a body, which consists of sequentially installed elements - a base (2), a body (1, 3, 11) with a bottom (4) and a tray (5), a mesh for the main body (10) and cover (12). The bottom housing is equipped with a dust collector (6); it is located above the mesh and consists of many plates attached in pairs, which are installed at an angle to the horizontal. In cross section it has a herringbone shape. Very useful for collecting pollen by bees.
Blueprints

Ozerova
The Ozerov evidence includes three buildings, as well as two half-frame extensions. The lower body is divided into two compartments using a partition. Each compartment has two entrances - bottom and top. The case is placed on a bottom stand, which is also divided into two sections by a blank partition. Each section of the lower body can accommodate up to 8 frames with dimensions of 435x300 mm. The second body is divided into two halves, each of which has its own entrance - on the side or in front. There are no partitions in the third building. In addition, they also make two extensions. Instead of extensions, a fourth body is sometimes made.
Blueprints

Glazova
It is made in the form of a container. In Glazov’s devices of this kind, the bee colony very quickly increases its strength, the bees bring a large amount of pollen and nectar, and the evidence allows them to accommodate it all. Unfortunately, such models are very inconvenient to transport, they weigh too much, and it’s difficult to make them yourself.
Blueprints


Video
Both beginners and experienced beekeepers come to the conclusion that it is better to make a hive with their own hands. You are absolutely sure of the quality of your own product; if development is necessary, you can quickly produce the missing parts. We will talk about how to make hives yourself.
Popular hive designs
Before you build a hive with your own hands, you need to choose its design. Basically, novice beekeepers use two types of hives:
- Dadanovsky for 12 frames. It has a vertical design and grows upward. If necessary, another standard housing or magazine is placed on top (an additional housing half the height of the main one, into which the half-frames are installed).
- Lounger - for 20 frames or more. It differs in size - it has a greater width than depth. The number of frames used by the bee colony is regulated by rearranging the partition.
Both of these designs use standard 470*300 mm frames, which are widely used. These two types are the most common among beginner (and experienced) beekeepers. Sometimes they use Ruta hives, but they have frames of a different format - 470*230 mm and are not so easy to find. Also, it is more difficult to work with Rutas than with Dadanovskys or beds; more experience in beekeeping is required. Therefore, choose from two options - Dadanovsky or lounger. It’s best to find out which one specifically from beekeepers in your area.
Hive drawings
Since the Dadanovsky hive and the lounger use standard frames, they differ only in width: one should fit 12 pieces of frames, the other - 20 or 24 pieces. The rest of the parameters remain the same.

Changeable parameters for hives with different numbers of frames are shown in the table. Substitute them into the drawing and get the option that you need.
| Number of frames in the case, pcs. | Case width B, mm | Width of the internal opening of the housing B1, mm | External installation dimension of the housing rebate B2, mm | Internal installation size of the fold B3, mm |
|---|---|---|---|---|
| 10 | 455 | 375 | 419 | 425 |
| 12 | 520 | 450 | 494 | 400 |
| 14 | 595 | 525 | 569 | 575 |
| 16 | 685 | 615 | 659 | 665 |
| 20 | 880 | 810 | 854 | 860 |
What you need to know before you start making a hive with your own hands
Even before you start making hives yourself, you need to know the requirements for materials and technology for constructing bee hives. A lot of them. Let's start with the material requirements.
What are they made of?
The most common material is wood. Both non-resinous coniferous wood (spruce, fir, deresined pine) and loose hardwood - poplar, linden, etc. can be used. You should not use dense wood - the hive will be heavy and cold.
The requirements for wood are strict. It should be dry - no more than 16% humidity, without falling knots, rot, wormholes, or redness. Blue discoloration is acceptable (it does not affect quality indicators). If there are knots, they can be removed, sealed with plugs of the same type of wood and puttied. Do not use wood with other defects.
Today they make hives from plywood, preferably birch. In this case, the walls are made double with a gasket between layers of insulation - foam plastic. Such hives are warm in winter and cool in summer. Their disadvantage is that the walls are vapor-tight and moisture does not escape through them. Therefore, special attention must be paid to the hive ventilation system (make an additional entrance at the top, and, if necessary, open it for ventilation).
Sometimes hives are assembled from polystyrene foam, polyurethane foam and polystyrene foam. The best option is polystyrene foam. You can even install some kind of fasteners in it; neither bees nor other insects can gnaw it. The remaining two materials are collected using glue, and bees also sharpen them, and ants and other neighbors undesirable for bees can settle in.
Processing and Assembly Requirements
When assembling a hive with your own hands, you must strictly maintain the internal dimensions of the body and extensions. Then increasing volumes will not cause difficulties. Parts of the hive - bodies, extensions, magazines, roof - must be connected into a lock and the lock parts must also match. This is necessary for a reliable connection without cracks and drafts, which bees really don’t like. In this regard, the maximum processing tolerances are 1-2 mm.
There are also requirements for the quality of processing of materials. Most of them relate to wood, but they can also be applied to other materials:
- Boards and bars must be smooth, without burrs, burrs or chips.
- It is necessary to cut materials strictly at an angle of 90°, without allowing deviations.
- The hive bodies must be knocked down from solid boards 40-45 mm thick or using a tongue-and-groove joint, glued for reliability.
- To pair the parts of the hive, a quarter is chosen in the parts - for a reliable gapless connection.
- Rebates are made on the front and back walls of the hive for hanging frames. The depth of the fold should be such that there is a distance of at least 8-10 mm from the top edge of the plank to the cover or extension. If the distance is smaller, the frames may stick to the cover, which creates maintenance problems.
- If the walls are made of two layers (if the boards are not thick enough), the outer ones are connected in quarters, making sure that the seams in the layers do not coincide. It is better to connect the internal parts and the bottom into a tongue or groove.
Structural elements and their features
Most often, the hive has a modular structure - it consists of several detachable parts. This is convenient as it allows you to increase the volume as needed. Each of these parts is manufactured separately and the manufacturing precision must be high - all parts must be interchangeable.

Frame
This is the central part of the hive, which usually houses the bees' nest. Depending on the number of bodies, hives can be single, double-body or multi-body (3 or more). The corps are mentored as the family grows.

Roof
The roof of the hive can be single-pitched (sloping backwards) or gable. In any case, it should have overhangs - protrude beyond the geometric dimensions of the hive and protect the walls from exposure to bad weather.

The roof consists of a roof liner - a flat body for placing insulation or feeders for feeding bees - and the roof planks themselves, nailed to the roof liner or screwed with self-tapping screws. The height of the underframe depends on the thickness of the insulation, and this value depends on the region. Typically the height of the roof liner is 80-140 mm. Ventilation holes are often also made in the roof liner to remove moist air from the hive.

When making a roof, the boards are laid either in two layers with the seams overlapping, or from thicker boards in one layer, but the seams are necessarily covered with thin planks. Roofing iron, roofing felt or roofing felt can be laid on top of the wooden roof of the hive.
When making the roof, make sure that it fits tightly, without gaps. To seal the joint around the perimeter of the body, you can stuff a felt strip or nail a plinth to the outside of the body to cover the joint.
Bottom
The bottom of the hive can be nailed to the body (solid) or can be pulled out or pulled out, i.e. be detachable. The removable bottom makes hive maintenance easier - it allows you to clean the bottom without disassembling the entire hive. Structurally, the bottom can be:
- cold - from a single board;
- warm - made of two layers with insulating backfill.
The bottom can also be double-sided - with protrusions of different heights on both sides, which allows you to adjust the internal volume. Knock it down tightly, without gaps, connect the boards into a quarter or into a groove with additional gluing of the joint with moisture-resistant wood glue. The cracks must be carefully sealed (with wood putty), as wax crumbs are poured into them, and then wax moths appear. Therefore, from time to time they prefer to replace the bottom by knocking together a new one.
Video about making hives from different materials
After you have decided to become a beekeeper and have bought a couple of colonies, the time comes for you to need new hives. Families grow and swarm, and they need to be moved to new houses. You can, of course, buy ready-made ones, but buying used ones is dangerous. It is unknown what diseases can be purchased with them, and the new prices are steep. There is only one thing left - to make beehives for bees with your own hands according to the drawings. If you know all the manufacturing rules, then it’s not difficult at all.
In this article we will talk about making beehives with your own hands, the correct sizes and drawings for them. Let's find out what a beehive is and how to make it.
In ancient times, beekeepers extracted honey from hollow trees, then they began to hollow out logs for bees. With the development of beekeeping, they began to make evidence for bees with their own hands of different designs, and the material used for them is different.
Tree
A classic option for making bee hives. In such houses, bees feel in natural conditions, close to natural ones. The best type of wood for manufacturing is cedar, although linden and aspen are also possible. Such hives breathe better, smell nice and are dry.
Hives made of aspen and linden require additional insulation in winter. And these are expensive materials.
Some beekeepers make their own hives from cheaper materials. This is pine, spruce, fir. But the bees are not comfortable in such evidence. They collect moisture and resins, especially in new ones.. Pine smell. There is only one good thing about them: they are warm and require minimal insulation for the winter.
Plywood
Durable and environmentally friendly material. A house made from it must be painted and insulated from the inside with polystyrene foam, then it will be dry and warm. But plywood is afraid of moisture and requires constant and proper care.
Expanded polystyrene
Modern material used by beekeepers to make hives. It has a low cost and does not require additional insulation in winter.
The disadvantage of this material is fragility and brittleness. If you choose poor quality, the honey may deteriorate.
Styrofoam
The most economical option. It is possible to use packaging from household appliances. The advantage of this material is its lightness even with filled frames. Excellent thermal insulation. The disadvantage of this material is its fragility and permanent coloring so that it does not crumble from exposure to sunlight.
Polyurethane
Excellent thermal insulation properties. Does not rot, does not decompose. Fungus and bacteria do not develop in it. It does not allow moisture to pass through and it does not accumulate inside. Bees, mice and birds do not like to chew on it.
A small downside is that it is flammable and requires ventilation because it does not allow air to pass through.
After carefully studying the characteristics of the material, you can begin building the hive. Let's consider options for building wooden and foam houses.
Types and designs of hives
Bee houses are divided according to their design:
- collapsible;
- non-separable.
Almost no one uses the latter because they are difficult to care for.. All beekeepers use frame hives, where the number of frames can vary. A DIY beehive with 24 frames is popular. However, there are options for 16 and 20 frames.

In turn, frame hives are divided into:
- horizontal;
- vertical.
The horizontal or “bed” consists of one body. The expansion goes to the sides. It is easy to work with such evidence and change the number of frames, but they have a drawback - they are bulky and heavy.
Vertical ones consist of several buildings. This form is lightweight and mobile.
Both forms use multiple sections. They are separated by partitions, which allows you to change volumes in any direction.
Popular designs
Dadanovsky
Used in almost all apiaries. Made from wood (cedar, spruce, pine, linden, aspen). It is simple and spacious. Consists of 12 frames and can be supplemented with shops or cases as the family grows. In winter, bees are kept in the nesting compartment. As the weather gets warmer and the family grows, they are added to the buildings.

Alpine
Multi-body hive. The creator is French beekeeper Roger Delon. Made according to the hollow principle. That is, the natural living conditions of bees have been created and taken into account.
Compact design is convenient for tight spaces. It has no partitions or ventilation holes. Air naturally enters through the taphole.

Ruta
This DIY bee house designed for keeping bees in the southern regions, because due to constant rearrangements of the buildings, hypothermia occurs in the house. Consists of 6 cases of 10 frames each.

Cassette
Due to the increase in the incidence of bees, cassette hives have become popular among beekeepers. Such evidence have thin partitions, so bees create a microclimate on their own.
They are made only from wood and impregnated with wax, so the bees in them are less susceptible to diseases.

Ukrainian lounger
This hive design is the largest in size suitable for beginners. They are easy to maintain. Easy to build, which will allow you to master beekeeping skills. Usually such hives have 20 frames. The sides of the house are insulated, so the bees winter well in them.

There are many designs of evidence, but we will dwell in more detail on the classic one, a sunbed with a different number of frames, and a multi-frame unrebated one. In this case, there are beehives with 16, 20 and 24 frames.
How to build a classic hive step by step
Due to the ease of manufacture, the Dadanovsky hive is considered a classic option.
To make hives, it is better to use natural materials.
The classic design for hive production consists of:
- One or more buildings.
- One or two stores.
- Liner.
- The bottom of the hive.
- Ceiling.
- Roofs.
- Framework.
- Feeders.
- Insert board.

Bee house instructions with drawings
Now let's talk about how to make a beehive with your own hands step by step. The sizes of a bee hive can be very different, but we will focus on one option. To do this you will need:

A 15 mm thick board is required for the lid and liner. Collect and cover with tin to prevent water from entering. Paint it. Make ventilation holes with a diameter of 1.4 cm.

- back and front shield (cm): width 53, height 32, thickness 4.
- side shield (cm): width 48, height 32, thickness 4.
- internal (cm): width 45, height 45, thickness 32.
In order to place the frames in the body, folds need to be made.
Dimensions 1.1 * 2 cm.
If there is a multi-body bee hive, then the dimensions will be different: 1 * 1.4 cm.

The frame located in the nest is 43.5 * 30 cm;
Magazine frame - 43.5 * 14.5 cm;
The distance from the walls of the case to the side strips is 0.07 cm;
The space for the frame is 2.5 cm;
The width of the side of the frame is 3.7 cm.
Hive-bed for 16, 20 and 24 frames: drawings and dimensions
 Hive-bed for 16, 20 and 24 frames
 What tools and materials will be needed?
- Wood, plywood, foam.
- Rulers or tape measures.
- Squares;
- Hacksaws.
- Hammers.
- Drill, drill, self-tapping screws.
- Chisels.
- Glue.
- Carrying handles.
- Galvanized sheet for the roof.
- Frames in the amount of 24 pieces.
Hive dimensions:
- frames 30 * 43.5 cm;
- body (cm): length 87, width 56.5, height 63.5;
- roof length (cm): outside 93.5, inside 81;
- bottom thickness 3.5 cm;
- lower entrance - 1.2 * 14 cm;
- the upper tap hole is 2.5 cm in diameter.
Instructions for making a hive for 24 frames
- Cut out parts from the prepared material according to the drawings.
Observe the dimensions exactly so that the construction of the bee trap with your own hands is even and without large gaps.
 Instructions for making a hive-lounger
 - Assemble the bottom. Connect the two slats and the deck using primer and nails.
- Connect the side walls and attach to the bottom. Make a protrusion beyond the bars of 2 cm.
- Make grooves for frames on the front and back walls. Size 1.8 * 1.1 cm.
- Cut holes from below.
- Attach the valve and the landing board.
- Make a roof. Fasten the boards with nails into tenons.
- Attach opening hinges to the roof.
- Cover the roof with tin.
- Make a ventilation hole 20 * 0.03 cm on the back side of the roof.
- On the front wall drill a hole with a diameter of 2.5 cm.
- Cover them with a net.
- The legs are strong to the bottom.
- Dry and paint.
- Attach handles to make it convenient when carrying.
Should be painted white. Bees remember this color better. White color repels the sun's rays.
How to make an evidence bed for 20 and 16 frames
It is made according to the same principle with a difference in size.


Multi-body beehive: dimensions and drawings.

Over the years, this hive has not lost its popularity in use. Convenient design allows them to be used everywhere. And it’s easy to make.
In order to properly build a hive, you need to know what the structure consists of:
- Lid.
- Roof liner or ceiling.
- The shops.
- Cases.
- Stand.
- Framework.
- Dividing grid.

The body looks like a box. Its size from the inside (cm): width 37.5; length 45; height 24.
It includes 10 - 12 frames measuring 43.5 * 23 cm.
These sizes are more suitable for regions with warm climates, and for the Russian climate the width is made half a centimeter larger.
Reducing the size leads to inconvenience in working with frames. It is impossible to get them out when they are heavily polished or swollen from moisture. Therefore, some increase the width of the case to 38 cm.
To make cases, you need to take carefully dried boards. They should dry out within a year. When cutting out parts, the boards should have a small margin (3-5 mm). The stock is left for further fitting of parts. For trimming, it is recommended to leave an overlap of 1 cm.
Make folds on the front and back parts of the body to place frames on them. Sizes 1.1 and 1.7 cm. This depth allows you to freely install the upper body.
Handles or small recesses need to be attached to the side walls.
A 25 mm hole is drilled from the end of the hive under the roof to ventilate the house.
Boxes with frames are tightly connected to each other. In this case, folds are not used. This design solution is more convenient to use and simpler to build.
In cases using folds, during transportation or movement, bees most often get stuck in the lower part and hide in the folded recesses, subsequently dying. Most often, the queen dies in them and beekeepers abandoned such hives in favor of a non-rebated design.
To make the roof, a 2 cm thick die is taken. A shield is knocked together from it, which is covered with galvanized sheet.
It is better to make the bottom removable, double-sided.
- three bars 57*6.5*3.5 cm - side;
- one 44.5*6.5*3. cm is installed at the rear.
Make grooves in them. Width 3.5 and depth 1 cm. Assemble a U-shaped structure. The grooves are designed for installing a floor slab.

It is necessary to provide a front projection of 50 mm. It serves as an arrival board.
The roof liner (ceiling) is a solid shield assembled from dies, measuring 52 * 44 cm. Around it is a rim made of slats. They are 3.5 cm wide and 1.5 cm thick. There is a hole in the center. It is needed for ventilation between the buildings or a feeder is placed on it.
The liner is placed on the body with the smooth side without the rim, which allows the bees to move freely. It can also serve as a dividing grid; in this case, a mesh is stuffed over the hole.
Stand. It is made from bars according to the size of the bottom. A wide die is nailed into the front part at an angle of 45°. This will be the arrival board.

A recess measuring 2.5*9 cm is cut into the side bars. They are designed for convenience when you need to lift the hive or secure it when moving.
To increase the service life of the bars, impregnate them with liquid bitumen. Dissolve it with gasoline. This procedure will make the wood waterproof.
Dimensions of the dividing grid. Designed to isolate the temporary isolation of the uterus. To separate the body with brood from the honey ones.
The size of the grille must match the size of the inner housing. It is placed on bars. Made from wire mesh.
Frame sizes. Case and magazine frames can also be made with your own hands. They must correspond to the drawings.

Drawings of multi-body hives.


Frames for the hive: dimensions and description of how to make it yourself
Frames are an important part of hives and the main work is done with them. From constant use they become unusable and need to be added. Therefore, the beekeeper should always have a large supply. To save money, it is better to make them yourself than to constantly purchase them.

To make frames we will use the following tools:
- hammer;
- pliers;
- awl;
- shoe nails;
- a skein of thin wire.


For production, use natural materials. It is better if these are boards that have been dried for a year. To make a frame you need to know what parts it consists of:
Top bar.
Grooved or uniform.
Bottom bar.
Regular, grooved or through-gap.
Side bars.
They have holes for pulling the wire under the foundation.
Frame sizes depend on the design of your hive. Standard sizes are:
- the width of the top and side boards is 2.5 cm;
- height of the top block is 2 cm;
- bottom width 1.5 - 2.5 cm;
- height 1 cm;
- external dimensions vary depending on the design of the hive, but usually 43.5 * 30 cm.
After we have chosen the material and decided on the dimensions, we proceed to the actual production of the frame.
- Cut out parts from dry boards according to the dimensions of the drawing.
- Using shoe nails, connect all the parts.
- Drill 4 holes and two double holes on the side strips for attaching the wire. The distances between the holes must be equal.
- Pull the wire. Start from the top hole and snake it through. Make sure that the wire does not intersect anywhere. Fasten it securely so that the heavy honeycomb does not accidentally break off. As a result, you should have 4 lines.
The foundation is fixed onto the frames prepared in this way.
Now you know how to make bee hives yourself with your own hands with drawings. Using the drawings and dimensions, you can easily build it yourself, thereby saving your budget and providing the bees with comfortable living conditions.
Beekeeping is not an easy task, but it is beneficial not only because of its high profitability. Entomologists and farmers are unanimous: in general, the benefits of the honey bee Apis melifera are not only honey and wax, which is highly in demand in technology, but even more - pollination of fruit plants. An apiary in a country house, a personal plot, in a garden and next to a vegetable garden is definitely worth all the hassle and expense, if not directly in terms of the yield of marketable beekeeping products, then in increasing the productivity of the farm as a whole.
A ready-made hive in the Russian Federation can be bought for 2000-4000 rubles, but without frames. You can’t get by with just one hive in an apiary. The most expensive equipment for private beekeeping - a honey extractor and wax refiner - can be rented at first or the honeycombs can be sent for processing. Other bee care supplies are more affordable. That is, at the beginning of beekeeping, it makes complete sense to make hives yourself: they are not material-intensive, not structurally and technologically complex. This publication is dedicated to how to make a beehive with your own hands. The material is intended primarily for beginners.
To do or to create?
A beehive is not technological equipment in the usual sense. It is primarily the home of the bee colony(s). Honey yield is determined by many factors: the experience of the beekeeper, the method of beekeeping, the quantity, species composition and density of honey plants in a given place, the location of the apiary there, and finally, simply the weather. But honey yield from a hive depends on the correct choice of its type and quality of workmanship much more than milk yield from a cow depends on the design of its stall.
A bee colony is not a family in the usual sense, just as it is not a colony of individuals or a nest. Since the middle of the last century, some zoologists have used the term “superorganism” to briefly describe communities of social insects (termites, ants, social wasps and bees), implying that the “superorganism” is a subject of the population of a given species, an individual in it is its structural unit, like In our body, a cell carries strictly defined functions; one cannot exist on its own, but within the community-“superorganism” a complex exchange of information continuously occurs.
“Superorganism” in the full sense of the word is another life at our fingertips, and, as aptly noted in “The Life of Animals” in 1969, this word has no more to do with reflecting the true essence of the differences between them and us than a puff of smoke has to do with the Club of the Famous captains. The piston of an internal combustion engine is closer to an old soft boot, and its cooling jacket to a piece of clothing, than a bee colony is to our family, and its fertile female is to a mother or queen.
Therefore, at the beginning of beekeeping, you need to make a hive for bees, firstly, strictly following the chosen model. Beekeeping has been around for thousands of years, but the first frame hive, which made it possible to fully domesticate the honey bee, was developed only 200 years ago, so difficult is it for us to understand their life. Secondly, at the start, choose a proven model for repetition that is convenient not only for the life of bees, but also for the development of your understanding of it. To immediately chase only the maximum honey yield means dooming yourself to failure in advance. You cannot become a beekeeper relying only on book knowledge, and you need to make hives for your apiary in such a way that they can be supported as best and quickly as possible by observations and practical experience.
Dadan's Hive
The Dadan hive, in an area more or less provided with flowering honey plants, produces a honey yield comparable to that of the Langstroth-Ruth hive, and caring for it and beekeeping in the Dadan hive is not much more difficult than in a sunbed hive. The Dadan-Blatt hive with 12 frames 300 mm high (Dadanov frame, see below for frames) provides wintering for 2 bee colonies in a temperate continental climate, and at the same time can be made to fit a standard Ruta frame. A Dadan-Blatt hive completely filled with honey weighs up to 35 kg, which makes it possible to handle it alone.
In the Dadan hive, the body and magazine of different heights make up the hive module. Multi-body hives are obtained by installing modules one on top of the other. This hive is now known in several varieties adapted to local conditions. Russia has developed its own modifications of the Dadan hive, but due to ongoing climate changes, the Dadan hive in the version common in the northwestern states of the USA and Canada, designed for 9 Ruta frames, may be of interest; see its drawings in Fig. below. The climate there is much wetter and more unstable than in the central zone of the Russian Federation. But, perhaps, it is still too early for us to equip the hive with a comb-liner with inserts; then the Section Comb Super turns into a simple box, and the Inner Cover and OuterTelescoping Cover become the usual cover and roof, respectively. The construction material of this hive is a 16 mm thick Hemlock board; it can be replaced with moisture-resistant plywood.

Hive frames
Removable frames in a hive for bees are a kind of foundation on which they build a house - a honeycomb. From the point of view of bees, honeycombs are divided into nesting ones, for brood, and single ones, for storage. The queen lays eggs in the first cells filled with honey, worker bees seal them, and the larvae develop, floating in the food. Idle combs store food for the whole family for winter and bad weather.
Note: Although honey bees form a “superorganism,” they are not endowed with intelligence and act instinctively. Therefore, if there is excess space in the hive, it is possible to build dummy honeycombs. Their appearance is extremely undesirable, because... The family's strength is wasted for both it and the beekeeper.
From the beekeeper's point of view, nesting and idle combs need to be separated, allocating separate frames for both. In this case, you can take honey and wax without destroying or even disturbing the bee colony. Therefore, structurally, frames for hives are divided into nesting ones, placed in the body, and store-type ones.
Most hives are designed for low-wide frames, where the width is greater than the height. Bee colonies tend to develop vertically, so a low-wide frame reduces the likelihood of swarming when there is a large excess of food. Enthusiasts of narrow-high frames inevitably face a decrease in honey yield in general, because when the germ of a new swarm - the nucleus - emerges from a bee colony, the accumulated reserves are spent on it.
The standard dimensions of the nesting frame of a hive since the time of Ruth are 435x230 mm, and the store, or half-frame, 435x145 mm. The Dadan nesting frame differs only in its increased height to 300 mm; for dimensions and drawings of frames for hives, see Fig. A 2-mm galvanized wire is stretched into the opening of the frame (inset at the top right in the figure) and foundation is laid in it, this is a kind of trench for the foundation. Bees will build honeycombs without foundation, but honey collection from the hive will then begin later. The frame in the case/magazine hangs on hangers resting on the inner fold of the box, see below.

The width of the upper shelf of the frame is 36 or 37 mm, but the hive body/magazine is designed for a frame installation step of 37.5-38 mm. The fact is that a package of frames that is too dense due to thermal expansion can jam in the box, and beekeepers already have a lot of trouble with frames glued to it with propolis. Therefore, based on the local climate, the width of the frame flange and their design pitch are chosen as follows:
- The climate is even: sea, steppe or others with slight temperature fluctuations - shelf 37 mm, pitch 37.5 mm.
- The climate is temperate continental, e.g. Central Russia - shelf 37 mm, pitch 38 mm or shelf 36 mm, pitch 37 mm.
- The climate is continental or if the apiary is in the mountains - shelf 36 mm, pitch 38 mm.
The gap between the sides of the frame and the walls of the hive has been precisely adjusted by beekeepers over the centuries: 8 mm. More - the bees will build it up with honeycombs; less - it will be covered with polypolis and the frame will stick. Methods for removing stuck frames are known, but why fight problems if you don’t have to create them?

The gap between the bottom bar of the frame and the bottom of the hive is made larger, 20 mm. Less is impossible; if bees are deprived of the opportunity to walk along the bottom or it is limited, the colony will wither. But then regular maintenance of the hive is necessary: tearing off the frames stuck to its bottom without ruining the family is still a challenge.
The frames are assembled on nails using a special pattern board, see the inset in the figure; about wood for frames, see below. Removing honeycombs and caring for the apiary is made much easier by folding basket frames, see the figure on the right, but given that even a small apiary requires hundreds of frames, the expenditure of labor and money on the purchase of stainless wire in this case is not always justified.
Note: Some types of hives use non-standard frames. These will be described below along with the corresponding ones. types of hives.
Sun lounger
A hive-lounger is something like a chest with frames suspended in it; even its lid is often made hinged. The beehive is also called the Ukrainian hive, which is incorrect. It was invented independently by amateur beekeepers from several countries in Southern Europe. The beehive came to Ukraine ready-made, and there, frankly speaking, it was spoiled: they deprived it of the store and adapted it to fit the narrow, high frames of Dadan’s size, see fig. To be fair, it is worth noting that from the point of view of “lazy” beekeeping in areas with a bee-friendly climate and an abundance of wildly flowering honey plants, this made some sense.

The structure and dimensions of a hive-bed for 16 frames (one or two family) and 20 frames (2 family) are shown in the following. rice. In it, the bee colony is even more encouraged to develop horizontally, and the observation of the bees is easier. An indispensable accessory for such a hive is at least 1 diaphragm.

In general terms, the operating mode of a 16-20 frame bed is as follows:
- During the spring “explosive” peak of flowering of honey plants (garden, buckwheat field, lime tree, acacia grove), 2 families work, the main one and the auxiliary one. The movement of bees from family to family does not particularly reduce honey production, they have nothing to do with it, there is a lot of work.
- At the end of flowering, the auxiliary colony either separates and moves away (relocates), or is destroyed, or exhausts itself: its worker bees kill their queen and move to the main colony. The excess space of the hive is fenced off with a diaphragm.
- If the summer flowering of wild honey plants is not particularly intense, the hive operates in single-family mode before wintering.
- In the case of vigorous summer flowering, a nucleus is formed in the main family, developing into a new auxiliary family.
Thus, the hive-bed hive, at the cost of some reduction in honey yield, is largely self-regulating and self-adjusting for the honey/non-honey year. Therefore, even quite significant flaws in beekeeping do not excessively reduce honey production and almost never destroy the colony.
Note: If you read or hear anywhere the expression “two-queen bee colony”, “two-queen hive”, etc., do not believe your eyes and ears. Any student of the Faculty of Biology, not to mention entomologists, will explain that there are no “two-queen” bee colonies and, in principle, there cannot be. By analogy with individual organisms, again necessarily crude and imprecise, 2 bee colonies in one hive are not a two-headed bird in a cage, but simply 2 birds in one cage. Which may or may not get along there.
A hive-bed hive also has a property that is valuable for professionals: since the expansion of bee colonies is directed primarily vertically, one hive-bed hive is suitable for wintering 2 or more families, which allows saving weak colonies. There is no point in nursing them in a large hive; you will need to feed them abundantly. But an overfed family in the spring will not be able to restore vitality and will wither away. Imagine that someone lay in bed all winter on a diet diet, and in the spring he was sent to a logging site or an obstacle course. In small numbers and with neighbors, the bee colony experiences weakness, like a soldier in a trench with a runny nose. The appearance and layout of a wintering beehive for 4 families is shown in Fig.

Alpines
Roger Delon decided to create a hive that would allow bees to take full advantage of the incredible honey-producing potential of the alpine meadows, but this task is extremely difficult. Alpine honey plants bloom in groups of species throughout the season; flowering is volley, its peaks are high, sharp and short-lived. Flowering clumps are located in islands, often located at considerable distances from each other. Daily temperature fluctuations in the alpine altitudinal zone are also extreme: in the mountains at night and in the summer it is winter, and as soon as a cloud appears on the Sun it is deep autumn. The bees also need a volley of years to take a bribe, and they must wait out up to several cold days without turning on their hibernating instincts, i.e. A mountain hive should quickly warm up in the sun and retain heat well.

Delon the beekeeper came to the conclusion that, firstly, bees in such conditions need to be provided with the opportunity for the fastest possible development of the family. Secondly, the most suitable type of hive for this should replicate the natural habitat most preferred by wild bees - a log with a hollow. And in order to create conditions that would be good for the bees, and honey and wax would be good for us, Roger Delon, based on the knowledge acquired by that time (the middle of the last century) about social insects, developed a very low wire frame capable of holding foundation without supporting threads ( see fig.), and already under it - a hive of square buildings with a height of 108 mm, see fig. below.

Roger Delon made his hive-deck composite for ease of care; the number of its buildings can reach 12 or more. The roof of an Alpine hive is solid, like the roof of a natural bee hollow. There is only one entrance; there are no ventilation holes to reduce heat loss. Ventilation is also like that of wild bees in a hollow: air enters through the entrance, rises under the roof, cools there, falls down and exits again through the entrance. Bees also ventilate themselves by fluttering their wings. There are also no magazines, separators, diaphragms, etc., which we need more than the bees. Thus, although Roger Delon’s alpine hive is externally similar to Langstroth-Ruth’s multi-hull hive, the differences between them are fundamental.
The first tests of the new hive gave a result that Delon’s colleagues did not believe at first, despite his impeccable reputation: the bees did not steal honey and did not move from family to family, even when there were 40-50 square meters left per bee colony. m. melliferous lands. In the very honey-free year of 1988, Roger Delon’s hives produced a honey yield of 20-22 kg, and the dadans located in the same area produced 2 kg.

However, beekeeping in Roger Delon's hive, in terms of complexity and requirements for the beekeeper's professionalism, can be compared to caring for a canary or a budgie released into the garden in the spring. Labor costs for working with many small frames also increase by 3-4 times compared to the Dadan hive. At the same time, in flat areas where honey plants bloom in bursts, the climatic conditions are not so extreme, but even there the bees do not have time to take all the available nectar and pollen, and from an excess of bribes they begin to steal honey, instead of thoroughly exploring the surrounding honey-bearing areas. Therefore, we often offer for sale as alpine hives the hives of V. Khomich and Varre, modified for flat conditions, based on the same principles.
The Khomich hive differs from the Roger Delon hive by increasing the body height to 220 mm, which reduces the number of frames with the same total area. The Varre hive has been converted to fit a non-standard wooden frame of reduced height and increased width, see drawings in fig. on right; it is even more easily confused with the Langstroth-Root hive. Honey yield from these hives in bad years is less than from the prototype, but this is explained by the lower productivity of honey plants. In the mountains, its importance takes on fantastic values due to the transparency of the air, moderate temperature and high insolation.
Ozerov and others.
From time to time, interest flares up among beekeepers in the hive of Ozerov and Lupanov with a frame enlarged to 500x500 mm. In the conditions of Central Russia with a long, but rather sluggish flowering of not very productive honey plants, it, according to the authors, should have given the same effect as Roger Delon’s hive in the mountains. But it was smooth on paper. A 500x500 frame is far from optimal for the development of a productive bee colony (how many dry, warm hollows are half a meter across?) and instead of increased marketability in hives under large frames, there is the separation of side families, bees walking around and theft of honey.
How to make beehives
The method for assembling hive frames is shown above. The assembly of hive sections from the point of view of carpentry is somewhat complicated only by the need to select folds at the top and bottom. At the top, the fold is selected both inside and outside, see fig. The outer folds provide a detachable connection of the sections when assembling the hive, and the hangers of the frames rest on the inner folds. If it is not possible to use a milling machine, the folds can be evenly selected using a special folding plane - a sherhebel. They assemble hives on nails: you need a lot of self-tapping screws of various calibers for an apiary, they will cost a lot, and will not add strength to the hives.

Hangers in a poorly maintained hive can stick to the rebate, which is why enthusiasts are constantly offering designs for non-rebated hangers. But in fact, it turns out that the side gaps in all of them are “walking,” which is why the frames are no longer glued with hangers, but with the sides, which is much more serious. In general, the best non-rebated hanger is proper timely care of the hive.
What are hives made of?
Traditionally, hives are made from seasoned, non-resinous, chamber- or room-dry spruce, i.e. up to 8% humidity. When exposed to air, it will not become completely damp afterwards, because... from the inside it will be saturated with the fumes of beebread, honey and secretions of the bees themselves. Frames are also made from the same spruce, but the best material for them is linden. Linden wood is light, which is why the entire hive is lighter, and it is very tough and does not prick under nails.
MDF is similar in properties to linden, but, as far as we know, no one has tried making frames from MDF yet. Beekeepers are a conservative people, and for good reason. However, MDF is not at all chipboard or fiberboard; it emits gaseous products (“gasit”) even less than linden. More precisely, it does not gas at all: it completely lacks synthetic binders. MDF is produced by pressing wood pulp at elevated temperatures, resulting in almost pure lignin. For the expiration of phenol-containing compounds, etc. MDF is not certified, because That is unnecessary. In general, an MDF hive frame is perhaps the only thing a novice beekeeper can experiment with.
Plastic hives
Recently, hives made of various types of plastics have been actively promoted on the market. The Finnish polystyrene foam hive, see figure, is quite popular due to its relatively low cost and immediate readiness for work: set it up, put in the frames, and you can move in the family. Also, the absolute advantage of hives made of polystyrene foam is negligible heat loss, but their other features are worth looking into in more detail.

The popularity of Finnish beehives has given rise to numerous attempts to make beehives from foam plastic with your own hands, but this is not at all the same thing. Foam plastic is the trade name for expanded polystyrene foam. The last phrase is not a tautology, i.e. not expressing the same thing in other words.
Expanded polystyrene as a raw material is sold as polystyrene granules saturated with dissolved gases. In the production of foam plastic products, they are poured into a mold, which is heated to 80-90 degrees; in artisanal conditions - immersing the form in hot water. Gases are released, the granules swell, fill the mold tightly and stick together; on the surface and on the cut of the foam, its cellular structure is clearly visible.
Polystyrene foam is a very fragile material, and advice to make hives out of it by fastening the plates together... with self-tapping screws is not even funny. The foam hive will settle down simply when carried, even before filling it with honey. But molding polystyrene foam at home from granules is not realistic: a form to which the foaming granules would not stick is expensive.
In another method, the granules are foamed separately and the hot viscous foaming mass is pressed (extruded) into a mold, this is the so-called. extruded polystyrene foam, EPS. EPS is much stronger than polystyrene foam and sections of hives can be extruded from it. But - only at an appropriately equipped enterprise.
However, that's not all. The overall strength of EPS is higher than that of many types of wood, but the local strength (to scratching, cutting, pressure from something sharp) is much less. Therefore, if the hive is made of EPS, it is impossible to remove the stuck frame from it without damaging the hive itself. In the same way, mechanical cleaning of a polystyrene foam hive is impossible.
And that is not all. EPS, like its more durable and expensive substitutes (polyurethane, polycarbonate), is not absolutely resistant to ultraviolet radiation, temperature fluctuations, and precipitation. Protective painting/film increases its durability, but statements about a service life of... 30 years are also not funny from the point of view of the most reckless marketing.
And that's not all either. Yes, plastics do not absorb condensation; it flows down in the plastic hive, where it is discharged. But in a populated hive it is always warmer than outside. In a wooden hive, condensation is immediately absorbed without evaporating back, and diffuses outward - the dew point always shifts to the cold (more precisely, less warm) side. Therefore, the microclimate in a wooden hive under the same external conditions is more favorable for bees than in a plastic one, especially since in the latter there is no outflow of air through the walls.
And that's still not all. Almost any plastic, and especially EPS, gases when heated and under the influence of the slightest impurities of volatile organic substances in the air, which is not useful for bees, honey, or its consumers. Experiments with insulation materials have shown that EPS boards, tightly walled up in building structures, seriously decrease in volume over several years, releasing droplets of styrene - a viscous yellowish liquid with a specific odor. There is more than enough volatile organic matter in the hive atmosphere.
Note: This leads to another argument against plastic hives - disinfection/disinfestation, for example. against mites, and treating bees in them by spraying drugs is impossible, and with medicinal syrups it is very problematic.
These circumstances are of little concern to the Finns: in the local climatic and economic conditions, disposable hives for disposable bee colonies pay off very well. Moreover, a significant, if not the main share of the income of Finnish beekeepers comes from the sale of wax for technical purposes. Which, by the way, is of excellent quality among the Finns. But beekeepers specializing in the production of food and medicinal bee products subject polystyrene foam hives to severe and well-founded criticism, see for example. track. video about Shapkin's hive.
Video: about Shapkin’s hive
About insulating hives
From the above it follows that insulating plywood hives with polystyrene foam is also undesirable, and this is true. To insulate hives, it is better to use foam polyethylene (PE). PE definitely doesn’t gas, because It is susceptible to chemical attack only by strong acids and alkalis, it is resistant in the open air. Remember what problems there are with plastic waste.
Penolon is produced in sheets up to 12 mm thick, so to insulate the hive you will need several layers. There is no need to insulate the hive over the entire surface, turning it into a thermos: for normal wintering of the bee colony, some heat exchange between the hive space and the environment is necessary. The diagram and method of insulating a plywood hive are shown in Fig.

When choosing foam rubber for insulating a hive, you need to request a specification or certificate for it from the manufacturer and make sure that the base is high-pressure PE, suitable for the manufacture of parts, incl. medical equipment. In the production of low-pressure PE (otherwise known as catalytic PE), a cadmium catalyst is used. Its traces in the finished product are negligible, but cadmium and its compounds are highly toxic carcinogens of the highest degree of danger with a cumulative effect. Once upon a time, household utensils made from low-pressure PE were labeled “For non-food products and substances,” but now “alternative” suppliers hide the mention of the method of obtaining their PE away in the papers.
Finally
So, which hive should you start with? Without any experience at all, or, if the apiary is intended primarily for pollination, from a hive-bed. In the latter case, it is possible to use a Ukrainian sun lounger without a store, and then it is better to entrust beekeeping and honey collection to a visiting beekeeper.
If you have taken the trouble to prepare theoretically in advance and have a general idea of what bees are and how to handle them, it is better to make the Dadan hive first. By increasing it, you can eventually move on to commercial beekeeping without increasing the area for the apiary.
When you become more experienced, the best choice will be the Varre or Khomich hive. With them, again, without expanding the apiary and without attracting help, it is possible to achieve profitability and marketability of the apiary such that one can think about turning into professionals and having one’s own industrial apiary from Langstroth-Ruth hives.