Everything you need to know about installing a porch. Reconstruction, or the history of budget construction from a FORUMHOUSE participant We do this for a wooden subfloor
Read also
Proper construction of extensions for various purposes can not only expand the residential part of the house, but also improve its appearance and protect it from wear and tear. The construction of a veranda adjacent to the house, regardless of the type of structure, requires careful development of the project, with the determination of materials and construction technology.
Proper execution and approval of project documentation by government authorities will not only insure against problems with the law, but will also help to draw up a plan and estimate for the structure.

Design
A typical veranda is a roofed frame structure built on a strip or column foundation, with glass or half-glass walls. The statement that the veranda should be built from the same materials as the main building, with the emergence of new styles and fashion trends in architecture, has lost its relevance.


The photos below show ready-made solutions for verandas attached to the house, with different principles compatibility. In some cases, the new extension is made of the same materials and is completely combined with the house, in others the new is combined with preservation common elements– roofs, beams, etc.

There are also projects in which original design The extension introduces a new architectural touch, updating the exterior.

When choosing materials and construction technologies, you should also take into account the parameters of proper ventilation, moisture resistance and thermal insulation. With full glazing, it is necessary to provide opening segments for ventilation.

If you are building an open veranda, or, as it is also called, a summer terrace, you need to take care of the frost-resistant lining and the slope of the floor towards the site.

Designs with removable frames are optimal for year-round use. Installation of large sliding doors will also allow the building to be used in a dual-mode version.

IN standard project The area of the veranda is rectangular and ranges from 10 to 15 sq.m. For smaller areas it will be too cramped; for larger ones, additional reinforcement for the roof will be required. Polygonal and semicircular foundations are also possible.

According to its location, the veranda can be corner, end or facade. An original solution can be considered the construction of a terrace along the entire perimeter of the house, which can have glazed, open and closed areas for various purposes: they can accommodate a hallway, a recreation area, and a large storage room.


Foundation
The foundation of terraces and verandas attached to the house must fit tightly to the main building, but at the same time have independent supports.

A strip foundation is suitable for large and heavy structures; in all other cases, a columnar foundation can be erected. When pouring concrete, you need to leave a gap of 3-4 cm with the main wall, which will subsequently be filled with waterproofing foam.

At the first stage of preparation for construction, the soil is cleaned and compacted. Then, for the pillars, corner holes are dug along the depth of the house foundation (about 1 m on average), a cushion is made of crushed stone, gravel and sand, onto which concrete is poured.

After setting, asbestos or asbestos supports are inserted metal pipes. Concrete pillars or brick can also be used. The same method is used to lay high piles for buildings adjacent to the second floor level.

Depending on the area and weight of the terrace, intermediate posts may be needed, installed every half meter.

For the foundation belt type a trench of 30-50 cm is broken, the formwork is placed 15-20 cm higher. Metal reinforcement bars or reinforcing mesh are placed into the soil. Concrete is poured onto a layer of crushed stone and sand.


Wood frame
The frame is assembled from beams or logs with a width of at least 12 cm, which are covered with a waterproofing layer. For the strength of horizontal knitting, experts recommend using fastenings in the foot, the surface of the connection will be at an angle. Vertical racks secured with diagonal interceptions.


At the final stage wooden frame covered with rafters for the roof. For cladding you can use plywood panels, chipboards, etc.

Construction of a wooden veranda is the best budget solution in terms of materials prices, but when choosing this type of construction you need a professional approach and knowledge of the nuances of construction from wooden beams.

Other materials for verandas

The foam block structure is erected on strip foundation. This type of masonry is easy to do yourself. Laying is carried out using special glue, with bandaged seams for strength.

When finishing, an internal and external waterproofing layer, plasterboard finishing, wooden shields, moisture-resistant wallpaper and paints. External surface can be faced with ventilated facades.


The construction of the structure is made of polycarbonate, a modern and attractive option. This material goes well in buildings with wooden and brick frames.

For a building that consists entirely of bicarbonate panels, you do not need a foundation. The earth can simply be compacted and covered with paving slabs.


The structure is created using aluminum profiles; it is necessary to provide for the possibility of ventilation and water drainage. Polycarbonate panels and frames various types can be tailored to specific needs for lighting and thermal insulation.

Before you attach a veranda to the house, you need to decide on the functions that it will perform. In addition to the necessary drainage and ventilation systems in any case, proper connection to the permanent structure and roof structure, the schedule for using this part of the house is important.

Design and construction summer verandas differs from the requirements for premises with year-round operation. It is also important to note that any extension will require the same care and updating as permanent buildings.


Photo of the veranda attached to the house


Verandas of various types and sizes, purpose and appearance have become a common addition to a country house, a place to relax in the heat and feast on summer evenings. We will tell you how to make a veranda at the dacha in the article, and also consider some features of a legal, technical and architectural nature.
Construction of a veranda
Selecting a view and location

First of all, you must decide for yourself what kind of design you want.
To do this, you need to determine the following points:
- Location of the building relative to the house. As you know, a veranda is attached to the front part of the facade where the entrance is located or to the side of it, but not on the back wall or anywhere else;
- Building dimensions. should fit well into general style structure and not become too bulky, while it should not be cramped either. Usually the length is made from 4 to 7 meters, and the width from 2.5 to 3.5 meters;
- Construction materials. Everything here is extremely simple: the material of the veranda must match the material of the house, or at least include them in its design. Attach plastic structures to stone or metal to wood is unacceptable due to obvious inconsistency, not to say ugliness;
- Will it be an open or closed structure, will it be heated in winter period or serve only as a summer room. The question is immediately resolved: “How to close the veranda at the dacha?” - it can be wood or brick, frame construction, glass and other materials that are in harmony with the house and surrounding objects of the site;
- Issue price. This will determine what materials and technologies you can afford, as well as how reliable and durable the structure will be.

As a rule, they make drawings of a veranda at the dacha with their own hands, so the process involved here is not only labor-intensive, but also creative.
Of course, if you are a wealthy person and don’t want to take risks, you can hire an experienced architect or order turnkey construction, but your own is always more expensive and nicer, believe me.

Open or closed type is also easy to determine - it depends on the frequency or consistency of your stay in country house. If it is constant or on the principle of “back and forth in winter and summer”, then it is better to build a closed and warm room, if you see the site only in the summer, then choose the open summer option.
Important!
Before starting construction, it is better to coordinate any extension with the competent authorities and re-register the house.
Legal aspect

Of course, the sonder team will not come to you the next day and will not demand an ausweiss, but if you eventually want to rent it out, give it to someone as a property, sell or donate your house, the extension will have to be registered, only through a fine and in a less acceptable way.
First of all, finished sketches are sent to design organization, which draws up a project plan and approves its feasibility.

Next, you should write a statement about your desire to build a structure, take a passport, documents for ownership of the house and land, as well as a previously approved project, and visit a number of organizations that are involved in real estate registration in your region.
Important!
Your application will be considered, and only after a positive resolution is made, you can safely begin construction.
Who, how and from what it will be done does not affect the documents, the fact itself is important.
Construction of a wooden veranda

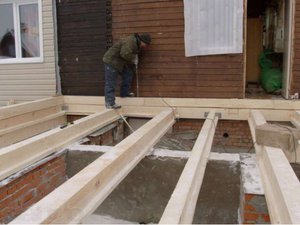
- We make a columnar foundation for the veranda at the dacha. To do this, in the corners of the structure, as well as at a distance of 1.5 m, we dig holes 70–100 cm deep, make formwork, install reinforcement and concrete pillars, the height of which should be approximately 30 cm below the foundation of the house itself. Don't forget about concrete waterproofing;

- We make from timber 100x100 or 150x150 cm bottom trim pillars around the perimeter, and if the length and width are large, then you can make an internal beam, or two, crossing them in the middle. Fastening to concrete through half-wood roofing felt with anchor bolts;

- From timber 100x100 cm we set corner posts, pillars near the doorway, as well as at a distance of 1.5 meters along the entire perimeter of the structure, the height of the pillars is such that the edge of the veranda roof is several centimeters below the edge of the house roof for the slope angle. We fasten it with steel angles and self-tapping screws, you can make a cut and “plant” it on nails;

- Then from the same timber we make an upper frame, which will connect the outer perimeter of the extension in one line and make the frame strong and monolithic;

- We cover the walls with clapboard, taking into account window openings, from the inside of the vernade with cotton wool or polystyrene foam and also sew it with clapboard. We install double-glazed windows and hang the door;

- Along the top trim we fill a system of logs from 150x50 boards, make lathing and lay the roofing pie;

- Deciding what to cover the floor on the veranda at the dacha ( terrace board, concrete screed etc.) and carry out its installation. Next we move on to finishing and painting.

Reconstruction is Alternative option when there is no money for new construction. A major refurbishment based on an existing structure is cheaper than a new one. Especially when there are skillful hands, a burning desire and a severe need to improve living conditions. U FORUMHOUSE member under the nickname Upravdom, they turned out to have golden hands, and the desire to live in their own house, and not in an apartment, couldn’t be hotter. Perhaps his experience will help others make up their minds, because a journey of thousands of kilometers always begins with the first step, and only those who walk can master it.
Stage one: purchasing a base, first modifications
As a result of a long search that lasted almost a year, our forum member became the happy owner of a house in a state of average neglect and a plot of about 10 acres. So, in stock:
- total area– 60 squares;
- the main part is log walls, size 6 x 6 squares, solid;
- extension – kitchen 4 x 6, backfill;
- the roof is a combination of slate and metal, far from both practicality and aesthetics;
- veranda – scrap for demolition;
- heating - stove, old heaters, demolition.

The first priority to survive the winter is restoration to a livable state. To implement it, the minimum is required: heating from scratch, normal wiring from the same level, sealed windows.
My father-in-law helped with the wiring; it was decided to entrust the installation of the stove with a well, as the most efficient one inside the house, to a professional. Still, the process is not easy, it has its own subtleties. It turned out that it was not so easy to find a stove maker; the result of the “demonstration performance” of the invited “master” was masonry on their own. Although the main assistant in the person of his father had strong doubts, after studying additional materials from all available sources, the process has begun.
Upravdom FORUMHOUSE Member
In short, my father and I built this stove! It still works, and works great. This was my first lesson that nothing is impossible, even if you don’t understand anything about it. You have to search, delve into it, figure it out, and everything will definitely work out.
The reconstruction was carried out at an emergency pace, after the main work and on weekends for two months. During this time, the partitions were dismantled, a room was separated into a nursery, and the stove was equipped with a heating system. I had to tinker with the glazing of the windows, but this labor-intensive stage was left behind. For improvement appearance, what was needed was whitewashed and tinted.
A housewarming party took place in October, and it was planned to test the house against frost and wind. Winter showed that there will be further reconstruction. The house is warm, no drafts or frost on the walls.
Stage two: veranda
After debates at home, they decided to build a new one on the site of the old veranda and combine it with a summer kitchen and utility room. Now that they are using them right up to the frost, they are not overjoyed that they decided to combine them. During the winter, construction materials were purchased, a lot of information was studied exciting issue, design option selected, dimensions - 3 x 10 m. Disassembly took only a day, old wood broke easily.
The foundation was poured using a strip foundation; incorrect assembly of the formwork from the very bottom of the trench resulted in unnecessary expenditure of effort and time.

A concrete mixer was connected to the work, which interested many users. The unit is assembled by local craftsmen, it costs a decent amount, but it is not suitable for demolition. The foundation was based on standard layers of sand with gravel and compaction; the reinforcement was used whatever was available. It turned out that it was expensive to buy a special one, and it also took a long time to knit, so we made do with strengthening the corners along the way.
Laying cinder block walls - also with my own hands, the first time on such a scale and everything was successful, nothing cracked. The desire to save money led to the invention of a new method of attaching a single sheet of iron to a frame - with rivets. For beauty, the doors were given polymer painting. It turned out durable, cheap, and cute. Inserted into savings plastic windows to the kitchen.
To protect yourself from possible spontaneous combustion of coal in the utility unit - which is unlikely, but anything can happen - a forum member over wooden wall stacked a brick one. Moreover, I organized ventilation with four windows to avoid this. The walls were connected to the house, but the technology was far from correct, as the craftsman himself admits.
Upravdom FORUMHOUSE Member
The premises are adjacent to the main house. For the tie, nails were driven into each seam of the masonry. I didn’t really delve into it then, but now I know that this is not true, but everything stands still. The walls do not move relative to each other, there are no cracks.
The ceilings are made from a metal corner, old boards from the veranda were used on the ceiling in the corner and woodshed, and chipboard sheets were placed on top. A clean board was immediately put into the kitchen so that there would be no need to finish it. Thick cardboard is used as insulation and is environmentally friendly. clean insulation– clay, corrugated roofing.
Come winter Upravdom I was engaged in the interior decoration of the constructed veranda - preparing the lining and sheathing the walls. We started living in the first finished room in the house in the spring.


Stage Three: Expand and Overlap
To expand the living space, a 16 x 16 beam was purchased for the occasion. However, after sitting for the winter, it became more like a propeller; the quality of the timber forced us to abandon its use for the extension. We bought a foam block, due to a catastrophic lack of time, hired craftsmen, the box was put out almost in a day - 4 x 10. We went into the winter without a roof, which we regretted in the spring, when the water level in the extension allowed the children to launch boats.

Although it was planned to start the season with the roof - remove the old one and cover the common one over the house and extension, the weather made adjustments. While the rains were rinsing, there was time for the bathroom, which had been waiting for the third year. A corner in the kitchen was allocated for it, half of the floor was dismantled, the rest was leveled, as it was skewed, and walls made of sand blocks were installed. At the same time, we redid the sewer system and poured screed under the bathroom.

Along the way, the extension was overgrown with partitions - it turned out to be two bedrooms and a substantial storage room. Both the forum member and his wife dreamed of this room.
Upravdom FORUMHOUSE Member
Exit to the pantry from the kitchen. I will say separately: the pantry is a DREAM! And both my wife’s and mine! How tired I am of jars, basins, bags of sugar, flour and other things in the kitchen. Everything always got in the way! Although the kitchen was 6 x 4 - before the bathroom was built, the household belongings were still in the way. There is also a wardrobe in the closet. There is still a lot of seasonal clothing in a private home.
Finally, the weather took pity and we started working on the roof. On your own, since the prices of mercenaries are off the charts, and some experience was gained during the construction of a bathhouse made of timber. The same thing that didn’t go to the extension, but it worked there. Dismantling did not create any problems here either; the roof was “blown away” in a day. It took another five days to assemble rafter system.

Upravdom FORUMHOUSE Member
Anticipating slaps and kicks from the craftsmen for such a roof construction, I will say this – I did it consciously. My father’s roof just lies on top of his house. It’s been 25 years now. My rafter system is even stronger. I simply wouldn’t have enough time and energy to do all the armor belts, correct cuts, etc. alone. And, in general, the roof has already been tested by strong hurricanes. I hope these tests gave a 100% guarantee of the reliability of the design.
A galvanized profile sheet, unpainted, was used for the roof. Both cheaper and more practical, climatic conditions “eat up” the most durable paint in a few years, so why spend money? Chipboard from the floor in the house was used for the gables.

After the roof was completed, despite the lack of finances and the attendant difficulties that the whole family bravely endured, the doors to the extension were cut, the windows were broken, and the renovation of the heating began. There are registers left, since the forum member has no confidence in radiators. A crew was brought in to plaster all the stone surfaces inside, and the new extension on the outside as well.
Plastic windows throughout the house did not attract the craftsman, as well as radiators; the choice was made in favor of modern double-glazed windows, but in wooden frames. All openings are trimmed and raised to the general level. Windows were ordered in two stages, which resulted in discrepancies in color palette, clearly visible to the naked eye. That's why Upravdom advises everyone in such situations to order the entire volume at once. He did the same with the doors.


Stage four: finishing
Since the holidays have already been chosen, there are 100 square meters to be finished, and I don’t want to live in renovations for the next few years, I had to be puzzled by finding a finisher. Although it is difficult to find a generalist who can twist the plaster, lay the tiles, and glue the wallpaper, I was lucky, such a master was hired for a very reasonable amount. Scope of work: sew up all unplastered (wooden) parts and finish them, design and implement two-level ceilings, lay tiles, lay the finished floor.
Upravdom FORUMHOUSE Member
Together with the master, we came to the final decisions on finishing the rooms. But there were so many arguments with my wife, views of thousands of photos design solutions. There is so much information on your computer, organized into folders, you just have to get over it.
Nobody pushed the master in the neck, all possible help was provided, and therefore the quality of workmanship is at its best.


Stage five: facade and landscaping of the site
Describing all the vicissitudes of reconstruction is much easier and faster than experiencing them. The epic stretched for almost five years; the next stage after finishing was covering the house with siding. For decorative purposes, contrasting colors were chosen - light canvas and dark brown corners. The hired team of professionals, due to large “jambs”, did not deliver the project, and completed the work on their own. The base was lined with natural stone.
Throughout the years of reconstruction, the family lived in the house, moving from room to room as it became more refined. Despite the lengthy process, the result proves that it was worth it. Of course, how everything happened in reality does not fit into a dry description, but the difficulties did not force the forum member to give up his dream of own home. Go for it, and you will succeed!
The entire cycle as presented by the author is on topic. Others, no less interesting projects– in the section The article may suggest original solution everyone who wants to get away from the standards. Well, the video is for lovers of natural materials and traditions.


Paradox: the more cities grow, the more large quantity their residents dream of a cozy home of their own surrounded by nature. Country construction flourishes in all regions of Russia. Many families have had for a long time summer cottages with buildings erected on them. By various reasons owners of such old buildings do not start building a new house and continue to live in cramped rooms and use dilapidated communications.
There is an alternative to expensive new construction - reconstruction country house, which can be carried out inexpensively and reasonably using the experience and skills of specialists. Professionally executed, technically sound work using modern materials can completely transform a home.

A house that no longer meets the needs of its owners
Methods of repairing a country house: reconstruction (completion, rebuilding, redevelopment) and restoration
An old, but quite usable house that suits the owners can be restored. This will be an economical renovation option with facade cladding and wall insulation. You can also extend the life of the building by covering the roof, strengthening the foundation, and re-laying the floor.
Reconstruction is resorted to when simple repair it's impossible to get by. There is a need to reconstruct old dacha with increase usable area, finish building a house or combine it with other buildings. Often, owners strive to complete the construction of a country house or remodel the premises, equip residential attic, add a veranda or terrace.
The reason for the transformation can be not only physical, but also moral wear and tear (family composition, tastes and preferences change). Although the renovation does not touch the foundation (and is a significant savings compared to constructing a new building), such tasks require a large amount of work. During this time, the owners will have to find temporary housing.

There is never too much usable space
In old country houses problems are often related to the roof, floors and ceilings. The roof (usually slate) cracks, leaks appear, and the house becomes cold. The rafter system does not support the load, the structure is deformed. Ceilings and floors begin to rot and collapse.
Since the completion and reconstruction of country houses of any level is a costly undertaking, both in terms of finances and time, a prudent owner conducts a full inspection of the home (often with the assistance of knowledgeable people). As a result, a defect sheet (list of deficiencies) is formed, a step-by-step plan necessary work, an estimate is drawn up. During the inspection, special attention is paid to the condition of the elements responsible for the stability of the structure:
Foundation. May become deformed due to changes in soil characteristics. The presence of cracks on the blind area indicates that the house is sinking. Over time, the scale of destruction increases, affecting the walls. Cracks also appear on them, and in log buildings the seams and joints expand. If this happens, the foundation must be strengthened.

Work to strengthen the foundation, pouring the blind area
Walls. They need repair if there are cracks and bulges (in brick buildings). In the latter case problem area disassembled and reassembled. If the walls are in good condition, they can be given a presentable look by finishing them with modern facing material, not forgetting about insulation.
Roof. In most cases, older houses are covered with slate. It needs to be replaced with modern material (for example, metal tiles), which is lighter, more beautiful and environmentally friendly. Insulate the roof.
Wooden details. They are highly susceptible to deterioration due to exposure to moisture, temperature changes and insects. Rafters, floor beams and floors with signs of wear must be replaced and the floors insulated.
Interior decoration walls They can be sheathed with plasterboard, eliminating problems with cracks on the surface, or use another suitable method.
Engineering networks and plumbing. Just like interior decoration, they do not directly affect the stability of the house.
Renovate an old house or build a new one - which is more profitable?
An old country house can have a very deplorable appearance. Sooner or later, the owners will have to decide what is more profitable - to reconstruct the old one or to build new house. The financial situation does not always allow capital investment suburban construction. The decision on capital reconstruction is made after studying defective statement and assessment of the scope of work.

Major reconstruction of the roof
If the foundation load-bearing walls and the floors are in satisfactory condition, then a major reconstruction will cost less than building a new house. Perhaps the roof, carpentry and utilities will require immediate replacement, and this is a completely different level of costs. If the main structures have become unusable, it is worth thinking about radical measures.
On our website you can find contacts construction companies who offer the service of reconstruction and rebuilding of houses. You can communicate directly with representatives by visiting the “Low-Rise Country” exhibition of houses.
What types of work are performed when restoring country houses?
Home renovation includes:
gain load-bearing structures and, if necessary, the foundation;
repair of the blind area, extension of the base;
increase in number of storeys;
redevelopment of the house (interior);
increasing the usable area (various extensions, arrangement of the attic as an attic);
laying fireplaces and stoves;
works on insulation of walls, floors, roofs;
internal renovation work(partitions, floors, ceilings, stairs);
façade cladding;
update engineering communications(organization of gas supply, repair of water supply and electrical wiring).

Work on wall insulation is an indispensable part of facade work
What does reconstruction and repair of a country house give?
Reconstruction and repair allow you to solve several important problems:
Extend the life of the building. Properly carried out work, the use of modern materials and technologies will transform the house. All unusable elements are replaced, the rest are processed to prevent rotting and oxidation.
Increase usable area. Additional meters appear after the construction of an extension (linked to the foundation), conversion of the attic into an attic, reconstruction of the roof (covered parking or barbecue area).
AND Use all year round. Thanks to insulation and insulation, a comfortable microclimate will be maintained in winter.
Updated home style. The landscape designer will select plants and design the territory of the site, arranging garden paths and flower beds.
Video description
About how it was rebuilt and changed garden house on video:
Drawing up a reconstruction project
Since the reconstruction of an old house involves a complex reconstruction, often associated with changes geometric dimensions buildings, it is logical to entrust it to a company that has experience working with similar objects. Each house has its own characteristics, which only professionals can evaluate.

A comprehensive renovation of a country house requires attention to detail.
If the customer wants to add a floor, experts will determine whether the foundation can withstand the load and whether strengthening it will be too expensive and ineffective. The layout of the first floor, where the staircase will need to be located, will also require changes.
The company is developing project documentation taking into account the characteristics of the house, firefighters and sanitary standards. The final version requires approval from the relevant authorities.
Video description
How to insulate a house and attach a terrace to it in the video:
Stages of work during reconstruction
The customer calls or comes personally to the office and arranges a departure technical specialist per site, 15-20 minutes.
Site visit, inspection, measurements (including photography and video) and initial consultation, 1 day.
Compilation technical project and estimates for reconstruction (including the cost of materials), purchase of building materials, 7-10 days.
Preparation of a contract, 1-2 days. The contract can specify staged payment (each stage is paid after completion).
Preparation of the construction site, 3-7 days.
Carrying out work (taking into account the requirements of SNiP and safety rules) according to schedule.

Thoughtful reconstruction carried out according to an individual project
Cost of reconstruction of country houses
Many old buildings were used as temporary housing, so they were built ill-considered, often without communications. When the owners decide to turn such a house into a place to live all year round, you can’t do it without the help of specialized specialists. Even if the owner is a hard-working and skillful person, it is unlikely that he has special skills and knowledge. And without them, it will not be possible to carry out reconstruction in compliance with all technological standards.
Price individual works during reconstruction (Moscow region):
Site visit with consultation - 4-5 thousand rubles.
Reconstruction of the foundation (work, material) 8-9 thousand rubles. for m/p.
Roof repair (work, material) 6400-7500 RUR/m².
Frame assembly. External walls - 320-350 rub./m², internal walls and partitions - 300-335 rub./m².
Insulation of frame and ceiling, sound insulation of internal walls (thickness 50 mm). 45-55 rub./m².
Sheathing outer wall(OSB sheets). 180-220 rub./m².
Installation of utilities (work) - 3.5-4 thousand rubles/m.
Electrical network installation (labor, materials) 2.4-3 thousand rubles/m.
Strengthening window and doorways. 550-600 rub./piece.
Interior finishing (work, materials) - from 9.4 thousand rubles/m².
Exterior finishing(work, material) - from 4 thousand rubles/m².

Major renovation, external finishing works
Some performers offer their services in a comprehensive manner. In this case, the prices will be as follows:
Redecorating. 2900-3200 rub./m².
Major renovation. 5700-6500 rub./m².
European-quality renovation. 8990-10700 RUR/m².
Rough finishing (excluding materials). 3000-3400 rub./m².
Finishing(excluding materials). 2700-3100 rub./m².
Video description
How to make a veranda warm in the video:
Reconstruction options
Reconstruction of a private house is an ordinary and at the same time individual process, with its own subtleties and complexities. The owners have many wishes in their plans, from moving partitions to building a terrace. But, as a rule, all work is tied to one of the options.
Option 1. Completion of an unfinished structure
To complete all work to complete construction, the efforts of a team of specialists are required. They are erecting around the existing building outer frame, simultaneously completing unfinished fragments; the frame can also be internal. The completion of a country house includes the installation of communications and insulation.
Often, the total area is simultaneously increased by converting the attic into an attic. If this method is not available, you can use a less practical one: build an extension. In this case, an additional foundation will be required.

Completion of a country house is a common reconstruction option
Option 2. Alteration (reconstruction)
Most often, a temporary structure is converted into full-fledged housing. This option involves the restoration of damaged elements: the foundation and walls are modernized, roofing and finishing work is carried out.
The depth of rework is determined individually for each type of work. So, when converting an attic into an attic, the need to strengthen or replace the rafter system is determined. Quality is checked wooden elements; If necessary, the fungus is removed from the surface. Windows may need to be replaced PVC structures. When reconstructing a two-story country house, they change internal staircase. Reconstruction of a house made of timber includes treating wooden surfaces with a protective compound.
If a family plans to live in the house permanently, the outer walls and the floor of the first floor are insulated. A bathroom with hot and cold water will create the usual comfort.

Construction companies have extensive experience in carrying out reconstruction
Conclusion
It is logical to carry out the reconstruction of a country house with perspective, taking into account the future needs of the family. It is important that all changes are carried out by specialists who are able to accept technically correct and economical solution at any stage of work.
Seeking help from professionals will help you high-quality reconstruction country house with special meaning for owners. Modern technologies breathe new life into housing; The owners will have the opportunity to breathe fresh country air all year round.
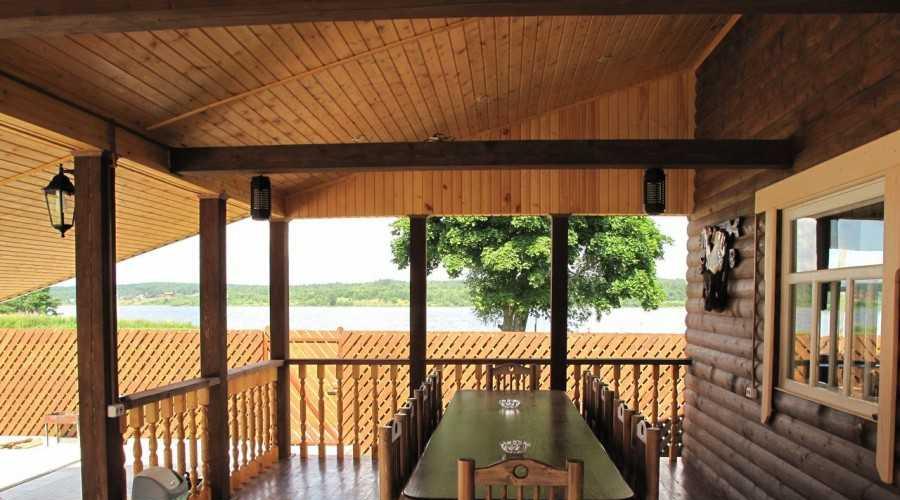
A veranda in a private house is covered terrace, which is often attached to the house with your own hands. It is located along the main wall and is a room without heating, for a pleasant pastime in summer season. You can often find modern terraces with glazing; you can stay in them in any weather. When making it with your own hands, it is necessary to observe the general ensemble of the country house or country house, maintain a uniform style and use the same materials in construction.
In a country house from logs it is better to make a summer log-shaped terrace located next to the main building. Construction of a veranda in wooden log houses often carried out in conjunction with the construction of the main house and its roof smoothly transitions into the roof of the extension, which has a wall adjacent to the house, a single roofing material is used. In this article we will go through step by step the main points of building two types of terraces: open or closed view, with your own hands.
General provisions for constructing a veranda
Modern construction country houses, country cottages, at the design stage they provide for the construction of a veranda for the house. In order to save money, customers remove the process of constructing extensions in order to further complete it with their own hands. Let's consider the main points that you need to pay attention to from the generalized experience of building terraces yourself.
Parameters by which verandas differ:
- How is it located in relation to the house: corner construction, from the end or along the facade of the house.
- Degree of protection: open or closed (glazed) extension. You can use modern materials to make from closed veranda open, this is achieved by sliding doors.
- What type of construction is it made of: built-in - a common foundation with the house or attached - its own foundation.
- Construction shape: rectangle, semicircle, polygon.
Veranda project
We must not forget, when designing an extension to a house, that its purpose is to improve the performance of the main structure: make it spacious, add beauty, comfort. A closed terrace also has the function of improving the thermal performance of the house. For proper construction The design of the summer extension must comply with the rules that are indicated in the developed project.
What does the project consist of:
- We determine where in the main house we will add a veranda. The main aspect is maintaining the aesthetic perception of the entire architecture own home together with the veranda. Important! Experts recommend setting up a veranda in regions with high summer temperatures on the western or eastern side of the main house. It will be less exposed to direct sunlight.
- It is necessary to indicate the location of the entrance to the terrace (veranda). Indicates the input from outside and entrance from the house. You can make a through passage through the veranda when the door to the house is opposite the entrance to the veranda; this method is not recommended, as there is a risk of drafts.
- We select the type of doors and their installation location.
- We determine the total size of the summer room located along the house. Length is often accepted equal to length the wall along which the veranda is built. The width is usually taken in the range from 3 meters to 7 meters, the main thing is to maintain the proportion. When choosing the dimensions of the veranda, we relate them to overall dimensions at home, in order to maintain a single ensemble of the exterior of the building.
A good example of building a veranda with your own hands, when the design is done at the design stage of the entire house.
Let's go through the construction of a veranda step by step wooden house with your own hands. It should be noted that an extension to the house can only begin after it has completely settled. Log houses, or made from timber, shrink actively over the course of three years; during this period it is better not to build an extension, otherwise the walls may warp. For those who don't want to wait, experienced builders recommend building a transitional porch structure with the house that allows the frame to play.
How to start construction?
Home reconstruction must be reflected in permitting documents. To obtain these permits, you must contact the regional architecture department and submit the following documents:
- The right to own a plot of land (the land on which the house stands).
- Design documentation of the main structure.
- Written consent of all registered residents in the house for reconstruction and addition of a veranda.
- Application from the developer for registration of an extension.
It is advisable to start drawing up documents for a construction permit 3-4 months before the start of work. From the general experience of private developers, this is a lengthy procedure.
It is possible to build an extension without permitting documentation, but in this case problems may arise when the house is inherited or you want to sell it. The reason is the change in the total area of the house, since the veranda is part of it, and the total area of the residential building is taken into account with it. The BTI department may consider this as an unauthorized decision to increase the area for housing. This is especially true when the terrace is closed and heated.
There is no need to get carried away and make deviations in the dimensions of the terrace, which are indicated in the project. A simple check will easily reveal this, and a fine will follow with adjustments to the documentation. For what unauthorized developers can expect to add verandas to the house specified in the law of the Russian Federation.
Preparing for construction, choosing material
After determining the construction site of the veranda, it must be prepared. Starts along the selected wall construction site, so before starting all work you need to:

What tools and materials will we need?
When it's done wooden extension with your own hands, Tool you will need:
- Having construction skills you need: a hacksaw, an ax.
- Power tools: sledgehammer, hammer.
- Marking: tape measure, plumb line, level, marking cord, corner.
- For the foundation: shovel
If done metal carcass, additionally being prepared welder and a grinder with a disc for cutting metal. This type of frame is considered the most economical for building an extension.
It will look better brick veranda or wooden. Important! Make sure the materials of the extension and the main house match.
Wooden summer extension requires the following material:
- Lumber: beams, logs, boards, slats.
- Elements of wooden fasteners.
- Mixtures performing protective functions for wood.
- Construction material: crushed stone, concrete.
- You will need drying oil and roofing felt.
- Choosing the material for the roof of the veranda.
- Window and door systems.
In the design of an additional room, for summer holiday, using metal corners, instead of wooden materials apply metallic profile , compositions for metal processing.
Possible for better review make an extension (walls and roof) from polycarbonate, the panorama will be complete and clear. TO positive properties This material has excellent heat retention properties and can be used for walls and roofs.
Advice! Materials that will be used in construction and require pre-treatment, must undergo this process prior to construction.
 The first thing you need to do is determine the type of foundation for your veranda. A popular type is columnar foundation, since it is not tied to the base capital construction(Houses). If the veranda is being built for a long time and thoroughly, it needs a strip foundation.
Before making a foundation, you need to refer to the house construction documents, which indicate what soil it stands on; you can choose from this type of foundation for an extension. Parameters to pay attention to:
- What is the soil's ability to absorb moisture?
- What is the composition of the soil at the site where the veranda is being built?
- To what depth does the soil freeze in the region where you live?
- How close to the surface is groundwater?
- General provisions for soil stability.
When choosing the type of foundation for the veranda, we pay attention to the foundation of the main building, its design, and the condition of the load-bearing walls. After choosing the foundation, it is done marking on the soil for further work.
Advice! A small wooden veranda will sit quite well on a columnar foundation at the corners of the extension. For wide and long verandas, the installation of pillars is used at intervals of 600 millimeters along the length and width of the extension.
Columnar foundation, how to make it?
The foundation (foundation) for an extension is just as important as for the main house; it must be made from quality material. Work order:
- We dig holes for the pillars to a depth of at least 100 centimeters; its depth cannot be less than the depth of the foundation under the main building. The level of soil freezing is taken into account; the hole should be deeper than this level.
- At the bottom of the dug holes we make a cushion, this is a mixture of sand and crushed stone. The pillow can be made in layers, sand, crushed stone.
- Fill the pillow with concrete.
- We lay out support columns from brick when the main house is brick. If the main house is made of wood, posts are used wooden beam. Metal supports or asbestos pipes are used in columnar foundations for a frame veranda.
The veranda looks beautiful when it is on the 2nd floor level of the house. In this case, the ground part of the extension support is laid out at the level of the main foundation under the house. When a house with a high base is recommended, the veranda should be built according to its level.
Making a strip foundation
It is used if a heavy veranda with glazing is planned. To equip it, a trench is dug around the perimeter future veranda, formwork is being installed. It is placed a little higher than it is planned to fill the foundation with concrete.
After pouring the foundation with concrete, it is periodically moistened with water until it is completely formed; this is necessary for uniform hardening of the foundation.
Making a veranda frame
 For wooden house The frame of the veranda begins with laying the timber on supports in the lower frame. In the corners we use a “dovetail” for cuts, it’s better this way join timber at corners. For reliability, nails are used; dowel fastening is possible.
Timber for a wooden veranda is used with a cross-section: 100x100 or 180x80 millimeters. When logs are used in the harness, their cross-section should not be larger than 120 millimeters. The supports near the wall are made higher than the rest to form pitched roof. When the frame is mounted, horizontally installed beams are the basis for the window sill, if glazing is provided. Upper harness completes the installation of the veranda frame; it is the basis for the rafters and creates rigidity for the entire system.
Temporary spacers must be used to avoid distortion in the frame structure.
Veranda roof
Once they have decided on the material for covering the roof, they begin to install the sheathing on the rafters, which are attached to the top trim.
Structurally for verandas we offer the following types roofs:
- Single pitch roof. This is a simple design and easy to implement. Requires a slope from the main wall of the house towards the street.
- Gable roof. It is used if the veranda is attached to the end of the house with a narrow side.
- Polygonal roof. Its design is varied, the main thing is to maintain a slope for water drainage.
The rafter system is installed based on the selected material:
- Lathing for metal tiles, slate and ondulin
- Solid decking is made for flexible roofing materials.
 Making the floor with your own hands is simple:
- We install the logs on the lower frame of the veranda structure. The distance between the lags is no more than 100 centimeters. We install them perpendicular to the floorboard.
- We cover the logs, checked by level with a floorboard.
If you plan to build open veranda , many agree on installing a floor with a slight slope to allow water to drain. The board is fastened with self-tapping screws, the length of which is twice the width of the board. It is necessary to impregnate the floorboards with a solution that resists the creation of fungal deposits.
Conclusion
Some finishing elements can be wooden veranda make carved. Great importance The arrangement of furniture on the terrace plays a role, this will create the interior and add coziness. Flowers and plants will enliven the room and give the feeling of an extension of the residential building.