Everything about concrete countertops for the kitchen. Concrete countertops How to make a concrete countertop with your own hands
Read also
Recently, concrete countertops have become increasingly popular, which can give your home exclusivity and individuality. Of course, you can invite a designer and builders who will make your dreams and desires come true. But, by showing “miracles of craftsmanship”, it is possible to make a similar product on our own, which in the end will not be inferior to its marble counterpart.
Preparatory stage
A countertop is a work surface that is an integral part of any kitchen. At the first stage, you need to decide on the dimensions of the future product, since it must be harmoniously combined with the existing interior. Also when creating kitchen countertop With your “golden” hands you need to make sure that it fits as tightly as possible to the wall. To achieve this, you need to carefully measure everything and make an accurate drawing.
Advice! If you want to avoid problems in the manufacture and installation of the countertop, it makes sense to divide the entire product into several elements and take this into account in the drawing, that is, the formwork will be single, but divided into sections.

Also, when designing a kitchen concrete countertop, a very important point must be taken into account: the joints of parts of the finished product must clearly align with the transverse elements of the table frame (otherwise there is a possibility of cracks).
Required materials and tools
To make a concrete countertop you will need following materials:
- cement;
- sand (fine, sifted);
- gravel (or expanded clay);
- wooden blocks (size 40 x 40 or 50 x 50 mm);
- boards;
- , laminated chipboard 18 mm thick;
- (for reinforcement);
- silicone sealant;
- decorative elements;
- glue;
- drying oil, vegetable oil or special form;
- pigments – dyes (if you want to have a colored surface).
You will also need the following tools:
- screwdriver and screws;
- Bulgarian;
- hacksaw;
- Sander with abrasive discs;
- construction mixer or electric drill with a special attachment;
- building level;
- rule;
- roulette;
- container for preparing the solution;
- respirator, safety glasses and rubber gloves;
- putty knife;
- vacuum cleaner.
Work order
The procedure for making a house countertop from concrete with your own hands is as follows:
- we make formwork for casting the future tabletop based on a previously completed drawing;
- we install it on a workbench, sawhorse or work table (we check the correctness with a level);
- coat the mold with drying oil or vegetable oil(this will make it easier to remove the finished product);
- put on the bottom decorative elements(there is room for your imagination) and secure them with glue (it is these parts that will later become the front side of your tabletop).

- put into shape metal mesh, which we attach to the edges of the formwork thin wire in such a way that it is raised to a height of 25-30 mm from the bottom of the mold, and during the pouring process the solution appears under and above it;
- we prepare a concrete mixture using the basic recipe (that is, which includes sand);
- pour into the mold.

If the form will be filled with solution layer by layer, then we adhere to the following order:
- prepare a solution for the layer that will be the front surface of your countertop (the components correspond to the main recipe);
- pour the prepared solution into the mold;
- we lay a metal mesh (there is no need to lift it);
- we prepare a solution for the base layer, to which we add gravel or expanded clay instead of sand (it takes no more than two hours to prepare it, since the liquid stage of concrete does not last that long);
- pour it into the mold.
- put in liquid concrete blocks or corners so that the tabletop can later be attached to the legs or walls of the table;
- tamp with a trowel and remove excess with a rule;
- cover the formwork with a sheet of laminated chipboard, having previously lubricated it with drying oil;
- We cover the entire structure on top with a polyethylene film;
- leave everything alone for 7-9 days;
- free from polyethylene;
- remove the formwork;
- leave the product for additional drying (5-7 days);
- if you need to trim the tabletop, we do it using a grinder;
- grind;
- polish;
- if the countertop consists of separate elements, then after assembling them we seal the joints with special silicone or moisture-resistant grout.

If you still have any questions about the process of making a kitchen countertop from polished concrete, then the video will help you.
We create a form (formwork) for making a tabletop
In order for the hand-made tabletop to ultimately bring you satisfaction and not disappoint you with its quality characteristics, it is necessary to strictly observe all the dimensions indicated in the drawing when creating its shape. The work algorithm is as follows:
- cut out a sheet of moisture-resistant plywood (or laminated chipboard, fiberboard or MDF) with dimensions exceeding the dimensions of the future tabletop by 10-15 cm on each side;
- along the entire perimeter of the form we make sides 50-60 mm high (this thickness is optimal for the future tabletop), using long boards (50X30 or 60X30 mm), which we place on the edge and fasten with self-tapping screws; to strengthen the structure from the outside, we install two or three bars or metal corners in the corners and in the middle;
- as a result, we obtain a container whose dimensions clearly correspond to the dimensions of the tabletop;
- carefully seal all joints, seams, gaps and cracks in the mold using silicone sealant;
- if desired, give the finished product rounded shapes, we recommend using plastic or silicone inserts that are installed in the corners of the mold and removed after concrete mortar dry;

- if you plan to install a sink in the working surface, then you should provide free space for it (to do this, draw a rectangle at the bottom of the mold corresponding to the size of the sink; secure bars 50 x 50 or 50 x 60 mm; the drawing lines must remain on the outside of the bars) , and also make a hole for the mixer (for this you will need a piece of pipe with a diameter of 35 mm and a length of 50-60 mm).
Advice! For the countertop, it is better to choose a countertop sink, so as not to suffer in the future with the seating chamfer, which is available in built-in models (but do not forget to take into account the presence of a horizontal side of countertop sinks around the entire perimeter at the stage of preparing the drawing).
The creation of formwork must be approached carefully, without missing anything, since the concrete countertop will completely repeat the shape into which the solution will be poured: all irregularities, bends and recesses will spoil appearance finished product.
Preparing the concrete mixture
It includes:
- 2 parts cement (M 500);
- 3 parts sand (sifted);
- plasticizers;
- water (to give the mixture a creamy appearance).
If the volume of the solution is not large, then it can be prepared in a small container (for example, in a bucket) and stirred using construction mixer using a special nozzle. If the dimensions of the finished product are large, then it makes sense to use a concrete mixer.
Important! The mixture must be stirred very thoroughly.
If you want to make a concrete countertop with your own hands of a certain color, then you need to add pigments - dyes - to the solution. But remember: to give the concrete a uniform color, pigments must be added to the dry mixture; and to obtain stains, like on marble, it is recommended to dissolve coloring matter in water, and then mix with the finished concrete mixture.
Advice! If you doubt that the mixture will not have the consistency required, it is better to go to the store and buy a ready-made one, the packaging of which will indicate all the proportions.

Grinding and polishing
To make a concrete countertop attractive and similar to granite or marble, we carefully polish it with a special machine using diamond discs. The process looks like this:
- Place the tabletop flat with the front side up;
- remove the main irregularities using a rough disc;
- processed with special care front surface products;
- grind with a disc, abrasiveness – 50 units;
- We perform final grinding with a disc - 100 units;
- we carry out polishing (it is better to polish with discs - 400 units);
- on final stage use a felt circle.

In custody
Our step-by-step instructions outlined above will help you make a very beautiful work surface for kitchen. Make it yourself, and then use your experience to show others how to make a countertop.
The technology for manufacturing concrete products is popular in both industrial and private construction. This material can be used to fill window sills, steps for stairs, floor tiles, countertops, and so on. The main thing is that any thing can be made independently, without involving outside specialists. Let's give an example of how to make a concrete countertop with your own hands.
Like anyone construction process, the production of countertops from concrete mortar is divided into several stages. Each of them is very important; it is impossible to allow any operation to be missed.
Preparatory process
Preparation consists of acquiring the necessary materials and tools. To begin with, all the same components are purchased that are necessary for the production of a standard concrete solution. Namely:
- cement;
- sand;
- crushed stone;
- water.
Since the tabletop is a decorative element, it is worth considering the issue regarding it color design. For example, if you use regular cement gray, then the tabletop itself will be gray. Fortunately, today there are a large number of colors that can be added to the mixture, choosing according to the color shade.
Basic materials
To increase the strength of a concrete countertop, it is necessary to place a metal reinforcing frame in the body of the solution. To do this you will need steel wire with a diameter of 2-3 mm. To assemble a mesh from this wire, you need to tie it, for which you will need knitting wire. To attach the frame you will need self-tapping screws.

The tabletop must be poured into the formwork. It is made from several different materials. The main one is a sheet of moisture-resistant plywood with a thickness of at least 12 mm. Instead of plywood, you can use laminated chipboard or MDF.
Please note that the strength of these materials must be high. A slight curvature will immediately appear on the concrete product itself.
To create the thickness of the tabletop, you will need boards with a section of 50x30 mm and several wooden blocks of 50x50 mm.
Since a sink will definitely be installed on the kitchen countertop, it will be necessary to make a hole for the mixer. What is it needed for? plastic pipe with a diameter of 35 mm and a length of 50 mm. Typically, the diameter of the mixer mounting pipe is 35 mm.
Tools
To make a concrete countertop, you will need the following tools: a shovel, usually a trowel, a spatula, a bucket, a construction mixer (if a small volume is mixed) or a concrete mixer.

To assemble the formwork you will need a saw and a screwdriver. To make a reinforced frame, use pliers. Do not forget that all formwork elements will have to be precisely aligned according to a pre-made drawing, so a ruler, level and pencil will also be needed. To measure the dimensions of the future tabletop, you need to prepare a tape measure.
Create a drawing
You can draw a sketch either before or after preparation. It is important to accurately measure the space where cabinets with concrete countertops will be installed. If kitchen furniture will be installed in the corner of the room, then we kindly ask you to align the angle at 90º. This is not only a criterion for the quality of the repairs carried out, but also the ease of installing furniture exactly along the wall planes.

Now the boundaries of the tabletop installation are measured with a tape measure. Very often the kitchen work area has a curved shape with an approach to the adjacent wall. If this is the shape (corner) that is adopted, then it is better to divide the element into several sections and make its own tabletop for each part. In this case, the formwork will be uniform, but divided into sections.
The main thing is to make the boundaries of the areas transverse, which must exactly coincide with the walls of the kitchen cabinets. This is the only way to avoid the formation of cracks. A monolithic countertop will weigh a lot, which will create inconvenience during its installation.
Place a sheet of moisture-resistant plywood on a flat horizontal surface. It could be a table. Now transfer all the dimensions from the drawing to this sheet, for which you use a ruler and pencil. Along the edges of the lines, 50x30 mm boards are installed on the edge. They will determine the height of the concrete countertop, which will be 50 mm. Why this particular size? Reducing the thickness will reduce the strength. Increase – increases the weight of the product. Therefore, 50 mm is the optimal size.
Since the concrete solution will create a lot of pressure on the walls of the formwork, it is necessary to secure them well. There are two options here:
- use 50×50 mm bars for fastening;
- install metal corners.

In the first case, the bars are attached to the corners of the structure. If the installed board is long, then 2-3 additional bars are attached in the middle evenly from each other along the entire length of the board.
As for sinks, you need to pay attention to the type of device purchased. There are built-in sinks and overhead sinks. They differ from each other in that the overhead ones have a horizontal edge along the entire perimeter of the plumbing fixture.
For overhead models
If this particular option is installed, then the sink is turned over, placed on a sheet of plywood and a line is made along its side. Then the width of the side is measured, for example, it is 3 cm, which means that exactly the same shape is placed inside at a distance of 2.5 cm.
For built-in
In the case of a built-in sink, the outline is drawn along its edge. Now 50x50 mm bars are installed along the lines, which are attached to the plywood with self-tapping screws. Please note that 50x30 mm boards are installed outside the marked lines, and in the case of a sink, 50x50 mm bars are installed inside.

And one more thing - built-in sinks have a seating chamfer, which is not easy to make. Therefore, anyone who is going to make a concrete countertop with their own hands is recommended to choose an overhead model. All that remains is to glue the pipe to the location where the mixer is installed.
It is necessary to immediately make a reservation that the reinforcing frame made of steel wire should be like a mesh with cells 25x25 mm. At the same time, it should also be located at a distance of 25 mm from the plywood sheet and from the edges of the formwork. Therefore, pieces of wire are cut taking into account these reservations.

A polyethylene film is placed in the formwork, the edges of which are placed on the boards. Make sure that the film lies flat without folds.
Installation of supporting structure
Now the frame itself. It can be made separately and then installed locally. You can assemble it directly in the formwork. Installation at a height of 25 mm is done using self-tapping screws. For example, the second installation option.

We screwed self-tapping screws into the plywood along the entire perimeter of the formwork every 25 mm. Alignment of the caps in height is done using a ruler and level. After that, pieces of wire are screwed to the screws. At the intersection points, tying wire is used for fastening.
Almost everything is ready to start pouring the concrete countertop with your own hands. All that remains is to treat the joints between the formwork elements with sealant. It is important here that this material fills exactly the gaps and cracks.

If there is a need to make rounded corners on the tabletop, then a pipe is installed at the junction of two 50x30 mm boards, that is, in the corner. And the corner space, limited by the pipe and two adjacent boards, is filled with sealant.
Concreting
There are two ways to pour concrete.
- Completely filling the formwork.
- Layer by layer.
In the first case, concrete is prepared according to the classic recipe: 1 part cement, 2 parts sand (pure river), 4 parts coarse aggregate (in this case it is best to take marble chips), and 0.5 parts water. First, cement and water are mixed until cement laitance is formed, then other components are added in portions. The solution must be mixed very thoroughly.
A tabletop made from concrete mortar can look very original. The main thing is to approach the design of its front side correctly. For example, you can place pieces of broken glass, beads on plastic wrap, and arrange them in patterns copper wire or fiber optic cable cores.

It is imperative to secure these decorative elements with glue so that they do not move during the pouring process. The brand of glue is not important, the main thing is that it holds well.
For the first face layer, a solution of fine sand without large fillers (gravel, crushed stone) is required. There should be a little less water than in the classic recipe. This way you can avoid the appearance of pores. But you also cannot add too little water, because this can lead to the formation of cracks.

Therefore, if there is any doubt that the solution may not turn out the same, it is better to purchase a ready-made dry mixture for screed. There are instructions on its packaging indicating how much water to add. Mixing should be carried out at low speeds. It doesn’t matter whether the process is carried out with a mixer or a concrete mixer. This solution is poured to a third or half the height of the formwork. There is no need to wait for it to dry.
Filling the base layer
The main supporting layer can be poured after half an hour. There are no restrictions on the composition of this mixture. This can be a classic recipe, in which, instead of gravel or crushed stone, expanded clay can be added to lighten the entire structure.
After which (it doesn’t matter whether it’s the first or second option), the concrete countertop needs to be covered with film. After a day, the film is removed, and pieces of wet fabric are placed on top. After two days you can dismantle the formwork.
If a concrete countertop is made without a decorative layer, then its front side must be sanded. You should not use a grinder for this. It is better to use a grinding machine corner type. It is more convenient to use for horizontal surfaces. Plus, you will have to buy several grinding wheels for the machine.

First, the slab is ground with a coarse-grained wheel. Then they switch to fine-grained. Polishing is best done with a felt wheel. If it is necessary to trim the tabletop, then use a grinder with diamond blades.
If small depressions have formed on the surface of the slab, they can be removed by applying a special sealing mixture to acrylic base. After it dries, additional sanding is carried out.
This is how you make a concrete countertop with your own hands. We will not assure you that this process is simple. It is complex and requires attention and accuracy.
Every housewife dreams of a spacious work area in the kitchen. Main surface, on which culinary processes take place is the tabletop. Its choice is subject to increased requirements for strength, reliability and safety. One of the most popular trends in the world is a loft countertop made of decorative concrete and used as... These smooth and durable concrete countertops feature... unique design. Thickness, shape, texture and color - all these parameters are determined individually in each specific case. Concrete countertop or for the kitchen it can be made of polished concrete, polished concrete or painted concrete, and the concrete countertop can have inclusions (from shells to pebbles) or various inserts. - practical and functional furniture which will become extra space for eating or for accommodation necessary items at hand (TV remote control, magazines). Most often, such concrete furniture is installed in the living room, so it should complement the overall design of the room. A practical solution for the home would be.
By technical specifications, such concrete countertops show exemplary performance. A concrete kitchen is the ideal solution for your interior.


Benefits of concrete countertops
Thanks to a unique recipe developed by the masters of the Bershovo company, the concrete mixture includes environmentally friendly admixtures with increased mechanical properties. Due to this set of ingredients, decorative concrete countertops have the following advantages:
- strength, due to which there are no chips or cracks when struck by heavy objects,
- resistance to moisture and temperature changes, which is important for the kitchen area,
- mold and mildew do not appear on the surface,
- durability, the table will last for ten years without complaints.
Advantages of decorative concrete products over artificial stone

- More complex designs
- Heat resistance
- feels like stone, not plastic
A decorative concrete product may have:
- any colour
- any form
- any texture or pattern

Combination with any design
The unlimited design possibilities of concrete countertops allow you to create essentially art objects from concrete, such as:
- unique shapes of concrete sinks
- integrated drain surfaces
- various inserts into the polished concrete countertop
- add various elements such as glass, wood, metal, etc.

High performance
Expressed in excellent aging
- high temperatures
- constant exposure to moisture
- blows
- scratches
- caustic liquids
Design
It is impossible to imagine any kitchen without a countertop. Modern options can boast of the highest quality, reliability, wear resistance, as well as remarkable appearance. Naturally, the cost of such a product is very high, so you will have to pay a fair amount for the purchase. The solution is very simple - make the tabletop yourself, because there is nothing complicated in this task.
Kitchen worktop – why do we choose concrete?
The most popular material when making countertops yourself is considered to be concrete, although products made from liquid stone, Chipboard or wood are also very much in demand. A concrete countertop is a simple and convenient option that is ideal for the interior design of any kitchen due to its versatility. After all, concrete products are quite easy to make with your own hands without the involvement of specialists.
Concrete structures have many positive qualities and advantages. You should know that this material belongs to the category of durable and hard, thanks to which the countertops are able to withstand enormous temperatures. In terms of strength and durability, concrete is not much inferior to granite, although the cost of the latter is several times higher. However, high performance is achieved due to a unique structure consisting of numerous small pores. With constant use, especially in the kitchen, these pores become clogged. organic substances. As a result, kitchen maintenance becomes somewhat more difficult.
Particular attention should be paid to acids, since they can cause negative impact on a concrete surface. Even a drop lemon juice leaves a dark stain.
The cause is calcium contained in concrete. It is this element, which acts as the main connecting link, that is susceptible to the destructive effects of acids. However, there is no need to worry too much about this - all problems can be solved with the help of a protective layer of polymer substances. Polymers are applied to concrete after hardening, which ensures reliable protection, and also helps to simplify the maintenance of the countertop. The only disadvantage of the polymer coating is that it is no longer possible to place hot frying pans without a stand, since extreme temperatures will lead to the destruction of the polymers. Unlike concrete itself, this coating will not be able to withstand such loads without consequences.
We draw a drawing and select materials - preparation is in full swing
One of the most important stages on the way to production concrete surface is to create a drawing. This is necessary in order to know exactly the dimensions of the tabletop, as well as its appearance. To ensure that the product is firmly attached and does not wobble during operation, it must be installed as tightly as possible to the walls. You should also not forget about the sink - its dimensions and location are indicated in the drawing. The same applies to the corner, because kitchens are very often corners, and that’s where it usually happens. Ideally, the angle is straight and 90 degrees - this will greatly facilitate the work process. If the angle is slightly different, you will need to take this into account when construction work, and also note when making the drawing.

In some cases, it is recommended to make a surface from several individual components. This method is due to the fact that for large kitchens the surfaces are very bulky and heavy. If the product is divided into several smaller structures, then it will be much easier to work and install them. In addition, it will be possible to avoid cracks and chips that may appear in case of unsuccessful processing or movement. heavy objects. Having drawn a sketch, you can begin collecting the necessary materials and tools. Choose high-quality and reliable equipment. For work you will need the following items:
- plastic sheets 18 mm thick;
- plywood sheets;
- hardwood boards;
- sand and cement for mixing the solution;
- polymer concrete made from acrylic resins;
- reinforcing mesh to strengthen the structure;
- decorative elements - shells, small stones, broken glass for surface decoration;
- spray adhesive;
- silicone sealants;
- colors – special coloring pigments to give the surface the required color shade.
Naturally, we cannot do anything without tools. For successful work you will need tools such as:
- 1. building level;
- 2. wood hacksaw;
- 3. screwdriver – required for installation of formwork and its subsequent disassembly;
- 4. spatulas, levelers, trowels for working with uncured concrete;
- 5. polishing wheels;
- 6. sandpaper;
- 7. grinding machine.
Formwork and reinforcing mesh - the influence of elements on the quality of the product
The next stage is to form wooden frame or formwork, where we will pour concrete solution in order to give it the required shape. It is necessary to make a strong frame that can withstand the pressure of concrete for several days. Formwork largely influences the quality and aesthetic appearance of the finished product. To create it we use plywood sheets laid on flat surface. Next, we transfer all the lines and strokes from the drawing to the plywood, exactly repeating the shape of the future tabletop. It is necessary to install wooden blocks 50 mm high along the perimeter.

As practice shows, a tabletop with a thickness of 50 mm is optimal for a kitchen work surface. Increasing the thickness threatens to make it too heavy, while less thickness negatively affects the strength of the product.
To give the frame the necessary strength properties, Special attention pay attention to securing the walls. To do this, we will use long screws (at least 6 cm) or metal corners, which will provide connections of sufficiently high quality. Depending on the size and type of sink and faucet, we will determine the space for the sink. Today, overhead and built-in sinks are popular. There is not much difference between them, this also applies to cost. If you choose an overhead sink, then the only significant difference is the horizontal side, about 3 cm wide. When drawing up sketches and forming wooden frames for concrete, you need to remember this.
Experienced craftsmen note that countertop sinks are optimally suited for installation in self-made countertops. The reason lies precisely in the above-mentioned side, the presence of which makes it possible to allow small errors when forming the hole for the sink. In addition, built-in sinks have special seating chamfers, which cause great difficulties in the manufacture of a concrete surface. To make a hole for the faucet, you can use various tools. A plastic pipe with a cross-section of 35 mm is best suited. This diameter is the standard for faucet pipes.
After this, all we have to do is install a reinforcing mesh to strengthen concrete structure. A regular one will do. steel mesh, the cell size of which is 25x25 mm. It is necessary to select the mesh so that it does not touch the walls of the wooden frame. Thus, the distance between the reinforcement and the formwork should be about 2 cm. There is one trick that allows you to avoid any appearance of the mesh on the surface of the concrete - you just need to cover the base of the formwork with a regular polyethylene film. In this case, the concrete will be even and smooth, but the mesh will remain inside and will not stand out in relief.
Concrete mixture - proportions for mixing the solution
After all preparatory work You can proceed to the main operation - creating a concrete mixture. To do this, we need several basic elements - river sand, M500 cement and water. When creating a concrete table with your own hands, you need to prepare a solution of the correct consistency, so be careful with the proportions. So, for one share of M500 cement, 3 shares of river sand are added.
To decorate the finished product, you can add a little small crushed stone, but do not overdo it. After this, all that remains is to add water and a plasticizer, constantly stirring the resulting solution. A construction mixer or an electric drill with a special attachment is ideal for these purposes. You can stop stirring the mixture once the consistency has reached the state of cream or paste.

At the stage of creating the mixture, coloring colors are introduced, the task of which is to give the mixture the desired shades. To create unusual and beautiful stains that imitate natural stone or granite, pigments are added to the ready-made solution and then mixed. If the tabletop should have a uniform color, then the color is added to dry cement before diluting it with water and sand.
Now you can fill the prepared formwork with the solution. The frame must be located on a straight and level surface, as can be verified by the building level. If the countertop is very large, then it is recommended to pour the mixture in several stages, since the container with concrete will be extremely heavy. Having carefully covered the formwork with polyethylene film, we leave the solution in this state for a day. Naturally, the film should not touch the surface, otherwise unsightly marks will remain. After a day, the film is removed, and a damp cloth is laid in its place, the task of which is to prevent the appearance of cracks and chips characteristic of concrete at the drying stage.
After several days (from 7 to 10), you can begin to dismantle the frame. Having removed the sides, turn the tabletop over and carefully tap it rubber mallet, being careful not to damage the surface.
Finishing the countertop - how to sand and polish?
The last thing we need to do before installation concrete product This is grinding and polishing. To do this you will need either regular sandpaper or an electric sander. Last option preferable in cases where the surface is large enough.

First, the tabletop is sanded with a rough disc or coarse-grained paper. By removing existing unevenness, we also help open nearby pores, which we can now treat with a special solution consisting of cement and acrylic sealant.
Having carefully removed the remaining mixture, after waiting just a couple of hours, we proceed to sanding again, this time we need fine-grained paper or a disc of appropriate abrasiveness. In order for the product to look beautiful and stylish, it will be necessary to polish it with high quality. To do this, you will need a special grinding disc, the abrasiveness of which reaches 1500. Polishing occurs very carefully, carefully processing every square centimeter of the tabletop in a circular motion.
The result of your efforts will be aesthetic, beautiful tabletop with shiny and smooth surface. You can already use it by first installing it on workplace. However, we recommend pre-treating the product with antiseptics and special compounds that will provide protection from external irritants, including negative influence acid-containing substances.
Attractive and original kitchen, the dream of many people. Someone to create kitchen interior attracts experienced specialists, but someone is trying to arrange everything themselves. Not the last place in the kitchen is played by the countertop, the manufacture of which will be discussed in this article.
DIY concrete countertop
Today, kitchen countertops can be made from the most various materials- glass, wood, concrete, etc. But it is the concrete countertop that has gained great popularity due to its attractiveness and durability of use.
You can make a concrete countertop yourself, using available materials. By the way, read in great detail about how to make a kitchen countertop with your own hands on the website. This approach will save significant financial resources, because today it is very expensive to buy a kitchen countertop made of natural stone.
 Before you start making a concrete countertop, you should make a drawing of it indicating the dimensions, angle, etc. This will help you avoid many mistakes and disappointment when making a countertop with your own hands.
In addition, do not forget that concrete has a decent weight, so a kitchen countertop made from it must be able to support the frame on which it will be installed. Otherwise, you will have to additionally strengthen the frame with slope supports made of timber or a metal corner.
Composition of concrete and materials for making countertops
So, after all the measurements have been made, and the drawing for the manufacture of a concrete countertop is ready, you can proceed directly to solving the issue of the composition of concrete and materials for the manufacture of the countertop.
For this you will need:
- Portland cement;
- Clean sifted sand;
- Wooden blocks 5x5 cm;
- Plywood 12 mm;
- Reinforcing mesh (will be used as reinforcement);
- Glue or sealant for gluing decorative elements to the tabletop to solve the problem of how to cover a concrete tabletop;
Among the tools, in order to make a concrete countertop with your own hands, you will need the most available tools, which are sure to be found in the household of every “jack of all trades”.
 First of all, the tools you will need are:
- Metal spatula different sizes;
- Grinder and polishing wheels on it;
- Construction level with tape measure for performing various measurements;
- Screwdriver;
- Wood screws;
- Thick polyethylene film;
- Wood saw and other small carpentry tools.
Now a few words about the composition of concrete for making kitchen countertops. To make a concrete solution, you need the following components, which are maintained in the following proportions:
- Three parts of sifted sand;
- Two parts of Portland cement grade not lower than 500;
- One part polymer-based concrete plasticizer;
- N - water, depending on the amount of all components. The concrete solution for the countertop should not be too liquid, it should have a certain degree of viscosity.
The process of making a kitchen countertop from concrete
First you need to assemble the formwork for the concrete countertop into which the solution will be poured. It is made either from plywood or plastic sheets. Of course, the second option is preferable, since the concrete solution does not adhere well to plastic.
 The dimensions of plastic sheets or plywood must be strictly those dimensions that were previously indicated in the drawing. Be sure to attach a 5 cm thick beam around the perimeter of the plywood using self-tapping screws. If you need to make a concrete countertop of greater thickness, then the thickness of the beam increases accordingly.
If, after assembling the formwork for the tabletop, between it structural elements If there are cracks, it is advisable to seal them using silicone sealant or any other suitable for working with a specific material.
If you want the table top to have rounded edges, then you need to insert small plastic inserts in the form of a semicircle into the formwork before pouring it with concrete mortar. Then, it is necessary to fix a metal mesh for reinforcement at a height of 3 centimeters from the surface of the formwork.
 However, before installing the reinforcing mesh and pouring the concrete solution into the form of the table top, it is recommended to lubricate its base and sides. machine oil. After the formwork is completely filled with concrete mortar, you need to cover it on top plastic film and leave to dry for at least ten days.
Polishing and sanding concrete countertops
Grinding a concrete countertop is done using an angle grinder (grinder) with a polishing disc installed on it (just like grinding marble at home). You should know that different stages When grinding a concrete countertop, different discs are used.
At the initial stage, a rough disc is used to remove the main irregularities of the tabletop. Then exclusively discs of 50 and 100 units are used (for finishing the kitchen countertop).
 After sanding the concrete countertop is completed, the final stage of polishing follows. A concrete countertop is polished with the same tool, but only with a much less abrasive disc (no more than 400 units).
The finished concrete countertop should have a smooth and shiny appearance. If you run your hand over its surface, you should feel absolutely no abrasions or roughness.
DIY video concrete countertop
samastroyka.ru
Concrete countertop
You can make a countertop from concrete that looks like a countertop made of natural marble. Durable, resistant to external influences, waterproof material reveals his decorative possibilities.

Do not use concrete to make a kitchen countertop. new idea. In one of the articles, I already wrote how countertops are made from concrete and broken glass bottles. Concrete is an excellent material that can be faced with ceramics, natural stone, wood... However, it is preferable to leave the natural surface of the concrete, subjecting it special treatment.
Concrete mix composition
The appearance of a concrete countertop depends on the brand of cement, additives and their dosage. It is advisable to experiment by making several small test samples in small formworks, and after drying them, sand the surface until the desired result is obtained.
Cement of a grade not lower than M500 is used. Washed, sifted sand up to 0.3 mm provides an even color and guarantees good homogeneity of the mixture. Fine crushed stone is used.
Formwork assembly
The formwork is placed on a strong support strictly level. The base of the formwork is made of 20 mm plywood, treated with a special lubricant that prevents concrete adhesion and moisture penetration. Instead of lubricant, you can put plastic film on the bottom. The sides of the formwork are made of bars with a cross-section of 50×50 mm and secured with self-tapping screws along the perimeter of the base of the formwork. Self-tapping screws should be screwed through the plywood from the outside of the formwork. The bars are treated with oil to facilitate their subsequent removal.
At the location of the opening in which it will be located kitchen sink, an insert cut from 50 mm polystyrene foam is screwed to the bottom of the formwork. After the concrete mass has hardened, the polystyrene foam is cut out.
Preparing the mixture
The mixture includes cement, sand, crushed stone in a ratio of 1:2:3 with the addition of superplasticizer SP-1VP at the rate of 5 kg per 100 liters of water.
To obtain colored concrete, inorganic color pigments are added: cobalt blue, manganese blue, red, yellow, black and brown iron acid pigment. For clarification, white titanium dioxide is used. White Portland cement is used to color concrete in light colors, and gray cement is used to obtain a dark color.
To ensure uniform coloring of concrete throughout the entire volume, it is recommended to add pigment to the dry mixture and mix everything thoroughly. The amount of added pigment is selected experimentally. When simulating granite, non-uniform stains on the surface of the countertop are obtained by adding dye diluted in water to the prepared concrete mixture.
Prepare the concrete mixture in small portions of 8-10 liters. To increase the strength of the tabletop, a reinforcing metal mesh is used.
The prepared concrete mixture should resemble a thick paste, not very wet and not very dry. Excess water causes porosity of the product and reduces the strength of concrete. Lack of water leads to the formation of air bubbles and, consequently, voids.
After pouring, the countertop is covered with plastic wrap and dried for two weeks. The formwork is removed and the polystyrene foam is removed after seven days of drying.
Treating the surface of the tabletop.
Used to process table tops Grinder power of about 1000 watts with speed control. Sanding removes surface layer concrete and highlights crushed stone particles more clearly. To obtain a smooth, glossy surface, grinding is performed in two stages using a disc with silicon carbide sandpaper: first coarse-grained, and then medium-grained.
During the grinding process, a lot of dust is generated, therefore, all work is performed with safety glasses and a respirator. It is recommended to use a vacuum cleaner to remove dust from the sanding area.
After removing dust, the surface is treated with a water-repellent agent using a brush or roller. This treatment gives the surface water-repellent properties and prevents contamination with oil and grease.
Good news for those who decided to make their own concrete countertops. A filler for concrete countertops, Super Seal, from Concrete Encounter, has appeared on the Russian market. After treatment with this composition, the concrete countertop will have the same operational properties, like granite.
Final sanding is done with sanding paste. Thin suede is secured to a rubber disc and a thin layer of sanding paste is applied to it. Grinding is performed at low speeds. In this case, the sander is slowly moved along the tabletop until a gloss appears. Suede is changed as it becomes dirty.
This article describes a method for making marbled concrete countertops. A translation of an article from the Spanish magazine Brico No. 172 was used.
The grinding process using silicon carbide sandpaper is an expensive pleasure and requires a lot of time. Therefore, another option is proposed - covering the surface of a concrete countertop ceramic tiles www.rmnt.ru/story/furniture/256141.htm.
The entire process of making a concrete countertop can be watched in video format. Film on English language, but everything is clear without translation. If you have Slow internet, then the film can be downloaded here (65.57 Mb).
iddeas.ru
DIY concrete countertop
 Countertops made of decorative concrete and tiles ( left photo)
 Despite the apparent complexity, making such a practical detail as a concrete countertop with your own hands is not particularly difficult. The video in this article will help you cope with this task. As a result, you will have both a durable work surface and individual design solution.
Sequencing
Key points to consider before making a concrete countertop with your own hands:
- During operation, actions may be performed on the table that cause significant impact loads. For example, chopping a part of a meat carcass containing cartilage. Therefore, reliable reinforcement is required.
- Washing and hob for the kitchen, it is better to choose the overhead type. They do not need special precision in the dimensions of the opening, and the installation side is wide enough. It will hide possible flaws, while the product itself will be securely fastened. Mortise structures require specific equipment and work in a workshop.
 The side of this sink is 20-30 mm
 - A concrete countertop has considerable weight, which means the frame on which it will stand must have sufficient strength. To reduce weight, you need to try to reduce the thickness without compromising strength.
- One of the stages of work will be grinding the surface, which causes a large amount of dust.
This instruction describes how to make a concrete countertop with your own hands, either locally or as a separate product.
Drawing
A properly drawn up plan is the key to the success of any business.
 Drawing of a corner table top
 In this case, the main factor is sizing. The most difficult thing is to transfer the angle if the design provides for it. For this you will need a protractor.
Advice! The most accurate and cheapest goniometer - two even strips at the required height are inserted into the corner, pressed against the walls, and fixed in a convenient way.

The next stage is preparing the frame.
Base, reinforcement and formwork
The best option the base will be moisture-resistant plywood or OSB board. A contour cut exactly according to the drawing will greatly facilitate the manufacture of a concrete countertop with your own hands.

In cases where work is carried out on site, the base remains in the structure, so all openings and seats must be prepared in advance. If the manufacture of concrete countertops is not carried out at the point of use, then the base is cut only along the contour, and the cavities in the future working surface are limited by appropriate frames.
 Basis for remote manufacturing
 Formwork of rectilinear shapes can be made of any molded materials, as in the photo above. A profile for plasterboard is well suited for shaped products.
Formwork using profiles and foam plastic
Advice! When installing formwork, inner side It is better to lay it with strips of foam plastic 20 mm thick. When laying the reinforcing elements, you will need to deepen their edges into the foam. This “trick” will allow the decorative layer to grab onto the reinforcement.
You can create a reliable concrete countertop with your own hands only if it is well reinforced. The best, although not the cheapest, material for this is stainless steel expanded metal. Since its use is rare in such advice, it is worth considering PVL in detail.
Such sheets are made by cutting slots in ordinary steel sheet and stretching it. In this case, the jumpers between the slots are rotated perpendicular to the plane of the sheet. Thus, it is not the thickness, usually 2-3 mm, that becomes load-bearing, but the width of the lintel. For these purposes, sheet 308 with a total thickness of 16 mm is suitable.

Due to the high strength of PVL, it is used for the manufacture of stairs and floors.
The parameters that PVL must comply with are regulated by GOST 21014:
Concrete worktops are usually at least 50mm thick. The ability of PVL to withstand such loads allows us to reduce this figure to 25-30 mm.
This means that the material consumption, weight and requirements for the frame on which the concrete kitchen countertop will stand will also decrease. Complex contours for insertion can be made with a grinder, or when purchased at a metal warehouse.
 Reinforcement using PVL
 Concreting
At the pouring stage, you need to select the concrete composition for the countertop. The presence of PVL makes the presence of crushed stone unnecessary.
The statement that gravel and crushed stone have higher compressive strength compared to steel is true, but in this case it is useless. Concrete countertops do not compress. They beat meat and crack nuts. Steel can withstand impact loads better.
You can use a mixture of cement and granite sand fine fraction, the so-called granotsev. Having chosen these components, you will need to buy plasticizers that increase bending strength. Their retail price is high chemical composition granotseva is unknown, it is easy to make a mistake. The process of “how to make a countertop out of concrete” may end with cleaning up its remains.
 Assortment of plasticizers. How to choose?
 In order not to take risks, it is better and easier to buy ready-made sand concrete of high strength grades, M400 and higher. This material is intended for pouring reinforced foundations and is designed to work with fittings. Just the right situation. All the additives are already in it.
All that remains is to mix the solution to the consistency of sour cream and pour it into the mold. If further processing consists of varnish or paint, then it should be poured along the edge of the formwork and immediately leveled.

In the case where decorative concrete is intended to be used for the countertop, or free space is required for the tiles, the height depends on the decorating material.
Advice! When reinforcing PVL, it is better to leave 2-3 mm of the sheet protruding above the fill. They will ensure the connection of two layers into one, or reinforce the tile adhesive. If traditional reinforcement was used, you need to put it on the surface of the poured concrete. plastic mesh. This notch will increase the adhesion of the next layer.
 Space left for the finishing layer
 After pouring, you need to cover the mold with film and leave for 1-2 days. Further processing will depend on the finish coat.
Decorating with varnish or paint
In this case, 2 days after pouring, open the film and leave the concrete countertops until completely hardened. Depending on conditions, this may take up to several weeks.
 Concrete countertop varnished
 The countertop is sanded, primed, painted or varnished using the technology specified for selected materials.
Application of tiles and stone
To decorate with tiles or stone, a concrete kitchen countertop is dried in the same way as for paint. After this, the product is removed from the mold, placed in its place and covered with decor.

The reinforcement or hardened notch left under the foam and on the surface will ensure reliable fixation of stone elements or tiles.
Advice! If preference is given to tiled models, it is better to choose porcelain stoneware for the floor, which is most resistant to mechanical stress.
Decorative concrete
Provides the greatest scope for flight of fancy in choosing: how to cover a concrete countertop. At the final stage, you can choose a ready-made dry mixture from those offered on the market, there are a lot of options.

Or make it yourself using the same sand concrete with the addition of dyes, sea pebbles, quartz, marble chips, any decorative elements. The only thing that should be taken into account when choosing inserts is that the countertop made of decorative concrete must be polished.
Advice! Part ready-made mixtures includes additives that increase the hardness of concrete, making it easier grinding work and increasing the service life of the surface until the next grinding. The best option is to choose the appropriate color and texture from ready-made proposals. It is better to entrust the assortment of inserts to your own imagination.
Wood inserts and artificial stones(on right)
The final filling work must be carried out one day after filling with the base layer. The concrete in the mold should no longer be liquid, but not yet completely harden.
Having decided on the composition of the finishing layer, you need to remove the foam from the formwork. Decorative concrete is poured into the space freed up at the edges and up to the upper level of the formwork and the surface is leveled. The form is closed again for two days. After removing the film, allow the product to dry completely.
From this video you will learn how to properly make a concrete countertop with your own hands.
Grinding
The final stage is grinding and polishing concrete countertops. Only an inveterate enthusiast can do this kind of work manually. The Chinese grinder will die halfway through.
Final tip! You can rent a good professional grinder. Over the course of the weekend, the fruit of the long labor will be finished.

Independent production Concrete countertops are a painstaking, but not difficult task. The price of the product will be several times lower than what was ordered in the workshop, and the moral satisfaction will be just as many times higher, and it will also serve the grandchildren.
concrete-house.com
Do-it-yourself concrete countertops - manufacturing instructions
Recently, concrete countertops have become increasingly popular, which can give your home exclusivity and individuality. Of course, you can invite a designer and builders who will make your dreams and desires come true. But, having demonstrated “miracles of craftsmanship,” you can make a similar product on your own, which in the end will not be inferior to its marble counterpart.

Preparatory stage
A countertop is a work surface that is an integral part of any kitchen. At the first stage, you need to decide on the dimensions of the future product, since it must be harmoniously combined with the existing interior. Also, when creating a kitchen countertop with your own “golden” hands, you need to make sure that it fits as tightly as possible to the wall. To achieve this, you need to carefully measure everything and make an accurate drawing.
Advice! If you want to avoid problems in the manufacture and installation of the countertop, it makes sense to divide the entire product into several elements and take this into account in the drawing, that is, the formwork will be single, but divided into sections.

Also, when designing a kitchen concrete countertop, a very important point must be taken into account: the joints of parts of the finished product must clearly align with the transverse elements of the table frame (otherwise there is a possibility of cracks).
Required materials and tools
To make a concrete countertop you will need the following materials:
- cement;
- sand (fine, sifted);
- gravel (or expanded clay);
- wooden blocks (size 40 x 40 or 50 x 50 mm);
- boards;
- moisture-resistant plywood laminated with chipboard 18 mm thick;
- metal mesh (for reinforcement);
- silicone sealant;
- decorative elements;
- glue;
- drying oil, vegetable oil or special liquid for lubricating the mold;
- pigments – dyes (if you want to have a colored surface).
You will also need the following tools:
- screwdriver and screws;
- Bulgarian;
- hacksaw;
- grinding machine with abrasive discs;
- construction mixer or electric drill with a special attachment;
- building level;
- rule;
- roulette;
- container for preparing the solution;
- respirator, safety glasses and rubber gloves;
- putty knife;
- vacuum cleaner.
Work order
The procedure for making a house countertop from concrete with your own hands is as follows:
- we make formwork for casting the future tabletop based on a previously completed drawing;
- we install it on a workbench, sawhorse or work table (we check the correctness with a level);
- coat the mold with drying oil or vegetable oil (this will make it easier to remove the finished product);
- We place decorative elements on the bottom (there is room for your imagination) and secure them with glue (it is these details that will later become the front side of your tabletop).

- we place a metal mesh in the mold, which we attach to the edges of the formwork with thin wire so that it is raised to a height of 25-30 mm from the bottom of the mold, and during the pouring process the solution appears under and above it;
- we prepare a concrete mixture using the basic recipe (that is, which includes sand);
- pour into the mold.

If the form will be filled with solution layer by layer, then we adhere to the following order:
- prepare a solution for the layer that will be the front surface of your countertop (the components correspond to the main recipe);
- pour the prepared solution into the mold;
- we lay a metal mesh (there is no need to lift it);
- we prepare a solution for the base layer, to which we add gravel or expanded clay instead of sand (it takes no more than two hours to prepare it, since the liquid stage of concrete does not last that long);
- pour it into the mold.
- we place blocks or corners in liquid concrete so that the tabletop can later be attached to the legs or walls of the table;
- tamp with a trowel and remove excess with a rule;
- cover the formwork with a sheet of laminated chipboard, having previously lubricated it with drying oil;
- We cover the entire structure on top with a polyethylene film;
- leave everything alone for 7-9 days;
- free from polyethylene;
- remove the formwork;
- leave the product for additional drying (5-7 days);
- if you need to trim the tabletop, we do it using a grinder;
- grind;
- polish;
- if the countertop consists of separate elements, then after assembling them we seal the joints with special silicone or moisture-resistant grout.

If you still have any questions about the process of making a kitchen countertop from polished concrete, then the video will help you.
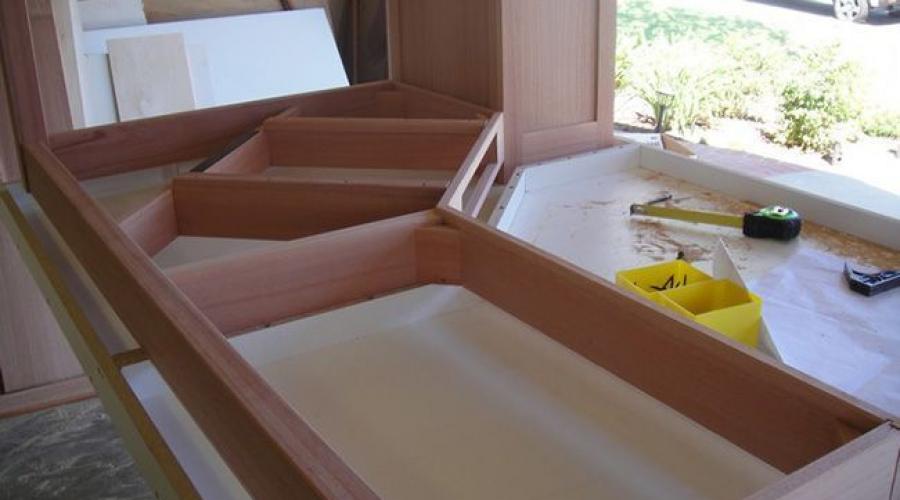
We create a form (formwork) for making a tabletop
In order for the hand-made tabletop to ultimately bring you satisfaction and not disappoint you with its quality characteristics, it is necessary to strictly observe all the dimensions indicated in the drawing when creating its shape. The work algorithm is as follows:
- cut out a sheet of moisture-resistant plywood (or laminated chipboard, fiberboard or MDF) with dimensions exceeding the dimensions of the future tabletop by 10-15 cm on each side;
- along the entire perimeter of the form we make sides 50-60 mm high (this thickness is optimal for the future tabletop), using long boards (50X30 or 60X30 mm), which we place on the edge and fasten with self-tapping screws; to strengthen the structure from the outside, we install two or three bars or metal corners in the corners and in the middle;
- as a result, we obtain a container whose dimensions clearly correspond to the dimensions of the tabletop;
- carefully seal all joints, seams, gaps and cracks in the mold using silicone sealant;
- if you want to give the finished product rounded shapes, we recommend using plastic or silicone inserts, which are installed in the corners of the mold and removed after the concrete solution has dried;

- if you plan to install a sink in the working surface, then you should provide free space for it (to do this, draw a rectangle at the bottom of the mold corresponding to the size of the sink; secure bars 50 x 50 or 50 x 60 mm; the drawing lines must remain on the outside of the bars) , and also make a hole for the mixer (for this you will need a piece of pipe with a diameter of 35 mm and a length of 50-60 mm).
Advice! For the countertop, it is better to choose a countertop sink, so as not to suffer in the future with the seating chamfer, which is available in built-in models (but do not forget to take into account the presence of a horizontal side of countertop sinks around the entire perimeter at the stage of preparing the drawing).
The creation of formwork must be approached carefully, without missing anything, since the concrete countertop will completely repeat the shape into which the solution will be poured: all irregularities, bends and recesses will spoil the appearance of the finished product.
Preparing the concrete mixture
It includes:
- 2 parts cement (M 500);
- 3 parts sand (sifted);
- plasticizers;
- water (to give the mixture a creamy appearance).
If the volume of the solution is not large, then it can be prepared in a small container (for example, in a bucket) and mixed with a construction mixer using a special attachment. If the dimensions of the finished product are large, then it makes sense to use a concrete mixer.
Important! The mixture must be stirred very thoroughly.
If you want to make a concrete countertop with your own hands of a certain color, then you need to add pigments - dyes - to the solution. But remember: to give the concrete a uniform color, pigments must be added to the dry mixture; and to obtain stains, like on marble, it is recommended to dissolve the dyes in water, and then mix them with the finished concrete mixture.
Advice! If you doubt that the mixture will not have the consistency required, it is better to go to the store and buy a ready-made one, the packaging of which will indicate all the proportions.

Grinding and polishing
To make a concrete countertop attractive and similar to granite or marble, we carefully polish it with a special machine using diamond discs. The process looks like this:
- Place the tabletop flat with the front side up;
- remove the main irregularities using a rough disc;
- We process the front surface of the product with special care;
- grind with a disc, abrasiveness – 50 units;
- We perform final grinding with a disc - 100 units;
- we carry out polishing (it is better to polish with discs - 400 units);
- At the final stage we use a felt circle.

In custody
Our step-by-step instructions above will help you make a very beautiful kitchen worktop. Make it yourself, and then use your experience to show others how to make a countertop.