Do-it-yourself gate at the dacha. Double-leaf portal on a summer cottage. Video: types of sliding gates
Acquaintance with the house begins from the gate. Essentially, this is the owners’ business card. Therefore, their appearance should, by definition, be solid and beautiful. But, at the same time, their main purpose is to ensure the safety and security of private country houses and dachas.
How to combine these two purposes together? How to make swing gates for your dacha beautiful, reliable and functional. What types of swing gates are there and which ones are best to choose? How to make and install. About all this in detail step-by-step instruction in our article.
Before we move on to describing the process of installing gates, we will focus on their pros and cons.
Advantages of swing gates:
- simple design;
- relatively low price;
- undemanding in maintenance;
- long service life;
- strength;
- ease of operation;
- unlimited choice of design solutions and shapes;
- no need for concreting the site. For example, under the rollers for;
- possibility to install automation.
Flaws:
- the need to provide quite a lot of space for opening and closing;
- need to take into account wind load in the region.
Simple arithmetic shows that swing gates have significantly more advantages. And the shortcomings are removable or not critical. The long history of their existence only confirms the reliability of the system.
Swing gate design
No matter what materials appear, no matter how the fashion for decorating gates changes, the basic principle of their arrangement remains unchanged. Structural device:
- pillars (racks). In fact, they are not gates, but they are supports for their fastening;
- frame for swing gates. Wood or metal can be used in its manufacture. The latter is more popular because gives the frame greater rigidity;
- finishing (cladding) material for cladding;
- loops;
- latches and locks.
So, we have decided what swing gates are and what features they differ from.
Making swing gates - tools and materials
Having made sure that we can make them ourselves, we will begin construction.
Required tools for making swing gates and consumables to him.
Tool
Mandatory for the manufacture of the frame and arrangement of racks:
- Bulgarian. Designed for cutting and grinding metal workpieces;
- threaded discs;
- grinding discs;
- welding machine;
- electrodes;
- roulette;
- building level;
- corner;
- hammer;
- shovel;
- Master OK.
Auxiliary:
- compressor, spray gun or brushes for painting racks and/or gates;
- drill. If necessary for fastening the gate trim;
- rivet, as well as rivets for it.
Material
- pipe for making a frame. Preferably use profile pipe 60x40x1.5. 40x20x1.5 will also do. The final choice depends on the finishing material and taking into account the wind load;
- pipe for making racks. Here you should also be guided by the weight of the finished gate.
- gate weight is within 150 kg. and below. A pipe 80x80x4 is suitable;
- gate weight from 150 kg to 300 kg. Pipe - 10x100x5;
- The weight of the gate exceeds 300 kg. Pipe -140x104x5.
Tip: You can use brick, concrete or even wood for the racks. In any case, correlate the properties of the material with the expected load.
- hinges for swing gates. They can be adjustable or unregulated. Must be made from quality material and have the ability to withstand significant loads;
- locks. Can be mechanical or electromechanical. The choice is discretionary;
- dye. Needed for painting racks and/or trim;
- sheathing There is also complete freedom of choice here. The main thing is that it is to your liking and affordable;
- automation for swing gates. To be able to make automatic gates. You can not install it at all or install it later. But, if its installation is expected, even in the distant future, it is better to make the frame of the swing gates more durable.
How to make swing gates with your own hands
Do not think that homemade is a synonym for the words “ugly” and “unreliable”. Quite the opposite - homemade swing gates mean creativity, individuality and concern for your own safety.
Sequence of work.
- stage - installation of racks for hanging gates.
- stage - manufacturing swing gates.
The stages, of course, can be changed. But the installed racks (posts for swing gates) must last at least a week. In order not to prolong the pleasure, the waiting time can be occupied by welding the gate.
Stage 1 - installation of swing gate posts
The following can be used as a stand:
- profile pipe. The choice of pipe cross-section is justified above in the “materials” section;
- concrete pillar - purchased or poured on site;
- brick or a natural stone. The latter is used more for cladding due to its non-standard dimensions;
- wooden beam (100x100).
Methods for installing poles/racks:

The pipe can be driven to a depth of about one and a half meters
This installation method is the fastest, most cost-effective (no concrete costs), and it is possible to replace the stand. The main thing when constructing pillars using this method is to maintain the level. This will prevent the gate from skewing.
Material prepared for the website www.site
 Strengthen the support pillar with concrete (concrete), i.e. make, a kind of foundation for the base of the gate.
We will describe the second one, because the first requires brute force and suitable soil.
Installation of gate posts
Execution sequence:
- Dig or drill with an earth drill a pit at least 1 meter deep. The diameter of the drill must be at least 200 mm, with a pipe cross-section of 100x100.
The depth depends on the depth of soil freezing in the installation region. The width of the sides is determined by the quality of the soil and the dimensions of the supports (pipe, wood, concrete).
- We arrange a sand and crushed stone cushion under the concrete. Its height is 150-200 mm. The purpose is to prevent the post from deepening and to create a foundation for concreting.
- We install the post and level it using a building level.
- Prepare the concrete and pour the stand.
Concrete pillars must withstand for 7 days, no less. The concrete must harden well. While the concrete is curing, periodically moisten it with water. Of course, cracks in such a small area are not as dangerous as, for example, cracks in the foundation of a house. But it's better to avoid them.
Tip: If you use brick or concrete rather than a pipe, the depth of the recess will also be 1 m.

For reliability, the racks need to be reinforced. And also, take out two or three reinforcing embeds in advance for fastening the hinges.
Stage 2 - production of swing gates
Sequence of independent device.
Installation location and appearance of swing gates
This is the starting point from which all work begins. Often the installation location has a direct impact on appearance designs.
For example, you need to install a gate in the backyard, at the entrance to the garden, or to fence off a future construction site. Then both the material and the design will be as simplified as possible.
If it is a front gate or a garage, then the costs will be higher.
Swing gate sizes
Ideally, the gate is made together with the fence. However, if you have, for example, hedge or you are expanding the driveway and need a new gate - you should measure the dimensions accurately.
Tip: Try to make swing gates in one stylistic decision with a fence.
It is important to measure the height and width of the opening for the gate. When measuring the height, keep in mind that a technical gap is usually left at the bottom of the gate. Its value depends on the coverage of access roads. If you have asphalt, tiles or concrete in the gate area, then 5-7 cm of clearance is enough. If the soil is not strengthened (grass grows) and the surface is not flat - then about 10 cm. Technical clearance is also needed to reduce the wind load, if the future gate is solid, without ventilation gaps.
It is also necessary to ensure that there is sufficient clearance between the sashes. This will level out slight displacement of the racks.
Drawing of swing gates
Having at your disposal a drawing and design diagram of swing gates, it is easy to calculate the quantity required material.
Try to make a frame for the gate so that its dimensions correspond to the dimensions of the intended finishing material. This will make the installation process easier for you and avoid connecting seams on front surface gate Eg, standard width corrugated sheet PS-10 1,100 mm.
Advice. When making calculations, use the working, and not the total, width of the finishing material.
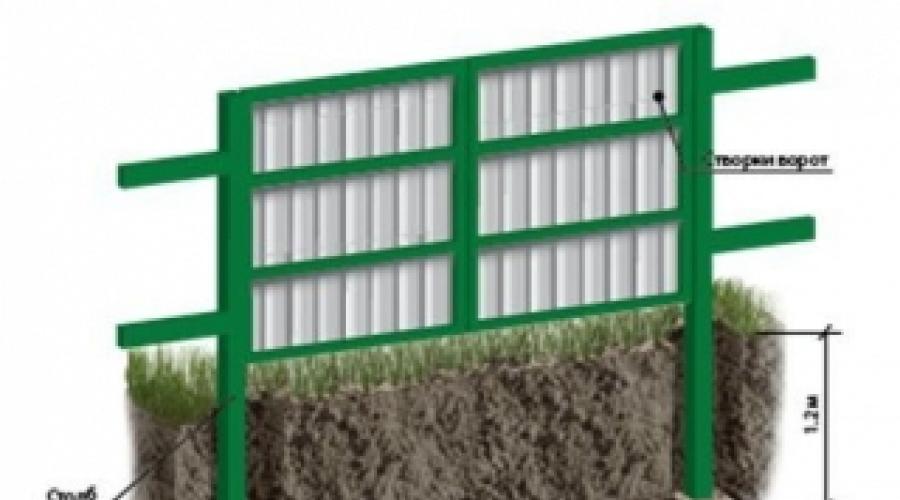
The figure shows a diagram of a frame for swing gates, which we will take as a basis.

Using this drawing as a basis, you can calculate the amount of material, attachment points and parameters of pipes and finishing materials.
In our example, the frame is welded structure. It will be made from pipe or metal profile. But you can also use wood. If, for example, you have completely wooden gates.
The picture shows that the frame has a square appearance and internal jumpers. They are needed to give the frame rigidity.
Please note that this diagram is shown for swing gates that are not equipped with a wicket. The gate is located separately. If you decide to save space and embed the gate into the gate, consider this need when creating a drawing of the frame for swing gates.
Calculation of swing gates
For the frame shown in the diagram you will need the following material:
- profile pipe 60x40 - 22 meters - for the perimeter of the frame and lintels. This pipe will be attached to the racks and support the entire structure;
- profile pipe 40x20 - 15 meters - for the internal frame (perimeter reinforcement). Namely, the gate lining material will be attached to this pipe.
Usually pipes are sold linear meters, so it’s better to immediately take the sizes that you need. Among other things, this will make delivery easier for you.
Pipe cutting and grinding
At this stage, the manufacturing of frame components occurs. The pipes are cut to the required length and polished.
Grinding is needed to remove rust from pipes. If the metal is lubricated with oil, it must be removed using a solvent (usually gasoline).
Welding swing gates
When implementing welding work, remember the safety precautions. It is better when this type of work is performed by a specialist. So quality welded joints will be higher. And the appearance is more beautiful.
When welding, it is important to make joints in such a way as to protect the pipe from water leakage. Otherwise, water or snow will get into it. In winter it will freeze, and with warming it will begin to expand. This will inevitably lead to expansion of the pipe walls. And, as a result, to deformation of the entire structure.
In our example, the internal pipes are welded in the form of squares. But this is not of fundamental importance.
The pitch of welding fastening of the external and internal frame (pipes 60x40 and pipes 40x20) is 250-300 mm. Maintain staggered order. This way, the pipes will not break the weld seam due to thermal expansion.
Some drawings of frames for swing gates are given below.


The more stiffening ribs, the greater the wind load your gate can withstand.
If you are sewing up a fence with finishing material, then weld the pipe in the middle of the outer one. This way, it’s easier to mark the place where the casing is attached.
Primer
It doesn’t matter what material was used to make the frame - metal or wood - it needs to be primed. The primer will extend the service life paint coating and make the application process more enjoyable.
Welding areas are primed especially carefully.
Latch and hinges for swing gates

The hinges are welded to the frame and to the racks (pillars). If the stand is made of brick, and the removal of reinforcement was not provided, then you must first attach the channel to the brick with a dowel, and then weld the loop.
Varieties of loops are shown in the photo


The valve mechanism you choose is the one you like best. The most common and easiest to manufacture is the one shown in the photo.

Finishing of swing gates
- Painting the frame
The frame must first be wiped clean from dust. Any paint is suitable for painting. Apply paint better with a spray gun, so it will lie more evenly, and the work will pass faster. You can also use a brush. In this case, the process will be somewhat delayed, and the paint consumption will be less.
It is better to apply paint in several layers.
- Fastening finishing material
Covering the gate is possible before and after installing the frame on the posts. To do this on inner tube(40x20, in our example) we attach the sheathing. The method of fastening and fastening depends on the finishing material.
How to cover swing gates
The following materials are used:
Corrugated sheeting
Advantages - low price, wide range of colors, light weight. The disadvantages include: the difficulty of replacement (it is difficult to choose a color, because the sheet fades slightly, plus, the shade depends on the batch and manufacturer). And also, the possibility of damage during installation and high windage.

Tree
Advantages - accessibility, beautiful appearance natural wood, ease of replacement. Disadvantages: high maintenance requirements. Over time, the wood may dry out, leading to cracks.

A metal sheet
The advantage is durability. The disadvantage is significant weight.

Forging
Advantages: unlimited designs. The downside is what to do Forged gates Only specialists can do it with their own hands.

Steel mesh
Advantage - low cost, high speed work, light weight. Disadvantage - low aesthetic properties; the transparency of the fence makes the entire territory of the yard accessible for viewing.

Rabitz
The characteristics are the same. More suitable for installing technical gates.

Combined
The basis of this combination is most often forging, which allows you to give the gate any shape. And they are closed by lining the inside with wood, metal, corrugated sheets or polycarbonate. Examples of such gates in the photo

Installation of swing gates
So, the racks are ready, the frame is welded, finishing material fixed. It's time to hang the gate.
Conclusion
We hope you are convinced that installing swing gates with your own hands is not a difficult task. If you have the materials and tools, installing the gate will not take more than a week. From the installation of the pillars to the installation of the gates. And if you consider that it takes 7 days for the concrete pillars to settle, then generally a day. I wish you success!
Swing gates - photos of different device options


Acquaintance with the dacha plot begins with the entrance. This is why it is important to provide good gate, which will not cause inconvenience to anyone.
Of course, you can order the production and installation of the structure from specialists. But, if you have the necessary knowledge and skills, it is better to do everything yourself, while leaving some of the funds in your pocket. We will try to figure out further how to make a garden gate with your own hands and what is needed for this.
So, first you need to decide what kind of gate you want to make. There are several types of systems, and each of them has both its advantages and disadvantages.
The simplest option, found everywhere. Their design is quite simple: two doors that swing open different sides. It is easiest to make such gates and install them. The service life also promises to be long. But there is also weak sides. So, you must ensure that the exit path (in the opening direction) is clear, otherwise the gate simply will not swing open. If you want to purchase automation, you will face serious expenses: the design has two doors, and a mechanism is required for each of them.
Important! Whatever option you choose, you need to carry out necessary calculations and make drawings. Otherwise, all work may go in vain. So, if you don’t guess the width, you can at least end up with an opening that doesn’t close completely.
There is only one leaf, so if you decide to automate it, it will cost less than with the previous design (and not only with that). In addition, when opened, it moves along the wall, which no longer takes up much space. Similar gates are divided into three more subtypes:
— rail. The main feature of this type is the rail on which the sash moves.
- suspended. Here the structure for movement is on top. This is convenient, since it can be continued above the entrance, which is not so easy to do below. This option will be quite expensive.
— console. The most complex design, which is based on cantilever mechanisms and a channel beam. But it doesn’t publish loud noises when opening, and the guide does not get clogged as in the case of a rail type.
There are two doors that move in different directions. This choice is suitable for those who have little space behind the entrance, and the entire structure does not fit on one side. In addition, it will only be possible to use the driveway and the gate at the same time if the latter is located further away from the system, otherwise the gate will block it.
Important! In the last two cases, you can make the necessary elements yourself and install them only with the necessary experience and skills.
Materials
We talked about the types, now we’ll tell you what can be made from country gates with your own hands. From wide range Most often, only two materials are chosen: metal and wood. And, again, both the first and second options have their own characteristics, pros and cons.
Tree
Previously, such solutions could be seen on sites almost everywhere. But wood still remains a relevant material. And that's why:
- the cost of wood is less than metal, so the gate will be relatively cheap;
- it’s also easier to get;
— fewer tools and consumables are needed;
- wood is easier to process;
— installing the structure is also easier.
However, this material is not often preferred. There are reasons for this too:
- wood deteriorates faster (due to the influence external factors, such as moisture);
- it is inferior in strength to metal;
- the material is highly flammable.
Metal
But he is being chosen more and more often. This fact can be explained by the following advantages:
— such gates have great strength;
- the material is more expensive, but not so much as to avoid it;
— assembly and installation are no different;
— the design is more resistant to external influences.
The disadvantages of metal are the following:
— small defects can cause corrosion;
- some materials (such as, for example) make the doors light, but not strong enough;
— when exposed to various precipitation (for example, rain jets or hailstones), the metal makes a lot of noise;
- some mechanical damage may lead to deformation.
What is the best material to make a gate from at your own dacha? Here everyone decides for himself. However, not all of them can be made independently. Therefore, first you just need to decide what you are willing to put up with and what will not suit you.
Assembly and installation
Now let's talk about the main thing - how to make gates at the dacha and how to install them. The easiest way to build (or, more precisely, to execute) are swing ones. And now we will look at how this is done.
Pillars.
If you already have a fence, then you may want to skip this step. We move on with the rest. So, first we calculate the height of the pillars. We take the height of the fence, add to it the lower opening (about 5 cm), and the underground part, which is at least a third of the total height and (at the same time) not less than a meter. You can choose pipes as the material, but some make supports from logs or bricks. In any case, preparation must be carried out: for example, the pipes are cleaned, degreased, primed and painted.
Now we dig holes in the right places (after taking all the necessary measurements). We lay a 30 centimeter layer of sand and crushed stone on the bottom. Then we put up our pillars, fix them, and check the verticality with a level. Now you can fill the holes with concrete (at ground level). Now you have a week or two to do the main part.
Doors
Let's move on to almost the main thing, namely how to make a gate in the country. Regardless of the material, assembly work can be done independently (or with some assistant). So let's get started.
The first stage is making the frame. For this, everything necessary metal elements cut according to the diagrams drawn up and placed in the required sequence. Next, the profiles (two horizontal and three vertical) are connected to each other by welding.
Important! You need to take care of fastening the profiles, otherwise during welding they will simply unscrew and all calculations will be disrupted.
When the frame is ready, braces are welded to it, which will prevent it from “playing.” Next you need to install small parts: latches, hinges, etc. When everything is ready, the welding areas should be cleaned, and the frame itself should be painted in two layers, having previously been cleaned. And all that remains is to sheathe the structure with metal or wood. Sheathing should be carried out in one direction (based on whether you are right-handed or left-handed).
Installation
The simplest one at the dacha is the one where you chose swing option. If everything was done correctly, you just need to hang the sashes on the hinges. But how to install sliding or sliding ones? With pillars and sashes everything is the same here, except that they are mounted to the profile additional elements. But you'll have to tinker with the rest. Thus, for the installation of rails, catchers, console mechanisms, it is required good experience. Perhaps that is why this option is not very often chosen for the dacha. However, if you have the necessary skills, you have a chance to save a lot. Otherwise, it is better to entrust the work to specialists.
Bottom line
Now you know how to install gates at your dacha. If everything worked out correctly for you, you can be happy for yourself: now you have a comfortable and secure entry into your territory. Now the main thing is not to forget to monitor the components of the structure, and then it will serve you for a long time and with high quality.
We will send the material to you by e-mail
Gates are an integral part of any fence or garage. Today you can make them yourself, the main thing is to choose the right type of construction. They will help you make the gate yourself: drawings, photos and videos. This information will also help you decide on the material from which the structure will be made.
Gate in a private yard
A common option for everyone is swinging products. They are used in country houses, in private houses and in the construction of garages. A gate can also be located next to such options. The design involves the installation of two supporting elements along the edges of the canvas. Today it is quite easy to make swing gates with your own hands. Drawings, photos and videos will help you study all the intricacies of the work.
Arrangement of supporting elements
At the first stage of construction, it is necessary to install supports. Most often this metal poles of suitable diameter, which are concreted into the ground. Very often done with brick pillars. In this case, they can also be a support for the product. But do not forget, when laying bricks, to make metal embedded parts to which the hinges will be welded.

Preparing the sashes
From which side such hinges are welded depends on which direction they will open. That is why, when making a gate with your own hands: drawings, photos and videos must be viewed without fail. To make the sashes, a metal frame is most often used, which is attached to sheet material. If the fence is wooden, then it is more expedient to make the gate from wood. In this case, the frame can be made as follows: metal corners, and from timber. It is important that the sashes are not too heavy, otherwise they will put a lot of stress on the posts and hinges. Over time, this can lead to deformation and the doors will not close well.

Therefore, it is worth studying some information before making swing gates with your own hands. Photo and video drawings will help you become familiar with all the intricacies of the work and prevent all sorts of defects. At the final stage, it is necessary to install a locking system on the doors. The most simple option may become a simple deadbolt.

Video: swing gates made of corrugated sheets and metal profiles
Features of sliding gates
Sliding options are increasingly being used during the construction of fencing. They take up relatively little space. In addition, the machine can be located just a few centimeters from the fence and this will not interfere with opening or closing them. Availability of diverse building material gives everyone the opportunity to make sliding gates with their own hands. Drawings, photos and videos will allow you to more carefully study all the features of the work.

Sliding option
The main types of sliding gates:
- console;
- hanging;
- recoil.
Hanging variety
The hanging option is not particularly popular. This is due to the fact that a rail is installed in the upper part along which the canvas moves. This rail is a kind of limiter, so not every vehicle will be able to enter the yard.

Sliding products
To operate sliding options, the rail is installed along the wall and directly in the opening itself. IN northern regions It is not practical to use such a system. Because with a large amount of snow, the operation of the shutters will be difficult, and snow-covered areas will constantly need to be cleared.

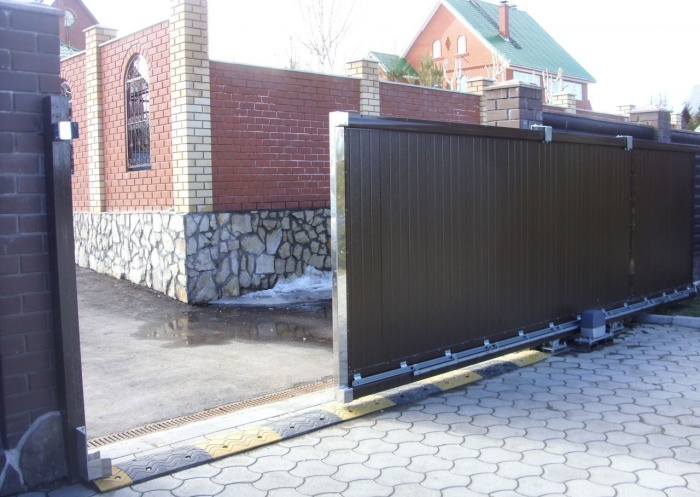
Advantages of the console type
The console type is by far the most popular. They can be used in both southern and northern regions. The movement of the canvas occurs above the ground, so there is no need to constantly clear the path. In addition, the advantage is that there are no restrictions at the top. This makes it possible for even high-height vehicles to enter the yard.

For an installation of this type, only one support column is required, which will bear the entire load from the canvas. Therefore, it is important to make it as high quality and reliable as possible. The cantilever beam itself on the gate can be located below, above or in the middle of the door leaf.
Helpful information! The beam located in the middle is considered the most the best option, since it generally strengthens the entire structure.

Recoil model
Everyone can handle making sliding gates with their own hands. Drawings, photos and videos allow you to study the principle sliding system. It is important to take into account all recommendations when performing work.

Features of sliding gates
Sliding options can significantly save space in the yard. But at the same time it is necessary to control the space along the fence. For the system to function properly, it is first necessary to clear the area of debris and any vegetation.

Installation of support elements
The beginning of the work is the installation of the main support column, which will bear the main load. If you wish, you can do it and the video will help you follow the technology. To work you need to prepare the following tools:

For the sashes themselves, it is best to use galvanized material. He is able to serve for a long time, while retaining its original appearance. Polymer-coated corrugated sheets are often used.
Helpful information! The use of corrugated sheets is considered the most a good decision, since it is processed by special means which prevent corrosion.
Products of this type can be equipped with automatic or manual drive.

Sliding type drawing
At the beginning of work, it is worth preparing drawings according to which the work will be carried out. Drawings and diagrams also allow you to calculate the exact amount of material required. The height of the gate must correspond to the fence. The width of the opening can be very different. Sliding products exert pressure not only on the rails, but also on the pole, so its design must be given Special attention. His Bottom part must be immersed in the soil and properly concreted.

Arrangement of rails for moving the web
Sliding gates will run on a rail that is located on the ground. To do this, you need to choose a U-shaped metal profile. Its length should be equal to two lengths of the canvas. For reserve you need to make another 30 centimeters. It is important that the rail is installed on concrete base. Only in this way can you get the maximum reliable design, which will last for a long time. After all the rail systems are installed and secured to the support pole, the electric drive can be installed.

Assembly of the canvas and its installation
The gate leaf is made with metal frame, to which the profiled sheet will subsequently be attached. Rollers are attached to the bottom of the metal frame. The door leaf is installed last. Do-it-yourself sliding gates: drawings, photos and videos full information about the design and process of performing the work.

Tips and tricks for doing your own work
Every person can make a gate of any design. It is important to follow the recommendations of specialists and study some information beforehand.
- Select materials for work only High Quality. This will allow the structure to be used for long period and no repair work will be required.
- It is important to pay attention to all drawings and diagrams. Only strict adherence to the scheme will allow you to complete all the work correctly the first time. Compliance with dimensions and parameters makes it possible to make functional design, which will work without problems.
- Drive installation electric type must be carried out with full understanding of the matter. If you have no experience in this field, you should entrust all the work to specialists. They will do everything efficiently and quickly. The products will open and close without difficulty.
- If the use of a roller system is envisaged, special attention should be paid to its selection. It is best purchased in specialized stores. In this case, such a system will work flawlessly for a long time.

Today, you can supplement your fencing with a self-made gate. Various materials can be used for manufacturing. The most commonly used materials are wood and metal. Before you begin, you should consider what type of construction is best to use. Starting to make gates with your own hands: drawings, diagrams and photos will help you decide even complex tasks. Swing gates classic version a task that anyone can handle. Their arrangement requires a lot of space so that they open freely. You can save space in your garden using sliding doors sliding gates.

Save time: selected articles delivered to your inbox every week
The simplest country gates consist of two leaves, which can be made from various materials. Often the material for cladding is corrugated board or wood. If desired, a wicket is created at the gate. It can also be placed in a separate opening. To make a garden gate with your own hands, you should know what material is best suited for such products.
How to choose gate material
Metal and wooden gates are often installed at dachas. Are becoming more and more popular combined designs. For the manufacture of metal gates profile pipes, fittings and angles are used. The most popular are structures made of corrugated sheets, as they have the following advantages:
- reasonable cost of cladding material;
- gate creation speed;
- ease of creating sashes from corrugated sheets;
- long service life of the gate;
- no corrosion on the material;
- beauty of the material.

It is worth remembering that there should be no defects on the corrugated sheeting, as this can cause rust to appear on the material. The disadvantages of the described material include:
- Insufficient strength. Gates made of thin corrugated sheets can be damaged if strong wind or in other cases when a large load is applied to the canvas.
- Possibility of corrosion. In order for the facing material to remain intact, it is necessary to ensure that its coating is not damaged.
Wooden gates are less popular, as they are being replaced by more reliable and cheaper designs. To make gates with your own hands, you can use both cheap boards and lumber from expensive wood species.

Simple swing gates (as in the photo) can be assembled with my own hands, having standard tools. If a complex and beautiful design, you should entrust the work to professionals. This is due to the fact that many works in this case must be performed using special equipment for wood processing.
Combined products include designs that were created using several materials. Often created following types such products:

If you want to make a gate with your own hands, you should choose the third option. You can also use corrugated sheeting instead of mesh.
Features of the manufacture and operation of different types of gates
Depending on the type of construction, gates can be divided into two types:
- swing;
- recoil .
Swing ones are the most popular, as they can be made independently. They consist of two doors, which are secured to supports using hinges. It is worth remembering that they have some disadvantages:
- difficulty of opening in winter time, when it accumulates near the valves a large number of snow;
- large gate opening radius;
- need for additional space.
It should be remembered that the swing gate frame must have large stock strength, since over time such structures begin to sag. If the frame is not rigid enough, the canvas will quickly warp.

When creating the frame of swing structures, it is used steel pipe or metal profile. Structural elements are fixed using bolts or welding. The frame is covered with galvanized steel, corrugated sheeting or wood, onto which an antiseptic is applied in advance. Should not be used heavy materials, since they greatly increase the load on the hinges.
In the closed position, swing gates are secured with a bolt or padlock. To more securely fix the sashes in the lower part, it is necessary to install a latch.

Before you make a gate at your dacha, you should think about the fact that the pillars may become loose over time due to the constant load exerted on them. This is why it is important to create a reliable foundation for the pillars.
Sliding doors are divided into cantilever and rail. They have several advantages:
- Ease of use. When installing automation on the sash, opening occurs after one press of the button. In this case, the owner of the site does not need to leave the car or house.
- Saving site space. Sliding structures They take up little space, since in the open position they are located along the fence, as can be seen in the photo.
- There is no need to clean the area around the gate. This is due to the fact that the gate leaves do not touch the ground and move along a guide.
- Durability. If you install sliding gates correctly, you can use them for a long time without worrying about them becoming deformed.

Many experienced builders agree that the best material For cladding sliding gates, profiled metal is used. A separate group should include gates with a wicket built into the door leaf. Such structures are constructed using the same technology, but a frame for the gate is welded inside the canvas.
Gate project development
Before you create a diagram future design, it is worth determining where the gate will be located. If the house is located in the center of the site, it is worth placing the doors opposite the facade of the building. If the cottage is located close to the roadway, the doors should be located as far from the road as possible. This is due to the fact that if the gate is opened frequently, a lot of dust and exhaust gas will enter the area. In the case where the site is located in natural area, the gate can be located close to the facade. By looking at photos of different areas, you can understand where exactly the doors should be placed.

To develop a drawing, it is worth deciding on the dimensions of the future structure. To do this, you need to measure the width and height of the opening. During determination optimal height It is worth considering that there should be a small gap under the sashes. If the entrance is covered with asphalt or concrete, you can leave a gap of about 7 cm. For unstabilized soil, you should leave about 10 cm.
When creating a drawing, it is worth comparing the dimensions facing material and frames. In this case, it is best to create the structure in such a way that the dimensions match. This will allow you to get the job done in more time. short term. Having correctly drawn up the drawing, you can begin to select materials.
Tools and materials for gates
Before carrying out work, you should prepare the following materials:
- Profile pipe for creating the frame of the valves. Most often, products with a cross section of 60*40*1.5 are used.
- The pipe that is needed to create supports. The choice of a particular option depends on the weight of the sashes. If they weigh less than 150 kg, you can use an 80*80*4 mm pipe. When the weight of the valves is 150-300 kg, pipes of 10*100*5 mm are used. If they weigh more than 300 kg, pipes are used
- Loops.
- Locks.
- Profiled sheeting.
- Dye.
It is also important to prepare an angle grinder, a building level, a shovel and brushes for painting the canvas.

Gate installation sequence
The first step is to install support pillars. They represent metal supports, which are concreted to a depth of more than 1 meter. Installation is carried out as follows:
- The pipes are first cleaned of rust. In this case, their surface must be degreased, and then primed and painted.
- After this, in pre-selected places it is necessary to dig holes to a depth of about 1.5 m.
- A sand cushion about 10 cm high is created at the bottom of the pit. Crushed stone is poured onto it to a height of about 10 cm.
- After this, a support is placed in the hole. It needs to be fixed in vertical position, and place reinforcement in the hole.
- On last stage The concrete solution is poured with the addition of fine crushed stone.
After carrying out such work, it is necessary to leave the foundation of the supports to harden for about a week. This time is worth spending on making the sashes. Such work is carried out in several stages:
- First, the pipes for the frame are prepared. They are cleaned, primed and painted. If this is not done, rust may appear on the material during operation.
- After this, it is worth cutting the pipes at an angle of 45 degrees into sections.
- Then you should lay out all the segments on a flat surface. It is important to measure the diagonals before starting to connect all the parts. If they are equal, the structure is assembled correctly. First, all joints are tacked by welding and after measurement they are finally welded.
- Corners are installed at the corners of the frame being created. This helps to increase the rigidity of the structure.
- After this, the crossbars are welded to the frame. The stiffening ribs should be welded at a distance of approximately 40-50 cm from the edge of the sash.
- The next step is to sand and paint the joints.
- Then the sheathing is carried out with corrugated board. On at this stage the corrugated sheet is laid on the frame and fixed with self-tapping screws or rivets. Fasteners must be placed in the depressions of the specified material. When calculating the number of screws, it is worth remembering that for 1 square meter you need about 10 pieces.
Any personal plot surrounded by a fence and gates. Such designs ensure the safety of personal property. The selection and construction of gates can be done independently. Before work, you will need to create drawings, take into account the basics of installing poles and choose the right construction material. During the installation process, it is better to follow the advice experienced builders. When installing gates with your own hands, you will need drawings, photos and videos. ready-made structures.
Advantages of swing gates
Regardless of the design, the owner of the site can choose the method of opening the doors - outward or inward. Installation of swing gates is carried out without any particular difficulties. If all stages of construction are carried out correctly, the structure will serve for a long time and properly. Classic swing gates have a number of advantages:
- high functionality;
- compactness;
- no size restrictions;
- the ability to use any materials;
- ease of use.
Also, such gates are easy to install, they are undemanding to maintenance, quite durable and can be erected in a variety of design solutions. Swing structures also have a long service life. If the need arises, they can be equipped with an automatic control system.

The disadvantages of such gates include:
- the importance of taking into account the wind load relevant for a given region;
- the need to free up sufficient space for opening-closing gate
A simple consideration of these factors allows you to understand that swing gates have much more advantages than disadvantages.
Swing gate design
Regardless of size, finish, opening direction and materials, swing gates include:
- Support posts. The posts must match the type of gate.
- Frame. It is made of metal or wood. The main requirement for the frame is greater rigidity.
- Sheathing material. Metal profiles are very popular.
- Loops. They are selected according to the weight of the gate and its design features.
- Locks and constipations. They are devices that prevent intruders from entering the site. Also, such mechanisms have a variety of designs.
Every detail of a swing gate performs an important function. Correct installation of each of them is the key long service gate When building a gate with your own hands, you need drawings, diagrams, and design sketches.
Gates made of corrugated sheets
Swing gates are the most popular among private developers. The doors can open in one or both directions. Corrugated sheeting is used as the material that is attached to the frame. You can also make a wicket in the door leaf.
The popularity of swing gates is achieved due to the long service life of such products. Metal constructions do not require repairs in comparison with wooden ones. They are often supplemented with automation systems. In addition, the profiled sheet has a number of advantages:
- low cost of materials used;
- simple manufacturing process;
- enough long term operation;
- external attractiveness;
- excellent characteristics.
The disadvantage of gates made of corrugated sheets is their exposure to wind loads. Such sashes must be installed on reinforced hinges. It is also worth taking care in advance about the correct installation of the pillars. The disadvantages of such structures include the need to free up space for opening.

However, the advantages of metal profile gates significantly outweigh their disadvantages. Moreover, many problems are not so critical that you need to pay attention to them.
Installation of swing gates
If you plan to make swing gates from corrugated sheets, you will need to install fairly strong posts. For supports, it is better to choose pipes with a diameter of 80 mm or more. A square pipe will also cope well with loads.
The doors are welded from square pipes. It is better to choose products with dimensions of 10x25x3000 mm. To connect them you will need to use welding. The frame must be strengthened with diagonal tensioners. It is also necessary to provide space for constipation, a lock and limiters.

Work begins with the installation of supports. This stage requires some preparation. It is also important to use ready-made gate drawings and photos. You can also get a lot of information from videos showing the installation of swing gates step by step. Useful information on the topic is in this material:
Pole installation methods
Support pillars can simply be buried in the ground or concreted. In the second case, the supports will be much stronger and more reliable. Also, do not forget about the need correct installation loops When driving, it is necessary to immerse the supports into the ground 130 cm.
Using this method of installing gate posts saves time. Almost immediately after hammering in the supports, you can attach the hinges and hang the sashes.
Another method is concreting. It is better to combine it with support reinforcement. The depth of the pits is 150-200 cm. The diameter of each pit depends on the cross-section of the pipe being buried. First, a cushion is prepared (from sand and crushed stone, and then concrete is poured).
Important! Before concreting, it is worth placing a waterproofing “glass” made of roofing felt into the hole. Thanks to this, the concrete milk will not go into the ground, which will make the solution more durable. Concrete must be compacted periodically to expel excess air.

Manufacturing and installation of sashes
After installing the pillars, you will need to make the sashes. Particularly time should be devoted to this process. The work is carried out in stages:
- First on flat surface it is necessary to lay out a profile pipe or corners and weld the shape according to the drawing.
- To ensure high structural strength, it is important to strengthen the sashes with diagonals.
- When the frame is ready, you can begin covering it with profiled sheeting. The material should be 2 mm thick. You should not choose metal that is too thick - then you will have to think about strengthening the racks.
- After this, the hinges are installed. First, one half of them is welded to the gate frame, and then the other half is welded to the post.
- When all the work is completed, you need to take care of security - a lock and bolt are installed on the gate.

The same principle underlies the installation of a wicket door. The painting of the sashes can be done either suspended or on the ground - even before installation on the supports. The difference is that already installed gates Drips may appear during the paint application process. For this reason, you need to treat the work with special care.
Sliding gates
Sliding gates are particularly functional. They do not take up much space, are silent, and open quickly enough. There are several types of sliding gates:
- recoil;
- hanging;
- console
The least popular type of gate is the hanging type. This is explained by the emergence of travel restrictions, the complexity of installation, and the many requirements of such structures.
If your region regularly experiences severe frosts, you should not install sliding gates on your property. The guides will become covered with ice, which will reduce the functionality of the structure. Such gates will require ongoing care. Otherwise they are quite good.

Anyone can build sliding gates with their own hands. To do this, you need to have drawings and decide on the dimensions of the sash. Can also help various videos and photos of finished structures. The main condition for installing sliding gates is the need to free up space along the fence.
A special profile is installed on the ground surface. The sash will move along it. Special rollers are also installed on top of the gate. So that the gate stops at in the right place, install special fixing elements. Useful information is in this video:
Installation of cantilever gates
Cantilever gates are considered one of the most complex. The advantage of such structures is that there is no need to equip a ground rail. The gate does not touch the ground surface while moving. Also, when installing cantilever gates, there are no height restrictions. In addition, you only need to install 1 support pillar. Such designs are used at any time and in any weather.
The folding is quite simple. It consists of a frame and casing. A guide is welded to the bottom of the sash, inside which roller carriages are placed. The gate can move along them in both directions.
Advice! Once the frame is welded, it is necessary to clean the welds. In addition, traces of corrosion should be removed from all surfaces.
The cantilever gate leaf is conventionally divided into two parts - the one that closes the opening, and the one that serves as a counterweight. The second part should have a length equal to 35-50% of the length of the first. A special foundation is installed under the cantilever part, capable of withstanding significant loads during operation of the gate.
To equip the foundation, you will need to prepare a channel that will equal to length cantilever part of the sash. It is also worth digging a pit into which it will be poured. concrete mortar. The length of the pit should be several tens of centimeters greater than the length of the channel. The foundation is poured to a depth below the freezing level of the soil. In addition, in order to securely fasten the channel to the foundation, you will need to make a special reinforcement cage.
Once the foundation has been poured, the sash can be installed. This work also has its own nuances and requires a special approach.
Necessary accessories
The elements necessary for installing cantilever gates are presented in construction stores in great variety. To choose the right fittings, you will need to determine the weight of the sash and its dimensions. It is also important to know the width of the opening.
The standard set of elements for installing sliding cantilever gates includes:
- guide beam;
- plugs with which the beam is equipped;
- end rollers;
- additional device equipped with 2 rollers;
- roller bearings;
- roller catchers.
This set is necessary when installing cantilever gates. During the selection process, it is important to seek the opinion of a specialist.

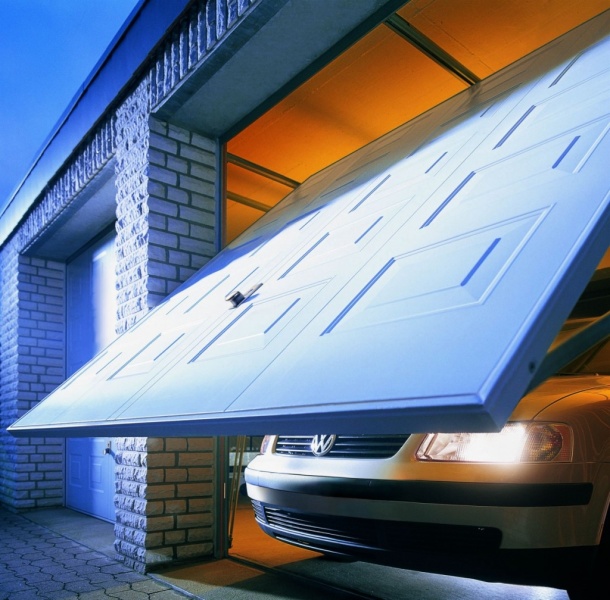
Up and over gates
Such designs are perfect for a standard garage. It is not recommended to use them as gates on the site - they have a height limitation. The principle of operation of the structures is quite simple - the canvas moves upward, taking a horizontal position. These gates open and close quickly and are relatively easy to install.
When the sash opens, swing gates, it begins to protrude a little outward. This should be taken into account when driving the car to the garage. If you do not calculate the distance, the gate may hit the car.
These gates have become popular partly due to their compactness. When folded, they take up virtually no space. They also differ in accessibility. The frame is covered with wood, metal sheets or composite. If we compare such structures with swing ones, they clearly have more advantages for installation in a garage.
To make up and over gates you will need to draw a diagram. Features of installation of structures:
- When preparing to install a lift-and-turn structure, you will need to make 2 frames - for the gate and the one on which the gate will move.
- Inside the garage, the frame will be L-shaped.
- The canvas is equipped with sashes at the top and bottom.
- Also, levers are mounted to the frame to lift the blade during the opening process.
- Be sure to provide shock absorbers that will soften the impact of the blade during closing.
The support frame is attached to the opening using anchors. Installation of automation should be carried out only after all procedures for installing the gate. It is better to entrust the work to specialists who will help install the power supply.

Installing up and down gates will not take much time if you are well prepared for the work. The process will also speed up if you invite experienced craftsman. In addition, it is necessary to use design drawings to calculate in advance the dimensions of the sash and guide frame. How to install such gates can be found in the video:
Results
It is better to install gates of any type according to the drawings. Swing structures are more often used in individual construction, sliding - both for closing entrances to private areas and for fencing industrial facilities. Lift-and-swivel the designs are ideal for garage entry equipment.
Each type of gate has certain advantages. They also have certain disadvantages. The simplest and affordable option- swing gates with two leaves. During the installation of such structures, special attention should be paid to the installation of support pillars.