Gates made of boards. Wooden fence with gates and wicket. Wooden gates on a metal frame
Read also
Wooden fence with gates and wicket- a traditional solution that does not lose its relevance. Beautiful and functional structures decorate many private homes and summer cottages throughout Russia.
- The products are reliable and durable. With proper installation and timely processing protective compounds wooden structures serve for a long time.
- Installation is quick. Professionals will install almost all fencing elements in a matter of days. Exceptions are wooden sliding gates with electric drive and automatic swing models. Their installation will require serious labor costs.
- Wood is an environmentally friendly material. The fences do not emit hazardous substances and do not harm the health of humans and animals. Modern protective compounds also make them safe.
- Wood is easy to process. With the help of a small set of tools and paints and varnishes, craftsmen create interesting design solutions.
Wooden gates and wickets are integral fencing elements. It is these additional structures that will be discussed in this article. We will tell you about the most beautiful and popular types of gates and describe in detail the process of manufacturing and installing standard structures.
Types of wooden gates
We will look at the types of wooden gates below. There are a huge number of simple and complex design solutions, however, the structures are conventionally divided into 4 main groups.
Slatted wooden gates
A slatted wooden gate in a fence is the simplest option for organizing an entrance to the site. The design consists of a frame with pickets attached to it.
Photo No. 1: slatted wooden gate
If you place the boards close together, you will get a solid wooden gate. This design will protect your yard from prying eyes.

Photo No. 2: solid gate
You can install such gates yourself. Manufacturing and installation will not require significant financial costs.
If desired, the design can be made very attractive. For example, carved wooden gates and gates look beautiful and original.

Photo No. 3: carved wooden gate
Wooden gates with frame frame
Wooden gates with a frame frame are more complex and reliable designs. A wide beam is usually used to make the base.

Photo No. 4: wooden gate with frame frame
Frames are made not only rectangular. Interesting curved designs are often found.

Photo No. 5: wooden gate with a curved frame
To make such a gate, you will have to cut out the frame elements from thick and wide board or timber.
To fill the frames, slats, pickets, plywood, metal structures, forged elements and other materials are used. An interesting option for finishing a wooden gate is “herringbone”. The crossbars are attached at an angle to the shaped vertical bars.

Photo No. 6: “herringbone”
Wooden gates with awnings
If you want to make an impressive structure, install large support pillars and build a canopy. The resulting structure will look impressive and solid.

Photo No. 7: wooden gate with a canopy
Lattice and solid canopies decorated with green plants are popular. Such structures are called pergolas. With the addition of such a canopy, even a simple structure turns into a beautiful wooden gate.

Photo No. 7: wooden gate with pergola
Wooden gates with arches
Wooden gates with arches never go out of style. Support structures are made from various materials. An arched vault made of wood is the easiest to make. It is necessary to supplement the pillars with a semicircular beam.

Photo No. 8: wooden gate with an arch
Do-it-yourself wooden gate - relevant or not?
DIY wooden gate - The best decision. However, it is relevant when you have time for production, processing, installation and design. Otherwise, contact a reliable construction company that offers wooden fences with the installation of additional structures (wickets, gates, arches, etc.).
Professionals will complete all stages of work faster and with better quality. You will receive a guarantee of the reliability and durability of the structure.
Manufacturing and installation of wooden gates. Stages of work
Let us consider in detail the preparation of the opening, the manufacture of a wooden gate, installation and finishing using the example of a simple rack structure.
Important! Any gate consists of a frame and materials filling it. Having studied universal instructions, you can independently implement a more complex project.
Necessary materials:
- timber 10*10 cm (for pillars);
- timber 4*4 cm (for frame);
- everything you need for cladding (slats, pickets or other materials);
- sand, cement and crushed stone;
- bitumen-based impregnation;
- protective and paint compositions.
The tools you will need are:
- square, pencil and tape measure;
- container for mixing concrete;
- screwdriver or screwdriver;
- drilling rig;
- plane and rasp (if you purchased raw materials)
- hacksaw;
- tamping;
- plumb and level;
- shovel;
- necessary fittings (canopies, hinges and latches);
- screws and galvanized self-tapping screws.
Stage 1. Concreting the pillars
Drill holes to install supports. The optimal depth is 1.2–1.5 m. Fill the bottom of the holes with a mixture of sand and crushed stone (10 cm) and compact it thoroughly. Treat the lower part of the pillars with a bitumen-based impregnation. This will protect wooden structures from rotting.
Place the treated post in the hole, adjust the position to a plumb line and fix the beam with a mixture of sand and crushed stone.

Photo No. 9: installation of a wooden pole
Make sure that the support is strictly vertical and fill the empty part of the hole with concrete. Install the second pillar using the same pattern.
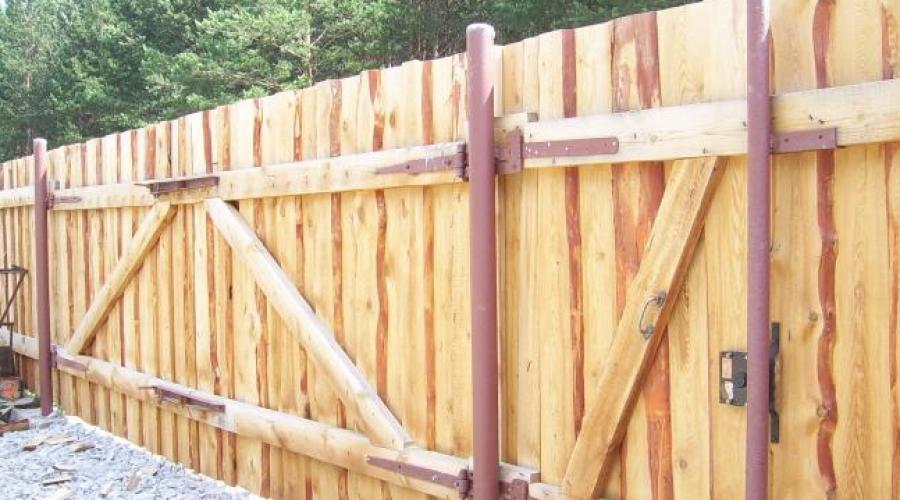
Stage 2. Making the frame
The Z-shaped frame is ideal for attaching pickets and will perfectly resist deformation. The resulting structure will not sag.

Image #1: typical diagram z-frame
To improve the appearance, make sure that the brace, horizontal and vertical crossbars are in close contact with each other. The gate will look harmonious.

Image #2: detailed diagram gates with z-frame
Important! What the frame will be like is up to you. The main thing is to make sure that the structure is rigid enough. To connect frame elements, use long screws and tighten them at slight angles.
Stage 3. Sheathing
To make a solid gate, fasten the boards closely, and to obtain a lattice structure - at a certain distance.
Important! To avoid problems, purchase necessary materials for cladding only after making the frame. Calculate everything carefully and order boards of the correct width. This will allow you to save on the purchase of materials, reduce labor costs and create exactly what you need.
If you want to make a gate with carved pickets, process the boards in advance. Already fixed elements should not be subjected to loads.
Use galvanized self-tapping screws to secure slats, boards and other materials. Their length should be slightly less than the total thickness of the frame and sheathing.
Stage 4. Installation
Before installing the fittings, treat parts of the posts and gates with protective compounds. This will prevent the wood from wearing out.
Screw the hinged hinges to the gate frame in in the right places. Secure the structure to one of the support posts. At least 5 cm of free space should be left between the ground and the lower edge of the gate.
The final stage of installation is the installation of valves, handles and hinges for locks. Screw the elements in the right places. Wooden gate locks are usually located at a distance of 90 cm from the ground.
Everything is almost ready.
Stage 5. Finishing and design
Treat the installed gate with protective compounds in at least two layers and begin applying the finishing coating. Will fit various paints and enamels.
Advice! Buy only high-quality and proven coatings from well-known brands. On Russian market The products of Aquatex and Tikkurila have proven themselves well.
After finishing coat dry, you can start decorative design wooden gate. The structures are decorated with green plants, carvings, original mailboxes and other interesting items.
As you can see, the manufacture and installation of even a simple wooden gate takes a lot of time and effort. Implementation of complex projects will require even greater costs. If you want to avoid them, order the desired design and its installation.
Buy a wooden gate
Buying a wooden gate with installation from a reliable construction company means getting convenient service, project implementation in a short time and a guarantee for the work performed.
- A surveyor will come to your site and do everything. necessary calculations. You will be able to conclude an agreement on the spot.
- Specialists will quickly produce a standard or non-standard gate that will fit perfectly into the existing opening, will not sag under its own weight and will not warp.
- Professional installers will fulfill necessary work quickly and efficiently. You will receive a guarantee for the installed structure.
If you want to take advantage of the above benefits, contact the MASTEROVIT company.
Gates are the face of any home or cottage, so their manufacture should be treated with full responsibility. The main task of this design is to protect against vandals and ill-wishers, or simply annoying eyes. From this we can conclude that the ideal gate should be attractive in appearance, provide good protection and be comfortable. Most of all, swing doors meet these criteria.
Due to their ease of assembly, they can be assembled quite easily and quickly by yourself. Wood is the most popular material because it is easier to process and is relatively cheap. Lumber from pine or larch is ideal for this, as it is durable and light in weight.
Now let's look at how to build wooden swing gates step by step and make sure that there is nothing complicated about it.
Stage 1: calculation and planning
In order for swing gates to turn out smooth and stand without swaying for decades, it is important to correctly design their construction. First you need to measure the surface where the opening is located and make sure that it is perfectly flat. If there is a small error, it is better to eliminate it before starting installation work.
Be sure to accurately measure not only the overall width of the gate, but also each leaf and gate separately. It is better to depict the measurements and locations of important elements on paper in the form of a diagram or sketch.
The presence of such a leaflet will greatly facilitate subsequent work and help install swing gates correctly.
Advice: Standard width for gates it is generally accepted that 3-4 meters are required, but this size may vary depending on the owner’s requirements. For example, if construction is planned on the site, then make the passage wider so that trucks or construction equipment can enter it.
It is important to remember that wooden panels must have a gap between the bottom edge and the ground. It is necessary for normal opening in the event of fallen snow or soaked mud.
Stage 2: materials
Before you go buying lumber, calculate how tall the wooden gate will be, and decide whether it will have a gate or not. It is believed that ideally the height should not be 120 cm. When calculating the length of the supports, it is worth considering that for reliability they must be buried in the ground to a depth of at least a meter. So:
For supports you will need a round or square beam with a diameter of at least a meter. It is better to purchase oak beams, as they are considered the strongest and most resistant to moisture and rot.
- For the frame - bars with a cross section of 4x4 cm or more.
- For cladding - a picket fence with a cross-section of at least 2x4 cm.
You will need to screw iron elements onto wooden gates, such as:
- A pair (or four - optional and including design features) of canopies.
- If necessary, loops for a padlock.
- If there is a gate, there are hinges and a latch.
- Self-tapping screws.
Prepare some tools:
- Jigsaw, screwdriver, drill.
- Drill, crowbar, plumb lines.
- Planer, rasp.
- Container for mortar, concrete, sand, crushed stone.
- Water level, measuring tape.
Stage 3: installation of supports
Supports are the most important element, because the entire load carried by swing gates is distributed on them. They need to be buried to a depth of at least a meter - this guarantees their stability against distortion and durability.
Advice: to increase the service life of the supports, they can be impregnated with an antiseptic, and resin or bitumen mastic can be applied to the underground part.
Carefully prepare the area where the supports will be installed: remove debris and large stones, level the soil if necessary and loosen large clods of earth. To mark the location of the supports, you can use a cord stretched over stakes.
The next stage is drilling (or digging) holes for supports with a depth of a meter and a half and a diameter exceeding the diameter of the pillar (beam) by about 15 cm. The bottom of the dug hole must be thoroughly compacted. This is done so that the swing doors do not sag. For the same purpose, crushed stone or sand can be poured onto the bottom. Next, install the posts in the holes and check that their height is the same. It is also necessary to check verticality using a plumb line. If the situation is level, then you can begin filling with crushed stone and pouring concrete.
Important! It will not be possible to reliably install and measure the supports alone, since this work is quite difficult. Be sure to invite helpers for this stage of work!
You can proceed to the next steps only after completely dry solution.
Stage 4: assembly of the sash frame
Correct assembly of the frame is a reliable and durable wooden gate, so you need to be meticulous in this process. Make blanks: cut the timber into even pieces of the required size.
Hinged doors are two doors, each of which consists of two bars for the side posts, two bars for the bottom and top, and a central lintel. Elements must be fastened to flat surface using dowels treated with epoxy glue. Thanks to the dowels, the structure will gain additional strength. For better fastening, it is advisable to use self-tapping screws.
After fastening the main elements of the frame with dowels, it is necessary to attach jumpers that serve for strengthening. Most often, jumpers are attached diagonally (z-shaped) or horizontally in the center, but then it must be supplemented with jibs.
Tip: to avoid premature rotting, you can treat the surfaces with a plane and then coat them with an antiseptic.
Stage 5: framing the frame
Wooden gates cannot be made without cladding. To do this, you can use a picket fence, boards or slats, which are attached to the frame using self-tapping screws. The lumber for the sheathing needs to be cut so that it extends about 20 cm beyond the frame. The sheathing should be leveled only after the elements have been screwed on.
There are many ways to attach the sheathing, it all depends on the desired design. Most often, swing panels look like a monolithic structure - for this, the slats must be attached tightly to each other.
If there is a desire for wooden panels to have a more decorative appearance, then the boards need to be fastened with clearance diagonally or vertically.
Tip: to ensure that the distance between the pickets is the same, it is worth using templates, the thickness of which will depend on the width of the required clearance.
Stage 6: installation of sashes
Swing gates Basically ready, now all that remains is to attach the hinges to the finished sashes and supports. For this, self-tapping screws are used, preferably with a screw thread. In this process it is important to pay attention to the adjustment, i.e. make sure that the loops are attached at the same distance. To properly hang wooden sashes, you can use a level.
Tip: to make it easier to tighten the screw, you can first drill small holes with a drill.
If the calculations and work were done correctly, then the installed swing doors will not open on their own in calm weather.
Gates are not only an integral part of protection, but also a decorative element of the site. Can significantly reduce the cost of work self-production structural elements and installation itself. Used for production various materials, new processing methods and ways of functioning appear. Wooden gates are suitable for a cottage, country house, house, garage. If you decide to make the gate yourself, below is information on how to prepare and protect the wood, how to calculate the consumption of materials, draw up a work plan, install and sheath the structure.
Advantages and disadvantages
Until recently, wood was the most common and available material. Wood is easy to process and has a low cost. Basic skills in using tools were enough to make wooden structures - fences, wickets, gates. Nowadays, fencing made from untreated wood is rare. Typically, they are used as temporary site boundaries during site improvement and house construction.


Wood – universal material, which is used for sliding, swing, lift-and-turn structures. The gate is the first thing guests pay attention to. Therefore, they became an indicator of the status and impeccable taste of the owner. Garage doors made of wood are usually made of the up-and-over type. The only limitation in the use of the material concerns lamellas in roll mechanisms. The wooden canvas has low strength in this case. Often a metal frame is sheathed with wood. Wooden sliding gates with this method of covering the base increase the thickness of the gates and total weight.
Wood as a material for gates has the following advantages:
- ease of processing;
- speed of installation;
- affordable price;
- beautiful texture;
- reliability.
Purchase wooden blanks will cost less than metal ones. Various varieties wood and board sizes are presented in construction stores buyers with any material opportunities. In addition, in the Russian Federation you can get 50 cubic meters of timber for free, depending on the region; you can learn more about this from the video:
Woodworking tools are available and do not require special skills. While for processing metal parts you will need welding machine, angle grinder. Properly processed quality wood will last for decades, even in harsh weather conditions. If a wooden panel breaks, it can be easily repaired by replacing the board. The easiest to make and self-installation– swing wooden gates.
There are also disadvantages to using wooden gates:
- low mechanical strength;
- if processed poorly - short service life;
- high flammability.
For gates, they usually do not use valuable types of expensive wood, but larch and pine that are resistant to moisture and decay. The internal metal frame will increase the strength and durability of the structure.
Preparatory work
Before starting to process the material, you need to draw up a schematic structure of the structure, taking into account the location of the elements. Preparing a diagram and accurately measuring the opening are important when calculating the expected material consumption and will save time during installation. It is possible to make wooden gates and gates yourself. Will be needed basic knowledge in wood processing, skills in working with carpentry and joinery tools, patience.


After measuring the gate opening, you need to draw up a drawing future design, observing the proportions of the height, length of the doors, the distance between the supports, and the location of the gate. It is taken into account in the diagram of the place of fastening of constipations, awnings, and decorative elements. The boards for the gate leaf are suitable in size 100 by 25 mm, the frame - 80 by 60 mm. The workpieces will decrease in size as a result of processing by 5-10 mm. In the calculations, it is necessary to take into account technological gaps of 10 mm, possible deformation, and expansion of the material. When purchasing boards, you need to clarify their purpose and degree of drying. For the production of gates with your own hands, carpentry is best suited edged board. Such lumber is less susceptible to deformation and delamination. It is enough to dry fresh boards for one year in a well-ventilated area.
Preparatory work should include the manufacture of special supports from logs or wooden beams. Reliable supports are deepened into the ground to a depth of 1 m.
It is recommended to leave a distance of 200 mm from the longitudinal elements of the frame to the edge of the board. Canopies are attached at the same distance. Gates with a height of more than two meters are additionally reinforced with a middle vein. If the gate frame is made of wood, be sure to use braces to maintain strength and geometry. When sewing the fabric, the boards should not be placed closely. Leaving gaps will prevent bulging and deformation of the canvas due to increased humidity. If the gaps between the boards are unacceptable, you need to buy a tongue and groove board.
Required Tools
You will need wood for the gate:
- bars for the gate frame with a section of 40 by 40 mm;
- slats for covering the frame 20 by 40 mm;
- round or square timber for supports with a diameter of 100 mm.
For processing lumber, assembly and installation you need:
- wood saw or electric jigsaw;
- plane;
- drill with a set of drills;
- garden drill;
- plumb lines;
- rasp;
- hammer;
- screwdriver, screwdriver;
- self-tapping screws;
- components for concrete mixture(cement, sand, crushed stone);
- basin for mixing concrete;
- roulette, level;
- pencil for marking;
- sandpaper;
- blowtorch;
- primer;
- brush;
- antiseptic for impregnation.
Required metal construction parts:
- gate canopies – 2 pcs.;
- hinges, latch for gate;
- loops for a padlock (if the gate will be closed from the outside).
Manufacturing and installation process
In order to make wooden gates with your own hands, you will need careful preparation. Only after drawing up a design diagram, collecting necessary materials and tools can begin production and installation.
Installation and erection of poles
Pole installation steps:
- Clearing the site and determining the location of the holes.
- Digging holes with a drill or bayonet shovel to a depth of at least 1 meter, with a diameter 10 cm larger than the post.
- Cutting pipes with a grinder and inserting them into prepared holes.
- Filling the gaps with crushed stone.
- Checking the verticality of the support with a plumb line.
- Compacting crushed stone to strengthen the foundation.
- Mixing a liquid mortar (1 part three hundredth cement to 3 parts sand).
- Pouring mortar into holes. Wait for it to dry completely.
- Covering supports with bricks. If you add washing powder to the solution when laying, this will prevent the composition from settling. Check the correctness of the angles periodically with a plumb line.
- After installing the pillars, their tops are equipped with caps (finished or cut from galvanized steel). This improves drainage characteristics and looks aesthetically pleasing.
- Folded brick rows after drying they are embroidered.
Parts of wooden supports that will be underground must be treated with water-repellent resin or bitumen mastic to prevent destruction.
The gate is mounted on supports. Therefore, they need to be installed correctly, securely, with rigid fastenings. For normal functioning of the structure, sagging is unacceptable. To prevent violation of the gate geometry, it is important to maintain the perpendicularity of the supports in relation to the ground. Strengthening them with half a brick will prevent the pillars from warping. This width must be taken into account when drawing up the preliminary drawing.
Instead of wooden poles You can install metal, brick or concrete supports. As an additional stiffening rib at the top of the support, it is recommended to fasten it with a horizontal beam.
Construction of the frame
The basis for the frame can be made of wood or metal profiles. In the second case, you will need a welding machine to connect the parts. If the gate frame is made of wood, the timber is cut into the required parts and laid out on level ground in the shape of the future gate. After checking the verticality and horizontality, holes are drilled in the beams. The parts are fastened with self-tapping screws. It is fashionable to further strengthen the center and corners with the help of a cross beam and metal corners. Beams for reinforcement are attached crosswise across the frame at an angle of 45 degrees.
For fastening, you can take self-tapping screws or use dry wood dowels. The pins must first be coated with epoxy glue. To secure the sheathing, an additional jumper is installed in the center of the frame. Jib beams are attached in the corners - 30-40 cm bars. When erecting a frame, its size should take into account the protrusion of the sheathing boards by 20-25 cm. It is convenient to assemble and sheath it in a horizontal position on the ground.
Manufacturing of sashes
The sheathed frame must be hung on installed supports. After preparing the sashes, they are attached metal hinges. They are hung on a frame or on support posts. The optimal location of the loops is calculated in this way. A distance of ¼ of the total height is marked from the top and bottom of the support. After marking, lancet hinges are attached on which the sashes are installed.
The lower edge of the gates must be at least 5 cm away from the soil. Otherwise, fallen snow or formed ice will prevent the gate from opening. To prevent the doors from opening from the wind, they need to be adjusted. When marking mounting locations, it is advisable to use a level.
Gate installation
Before installing wooden gates, the hinges are screwed to the leaves. At the same time, the capcaillie are inserted. Before screwing in the bolts, holes are drilled to a depth of several centimeters in pre-marked areas. Their diameter should be less than the diameter of the screw. This trick will make it easier to screw in the bolts. It is important to maintain a distance of 5 cm from the ground to the sashes. After installation, the closed sashes are secured with a padlock or metal pin. The coating is applied to the wooden surface after installation of the gate structure.
Sheathing of the structure
The frame is covered with boards, slats or picket fences. The elements are fastened to the base with self-tapping bolts. Various options for fastening elements are used. For example, a picket fence is attached vertically without gaps, or boards with a gap diagonally.
Sheathing elements are cut to required sizes in the required quantity. Pine boards are often used for cladding. This type of wood is most protected from climatic influences. After trimming, the elements are planed on all sides and attached to the frame.
When installing boards with gaps, use wooden slats as a template. The lath is taken to be equal to the length of the board and the width of the gap step.
The boards secured with self-tapping screws are cut in a straight line. The cut area and unevenness on the surface are sanded with sandpaper. The edges of the sashes can be insulated to ensure better density fit and better thermal insulation.
Impregnation and coloring of wood
Installed sashes All that remains is to cover it with a primer, an antiseptic solution, or varnish. Wood coating products must be designed for outdoor use. Sequence of processing work:
- Sanding wood with sandpaper or a sander, including sanding the side surfaces.
- Seal the pores with putty and sand again after drying.
- Tinting to reveal the shade and texture of wood.
- Applying primer.
- Coating with the first layer of varnish.
- After drying, apply a second layer of varnish.
If iron forging is used as decor, the decorative elements are attached before grinding and painting. To protect the wooden panel during the fastening of forged parts, a thin sheet of tin is used. After varnishing, the joints between iron and wood are treated with sealant.
Finally
To independently manufacture and install wooden gates, you will need minimal skills in working with construction tools and your patience. All steps are simple and can be done with your own hands if desired. Like any construction works, a quality result is a combination of strict adherence to the recommendations of professionals used quality materials, accurate measurements. Wooden gates, like the face of your home, will last for many decades with proper approach and periodic maintenance.
It’s hard to imagine a modern garden plot without a fence - beautiful, durable, protecting from prying eyes. The most important part of the fence is the installation of gates in the entrance area. Can buy finished goods, make it yourself or order it from a workshop according to an individual drawing. Convenient option- wooden gates, which are in no way inferior to metal ones, and in some respects even surpass them.


Peculiarities
Wooden gates look traditional for Russia; they can be made to match other fences common in the area. Thus, you will be able to achieve the appearance of a fence similar to dozens of others. If you want to stand out and show your status, you can use tinting or wood carving. To achieve harmony, it is enough to make the fence in the same style as wooden house standing on the site.


Many masterpieces of wooden architecture have stood for centuries under snow, rain and different temperatures. If you follow the technology correctly, the gate will last a long time. It is worth considering that for windy areas solid canvases are not the best option. The style can have many variations, for example, Bottom part solid, and the top one is openwork or lattice. This way you will not only decorate the fence, but also reduce wind load, constantly acting on it. As a result, after a strong storm you will not have to raise a tilted fence.


Advantages
Wood - traditional construction material, used for thousands of years. It is easy to process and relatively inexpensive.
Wooden gates have the following advantages:
- Low cost compared to metal models.
- High strength characteristics.
- Long service life (more than 10 years); if you treat the wood with a protective impregnation, it will last even longer.
- Environmental safety - wood does not emit harmful fumes into the atmosphere.
- Possibility of use various types decor to add personality.
- Self-production using inexpensive building materials is allowed.


Flaws
The design is not without some disadvantages:
- Susceptibility to rotting - the material is destroyed under the influence of water.
- Fire hazard - wood easily catches fire; in a fire, the gate can burn out completely.
- Strength characteristics are lower than those of metal.
- Heavy weight- fences sheathed with polycarbonate or corrugated sheets weigh less.
- Low level protection against vandals - traces of marker or spray paint will not be easy to remove from the surface.


Kinds
For the manufacture of gates, types of wood that are resistant to high humidity are used. Mainly used are pine, larch and oak. Nowadays, it is rare to find fences made entirely of wood. Basically, a metal frame is used, and boards are used to cover the doors.


But first of all, models are distinguished by type of construction; today only 4 varieties are common.
Swing
A universal solution, the doors are mounted on hinged hinges; if the doors are heavy, bearing fittings are used. One door may be wider than the other. Among the advantages of swing models is the low price for square meter and simple installation. Recommended driveway width Vehicle- 3.5–4 m, height - at least 2 m.
The supporting pillars must be at least 20 cm higher than the sashes. If you plan to install a canopy, it is worth considering that it will prevent trucks from leaving. To bring in building materials, you will have to place the canopy on supports about 4 meters high. Since fences often warp due to the wind, a moving pin will have to be secured between the two sashes. It will go into the ground or a special cylinder and fix the doors.
To simplify operation, it is convenient to install automation, with the help of which opening and closing is carried out. To control you only need a remote control with a few buttons.


Swing gates also have disadvantages:
- free space is required to open them;
- the ground will need to be leveled, otherwise the doors will cling to every bump;
- strong supports are needed that will support the weight of the structure, otherwise the gate may fall from wind load;
- in winter you will have to clear the snow to get to the dacha, otherwise the snowdrifts will not allow you to open the doors.


Recoil
When opened, the door moves to the side, that is, the gate operates on the principle of a sliding wardrobe. There are both mechanical sliding gates and automatic ones. This option is often chosen for a warehouse or construction site, since it is more convenient to use this model. The maximum span is 11 meters, which allows large trucks to easily pass through. Even after a snowfall, you won’t have to worry about clearing the snow.


The disadvantage is that:
- You cannot plant plants close to the fence. The sash will move to the side; there should be free space on the side near the fence;
- To install the rails, you need a prepared concrete base, otherwise it will warp and the carriage will not be able to move freely;
- only an experienced master will undertake the installation of a sliding model; not everyone can do it on their own;
- This mechanism with a carriage will cost much more than conventional hinges. The price can reach 30,000 rubles.


Lifting
Previously, such modifications could only be seen in ancient castles. But now they are being produced again, only the heavy door is lifted not by physical force, but by an electric mechanism. Products with wooden elements are rare; metal ones are more common. Because of large mass These models are used only when connected to the mains.
If you're gardening without electricity, you may not want to lift and lower a heavy frame by hand. The price of such a structure is high; installation must be carried out by a specialist.


Gate with wicket
Any of the modifications described above can be equipped with a gate. In this case, an opening is cut out inside the canvas and a door is mounted inside. Another option is to install the gate as a separate leaf.
To improve this structure, you can make a viewing window in the door, install a visor and an intercom.


Installation
You need to start the installation with the foundation, since the gate will be subject to dynamic and static loads; the foundation must be very strong and heavy. The foundation can be a large wooden log that needs to be dug in and doors hung on top. But wood in damp conditions due to temperature changes will one way or another rot, even if it is impregnated with bitumen. It is best to make the base from concrete with reinforcement metal mesh or a rod.
The depth of the foundation on heaving soils should be no less than the freezing depth. This value can be found in tables; for example, in the North-West of the Russian Federation this parameter is approximately 1.7 meters. To build a reliable foundation, you need to dig a rectangular hole of sufficient depth. Ruberoid or film is placed at the bottom of the hole, large boulders are placed on top, then filled with concrete.


The pillars on which the gate will be supported are laid out of ordinary solid brick; reinforced concrete ones are also suitable. Metal supports to strengthen the gate leaves, it is also necessary to fill cement mortar to prevent the structure from swinging.
TO metal poles Loops or places for their fastening can already be welded at the factory. If used solid brick, it is necessary to secure the hinges while laying. For wooden modifications, the hinges are screwed onto nuts; it is advisable to coat the wood with an antiseptic in advance. The gates must be installed at a distance of at least 50 mm from the ground, otherwise the gates will not be able to open if any snow or even fallen leaves enter.
The frame for the gate can be made of wood or picket fence, connecting its elements on metal corners or without them. In the second case, it is advisable to connect the opposite corners with struts. It is possible to join the tree into a tenon or a dovetail.
Welded construction more reliable, such a product can be made from metal profile using welding.


To learn how to make swing gates for your dacha with your own hands, see the following video.
Decor
You can decorate any gate with your own hands, even old ones, and you don’t have to spend a lot of money.
Basic design methods:
- Coloring- ordinary stain or Pinotex can transform ordinary pine wood in oak or ash. Also, the painting layer will protect the surface from atmospheric influences and pollution. For the aging effect, in addition to paint, you will need copper sulfate, which will give the wood a grayish tint.
- Antique painting- usually the pattern is placed with inside. But if you need to decorate the entrance to any institution, the decoration can also be on the outside. Most likely, you will need the help of a professional artist to create unusual effect You can use Khokhloma painting.


- Finishing with forged elements- attracts attention, creates a feeling of respectability. If the upper part of the doors is made of metal lace, the gates will transmit light better and be less subject to wind load.
It is worth noting that forged elements They are resistant to corrosion, but few people dare to use them at the dacha. Such decorations will be expensive and will attract intruders if the homeowner does not live on the country estate year-round.


- Thread- allows you to turn an ordinary product into a work of art. Only an experienced person can handle carving, but he will need a set of chisels - special tools. It is advantageous to order carving in a workshop, where it will be done on a CNC machine, which will allow you to bring to life the most complex relief. Handmade work will be more expensive, and now few craftsmen know this technique. But in the store you can buy ready-made carved panels and attach them to the canvases yourself.
- Wood paneling- if the gate has a metal frame and the top is planned to be covered with wood, there are many decorating options. You can fasten the boards horizontally, vertically, diagonally or fancy, alternating different directions for laying the material.

For many years, wooden gates have been relevant for summer cottages, country house and a garage. Today, new materials and designs, methods of processing and decorating lumber have appeared, and automatic drives controlled by remote control are widely used. How to make reliable and durable, practical and easy-to-use wooden gates with your own hands? How to properly prepare, protect and decorate wood - find out about this at the planning stage to avoid mistakes.
Wooden gates
Gate designs using wood
Just a few decades ago, wood was the cheapest and most common material. Its availability and ease of processing made it possible to make fences and entrance structures for anyone with basic skills in working with a saw and a plane. Even now there are gates and fences made of untreated boards, mostly temporary products for the period of construction and landscaping of the site.

Drawing of swing gates made of wood
This use of wood is not economically justified and is far from beautiful. Modern wooden gates are an indicator of good taste, aesthetics, and in many cases, the status of the owner.
Wood is suitable for swing, sliding and up-and-over gate structures. Slats for roll options They are not made of wood due to the low strength of the joints and the canvas as a whole.

Up-and-over garage doors

Electric swing gates

Lift-and-swivel version with wood paneling
Wooden parts are often used only as sheathing for an iron frame. For sliding garage doors, this is the best solution, as a wooden frame increases the weight and thickness of the door.

Sliding gates made of wood with a wicket
How to make wooden gates with your own hands
Making a high-quality and beautiful wooden gate with your own hands for a garage or yard is troublesome, but possible. You need to have minimal knowledge of woodworking, have the appropriate tools, patience and perseverance. It is also necessary to know the principles of calculating gates, methods of their installation, types protective coatings and methods of their application. Reasonable imagination and good artistic taste will be useful.
Selection of material for construction
Wood valuable species They are rarely used in the manufacture of gates; pine is mainly used. Weather resistance, price, beautiful texture and ease of processing are the main advantages of pine lumber.
The suitable board size for making gates is 100×25 mm, timber for the frame is 80×60 mm. After processing, the net size will be 5–10 mm smaller. When purchasing lumber, you need to understand the degree of drying and its purpose.

Edged joinery board
To make gates from wood, in order to avoid deformation, peeling of the coating, and disruption of appearance, it is better to use edged wood boards. The price of such wood is quite high, so you can dry fresh wood in a garage or utility room. It takes one year for boards 25 mm thick to dry, but be sure to reposition them and ensure good ventilation.
Woodworking tools and equipment
To make a wooden garage door with your own hands, you will need a fairly impressive list of equipment, tools and consumables. Ideally you need to have:
- jointing machine for processing and giving workpieces the desired geometric shape;
- thickness planer for bringing to one size;
- miter saw for cutting workpieces to length;
- grinder or belt grinder (“tank”) with the ability to be mounted on a frame for end processing;
- surface grinder or orbital sander for cleaning surfaces;
- compressor for the possibility of painting wood with a spray gun;
- hand router with a conical or semicircular cutter for processing edges;
- drill with a set of necessary drills;
- screwdriver with a set of bits and sockets;
- abrasive Consumables, fasteners;
- solvent, impregnate, varnish or paint;
- level, tape measure, pencil.

Hand tool
Such a list looks like a small carpentry workshop, but it will allow you to quickly and efficiently process unedged board. The list can be reduced by replacing some equipment hand tools.
You should not try to plan the workpieces with a hand plane or saw with a dull hacksaw - you will not be able to produce a high-quality product “on your knees”. If you do not have a jointing machine, it is better to purchase ready-made planed material (or lining, block house).
Impregnation and painting can be done manually, although the appearance will be worse. In this case, it is better to use a roller rather than a brush, which allows you to apply the product more economically and evenly.
If the gate frame is made of angle or steel profile pipe, you will need welding equipment and a mounting saw (or a grinder with cutting and sharpening wheels).

Example high-quality painting gate
- After measuring the opening, you should carefully draw a sketch of the future wooden gate to scale, observing the proportions. This will allow you to evaluate the appearance, think about the location of canopies, locks, and decorative fittings.
- You should remember about technological gaps (at least 10 mm) for possible expansion and deformation of the structure. The recommended distance from the longitudinal parts of the frame to the edge of the board is about 200 mm; accordingly, canopies will be installed at the same distance.
- If the gate height is more than 2 m, an additional middle vein is recommended. With a completely wooden frame, braces are required for strength and stability of the geometry of the structure. For a metal frame, instead of braces, it is permissible to use gussets with a leg of at least 150 mm and a thickness of 4 mm.
- When sewing the fabric, be sure to leave gaps between the individual boards. Placing them closely, and even more so tightening them with clamps, will lead to deformation and bulging of the canvas (with a smaller radius on the side of the frame) due to the expansion of the boards from moisture.
- Placing parts at intervals with deep edge processing can hide errors in the thickness of the boards if they are not processed using a thicknesser. If you need to make the canvas without gaps, you will have to use a tongue-and-groove board or with selected quarters.

Cutting a board with a miter saw
Manufacturing and assembly of gates
The most logical and simple question Making a wooden gate with your own hands for a garage or yard looks like this: measure the opening, assemble a frame to size, sew it up with a board and paint it. But to achieve a beautiful and durable result, the process is much more complicated. Approximate technological instructions look like this:
- Using a miter saw, cut the board to length with allowance for finishing.
- Mark with an allowance along the width and cut the workpiece.
- Process the base surface on a jointer.
- Using a 90º stop, machine the side surface.
- Use a thickness planer to finish the workpiece, first bringing the side surfaces to size, and then the back. With a final pass with a minimum allowance, process the base surface again. It is clear that when using ready-made material (the same block house), previous operations are not required.
- Cut the pieces to length.
- Process the ends of the workpiece (sandpaper using a machine or device according to ISO-6344 - P80). This operation is very important and allows you to achieve a smooth and even surface on the edges of the board. In the future, this will simplify impregnation and painting of the product and significantly increase its service life.
- Details wooden frame process and cut in the same way. If the frame is iron, make it, maintaining the diagonals and parallelism of the parts.
- Lay out the frame parts on a flat surface ( metal frame) and arrange the boards in in the right order.
- Mark the position of the parts and the locations of future holes (for self-tapping screws, bolts; for fastening fasteners, decorative elements).
- Sign the arrangement and numbering of parts. This is usually done from the bottom end, since the inscription will be visible after painting.
- Drill holes in the required places.

Working with a spray gun
Impregnation and coloring of wood
To obtain a high-quality painted surface, the service life of which will be at least 5–8 years without additional maintenance, the following sequence of work is recommended:
- Treat the surfaces with a grinder (abrasive P120 - P150). If necessary, fill the defects with a special wood putty and rub them in.
- Impregnate the wooden parts with impregnate (for example, Vidaron). It is better to do this with a spray gun or an ordinary garden sprayer. Follow the instructions for use - exceeding the concentration of the solution will lead to destruction of the wood structure and its fragility. After drying, treat the wood again, Special attention focusing on the ends.
- After the impregnant has completely dried, sand the parts again (P150 - P180 sandpaper).
- If you plan to varnish, apply stain or a special toner (alcohol or acetone based). Sometimes color is added by burning wood. blowtorch, you don’t have to tint it at all. If painting is carried out using products with added toner (such as Pinotex), apply the first layer.
- After complete drying, manually and very carefully sand the surfaces with P400 - P600 sandpaper. It is more convenient to use a sanding block (which looks like a dishwasher).
- Apply the first coat of varnish (or a second coat of toner), sand again after drying.
- Apply the final coat of varnish.
- After drying, lay out all the parts (according to the previously signed diagram) and assemble the gate, strictly controlling the dimensions and diagonals.
- Install strictly at the level of the gate leaf.

Sanding block
Features of manufacturing sliding gates
Sliding gates for the site and garage are gaining more and more popularity due to the functionality, convenience and ease of electric drive equipment.

Scheme sliding gates
Structurally, such gates are divided into three types, each with its own advantages:
- with a load on the bottom guide and support rollers on top;
- moving along the top guide and support rollers at the bottom;
- console type without upper and lower guides.

Wide sliding sash
To make wooden sliding gates with your own hands, you need to meet certain conditions and dimensions.
The gate leaf itself is usually a rigid frame made of a corner, channel or profile pipe, covered with wood.

Required measurements for sliding gates
Fittings and carvings - stylish decorations
In antique-style wooden gates, the fittings play not only a functional, but also a decorative role. Iron and copper strips, bolts and nails with large heads, forged elements, handles. Everything depends only on the author’s imagination.
You can make many decorations and elements yourself. For example, swept awnings can be made like this:
- Weld a steel strip (approximately 400x100x6 mm in size) to the top of an ordinary cylindrical hinge.
- Then heat the strip (with a cutter or in an oven) and hammer it on a flat surface. In this case, the side adjacent to the wooden plane will remain flat, and the front side will look like forged product.
- Using a grinder and a sharpener, process the side surfaces, giving the canopy its original shape.

Antique gates with original fittings
Wooden gates decorated with carvings, sculptures, and bas-reliefs look rich and elegant. For these purposes, pine is not best material due to the heterogeneous structure (annual rings, which look like veins in a board spread along the length, are much harder than the rest of the material). Therefore, linden, a homogeneous and easy-to-work wood, is often used for carving.
It is almost impossible to decorate a gate with carvings yourself without the appropriate skills and tools. If desired, you can order it in specialized workshops carved elements and decorate the doors yourself. It should be remembered that the durability and service life of such products is much less than that of a smooth board.

Gates with forged parts
Examples of beautiful and original gates
Everyone wants the exterior of their house, garage and plot to be harmonious and unique. Installing wooden gates perfectly meets these requirements. Various styles and appearance, reliability and durability, the ability to combine with the fencing of the site, organic integration into the landscape - all the advantages are countless.
Before making a gate, you should look and evaluate ready-made solutions, this will allow you to decide on the design and appearance.
The main decision you need to make is to turn to specialists or believe in your own abilities and do yard or Garage Doors made of wood with your own hands. Think carefully about what is more important – economy or quality.