The floor fan does not spin up. The computer does not turn on, but the system unit fans are running. Fan does not turn
Read also
When producing cheap models, the manufacturer saves on the quality of materials, so they break more often than their more expensive counterparts. If the fan stops working, then do not rush to throw it away, because restoring its functionality in most cases will not require much time and financial costs.
I won't dwell on mechanical failures. such as repair of the impeller, housing, turning mechanism, etc. To eliminate these breakdowns, you simply need to restore the worn or broken part or replace it with a new one. This article will discuss issues related to repairing the electrical part of the fan, in which the electric motor does not turn on or operates with a hum, unpleasant burning odors, or jamming. A more complex floor model will be taken for consideration. Built-in exhaust fans are much simpler in design, due to the absence of a speed switching unit, so they are even easier to repair. But repairs, given the price of a simple model of an exhaust fan without bells and whistles, are impractical.
For that to find the reason If the fan is malfunctioning, it will need to be disassembled. Doing this yourself will be quite simple and quick. First remove the protective grille, then the fan blades or impeller, which is secured with a nut. Next, you need to remove the second part of the protective grille and unscrew the screws of the cover.
Troubleshooting when repairing a household fan
Before you start repairs You need to study the principle diagram of the device with your own hands. 
As a rule, an asynchronous electric motor is installed in a floor fan, consisting of eight windings (working and starting). A 90 degree phase shift is required for successful launch. For these purposes, a capacitor is installed. The device starts to work after pressing the power button, after which the indicator light lights up and the motor starts, the rotation speed of which depends on the winding switching circuit, which is controlled by a 3-speed switch with a mechanical lock for the simultaneous activation of several buttons, which may cause short circuits.
Before you start checking the motor:
- Straightaway it is necessary to check the serviceability of the cord connection to an electrical outlet. To do this, you must first disassemble the switch block, and then, in compliance with electrical safety measures, use a multimeter to check the presence of 220 Volts at the contacts of the light bulb.
- Check the condition of the capacitor By .
- Ring for integrity and check the reliability of all wire contacts and connections in the circuit.
- If you hear a hum when the fan is running or noise, then lubricate the plastic parts inside the gearbox with Lithol or Solidol through the holes that are specially provided for this purpose.
- Check availability of 220 Volts at the output with the switch button turned on.
Fan motor repair
You need to start repairing the electric motor yourself by lubricating the bearings, very often after this the fan begins to work normally. The motor shaft rotates in plastic bushings.  Machine oil is suitable for lubrication - drop a couple of drops of oil at an angle so that it flows into the inside of the bushing, and then rotate the shaft back and forth along the axis until it begins to rotate easily.
Possibility of rotor failure motor is relatively small and has not yet been encountered in my practice of repairing household appliances, because an EMF is induced in the rotor (current arises) under the influence of the stator windings.
Often in electric motors household fans there is a break in one of the stator windings. If even one winding is broken, then the engine will not work at all. To check, simply turn the blades sharply clockwise. Just immediately quickly remove your hand from the blades to avoid injury. If after this the floor fan starts working, it means one of the windings has burned out. Please note that if the winding connected to the capacitor breaks, the fan will not work in any case. To determine the integrity of all windings, I recommend testing them with a multimeter. Please note that the winding resistance should not be too high or zero.
Very important Before disconnecting the wires from the windings, do not confuse them when connecting them, so before removing the wires, apply distinctive markings on them if they are the same color. Before removing wires or starting to disassemble any devices with my own hands, I always take photographs of all stages. If you then have questions or doubts during assembly, then photographs are a great help.
If the stator winding is broken or burnt out Considering the price of a floor or built-in fan, I do not recommend rewinding or repairing the winding. In this case, it is more advisable to buy a new model.
The service life of the fan motor is reduced several times, if you do not periodically clean it from dust and dirt, and also if you do not lubricate the bearings or gearbox.
Related materials:
Victoria:
Hello. Help me please. The floor fan broke, and I, pregnant, am dying from the heat. It worked, and then it just started humming and the impeller wouldn't spin. What to do?
Yuri:
It's a shame! I didn't do anything... I read the instructions, dripped some oil and the fan started working like new. Thank you!
Andrey:
Good day! I read the entire thread and to be honest, I saw only one similarity with my problem, but I’m not completely sure.
So there was a fan, an ordinary kEtai. I bought it when I was in Bulgaria, brought it home. It worked... Then it stopped starting, it hummed when turned on and started only with the pusher. It spun and then began to stop sometimes. It helped to stop again with the pusher, but with turning on overdrive) 2 or 3. Then I disassembled it, washed it and lubricated it. It started working without a pusher, but with a loss of power in all modes. At speed 3 it works like at speed 1 approximately.
I have two options. Either a capacitor or one winding. I haven’t figured out how to ring it yet. Thanks in advanceMarseilles:
Hello! I have this problem, the fan was spinning, then I turned it off, moved it to another room, after a couple of hours I turn it on, and suddenly it spins slowly, after a couple of minutes it stopped spinning altogether, the motor inside works, but the fan itself does not spin. What could be wrong? problem? What do you recommend?
Anonymous:
Hello! I have this problem. Vitek floor fan, when turned on, two indicators on/speed and mode light up simultaneously. And the fan turns off. Please tell me what could be the problem.
Victor:
Good afternoon A very good, solid article) The essence of my difficult problem is this: the children knocked over the fan, thereby damaging the motor windings with the rotor. Result: multiple breaks in the windings. Due to a limited budget and sporting interest, I want to rewind the engine. At least even at one speed. Do you have any useful articles at your disposal?
Conventional floor fan Chinese delfa 40W. Motor with 8 windings, three speeds. What surprised me: the winding wire is aluminum. I myself am a winder of transformers, but I have no experience with motors. Please help. Thank you in advance!Victor:
I’m also interested in whether there is anywhere approximate data on the number of turns of windings (maybe you’ve seen it?). Otherwise, it is no longer possible to count by eye.
Ilya:
Hello, I bought a fan, assembled it at home and turned it on, it seemed to me that it was working quite noisier than the one that was on the sample in the store and I noticed that the motor shaft (to which the blades are screwed) gets very hot, after about half an hour of operation the shaft becomes very hot, It’s impossible to say that it’s really hot outside and at home. Is this normal or should this iron pin not get hot at all?
Experienced Electrician:
Hello, the engine is noisy but does not turn over.
When turned on, does your little assistant begin to hum and emit an unpleasant aroma? Another common fan failure is blades that do not spin. Why is this happening, because just yesterday the device was working properly. Unfortunately, many users encounter this problem, especially when actively using the device. Today we will figure out why the fan hums but does not spin?
Let's sort it out together
If the floor fan does not turn on and external inspection does not produce results, then you will have to unwind the device. To do this, prepare a screwdriver and pliers in advance. By the way, this method is suitable for those who are concerned about why the floor fan spins up slowly. Reanimation of the device is carried out in several steps:
1. Remove the grille that covers the fan blades. As a rule, the mesh is secured with three latches.
2. Next, remove the impeller. It is secured with a plastic nut. It needs to be unscrewed. Proceed carefully so as not to damage the parts. Otherwise, you will have to come up with an alternative to the nut. By the way, also carefully remove the impeller. In inexpensive fans, plastic elements quickly fail under the influence of heat and air. As a result, the impeller may crumble right in your hands.
3. Now you need to disassemble the case. First, remove the nut that secures the rear grille. Then gradually remove the screws, first from the front and then from the back of the fan.
4. Once you reach the device casing, you can remove it. In front of you will be an engine and a gearbox. The last part is made of plastic. A capacitor is attached to it. It is necessary to start the engine.
5. The next step is to remove the gearbox. It is attached with several screws. After unscrewing them, you can easily remove the gearbox with all the filling.
6. Next, remove the screws that connect the motor housing to the stator. Now we can remove the front and back of the box. You will come across rubber bands as you go, put them in a separate container. You can also place small screws there.
7. Now we begin to clean the bearing itself and the surface around it. We remove dirt using ordinary cloth. Then you should degrease the surface, acetone will do, and wipe everything dry. You need to drip some oil from the oil can into the center of the bearing.

This way you remove the thick grease that gets inside the engine. As a result, it jams and the fan blades stop spinning. The described process can be repeated for a tabletop device, since they are designed in the same way.
Misunderstanding of the nature of certain computer problems often leads to diagnostic errors, without which qualified repairs are impossible. And you should approach the search for a problem with its accurate description. A malfunction that is described with the words: “when you press the power button, the computer does not turn on, but the fans work” is called a lack of initialization or an initialization error. It should not be confused with “non-powering” - complete inaction when pressing power, since the causes of these two problems are usually different.
Initialization, in this case, is the readiness of the equipment for operation. And if any of the devices critical for starting the PC refuses to start, we will observe a characteristic picture:
- after turning on the system unit, a loud noise from the fans is heard (they rotate at a constant high speed);
- The keyboard and power indicators come on and do not go out;
- the screen remains black.
Nothing else happens.
Causes
According to statistics, the most common source of such a problem is the following:
- damage to the BIOS - a program stored in the CMOS flash memory chip on the motherboard, responsible for the initial boot of the PC, as well as for checking and consistency of operation of all its devices at the startup stage;
- a failed processor or a malfunction of its power supply system;
- inoperability of RAM (random access memory) or incompatibility of installed RAM strips with each other;
- malfunction of system logic chips (chipset) on the motherboard, especially often the north bridge.
Other reasons that can also cause such a “clinic” include damage to the components of the motherboard, leading to destabilization of the device’s power supply, a defect in the solder contacts of the microcircuits, a power supply with voltage “drop” along individual lines, a dead CMOS battery, as well as other problems equipment installed on the PC. However, this is less common.
It is also important to understand that this problem is never the result of software glitches in the operating system. Because its download doesn't even start.
Diagnostics
What can a user do if he finds himself in such a situation? Even without special equipment, you can try to solve the problem at home. It is enough to know how to use a screwdriver.
Resetting BIOS settings to factory settings
This is the simplest and, sometimes, very effective way to troubleshoot computer boot problems. If your case is not the most difficult, perhaps it will help.
- Turn off the computer's power and remove the system unit cover.
- Find the coin cell battery on the motherboard and remove it from the socket.
- connect the contacts of the battery socket to each other, for example, using a screwdriver;
- reinstall the battery.
There is another option for resetting the BIOS - using a Clear CMOS jumper. It must be removed for 15 - 20 seconds. and move it to two adjacent contacts, and then return it to its place. Sometimes the jumper is called differently: CL_CMOS, CCMOS, CLRTC, CRTC, etc.
After completing these operations, connect the power to the computer and try to turn it on. If the problem is resolved, its cause lies in an incorrect BIOS Setup configuration.
Disable everything unnecessary
If the first method does not help, move on. Let's try to exclude the influence of equipment that is not necessary for a successful start of a PC. To do this, you need to prepare a table covered with insulating material (polyethylene, rubber, plastic, wood, etc.) on which you will assemble the stand.
Let's get started:
- turn off the power to the PC and remove the case cover;
- remove expansion cards from the slots of the motherboard, disconnect the power and interface cables from it, remove the memory sticks;
- remove the motherboard from the case, place it on the table and inspect for artifacts - swollen capacitors, signs of overheating (darkening and deformation of plastic parts), mechanical damage and other defects;
- if there are no artifacts, install one memory stick in the slot, connect a video card (if there is no built-in one), a monitor, a previously removed boot hard drive and a power supply;
- turn on the power supply to the mains;
- use a screwdriver to close the contacts of the power button - Power Switch (can be labeled as ON, PWR_ON, PC_ON) - this action is similar to turning on the computer by pressing this button.
If you see the operating system loading on the monitor, it means that the failure is caused by one of the disconnected devices. Well, if nothing happens besides the rotation of the fans again, let’s try to figure it out in more detail.
- Start the system. Carefully touch the processor heatsink and large board components - microcircuits, mosfets, etc. - normally they should be warm. Strong heating (don’t get burned!) indicates a malfunction of the elements (soldering defect, short circuit), and a complete absence of heating (room temperature) most likely indicates that the unit is not receiving supply voltage.
- Turn off the power to the PC. Remove the memory stick, remove the oxide layer on its contacts by rubbing it with a school eraser, blow out the slot where it was located, and install it back. Turn on your computer. If the problem is solved, the reason was poor contact between the RAM and the board connector. If it doesn't work, install the bar in another slot - it might be the culprit.

We replace components with known good ones
None of the methods helped? The last thing left that can be done at home is to replace PC devices one by one with working ones, of course, compatible with your system. However, there is a risk of damaging them.
If there is no such possibility or desire, or if the described problem occurs on the laptop, the only remaining option is to contact a service center.
On the hottest summer days, the only salvation from the sweltering heat is a regular floor fan.
Not everyone can afford a full-fledged split system or even a mobile air conditioner. 
But unfortunately, even this inexpensive and accessible wind blower breaks down from time to time. Chinese models especially fly like seeds.
And there is an overwhelming majority of them in our market. What to do if the fan stops rotating and working? What are its main problems and why does it break down?
Let's take a closer look.
Why doesn't the fan work?
In total, there are 5 main reasons for the failure of floor fans: 
- old dried grease or lack of it
- dried out capacitor
- blown thermal relay or fuse
- turn short circuit of windings or wire breakage
- mechanical displacement of the motor shaft
The main problem of cheap models, which for some reason few people pay attention to, is incorrect casting of the blades. Because of this, an imbalance occurs, bearings break, and gaps increase. 
You cannot influence this in any way, since you already bought a fan with such an initial defect. Sometimes it seems to work, the impeller rotates normally, but it does not blow.
That is, there is no cooling air flow from it. Why is this happening?
Due to the incorrect angle of attack of the blades. Its petals are deformed and drive the air flow in a circle, rather than throwing it out. 
This effect can appear over time, after the fan has been standing in direct sunlight for a long time and its impeller, having heated up, begins to gradually change its shape.
This can only be treated by replacing the impeller with a new one.
Floor fan does not spin
The most common problem is dried out lubricant or lack of it. The fan begins to jam, lose speed and, as a result, the load on the engine increases. The wind blower no longer operates at full capacity. 
The motor, wound with a thin wire of 0.2 mm, begins to heat up and the windings gradually burn out.
How is such a defect detected? In this case, the fan stops rotating. It hums, but the impeller does not spin. 
It also happens that it starts only at 3rd speed, and does not respond at all to the first two. It just doesn't have enough power to turn the shaft.
In order to start it, you have to brazenly spin the blades like on old airplanes. 
By the way, the same symptom can occur if the starting capacitor is damaged. Without instruments, how can you find out which reason is to blame for the breakdown?
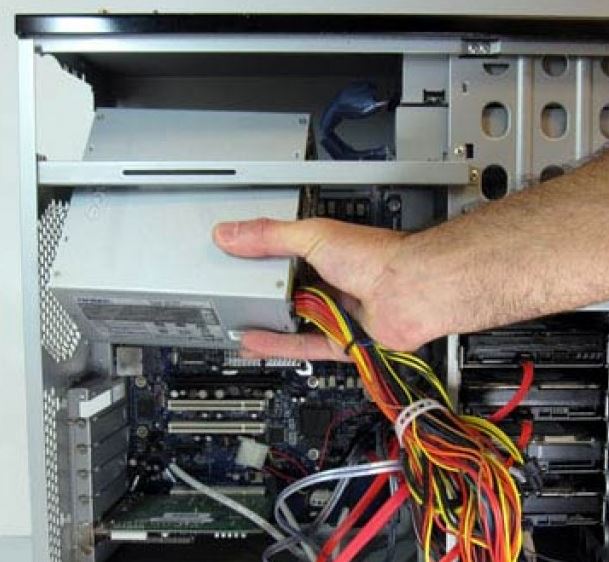
To do this, you need to at least get to the engine shaft by removing the protective casing and blades. If the shaft rotates by hand with great difficulty, blame dirt and dried grease. 
And if it spins easily and has inertia, then the air conditioner is most likely covered. Symptom - plugged in the fan, but it does not spin. At the same time, you crank the engine up and it starts.
If you hold the fan blades with your hand while working, it may stop again. The capacitor is checked with a multimeter if it has an appropriate capacitance measurement scale.


To replace, select a new condenser according to the same parameters as indicated on the body of the old one.
By the way, a capacitor that is not yet completely dry also affects the speed. If you notice that they have fallen and the fan has begun to spin more slowly, this is a sign to check it.


The problem of tight rotation is solved by new lubrication of the bearings. So-called plain bearings are used here. Some people call them bushings. 
It’s a little expensive to use balls in such designs, and they rattle over time. For repairs, it is not at all necessary to disassemble the entire engine. Just unscrew a few screws and spray the required areas with WD40 universal aerosol.
How to disassemble a fan - instructions with photos
How to get to the bushings without removing the engine? To begin, unscrew the central screw on the back wall of the protective casing. 
Another self-tapping screw is hidden in the adjustment button-lever for turning or stopping the fan head. 
After this, the back cover can be easily removed from its place. What's underneath? Here you can see the rotation gearbox that gives rotation to the entire head.
A special rod connects to it from below. 
The starting capacitor of the engine is fixed on top. 
By the way, keep in mind that it may not be there in different models. In this case, look for it near the speed shift buttons. 
To access the motor bearing, you will need to remove the gearbox. It is secured with three screws and supported from below by a rod. 
Tighten the screws and disconnect the rod. After this, the gearbox is removed from the shaft and you have access to the rear bushing.
There is no need to unscrew or disassemble anything else. Vedashka will do the rest for you. 
Place a narrow guide tube on the WD40 can and poke it several times into the gap between the shaft and the bearing. 
After spraying WD40, turn the shaft in different directions by hand and move it back and forth a little. 
Excess thickened grease, foreign debris and dust will gradually come out. This excess dirt can be easily removed with cotton swabs. 
If you have a thick lubricant like cyatim or litol, it is advisable to apply it to the gear worm. After these cleaning procedures, drop a few drops of sewing machine oil onto the bearing from the outside. 
Just don't apply it too much. Otherwise, it will eventually spread all over and dust will stick to it, turning back into dirt. As a result, you will again get a wedge and a problem with fan rotation.
In some models, felt washers are placed near the bushings. They are saturated with oil and when heated, the oil flows onto the shaft, lubricating it. 
Everything is assembled in reverse order. Rod - three gearbox screws - outer cover.
By the way, if you overtighten the central screw on the back cover, and this is a self-tapping screw, not a screw, it can pass through the plastic of the rotary gear and rest against the shaft.
You will again have problems with revs and jamming. Sometimes the cause of a breakdown is trivial and unpredictable.
We've sorted out the rear bearing, then move on to the front part of the fan. There is a protective cap in the center here. 
It unscrews, attention - clockwise, since the thread here is left-handed.
You throw it off and remove the propeller from the shaft. You now have access to the front journal bearing. 
The principle here is the same. First, you squeeze out and soften the old grease and dirt with a Vedashka, and then apply the new one. 
After that, put the propeller back on and close the lid. Having completed the repair, turn on the fan at high speeds, let it run for a few minutes, and switch to the speed required.
Short circuit of windings or broken wires
If the damage is more complex and simple lubrication does not help, you will have to disassemble the fan in more detail.
First, do all the disassembly machinations as indicated above. After removing the propeller, unscrew the plastic front lock nut, which is located immediately behind it, and remove the entire protective frame. 
In your hands you still have the motor itself and the leg in which the power wires pass and the push-button mechanism is located. 
You disassemble this leg by unscrewing 6 screws. 
First of all, check the soldering of the wires. It is quite possible that one of them, or even several, has fallen off or burned off.
If everything is intact, how can you figure out which wire goes where and is responsible for what? Start testing with two wires from the power plug.
One of them, let it be black (as in the photo below), goes directly through the backlight to the fan motor. 
The second wire goes to the lower terminal of the dial switch (button 0). 
Next, by pressing the corresponding buttons - 1st speed, 2nd, 3rd, certain switch contacts are closed, and thereby the engine speed changes. 
Each wire from these buttons goes to its own terminal on the winding, with a greater or lesser number of turns. By applying voltage to them, you make the propeller spin faster or slower.
Floor fan connection diagram
A simplified diagram of a wind blower looks like this. 
Typical circuits for most inexpensive 3-speed floor fans are something like this:


Pressing each button is accompanied by the closure of its contact group. 
In this case, the other contact group opens at this moment.


Sometimes these contacts burn out or do not reach their plate. Then you lose any of the speeds.
All this is checked simply with a Chinese multimeter, in circuit continuity mode. 
If your very first wire breaks or there is no contact on it, the fan motor simply will not start. Therefore, if the fan is completely inoperative, check it first.
Unless, of course, before you make sure that the plug itself and the power cord from it are working. This is also caused by the tester.
Place one end of the probes on the pin of the plug, and touch the other end to the contact pad on the “0” button. If working properly, there should be zero resistance. 
Then you can check the wires in the same way at all speeds. A contact probe on the plug - another probe on the outgoing wire from the corresponding speed button to the engine. 
If there are zeros everywhere, then the switch and wires are working.
Next, check the second contact on the plug and the wiring that goes directly past the switch to the engine. Make sure your cord is intact here too. 
Only after this can you proceed to checking the windings of the motor itself.
How to check fan windings
Set the resistance on the multimeter to 2000 ohms. Next, in order not to bite the wires anywhere, at the place where the capacitor is connected, strip off the insulation a little.
Look for the common point of the circuit, as in the diagram below. 
Having found it, you call up the resistance of the winding. To do this, touch the contacts on the switch with the second probe one by one.
Approximate fan winding resistance values can be as follows: 
Of course, they may differ slightly for different models, but the most important thing is that there is no breakage or short circuit. Measurements can show either several hundred Ohms or a little more than 1 kOhm.
It all depends on the power of the fan and the cross-section of the wire.
The resistance between the terminals of the windings will be lower - 100-200 Ohms. 

The capacitor winding and the total resistance of all windings combined are also checked. 
Here is the most competent and complete video on checking the performance of fan windings with a multimeter.
If checking the integrity of the windings also does not reveal any deviations or defects, move on. To do this, you completely disassemble the fan, as they say, to the bones.
Engine disassembly and malfunction
First, the engine must be freed of all plastic parts. Unscrew the 4 screws from the front side and remove the cover. 
On new models, in addition to screws, there are also latches. They need to be bent with a screwdriver. 
To disconnect the leg, you need to find another screw, which is usually hidden under the plug.


Loosen it and pull out the mounting shaft. To dismantle the wires that pass through the leg, you will need to bite them out or unsolder them from the terminal blocks on the speed buttons. 
At the same time, write down or sketch where each one is initially connected.
As a result, you should have a bare fan motor in your hands without anything unnecessary.
Let's take it apart. Unscrew the screws holding the back cover together. 
At the same time, before disassembling, be sure to put marks on all covers and hardware indicating how everything was originally assembled. 
Otherwise, after incorrect docking, you will lose alignment. There will be problems with shaft jamming and blade rotation.
Thermal safety relay malfunction
After removing the bearing, you get to the windings themselves. Among the bundle of power wires coming from the switch, look for a special thermal relay. 
Very often the engine stops working after it burns out. This relay should operate and open the circuit at a winding temperature of 135-145 degrees.
After cooling, the relay closes again and the fan starts. So, sometimes it burns out completely and actually plays the role of a fuse. 
If your fan often turns off and starts again on its own, this protection is to blame. Know that it doesn't just work. This means that your shaft is either jammed or the windings are exhausted and they are overheating.
Overheating of the windings may be associated with the destruction of the small impeller, which is located on the shaft inside the engine itself. It is designed to blow air and reduce the temperature of the coils.


The cheapest models do not have a temperature sensor-relay; everything is connected directly. Based on this, if your “thermal fuse” has burned out, you can, of course, bypass it and start the wind blower. But at the same time you will be left without fire protection. 
This relay is also checked by the tester. 
There should be a chain between its legs in continuity mode.
Shaft displacement and broken turns
If all the parts and relays inside are intact, all that remains is to carefully examine the windings, shaft and rotor through a magnifying glass. You may see broken or damaged copper strands. 
This happens when a bearing jumps out of its seat and the rotor begins to hit the windings.
With modern Chinese floor fans, the screw connection between the two halves of the motor quite often loosens. Do not forget that the shaft on both sides is mounted on self-centering copper-graphite bushings, which are tightly locked in the covers.
When assembling and tightening them, you can lightly tap the transformer iron itself with a hammer so that the shaft rotates easily, with little inertia. Someone tries to catch the center on their own and creates such a quiet horror. 
Eventually the shaft falls out of the bearing, resulting in a wedge. As a result, the rotor begins to scratch the windings and its surface. 
Also keep in mind that if your fan fell and then stopped working and rotating, then the bushings are most likely misaligned here too. Nothing else can break from such a fall.
This will not damage the capacitor, and the windings covered with varnish will not break. Perhaps some buttons may move away. But first of all, check the alignment of the bearings. And then everything will work as it should. 
Unfortunately, you cannot cope with a mechanical defect in the windings or rotor, as well as their intra-turn short circuits on your own. It is not rational to rewind the engines of cheap wind blowers; it will be much easier to buy a new model.
However, this is already the last stage of verification, and there is hope that you will never get to it, having found damage somewhere else using the methods discussed above.
What should I do if when I turn on the computer it does not turn on, but the fans start and stop?
What should I do if the fans start and stop when I turn on my computer?
This situation is a very common malfunction in which the system unit refuses to start. When you press the power button, the processor fan seems to start spinning, but literally stops after a second. Naturally there is no image on the screen.
In this article we will tell you about the possible reasons for this behavior, as well as what you can try to do yourself at home in order to try, if not fix it, then at least diagnose the breakdown.
Possible reasons
First, in this situation, you need to try it on the motherboard. Some boards will not start if the battery is dead.

Replacing the power supply
If it is not possible to temporarily replace the power supply, then at least try starting your power supply manually.

Connection of the 4th and 6th pins of the 20-pin power supply connector
Pay attention to the external condition of the motherboard, or rather to the capacitors on it. Are there any swollen ones among them that could cause such a malfunction?

One of the reasons is a swollen capacitor
Sometimes there are problems with the power button. Therefore, we recommend that you try to start the motherboard by disabling the power button and .

This is what the connected power button looks like
If manual start without a button does not lead to a positive result, then we try the following. We remove all RAM and video card from the motherboard, disconnect both cables from the CD drive and hard drive.
Required with USB and audio connectors.

Connecting the front USB inputs to the motherboard
We leave only the processor, processor cooler and power supply connected to the motherboard. Let's try to turn it on.
If the result is positive and checkmate. The board still started, then we try to install all the removed elements in place one by one to find out what is causing the problem. It's not uncommon for a computer to not turn on or fans to start and stop due to problematic CD drives or shorted USBs on the front panel.
In the case when replacing the power supply did not help, as well as removing all attachments from the motherboard, with a 99% probability we can say that the problem is in the motherboard itself and requires its replacement.
The best way to thank the author of the article is to repost it on your page