Venetian plaster: application technology, video. Do-it-yourself Venetian plaster, video Venetian plaster technique for applying to walls
Architecture is often called poetry frozen in stone. If we follow a similar allegory, then, for sure, Venetian plaster can be a romantic ballad of design; the technology of its application remains unchanged for more than 2000 years, and its unusual beauty still excites the imagination. How to apply Venetian plaster?
The technology for applying Venetian plaster has remained unchanged for 2000 years.
Due to the fact that this type of finishing work is in great demand, the application of Venetian plaster on the construction services market is often offered by craftsmen who are very superficially familiar with the technology of such work. In addition, the market offers many coatings that only imitate the famous Venetian.
How to choose real Venetian plaster

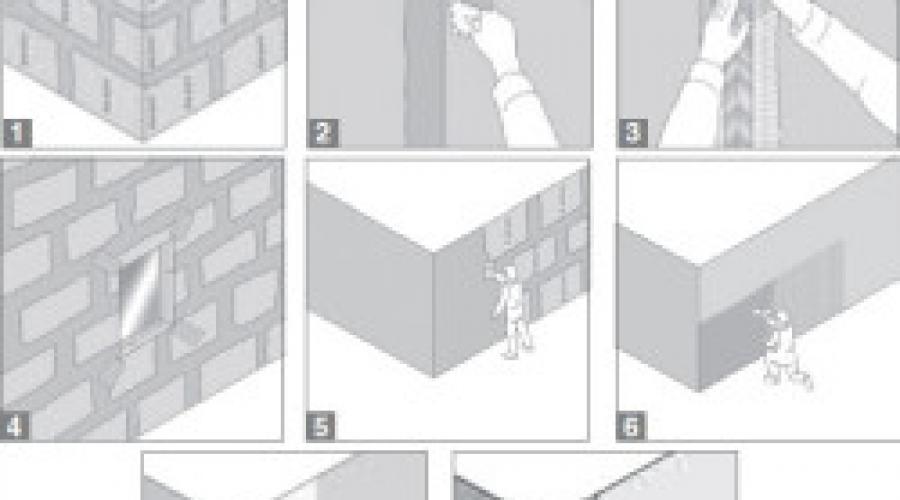
Application of plaster coatings: 1 – prepared base; 2, 3 – reinforcement of corners; 4 – reinforcement at openings; 5 – applying the base layer; 6 – laying of reinforcing fiberglass mesh; 7 – application of primer soya; 8 – application of decorative plaster. Application of plaster coatings: 1 – prepared base; 2, 3 – reinforcement of corners; 4 – reinforcement at openings; 5 – applying the base layer; 6 – laying of reinforcing fiberglass mesh; 7 – application of primer soya; 8 – application of decorative plaster.
Classic Venetian plaster is carried out with a putty mass; it necessarily includes marble dust, which is replaced in some cases by quartz, onyx or granite. The second constant component of the coating is slaked lime, thanks to which the Venetian plaster finish is very strong and durable. In addition to these components, various colorants and pigments are usually used to add color, which help the finished surface to resist the negative effects of ultraviolet radiation and oxygen. Often, modern mixtures for Venetian plaster have a certain percentage of acrylic binder. According to experts, Venetian putty compounds based on acrylic dispersion are much more plastic and are not subject to the formation of microcracks on the surface. But no one will argue that such material is less environmentally friendly than water-based Venetian plaster.
Nowadays, finishing specialists do not need to assemble the mixture themselves; it is sold ready-made in plastic buckets. Moreover, each manufacturer has original recipes that allow you to obtain different visual effects (matte, velvety, gloss). Often, there is no need to add color to the mixture, although certain manufacturers supply dyes separately so that the master can individually select the required shade.
Return to contents
Required Tools
If you have some artistic talent and feel the desire to try your hand at this type of creativity, be sure to prepare special plastering tools:

The application of Venetian plaster requires an ideal wall surface.
- steel graters (necessary for grinding and leveling the solution) 25 and 20 cm wide;
- specially shaped spatulas. Their feature is rounded edges and a very smooth, literally polished surface without scratches or nicks. You also need two spatulas, wide and narrow;
- brushes of two shapes: a paint brush-maklovitsa and a flat classic flute brush. The first has an oval, rectangular or round shape, somewhat similar to a brush. It is necessary to choose a brush with thick bristles.
A level, tape measure and a long metal ruler will also come in handy. Stock up on a sanding grater with fine-grained sandpaper.
Return to contents
Basics: preparatory work

The method of applying Venetian plaster involves very scrupulous and thorough work in preparing the surface. Only in this case will Venetian plaster be able to delight not only with its beauty, but also with its main operational advantages - practicality and durability.
If certain types of decorative plaster are not very demanding on the base and even allow you to hide small construction flaws - chips, uneven walls and cracks. Alas, Venetian plaster, like a real aristocrat among finishing plasters, will not tolerate such neglect of the preparatory work. Although the base for it can be concrete, brickwork, drywall and even walls that were once covered with oil paint, all this must be thoroughly cleaned of dirt and dust, peeling plaster and paint residues. Carefully repair chips, cracks and cracks. For plasterboard sheets, all joints must be processed flush. After this, the areas to be sealed are sanded.

Using Venetian plaster you can achieve the effect of a marble wall or decorative stone.
After the walls can already boast of the absence of noticeable defects, the first continuous filling is carried out. When the putty layer has dried, the surface is sanded with pumice or sandpaper. Now you can blow off the walls with compressed air or walk over them with a dry rag to remove particles. After this, it is better to prime the surface; in this form it will more easily lend itself to a continuous second puttying. Yes, a full filler and sanding will be required again to correct all the scratches and roughness. And again the primer. And if the condition of the walls is poor, this tedious procedure sometimes has to be done three times before applying Venetian plaster. The finishing putty must be of high quality, and the final sanding is done with “zero” sandpaper, followed by careful removal of dust with a dry cloth.
Return to contents
Preparatory work will take a lot of time
In addition to being painstaking and labor-intensive, the preparatory work is quite time-consuming, since after applying each layer you need to give it time to dry. Each layer generally takes approximately one day to dry. If the temperature in the building is low or the air humidity is significant, it may take longer. In the end, the walls should be even and smooth. Now all that remains is to coat them several times with a deep penetration primer for the last time. Its type must match the putty material; they are usually sold as a set. After priming the wall, you need to wait until it dries completely. Finally, now is the time for real creativity.
Return to contents
Which color should I choose?
Before starting work, cover the tops of the walls with masking tape. To preserve Venetian plaster, this tape will have to be removed immediately after completion of the work, without waiting for the material to completely dry. Otherwise, when it is removed, very unaesthetic chips and cracks may form. If the putty mixture for Venetian plaster is not tinted, it is necessary to add the required amount of dye while thoroughly mixing. When choosing a shade, you must take into account that the finished Venetian most often turns out to be somewhat darker and brighter in a confined space than in the catalog of a construction showroom or on a small test piece of material. It is better to refuse to use very flashy colors for residential premises, and limit yourself to pastel shades. Plaster mass and colorators must be purchased from the same brand, since otherwise they may be incompatible in their own properties.
The history of the origin of Venetian plaster (from Italian: Stucco veneziano - liquid marble) goes back to Ancient Rome. The most popular in Rome was marble, which left behind particles of shimmering dust after processing by the master. It was marble chips that ancient Roman masters began to use to create frescoes and artistic patterns. Subsequently, marble was replaced by materials such as granite, quartz and limestone.
Revived in Venice, marble design came to life in the hands of many masters and artists, in particular Michelangelo and Raphael, and subsequently became the decoration of majestic European churches, rich houses, as well as ancient palaces of Italian and French kings.
Today, among the variety of decorative coatings, Venetian plaster also occupies a special place. It allows you to realistically convey the texture, amazing shades and mesmerizing radiance of marble.
The consistency of Venetian plaster is closer to paint than to plaster. However, it has a fairly large fraction of fillers - about 0.5 mm. Due to this, it is possible to create fairly thick layers that hide base defects. This also increases resistance to impacts, chips, and scratches.
Do-it-yourself Venetian plaster is created using tools and materials such as:
- masking tape;
- trowel for Venetian plaster. It differs from a regular trowel in that it has a trapezoidal working surface and rounded corners, which avoids streaks when applying decorative mass;
- bath;
- decorative plaster;
- fifteen- and thirty-centimeter alloy steel spatula;
- roller;
- deep penetration primer;
- an electric drill with a mixer attachment that will help stir the solution;
- machine with a nozzle for wax polishing;
- dye to give the desired shade to Venetian plaster. As a rule, 2 paints of different shades are purchased, since at least two layers are applied to the surface;
- wax for Venetian plaster.

Applying Venetian plaster (step-by-step instructions and video):
Step 1. Using masking tape, tape off the border of the wall that you do not plan to plaster. It is better to use less sticky tape, since when the tape peels off, part of the wall may be pulled behind it.

Step 2. Surface preparation. Venetian plaster is applied to a dry, perfectly smooth, pre-putty surface. Subsequently, a classic primer is usually applied to the surface of the finishing putty, which performs the following functions:
- elasticity;
- strengthening and dust-removing function;
- reduces subsequent consumption of paints and varnishes;
- evens out the absorbency of the surface;
- crack resistance;
- due to the fact that it prevents premature loss of moisture from our solution, uniformity is ensured;
- has adhesive properties.
The drying time of the soil varies from 4 to 6 hours.

Step 3. Venetian plaster, pre-tinted to the desired color by hand or using special equipment, is applied in at least two layers to create a marble effect. We will do it in three layers: for the lower and upper layers we will take a paint of a darker shade, for the intermediate one - white. You can do the opposite by placing a darker shade between light layers.
Do not immediately mix a large portion of the plaster solution. This will eliminate the risk of premature drying and, as a result, hardening.
To apply the first covering layer, we use a spatula, scooping a little Venetian plaster onto it. Then we transfer the paint to the edge of the trowel, and from the upper left corner, pressing the trowel to the selected area at an angle of 30°, apply the plaster solution to the surface of the wall with multidirectional strokes. In this case, each subsequent stroke is located perpendicular to the previous one. It is better to work from a dry surface to a wet one - to the area where the plaster has already been applied - since otherwise trowel streaks may remain. Therefore, try to make strokes starting from the edges of the wall or from its dry part.

Carefully ensure that the layer of Venetian plaster does not exceed 1-1.5 mm, but is also as smooth as possible. As soon as the Venetian plaster begins to dry out (lighten in places), polish the surface with the corner of a spatula. The result of polishing the wall surface should be thin veins characteristic of marble.
If gaps form during the application process, it’s okay. That's how it was intended. Your goal is to create some kind of flow that will appear as the number of layers increases.
A prerequisite is to use a clean tool, since the slightest grain of sand will leave streaks. Therefore, after completing the application of plaster, rinse the tool used well with water. You should also wipe the spatula and trowel with a damp cloth from time to time. This will help avoid the appearance of dried particles that leave marks on the decorative surface.
Although the indicated drying time for Venetian plaster is 6-12 hours, we recommended leaving the first layer to dry for 24 hours.
After the plaster has completely dried, remove blemishes (roughness and small irregularities) using a spatula.
Step 4. The second layer and third layers are applied using the same principle. For the second layer, light paint will be used. We pick it up on a spatula and transfer it to a trowel; and from the upper right corner, gradually moving to the lower left corner, with the thinnest chaotic strokes possible, we begin to apply white paint.
I would like to note that it is best to continuously distribute the paint from one corner to another.

We polish the still damp surface with the angle of a spatula, randomly crossing the direction of the strokes until a pattern and gloss appear. Working on an area of 0.5 m2, we continue application, subsequently also dividing the surface into sections of 0.5 m2.
Step 5. After finishing applying the third layer, let the material dry. Finishing with Venetian plaster usually ends at the stage of glossing, or ironing. This stage involves giving the surface a shine using a trowel. It is very important to wait for the material to dry completely, because if it does not dry completely, chipping may occur during the glossing process. We would advise waiting until the plaster has completely dried, leaving it untouched for 40-46 hours.
When all layers have dried, you can proceed directly to the glossing process. To do this, take the trowel with your right hand, and with your left hand press the blade well (almost tightly) to the surface to create additional pressure. Be sure to hold the trowel at an acute angle, and press all layers towards each other with semicircular movements. In this case, pay special attention to the cleanliness of the surface. If debris remains on it, a scratch will immediately remain on the surface of your plaster, which will be quite difficult to remove later.
Step 6. In order to give the coating additional wear resistance, moisture resistance and color contrast to the texture, after glossing, a waxing operation can be performed. To do this, special wax for Venetian plaster is applied to the surface of the wall, and then rubbed in with a smooth circular motion using a polishing machine.

To give an additional decorative effect, you can tint the wax with a special decorative powder, the approximate consumption of which is 20 grams per half-liter jar of wax. To do this, you need to dilute the powder with a small amount of water; add powder to wax and mix thoroughly. If you want to get a more intense gold-plated or pearlescent effect, you can increase the amount of powder, but not more than 50 grams per half-liter package.
Video lesson: How to apply Venetian plaster with your own hands
Video: Textured method of applying Venetian plaster
Express lesson on applying Venetian plaster to the wall
- For those who are wondering “how to make Venetian plaster,” we recommend trying this technology on a small plasterboard sheet.
- Pay close attention to the cleanliness of the tools you use.
- Avoid getting particles of dust and debris on the material, which will subsequently be noticeable on the finished wall.
- If a bucket of decorative plaster is left indoors for a long time, thoroughly shake the container with the solution before applying.
Technique for applying Venetian plaster “sand wind”
“Sand Wind” creates the effect of sand dunes, where golden grains of sand, sprayed by a strong wind, bask in the sun’s rays. This effect allows you to visually expand the space and raise the ceiling. Additional lighting enhances the effect.
To perform this technique, you will need decorative plaster, which contains fine-grained sand.
We present two options for performing the “sand wind”: a directional pattern (diagonal, vertical or horizontal) and chaotic strokes.

For a directional drawing, brush strokes are made in the appropriate direction with certain indents, and then they are connected. When shading, a large concentration of the color mixture is formed in one place, and a smaller one in another. When dry, the pattern becomes more contrasting. Where there is more sand, it is darker, where there is less sand, it is correspondingly lighter.
To create a better effect, it is recommended to tint the substrate before applying strokes. If you are using a pearl shade, then tinting is not necessary, since the shimmering effect hides small errors.
The second effect is chaotic strokes. To do this, you will need two shades of Venetian plaster and, accordingly, two brushes, so as not to waste time washing off one of the paints. With chaotic movements, first one shade is applied, then another; they are connected with a brush, which was previously used to apply a lighter shade. If you apply it the other way around, the darker shade will “eat up” the light tone. It should be noted that you need to shade the colors without waiting for the Venetian plaster to dry: apply several strokes and combine them.
If more sand forms in some place, you can hit it with the edge of the brush and shade it again.
After complete drying, secure the treated surface with colorless wax.


Ways to help “revive” Venetian plaster
- To create an original texture, you can use decorative rollers. To do this, apply an even layer using a trowel. Depending on the pattern on the roller, we roll up and down or limit ourselves to one roll on the surface. So, as with the basic technique, the surface is waxed and polished. In addition, when using this technique in the interior, you can add tinting to the wax. It can be tinted either manually or computer-aided.
- To highlight the texture of natural stone, after applying the finishing layer, use a brush to highlight the veins. Using a color diluted with water, draw a thin, curved and broken line along the surface with a classic brush (“zero”). We will use an airbrush. To give the picture a dilapidated look, after applying the main texture, all the veins must be carefully plastered. The surface is then waxed and polished.


Venetian plaster is a special type of decorative finishing materials. It is used exclusively for decorating the room, since the starting layer will require a large amount of material, and its price is quite high. Therefore, leveling walls with such plaster is unprofitable. Do-it-yourself Venetian plaster must be laid according to certain rules and taking into account climatic conditions, the material of the surface being treated and many other factors. Therefore, if you do not have confidence in your abilities and experience in carrying out such work or the qualifications of a finisher, it is better to contact a specialized company.
The main advantages of this material are the following:
- "Glow effect" After drying, Venetian plaster reflects light well.
- Environmentally friendly. The substances used in the manufacture of Venetian plasters do not emit toxic compounds. The main component here is absolutely safe flour made from natural stone.
- Resistant to water. Thanks to this feature, the material can be used for finishing surfaces in bathrooms.
- Venetian plaster does not burn, does not support combustion and does not smolder.
- Possibility of tinting. During preparation, coloring pigments can be added to the mixture to obtain the desired shade of the surface.
- Long service life. The surface will retain its original color and texture for 25 years.
 Venetian plaster – “Glow effect”
 The main disadvantage is the high cost of the material. In addition, it is quite difficult to work with, and before applying Venetian plaster, the surface to be treated must be perfectly leveled.
Composition and features of plaster
Venetian plaster is made from 3 main ingredients: crushed natural stone (quartz, onyx, granite, marble), binder and color pigments. Previously, slaked lime was used as a binder, but now acrylic resins are increasingly being used instead. Synthetic or natural substances can be used to tint the composition.
This plaster can be laid on surfaces made of brick, concrete, natural stone or wood. The main feature of the composition is its transparency, which results in the effect of illuminating surfaces. Even minor defects are visible under a layer of translucent finishing, so they must be carefully hidden with starting plaster, putty or drywall.
 Venetian plaster is very capricious, so the walls must be perfectly smooth
 Types of material
There are 4 main types of Venetian plaster:
- Veneto.
- Using this plaster, an imitation of polished marble is created. It is inexpensive, and working with it is not difficult when compared with other types of “Venetian”. The coating is also easy to care for: it can be washed with water and a sponge.
- Trevignano.
- This type of plaster involves applying several layers (up to 12 pieces). Polymer compounds are used as binders. This coating is suitable for interiors in baroque, classic or vintage styles.
 Marbello.
 Using this type you can create a matte finish with a small amount of glossy inclusions. The technology for applying Venetian plaster involves the use of multi-colored mixtures. Typically, polymer components are added to such compositions to increase water-repellent properties.
Before purchasing Venetian plaster, it is important to decide what type of coating is planned. The material can imitate marble surfaces, malachite, onyx, quartz, pearl and so on. Some types of “Venetian” can imitate the texture of fabric, natural leather or wood. It is also important to decide whether you need a matte or glossy surface.
 Venetian plaster: imitation of fabric, leather, stone, wood
 Also, when choosing, you need to take into account the features of the interior and the purpose of the room where the work will be carried out. For example, it is better to decorate surfaces in bedrooms with pastel-colored materials. Dark or rich colors are suitable for living rooms. For children, it is recommended to use variegated mixtures. Also, before purchasing, it is better to clarify all the nuances that are associated with the operation, application of Venetian plaster and the features of caring for it.
Venetian plaster consumption
Calculating the consumption of this material is quite simple. First you need to calculate the total area of all treated surfaces, and you need to round up. The layer thickness and material consumption per square meter are indicated by the manufacturer on the packaging. Provided that the layer of plaster recommended by the manufacturer is applied, the formula for calculating consumption is as follows: N = R x S x K, where N is the amount of material, R is the amount of material per square meter, S is the total surface area, K is the number of layers.
Required tools and materials
To finish surfaces with Venetian plaster you will need the following:
- plaster mixture;
- primer;
- wax;
- suede leather;
- putty;
- trowel for Venetian plaster;
- wide and narrow spatulas;
- sponges, rags;
- electric drill with mixer attachment;
- container for mixing the solution.
Preparation for finishing work
Preparatory work includes the following steps:
- The first step is to remove the old coating: paint, wallpaper, plaster, and so on. Then the surface is cleaned of oil stains, construction dust and other contaminants.
- All large cracks or potholes are sealed with cement-sand mortar, and minor defects are corrected using putty.
- Protrusions are removed with a grinder with a diamond wheel, and roughness is removed with sandpaper with different degrees of grit.
- After this, the surfaces are treated with starting putty, and after it dries, they are finished with fine-grained finishing putty. Then the surface is treated with sandpaper.
- Next, the walls must be impregnated with a primer to increase surface adhesion. This procedure must be carried out twice at intervals of 3-4 hours. Sometimes a third layer is required, which is tinted to match the Venetian plaster.
How to prepare the solution
If the dry mixture was purchased at a hardware store, then the manufacturer will write on the packaging about how to make Venetian plaster. Usually the mixture is poured out of the bag and diluted with water, only after that color is added, if necessary. For stirring, use an electric drill with a mixer attachment. The consistency of the finished mixture should resemble sour cream. After preparation, leave the composition for 10-15 minutes and then mix again.
 Preparation of Venetian plaster solution
 Something to remember! The air temperature during preparation of the mixture should not be lower than 10°C. One portion of the solution should be enough to treat the entire wall, otherwise the boundaries of materials from different batches will be clearly visible.
Now let’s talk about how to make Venetian plaster yourself. To do this, you need to mix flour from natural stone (marble, malachite, quartz, granite or others) with slaked lime in equal proportions. Then add a little soap to the mixture, then mix the ingredients as indicated above. At the end, color is added.
Basic rules when working with Venetian plaster
There are some rules for decorating walls with Venetian plaster. The technology for applying the material is as follows:
- The first layer should be as thin as possible, but at the same time completely cover the entire treated area.
- Subsequent layers are applied with rubber spatulas using arcuate movements to obtain the desired pattern.
- Between applying layers it is necessary to pause for the material to dry.
- The minimum number of layers is 4, the maximum is 12.
- Each layer should be different in tone from the previous one. It is also acceptable to use mixtures of contrasting colors.
- Finally, the surface must be treated with wax.
- Depending on the characteristics of the material, it can set in 20-40 minutes, and you can touch the coating only 6 hours after completion of all work.
It should also be noted that Venetian plaster dries quite quickly, so it is not recommended to carry out work on the entire wall at once - it is better to limit it to an area of 1 square meter.
 When applying Venetian plaster it is necessary to work with small sections of the wall
 Material consumption largely depends on the number of layers, as well as the desired effect. Most manufacturers give an average figure of 0.5 kg per square meter. meter. Colors for also differ in some features: after drying, they can retain the shade, darken or lighten by several tones. Therefore, it is recommended to clarify all the details with the supplier or seller in advance.
Various material application techniques
There are different techniques for applying Venetian plaster. Let's consider only the most popular options.
Imitation marble
The mixture is scooped onto a spatula and applied to the wall with chaotic strokes, it is important to treat the entire area without gaps. Without waiting for the solution to dry, the surface is given texture using a trowel. After this, work is suspended for 2 hours. Now you need to prepare 2-4 types of solution, using different numbers of colors. They are collected in small portions onto a spatula or trowel, after which they are applied in long arched strokes. After treating the entire surface, it is left to dry for a day. If necessary, repeat the above procedure 2-3 times, with each layer requiring at least a day to dry. The dried surface is treated three times with a sander, changing attachments each time. At the end, the so-called “ironing” is carried out - processing with a trowel, during which the tool is pressed forcefully to the surface. The last procedure is waxing or varnishing.
 Venetian plaster allows you to create a marbled pattern
 Classic version
First, apply the first layer in the same way as in the case of imitation marble, after which it is left for two hours. Using a trowel, all excess material is removed, and then ironing is carried out until the surface acquires a metallic sheen. Then prepare a single-color plaster and apply it in a thin layer, after which ironing is carried out again, but now it is enough to wait about 40 minutes. All subsequent layers (no more than 10) are applied using the same technology. After the coating has completely dried, it is treated with a grinding machine with three different attachments, and finally coated with wax or varnish.
VIDEO: applying Venetian plaster
Craquelure
Translated, this word means “antique”. The technology for applying Venetian plaster involves using a spatula, and the layer should be thick and the movements should be chaotic. Then turn on the hair dryer and heat the surface. Due to a sharp increase in temperature, the plaster will crack. Once the desired effect is achieved, the heat treatment is stopped and the coating is left to dry as usual for 24 hours. Next, a final thin layer of a different color is applied, and at the end there is standard three-stage sanding and “iron plating.”
 Craquelure - artistic cracks or artificial aging effect
 Cork tree
To achieve this effect, the first layer is made in different colors. Making this type of Venetian plaster with your own hands is quite simple. First you need to prepare 2-3 portions of a solution of different tones, then mix them, but not completely. The mixture is scooped onto a trowel or wide spatula and laid in a thick layer on the surface. In this case, applying the composition is not enough; you also need to dry the coating with a hairdryer. Keep the device at different distances from different sections of the wall to create a non-uniform texture. Characteristic cracks should appear on the surface. Then the coating is left alone for 48 hours to allow it to dry naturally. Next, apply a second layer of plaster of a different shade. Finally, the surface is treated with a grinding machine or sandpaper, and then waxed or varnished.
VIDEO TUTORIAL:
Before plastering with this type of “Venetian” plastering, you need to coat the wall with a penetrating primer, and after it dries, treat the surface with a covering primer. After 2 hours, the main work begins. To carry them out you will need a fur roller. With its help, Venetian plaster is stretched over the wall in a thin, even layer and left to dry. After 3-4 hours, when the material has set, it is necessary to “go” with a narrow metal spatula over the most protruding places and cut them off. To apply the next layer you will need a trowel. After completing the finishing work, you need to give the wall 6 hours to dry, after which all protruding fragments should be removed again. Venetian plaster is then mixed with a small amount of finishing varnish. To do this you will need a drill with a mixer attachment. After applying the composition to the wall, you need to wait 6 hours again. At the end, ironing is carried out with a trowel until a metallic sheen appears and wax is applied.

Applying Venetian plaster is a rather complex undertaking that requires certain qualifications and experience in carrying out plastering work. Therefore, if you do not have confidence in your own abilities, it is better not to try to save money, but to immediately hire a team of specialists in this field, or at least get a master class on Venetian plaster.
Architecture is often called poetry frozen in stone. If you follow such an allegory, then, probably, Venetian plaster can become the romantic ballad of your design; the technology of its application has remained unchanged for 2000 years, and its extraordinary beauty still excites our imagination.
Due to the fact that this type of finishing work is in high demand, in the construction services market, the application of Venetian plaster is often offered by craftsmen who are very superficially familiar with the technology of such work. At the same time, trade offers a lot of coverings that only imitate the famous Venetian.
Let's immediately make a reservation that classic Venetian plaster is performed with a putty mass, which necessarily includes marble dust, which in some cases is replaced by quartz, granite or onyx. The second constant component of the coating is slaked lime, making the Venetian plaster finish extremely strong and durable. In addition to these components, to add color, various pigments and colorants are usually used, which help the finished surface to resist the negative effects of atmospheric oxygen and ultraviolet radiation.
Modern Venetian plaster mixtures often contain some percentage of acrylic binder. According to experts, Venetian putties based on acrylic dispersion are more plastic and are not susceptible to the formation of microcracks on the surface. However, no one will argue that such a material is less environmentally friendly than water-based plaster.
Nowadays, finishing specialists do not need to assemble the mixture themselves; it is sold ready-made, in plastic buckets. Moreover, each manufacturing company has original recipes that make it possible to obtain various visual effects (velvety, matte, glossy). Often, there is no need to add color to the mixture, although some manufacturers supply dyes separately so that the master can individually select the desired shade.
Required Tools
If you have some artistic talent and, after watching the video of applying Venetian plaster, feel the desire to try your hand at this type of creativity, do not forget to prepare special plastering tools:
- steel graters (which are necessary for leveling and rubbing the mortar) with a width of 20 and 25 cm;
- specially shaped spatulas. Their feature is rounded edges and a very smooth, literally polished surface without nicks or scratches. You will also need two spatulas, for wide and narrow ones;
- brushes of two forms: a classic flat flute brush and a paint brush. The latter has a rectangular, oval or round shape, somewhat similar to a brush. You should choose a brush with thick bristles.
You will also need a tape measure, a level and a long metal ruler. Don't forget to stock up on a sanding float with fine sandpaper.
Preparatory work is the basis!

The technique of applying Venetian plaster involves very careful and scrupulous work on preparing the surface. Only in this case will the Venetian be able to delight you not only with its beauty, but also with its main operational advantages - durability and practicality.
If some types of decorative plaster are not demanding on the base and even allow you to hide minor construction flaws - uneven walls, small chips and cracks. Alas, the Venetian, like a true aristocrat among finishing plasters, will not tolerate such a disdainful attitude towards the preparatory work. Although the basis for it can be brickwork, concrete, plasterboard and even walls that were once covered with oil paint. But all this must first be thoroughly cleaned from dust and dirt, from peeling pieces of plaster and paint residues.
Carefully seal gaps, chips and cracks. For plasterboard sheets, all joints must be flush. After this, the sealed areas are sanded. Are you tired already? Be patient, this is just the beginning! After our walls can already boast of the absence of visible defects, the first continuous filling is performed. When the putty layer has dried, the surface is sanded with sandpaper or pumice. Now you can blow off the walls with compressed air or walk over them with a dry cloth to remove particles. After this, it is advisable to prime the surface, in this form it will more easily lend itself to a second continuous putty.
How, again? Yes, again complete puttying and sanding again to correct all the roughness and scratches. And again the primer. And if the walls are in poor condition, such a tedious procedure as continuous puttying, sometimes has to be carried out three times before applying Venetian plaster. The finishing putty must be of high quality, and the final sanding is carried out with “zero” sandpaper, followed by careful removal of dust with a dry cloth.
Preparatory work will take a lot of time

In addition to being labor-intensive and painstaking, the preparatory work takes quite a long time, because after applying each layer you need to give it time to dry. In general, each layer dries in approximately one day. If the room temperature is low or the air humidity is quite high, it may take longer.
Well, and finally, our walls are even and smooth. Now all that remains is to coat them a couple of times with a deep penetration primer for the last time. Its type must correspond to the putty material; they are usually sold as a set. After priming the wall, you need to wait until it dries completely. Well, now the time has finally come for real creativity.
Which color should I choose?

Before starting work, we glue the upper parts of the walls with masking tape. When working with Venetian, you will have to remove this tape immediately after finishing the work, without waiting for the material to dry completely. Otherwise, when it is removed, very unaesthetic cracks and chips may form.
If your Venetian putty is not tinted, add the required amount of dye while mixing thoroughly. When choosing a shade, you should take into account that most often the finished Venetian in a confined space turns out to be somewhat darker and brighter than on a small test piece of material or in a construction showroom catalog. For residential premises, it is better to avoid using too flashy tones, and limit yourself to more pastel shades. Colorators and plaster mass must be purchased from the same brand, since otherwise they may not be compatible in their properties.
Venetian plaster. Application technology
You need to finish the wall in small sections, approximately 1 m2, starting from the top. The first layer of mass is the base one; it is applied completely and sets the tone for the entire future color of the wall. When working, use a trowel, onto which the mixture is applied with a spatula. If you carefully looked at the material, Venetian plaster application technology, video in this article, you noticed that the movements of the trowel applying the coating are short and rounded.
The general trajectory of movement when covering a wall is from left to right. Whether you apply the mass from top to bottom or from bottom to top does not matter, do what is most convenient for you. The material is applied in a thin layer, and, without waiting for it to dry, it is distributed with a Venetian spatula, using multidirectional movements in an arc, avoiding sharp joints along straight lines. The spatula must be pressed tightly against the wall, maintaining an inclination angle of 15-20 to the surface. It is precisely these methods of applying Venetian plaster that will allow us to obtain those veins that, in the final version, will make our wall look like natural stone.
The first layer dries for at least 4-8 hours, depending on the brand of Venetian mass used. Most often, further work continues the next day.
The second layer is applied with short, jerky movements, and immediately rubbed with a spatula. The movements are performed in pairs, crosswise, overlapping one another. By moving in one direction you apply the material, and by moving in the opposite direction you remove excess. This technique of applying Venetian plaster is called “butterfly”. As a result, the relief of the base layer disappears, and veins appear on the surface. Their size depends on the method of applying the decorative layer. Experienced master decorators can perform work in different manners, creating different sizes of patterns.
After the applied decorative layer has completely dried, the surface is sanded with fine-grained sandpaper. To increase the visual effect of the depth of Venetian plaster and its famous internal glow, a larger number of intermediate layers are performed, the total number of which can reach up to nine.
Adding the final shine
After applying the last layer, to make Venetian plaster waterproof and increase shine, the surface is polished with wax. This work is carried out no earlier than a week after the final application of the finishing layer. In addition to the usual transparent composition for the Venetian, you can give preference to a coating with an additional decorative effect, and then your wall will be decorated with mother-of-pearl, gold or silver veins. Liquid wax is applied using a special nap glove, and then the wall is finally polished with a grinding machine with a special nap attachment.
Italy is far away, but sometimes you want to feel like a rich Doge in a small personal palace. There are many modern materials for wall decoration. They all differ in quality and have their own specific characteristics, such as Venetian plaster. Let's figure out what application techniques exist, since decorative coating can be done in different ways, and consider the most common and simple ones, which will still give the desired effect.
Preparatory stage
Even if you have long been eyeing a container with the mixture in the store, and, having decided to change the design of the premises, rushed to the store and made a purchase, this does not mean that when you come home, you can immediately start decorating. The most important part of the job is preparation for it. The surface of the wall must be thoroughly cleaned of any old coatings, including plaster, if it is not held securely and has cracked areas. After this, we inspect the walls for unevenness.
It is better to smooth out very noticeable protrusions using an grinder's abrasive disc, since this is only suitable for ordinary finishing. If cracks are found in the walls, we embroider them with a diamond disc and cover them with cement-sand mortar; small cracks can be covered with putty, which, in general, is suitable for preparing the surface. The main thing is that after applying each layer it is necessary to use a primer impregnation, applying it with a brush.
If the base is in order and fairly level, minor roughness will be easy to hide directly with decorative plaster.
The only thing that should be done if you have a good base is to thoroughly clean it of foreign particles such as dust and other contaminants, degrease it and impregnate it with a deep penetration primer. The last action is necessary to increase the adhesion of the coating. When the putty, primer and other preparatory compounds have dried, you can worry about the problem of how to apply Venetian plaster.
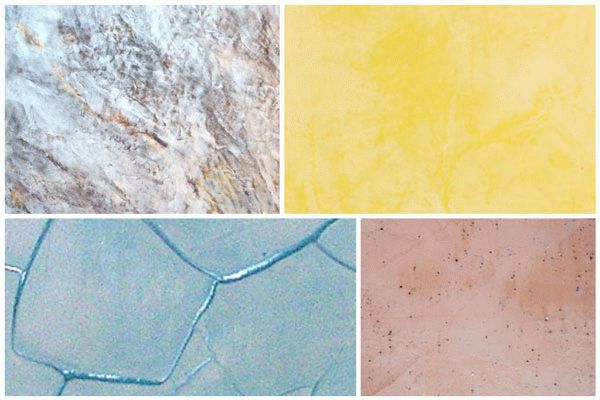
Photo gallery: finishing options
Application methods
Even during the Renaissance, noble Italians ordered the decoration of walls in mansions not with carved wooden panels, as was fashionable earlier in knightly times, but with the thinnest layer of plaster. The mixtures were made from finely ground marble and gypsum mixed with lime. Other binders were added to them, according to recipes that were kept by ancient masters and, unfortunately, are mostly lost. But today this unique material and methods of applying its solution have been restored, while modern mixtures are used as binding fillers. As for working with this finishing material, the methods of working with it are strikingly different from covering walls with conventional leveling compounds. The decorative mixture is applied in the thinnest layer and is therefore completely unsuitable for smoothing out serious unevenness
. Moreover, in most cases, each layer, except the first, is finishing in its own way, that is, it can be final, with the exception of single-layer options. Compositions are also produced that require 4-6 layers of coating to obtain the desired effect.
The main method of covering walls is brushstrokes, like those left by artists on canvases, but somewhat larger, and made not with a brush, but with a smooth steel trowel. But this technique is only appropriate when you are working with compounds for multi-layer finishes. First, a section of the wall is covered with scattered strokes, then new ones are placed on top of them, overlapping the previous ones, and so on, until you decide that there are enough layers and you can move on to polishing and applying wax for more gloss.
Single-layer decorative compositions are easily applied with a roller, and you can use both regular foam rubber and textured or shaped nozzles. In most cases, the consistency of “Venetian” and liquid wallpaper, which also belongs to the finishing finishing materials, is similar to thick sour cream and is easily grabbed by both a spatula (and then a trowel) and a roller. The latter can also be used to structure two-layer plasters by first applying a starting coating.
Photo gallery: examples of interior decoration
How to apply Venetian plaster: step by step steps
As a rule, the result of the work always differs from the desired result, for better or worse, and beginners who want to get the effect of stone when decorating walls with decorative plaster are sometimes disappointed. The whole point is that the smallest errors overlap each other during the work process no worse than strokes of the mixture, and it is impossible to correct the flaws once the work has begun unless you redo everything from scratch. We will try to follow all stages to eliminate possible mistakes.
- Don't be surprised that too much emphasis is placed on this stage. The most important thing is that the base to be processed is perfectly level, since decorative finishing materials not only do not hide defects on the wall, but also emphasize them. Therefore, we carefully putty the recesses, remove the protrusions with a grinder or sandpaper, clean the surface and cover it with at least a double layer of primer (after the first treatment, you must wait until it dries).
- After the soil has completely dried, we begin to apply strokes of the mixture in scattered strokes onto a clean plastered or puttied surface. It is not at all necessary to maintain the same distance between the “blots” of the Venetian composition; it is enough to cover the wall more or less evenly. We make arched or winding movements in any direction, trying to press the trowel more tightly to the base, giving the strokes a high density. Next, wait at least 8 hours until the coating dries completely.
- We continue finishing using the same technique, that is, we apply the mixture with smooth, rounded movements, only shorter ones, this time placing portions in the spaces between the previously made strokes. It is better to replace the trowel with a spatula and use it crosswise, that is, apply the mixture with a pass in one direction, and remove its excess with a reverse movement. This method is called "butterfly". By laying new portions overlapping, taking into account individual fragments of the lower layer, we get the illusion of veins. A good solution would be to separate a small part of the solution and add pigments to it to change the shade by one tone. Occasionally using a different coloring, you will get much closer to imitation stone.
- It is better to immediately choose the direction from left to right; it is not necessary to focus on the window when layering strokes; on the contrary, the play of light and shadow from the resulting folds will give more resemblance to stone.
- When the applied mixture hardens after 4-6 hours, we create a gloss effect by polishing the surface with zero-grade sandpaper. Some areas can be left rough, which will create the appearance of moire, that is, a subtle shimmering pattern.
- Take a sponge. We dip it in a special wax composition for decorative plaster and rub it into the surface with soft circular movements. After drying, you can wash the walls with soap dissolved in water. Products containing solvents are not recommended for use under any circumstances. Once upon a time there was a profession called a floor polisher, whose duties included figure skating on parquet floors with brushes on their feet, regularly dipped in wax. You won’t be able to ride on the wall much, but the result is just as brilliant, the walls begin to reflect the surrounding environment, like a mirror. Muddy and blurry, but reflective, and when light falls on them, a transparent effect occurs when you bring your palm to the wall and find it difficult to determine when contact will occur.