Make a round glass vase with your own hands. Floor vase. Manufacturing technology is very simple
Read also
In decoration modern interior, outdoor ceremonies and special events cannot be done without a huge number of flowers, so it is very interesting, which would be as beautiful as its contents, but at the same time would be quite cheap. We will look at what interesting ideas there are, including new items that you may not have heard of yet.
In modern variations, how to make a vase with your own hands, the use of improvised materials, such as glass containers for food and drinks, predominates. Indeed, in this way you recycle potential waste, and in the end you get very interesting decor for your home. Moreover, for example, it will be very simple to implement; you can decorate your interior with it at no cost. country house, open veranda, set the table for a birthday party outdoors, and then at the end summer season Dispose of it according to all rules or leave it for future use.
Incandescent light bulbs turn into miniature vases if you remove the base and socket from them, tie them to a string or ribbon, and add a stand. Pasted strips of self-adhesive paper onto an empty bottle will turn it into an interesting stand for one flower, and coins applied to a cheap vase will turn it into a luxurious decoration.
The main thing is to do everything carefully and extremely carefully, choosing colors and textures, then the homemade product will be indistinguishable from designer decor.
Don't think that science how to make a vase with your own hands from paper or from a plastic bottle does not allow you to get durable, reliable and presentable decorative items. If you decorate them correctly by choosing related materials, then according appearance no one can distinguish it from a ceramic or glass product.
What you should not do in such cases is to trim the edges with fringe, cut it out on plastic and paint it, this way you will not hide the material itself, but will only emphasize its cheapness. Much the best options There will be papier-mâché, decoration using woolen threads, jute and hemp ropes, colored tape, sparkles, and sequins.

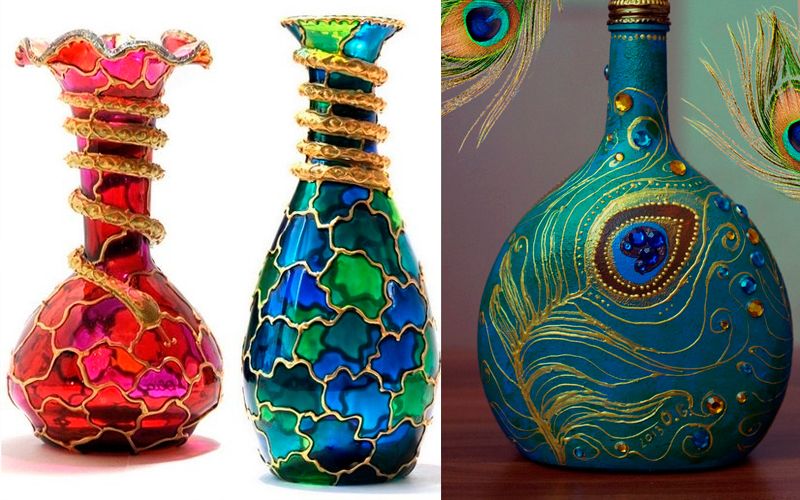
Eat great way design, which is equally suitable for both plastic and glass bases. It consists of using, in addition to paint, which completely covers the surface of the workpiece, also special stained glass contours. Moreover, it is the contours that apply the pattern even before the paint is applied.
Thanks to its texture, the contours will appear on the paint, which means an interesting and very valuable effect will appear. It is good to make such vases in an ensemble, from several products of different sizes and shapes, and use this decoration option for methods how to make a floor vase with your own hands theirs is simpler and cheaper.
In the photo you can see what it looks like finished result, and you will probably want to repeat something similar with your own hands, be it ordinary or.

Great way to use plastic container in a slightly non-standard version, the designers looked at the ideas, . It's about about concrete vases that are poured into the base.
In the photo above you can see the main stages of such a master class, but if you are more interested in this topic, you can find detailed lesson how to make a vase with your own hands, video which clearly explains all the main stages of the manufacturing process.
How to make a vase from a bottle with your own hands
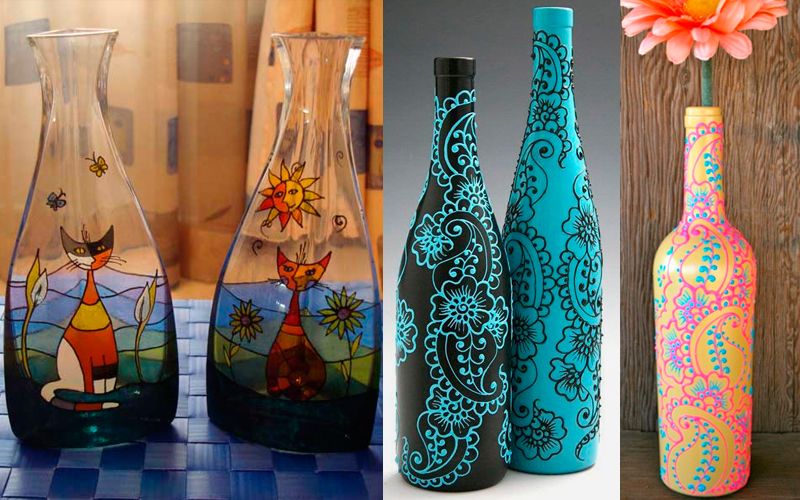
And still, greatest number truly interesting, fashionable, modern ideas relate specifically to how to make a vase from a bottle with your own hands, from an ordinary glass container, which in most cases cannot be modified in any way, cannot be cut, and so on. Moreover, the fashion for simple vases has reached such a level that even in stores home decor you will be offered to buy a ready-made vase, which in appearance cannot be distinguished from a classic milk bottle, only its cost will be at least five times higher than the cost of the same one, but in a grocery store and full of milk.

The most simple ways concern purely decoration, that is, the use auxiliary materials, which can be quite easily put on or removed from the base. In the photo above you can see just such ideas that will require from you not only a minimum of time spent, but also a minimum of financial costs.

Plus, you can not only wrap the glass with tapes and stickers, but you can also get more creative, for example, take two containers of a size so that one fits inside the other. And pour into the space between the glass walls decorative material, be it sand, glitter or even colored jelly beans.
But the most popular method is partial or complete coloring, which will help you get perfect decor the desired texture and shade for the interior of the room.

Using glass containers in combination with wooden decor and bases, you will get modern products in eco-style. To do this, you need to either cut a hole of a suitable diameter in the trunk cut, or make an original wooden stand, or even use wooden multi-colored pencils for work.
How to make a beautiful vase with your own hands? 50 ideas


How wonderful it is to receive a bouquet of flowers as a gift or simply pick them in a field and bring them home to fill the atmosphere with a fabulous aroma! Be that as it may, you will definitely need a vase.
Decorating your home is common to all women. They lovingly arrange their life, decorating cozy home cute trinkets, including a variety of figurines and vases. Of course, it’s easier to buy ready-made products, but if you want something exclusive and unusual, read our article. In it we will tell you how to make a vase with your own hands.
How to make a paper vase with your own hands
You can make a completely paper vase at home using papier-mâché or origami techniques. But for this you need to have certain skills, and this is not suitable for everyone. And be sure to keep in mind that in a vase made of cardboard or paper you can only put decorative flowers, because water will render the product unusable.
To make a paper vase, you can use any transparent container such as an old jar or used bottle. To give them beautiful view The surface should be covered with corrugated paper of the selected color or wrapped in colored cardboard and decorated with matching ribbons.
DIY paper vase: video
Tip: to ensure that the paper sticks well to the glass, use PVA glue diluted with water in a 1:1 ratio.

How to make a cardboard vase with your own hands
For work we stock up:
- cardboard;
- scissors;
- glue;
- paper clips;
- tape;
- coffee beans, nut shells, pistachios (for decoration).
We take any large box, lay it out on the floor or on the table and draw a diagram on it (Fig. 1). Then we cut out the shape and fold the vase out of cardboard, securing the corners with tape. Carefully glue each fold so that the vase does not fall apart. If necessary, paste over outside products with paper, wrapping it inside and securing it with paper clips.
It's time for decoration. Of course, it is difficult to calculate how many decorative elements will be needed for decoration homemade vase, but in the process of work you will figure it out and, if necessary, buy the missing amount of parts. So, smear each piece with glue and, starting from the bottom of the vase, begin to carefully paste it over. At the same time, try to leave as little empty space between elements as possible. The result should be a vase, as in the picture shown.

Do not forget to process the upper part of the product from the inside in a similar way. That's it, the vase is ready to decorate your home!
DIY cardboard vase: video
To make a vase with your own hands you will need: 1. Corrugated cardboard; 2. Mass of papier-mâché; 3. Masking tape; 4. Hot glue; 5. Acrylic paints and varnish.
If you have a few hours of free time and a desire to create something beautiful with your own hands, read how to make a simple origami paper vase with your own hands.
In fact, you don’t need anything other than double-sided colored paper and strictly following the instructions! In addition, origami is a great way to develop fine motor skills, imagination and logic.
A simple paper vase is useful for storing office supplies, and you can also put a vessel with water and flowers in it.
So, let's get to work. We take a square of colored paper and bend it diagonally, then unfold it and do the same with the opposite diagonal (see Figures 1-3). Then you need to fold the sheet into a diamond shape and smooth the lines with your fingers, along which we will then bend the part (see Fig. 4-6).
Now we bend the left and right corners, turn the part over and repeat the steps with the remaining corners. After this we unbend central angle, lowering it to the middle, and bending the left corner. Then you need to turn the workpiece and repeat the manipulations: bend the corners to the center and along the intended lines. The lowest corner is unfolded and unbent: this is necessary for the stability of the vase.
The procedure can be viewed in more detail on the provided step by step diagram with images. Experts say that it is unlikely that you will be able to make a beautiful vase using origami the first time, because the work is painstaking and requires some skills, so it is better to try it on unnecessary pieces of paper.

If desired, decorate the vase by applying touches of glue to the surface and filling them with colored semolina, sparkles, rhinestones or beads.
In the next collection of pictures you can see how to make a vase from modules - parts from which it is then assembled decorative item. To make the vase bright, use modules of different colors.


This work is considered more complex and requires experience and thoughtfulness: one wrong step and everything will go down the drain.
Vase made from origami modules: video
Modules are made of 1/32 rectangles
Video: how to make 1/32 origami modules. Master class for beginners.
Now we will tell you how to make such an unusual and stylish storage vase small items. Please note that the product is not intended for food!

Take a plastic bottle of any color and hold it over the fire to bend it: this must be done while the plastic is hot. After cooling, take a soldering iron and drill in a chaotic manner a large number of holes of the same diameter. That's it, our vase is ready!
You can take an ordinary plastic bottle and sew a case on it from felt or an old sweater. This decor is perfect for decorating a country house interior.


A plastic bottle or box of chips can also be transformed beyond recognition by covering the surface with stones or shells.

The most basic way to decorate a plastic bottle is to wrap it in printed tissue paper or colored tape, and then decorate it with a matching bow.

You can also wrap the bottle with colored threads or rope.

DIY vase from a plastic bottle: video
Vases made from natural materials
IN modern world There is such a lack of environmental cleanliness that you want to be closer to nature even in urban environments. Eco-design is very relevant today, so if you are choosing a vase for your garden, feel free to follow our advice.

Pumpkin crafts are a great way to show your imagination and bring the family together over shared needlework. To work you need to stock up sharp knife, spoon and pumpkins of different sizes.
Take the pumpkin and cut off the top, and through the hole, clean it of the insides and let it dry. Instead of throwing away the pulp, you can use it to make face masks. Let's start with making the simplest versions of environmentally friendly vases.

The edges of the vase can be made “lace” by carefully cutting them with a thin knife.

If you're familiar with , put your skills to use by making a unique pumpkin vase that you can place lit candles inside!

How to make a vase from maple leaves with your own hands
And kids will surely like such a vase, because it’s fun to make and it’s also interesting to use! Collect a bunch maple leaves, clean off any dirt and trim their stems. In the meantime it is necessary to inflate balloon and spread it with glue to the middle. Glue the leaves overlapping each other using PVA glue and a brush. Let the product dry. When the leaves are dry, pierce the ball and carefully remove it.

Good luck in your creativity!
Decorating a vase with your own hands is quite exciting hobby. Author's, unique vases in finished form are quite expensive, and a vase decorated with your own hands will definitely suit your interior, because you will select materials according to color and style to match finished room. Another advantage DIY decoration vases - its uniqueness. You will never find exactly the same one, even if you use materials from a specific master class.
A vase in the interior is not just a vessel in which you can put a bouquet of flowers. This is a work of art, a piece of furniture, and a thing that can be used to cover empty place. And in combination with the bouquet itself, the vase will become an integral part of your interior.
To decorate a vase with your own hands, you may need available materials and various instruments, but also of course, your hands. Decorating a vase with your own hands is a creative process that can be a fun activity for the whole family. Well, we will give you ideas and tips on how to decorate a vase with your own hands in this article.
There are many ways to decorate, the most popular of which are:
- glass painting;
- decoupage;
- decoration with fabric;
- using color or corrugated paper, newspapers, sheet music;
- design using pencils or brushes;
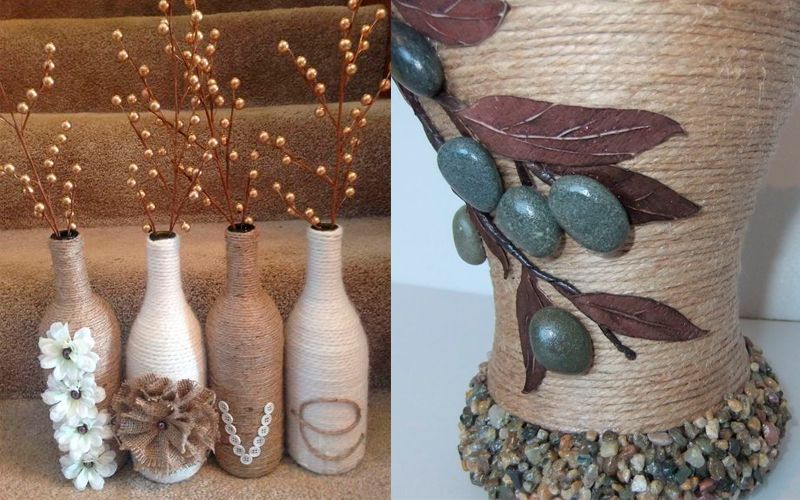
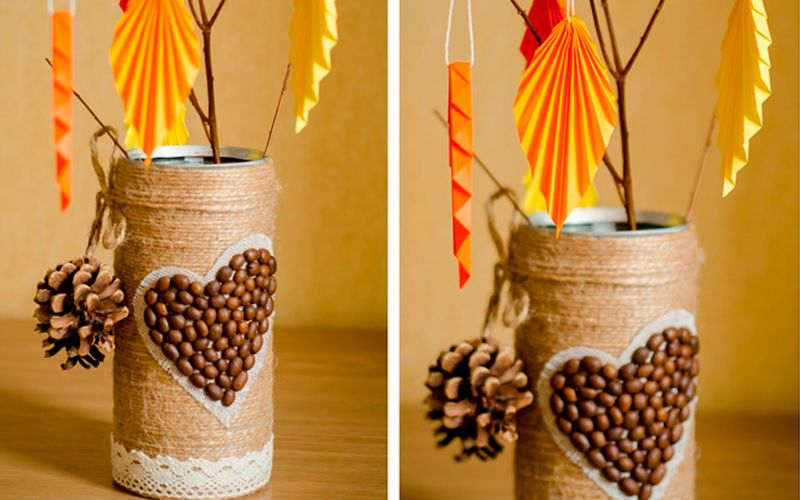
- decoration with twine, rope or colored threads;
- using artificial flowers;
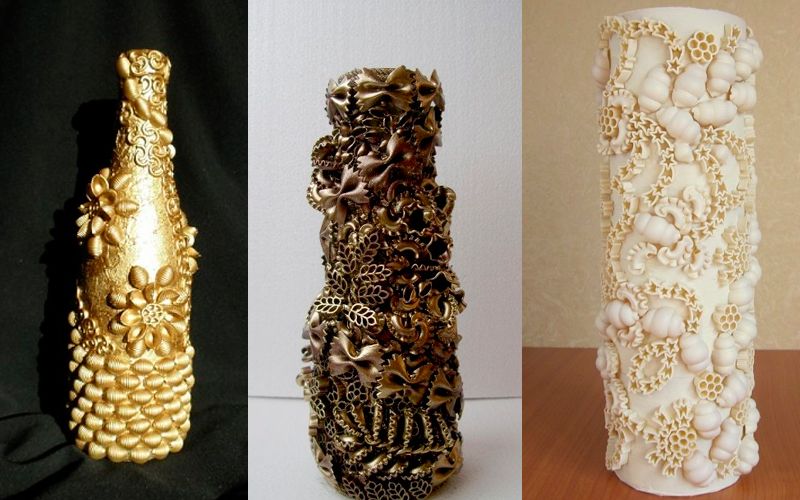
- decorating with edible materials - pasta, seeds;
- using improvised materials, for example, buttons, coins, beads;
- decorating a vase with ribbons and lace.
Let's look at some of them - do-it-yourself vase decor with photos.
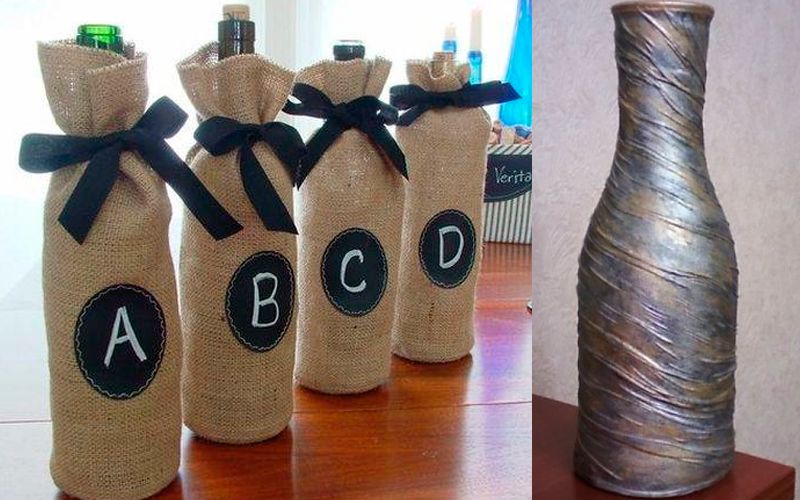
Twine - excellent material for decorating bottles, glasses and vases. Its flexibility (literally) allows you to decorate even the most complex shapes. Along with twine, you can also use other materials: rhinestones, beads, buttons, threads, fabric, ribbons. Both regular PVA and hot melt glue or “moment” are suitable as glue.
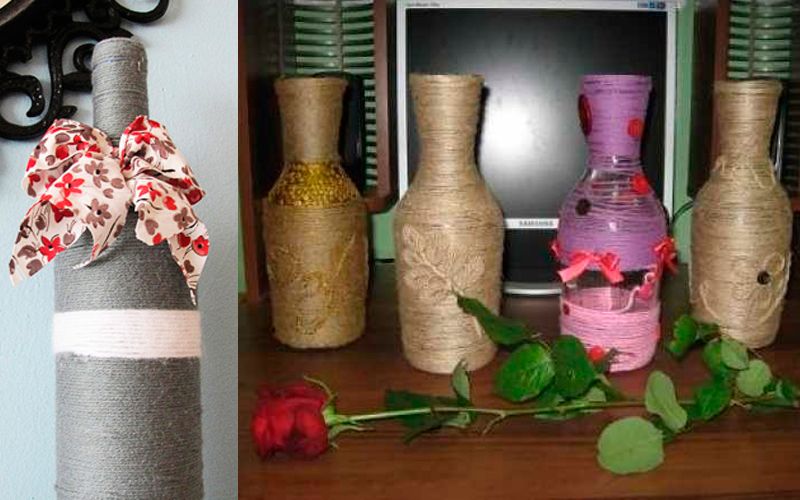

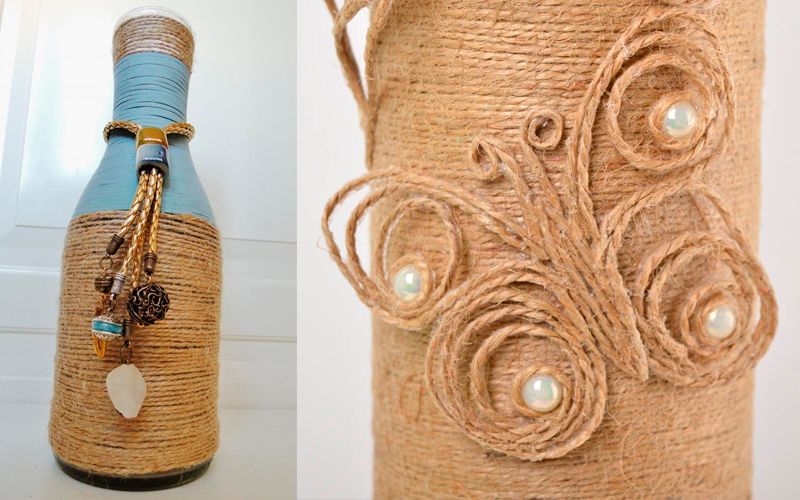
Natural materials can also complement twine or rope: pine cones, shells, dried leaves, small pebbles or other stones.
Certainly, art painting not for everyone. But a vase painted with your own hands will look expensive and unique. For painting on glass, use stained glass paints or special acrylic paints marked “for painting on glass.” You can go another, more economical way: first, the vase is coated in two layers with PVA glue, and then a drawing is applied to it using ordinary gouache.
Important! Before starting work, the vase must be thoroughly degreased - wiped with alcohol or an alcohol wipe.
In order not to spoil a large vase without painting experience, you can practice on an ordinary glass or bottle of wine or champagne.
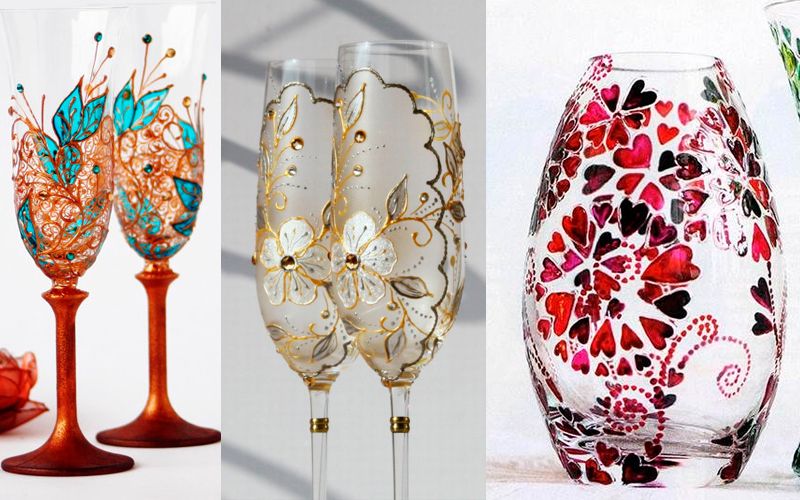
To create a relief contour, use a special acrylic contour on glass.

The fabric can be used not only for sewing clothes or home textiles. It is also an excellent material for decoration. various items interior
You can decorate a vase using fabric in different ways: sew a cover on it, paste it with pieces of multi-colored fabric, wrap or tie the vase.


You can decorate with fabric not only a vase, but also any other container, for example, a bottle. For this you need following materials and tools:
- textile;
- bottle;
- glue;
- paints;
- decorative elements- beads, buttons, shells, ribbons.
The fabric should be soaked in glue and wrapped around the bottle. Then glue the decorative elements and paint.

A vase decorated with lace and ribbons is no less beautiful and elegant. To glue materials to the surface of the vase, you can use hot glue, moment, or PVA. Also combine with artificial flowers, buttons, rhinestones, beads and beads.
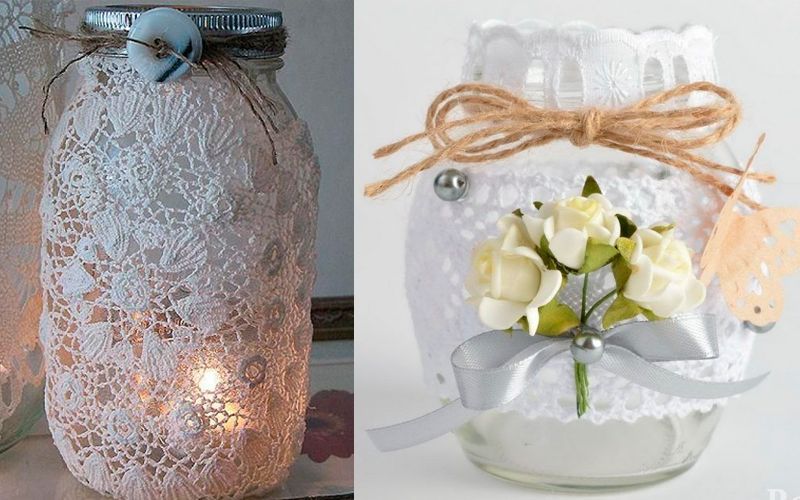


Decorating a vase with lace is quite easy, and you get a unique and original pattern.


Any natural materials can be used as decoration for a vase with your own hands: wood, twigs, pine cones, shells, pebbles, dried leaves and flowers, straw.
How to decorate a vase with your own hands using natural materials? Just like other materials for gluing, you can use PVA, hot melt glue, and moment. Before applying glue, the vase must be degreased.


One of original ways decorate a vase with your own hands - cover it with pasta different shapes and size. Thanks to the huge selection of pasta in modern supermarkets, vases turn out to be unique and original. From above, the entire pattern is covered with paint and varnish for durability.


Old newspapers can be used to decorate a vintage style vase. Aged paper or sheet music are also suitable for this purpose. Simply cover the vase with pieces of newspaper and decorate with twine or thread.


Original DIY floor vases will help you bring a little personality into the surrounding interior and add uniqueness to it.
You can make it from any waste material, which in this moment will be at hand.
Especially popular are tall ones made from cardboard, papier-mâché, newspaper tubes, plastic bottles, old cardboard box and so on.
Dry branches and artificial flowers will help add elegance and originality to it.
Exactly like this decorative composition, which is complemented by branches or flowers, will become a noticeable item in the house, it will definitely attract attention.
In the photos below you can see the most interesting floor vases, which can be made with your own hands from a variety of materials.
All that is needed to create a product is imagination, patience and, of course, original idea, which the corresponding master class will help you find.
How to create a floor vase with your own hands
Before you start creating a floor vase with your own hands from scrap materials, you should take a closer look at the surrounding interior and try to make it in exactly the same style.
After all, if this item fits harmoniously into the overall decor of the room, then it will sparkle with completely new colors, and the vase itself will not seem like some kind of foreign body.


So, for example, for a room made in modern style hi-tech, it is better to use an unusual style with minimum quantity flowers and additional decorative elements.
For premises in classic style strict shapes and similar shades are suitable; avant-garde design will originally complement a product with many curves and bright colors.
Very often it is enough to simply change the design of an old vase, slightly change its decor and color - and this object will decorate the surrounding space in a completely new way.
In this case, you should show your imagination as much as possible and not be afraid to realize even the most daring ideas.
Of course, this will require finding old item and it is desirable that it has a smooth surface.
Paints, coins, broken glass- in general, everything that can be nearby.

The main thing here is not to be afraid to experiment, because even the most unusual idea can help change an old item beyond recognition.
Some examples of the design of old vases can be seen in the photos above.
Well, if you want to do something completely unusual and original with your own hands, then it is recommended to take a master class and start turning all your ideas and ideas into reality.
Probably everyone will find a lot of old and unnecessary newspapers in their closet.
It is from this waste material that you can very easily make an original floor vase with your own hands, as shown in the photo below.

You will definitely need a lot of old newspapers, as well as glue for paper, it is better if it is PVA, as well as a lid from a saucepan.
Such decorative vase made from newspaper tubes, even though it is created in just a few hours, will become a real decoration of the surrounding space.
First you need to prepare a sufficient number of newspaper tubes. The bottom can be made of cardboard, or you can weave it yourself from newspaper tubes.
To do this, you should collect four bundles so that each of them has four bundles.
The photo below shows how to do this.

To do this, strands of newspaper tubes remaining from the bottom are bent upward and braided in a circle with another strand so that the leg is completely formed.
Now you need to insert the lid from the pan between the formed posts and continue weaving. After about ten rows, you should begin narrowing the neck.
At the final stage, it is necessary to carefully form the neck itself.
After the vase from newspaper tubes is fully formed, it must be covered with glue and clear varnish and allowed to dry. Next, you should carefully cut off the protruding remnants of newspapers.
To give more original look finished product, you can make decor from any available materials. You can also use artificial flowers and dry branches for this.
This composition, complemented by artificial flowers, will give the floor vase a unique appearance.
The video below shows a master class on making a vase from newspaper tubes.
In the video above you can see a kind of master class that will simplify the assembly of a product from newspaper tubes with your own hands.
It should be noted that in exactly the same way you can make a floor vase from many other materials. So, dry branches, vines, rattan, and so on are perfect for this.
Floor vase using papier-mâché method
One of the most popular ways to make an original floor vase with your own hands is the papier-mâché method.
Surely, everyone took a master class on papier-mâché back in school during labor lessons, which means no problems should arise.
Everything you need to create one original vase- this is the material for papier-mâché (pieces of paper), glue, paints, transparent varnish, as well as sandpaper.
So, first you need to take a blank that will help shape the shape of the future product. These can be old boxes or plastic bottles of various shapes.

It should be remembered that each layer of papier-mâché should be thoroughly dried before placing the next one on it.
After all layers of papier-mâché are completely dry, it will be necessary to process the frame future vase water-based base and let it dry well again.
For these purposes it is better to use spray paint, which should be applied evenly in several layers.
Once the surface of the papier-mâché floor vase becomes monochromatic, you can begin decorating it. The decor of a floor vase made of papier-mâché can be done in various ways.
So, using a foam sponge and contrasting paint, original patterns are applied to its surface.
You can also use broken glass or a mirror to decorate the product, various shiny objects and so on.
At the final stage, you should open the vase with several layers of transparent varnish, which will help protect it from moisture. Dry branches will also add originality to the finished vase.
More detailed master class How to create a floor vase with your own hands using the papier-mâché method can be seen in the video above.
Interesting ideas for creating floor vases
You can create floor vases with your own hands from the most different materials, there are no restrictions here.
For these purposes, use dry branches, old carton boxes and even plastic bottles.
It is from plastic bottles that you can make truly decorative floor vases that will amaze with their originality.
A simple master class on how to create a vase with your own hands from this universal material(plastic bottles) is presented below in the video.
You will need two bottles to work. different sizes, glue, rope, toilet paper, and spray paint.
To begin with, you should carefully cut off their upper parts from both bottles, after which you need to put the smaller part on the larger one.
After this, several layers are applied to the resulting structure using glue. toilet paper. Various designs are then made from the crumpled paper on the vase.
The finished vase should be opened with paint and made additional decor. In order for the composition to have a finished look, dry branches or artificial flowers are inserted into the floor vase.
To create original floor vases with your own hands, you can also use empty tin cans, for example, coffee cans, for example, as in the photo below.
Work should begin by cutting off the bottom of one of the cans, after which it is placed on top of the second can and carefully secured with tape.
The structure thus obtained should be tightly wrapped with thin rope in several layers.

This master class on creating an original floor vase can be completed independently by anyone.
In any case, a vase for the home can be created from absolutely any materials, for example, from branches, plastic bottles, cardboard and even old dishes.
The main thing is to show your imagination as much as possible and not be afraid to realize even the most daring ideas.
Any housewife dreams of an unusual and compact decorative element that would fit well into the interior. It could be a vase made with your own hands, because every girl has flowers at home when the spring holidays approach. Who would have thought that from the simplest glass jar or a transparent vessel you can create something really beautiful. Such a unique thing will not only delight you, but also attract the attention of guests.
This option for creating a vase is not suitable for beginners; it requires solid and experienced hand. But, as they say, experience comes in the process, so for those who want to create something quite unusual, ideal option will choose the dot painting method.

To do this you will need:
- Acetone.
- Cotton pads.
- Contour paints.
- Thread or toothpicks.
- Degreaser.
For skilled craftsmen, creating a masterpiece in this way will not be difficult, but if you are just mastering the technique, then it is better for you to print out the sketch and practice applying dots of the same size and density on plain paper. After this you can start decorating:

Geometric vases
A vase made in this way will certainly not leave anyone indifferent. To make it, you only need a degreaser, tape, multi-colored spray paint, a brush, cotton pads and a transparent vase:
- Use a degreaser and a cotton pad to treat the surface.
- Wait until it dries and cover it with tape in the order you like.
- Now spray paint the surface without touching the tape.
- Wait until everything is dry and remove it.
 Such a vase will look much more interesting than a simple one, and will add bright accent into your interior.
You can also use tape of a small width, so decorating the vase with your own hands will be more detailed.
The pattern is especially attractive when you cover the vase not completely, but only it bottom part. To do this you need to take a regular plastic bag and secure it with tape as shown in the photo.
For a vase in this unusual style An excellent choice would be to choose gold or silver glitter. The main thing in creating this decorative element is to choose the right tones and shades so that it attracts attention and complements the interior. To solve this problem, you should choose golden and copper colors, and also black or white.
Full Coverage
If you don't want to spend a lot of time creating a design, then the best solution would be to simply paint the vase in one tone. To do this you will need acrylic or any other spray paint. Peculiarity acrylic paint The point is that you can choose any color you like.
Don't forget about glitter.
You can also partially cover the vase by covering the top with a plastic bag.
There is another solution to cover the vase in one tone if you do not want to buy specialized paint. You can cover it with regular foil. For this you will also need glue and a brush. Let's get started:
- Cut the foil into small pieces to make it easier to glue.
- Apply glue to transparent vase and fix the material for decorating the vase.
Paste it over step by step. You can partially cover the surface, which will also look very impressive.
If, as spring approaches, you really want to please yourself with flowers, but... weather don’t allow you to find a couple of tulips, then you can create them yourself, using paints and a brush.
Such a decorative element will not only delight you and your loved ones, but will also suit a great gift on the eve of the Eighth of March.
To do this you will need:

And now step-by-step instruction. First, you need to rinse the vase well with soap and wipe it dry, and then use acetone or another degreaser to ensure that the paint adheres well. Once the surface is prepared, you can begin to create the image. Take a tube and carefully squeeze out the paint, begin to draw the outline of your future flowers. Even if you don’t know how to draw, the main thing is not to be afraid and finish the lines. Once the outline of the flowers is ready, you can start coloring. Apply the paint carefully and in small portions, as it is quite liquid and can spread quickly. Further actions are:

Ready! All that remains is to let the paint dry.
Such a vase, which at first glance seems difficult to make, can be made by absolutely anyone if desired.
Vase of cereals
Decorating a vase with your own hands seems like a complicated and time-consuming process, but is it so? Of course, if you want to create a painting or decorate using the dot method, then you need some experience. But semolina decor is so simple to make that even a child can handle it.
You will need:

First you need to wipe the surface with a degreaser. Just wet the swab and carefully walk along the walls of the future vase. So now you can get started:

 By the way, vases made from coffee beans are no less attractive. They are made in almost the same way, only hot melt glue is used, and the grains are attached one after another.
If you prefer working with cereals, then there are many options for decorating in this way. For example, corn and buckwheat groats, as well as millet porridge.
This way, you will get an exclusive and cute vase that can be used as a gift or as a home decoration.
Original wood product
Not everyone can create wooden decor DIY vases. The master class consists of several steps. First, you need to choose the material. This example uses a cherry log as the base. It can be purchased at special warehouses or cut yourself. Then dry and store accordingly. Secondly, do not forget to maintain the proportions; the diameter of the log should be twenty centimeters.
After all the manipulations, you can proceed:

After all the manipulations, you can lightly sand the letters with sandpaper.
We use twine
Jute twine is a fiber made from the stems of a plant. It can be used either independently or as part of yarn. It is usually used in plumbing or for gift wrapping, and is also used to make various miniature home decoration items.
How to decorate a vase with your own hands using twine—many needlewomen ask these questions.
To create you will need:
- Jute twine.
- Balloon.
- Wire.
- Scissors.
- PVA glue.
So, let's get started. First, you need to inflate a balloon of a size that matches the depth of the vase. Next, wrap it with fiber. Unlike making toys using thread and ball, in which you first need to blot the thread and then wrap it, here you need to do the opposite. First secure the twine, and then apply glue, since it is a natural fiber, it will absorb it very quickly. Now we do this:


Agree, it’s nice to receive flowers as a gift, and it’s no less nice to buy them yourself in order to add freshness and bright colors. In this case, you will never be able to do without a vase. Take your time and make it yourself. Such cute decorative elements will add comfort and warmth to your home. The main condition for creating the above crafts is time, patience and work.
Attention, TODAY only!