Fastening points for wooden frame houses. Main components and connections of a frame house. What is the wall of a frame house made of?
Read also
The construction of frame structures has long become extremely popular. There is nothing surprising about this. This construction method is very attractive due to its simple technology, which allows you to carry out all the work on your own, without resorting to the help of hired workers. And the materials required for construction are not too expensive and quite affordable.
However, when deciding on the type, one should not proceed from the mass of the building alone.
The location on which the building is planned to be erected must also be taken into account. If it is clayey and heavy enough, then it will hardly be possible to do without a solid, monolithic foundation. If the soil has a normal sand content, then or is quite enough.
If a homeowner has doubts about the quality of the soil for construction on his site, he can check its type and composition with a local architectural office. You should not neglect it without first making sure that you can actually do without it. Natural materials of wood origin will be used in the proposed construction. Even for fully processed, high-quality material, it is better to avoid prolonged contact with water.
There are two schemes for building a frame house:
- All activities are completely self-guided. Ready-made blocks are not used: only original building materials;
- construction of a structure from fully finished, complete blocks, which are manufactured industrially.
Let's consider the first, more democratic option
Diagram of frame house components: laying the foundation
The material for the roof is selected according to the preferences and capabilities of the construction owner. It could be roofing material, and much more. Like other installation work, installation of the frame also begins from the corners.
The ends of the roof frame are securely attached to the floor joists. The roof usually has the shape of an isosceles triangle. The distance between the rafters corresponds to the width of the material that is supposed to be used as insulation or coating.
It is convenient to assemble the roof frame on the surface of the ground, and then lift it and install it on the house.
Do-it-yourself cladding of a frame house
 Frame wall pie diagram
 Covering options may vary. This and more. A durable, waterproof material is laid under the overlapping sheathing, with a margin of 20-30 cm.
The walls are covered with the selected material, then the roof, windows and doors are inserted. The floors are laid last. The boards are hemmed under the laid joists, all the gaps formed between the boards and joists are filled with insulation.
If there is such a possibility, then it is better to make the floor insulation double-layer.
First, a layer of polystyrene foam, followed by mineral wool. When all the insulation is laid out, the floorboards are laid. They are placed perpendicular to the joists. For greater evenness and smoothness of the floor, the top can be finished with OSB boards or sheets. Once the floor is laid, you can begin finishing the interior walls. All existing gaps between horizontal and vertical joists should be filled with insulation. A special film is applied on top. Then sheathing is carried out or.
To make the walls more stable, you will have to install internal jibs for both intermediate and external walls.
Fastening points during the construction of a frame house
 To
To
Frame houses are buildings that are quite comfortable and durable, of course, if they were erected in accordance with existing rules. The design of a frame structure consists of numerous components, fundamental - basic, and auxiliary. Absolutely any of the existing components of a frame wooden house during construction will certainly require especially close attention: there simply cannot be any trifles here. After all, if all the elements of such a structure are fastened and joined incorrectly, living in the building will not only be uncomfortable, but very dangerous for you and your loved ones. One day, from an incorrectly distributed load, such a house risks simply “falling apart” into pieces.
Frame house components: features
In order for the frame structure to be strong and reliable, all components must be carried out in absolute accordance with the design documents and drawings. The frame structure includes three key components of the building - these are, of course, walls (more precisely, the wall system), floors (floors, ceilings), and also the roofing system. This is the basis of the basics, and without the correct construction of these elements, long-term living in the house will be simply impossible. In addition to the main ones, it is also impossible not to note the additional structural components of the structure. They are places of docking, connection of different parts, elements of the future house - the frame.
Support for the nodal system of walls of frame houses - foundation. It can be of various types, the most commonly used are:
- slab foundation;
- tape;
- columnar-ribbon base.
 Anchor bolts act as fastenings for wall units. Ordinary racks are attached to each of the strapping beams. Auxiliary nodes in this case are the lower as well as the upper harnesses. In order to mount the harness, you should use special bolts. The most reliable option with maximum strength is the “frame” assembly, when the fastening bolts are located in the frame, and the racks are put on them. The process of installing rack beams should be given special attention, because it is these elements that are assigned the load-bearing function.
Walls: features of corner nodes
When designing corners, or rather, corner nodes of the walls of a future building, it is also important to avoid mistakes. If there is no competent connection diagram for such nodes, you will have to spend much more time installing the side and facade walls of the building.
 To create a frame for the side walls, it is imperative to provide an additional post, which will be rotated to the corner post exactly ninety degrees. Thus, it will be possible to qualitatively bandage the frames of the facade and side walls. This means that the corner connection will become reliable and durable. An undoubted advantage is that such a connection makes it possible to form a good internal corner: accordingly, lining the building from the inside with plywood, plasterboard or other finishing materials in sheets will be simple and convenient.
Pay attention to the most important detail: the structure of the wall (load-bearing) of your future building must certainly be of a frame type. The dimensions of the vertical racks must certainly be observed in accordance with the existing project; the same requirement would be fair for the gaps between the racks. If we are talking about strengthening load-bearing racks, then it is usually done with plywood or chipboard.
Joining the foundation and walls
What is the best way to connect the walls and the base of your frame? Beams can be placed on the support beam either perpendicularly or parallel to the walls. At the beam level, beams can be located on anchors or on a suspension, perpendicular to the wall. The roof, as well as the walls of the frames, have a unit represented by racks. These posts should be positioned at right angles to the wall surface. You can also place them parallel to the wall, on the roof gable, as well as in (internal) partitions.
As for the beams supporting the attic, they are made of several elements. If the coating on them is reinforced, it can be installed parallel to the walls.
 The outer corners of the frame walls contain at least a couple of studs. The corner elements of the walls, as well as their intersection points, will become the support for the outer and inner edges of the floors. The walls will be bound using boards whose thickness exceeds 4 centimeters. The width of these boards is similar to the width of the supporting posts in the main frame of the building. Bottom trim boards are available in any structural part of the building, and in the outer wall they will protrude above the support by a maximum of a third of the total width of the trim.
Top frame of frame-type buildings
In the event that the lintels and walls are fastened using special wooden plates or high-strength steel plates, it is quite possible to allow the absence of a top frame above the opening with lintels. The harness itself is formed from a pair of boards. If there are openings on the wall for future window or door structures, a jumper is already provided, which will form one unit with the strapping.

The design of the frame implies that in the upper frame the joints of the boards are located above the central part of the vertical posts (installation in staggered order). To fix the elements, nails of at least 6 cm in length are used. Each end of the top trim boards is secured with two nails. A post is nailed to the harness, markings are made indicating the location of the first post. It is advisable to place the mark on two boards at once.
For standard sheet material, the optimal distance between the posts is 380 mm. Where the window openings and door structures will be located, mark the locations of the main posts, as well as the elements that will support the lintels. It is imperative to include the obtained distances in the design of the frame building: it is important that the distances between the underlying posts are equal.
Proper installation of openings with lintels is a guarantee that all loads will be correctly distributed and the building will last a long time.
The bottom trim knot is where the trim beams will be attached to the base of the house. The elements are joined using clamps or special foundation fasteners (bolts). Before laying the beams, ensure high-quality waterproofing of the joints. There is another node in the design of the lower trim - these are the corners at which the beams will be connected to each other. Docking is carried out in one of two traditional ways: “half-tree” or “in-paw”. In order for the connection to be strong, you should take special metal corners or use bolts.
Ceiling and floor beams: what to consider during installation?
Floor floor beams must be supported by a frame beam and their installation is carried out with a pre-calculated step. Ceiling beams are also installed. As for the racks, in frame buildings, first of all, vertical corner racks are installed, and after them - intermediate ones. There are several nodes here:
- corners, in places where vertical posts connect to the upper and lower frames;
- connection of strapping beams and racks.

 To ensure that the vertical posts are securely fastened in the corners, grooves are made and additionally fixed with metal corners. By analogy, the intermediate racks are fastened. The bars of the upper and lower trim will be secured equally (joining points - frame structure posts and corners).
Additional “connections” turn out to be important for those who strive to make their home as reliable as possible. Vertical and diagonal supports are the connecting elements with the help of which the entire frame structure receives additional strength. But this method is not always used. More often, the design of frame buildings suggests that for reinforcement it is enough to sheathe the frame with OSB boards.
Rafter system
The rafter system of frame buildings will also consist of a significant number of nodes. These are, in particular:
- places where the rafters rest on the ridge girder;
- places where the rafters rest on the beam of the upper frame;
- the place where the crossbar and rafters meet;
- the junction of the counter-lattice of the frame and the rafter legs;
- the junction of the building's counter-lattice and its sheathing.

 Briefly about each node we can say the following:
The rafter legs of a ridge are connected in two ways: overlap or butt. In order to secure the rafters to the beams of the upper frame, cuttings of appropriate sizes should be made on them. As for crossbars and other types of supports, their role, as a rule, can be played by bars or boards. The counter-lattice bars should be installed with a pitch similar to that with which the rafter legs will be mounted. The sheathing of a frame building can be either continuous or sparse, it depends on what the roof structure is and, of course, on the type of future roofing material.
The issues of fastening house elements are discussed in detail in this video:
Having knowledge of what the design of the components of a frame building should be, such housing can be built with your own hands. The use of high-quality wood and other necessary materials, compliance with all standards and technologies is the guarantee that your residential building will be functional, reliable and of high quality!
Walls are one of the main structural elements of a frame house. They have a complex structure, require the use of several types of materials and require strict adherence to work technology during installation. In order for the construction result to please you for many years, you cannot do without some theoretical knowledge.
The initial stage of wall construction is frame assembly
The frame determines the geometry of the house, ensures its rigidity and safety. That is why it is so important to choose the right building material for it and follow the construction technology.
Bottom trim - material used and preparation for installation
A week after pouring the foundation, you can begin laying bottom trim. It provides support for future walls and connects them to the foundation. Most often it is made of timber with a rectangular cross-section of 150x200 mm.
You can choose between solid and laminated timber. Their main differences are strength and price. Glued laminated timber can withstand heavy loads, but its price is higher than that of solid timber.
Immediately before laying the strapping, be sure to check the evenness of the foundation. If the horizontal line is maintained, begin waterproofing work. For this, bitumen or roofing felt is used.
Note! If the horizontal deviation is more than 10 mm, a mortar is used. If the deviation is less than 10 mm, planks are placed under the harness.
Connecting the beams of the lower frame and fixing it to the foundation
The frame is attached to the foundation using anchor bolts. Holes for them are made in the beams and foundation at a distance of 1-1.2 m from each other. Anchors must have a diameter of 12-16 mm and enter the concrete to a depth of at least 100 mm. Choose anchor bolts with a hex nut and a wide washer.

The beams can be connected to each other in several ways. Particular attention should be paid to the corners. The following connection types are suitable for these areas:
- “half a tree” and “in the paw”;
- "dovetail";
- "root thorn".
The last two options are reliable, but labor-intensive. That is why in practice “half-tree” and “claw” joints are widely used.
Half-tree connection involves sawing out part of the timber. The height of the cut is equal to ½ of the thickness of the lumber, and the depth is equal to its full thickness. The “paw” connection is made in the same way, but the cut is made at an angle. As a result, the protruding part of the beam has a trapezoidal shape.
In this case, the beams are additionally reinforced with reinforced metal corners and 120-150 mm nails. You can also use a dowel - a wooden pin connecting the beams to each other. It should be slightly smaller in height and diameter than the hole previously prepared for it. This requirement is connected with the subsequent shrinkage of the frame house.
Installation of vertical racks
Vertical frame posts begin to be installed from the corners. To fix the corner elements on the lower trim, reinforced metal corners are used.
Racks on straight sections can be secured by complete or incomplete cutting or using the same steel corners. In this case, conventional products without additional reinforcement are suitable.

The cutting method involves cutting out special grooves in the strapping beams. Their width corresponds to the same size of the vertical post, and their height is equal to 30-50% of the thickness of the strapping beam. With complete cutting, the end of the rack is completely recessed into it to the selected height, with incomplete cutting - only partially. As a result of drinking, it takes on an L-shape.
Note! If you choose the cutting method, then the length of the racks corresponding to the height of the future walls must be increased by the height of two grooves.
The pitch of the racks largely depends on the pre-selected wall material.
Performing the top trim
The upper harness is performed in the same way as the lower one. Fastening the racks to its horizontal beam can also be done using metal corners or cutting. In this case, choose the method that has already been used when working with the lower harness.
It is important! The upper grooves for the racks should be cut strictly perpendicular to the lower ones. This will avoid distortion of the frame. 
Each vertical post is not only inserted into the cut-out groove, but also additionally secured with two nails. They must be recessed into the frame element by at least 100 mm.
Jib bars - what are they for?
Jib beams are boards with a cross section of 25x100 mm. Fixed on the bars of the lower and upper frames and racks, they give the structure spatial rigidity.
It is important! Do not confuse long struts that connect multiple posts with short struts within a single vertical member.

The jibs are installed at an angle of 45-60°, cutting grooves for them in the frame. In places where they drank, they are additionally fixed with two nails. For walls up to 6 m long, two jibs directed from the center of the lower frame to the two upper corners are sufficient. For longer walls, their number can also be increased.
Walls of frame houses - their structure and construction technologies
Walls erected in compliance with the technology provide a comfortable microclimate in the house, ample opportunities for decorating its interior and safety.

Layer-by-layer wall construction
All external walls of frame houses are a “pie” made of various materials. They form it as follows:
- The frame fixed to the foundation is covered from the outside with sheathing material.
- It is covered with a layer of waterproofing.
- A lath is attached over the waterproofing for installation of façade finishing material.
- Insulation is laid inside between the frame posts.
- Cover it with a vapor barrier material.
- Install the internal wall cladding. Usually it serves as the basis for working with finishing materials.

The result is a multi-layer “pie” of the wall, which demonstrates high strength and insulation characteristics. However, the entire range of work does not always take place. Its completeness depends on the chosen construction technology.
Canadian and Finnish technologies for raising the walls of frame houses
Canadian and Finnish frame construction technologies make it possible to build a residential building from environmentally friendly building materials in a short time. However, they have one fundamental difference. It lies in the method of raising the load-bearing walls of a frame house.
Finnish technology involves performing all work on the construction of walls - from installing the frame to vapor barrier - directly at the construction site.
Canadian technology allows you to further reduce the construction time of a house through the use of ready-made SIP panels. Usually they are a “pie” of two layers of sheathing material and insulation laid between them. The thickness of the panels and the materials used to make them may vary.

Note! After installing the frame, insulating it and covering it with finishing material, the thickness of the walls for central Russia is 150-200 mm.
External wall cladding
Taking on a large load, the outer cladding of the wall frame ensures the rigidity of the structure and its stability during operation. Properly selected building materials for cladding will allow the walls to maintain their shape for many years and withstand negative external factors.
Application of OSB-3 boards in frame construction
OSB-3 boards (OSP-3) are moisture-resistant oriented strand boards of increased rigidity. They are made by pressing and gluing three to four layers of wood chips. In each layer it has a different direction, which gives the material increased rigidity.

Advantages of OSB-3 boards:
- The optimum ratio of price and quality.
- Easy to process - cutting, drilling, grinding.
- Suitable for using various fastening elements - nails, screws, dowels, etc.
- Resistant to splitting even when fasteners are used close to the edge of the slab.
- Do not deform due to temperature changes and various atmospheric conditions.
Main disadvantage– low vapor permeability. The slab walls “don’t breathe.”
Of no small importance is the fact that synthetic resins are used for gluing chips. This means that the cladding material can release formaldehyde and phenol into the air. However, stoves made according to European standards are safe for humans.
Note! The most environmentally friendly material is the one with markings E0 And E1.
Cement particle boards (CSP)
DSP is a material based on a mixture of wood chips and high-grade cement. To improve its performance properties, special additives are included in the composition.
Cement particle boards have the following advantages:
- Resistant to moisture and, accordingly, to mold formation.
- They are not afraid of rodents.
- Environmentally friendly. They do not release harmful substances into the air.
- Fireproof, belong to the category of low-flammable materials.
- Retains heat well.
- They have good vapor permeability and are breathable.
- When covering the frame, a flat surface is formed.

In contrast to the advantages of DSPs, they also have disadvantages:
- Heavy weight.
- Difficulty in processing the material. Drilling and cutting require a lot of physical effort. At the same time, a lot of dust is generated during the work.
- High price.
Fiberboard for external cladding
Fiberboard is wood fibers pressed into a board. As in the production of OSB, they are laid in several layers, in each of which the fibers have their own direction. No adhesives are used. Enough pressure, exposure to high temperatures and resins contained in coniferous wood.
What characterizes this material on the positive side?
- It provides good heat and sound insulation of rooms.
- Environmentally friendly.
- The slabs are light in weight.
- Good vapor permeability.
Basic lack of fiberboard– low rigidity index. When using this material, it is necessary to install jibs and select rigid internal lining.
Covering the frame with plywood
Plywood is a sheet material made from several layers of veneer that are glued together. In frame houses, regular walls made of moisture-resistant plywood have a thickness of at least 12 mm.

Advantages of plywood:
- not afraid of low temperatures;
- easy to process;
- high compressive strength;
- affordable price.
The disadvantages of plywood include its flammability, the presence of synthetic resins, and its tendency to chip.
Attaching the outer skin to the frame
Attaching the outer skin to the frame is done according to general rules.
- The presence of a temperature gap of 3-5 mm between the plates (sheets) is mandatory.
- Their joints should be in the middle of the frame beam.
- To fasten the sheathing, self-tapping screws 55-70 cm long are used. At the same time, they must go into the frame stud to a depth of at least 40 mm.
- Self-tapping screws are screwed in at a distance of at least 10 mm from the edge of the slab.
- Fixation of sheets or slabs is carried out in increments of 15 cm - along the edge, in 30 cm - in the center.
Since you will be using a huge number of fasteners, stock up on high-quality power tools in advance.
Hydro-wind protection of the external walls of the house
The insulation in the “pie” must be reliably protected from moisture. Only under this condition will it be able to perform its direct function without deteriorating its performance properties.
On the outside of the walls, for these purposes they use superdiffusion membranes. Their complex structure makes it possible to remove steam from the insulation and at the same time prevent moisture from penetrating into it from the street. Low breathability makes this material windproof.

Note! Superdiffusion membranes are not a vapor barrier material, but a vapor-permeable waterproofing material. This must be understood, since the vapor barrier completely prevents the penetration of steam through itself.
The membrane is laid without gaps on the sheathing and secured with staples using a construction stapler. When laying rolled material, overlap adjacent strips by 10-15 cm on all sides. Then all seams are taped with special tape.
Thermal insulation of walls - choice of material and its installation
Properly selected one provides not only a comfortable microclimate in it at any time of the year. Low thermal conductivity and proper placement of the material significantly reduce energy costs.

One of the main thermal insulation materials used in frame construction is mineral wool. It retains heat well, provides high-quality sound insulation, but is afraid of getting wet and releases harmful substances into the air in small quantities. The optimal density of mineral wool for frame walls is 30-50 kg/m3. m.
When working with mineral wool, the use of personal protective equipment is mandatory.
In terms of performance properties, it is superior to cellulose with special impregnation. It is not afraid of getting wet, is environmentally friendly and non-flammable, and perfectly fills all voids. However, you will have to hire experienced specialists to install ecowool.

Polystyrene foam is a moisture-resistant and economical material that does not emit any substances and does not shrink. However, its fragility, which increases at low temperatures, and flammability make it unclaimed in frame construction. Much more practical and more resistant to external influences is the “relative” of polystyrene foam - extruded polystyrene foam.
Any insulation is placed between the frame posts like this: tightly so that there are no voids left and gaps.
Vapor barrier material for walls
The vapor barrier is designed to protect the insulation from steam that can penetrate into it from the living space. Here we are already talking about insulation as a reliable barrier to moisture. The complex design of the wall involves laying a vapor barrier only on the “warm” side.
The most suitable option is dense (at least 200 microns) polyethylene film. It is fixed to the frame using a construction stapler.
The vapor barrier material must be installed as tightly as possible. To do this, carefully glue all its joints and places where communications are laid.
Internal frame lining
For the internal cladding of the frame, OSB boards (9 mm) or moisture-resistant plasterboard (12.5 mm) can be used. At the same time, plasterboard is more pliable in work, but OSB boards give the walls additional rigidity. Their use for internal and external cladding eliminates the need to install jibs.

Oriented wood boards for interior cladding are installed in the same way as for exterior cladding. The technology for working with drywall is slightly different. Sheathing can be done in several ways:
- Attach the sheets directly to the frame posts, having previously reinforced them with horizontal beams with a section of 50x50 mm.
- Install metal sheathing along the frame in increments of 40-50 cm.
- Attaching drywall to a frame is the “American” way.
In this case, there should be no gaps between the sheets. The joints are subsequently puttied. Self-tapping screws are used to secure the casing.

Walls erected in accordance with frame construction technology are a good basis for durable finishing of the facade and rooms. Being confident in the reliability of the “skeleton” of the house, you can enjoy the possibilities of its decorative design.
Video: wall construction technology from A to Z
Building a frame house with your own hands is a completely feasible task. You just need to figure out the sequence in which the main elements are installed, and you can pour the foundation, build the frame, and install all the other elements yourself. First, the sequence of constructing a house with your own hands as a whole will be considered, and then each stage separately.
Step-by-step instructions for building a frame house with your own hands
First, prepare the tools and materials that will allow you to install a frame house. You will need the following:

Figure 1. Diagram of a frame house with an attic.
- a large hammer and a smaller tool;
- several chisels of different sizes;
- electric plane;
- a large nail puller and a smaller tool;
- jigsaw;
- electric circular saw;
- electric drill and set of drills;
- building level;
- plumb line;
- several brushes of different sizes;
- Screwdriver Set;
- scaffolding;
- ladder;
- marker;
- concrete for the foundation of the structure (you can make it yourself or buy a ready-made solution);
- reinforcement of different sections;
- waterproofing material (usually roofing material is used);
- board of load-bearing walls (to construct this part of the structure you will need a board measuring 400x15x5 mm);
- board for constructing a floor frame (you will need pine elements measuring 400x20x5 mm);
- boards for internal partitions (products 400x10x5 mm are sufficient);
- OSB boards (traditionally 2.2 cm thick boards are used);
- thermal insulation material (foam and mineral wool can be used);
- polyethylene film for waterproofing the structure;
- plasterboard for finishing walls indoors;
- lining for external finishing of the structure (siding is also suitable);
- roofing material (experts recommend using metal tiles for the roof of a frame house, but if you wish, you can opt for other materials);
- pipes, wires and other elements for the installation of communications (think in advance about the layout of the future frame house and buy materials in accordance with it);
- leveling compounds;
- antiseptics;
- paint and varnish compositions.
The frame house itself can be erected according to one of two options, namely:
- Installation can be carried out from ready-made factory elements.
- Installation is carried out directly on the construction site, and the assembly and fastening of all elements will also be carried out independently.

Figure 2. Drawing of the wall of a frame house.
To completely build a frame house with your own hands, it is better to consider the second option. First, design documentation and drawings are prepared. All the nuances, the order of fastening and installation of various elements, dimensions and other important points must be provided for in advance, so that in the future there will be no problems with fitting materials, etc. There are many standard projects. For example, you can take as a basis the diagram of a frame house (Fig. 1). The main attachment points and interface points are given there. If desired, you can order an individual project from a specialized company. The project must contain drawings of the base of the frame house, plans for each floor, floors and roofing system, as well as facades and sections.
The foundation is being laid according to the project. Installation of a frame house is most often carried out on a column-type base. On top, the individual pillars are connected by a grillage into a single structure of high rigidity. It is not necessary to invite professionals to install such a foundation. You just need to find one or two helpers. At this stage, it is necessary to check the horizontalness of the grillage surface using a building level.
Fastening the lower trim is carried out in the following sequence:
- Waterproofing in the form of roofing felt is laid on the finished foundation.
- After this, the installation of the bottom trim beam is carried out. In the corners, fastening is done using anchors or nails.

Figure 3. Technology for building a frame house with your own hands.
It is important to check the horizontality of the timber. Its fastening must be strictly horizontal. Angles and diagonals are also checked. The timber is fastened to the base of the frame house using anchor bolts. The distance between the fastening points should be no more than 100 cm. The diagonals, angles and horizontality of the beam are checked again.
Next, the vertical frame posts are installed. Work begins with the corner elements. To make it easier, you can see what the attachment point looks like (Fig. 2). The racks are attached to the bars of the lower trim. To do this, use reinforced steel corners. See how the fastening points should be arranged (Fig. 3).
It is necessary to make temporary fastening of the racks. This way they won't wobble. The racks are fastened on one side diagonally using a board. Be mindful of door and window openings. In these places, the racks will be fastened at a distance different from other sections of the wall.
The installation of the upper frame beam is carried out using steel corners. Carefully check the horizontal and vertical fastening of all elements of this part of the frame house.
Next, each rack is secured using permanent jibs. Use a beam of relatively small cross-section. Look at the mounting points at this stage (Fig. 4). Ceiling beams are being installed and secured. Steel corners are also used. The rafter structure and sheathing are created. The selected roofing covering is being installed. The outside of the frame house is sheathed with plywood. You can use DSP or OSB. The vapor barrier membrane is being attached. This is done using a construction stapler. In the future, sheathing will be nailed along it and siding will be installed.

Figure 4. Scheme of the roof structure of a frame house.
The space between the racks must be tightly filled with thermal insulation material. It must be covered with a vapor barrier film. Use a stapler to attach it to the frame posts. The inside walls of the house are sheathed with plywood or OSB.
This is what the overall sequence of building a frame house looks like. However, this general information is not enough. Therefore, it is necessary to consider each stage separately.
Arrangement of the foundation for a frame house
As a rule, frame houses have 1-2 floors. Experts strongly do not recommend making a frame house higher than 2 floors. And it’s better to make the second floor an attic.
Most often, as already noted, a columnar foundation is erected for the construction of a frame house. You can use a strip base, as well as a prefabricated structure made of concrete blocks. Belt systems require the use of strong reinforcement to create additional strength and rigidity. In the case of columnar systems, the required rigidity is ensured using a monolithic grillage. When constructing a prefabricated base, a strong and reliable fastening is used to increase rigidity. It must be attached along the entire lower trim.
Guide to constructing a house frame

In the process of building a frame house, frame structures made of metal and wood are used. Metal frames increase the cost of a home by an average of 30-40 percent. Therefore, they are not as popular as wood frames. But a metal structure has much less weight, which allows you to save money on the foundation. In the case of wood, the most suitable material is oak. If you don’t have money for oak, high-quality timber from other species will do. Its cross-section must be at least 150 mm². A tongue-and-groove connection is used in the corners. The fit needs to be close. Gaps must not be left.
Professional builders categorically do not recommend using metal fasteners, as this material intensifies the processes of wood decay. Therefore, if possible, self-tapping screws and nails should be abandoned. Rotting will make the connection weaker. In such conditions, the frame house will slowly but surely become loose. To ensure a reliable, durable and building-safe connection, wooden dowels are suitable.
It is most convenient to install thermal insulation material in wall spaces. But in order for the structure not to lose its rigidity, it is necessary to brace the frame with braces. If this is not done, under the influence of external loads, distortions will occur over time, which will lead to further destruction. In accordance with the technology of building a frame house, everything needs to be done taking into account the creation of 3 braces. They are made from the same material as frame racks.
On the outside, the frame is covered with boards. It is best that the skin is not horizontal, but inclined by 30-40°. To do this, you can use tongue-and-groove boards 6 cm thick or lining. It is also important to take into account the fact that the wood you use to build a frame house may decrease or increase in volume during the first 12-18 months. Therefore, it is not necessary to completely nail down the exterior sheathing boards. Otherwise, after a year and a half, the casing may become deformed.
Arrangement of the floor and walls of a frame house

Installation of the structure begins with laying high-quality timber around the perimeter of the walls. Use a beam with a cross-section of 15x15 cm. Before installing the bursa, lay the roofing material. The wood itself must be treated with an antiseptic composition. Installation is carried out using anchor bolts. Try to set the angles as accurately as possible. Use a building level to check. The maximum permissible skew is 1 cm.
To construct the load-bearing structures of the walls and floor of a frame house, you need to use the same materials. If the materials are different, then their expansion coefficients will also differ. This can lead to the house simply becoming warped over time. For the subfloor, use an uncut board. This is the most budget-friendly and quite acceptable option. First, the lags are installed. Thermal insulation material is laid between them. Floorboards are placed on top. After completing the floor, begin building the walls.
Before you start building the walls, find a flat, dry area to assemble them. Otherwise the walls will warp. The frame is assembled from identical vertical boards. If possible, you need to select boards of such a length that would correspond to the height of the premises of your future frame house.

High ceilings require a lot of materials. However, it is better not to do them below 2.4 m either. Otherwise, pressure will be felt in the room, causing psychological discomfort. During the wall construction phase, you may want to consider saving on building materials by installing sloping ceilings. Such ceilings will have the same bevel angle as the slope of the roof slope. Thanks to this, you can create a comfortable attic space, install the right windows there and provide a more interesting and cozy result.
Calculate wall sections based on the maximum permissible and expected loads on the floor of the house. Beams are installed at distances of 300, 400 and 600 mm. Select the width of the boards in accordance with the selected cladding material.
What to cover the walls with?

Sheathing is most often done with siding. If you choose it, then you need to maintain a distance of 20-30 cm. If you use particle board, pseudo-log house or block house, then you can increase the distance to 40-50 cm.
Siding is the most practical, durable and easy-to-use cladding material. You don't have to paint it or open it with varnish. You don't even have to wash it regularly. The only drawback, and even then a subjective one, is the unnaturalness of such a finish.
If a frame house is built in a factory, then, as a rule, sandwich panels are used. From an economic point of view, this is the most profitable option.
Panels of this type weigh little, which makes it possible to reduce the load on the foundation of a frame house and generally make its structure lighter. In addition, sandwich panels have low thermal conductivity. This moment allows you to optimally solve the issues of thermal insulation of a frame house.
Installation of windows and roofing
It is necessary to pay due attention to the installation of windows. According to technology, the window area should be equal to 18% of the total area of the wall with the window opening. So the number and size of openings are selected individually. As for double-glazed windows, single glazing is sufficient for seasonal houses. If the frame house will be used throughout the year, you need to buy double-glazed windows with 2 or even 3 glasses. Select the required quantity taking into account the climatic characteristics of your region.
And the last stage in the construction of a frame house structure is the installation of the roof. The roof can be covered with a wide variety of materials. Experts recommend using natural tiles. It goes best with wood. You can choose in favor of any other material you like based on its properties, appearance or price. Good luck!
Before you start building your house, you should decide on the technology for its construction. The choice depends primarily on the cost of money and time for the future new building. A frame house is a low-rise prefabricated housing built on a wood or metal structure.
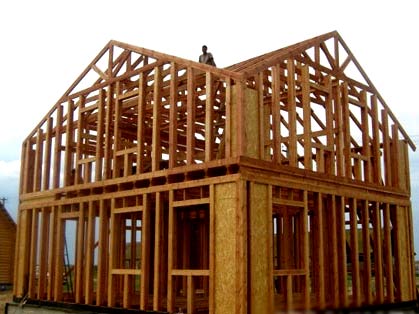
Mounted wooden frame of a cottage
Every year it is gaining popularity due to the fact that it is less susceptible to external influences, warm, light, and has a modern attractive appearance.
Wooden frame housing is not inferior in quality to concrete houses, and in some respects it surpasses them:
The disadvantage of frame housing, like all wooden buildings, is the fire hazard. And if you use cheap materials containing phenol-formaldehyde resins for finishing, then there is no need to talk about environmental safety. Therefore, when building a house, you should select building materials very carefully.
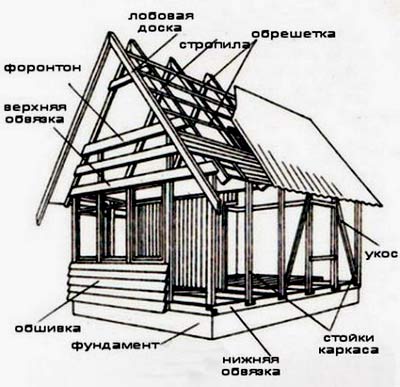
Main components
The frame of a low-rise wooden structure consists of:

Vertical posts can be corner or intermediate. The purpose of both is to connect the upper and lower trims. This is usually done using the following methods: using metal corners or using a full cut and dowels. The slopes are used to ensure that the frame does not warp or change its position when exposed to strong winds.
Materials
If, then the wood should contain the following basic elements:
- timber for the embedded crown, top trim and side posts of the structure;
- boards for crossbars and rough sheathing of the frame;
- bars for supporting slopes.
In addition to wood, the installation of the house is carried out using materials for roofing, vapor barrier, and insulation.

Scheme of flooring in a frame house
We should not forget about antiseptics, as well as fire retardants for wood processing. The roof is usually made of flexible Finnish tiles. The finishing of a frame dwelling, imitating wooden beams, looks very attractive. For thermal insulation, foam plastic or mineral wool is used. The insulation on the outside of the walls is protected with moisture-resistant plywood and cement-bonded particle boards.
Construction of a frame wooden house
To become the owner of a frame home, you can buy ready-made elements made at the factory, transport them home and assemble them. This is called panel technology, the advantage of which is determined by the speed of construction of a new building. It requires the use of a crane to install ready-made panels and, as a rule, pouring a strip foundation.
You can build it with your own hands from scratch, which will cost much less, and the homeowner will receive great satisfaction from the implementation of his ideas during the construction process.
Drawing for building a frame cottage
The frame of the home can be made of metal beams. But they are not used very often. This is due to the fact that metal is much more expensive than wood, and lifting equipment is needed to install the structure.
The use of wooden beams allows you to build a house yourself, without the involvement of qualified builders and special equipment. As with the construction of any building, the frame of the future building is worked out on paper or in a special computer program. The project can be developed by the home craftsman himself; special skills are not required. On, their dimensions, fit, connection methods, fastening of main parts.
When performing construction work, you cannot do without the following tools and materials:

Foundation
Construction begins with laying the foundation. Due to the low weight of a wooden building, it can be light strip or columnar. Having chosen one option or another, the territory is marked.
The foundation pit for the foundation strip should be of such a size that it itself is 5–7 centimeters wider than the wall and goes into the ground by about 30 cm.
A 5 cm sand cushion is poured onto the bottom of the dug trench and compacted. It is necessary in order to reduce the influence of shifting soil layers. Then the pit is reinforced with formwork made of boards or other sheet material. After this, the reinforcement is mounted on the rods. They are driven into the ground in order to support the reinforcing mesh, for the installation of which you can use the longitudinal metal parts of unsuitable bicycles or baby strollers.

Ready-made strip-column foundation for a frame house
They are connected using metal wire. The home craftsman can prepare and pour the cement mortar himself using high grade cement, water, sand, plasticizer, crushed stone or gravel in certain proportions. Before installing the frame, the finished foundation must be covered with waterproofing material.
If it is a basement, then a columnar foundation is used. Concrete, brick or metal pillars are installed at the corners of the future building, as well as at the intersection of internal and external walls. From above, these elements are combined with a thick strapping beam on which the structure will stand. The piping is isolated from the foundation supports with two layers of roofing felt.
Otherwise, condensation may appear in places where the wood comes into contact with concrete, brick or metal, and the wood will begin to rot.
Harness
To install the lower and upper trim, a beam measuring 150x150 mm is required. It can be made of oak, larch or pine. It is pre-treated with a fire retardant and an antiseptic solution. The corners are aligned according to the tongue-and-groove principle with a tight fit, without gaps.
You can connect using metal fasteners, but when they come into contact with wood, they oxidize and eventually cause wood to rot.
As a result, the entire structure loses its original strength. The frame is mounted on the lower frame. It should occupy the entire perimeter of the strip or column foundation, to which it is attached with anchor bolts. For greater strength, when pouring concrete or installing piles at the corners of the foundation, metal pins can be concreted to secure the strapping frame to the foundation base.  When the strengthening of the lower trim is completed, you need to make sure that it is laid strictly horizontally. Later, structural distortions are very difficult to correct. Now you can lay the floor joists.
Vertical support beams along the length should provide a ceiling at a height of approximately 2.7 m. Above - there may be problems with heating, below - it will be stuffy in the summer.
They are placed in the corners, and between them there are intermediate ones.
Initially, the vertical posts are strengthened with temporary bevels, two for each support, but after installing the top trim, they are replaced with permanent ones. To install the ceiling frame, beams with grooves are used. When it is ready, it is placed on vertical posts and nailed. Ceiling beams are placed in grooves and secured with steel brackets or angles.
Walls
It is preferable that the board for warm walls be at least 10 cm thick.

Drawing of the construction of the walls of a frame cottage
And the choice of material for insulating a house is determined by the preferences of the owner. Nowadays, polystyrene foam is recognized as the highest quality insulation material. It is inexpensive, breathable, and is a good heat insulator.
It does not bunch up in the insulation niche or slide down, as happens with mineral wool. After which the walls are finished from the inside, often with clapboard. Installed double or triple glazed windows also help retain heat.
Roof
Initially, a strong beam is laid on which all other elements will rest. The rafters are connected with nails and at an angle in the shape of the letter “A”.

An example of fastening the roof rafters of a frame roof
Then a sheathing is made, knocked together from boards one from another at a distance of 10 cm. Its upper part is covered with roofing felt using a construction stapler. On top of it, starting from the bottom, a profiled sheet, slate or tile is laid overlapping.
After completing the flooring, the ridge strip should be reinforced with self-tapping screws. Catchments with drainage are made along the edges of the roof. After this procedure, doors and windows are installed, a porch is built, and, if desired, an attic.