Insulation of a street wall in an apartment from the inside. Insulation of walls from the inside with penoplex. Modern materials for wall insulation
In buildings where panel walls are installed, insulation is often necessary. The thickness of such walls is simply insufficient. The following is observed: the room cools down quickly, but the heating system does not cope with the assigned tasks in all cases. As a result, the temperature in the rooms drops and residents feel uncomfortable. The problem needs to be solved. This is what we will talk about - how to insulate a wall in an apartment from the inside on your own. What materials should be used for this work, how to use them correctly.
Walls in the apartment and their insulation
External thermal insulation walls - this method can be called one of the most effective if you need to keep the apartment warm.
But this option is expensive - the complexity of implementation is too high, it is necessary to use special equipment and hire professional workers. The higher the number of floors, the more difficult and expensive it is.
Thermal insulation of walls in the apartment from the inside is completely justified in different cases . For example:
- If there is a government ban, the façade of the building cannot be changed. This happens if the building is of cultural value, or if the front part of the house has access to the main street;
- If behind the wall there is expansion joint between a pair of buildings;
- When the elevator shaft is behind a wall, or there is any other room that is not heated. Accordingly, mount external insulation in such a situation is impossible.

There is an exit! Optimal choice– insulate the walls of the apartment from the inside. Yes, this will slightly reduce the usable area in the premises. But better warm rooms somewhat smaller in area than spacious cold rooms. Moreover, if you work inside, you can do the work yourself, without hiring specialists. The main thing is to act correctly: prepare necessary tools and materials for work.
When autonomous heating equipment is installed in an apartment, insulated walls greatly help save energy resources - this is exactly what any owner wants to achieve.
Read more about the pros and cons of internal insulation if you can’t make a decision:
Positive sides:
- The cost of the work will be affordable for almost any family;
- Installation can be carried out regardless of weather conditions;
- During the process, it will be possible to level the walls.
Minuses:
- Condensation may appear, and the formation of mold colonies should not be ruled out. To prevent this from happening, you will have to think about it high-quality ventilation– then these problems will not exist;
- The wall does not accumulate heat or retain it. It is not uncommon for losses to be 15%;
- If you insulate a wall incorrectly, it will definitely freeze. Over time, this will cause the material to deteriorate;
- The volume of the room will decrease;
- The interior decoration of the rooms will be damaged;
- Residents often experience inconvenience when renovation work is being carried out in their apartment.
Insulation from the inside - how to do it right

It is worth noting that the thermal insulation of the walls of the apartment from the inside, which in the future will prevent the appearance of condensation due to temperature fluctuations in winter period, as well as the appearance of mold stains on the walls, must be carried out competently - all technological recommendations must be observed.
When a thermal insulation “pie” is formed, its structure is created, a high-quality vapor barrier is required. It should protect the insulation from moisture getting into it.
Before you start insulating the walls in the apartment inside, It is worth studying a number of recommendations on how the work is performed:
- You need to buy a vapor barrier film High Quality- it is necessary. Also, your shopping list should include waterproof tape so that you can seal all the joints between the sheets without any problems;
- A material is prepared that has low vapor permeability - this indicator should be lower than that of the walls. This approach is a guarantee that moisture will evaporate correctly towards the street, and there will be no evaporation into the apartment;
- It is important to glue the insulation as tightly as possible to the wall surface - any experienced craftsman will confirm this;
- Ventilation must be arranged inside the room - it can be either forced or natural. Due to this, there will be no excess moisture. For example, today they are often placed on window frames special valves - it is through them that the room will get Fresh air, which is very convenient;
- Before insulating the walls of an apartment from the inside, you need to correctly calculate the thickness of the insulation, which will be optimal.
This value completely depends on what region you are in. average daily temperature in winter. What happens if the thermal insulation material turns out to be less than the calculated parameters? There will be a violation of the steam-heat balance.
- The wall insulation system is installed after special primer solutions have been applied to the surface. This will help protect against mold, and will also increase adhesion, which is important if thermal insulation is being installed;
- Installation of insulation should be carried out strictly on the wall that has been thoroughly dried;
- When installing insulation, “cold bridges” are considered unacceptable. Especially where there are butt seams. It is these “bridges” that can ruin the entire process and significantly complicate the work.
What materials to use for insulation

Each owner decides for himself how to insulate walls in an apartment from the inside.
You just need pay attention to a number of materials and their features in order to make the right decision.
Penofol - in detail
Advantages of the material:
- Is environmentally friendly;
- Compared to other materials, it has a small thickness;
- The level of vapor permeability is low;
- Noise insulation is high;
- Installation is easy;
- Fire safety level is high;
- Transportation is carried out without any difficulties;
- Rodents do not like the material.
Minuses:
- This material is soft, so light pressure is enough – dents will form instantly;
- To perform high-quality fixation, use special glue;
- If the wall insulation is external, foil penofol is used as an additional thermal insulation layer. It is due to this that thermal energy is reflected and created. reliable protection from moisture - you need to know about this.
Minvata

Positive sides:
- The material is non-flammable;
- Has low thermal conductivity;
- Sound insulation is high;
- There is good air permeability and vapor permeability;
- Mineral wool is of no interest to rodents; the same can be said about insects. Even the structures are a fact.
Negative sides:
- Absorbs moisture strongly;
- You cannot do without additional vapor barrier;
- If mineral wool is used long time, shrinkage may occur;
- The area of the rooms will decrease, since the material is thicker.
Ecowool as insulation

Advantages:
- The material does not burn;
- Is environmentally friendly;
- Has low thermal conductivity;
- The level of sound insulation is high;
- It can be used for a very long time.
Minuses:
- It costs too much.
Expanded polystyrene for insulating an apartment from the inside

Positive sides:
- The slabs do not weigh much;
- Strength characteristics are high;
- The price is much lower when compared with mineral slabs;
- Easy to process;
- Not hygroscopic.
Negative sides:
- Sound insulation leaves much to be desired;
- The vapor permeability coefficient is low;
- Partial destruction cannot be ruled out if the temperature rises above 80 degrees;
- Low resistance to various organic solvents is observed;
- Limited in use. If the height of the house is more than 25 meters, it is not recommended to use it;
- The stoves are flammable. Expanded polystyrene is a self-extinguishing material; it does not support combustion.
An interesting point: if it turns out that the expanded polystyrene slabs do not extinguish themselves, this indicates one thing - the material does not meet the standard requirements. It is prohibited to use it in an apartment.
Polyurethane foam

Advantages:
- The insulation is manufactured right where the work is being done, which is very convenient. The set of required components is minimal. Accordingly, delivery costs are reduced;
- Weighs little;
- In addition to insulation, it gives the wall additional strength;
- Able to withstand a wide range of temperatures - from minus two hundred degrees to plus two hundred;
- When the installation is completed, the owner will see a solid canvas; there will be no seams.
Flaws:
- If polyurethane foam is exposed to sunlight (direct UV rays), wear occurs quickly;
- It is necessary to protect the additional insulation obtained. Plaster or any panels will help with this. Some people use simple paint. However, this is even good - the surface ultimately becomes as aesthetically pleasing as possible. When - the same thing is done;
- When the temperature is high, the insulation can smolder. If there is strong heating, a fire cannot be ruled out; this has also happened.
Cork as insulation
pros:
- Weighs very little;
- The material is durable, hard;
- It is not subject to rotting; mold does not appear due to exposure to moisture;
- Cork is an absolute dielectric and does not accumulate static electricity;
- Not flammable. If it smolders, toxic, harmful substances are not released;
- Not afraid of rodents;
- When humidity levels fluctuate, cork does not change volume, unlike many other insulation materials;
- Installation work is easy, so even beginners will not have problems with how to insulate a wall in an apartment from the inside;
- Complete environmental safety.

Minuses:
- It is expensive and not every family can afford it.
Plaster
Advantages:
- Very easy to apply;
- Excellent adhesion is observed with any type of surface;
- In difficult preparatory work there is no need. Plaster is a plastic material, so it will level the wall itself;
- Application can be easily done manually, but if you want, there is always the option of using auxiliary technical devices;
- Irregularities can be eliminated without problems - defects, cracks, all this is not a reason for worry;
- There are no cold bridges.
Flaws:
- When the application of plaster is completed, additional priming and painting must be done;
- If you plan to apply “warm plaster”, the wall must be dried before work;
- Since the thermal conductivity coefficient of plaster is high, high-quality insulation can only be obtained when the layer of mortar is thick - this is not always convenient.
Above we looked at the main materials that are suitable for insulating walls from the inside in an apartment. There are actually a lot of options here..
When insulating walls in an apartment, you need to remember two basic rules: organize a strong vapor barrier so that condensation does not appear between the insulation and the wall. Also, make sure there is good ventilation - all moist air from the room should be removed.

Before insulating the walls in an apartment from the inside, in order to protect yourself from unnecessary expenses, it is better to carefully study this topic. All thermal insulation materials existing today are usually divided into groups, which, in turn, correspond to the material that was used in the construction of the walls of the house - it is important to remember this so that the final result is positive.
Let's look at a few examples:
- If the wall is made of brick, you do not need to choose the insulation that is designed for concrete walls. In this case, expanded polystyrene foam is perfect;
- When concrete walls are insulated, polystyrene foam is also often used. The main thing is to choose extruded material;
- Any insulation will do for concrete walls. But here we also need to use vapor barrier material on any of its surfaces. The perfect solution– foil, this material will provide the necessary protection.
Insulation - features of working inside an apartment
It’s worth talking in detail about how to interact with this or that insulation so that the apartment is warm and the positive effect lasts for years.
How to insulate with penofol

To achieve optimal results, you need to create an air gap on both sides.
Acceptable indicators are 20 mm. In this case, penofol is fixed to a wooden sheathing, which, in turn, is attached to the base - this way the required strength is achieved.
What is being done for this:
Detailed description:
- Planks of wood, two centimeters thick, are attached to the surface of the wall. This can be done vertically, or horizontally. The pitch is selected depending on the width of the roll;
- Planks in wooden walls are attached with self-tapping screws, and for brick and concrete surfaces use dowels;
- They take roll material, strips of the required length are cut from it. Then they are stapled to the planks - a construction stapler will help with this;
- Penofol sheets are mounted end-to-end, the material is installed inside the room with the foil side;
- Each joint must be carefully taped with aluminum tape;
- The slats are installed and attached to the sheathing - they will provide the outer air layer of the required size;
- The outside walls are sheathed with sheets of plasterboard; clapboard or other materials are also used for this.
Insulation with mineral wool - details

Working with this material is somewhat more difficult - you cannot do without wooden slats. And the installation order looks something like this:
- Vertical slats are placed on the walls - this is done using building level. It’s just that one plane must be provided for all elements;
- The waterproofing layer is placed between the slats; you can also fix it directly to the slats;
- How to insulate a wall in an apartment from the inside now? It’s very simple - all that remains is to lay the insulation itself.
So that there are no cold bridges, thermal insulation material placed extremely tightly in the cavity between the slats. Sometimes it has to be cut to size - but only a little more than the distance between the slats. The fact is that there should be no gaps between the canvases, even minimal ones.
- Afterwards, a vapor barrier material is placed, and fastenings are made with slats;
- If there is no plaster layer, the ideal approach is to lay mineral wool in two layers, this will be more than enough.
About insulation with polystyrene foam
This solution can be called one of the cheapest and simplest if you need to insulate an apartment. If the walls are built of brick, the first step is to plaster, and only then move on.
What then? Following:
- When the coating dries, the wall is leveled - putty is used for this;
- They put waterproofing material, which will one hundred percent protect the wall from condensation between the insulation and the main one;
- Next, you can install insulation sheets. For fastening they usually choose special glue. In this case, the composition is applied not to the foam plastic, but directly to the surface of the wall - this is correct;
- It is recommended to place end-to-end foam panels, there is no need to make any gaps here;
- They put in a vapor barrier material; you can’t do without it here.
How to insulate with polyurethane foam

To spray polyurethane foam, you must use special equipment - no other way.
Besides:
- Must be mounted on the wall wooden sheathing– it is this that will serve as guides when the material is sprayed. It will also be the main one on which the decorative finish will be fixed;
- Then the polyurethane foam is installed;
- Attach trim panels. In general, nothing complicated.
Plastering and working with it
What should be done before insulating the walls from the inside in an apartment with plaster? It is important to study some of the features of the work ahead. For example, warm plaster is applied to walls in three layers - this is important.
- The first step is to spray with liquid plaster mortar- so that the composition can get into all the cracks. The casting of the composition is carried out evenly, with a certain effort. The layer thickness should be at least 1 cm;
- Now apply primer. If they are thermally insulated with plaster, this will be the main one. A coating thickness of 0.5-0.6 cm is sufficient.
It is best to apply the primer in several layers, and the size of each can be 2-3 cm. Due to this, the coating will not separate from the walls due to its weight. After application, it is important to thoroughly dry each layer.
- Now the covering. That is, a finishing layer that is up to 0.5 cm thick. To make this layer, fine clean sand is used, which is diluted with water. This composition is easily rubbed into the wall surface, resulting in a completely flat plane.
Cork and insulation

What to do if you need to insulate a wall in an apartment with cork from the inside. In fact, there is nothing complicated here - first the surface is prepared: ideally, the base should be as smooth as possible. Controlled this process building level.
How to achieve the desired result? So:
- If the surface of the wall is not smooth enough, it must be plastered, then various cracks, protrusions, depressions, and other defects must be removed;
- When the leveling work is completed, the room must be left so that it can dry thoroughly.
You should not insulate walls inside the room with cork materials if the surface is damp. Because of this, not only can fungus arise, but the panels can also become deformed.
- When installing insulation, you must strictly follow the instructions for the adhesive - this is very important;
- During operation, the strength of the coating will be worthy only when all technological aspects of the work are performed correctly;
- The cork, on which glue has been applied, is simply applied to the wall. Then the material is strengthened. It is important to act precisely and carefully. Many adhesive bases they grab under the cork very quickly, almost instantly. That is, it will no longer be possible to somehow change the location of the product after placing it on the wall.

The video “how to insulate walls in an apartment from the inside” will tell you in detail about the process of insulating walls inside an apartment - the lesson will be useful to everyone: how to an experienced master, and for a beginner.
- When installing the plug, it is important to ensure that the room is well ventilated. The glue can easily turn out to be toxic, in addition, the compositions usually have bad smell(very sharp).
All the recommendations discussed above will help to reliably insulate the walls in the apartment from the inside. How to do this in the end is up to the owner to decide; only he knows the answer to the question of what insulation materials will be used. The cold should not get into the apartment. If this is observed, the problem must be solved as quickly as possible, then life in the room will be comfortable.
If you have even the slightest opportunity to insulate the walls from the outside, do it. This is the most the best option, because insulating walls from the inside is a headache. There are only two correct and more or less acceptable options, and one takes up a lot of space, and the second requires significant costs during the winter. There is also a method suitable for insulating balconies and loggias. And that's all for now. All other options with polyurethane foam, liquid-ceramic thermal insulation, penofol and other materials only bring dampness and mold.
Insulating walls from the inside: what is the problem
Anyone who insulated the external walls of a house or apartment with inside- from the premises - they are faced with the problem of the appearance of fungi, mold and high humidity. These consequences are natural and appear regardless of the type of insulation that was used. You can get rid of moisture and fungi only by removing internal insulation, having done major renovation walls, treating them with antifungal compounds and plastering.
Let's look at the reasons. The so-called dew point is to blame. This is the line where warm and cold air meet and where condensation results.
The figure on the left shows the situation with the dew point if the wall is not insulated. It is located somewhere in the thickness of the wall, depending on the temperature and humidity, it shifts first to one side, then to the other, but is always located quite far from the inner surface. In this case, moisture accumulates in the wall and freezes. In the spring, as it thaws, it evaporates, and evaporates into the atmosphere. If dampness is observed in the room, it is for a short time and at the level of sensations.
The photo in the center shows a situation where the wall is insulated from the inside. In this case, condensation falls in the insulation, or, if this is not possible (expanded polystyrene is used, for example), at the boundary of the insulation and the wall. Even if the wall freezes and the condensation turns into ice, in the spring it will begin to melt, the insulation, wall material and finishing will become wet. Since there is a large distance to the outer surface facing the street, moisture dries very poorly in this case, which “comes out” in the form of dampness, mold and all the accompanying delights.

And the third option is to insulate the wall from the outside. In this case, the dew point is in the insulation. How to get it out of there is another story (make a ventilated facade or choose the right vapor permeability of materials), but for our topic it is important to understand that in this case the wall inside the room will definitely be dry and warm.
To summarize, we can say, if possible, insulate from the outside. Insulation of walls from inside premises has to be done only in a few cases:
- if they are not allowed to be insulated from the outside (the building is a historical monument or prohibited by local authorities);
- if the wall goes into the joint between two buildings;
- the wall opens into the elevator shaft.
But before you take on this work, thoroughly inspect the floor, ceiling, and windows. Sometimes most of the heat escapes not through the walls, but through these surfaces, and it is easier to insulate them (in the sense of less hassle with the dew point).
Correct internal insulation of walls in a house or apartment
There are only two ways to insulate indoor walls from the inside and avoid problems with dampness:
- recreating multilayer wall(place a half-brick wall with insulation at some distance);
- Heat the wall and then insulate it.
These options work, but, as you can see, they “eat up” a significant amount of space and cost a lot of money. In every specific case you have to consider what kind of insulation and how much is needed, but the wall pie remains the same.
Second wall
At some distance from the main wall, a second wall 10-12 cm thick is installed. Between the two walls, a layer of insulation, which is required for these conditions, is attached to the inner one. At the same time, up to outer wall There should be a ventilation gap of at least 3 cm. In total, this entire structure will be 20-25 cm away from the main wall. It will “eat up” a considerable area.

As you can see, in this case the dew point can be located inside the insulation or on the inner surface of the wall facing the street. To be able to remove the formed moisture, you can do forced ventilation by installing one or two exhaust fans.
Since in this case the insulation will get wet, it is necessary to choose one that is not afraid of moisture. These are polyurethane foam, polystyrene foam, foam glass. You can also use some types stone wool, but only those that are not afraid of moisture (there are some).
Thermal insulation material must be fastened simultaneously with the construction of the walls. They laid it out to a certain height and secured the thermal insulation. It’s inconvenient to work, but there is no other choice.
Electrical heating
The idea of this method is to move the dew point inside the wall when insulating a concrete or brick wall internally. To do this, it must be heated. The easiest way is to attach an electric heated floor mat. At some distance from it, insulation is installed, on top of which there is a finishing layer.

In this case, there are no problems with moisture removal, and much less space is required to install the system: from 8 cm (with a ventilation gap of 3 cm and an insulation thickness of 5 cm).
With this method, the thermal insulation material can be of any kind. To install it, first they make a sheathing, then a counter-lattice, and then a suitable insulation is attached to it.
Option for insulating a balcony from the inside
In the case of a loggia and a balcony, the situation is often completely different. If the authorities do not allow the installation of a wall, they require that the existing reinforced concrete screen be left; it is cut off from the warm air by careful thermal insulation made of extruded polystyrene foam (EPS).

In this case, it is better to make the insulation excessive than at least slightly insufficient. The total thickness is divided into two layers. They are laid without a gap (preferably with locks), and so that the seams of the first layer overlap the sheet of the second. There should be no through access of warm air to the screen.
It is necessary to approach the issue of insulating the floor and ceiling of the loggia/balcony very carefully and ensure tightness at the junction of them with the walls. Also pay attention to how the glazing will be installed: there may also be problem areas: joint with the screen, walls, insulation of the part above the frames. All of them must be well finished, excluding the possibility of contact of warm/cold air. In this case there will be no problems. Even .
Insulating the room will help you create an acceptable microclimate in your home and protect it from drafts and dampness. Thermal insulation of walls allows you to triple the cost of both heating the room in winter and cooling it in the summer. After all, the insulation acts as a kind of shield that prevents the movement of air flows, protecting the structure from exposure external factors. Unfortunately, it is not always possible to insulate the facade of a building. For example, thermal insulation end wall It is advisable to carry out the panel construction from the inside.
Advantages of thermal insulation of walls indoors
- Relatively low cost.
- Insulation can be carried out at any time of the year.
- You can insulate the entire building, as well as individual rooms and even walls.
- Soundproofing the room.
Among the positive aspects, one should also highlight the accessibility for independent implementation: any owner can do this. It is also important to know how to insulate walls and choose optimal material for this.
Methods for insulating walls from the inside
For thermal insulation indoors, mainly the same materials are used as for outdoor insulation. The most popular insulation materials are: expanded polystyrene, mineral wool and mixed asbestos-based thermal insulation materials.
Insulation of walls from the inside with plasterboard

Thermal insulation using plasterboard sheets - simple and quick way wall insulation. Minimum distance from rough wall to front surface slabs - three centimeters. The greater this distance, the correspondingly more insulation will fit into the voids of the structure. This method of thermal insulation is suitable only for large rooms, since the wall becomes noticeably thicker during the installation of the insulating structure.
The process of insulating buildings from the inside begins with the installation of a structure made of metal profiles at a distance of two centimeters from the wall. It is better to install the frame from a galvanized profile. It is necessary to stick a tape onto the base of the guide profile to insulate the surface from contact with the plaster, thereby protecting the drywall from the cold transmitted through the metal profile. Then mineral wool is placed into the cavity of the resulting frame (between the rack profiles). Air gap between the wall of the structure and the drywall there is already insulation. However, the use of mineral wool or polystyrene foam greatly increases the heat resistance of the structure.
Due to its structure and elasticity, the material perfectly fills the structure. The next step is to install the drywall. When insulating rooms with high humidity, you should not skimp. It is better to purchase moisture-resistant drywall. At the final stage, the plasterboard slabs are finished with wallpaper.
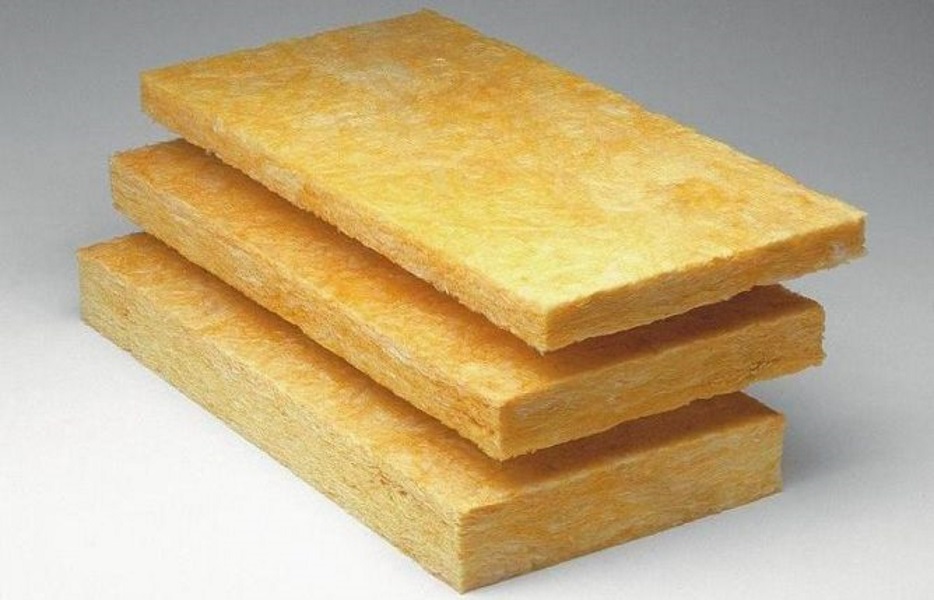
Insulation of walls from the inside with mineral wool
Thermal insulation using mineral wool is one of the most economical options. The advantages of mineral wool include lightness (which is very important when transporting building materials and insulating old structures) and low thermal conductivity. The “thermos” effect occurs due to the occurrence air cushion between mineral fibers.

Perhaps the only drawback of mineral wool is that it is quite hygroscopic. Therefore, if you decide to insulate the walls from the inside, you will also have to take care of the vapor barrier to avoid the accumulation of condensation. In order to prevent the absorption of moisture through the surface of the insulation, it is recommended, along with the use of the main thermal insulation material, to insulate the walls from the inside with penofol. This material has an extraordinary property - it retains up to 97% of heat. A layer of vapor barrier is applied to the frame made of metal profiles after installation of the mineral wool.

Penofol is a special, foamed polyethylene with an aluminum coating in the form of foil, which has vapor barrier and sound insulation characteristics. The penofol membrane has small holes that allow microparticles of moisture to move in only one direction. Penofol sheets have a small thickness. Due to its flexibility, this material is easy to install. It does not require additional maintenance during operation, which is also an undeniable advantage.
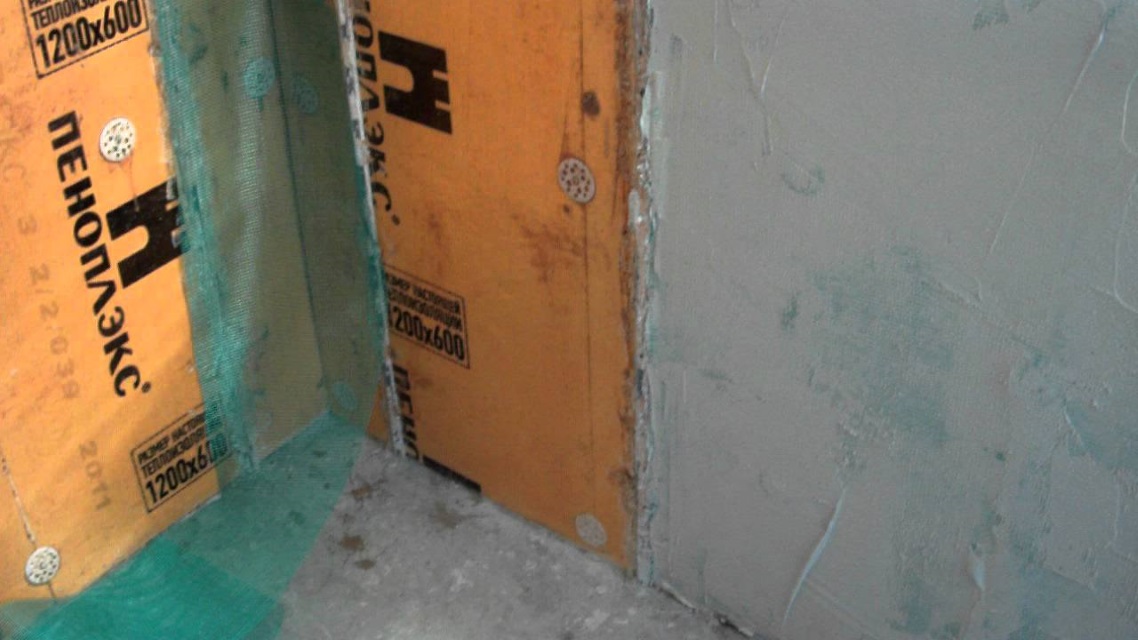
Insulation of walls from the inside with penoplex
Thermal insulation using extruded polystyrene is possible even for beginners who do not have great experience in construction. There is nothing simpler: Penoplex slabs, which can be purchased here http://penoplex-spb.ru, are attached to the wall with glue. In this case, the entire surface of the slab is treated with an adhesive composition. Small grooves along the edges of the slab help securely fasten the penoplex and improve the tightness of the joints. Extruded polystyrene with smooth edges requires additional sizing with tape. The foam is both glued and secured with self-tapping screws.

When insulating with penoplex, there is no need for vapor barrier, since the surface of the slab is vapor-tight. A thin layer of plaster applied to the grain (for better adhesion to finishing materials and increasing protection from fire hazards) the surface of extruded polystyrene will protect the walls from damage and prepare for further painting or wallpapering.
Technology for insulating walls from the inside
The thermal insulation process takes place in several stages. The sequence of operations depends primarily on the selected material. The insulation is either glued to the inner surface of the wall or attached to a special structure.
The most common is the scheme for insulating walls from the inside, in which the layers of thermal insulation are arranged as follows:
- Interior wall decoration.
- Small ventilation gap.
- Membrane for vapor barrier.
- Insulation.

The entire process of wall insulation can be divided into several stages.
Preparing the walls
When carrying out thermal insulation with mineral slabs or using plasterboard, it is not necessary to level the walls. It is enough to clean the walls from flaking particles of building and finishing materials, remove protrusions that prevent the fixation of thermal insulation materials and carry out fungicidal treatment (protection against excessive indoor mold activity). Small irregularities will be masked during thermal insulation and finishing work.
Frame formation and insulation installation
At a short distance from the wall, a frame made of aluminum profiles or wooden beams(depending on climate). It should be noted that wood is subject to drying out and deformation due to sudden changes temperature regime. The profile is fastened in a vertical direction. The thickness of the frame must necessarily correspond to the thickness of the insulation, and the distance between the beams or profiles is calculated depending on the size of the finishing material (for example, a sheet of drywall). When insulating with polystyrene, there is no need to build a frame.
Laying of thermal insulation materials begins after completion of the frame assembly. In order to thermally insulate walls from the inside, one layer of insulation is sufficient. If there is a need to install a second layer, then, accordingly, you will need to install an additional frame for it. In the area of radiators, installation of insulation is often difficult. In this case, a layer of penofol should be laid.
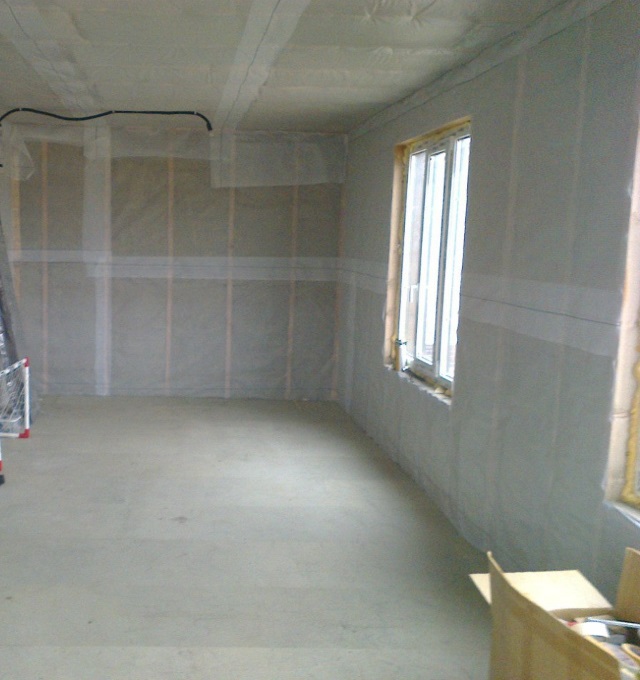
Laying a vapor barrier layer and finishing
The vapor barrier layer protects the walls from the concentration of excess moisture in the voids of the thermal insulation material. Foil-coated film is most often used as a vapor barrier. Make sure that the shiny part of the vapor barrier is facing interior wall premises. The vapor barrier layer sheets are overlapped. To improve the effect, the joints are glued with metallized tape.
After thermal insulation is completed, the surface is covered with plasterboard and plastered, and then painted or pasted over. decorative panels or wallpaper. As for the choice of finishing materials, there are no special restrictions.
Other methods of wall insulation

In some cases, polystyrene foam is placed in the space when laying walls. During the construction phase it is also used penoizol, which is poured into hard to reach places and cracks.

Liquid materials are used cellulose, which is also poured under the slabs and in the spaces between brickwork. Cellulose insulation has a number of disadvantages: it is flammable and is easily exposed to microorganisms and becomes infected with mold. To prevent this, fire retardants and antiseptics must be added to the cellulose mass.
One of the simplest, but most expensive ways to insulate walls is ceramic insulation. This is a liquid paste that is applied both to the surface of the wall and to hard-to-reach places. To achieve the effect, the walls need to be covered with 5-6 layers of paste, the consumption of which is 1 square meter- 250 ml. This makes this type of wall insulation, although expensive, durable.

When carrying out insulation work, unsightly heating or water pipes or additional electrical wiring can be easily hidden in a heat-insulating niche. Therefore, insulating walls from the inside is an excellent reason to both improve the performance of the room and improve the design of the room.
How to insulate walls in an apartment from the inside? If you, dear reader, are interested in this question, we really hope that the article will help you, as it presents important information, which is very useful to have before starting insulation work.
Insulation from the inside, pros and cons
Behind:
- Relatively low cost;
- Insulation from the inside can be done at any time of the year;
- Do-It-Yourself Accessibility: You can do it yourself.
Against:
- Insulation work will be carried out indoors, which will lead to temporary inconvenience;
- The living space is being hidden;
- The most important thing: when you insulate a wall from the inside, it does not become warmer, but, on the contrary, it begins to freeze more, since it is isolated from the heat source. In this case, the “dew point” (the conditional line in which the medium has a dew point temperature, that is, the temperature at which steam begins to condense) becomes closer to the inner edge of the insulated wall.
Condensation that forms at the dew point will lead to dampness and destruction of the wall structure. High humidity, in turn, will lead to the formation of fungus or mold. Brick walls can suffer the most.

Advice!
Think carefully about the possibility of insulating the walls of your apartment from the outside, this will help you achieve best result, compared to internal insulation.
Read what they say about it building codes Ukraine (DBN V.2.6-31:2006) „ Thermal insulation buildings”, in section 1 “General provisions for ensuring thermal insulation and performance indicators construction products", clauses 1.2 and 1.3.
In short, they recommend that insulation be done from the outside.
From the above, we can conclude that installing external insulation will be more effective than insulating the walls of an apartment from the inside. But if there is a ban on changing the facade of your building, or some other compelling reason why it becomes impossible to insulate the wall from the outside, you have no choice but to insulate the apartment from the inside.
Conditions that must be met when insulating from the inside
How to properly insulate a wall in an apartment from the inside?
To do this, it is necessary to ensure that the following conditions are met:
- The wall to be insulated must have minimal humidity;
- It is necessary to protect the thermal insulation material and the wall from the penetration of moist air from the room;
- The insulating material must have maximum moisture resistance and minimum vapor permeability;
- The thermal insulation layer must have a uniform structure without joints, gaps and cracks.
Selecting suitable thermal insulation materials
How to insulate a wall in an apartment from the inside? To choose the material that suits you, you need to familiarize yourself with their advantages and disadvantages, and settle on the most acceptable option.
Polyurethane foam
This material is obtained using special equipment, through the reaction of isocyanate and polyol (liquid components), the end result of which is the formation of microscopic capsules filled with air, bonded together.

Table: Main properties and characteristics of polyurethane foam:
Advantages of PPU:
- Record low thermal conductivity coefficient (among the insulation materials used);
- Does not allow steam and moisture to pass through (up to 99% of closed pores);
- It is possible to insulate uneven surfaces;
- Continuous insulating layer (no seams or cracks);
- High installation speed;
- Temperature range at which application is possible of this material: from -250°С to +180°С;
- It has the property of chemical neutrality to alkaline and acidic environments;
- Resistant to microorganisms, does not rot and mold.
Disadvantages of PPU:
- Flammable The combustion products of polyurethane foam are toxic;
- Requires a special, expensive spraying installation, so do it yourself thermal insulation work It won't work with this material.
Extruded polystyrene foam
It has a fairly strong, homogeneous microstructure, which consists of closed cells filled with air. The cells are waterproof because they do not have micropores, therefore, diffusion of gas and water between the cells is impossible.

Advantages of EPPS:
- Vaporproof;
- It has a low thermal conductivity coefficient of 0.05 – 0.06 W/m°C;
- Inert (does not react with most substances);
- Non-toxic.
Disadvantages of EPS:
- Flammable
Mineral wool insulation

To create, do the following:
- a frame is assembled from a metal profile;
- sheets of mineral wool are placed between the racks;
- Afterwards, this structure is covered with plasterboard.
This method has big drawback, since cotton wool is likely to absorb moisture and become a haven for unwanted pathogenic bacteria. So we will have to stop using it.
Insulation with polyurethane foam
This is a highly effective insulation that has properties that suit us, but in order to do this, we will have to use the services of a company that deals with this. Since you will need expensive equipment. The price of such pleasure is about 210 UAH per m 2 with a layer thickness of 50 mm.

Stages of wall insulation using polyurethane:
- construction of a frame for fastening finishing panels(they have a decorative function);
- applying a uniform layer to the surface;
- installation of finishing panels (for example plasterboard).

Insulation with sheets of extruded polystyrene foam
Expanded polystyrene is probably the most convenient insulation to use for the walls of an apartment from the inside, since it is not expensive, has excellent thermal insulation qualities, does not allow steam to pass through, and all operations for constructing a thermal insulation barrier can be done with your own hands.
So, how to properly insulate an apartment from the inside using EPS?
The following instructions will help us with this:
- Preparing the wall surface
- Installation of EPS sheets
Preparing the wall surface
According to DBN V.2.6-22-2001, the base must be clean, durable, and highly hygroscopic surfaces must be treated with a primer deep penetration, in our case, the primer should be antiseptic.
If the wall is covered with finishing materials, painted or wallpapered:
- remove paint (or wallpaper)
- prime and let the primer dry
- putty
- give time to dry
If the wall is “bare” (not covered with a finishing layer):
- prime
- level the wall (for example with plaster)
- putty
- give time to dry
Installation of EPS sheets
For installation you will need the following materials and devices:
- Antiseptic primer
- Tile adhesive (for example: Ceresit, Polimin or SUPER Master)
- Sheets, thickness 30-50 mm
- Sealant
- Reinforcing mesh
- Comb spatula
- Regular spatula (35 cm)
- Preferably an electric drill with low speed mode
- Painting nozzle (diameter 80 mm)
- Container for preparing the adhesive mixture
The installation of insulation sheets can begin after the prepared wall has dried.
Installation of insulation:
- Prime the wall and let the primer dry (how long it will take to dry - indicated on the primer package is 2-6 hours)
- Mix the glue. On the package construction mixture There is detailed instructions operation manual;
- Then, using a notched trowel, apply the adhesive to the sheet of polystyrene foam in an even layer;
- Install the insulation in the designed position and try to ensure that there are no air pockets between the wall and the EPS panel. Apply sealant to the ends. When all the sheets are mounted, you need to let the glue harden.

When the glue reaches its design strength, you can begin applying the finishing coating:
- First, a thin layer of the universal Super Master mixture or its analogues, 2-5 mm thick, is applied.
- Apply the reinforcing mesh before the mixture has hardened, which is called “wet-on-wet,” and embed it in the layer of applied construction mixture using a notched trowel (the mesh is needed to protect the plaster layer from cracking).
- We apply the solution on top of the mesh, immediately after it is recessed, and use a regular spatula to level the surface of the finish.
- The next day, the wall needs to be sanded to get rid of protruding irregularities (remember to protect your breathing organs from dust).
Advice!
Try to mount the sheets so that there are no gaps between them.
This necessary condition to provide a vapor-tight barrier that will protect the wall from the penetration of excess moisture and the formation of large amounts of condensation.
And if, for some reason, there are still cracks, don’t worry, because you can fill them out with foam.
We looked at several ways to properly insulate walls from inside an apartment and one of them in detail. We hope that the information we provide will help you make your home more comfortable. We recommend watching the video we provided: this article says a lot, but it can give you Additional information on the topic we are considering.
Insulating an apartment is a troublesome, but very useful procedure that allows you to improve the microclimate in your home, create comfort and coziness. The need for this measure arises if the heating networks do not cope with their task, or when the configuration of the room contributes to an increase in heat loss. For example, corner apartments that have an additional window, but in return receive a cold corner that constantly gets wet or becomes covered with a crust of ice. The recommended SNiP increase in temperature by 2° or an increase in the number of sections in heating radiators does not give the desired effect, requiring more effective methods. Let's figure out together how to insulate a wall in a corner apartment from the inside and what needs to be done for this.
What does "corner apartment" mean?
Corner apartments are located in the end areas of residential buildings. One or two rooms in such apartments have two adjacent walls bordering the street. The layout of such apartments is no different from the configuration of all the others in the house, only an additional window and a heating radiator appear, and such an addition is not found in all corner rooms. To compensate for heat loss through the enclosing structures resulting from an increase in the area of external walls, an increase in internal temperature by 2° is provided, which is ensured by increasing the standard number of radiator battery sections. In practice, this is achieved either by having a battery installed under an additional window in the room, or by installing a radiator bigger size(number of sections).
These measures rarely have the intended effect, since they are designed to solve the problems of a conventional premises and do not take into account many of the influencing factors that exist in reality:
- The outer wall is located on the windward side of the house;
- Deterioration of heating networks, non-compliance of heating mode with regulatory requirements;
- Errors and shortcomings made during the construction of a house.
These factors are often present all together, significantly changing the temperature in the apartment for the worse. The cold surface of the walls begins to get wet due to the active formation of condensation, and the apartment becomes cold and uncomfortable. Such situations occur quite often and require appropriate measures to be taken.
Wall freezing is a common occurrence in corner apartments Oh
Methods for insulating an apartment
Insulation consists of installing on external walls special material- heat insulator. There are two methods of insulation:
- External (external). Experts unanimously believe that this method is the only correct one. The heat insulator is installed with outside walls that are separated from contact with outside cold air. As a result, the heating circuit of the room begins to operate in nominal mode, the surface temperature of the enclosing structures returns to normal, and the formation of condensation stops.
- Internal. A forced option used when it is impossible to provide external insulation. The insulator is installed on the inside of the walls. The volume of the room decreases (slightly), and it becomes necessary to install a durable protective layer on top of the heat insulator. The main disadvantage of this method is the exclusion of walls from the thermal contour of the room. From now on, they perform only the functions of an external mechanical barrier, without participating in the heat conservation of the apartment.
External insulation has a lot of advantages:
- The work is carried out outside without creating any inconvenience for living.
- The surface of the walls remains intact, the interior of the room does not change, there is no need for cladding or finishing.
- The microclimate of the room improves, a feeling of coziness and comfort appears.
The disadvantage of external insulation is the difficulty of carrying out work outside, the reasons for which may be:
- The apartment is located on one of the top floors;
- The facade of the building has architectural value, as a result of which the installation of any materials is excluded;
- There are any technical or decorative objects installed on the wall;
- The building is located close to other buildings or structures;
- Work can only be carried out during the warm season.
Internal insulation is almost completely devoid of these shortcomings; no permit is required to carry out the work; work can be done at any time of the year. And, nevertheless, experts prefer external insulation. The reason for this is the presence of water vapor in the internal air of the apartment. It is gradually absorbed into the outer walls, passes through them and evaporates from the outside. This process occurs constantly in any living space. Installing an insulator from the outside does not stop it, you just need to properly organize the progress of the work. With internal insulation, water vapor is trapped inside the apartment, which has a sharply negative effect on the microclimate. Strong humidity, a feeling of stuffiness, and lack of comfort appear.
It is important! The solution to the problem is to install a high-quality ventilation system, removing internal air saturated with water vapor.
The choice of internal insulation is usually due to the inability to work outside. Exterior work requires a permit, which is not easy to obtain. In addition, to install the heat insulator you will have to involve industrial climbers, which will be quite expensive.
 External thermal insulation is more preferable, but is associated with higher costs
Therefore, most apartment owners choose a more affordable and simpler option - internal insulation. The method allows you to get a positive result, it is only important to understand correctly physical essence process and organize it as needed.
Types of insulation
There are many insulation materials available on the market. Let's consider the most popular insulation materials in detail.
Mineral wool
One of the most good options is stone (basalt) wool. Usually, when we talk about mineral wool, we mean stone wool, although the term refers to a wide group of materials, which include slag wool, glass wool and other types of similar insulators. Basalt wool more convenient to use, has a successful set of operational and technical characteristics. It doesn't burn, it doesn't emit harmful substances and is not subject to rotting. Available in different forms - from roll to more rigid slab. The disadvantage of mineral wool is its ability to absorb water, which makes installation somewhat difficult and requires additional operations.
 Mineral wool slabs are one of the popular insulation materials for walls and other surfaces
Styrofoam
This insulation is a confident leader among all other types in popularity. The reason for this is the low price of the material, light weight, ease of installation and processing. The material is resistant to water, has stable dimensions and plate geometry, and is impenetrable to water vapor. For internal insulation, this is the most preferable option, budget-friendly and not time-consuming.
 Polyfoam is suitable for both internal and external insulation
Penoplex
From a chemical point of view, this material is a complete analogue of polystyrene foam - both of them are variants of expanded polystyrene. But unlike polystyrene foam, which is polystyrene foam granules joined together during heat treatment, penoplex (extruded polystyrene foam) is a monolithic material, hardened foam. It is stronger and heavier than polystyrene foam and has a higher price.
 Penoplex does not crumble during processing and is completely resistant to moisture or water vapor.
Polyurethane foam
A specific heat insulator, sold in liquid form and applied by spraying onto the surface to be treated. In air, the material foams and hardens, resulting in a sealed layer resembling polyurethane foam. Polyurethane foam is ideal for insulating walls with complex geometry, the presence minor defects or protruding parts. The price of the material is quite high, and special equipment is used for application. These factors somewhat limit the use, although the performance qualities of the insulator are very high. It is completely impervious to moisture, sealed and perfectly covers the surface without cracks or gaps.
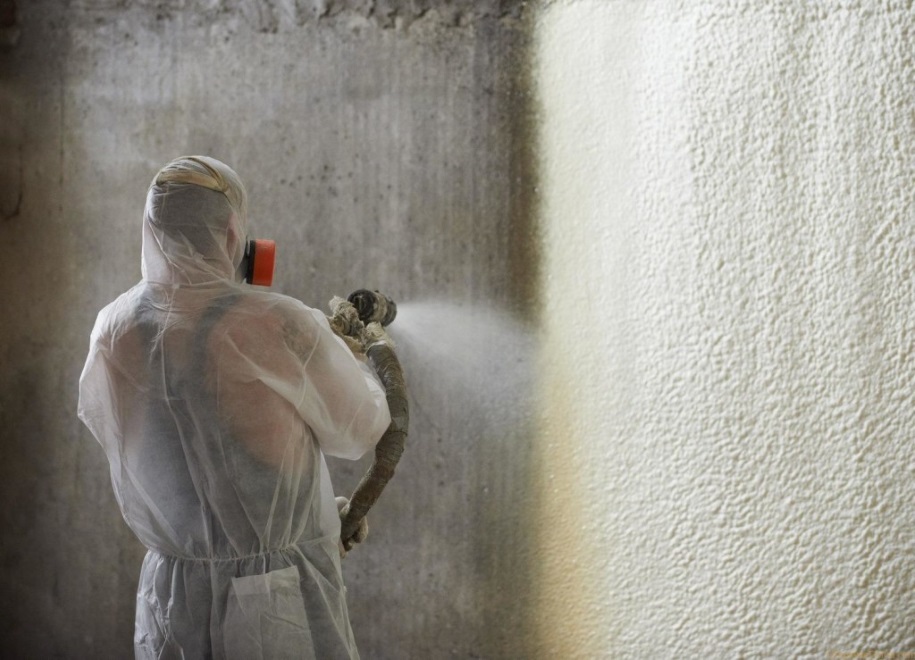 Wall insulation with sprayed polyurethane foam
There are other materials that can be used for internal insulation. It is inappropriate to list them all, since they are noticeably inferior to the named types in terms of operational and technical specifications or are expensive.
It is important! When choosing a material, you need to consider important parameter- vapor permeability. For internal insulation, it is important to properly cut off the wall from any contact with internal air, otherwise it will begin to get wet. If a non-vapor-permeable material is used, install it tightly enough and without gaps on the surface.
Permeable types of heat insulators require the installation of a vapor barrier film, which increases the number of installation operations and requires additional expenses. Permeable types of insulation include mineral wool and polystyrene foam; penoplex or polyurethane foam are impermeable to steam or water.
Carrying out work
The insulation process consists of installing a dense layer of heat insulation on the entire surface of the external walls. A feature of insulation is the need to install protective and decorative sheathing on top of the insulation, which requires the creation of a supporting structure - sheathing. It consists of a series of strips forming a vertical plane located at a distance from the wall equal to the thickness of the heat insulator. It fits tightly between the sheathing strips, forming a continuous layer with no gaps or gaps.
Insulation of corner apartments requires the installation of thermal insulation on two adjacent walls, which increases the consumption of sheathing, insulation and vapor barrier. In addition, the total amount of work increases. It will be necessary to efficiently and hermetically insulate the junction of the two walls.
Procedure:
- Surface preparation. Everything is removed from the wall foreign objects, hanging lamps, brackets, flower beds, etc.
- The walls are marked and the attachment points for the sheathing strips are determined. The markings should take into account the width of the insulation and the sheathing strips, so that the heat insulator does not have to be adjusted later.
- Installation of sheathing. Are used wooden blocks or metal guides for drywall. Installation of metal elements is more convenient and allows you to obtain an exact distance from the wall corresponding to the thickness of the insulation. At the same time, metal parts are capable of creating so-called cold bridges, forming pockets of condensation. Wood planks do not form cold bridges, but require great accuracy of installation.
- Installation of vapor barrier. This item is only necessary when using mineral wool. The vapor barrier is an ordinary polyethylene film (you can take a standard sleeve). Installation is carried out in horizontal stripes. The first row is from below, the next one overlaps at least 10 cm above it - and so on until full coverage wall area. The joints of the film must be taped with construction tape. Installation is carried out on top of the sheathing strips, the film is crumpled around them and fits tightly to the wall.
- Installation of heat insulator. Plates (or cut pieces) of material are tightly inserted between the sheathing strips. You should keep a can of polyurethane foam on hand to immediately fill cracks or gaps if they appear. Some experts recommend covering all edges of the insulation with foam to seal even the smallest cracks.
- A second layer of waterproofing is installed on top of the heat insulator. For impermeable materials, a polyethylene film is suitable, but for mineral wool it is better to use a vapor-waterproofing membrane. It has the ability to pass water vapor in one direction. When installing, you must carefully ensure that the material allows steam to escape from inside the resulting cocoon. This will ensure that the insulator dries out if water gets into it in any way.
- After this, a layer of protection is attached to the surface of the sheathing planks. Actually, the sheathing is installed precisely so that there is supporting structure for installation of sheathing. Commonly used sheet materials- plywood, plasterboard or similar. Some owners prefer lining or Wall panels. The choice is determined by the capabilities and preferences of the owner.
 Stage of installation of waterproofing for internal wall insulation
One option for installing a protective layer is to apply plaster. The work involves the use of wet solutions and requires some time to dry, but the result is quite decent, masking the work performed the best way. If you plan to use plaster, you can do without lathing. The insulation is tightly installed on the wall using an adhesive composition, after which a fiberglass reinforcement mesh is attached to the surface and a layer of plaster is applied. This option is best used if penoplex is used as insulation. The ability to avoid installing sheathing allows you to use fairly thin insulation while maintaining the volume of the room. Work in the area of radiators and risers of the heating system is simplified, it becomes easier insulation window opening.
 Application warm plaster- one of effective ways reducing heat loss
After installing the sheathing, finishing is done. All work is carried out indoors, so it does not depend on the time of year or the weather outside. No permits are required for internal insulation; these actions do not constitute redevelopment or even reconstruction of residential premises.
Insulating a room in a panel house
In panel houses the main problem areas are interpanel joints. Insulation will not be effective enough if the joint is not first sealed, which requires opening it as much as possible along the entire length of the wall. Typically, slab joints are sealed with tow, plaster or plaster. The gap must be opened as much as possible using a spatula or narrow chisel. Delete old tow, aggregate or other material. Then you need to inspect the resulting gap and determine its depth. The best option would be to fill the joint with foam. This is not difficult, is done quickly enough and allows you to effectively seal the joint.
It is important! After the foam has hardened, the parts protruding from the crack are carefully cut off with a knife to form even angle. Further work is carried out in accordance with general technology insulation.
Insulating a room in a brick house
The brickwork is well tied at the corner joints and has no gaps with access to the outside. This allows you to carry out work without preliminary insulation of the connection of planes. In this case, the properties of the material require hydrophobization before installing the heat insulator. To do this, the brick wall to be insulated is cleared of a layer of plaster over the entire area. After this, the surface is covered with a layer of water repellent using a brush or roller. It is necessary to use deep penetration material for interior works. Some types require application in several layers, as described in the instructions on the package. After the composition has dried, a heat insulator is installed on the surface of the walls using conventional technology.
Video: how to insulate a wall in an apartment
Insulation of corner apartments is a forced measure, dictated by mistakes made during the construction or design of housing. The owner’s main task is to install the heat insulator tightly and airtight, completely cutting off the external walls from contact with internal atmosphere apartments. Any crack will form an area that will constantly get wet and gradually saturate the entire area of the wall, which sooner or later will lead to its destruction. Accuracy and thoroughness when performing work will allow you to obtain high-quality and effective result, changing the thermal conditions in the room and increasing comfort for residents.