Basement ceiling insulation with polystyrene foam. How to insulate the cellar from the inside with quality materials. External insulation technology
To achieve an optimal microclimate in the cellar, it is necessary to perform its insulation.
I have an aunt - Anzhela Olegovna - who cooks the best in the world pickled apples pickling them in barrels. But this year, she and her husband built a new, more spacious cellar and fruit in it did not work out, as it froze in winter. As soon as I found out about this, I immediately realized that the wrong insulation of the cellar was to blame for everything (as it turned out later, it was not insulated at all).
If the thermal conductivity of the walls of an underground structure is too high (especially when paired with poor ventilation), then in summer ideal conditions are created in the cellar for the reproduction of various microorganisms, and in winter all homemade blanks simply freeze.
Features of the microclimate of the cellar
Regardless of whether the cellar was under a private house or built separately (like Angela Olegovna), in my opinion, it requires good insulation. This operation affects not only the formation of an acceptable microclimate inside, but also the service life of the building.

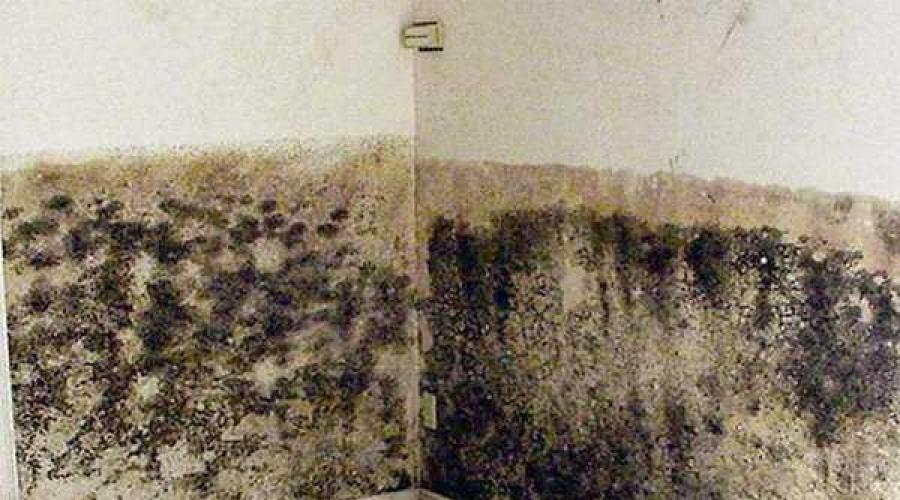
Walls in an improperly insulated cellar will mold.
If certain measures are not taken, the walls will quickly become unusable and collapse from destructive influences. external factors: high humidity and significant temperature fluctuations.
But the most important thing is the optimal temperature for storing food. Auntie told me that soaked apples are obtained only if the air does not warm up above 4 degrees Celsius and does not cool below 2. This can only be achieved if the cellar is thermally insulated both from the inside and outside.
If the temperature in the cellar is too low or too high, the blanks will deteriorate.
In this case, the cellar walls will not let through warm air inside in summer and cold in winter.
Another important point that many rarely pay attention to. I have come across situations many times when moisture condenses on the walls and ceiling inside the cellar. This is one of the consequences of improper insulation (or its complete absence).
Insulation measures are not enough to reduce the level of humidity. It is necessary to design and ventilation, which will regulate the content of water vapor in the room.
And, of course, I advise you to immediately think about waterproofing, without which the heat-insulating material will get wet and work worse, and the walls themselves will quickly collapse.
However, back to our sheep. Before describing the process of cellar insulation, I want to devote a few lines to the problem of choosing the right material.
Choosing the Right Material
Of course, if you have at least some idea about construction work, you can name a dozen materials that are suitable for insulation. But I decided to choose ordinary polystyrene for insulation of Angela Olegovna's cellar.

Styrofoam - the best insulation for the cellar.
Its technical characteristics and operational properties are fully consistent with the tasks, and the price is quite affordable. After acquiring thermal insulation, there will still be a lot of money left to buy in the market and pickle two or three barrels of apples.
For especially meticulous readers who are not used to taking a word, and also in order to justify their choice to my aunt, I will give comparison table pros and cons of foam.
| pros | Minuses |
| The material has a low coefficient of thermal conductivity, therefore it maintains the desired temperature in the food cellar well. | Styrofoam is not suitable for use on the outer surface of the walls of the cellar, as the outside will be subjected to significant mechanical stress from the surrounding soil and may collapse. |
| The foam plastic weighs very little, so it does not require a massive crate for installation. In addition, it does not exert a large load on building construction, so you can not be afraid of shrinkage of the walls after completion of work. | Under the influence of an open fire, the foam plastic ignites and, during combustion, releases chemical compounds dangerous to humans into the air. However, no one fries kebabs in the cellar, so this drawback can be neglected. |
| The heat insulator tolerates moisture well. Its thermal performance does not deteriorate when wet, and it does not collapse. | The foam is not very durable, so even when installed inside, measures must be taken to protect the insulation from damage. |
| When compared with other suitable heat insulators, the foam is the cheapest among them. This factor is important if you are insulating your cellar and want to save as much as possible. | The material can be damaged by rodents, but Angela Olegovna did not have any. Moreover, the cat Vaska is always on guard, who, although he does not like apples, is not averse to feasting on lard, which is stored in the same cellar. |
Another point that attracts me personally is the simplicity of cellar insulation operations. I can do all the work without a partner, so I don’t have to share the reward, that is, pickled apples.

All work on the insulation of the cellar with foam can be done by yourself.
So I immediately decided what kind of insulation to insulate the damp cellar from freezing and save the apples from spoilage. And I advise you to do the same.
And now I will tell you how to insulate the cellar from the inside.
Internal insulation technology
First, let's deal with the internal insulation. And all because they think about thermal insulation often after the appearance of problems and perform outside work difficult. Although I strongly advise you to take a comprehensive approach to the issue and insulate the cellar both on the street and in the room itself.
Preparatory stage
Even if the insulation is carried out after the completion of construction, some preparation is indispensable. I advise doing following works:
- Before installing the thermal insulation material, make sure that the surfaces (ceiling and walls) are level and free from defects. If, when examining the walls, you find cracks, potholes or bumps, you need to get rid of them.

Before insulation, the ceiling must be repaired.
- After leveling and repairing the walls, I advise you to treat them with antiseptic compounds that will destroy the existing fungus and mold, as well as prevent the development of various harmful microorganisms in the future.

Antiseptic treatment will prevent the appearance of mold.
- If for some reason there is no ventilation in the cellar or it works inefficiently, it is necessary to install ventilation pipes or repair the ventilation system. The fact is that after installing the heat-insulating layer, the humidity in the room will increase sharply and excess moisture will need to be quickly disposed of.

The cellar must be ventilated.
Having finished with the preparation, you can proceed to the warming. And I recommend starting from the ceiling.
Ceiling
So, the ceiling of Angela Olegovna, more precisely, the ceiling of my aunt's cellar, I insulated with foam plastic according to the following scheme:
- First, I examined the surface. Found there a few minor cracks in the seams between the concrete floor slabs. I sealed them with putty with antiseptic additives. If you are going to fix the thermal insulation with dowels, you need to take special, thermally insulated ones. Although heat loss in winter will be insignificant, the optimum temperature may not be reached.
- After repairing the surface, I attached a vapor barrier membrane to the ceiling so that during subsequent operation moisture would normally be removed from the cellar without condensing on the walls.

The vapor barrier of the ceiling in the cellar can be made with penofol.
The membrane is a polymer film with a special perforation, which does not prevent the infiltration of moist air to the outside, but does not allow the penetration of moisture from the outside.
As a vapor barrier for the ceiling, I used penofol, which consists of a layer of polyethylene foam protected by aluminum foil. It is good because it serves as an additional heat insulator. Aluminum acts as a screen that reflects heat energy into the room.
- Then I installed hangers for the crate. I used a galvanized profile, which is better suited for a wet room. Therefore, he attached it to special suspensions.

The crate can be made from a galvanized profile or wood.
Instead, wooden blocks of suitable height (a few centimeters higher than the thickness of the foam) can be used. However, it is desirable to pre-treat them with antiseptics and special hydrophobic compounds. Accordingly, they will have to be fixed on screws with dowels.
The distance between adjacent elements of the crate should be the same as the width of the foam boards. If there is less, you will have to cut it, if more - the cracks will become an excellent conductor of cold.
- After installing the insulation boards. In my case, foam, but something else can be used in a similar way. The only thing is, do not put glass wool, which, when wet, does not fulfill the tasks assigned to it. Yes, and it is harmful, apples will be in glass dust.

Styrofoam slabs installed in the crate.
It is necessary to mount the foam sheets so that the gaps between adjacent parts are as small as possible. I personally add them mounting foam to exclude even the slightest chance of the formation of cold bridges.
- On top I put another layer of penofol. As they say, the stock does not pull the pocket. However, this must be done in such a way that there is a gap of 5 cm between the foam and the vapor barrier, which will provide ventilation. If the height of the bars is not enough or you did not think about it in advance, you can make a low counter-lattice from above.
- I mount decorative material. I chose plastic panels. They are inexpensive, perfectly tolerate exposure to humid air and look good. Although for the cellar, maybe it doesn't matter.

Plastic panels are suitable as a decorative material.
This technology leads to the fact that the height of the room is somewhat reduced.
Floor
Now about the floor. It can be insulated using a similar technology with a few exceptions:
- the bottom layer must be laid waterproofing material (such as roofing material);
- supporting logs (crate) must be made of durable bars that can withstand increased loads;
- from above, the entire structure will have to be covered with a board or plywood.

The design with lags is not the best The best decision for the cellar.
This technology is simple and not very laborious, but the bottleneck is the use of wood. It is not suitable for use in the cellar, as it quickly becomes unusable. Therefore, if I did so, I would have to do everything again in a few years.
I chose to use extruded polystyrene, which has all the properties of Styrofoam but is strong enough to withstand the increased stress that is placed on the floor.
So, the workflow is as follows:
- Inspect the floor surface for defects and cracks. If the floor has large differences in height, I advise you to first perform a screed on the beacons (if the differences are small, you can pour a self-leveling mixture) and wait for it to dry.

Cracks in the floor need to be repaired.
- After the repair is completed, the surface must be cleaned. Then waterproof it. You can lay gluing materials or treat the floor with mastic based on bituminous resins. I prefer the second option, although it takes longer to dry individual layers.

Before installing thermal insulation, the floor in the cellar must be waterproofed.
- As soon as the waterproofing dries, sheets of expanded polystyrene are laid on top. They need to be positioned so that the seams go apart.

The installation of expanded polystyrene sheets is carried out after the waterproofing has dried.
- Then mounted metal grid which will strengthen the concrete screed. After all, the floor will have to withstand significant loads from standing barrels of apples. And this is a serious matter.

From above, before the screed, you need to lay a reinforcing mesh.
- Then the solution is poured onto the reinforcing mesh and carefully leveled.
- Final stage- decorative flooring. I made a gift to Angela Olegovna and built her a polymer self-leveling floor. It turned out that you can not only store fruits and vegetables there, but also live in general.

Polymer floor after completion of work.
However, it was still too early to live, as the walls were still without insulation. It is about them that will be discussed further.
Walls
For the walls, I also decided to use polystyrene, which I have already mentioned, but I did not fasten it under the crate, but with the help of special dowels with wide caps and glue.
I tell you a top-secret technology so that you, too, are in the know:
- I check the walls and fix the cracks. Of course, I have already repeated this twice, but believe me, many people neglect this stage of work, and then angrily write in the comments why they continue to freeze vegetables in the cellar.
- Installing waterproofing material. Perfectly fit pasting roll materials. Just choose not built-up, but on an adhesive basis. They are easier to install and do not emit hazardous chemical compounds into the air.

You can use penetrating waterproofing.
- I glue foam. For this, special solutions are used, which can be bought at hardware stores.

Styrofoam is glued to the walls with a special compound.
- I install plastic dowels. These are such brackets with very wide caps that will firmly hold the foam in place.

And secured with dowels.
- Installing reinforcing mesh. It is made from fiberglass. Some, again, skip this step, and then the plaster falls off.

A reinforcing mesh must be fixed on the surface of the foam.
- Stucco foam. This will protect the fragile heat-insulating material from mechanical stress and will allow you to install a decorative crate in the future.

The plaster is applied to the pre-fixed mesh.
By the way, about the decorative finishes. Here you can do everything on your own, but be aware of the high humidity. Angela Olegovna decided to take a swing at the tile, which will make her cellar just exemplary. But since she had no money to buy material, I postponed this stage of work for the time being.
And he took up external insulation, since it is in this case that the greatest efficiency is achieved from the conducted heat-insulating materials.
External insulation technology
For me, the answer to the question of whether it is necessary to insulate the cellar on the street is obvious. If you still doubt this, read the next section, where I tried to justify my own opinion and tell you how to perform external insulation.
Advantages of the method
Personally, I think that it is not necessary to insulate the cellar inside if it is possible to do it from the outside. The fact is that outer layer insulation protects the structure itself and the waterproofing layer not only from low temperatures, but also from mechanical influences.

It is better to carry out the thermal insulation of the cellar from the outside.
Besides:
- an ideal microclimate for storing vegetables and fruits is formed in the cellar;
- the very surface of the walls in the room will be warm, that is, the potatoes near them will not freeze;
- moisture will not condense on the walls;
- the size of the cellar will not change (although my aunt’s is already so spacious that you can stock up on food and survive a considerable cataclysm);
- proper external insulation eliminates the formation of cold bridges.
Therefore, if it is possible to put a heater outside, do just that. But before that, perform a thorough waterproofing of the surfaces. Now I'll tell you how and what.
Surface waterproofing
The peculiarity of the work here is that the surfaces to be treated after the end of the waterproofing measures will be underground, therefore they will be exposed to significant moisture.

Wall waterproofing can be done with gluing and coating materials.
For waterproofing in this case, I used guided liner materials. This is a modern roofing material, the adhesive layer of which is activated under the influence of high temperature. I used a gas burner.
If you do not know how to work with heated materials, use membranes with an adhesive layer. Or even take bituminous mastic and paint over the walls of the cellar from the outside.
Installation of thermal insulation
As thermal insulation, I used special heat-insulating plates made of extruded polystyrene. They have a low coefficient of thermal conductivity and sufficient strength to withstand the mechanical impact that the soil exerts when backfilling the cellar.

Plates are placed starting from the bottom of the wall.
The plates are installed on the waterproofing layer with the help of mastic. It is applied to the surface of the slab, after which the material is pressed against the surface until the adhesive sets (usually takes about 40 seconds, but it all depends on the air temperature).

Penoplex is glued directly to the waterproofing.
You need to lay out the plates starting from the bottom of the cellar walls (from the ground) and gradually move up. The last row should be located so that after backfilling it rises 30-40 cm above the ground.

After backfilling, the thermal insulation should rise above the ground level.
It is very important to ensure that the thermal insulation plates fit snugly against each other. Cracks and gaps need to be filled construction foam.
Also carefully backfill the soil. Make sure the ground is free of stones and dense clods of earth that could damage the insulation. After installation, the plates do not require any finishing. That's why I decided to use them.

The reward for the work done (pictured) is worth the effort.
Naturally, it is better to do all the activities described above during construction in order to reduce the amount of effort, but if you did not attend to this in time, then proceed according to the scheme proposed above.
Conclusion
Now you know how to protect the cellar from freezing in winter period. But in order to enjoy pickled apples, since you do not have Angela Olegovna, you will have to make them yourself. If you do not know a suitable recipe, you can watch the video in this article, where there is detailed instructions.
And personally, I would like to ask you about this: how did you perform or are going to perform the insulation of the cellar in the garage. Tell me about your practical experience or your thoughts on it. I would be grateful for detailed messages in the comments below.
 Subscribe to our channel in Telegram
 obustroeno.com
How to insulate the cellar from freezing from the inside: floor, ceiling, walls
The cellar, like the basement, is designed to store canned food and other food. In order for it to perform its functions well, it is necessary to constantly maintain the optimal temperature and humidity in the room.
If you allow minus temperatures, then all products will freeze, with excess heat they will become lethargic. Be sure to monitor the level of humidity, otherwise rotting cannot be avoided. Therefore, the insulation of the cellar from the inside is very important process.
It is important to know! Reducing the level of humidity cannot be achieved only by insulating the cellar, it is necessary to equip it with ventilation, which will regulate the content of water vapor in the room.
Determine the source of the problem
The main factors contributing to the freezing of the cellar are melt water. In some cases, groundwater that rises close to the surface becomes a problem. Therefore, before insulating the cellar from freezing from the inside, it is necessary to determine the source of the problem. Having found out the causes of moisture, it is necessary to determine to what depth the soil freezes during the frost period. And already starting from the information received, you can decide on the thickness and choice of heat-insulating materials.

The illustration clearly demonstrates critical areas for frost protection of cellar structures.
Today's market offers a large number of heat-insulating materials for warming any surfaces, but you need to understand that not everyone is suitable for warming the cellar. Cellar insulation must be able to maintain its geometry, have good insulating properties, it must be resistant to water and soil pressure. What are heaters?
- expanded clay;
- glass wool;
- mineral wool;
- expanded clay concrete;
- red ceramic brick;
- Styrofoam;
- cellulose insulation;
Regarding cellulose insulation and mineral wool: they are not suitable for cellar insulation, as they do not meet the required properties. If we compare heaters for the cellar, then in terms of efficiency they will be arranged in the following order:

What exactly needs to be insulated in the cellar to prevent freezing
Let us consider in detail the basics of insulation of all enclosing structures of the cellar: ceiling, walls, floor.
Ceiling insulation
Ceiling insulation plays an important role in the formation of optimal temperature and humidity, because when cold air enters the room, it threatens to form condensation on the ceiling and walls. So, how to insulate the ceiling in the cellar with your own hands.
- Surface inspection. It is necessary to inspect the ceiling covering for cracks in the seams between the concrete slabs. Then you need to cover them with putty with antiseptic additives. Regarding dowels for fixing thermal insulation, they must also be thermally insulated.
- A vapor barrier membrane is attached to the putty surface to the ceiling. It is necessary so that during each subsequent operation moisture is normally removed from the cellar, without forming condensation on the ceiling and walls. The membrane does not prevent the infiltration of moist air to the outside, and prevents the penetration of moisture from the outside. The material is a conventional polymer film, but with a special perforation.

The photo clearly shows the membrane for insulating the ceiling and aluminum suspensions.
For the construction of a ceiling vapor barrier, penofol should be used, the main composition of which is polyethylene foam protected by aluminum foil. Its peculiarity is that it serves as an excellent heat insulator, and aluminum acts as a screen that reflects heat energy into the room.
- Installation of hangers for crates. It is necessary to choose a material that will be more loyal to wet room, such material includes a galvanized profile. It must be fixed on special suspensions. Wooden bars can also be used as suspensions, but this will add additional trouble. The bars must be treated with an antiseptic and other hydrophobic compounds. Fastening will be carried out on screws with dowels.
It is important to know! When working with suspensions, it is necessary to set the distance corresponding to the width of the foam. Otherwise, gaps will remain.

How to insulate the floor
Floor insulation follows a similar pattern, with the exception of several technologies. The bottom layer will be roofing material or any other waterproofing material. The bars for the construction of the supporting logs should be chosen more durable, as they will experience a greater load. The top layer will be plywood or boards.
This floor insulation technology is quite simple to install and not so high in price, but the tree has a big minus, it quickly becomes unusable in moisture conditions. Therefore, it is better to use extruded polystyrene. The material in its properties is very similar to the foam.
As floor insulation effective solution will be using expanded clay base.

The base of the floor is expanded clay (insulation), then light reinforcing mesh and concrete screed
Sequence of work
Inspect the surface of the floor for cracks, if they are found, cover it up cement-sand mortar composition 1:2 (sand and cement). If uneven surfaces are found, screed along the beacons should be performed. After completing the repair, you need to clean the surface of debris and make waterproofing. The best choice the floor will be treated with bituminous resin.
It is important to know! It is possible to install polystyrene sheets only after the bituminous resin has completely dried.
Once the resin has dried, the polystyrene sheets can be laid. Sheets must be mounted so that the seams go in a run. Having finished laying the sheets, a metal reinforcing mesh is mounted. Reinforcing the floor screed will avoid the appearance of cracks on the surface. The mesh is light, made of smooth-rolled reinforcement ∅3-4mm. Then concrete is poured onto the mesh and carefully leveled. Regarding floor covering, then you can leave bare concrete or build a modern polymer self-leveling floor.
How to insulate walls
As a heat-insulating material for wall insulation, foam is the most suitable. It is attached with special dowels and glue. Foam fixing technology:

Video: another effective method - warming the cellar with penoizol
In conclusion, we can say that an insulated cellar is a guarantee of the complete safety of all conservation and other winter preparations, despite severe frosts and heat. Walls insulated from the inside will keep the whole body in the room and create optimal temperature and moisture.
No comments yet
uteplenieplus.ru
How to insulate a cellar: external thermal insulation, floor, wall, ceiling and door insulation
As you know, building a cellar does not mean getting a good place to store your crops. Poor waterproofing can be the cause of groundwater penetration into the room, and poor-quality thermal insulation can lead to unfavorable temperature conditions and condensation. That is why we will look at how to insulate a cellar in a garage or under a house, this will create an optimal microclimate in which all products will be stored in fresh a very long time.
It is worth remembering that only A complex approach: good waterproofing, high-quality insulation and competent ventilation ensure that the cellar will not be damp.

Styrofoam is a very popular option for cellar insulation among developers.
Insulation serves two main tasks:
- In winter, freezing of the structure is prevented.
- IN summer period high-quality thermal insulation allows you to keep a low temperature in the cellar even on the hottest days.
Features of insulation of various parts of the cellar
First, you should decide which insulation for the cellar to choose. It depends on the heat-insulated surface and the characteristics of the material used. We will consider the most popular options, and the final choice will have to be made by you.
External thermal insulation
Insulation outside the building is relevant in cases where the cellar is located under the garage, in the barn or at the outer walls of the house, and also if it is located separately. In cases where the cellar is located under the house a few meters from its outer walls, this operation may not be carried out.
At this stage, the following features can be distinguished:
- It is best to carry out work at the construction stage, when there is space. Otherwise, you will have to free the entire foundation, and in some cases this is almost impossible to do.
- Walls must be waterproofed. The best option is modern roll materials and liquid rubber. These coatings serve for decades, unlike bitumen and roofing material.
- If there are large gaps, it is best to seal them with mounting foam, it reliably insulates heat and does not collapse for a long time.
- Next, foam or other sheet heat-insulating material is attached. The easiest way to glue it is with mounting foam or a special compound. You can also use bituminous mastic - it also, drying, provides high fastening strength.

In the photo - heat-insulating material with external insulation is attached to a previously waterproofed surface
Advice! If high quality work is important to you, it is better to use extruded polystyrene foam.
This material is much stronger than conventional foam, it has higher thermal insulation properties, and thanks to the grooves in the ends, the joints are very reliable.
- To provide maximum efficiency the thermal insulation layer on the street, it is necessary to make a blind area along the wall in order to protect the basement walls from moisture.

The blind area will reliably protect the layer of external insulation and significantly extend its service life.
Floor insulation
This is also an important point in the arrangement of the cellar. Many believe that gender does not require special attention, but it's not. In order for your floor to be reliable, it should be thermally and waterproofed. This can be done in several ways.
Warming with expanded clay:
- The base is leveled, which must be covered with roofing material or poured with bitumen, and a waterproofing agent is glued to it.
- Next, expanded clay fractions from 5 to 20 mm are poured. The layer of material should be from 10 to 25 cm. A concrete screed with reinforcement is poured on top of the material, the thickness of which depends on the expected load on the floor. After it hardens, additional waterproofing of the surface can be carried out.

Expanded clay - great material for floor insulation
It should be noted that expanded clay is very lightweight material which simplifies the process of working with it. In addition, the price of this material is quite democratic.
You can insulate the floor with sand and gravel:
- The site is being prepared and leveled, after which 15-20 cm of fine gravel is poured onto it. Then a layer of sand 5-10 cm thick is poured.
- The pillow is rammed and waterproofed, this can be done using roofing material or construction film.
- Next, a reinforcing belt is arranged and concrete is poured. If groundwater is located close to the surface, you can waterproof the flooded surface and make a 5 cm thick screed on top. This will provide additional protection.

A reinforcement structure is installed on the gravel-sand cushion and concrete is poured
The third way is foam insulation:
- A sand or gravel cushion is arranged, which is closed with a waterproofing barrier.
- Styrofoam grade 35 is laid on top.
- Next, a screed is poured, which, if necessary, can be reinforced to increase strength.
But this method is less common, since the floor can be perfectly insulated in simpler ways.
Wall insulation
We examined how to carry out work outside, now we will analyze how to insulate the cellar from the inside.
The best option is polystyrene due to ease of installation and low price. With it, you can easily carry out the insulation with your own hands, you do not need the help of specialists and instructions - everything is very simple.
The walls should first be prepared - they should be even, all flaws should be repaired cement mortar. If there is a danger of flooding, it is better to treat the walls with a penetrating solution, at the moment this best defense premises from moisture.
Insulation sheets are easiest to glue, after which the surface is covered with a reinforcing mesh and plastered.

Styrofoam provides excellent thermal insulation
It should be noted that when insulating the outer walls with foam plastic 10 cm thick or more, internal insulation you can not do.
Another option is to stuff guide bars along the walls, after which the foam is inserted between the bars, and the surface is sewn up with wood or moisture-resistant sheets.
Many developers prefer to use mineral wool; the process of its installation does not differ from polystyrene foam. If the insulation will be carried out under the plaster, a solid insulation is used, if under the bars - soft mats or rolled material.
Another option is insulation with sprayed polyurethane foam. At the moment it is the most reliable and durable insulation. It has no seams, it is resistant to moisture and has high thermal insulation properties. But the price of this solution is much higher than others.

Spraying is carried out between the bars, after which the surface is sewn up - everything is very simple
Ceiling insulation
As a rule, the main problems with the microclimate in the basement are associated precisely with poor-quality insulation of the upper partition. Therefore, it must be done.
There are several basic options for insulating the cellar from above. Let's consider each of them.
You can use polystyrene foam: fill the slats, insert insulation between them and seal all seams with mounting foam.

Styrofoam can be used on both walls and ceilings
You can fill the crate at a distance of 30 cm from the ceiling with cells of 40 cm, you can weld it from metal. Sealed plastic bags with moss, straw and other natural materials.
You can use polyurethane foam spraying, but it will cost a significant amount.
door insulation
Many, when insulating the cellar, forget that a significant part of the coolness leaves through a poor-quality door. It is best to make a vestibule with two doors. But still, it is better to insulate the inner fabric additionally. The easiest way is to paste over it with foam - this is a simple and effective way of warming.

Styrofoam can be simply glued to the door
Conclusion
We considered how to insulate a cellar in a garage, barn, house or standing separately. Having completed the full range of work, you can be sure that your cellar will become a reliable storage for products. The video in this article will help you better understand some issues.
Page 2
Building a house is a complex and responsible process, and it does not end after the walls and roof are made. Work related to the thermal insulation of load-bearing structures is no less important stage than the construction itself. If you want to be comfortable and warm house, and you don’t want to spend extra money on heating in the future, then you need to think not only about insulating the roof, walls and floor, but also to insulate the foundation and basement of the building.

The process of manufacturing a heat-insulating belt
Many novice builders do not pay due attention to this aspect and absolutely in vain, because up to a quarter of the total heat losses can be lost through the basement and foundation.
In this article we will talk about how you can insulate this structure with your own hands, as well as what materials it is best to do and how.
Why insulate the foundation
If you do not know or are still thinking about whether it is necessary to insulate the basement of the foundation, then we will now try to explain to you in detail why it is still worth doing. The fact is that seventy percent of cold air enters the building through the foundation, therefore, in almost all building projects, flooring is raised above the level of the formed soil (see also the article “Quality and colorful lining of the pile foundation basement - what materials to use and how to perform their installation).
Important. Pay attention to the fact that cold air has a higher density than hot air, so the latter rises. Therefore, if you poorly insulate the roof, it will go into the atmosphere through it, and cold air will come in place of hot air.
This phenomenon is clearly visible during snow, because it does not accumulate on the roof. Therefore, the insulation of the basement of the foundation is as important an event as the thermal insulation of walls or roofs.

Basement on a residential building
Basement insulation methods
To date, many different insulators can be used to perform insulation work. Some of them have been known to us for a long time, and some are modern materials created thanks to advanced technologies(learn also how and how to close the basement of the pile-screw type foundation).
Builders with extensive experience are advised to insulate the basement during its manufacture (filling). But even if you already finished house, then nothing bad will happen. It must be said that most houses have concrete base, and this material has a high thermal conductivity.
That is, it heats up quickly and cools just as quickly, and if you make high-quality thermal insulation, you can minimize heat loss. One of the main tasks of these works is to separate the foundation from the damp earth, therefore waterproofing is performed as insulation work.
If the soil has high percent moisture content, it may be necessary to install a special pipe to remove excess liquid. It is laid on a special cushion of gravel and has a slope relative to the horizon of no more than five percent. Excess moisture accumulates up to a certain limit, and then, getting into the pipe, will be removed into the sewer or drainage pit.
Types of heat insulators
- Styrofoam. It has a porous cellular structure and has a white color, it is produced at factories in sheets of 100 * 100 mm or more, with a thickness of 2 cm or more. Production is carried out by foaming polymers, therefore it is 95% gas.

Styrofoam photo
It has good thermal insulation ability, but is afraid of direct sunlight and precipitation. When cutting, it begins to crumble, so it is recommended to use it entirely;
- Styrofoam. It is a derivative of foam plastic, and is obtained by polymerization of styrene and pentane. Depending on the production process, there can be three types: autoclave, extradited and press. It is usually released from standard thickness five centimeters, but there are other options.
For construction work in the private sector, pressed with a high density is well suited, this is exactly what you need to buy if you decide to insulate any load-bearing structures in your house.

Styrofoam
Buying a polystyrene board, you get additional convenience when working with it, since such plates are tightly joined and form extra layer overlap. Interpanel connections overlap during their installation, but compared to conventional foam, it has a lower thermal conductivity.
It is convenient to saw it, and unlike polystyrene, it does not crumble, but forms an even cut, besides, it is not afraid of a humid environment, therefore it can be used for external wall insulation;
- Penoplex. It is derived from expanded polystyrene and has a greater porosity, and, consequently, a greater breathable structure. Due to this characteristic, it is widely used both for internal thermal insulation works and for external ones. Therefore, if you have not yet decided what is the best way to insulate the basement of the foundation, then you should pay special attention to this material.

Appearance of foam
Warming process
In the process of plinth insulation, work can be carried out using two technologies: glue or frameless and frame (in this way, the plinth of the pile screw foundation is insulated).
In the latter case, due to the fact that the pile foundation is a point support, there is a need to create a frame around the entire perimeter of the house. It is also commonly called a false base. This design can be thermally insulated with foam or polystyrene foam.
In the first case, the insulator will need to be placed in the frame itself, because it is afraid of precipitation, and in the second case, the insulation is glued with special glue composition directly on the frame. Due to the fact that the price of expanded polystyrene is affordable for everyone, all construction companies and developers began to use it.

The process of gluing the heat insulator
Instructions for carrying out insulation work:
- If the foundation is piled, then you must first create a frame, but if it is ordinary, for example, tape, then it is necessary to perform hydraulic isolation. Bituminous mastic is well suited as a waterproofing;
- A small groove is made near the blind area, it serves to ensure that the sheets of thermal insulation go into it. If there are any leaks, they can be blown out with mounting foam;
- Each sheet of material is glued to a special glue, and you need to start the work itself from the bottom of the corners;
- At the next stage, the heat insulator plates are puttyed, and after the putty has dried, grouting;
- On final stage the whole structure is painted.
Important. The process of creating an insulating layer for ordinary foundations, similar to a strip foundation, differs from the method for a pile foundation in that the frame is made for the latter. All other items are identical.

Bituminous composition applied to the surface of the wall
If you use the services of specialists, you will get a solid amount, since for one square meter area they take 400-550 rubles, and if you have big house, then you can already roughly estimate the considerable cost for everything.
It must be said that such works seem complicated only at first glance, but even a novice master can handle them with a detailed acquaintance, so if you want to save money, then carefully read the information provided again.
Conclusion
In this article, we looked at why you need to insulate the basement of the foundation and how to do it. In addition, materials that can be used for these works were considered, and it was also agreed which insulation for the basement of the foundation is better to take. We repeat once again, experts advise using universal materials, such as polystyrene foam or expanded polystyrene (see also the article “Waterproofing the basement of the foundation - we will protect your home”).
The video in this article will help you understand this issue in more detail.
Add to favorites Printable version
mypodval.ru
 Insulation of the basement from the inside should be used when it is impossible to perform external thermal insulation or as an addition to it. Insulation of the basement from the inside allows you to extend the life of the building. Proper insulation and insulation help to reduce heat loss, protect against dampness, and prevent cracking if the soil swells. Insulation will allow not to heat the basement and maintain a stable temperature regime inside it. The cost of materials for insulation is not high, so all work can be done without significant costs. Equipped basement can be used as free space.
Each house has a basement, which is an area located between the ground and the first floor. Usually the height and width of the basement allows it to be used for a wide variety of purposes. Many people use the basement as a cellar for storing vegetables and canning.
 If there are irregularities on the surface of the cellar walls, then it is recommended to eliminate them, because they will interfere with fastening insulation material
For successful and long-term storage of products, the temperature in the cellar must be stable and optimal.
Proper insulation can make the room temperature normal and suitable for year-round use premises. Basement insulation can reduce heat loss by up to 20%. Basement insulation It has a positive effect on the condition of the walls of the cellar, protects them from dampness and moisture. Insulation of the floor with polystyrene foam will protect the surface from hypothermia.
Basement Strengthening Tips:
- The most effective way to strengthen is the external insulation of the basement. This technology of thermal insulation is mounted outside the building. This prevents freezing basement walls during cold periods.
- If you insulate the basement from the inside, condensation may form on the walls. Where the junction of the insulation and the wall passes.
- Do not forget that waterproofing basement walls is necessary. Thermal insulation must be resistant to moisture.
- An excellent option for wall insulation is foam. Styrofoam should be used on initial stage building construction.
Air insulation should be done in such a way that cold air does not penetrate into the room. Styrofoam insulation will provide a stable microclimate in the cellar both in summer and in winter. You should also take care of high-quality waterproofing, as protection from the cold will not be enough.
Cellar insulation: preparatory work
You can insulate the cellar with your own hands, but for this you must first decide what material will be used for this. At the initial stage of construction, the cellar can also be insulated from the outside. Floors, walls and ceilings must be insulated.
 Walls must be treated with waterproofing material (all kinds of mastics or liquid rubber can be used)
If all the work on the construction of the cellar is completed, then the basement can only be insulated from the inside.
It is important to remember that when performing insulation from the inside, condensation occurs between the joints of the two materials. Usually, condensation leads to the fact that building materials begin to deteriorate. To prevent this, it is necessary to perform high-quality waterproofing, which will protect the basement from the penetration of underwater water.
Preparatory work:
- Before laying the insulation on the surface, it is important to make sure that they are perfectly even.
- When the surface of the walls and ceiling is even, it should be treated with a special antiseptic solution.
- When the thermal insulation layer is laid, the level of humidity will increase in the cellar. To fix this, you need to take care of installing a high-quality ventilation system.
In order for the surface to be insulated reliably and efficiently, all cracks and crevices must first be removed. If the material is attached to the surface with dowels, it is important to make sure that they are also insulated, because cold will also penetrate through the cracks around them. You should not forget that you need to install a vapor barrier material.
How to insulate the cellar from freezing from the inside
Usually a lot of moisture forms in the cellar, which negatively affects the condition of all surfaces: the floor, walls and ceiling. In winter, the surfaces freeze, and in the spring they are covered with condensate. The cellar must be protected from freezing, condensation, penetration of melt and groundwater.
 As soon as the waterproofing layer is completely dry, foam can be glued to the wall
The best option for insulation is considered to be insulation with extruded polystyrene foam. However, here many may disagree.
Many masters advise to insulate surfaces that are on the street, since warming from the inside often leads to the formation of a freezing zone. A good option for external insulation is the use of roofing material. To insulate the surface from the outside, you first need to remove the soil that got on the walls and let the brick dry.
Step by step warming
- Remove soil.
- It is important to take a break so that the walls have time to dry.
- Stick foam boards. For reliability, it is better to fix them with dowels.
- Cover all surfaces with roofing felt to protect them from moisture.
In order for the insulation to be reliable, it should be done not only from the outside, but also from the inside. best material for this - foam. The foam is very strong and reliable, it does not crumble and is not afraid of moisture. Installation of plates can be easily done by yourself.
Step-by-step actions: how to insulate the basement from the inside
Today, the most common way to insulate walls, ceilings and floors in a basement, garage or barn is with foam boards. The plates can be easily glued to the surface on their own, after cleaning it and leveling it. For reliability, the foam is attached with dowels.
Significant disadvantage insulation like polystyrene is its instability to the attack of rodents - they love it very much and damage it quickly enough.
It is also important to pay attention to the fact that the foam burns well, so you should not mount it close to sockets and electrical wiring. At the initial stage of insulation, do not neglect the thorough preparation of surfaces. The foam boards will attach securely if the surfaces are level.
The most common floor and ceiling material is concrete. Concrete contributes to the penetration of cold into the room. But in summer it heats up. Concrete also cannot withstand moisture.
How to insulate the floor and ceiling:
- Concrete slabs must be treated with a special waterproofing compound that penetrates deep into concrete, filling capillaries and concrete cracks.
- After the concrete surface has completely dried, it is necessary to proceed with fixing concrete slabs.
- Plates must be additionally fixed with dowels.
After the plates are securely fixed, it is necessary to cover them with a mounting grid and fix them with plaster. Surfaces can also be reinforced with mineral wool. In order to fix the cotton wool, it is necessary to first mount wooden bars on the surface.
How to insulate a cellar in a garage (video)
The basement is very important to securely strengthen, as moisture and cold will penetrate into an unprotected room. Before warming, all surfaces must be carefully prepared beforehand - they must be as smooth and dry as possible. It is also important to insulate the places where the insulation material is fastened with dowels, as well as the cellar lid and hatch. It is important to reliably insulate a concrete or sandy floor, as they pass groundwater very well.
In most residential buildings, a basement is provided, located between the ground floor and the ground. Its height depends on the similar parameter of the base and can vary within 0.5-2 m or more. Insulation of the basement ceiling and measures for complex insulation make it possible to more efficiently use the interior space located under the ground floor. Properly selected materials and technologies allow you to create a comfortable microclimate in the basement.
Purpose of thermal insulation
The lack of insulation and violations of the waterproofing layer contribute to the penetration of moisture and cold air. This is especially noticeable in the basement, where, over time, mold appears from dampness and there is a risk of the fungus spreading along the surface of the walls. Insulation of the basement ceiling will prevent negative impact moisture and low temperatures on concrete and keep the load-bearing structures from destruction. In addition, effective thermal insulation will provide:
- reduction of heat losses by approximately 20%;
- comfortable floor temperature in the premises of the first floor.
Thanks to ceiling insulation and other insulation options, the basement can be equipped with a laundry room, utility rooms or recreation rooms. In some cases, a cellar is equipped under the ceilings of the first floor, Gym or pool.
The choice of insulation
The variety of materials used for insulation allows you to find the best option for different areas use. When choosing a particular type of insulation, you need to pay attention to the following parameters:
- coefficient of thermal conductivity;
- moisture permeability;
- acceptable cost.
An important criterion for evaluating a heater is its resistance to fire. To avoid accidents, thermal insulation must not ignite and release poisonous and toxic substances in the event of a fire.
Types of thermal insulation materials
Insulation of the ceiling in the basement can be carried out using mineral wool, polystyrene foam or extruded polystyrene foam, which differ in technical characteristics and installation nuances.

It is a compressed fiber of inorganic material, the layers of which are molten rocks, blast-furnace slags and glass fibers. For thermal insulation of basement ceilings, mineral wool based on sedimentary rocks is used. It differs:
- good insulating properties;
- low thermal conductivity;
- fire and chemical resistance.
The life of the material is about 30-40 years.
Styrofoam and extruded polystyrene foam

Heaters are made of polystyrene using different technologies, so some of their parameters have significant differences. Among common benefits can be distinguished:
- light weight;
- low coefficient of thermal conductivity;
- ease of installation and maintenance.
Extruded polystyrene foam is more effective as thermal insulation than polystyrene foam, but it costs more. The main disadvantage of these materials is the violation of the natural balance of temperature and humidity in the premises, which occurs due to the lack of moisture and air circulation. To maintain a comfortable microclimate, it is necessary to provide good ventilation.
Tools and materials
The list of tools and fixtures needed to insulate basement ceilings depends on how it is done. Minimum set should include:
- knife for cutting insulation;
- tape measure and building level;
- dry or ready mixes for leveling concrete surfaces;
- putty knife.
If foam or extruded polystyrene foam is used as thermal insulation, then you will need a special glue and a comb with fine teeth to apply it. Warming with mineral wool is carried out after the installation of the frame, which will require the following:
- metal profiles or wooden bars;
- hacksaw for metal or wood;
- drill;
- screws and dowels.
To protect the insulation from moisture, a vapor barrier layer is required, and to treat the surface of the ceiling, a special impregnation is required, the composition of which is determined by the floor material.
Preparatory work

Before starting work on insulation, you should inspect the surface of the ceiling, clean it of dust and identify bumps, cracks and other defects. In addition, you will need to check for the presence of a height difference in different sections of the overlap. With significant discrepancies for the installation of thermal insulation, it is advisable to choose the frame method.
After cleaning the ceiling of dust and dirt, repair the detected damage with wood putty or cement-based leveling mixtures. After drying, the surface is sanded and treated special formulations to protect against fungus and mold. Especially carefully carry out preparatory work with the adhesive method of fixing the insulation.
Mineral wool insulation
When using mineral wool for ceiling insulation, you first need to make a frame from metal rails or wooden bars. They are fixed on the ceiling in increments of 50 cm using dowels or self-tapping screws, constructing cells of a certain size. Then a vapor barrier layer is laid using a membrane film, and the following types of work are performed:
- cutting insulation into pieces the right sizes, coinciding with the dimensions of the frame cells;
- lay mineral wool slabs in cells, additionally fixing them with dowels with wide caps;
- fix the layer vapor barrier material.
As a finishing layer, various types of panels, siding and other types of finishes are used, the choice of which depends on the purpose of the basement.
Foam insulation

Installation of thermal insulation using foam or extruded polystyrene foam can be performed using a special adhesive composition. Ceiling insulation measures include the following steps:
- marking, which is necessary for orientation during the laying of the material;
- preparation of glue, the composition of which depends on the type of overlap;
- rolling one of the sides of the insulation with a spiked roller to increase adhesion;
- applying glue to the thermal insulation plates with a fine-toothed comb;
- gluing foam sheets or extruded polystyrene foam to the ceiling surface from the middle in a checkerboard pattern;
- additional fastening of the insulation with special dowels, which are placed in the middle and along the edges of the plates.
During laying, thermal insulation sheets are placed close to each other, trying to avoid gaps. The joints between the sheets can be closed with construction tape. If finishing is necessary, after the glue has dried, a reinforcing mesh is fixed on the insulation. Then the surface of the ceiling is puttied, eliminating irregularities. For household basements, it is enough to paint the plaster layer after it has dried, and in rest rooms and similar rooms, finishing is carried out taking into account the general design concept.
At the dacha, in a personal plot or in the courtyard of an honest house, they arrange a separate facility for storing vegetables, conservation, winter harvesting, twists and other things. The correct arrangement of the cellar involves insulation to create an optimal microclimate in the storage. The cellar and basement differ in a number of parameters, which means that the approach to warming them for the winter will differ in several ways.
What is the difference between a cellar and a cellar
Basement- a room under residential building. Key characteristic- the presence of indirect heating. IN this case, during the heating period in the basement is much warmer than in the cellar. In addition, it contains communications. As a result, the requirements are stricter. Among other things, the basement ceiling is a serious source of heat loss from the heated rooms on the ground floor.
Cellar- an object located separately or under a summer kitchen, garage, outbuildings. The temperature in it is more stable throughout the year, which means that preservation, vegetables or wine are stored much better.
This is what leads to the fact that if there is free space on the site, the owners tend to build a cellar on the street. And already in the process of operation, the question invariably arises whether it is necessary to insulate the cellar. After all, from an excess of heat, vegetables will begin to wither and rot, and from a lack of heat, they will freeze.
Of course, it is better to carry out thermal insulation work during the construction of the cellar. But what about those who already have a cellar in the country. How to insulate the cellar from freezing without serious costs?
The choice of insulation method involves work in one of the following areas:
- cellar insulation from the outside;
- cellar insulation from the inside;
- combined insulation. The most efficient way, because is complex.
Types of cellars for a private house
When deciding how to insulate the cellar from the inside or outside, the type of cellar is taken into account first of all:
A separate room with a penetration into the soil up to 0.5 m. It can be freestanding or wall-mounted (one of the walls of the cellar is a wall outbuildings or garage). From the point of view of insulation, this is the simplest option, because. It is possible to insulate the walls and roof from the outside and from the inside.

buried cellar
The lower point of the building is located at a depth of no more than 1.5 m from the ground surface. In this case, in addition to warming, one should also think about neutralizing the action of groundwater and frost heaving of the soil.

Underground (bulk) cellar
Distinguishes the location of the floor at a level of 2-3 meters underground. With proper waterproofing, this is the most advantageous cellar in terms of operation, which perfectly keeps the positive temperature, approximately constant, throughout the year.
Despite the differences in construction, the design of the cellar is not diverse.
Standard cellar design:
- walls - with dense soil - earth, with movable - brick or stone;
- floor - absent, or rather it is unpaved;
- ceiling - reinforced concrete or wood.
Accordingly, the ceiling, walls, and floor are insulated. Those. all cellar surfaces through which heat loss is possible.
Cellar insulation materials
Despite the significant variety of thermal insulation materials, it should be taken into account that not every one of them is suitable. The material for cellar insulation must have properties such as the ability to maintain geometry, withstand the pressure of water and soil, have high insulating properties (table), and absolute hygroscopicity.

For these reasons, mineral wool or ecowool is of little use for thermal insulation.
If you arrange the materials in descending order, then the following sequence will appear:
- cellar insulation with styrofoam. The most popular heater After all, in addition to thermal insulation characteristics, foam plastic is distinguished by low price and ease of installation. Styrofoam does not rot, is not hygroscopic, biologically inert, has a low weight, does not require application vapor barrier films and arrangement of the crate. Mounted both outside and inside the room;
- cellar insulation with sawdust or peat soil, which retain heat well and are unattractive to rodents;
- basement insulation with polyurethane foam. PPU refers to sprayed heaters. Possessing all the properties of its predecessors, it is distinguished by incombustibility and the ability to fill the entire space (crevices, cracks). PPU creates a shell, which is the most reliable way to insulate the cellar both from the outside and from the inside. At the same time, the cost of polyurethane foam is high, and the application requires special equipment and the involvement of specialists;
- cellar insulation with polystyrene foam. Expanded polystyrene has all the characteristics of polystyrene. It is distinguished only by a higher price, which is due to the greater density of the material, the integrity of the sheet structure (the ability not to crumble during installation), the presence of a tongue-and-groove mounting system;
- cellar insulation with expanded clay. Expanded clay, like any other bulk material, is distinguished by a limited scope. As a rule, it is used for floor insulation. It can also be used for walls external insulation underground (dug) cellar.
- cellar insulation with black soil. Used for outdoor insulation. In this case, the earth is poured onto the roof of the cellar. However, with the current level of technological development, there are many more effective ways insulation while maintaining the absolute ecological cleanliness of the site.
Insulation technology depending on the type of cellar
Approach to thermal insulation, taking into account the design of the structure.
Ground cellar insulation
With this design, the main emphasis is on the insulation of walls and roofs. So, it is best to do outdoor work and use foam or polystyrene foam. Insulation work is carried out on the street, according to the installation technology of these materials. The roof is insulated from the inside. For these works, soft or hard insulation can be used.
Underground cellar insulation
The walls of such a cellar are half located in the ground. Therefore, there is a risk of flooding. To level it, you need to release (dig) the buried part of the outer wall from the ground, treat it with any waterproofing solution (mastic) or wrap it with roofing material. Then lay a rigid insulation or polyurethane foam, re-wrap it with roofing material (this will protect the sheet from deformation) and cover it with soil. To minimize the influence of water, it is better to equip the drainage system.
Insulation of a bulk cellar (underground)
It is carried out both outside and inside. Below are detailed recommendations and advice on the phased thermal insulation of a building for storing agricultural products in the country.
How to insulate the cellar with your own hands
Different insulation technologies in the form of step-by-step instructions.
External insulation of bulk cellar
The most time-consuming part of the work, the implementation involves the implementation of a number of actions:
- the soil surrounding the roof and walls of the cellar is removed.
Note. It is sometimes not possible to excavate the soil. For example, when the cellar is dug in the ground, and the resulting slopes are finished with bricks. Such walls can collapse. In this case, users are advised to remove the soil at a distance of 100-150 mm. from the wall, and then gradually remove the rest.
Additional protection against moisture will be provided by the arrangement of a crushed stone-sand cushion at a depth of 200-300 mm. from the base of the wall.
- rigid insulation boards are mounted or polyurethane foam is applied;
- all defects from the surface of the walls are eliminated;
- for further work, it is necessary that the roof and walls are absolutely dry. Therefore, work is stopped until the walls are completely dry. As you can see, work is best done in the warm, dry season;
- roof insulation is, in fact, the overlap of the cellar with insulation. The technology provides for laying roofing material over the ceiling, backfilling the roof from above with a clay-straw mixture. The height of the embankment on the roof is 0.4-0.5 m. The mixture is carefully compacted and covered with a dense film. The edges of the film are wrapped on the wall with an overlap of 150-200 mm.
- waterproofing of the wall. Priming will not help much in this case. It is better to use a bitumen solution with diesel fuel (1: 3), mastic, roofing material or a special film;
- the joints between the sheets are blown with mounting foam;
Some masters advise tightening the insulation polymer mesh, to ensure the integrity of the sheet. Roofing material will more successfully cope with this task. But often the distance between the wall and the soil is simply filled with expanded clay, soil with a high content of clay, or a mixture of soil, sawdust / straw and clay.
In the absence of ventilation in the cellar, it is advisable to take care of it at this stage.
- the resulting hill is covered with a layer fertile soil 100-150 mm high. followed by disembarkation herbaceous plants, which will protect the cellar from the sun's rays, and strengthen the soil with their roots.
Cellar interior insulation
From the inside, walls, ceiling, floor and doors are subject to thermal insulation. A few photos as an example of the finished result.


Insulation of the cellar wall from the inside
Execution technology:
- walls are inspected for defects;
- the cellar is freed from the contents, shelves and drawers are temporarily dismantled;
- the detected defects are eliminated (the protrusions are knocked down, the slots are foamed with foam or sealant);
Increased attention is being paid to the quality of the surface, because. significant irregularities hinder quality installation polystyrene;
- the wall is waterproofed (with mastic or liquid rubber);
- rigid insulation boards are fixed.
For this, dowels-umbrellas or glue are used. The foam fixing starts from the bottom row and moves up. In this case, in each subsequent row, an offset of half the sheet is performed;
- a polymer mesh is attached to the insulated surface;
- the joints of the sheets are blown with foam. If the gap is significant, foam trimmings are placed in it;
- apply plaster.
Note. To eliminate pockets of mold formation, it is advisable to treat the walls with a solution of lime and copper sulfate.
Basement floor insulation
There are several methods of insulation that have proven themselves in practice. Consider floor insulation with expanded clay as the best option in terms of price / quality ratio.
Work order:
- after the concrete, on which the beacons are set and fixed, has hardened, expanded clay gravel with a fraction of 5-20 mm is poured. At the same time, the thickness of the gravel layer depends on the load that will fall on the floor;
- a vapor barrier film is laid on its surface with access to the wall. The height of the overlap is equal to the height of the backfill;
- the floor is deepened to the depth of the future heat-insulating layer (200-300 mm) and leveled;
- beacons are installed on the film. The first one is at a distance of 300-400 mm from the wall. The rest at a distance equal to the length of the rule, which will be equal to the screed;
- reinforced screed is poured. The thickness of the screed also depends on the load.
The method of thermal insulation using sand and gravel. This method can only be used for bulk floor.
Work sequence:
- if the insulation is not used, then the floor is poured with hot bitumen. It will perform the function of waterproofing;
- the sand and gravel cushion is carefully rammed;
- a layer of crushed stone is poured (100 mm.);
- the floor is deepened to the depth of the future heat-insulating layer and leveled;
- a layer of sand is poured on top (50 mm.);
- hard heat-insulating material can be laid on the surface (for example, foam plastic, polystyrene foam boards);
- the prepared floor is poured with reinforced concrete screed.

Basement ceiling insulation
In the case of buried or ground cellar the roof of the structure needs to be insulated. Roof insulation works involve the use of soft or hard insulation, which is installed in accordance with the manufacturer's instructions.
As for the underground (dug, bulk) cellar, the ceiling of the room needs additional insulation.
Work order:
- plaster is applied.
- a layer of rigid insulation is mounted;
- concrete slab or wooden beams treated with a penetrating waterproofing primer. The composition fills the capillaries and prevents water seepage. Wood is additionally treated with an antiseptic;
- heat-insulating material is closed with a mounting grid;
- whitewashing with lime and copper sulphate is performed.
Note. The ceiling in the cellar is the most vulnerable place in terms of temperature. Therefore, it is better to insulate it in two layers (100 mm).

Insulation of the entrance group: doors or hatch to the cellar
If the entrance to the cellar is located in the house or in the garage, there are no special requirements for its insulation.
But if the entrance is located on the street, then it is necessary to insulate the manhole into the cellar.
Work order:
- cellar door insulation previously carried out using felt and other soft materials. However, now it is considered justified to use rigid insulation that is glued to the door. Then the insulation is closed with a sheet of plywood, plastic or natural wood. Be sure to eliminate the gaps at the junction of the door to the box. In this place, a door seal is installed;
- cellar hatch insulation performed in a similar way. Only more attention is paid to the reliable fixation of the insulation on the surface of the cover. Otherwise, it may fall off.
An important point that you should pay attention to when insulating a door or hatch is to exclude the possibility of their arbitrary opening. Otherwise, all work on the thermal insulation of the cellar will be useless.
Insulation of a concrete or brick cellar is not difficult due to the optimality of their shapes and resistance to mechanical damage(brick, concrete walls can be drilled, fixing the dowel-umbrella or treated with hot mastic to provide waterproofing).

But with modern caissons for cellars, the situation is somewhat different, because. thermal insulation measures can damage the tightness of the tank.
However, their insulation is also important, because the walls easily pass both heat and cold. Since the caisson is a one-piece structure, it does not need waterproofing. From the point of view of the material used, the caissons for the cellar can be (types):
- plastic (made of polymeric materials);
- reinforced concrete (made of concrete rings);
- metal (steel).
Please note that the materials are different indicator heat loss.
In this case, the cellar-caisson can have the shape of a cube or a cylinder, which leaves an imprint on the choice of a heat insulator. To insulate the caisson for the cellar, you can use bulk, rigid and sprayed heaters. Consider how they are used in descending order of popularity:
- hard insulation. They are used in cases where the caisson has the shape of a cube, square, rectangle with even walls. The insulation is glued to the surface of the caisson. The caisson is placed in the ground, the distance between it and the soil is filled up;
- bulk insulation: soil, expanded clay, sand, peat soil. In this case, the caisson is placed in the ground, and the distance between its walls and the soil is filled up;
- sprayed insulation - polyurethane foam. Provide maximum effective thermal insulation. But the disadvantage of PPU insulation is the high price and the need to attract craftsmen with special equipment.
The indicated types of heat-insulating materials are suitable for insulating a metal cellar, as well as for insulating a plastic cellar. A plastic cellar with insulation is presented on the construction market, which eliminates the need for do-it-yourself insulation work, it is enough to perform the installation correctly.
Conclusion
An insulated cellar in a country house or in the courtyard of a private house is a guarantee that the preparations for the winter will be safe and sound, despite the cold or heat “overboard”.
One of the key steps to successfully storing vegetables and homemade products during the winter is maintaining the optimal temperature in the basement. If the work on the arrangement and insulation of the cellar is carried out correctly, its internal surfaces will not be covered with condensate, but fresh air enough to keep food fresh.
From this article you will learn how to insulate the cellar with your own hands so that all internal and external surfaces are reliably protected not only from freezing, but also from moisture accumulation.
We warm the cellar with our own hands from freezing
Owners of dachas, household plots and private houses have the opportunity to equip their own facility for storing various food stocks, harvested crops. To create an optimal microclimate in the basement, it is necessary to properly equip it. After all, an insulated cellar is a guarantee that the entire crop will remain intact, regardless of the time of year.
Note: When deciding how to insulate the basement, one should take into account its type: ground, buried or underground. So, the simplest for insulation is ground, since thermal insulation work is possible both inside and outside this structure. The buried storage needs not only thermal insulation, but also surface waterproofing. Finally, the most advantageous, from the point of view of operation, is bulk (underground), which keeps a constant positive temperature well throughout the year.
Despite the variety of storage types, their structures remain the same: roof, floor, ceiling. Therefore, when carrying out thermal insulation work, all the above-mentioned surfaces are insulated, taking into account the features of this type (Figure 1).
 Figure 1. The main types of cellars (from left to right): underground, ground and semi-buried
 For example, when insulating a ground storage, the main focus is on the thermal insulation of walls and roofs, and when performing outdoor work, foam plastic or expanded polystyrene is used. Thermal insulation of a buried structure is preceded by waterproofing work, since there is a risk of flooding such a storage. The most time-consuming is the insulation of the underground cellar, since it involves partial removal soil surrounding the roof and walls, followed by the arrangement of an additional protective barrier against moisture.
Waterproofing surfaces: walls, roofs or doors
You should be aware that the deeper the cellar is in the ground, the higher the requirements for its waterproofing (Figure 2). If it is done correctly at the construction stage, then it can be done at a low cost. On the contrary, it is much more difficult to repair a damp room. Therefore, when starting construction, take an interest in the level of groundwater and the depth of soil freezing in the cold season.
Note: With a low level of groundwater, it will be enough to make a concrete floor, plaster the walls and whitewash them. Roofing material can be used as waterproofing. In the event that groundwater comes close to the ground surface, it will be necessary to plaster the walls from the outside and inside, pasting them with roofing material based on bituminous mastic in 3-4 layers, pressing the roofing material with a wall of red brick. For additional protection on brick wall apply a 20-cm layer of crumpled oily clay. If the basement is located on sandy, drained soil, its cement walls should be covered with two layers bituminous mastics and immediately cover with coarse sand.
Recessed structures are subject to additional waterproofing before carrying out thermal insulation work. This is explained by the fact that the walls of such storages are half located in the ground and, therefore, there is a risk of flooding by groundwater. Therefore, in order to exclude such a possibility of flooding, it is necessary to free the underground part of the walls from the soil, treat them with a waterproofing solution or cover them with roofing material.
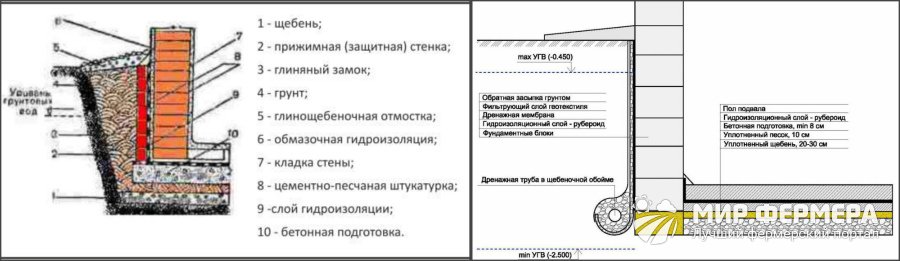 Figure 2. Cellar waterproofing steps
 Then a rigid insulation or polyurethane foam is laid, re-wrapped with roofing material and covered with soil. In addition, in order to minimize the effect of moisture on the storage, it is recommended to arrange a drainage system.
You will find more information about basement waterproofing in the video.
How to insulate the cellar from freezing from the inside
To protect the interior of the room from freezing, its walls, ceiling, floor and door are insulated, that is, all surfaces of the structure through which heat loss is possible. At the same time, materials such as expanded clay, roofing material, rigid insulation are used.
Let us consider in more detail the features of insulation of various internal surfaces of the storage.
Practice shows that the most the best option in terms of value for money, is floor insulation using expanded clay.
The technology includes several steps(picture 3):
- The frozen concrete floor with exposed beacons is covered with a layer expanded clay gravel fraction 5-20 mm (layer thickness depends on the expected load on the floor).
- The expanded clay layer is covered with a vapor barrier film with its exit to the inner wall. In this case, the height of the overlap must correspond to the height of the backfill.
- Beacons begin to be installed along the film, the first of which should be at a distance of 30-40 cm from the wall, and all subsequent ones at a distance that corresponds to the length of the rule with which the screed will be leveled.
- According to the installed beacons, a reinforced screed is poured, the thickness of which is determined by the expected load.
 Figure 3. Scheme of floor insulation in a home basement
 Sometimes the bulk floor is insulated with sand and gravel. In this case, the floor is first filled with hot bitumen, which acts as a waterproofing. Then a gravel-sand cushion is laid on it and carefully rammed. In this case, the crushed stone layer is 10 cm, and the sand layer is 5 cm. Then the surface of the pillow is covered with a rigid insulation (penoplex, expanded polystyrene sheets), which is poured with a reinforced concrete screed.
How to insulate the ceiling in the cellar
Since the ceiling of a buried cellar is considered the most vulnerable place in terms of heat loss, it is recommended to insulate it in two layers.
In this case, thermal insulation work is carried out in the following sequence(picture 4):
- Ceiling plaster;
- Treatment with a penetrating waterproofing primer on concrete floor slabs or wooden beams;
- Installation of a layer of hard insulation;
- Covering the heat-insulating layer with a mounting grid.
 Figure 4. Features of ceiling insulation in the basement
 At the final stage, the ceiling must be whitewashed with lime with the addition of a small amount of copper sulfate.
Wall insulation
Basement wall insulation is a rather laborious process, since it involves preparatory work (Figure 5). So, first of all, the room must be freed from its contents, and all shelves and racks must be dismantled. Then you need to inspect the walls for defects and eliminate all protrusions and cracks by knocking them down or foaming. Such preparatory work must be carried out carefully, since the remaining irregularities significantly affect the quality of the insulation installation.
 Figure 5. Do-it-yourself wall insulation scheme
 After leveling the walls, work is carried out on their waterproofing by applying a special mastic. Only after that you can proceed with the installation of foam using dowels or glue. You should know that the fastening of the insulation starts from the bottom row moving up. In this case, in each next row, the foam is shifted by half of its sheet. The joints of the sheets are blown out with foam, the insulated surface is covered with a polymer mesh and plastered.
How to make an insulated cellar door
If the door to the cellar is in the open air, it must also be insulated. The thermal insulation procedure is carried out using modern rigid insulation, which are fixed on the door and sheathed with natural wood, plywood or plastic.
 Figure 6. Ways to insulate the cellar lid
 Be sure to pay attention to the presence of gaps between the door and door frame. You may need to install a special door seal. In addition, check if the door can open spontaneously, because in this case, all your attempts to keep warm will be in vain.
The lid (hatch) can be insulated with foam or polystyrene foam sheets, which are easily attached to the surface with glue. Additionally, they can be decorated with plastic or wood (Figure 6).
It will not be superfluous to check how tightly the cover adjoins the inlet. Detected gaps can be closed by installing a door seal tape on the cover.
Do-it-yourself basement insulation materials
The choice of thermal insulation material is very important for high-quality basement insulation. Because modern construction market is oversaturated with various kinds of materials, we will talk about the most popular among them, which are acceptable not only in quality, but also in price (Figure 7).
Styrofoam
The most popular insulation is polystyrene, which has been used in construction for a long time and is valued for its cheapness, simplicity and quality. However, despite all the advantages, polystyrene is not relevant for basement insulation, since it is unable to qualitatively protect the underground room from cold and moisture. In addition, moisture that gets on the foam and freezes on its surface destroys this material. Therefore, the use of polystyrene foam in basements is impossible without the use of hydro- and vapor barrier films.
Based on the foregoing, we can conclude that foam plastic as a heat-insulating material can only be used to insulate ceilings in underground storage facilities.
Mineral wool and fiberglass
One of the most popular building materials is mineral wool. With a large list of advantages, this material is also available because it has a low price. Mineral wool is fire-resistant and non-hygroscopic, vapor-permeable and environmentally friendly. It has low thermal conductivity and high sound insulation. This construction material durable and strong, easy to mount on any surface with different configuration. Therefore, it can be recommended for thermal insulation work.
When working with mineral wool, care should be taken to protect the respiratory system, because small particles of this material rise into the air like dust. Inhalation of such dust by a person is not at all good for his health. In addition, mineral wool releases phenol, which is also harmful to human body. Therefore, when working with mineral wool, it is recommended to use respirator, and cover the surface insulated with it with a vapor-tight PVC film.
 Figure 7. Types of insulation for the cellar: polystyrene foam, mineral wool, polyurethane foam
 Glass wool is a type of mineral wool. It is elastic and quite durable material, consisting of fragile glass filaments. These threads, broken, dig into the skin and eyes, injuring them. Therefore, when working with glass wool, precautions should be taken: wear gloves, goggles, a respirator, work clothes with long sleeves.
polyurethane foam
The most popular thermal insulation material is polyurethane foam (PPU). He received high popularity due to his advantages, among which: complete protection from moisture, guaranteed tightness of the room, biological neutrality.
Since PPU is applied to the surface in a monolithic layer that quickly hardens, it has no seams and joints. Even with direct contact with moisture, this material does not rot and mold. Polyurethane foam can be used for both indoor and outdoor use.
The only downside to using PU foam is the way it is applied, as it requires installation. high pressure that only construction companies can afford. However, this disadvantage is insignificant in comparison with the achieved effect.
How is the ventilation of the cellar during insulation
Home cellar can not do without this important element of its design, as ventilation system(Figure 8). It is especially relevant for insulated cellars, because due to the constant positive temperature in storage, air humidity can be increased and, accordingly, mold can develop. To prevent this from happening, it is necessary to provide for ventilation holes during construction - vents. As a rule, they are closed in winter, and left open the rest of the time.
 Figure 8. Scheme for arranging ventilation in the cellar with your own hands
 For example, supply and exhaust ventilation is able to provide high-quality inflow and outflow of fresh air, but about normal temperature regime needs to be taken care of in other ways. For example, it is recommended to insulate the ventilation duct with mineral wool and cover it with waterproofing material. In this case, the ventilation system will work efficiently and smoothly, and a constant comfortable temperature will be maintained in the cellar.
Many of us own a basement or cellar in a garage, whether it's a garage cooperative or a garage in a private home. These rooms are ideal for storing various products, tires, conservation, materials, etc. But what about high humidity, fungus and frost, which can quickly ruin all stored products and materials, in this case the right decision would be to properly insulate the basement in the garage.
To create an optimal microclimate in the basement of the garage, a natural ventilation system should be provided. It is best to use two different ventilation ducts, which will be mounted in different angles cellars, this will allow you to quickly ventilate the basement due to intensive air exchange. If you need to create good traction, then we install one of the ventilation pipes 1 meter above the garage roof, and at the same time we output the second pipe in the lower part near one of the walls.
Due to the height difference, good natural traction will be provided. Even if the cellar in the garage is heated, with natural ventilation the whole hot air it will simply rise up to the ceiling, and the floor and the space above it will remain cold.
Communications (electricity, heating, water) must be securely installed before starting work on the insulation of the cellar. electrical wiring must pass in a protective corrugation, the wire switching points must be easily accessible place using cross boxes. Also, all joints of heating or water pipes must be accessible for maintenance.
Choosing a heater
We decided to insulate the cellar, but we don’t know how to do it, and most importantly, what material to use.
Let's look at how to insulate a cellar in a garage using modern materials, which are used by specialists for warming basements:
- polystyrene foam or extruded polystyrene foam;
- mineral wool;
- "warm" plaster;
- glass wool;
- reflective insulation.
Warming the cellar in the garage with the materials described above allows you to achieve good thermal insulation properties and eliminate the appearance of fungus in the room, but each of the materials has its own advantages and disadvantages.
Extruded polystyrene or foam
Advantages:
- simple installation;
- environmental friendliness;
- you can use extruded polystyrene foam for floor insulation;
- service life up to 40 years or more;
- excellent water resistance;
- low cost;
- tolerates sudden changes in temperature.
Flaws:
- has flammability;
- does not let air through.
Helpful information! Extruded polystyrene foam differs from polystyrene in increased density and strength. Thus, the thermal conductivity coefficient of extruded polystyrene foam will be higher than that of polystyrene foam with the same thickness of the material. In addition, only extruded polystyrene foam is used to insulate the floor covering.
Important! When using polystyrene foam or extruded polystyrene foam as thermal insulation, it will be necessary to treat all surfaces with a primer before starting work and, upon completion, additionally plaster the walls using reinforced, and make a cement and sand screed on the floor.
Mineral wool
Advantages:
- passes air, allows the room to "breathe";
- excellent sound insulation;
- excellent thermal insulation;
- affordable cost;
- long service life of 30 years or more.
Flaws:
- passes moisture;
- work is performed in special clothing and gloves.
Important! If mineral wool is chosen as a heater, then it will be necessary to additionally make a vapor barrier in the basement in order to prevent the absorption of moisture by the wool itself and the deterioration of its thermal insulation properties.
"Warm" plaster
Advantages:
- excellent thermal insulation;
- affordable cost;
- excellent soundproofing.
Flaws:
- it is necessary to apply a thick layer for good thermal insulation;
- difficulty in installation.
glass wool
Advantages:
- low cost;
- good thermal insulation properties;
- good soundproofing properties.
Flaws:
- work is performed in special clothing and gloves;
- additional frame required for mounting;
- passes moisture;
- May produce an unpleasant odor if exposed to moisture.
Important! If mineral wool is chosen as a heater, then it will be necessary to additionally make a vapor barrier in the basement in order to prevent the absorption of moisture by the wool itself and the deterioration of its thermal insulation properties. In addition to the vapor barrier material, it is necessary to use a film or foil to insulate the glass wool.
Reflective thermal insulation
Advantages:
- high thermal insulation properties;
- material thickness is only 2 to 5 mm;
- simple installation;
- opportunity to use facing material.
Flaws:
- price;
- possible heat loss
Important! The reflective heat insulation is quite thin and how the mirror will reflect infrared heat upon reflection. As a result, it is not effective enough at convection or induction of reflected heat, which leads to its losses.
We insulate the ceiling of the cellar
Before starting work on insulation, we check the entire surface of the ceiling in the basement for cracks, potholes, etc. We carefully clean all these defects and repair them with mortar or gently blow them with foam. After that, we treat the entire surface of the ceiling with antifungal solutions ( quicklime or blue vitriol).

There are a lot of options for insulating the basement ceiling in the garage - from polystyrene foam to reflective thermal insulation
You can insulate the ceiling with any of the materials described above, for insulation with mineral wool or glass wool you will need a special frame, which is then sheathed with sheets of HA, plastic, plywood, etc. Installation of polystyrene foam or expanded polystyrene can be carried out on parachutes with a preliminary application of a special solution, then the mesh is applied to plaster surface and paint, you can also use facing material (decorative tiles, panels, etc.). For reflective thermal insulation, you can also use decorative facing material.
We insulate the hatch cover
The cellar lid, like the ceiling, should also be insulated, as there will be a large heat leakage through it and the possibility of moisture from the main garage entering the basement.

DIY cellar lid insulated with foam
It is best to use polystyrene foam to insulate the manhole cover, it is better to choose the highest density of 100 or 150 kg / m³. We pre-treat the lid with antifungal solutions (quicklime or blue vitriol). We cut a piece of polystyrene foam to the size of the lid and fix it with special glue or foam. To make a decorative surface for an insulated cover, you can use plywood, which is fixed with self-tapping screws to the hatch cover itself. You can first make a wooden frame around the perimeter of the lid to cover the visible parts of the polystyrene foam. After fixing the plywood, it can be painted to protect it from moisture.
We warm the floor in the cellar
Answering the question of how to insulate the basement in the garage, we go directly to the process of insulation and start with the insulation of the flooring.

Rigid polystyrene foam is effective for thermal insulation of the floor
To insulate the floor, you will need to perform preparatory operations:
- we deepen the floor, digging a hole about 30 centimeters deep around the entire perimeter, and level the entire surface of the floor;
- we make a backfill with fine gravel about 10 centimeters deep around the entire perimeter of the floor;
- then we apply a layer of sand approximately 5 centimeters thick (this will avoid the formation of moisture on the floor);
- we apply a layer of insulation - it is best to choose extruded polystyrene foam, at least 5 centimeters thick;
- we make the reinforcement of the floor with a mesh and fill it with a concrete screed.
Recommendation! Do not use sawdust or wooden boards for floor insulation, as wood tends to absorb moisture. Within a short time, an unpleasant smell will appear and the wood will begin to rot, which will require replacement of the flooring, and as a result, additional costs.
We insulate the walls
Regardless of what material the walls will be insulated with, they must first be carefully sealed all seams, cracks and all walls treated with antifungal solutions (quicklime or copper sulphate).
To insulate the walls with mineral wool or glass wool, a special frame made of wall profiles is used. This is done so that the wool under its weight does not “flow” down, but is firmly fixed around the entire perimeter of the wall. After that, the frame can be sheathed with sheets of HA, plywood, etc., with subsequent finishing.

An economical solution - insulation of basement walls with foam
To fix the foam or polystyrene foam to the wall, a special solution and "parachutes" (dowels with a wide cap) are used. All joints between sheets of foam must be carefully blown out with foam. After that, a special mesh is applied to the entire surface of the wall and plastered. After plastering, the walls can be painted.
Important! Before installing foam sheets, it is advisable to level all walls, remove all protruding parts. This is done so that the foam sheets fit snugly against each other and against the wall, providing good thermal insulation.
Reflective thermal insulation is mounted quite simply, it is glued to the wall surface around the entire perimeter. From the side of the wall, the base of the material is foamed polyurethane foam, from the outside - polished foil. On top of the reflective thermal insulation, a decorative or facing coating can be applied.
Video: an example of a do-it-yourself basement in a garage
Conclusion
In this article, we tried to answer the question in detail - how to insulate a cellar in a garage, give examples and give useful recommendations. Use the knowledge gained in practice, and you can not only make your cellar in the garage warm with good ventilation, but also get rid of moisture. Create an ideal microclimate for storing food, materials, tools in the cellar of the garage at minimal cost.