Proper ventilation of the cellar. Hood in the cellar: how to make ventilation correctly with your own hands How to make ventilation in the cellar

Not a single basement room can be without a ventilation system, since if there is a lack of constant flow of cool air, dampness cannot be eliminated. In basements and cellars, as a rule, not only canned foods are stored, but also fresh vegetables and fruits, which “breathe,” which inevitably causes moisture to accumulate in the room. In addition to this problem, the walls can absorb moisture from the ground from the outer edge if the waterproofing of the base of the house and the basement was poorly organized during construction.
- The ventilation pipe of the hood rises above the ridge to ensure excellent draft or embankments above the ceiling of the cellar, at least 1500 millimeters.
- For good ventilation, they are often used only plastic pipes designated for sewerage purposes. For not so much large rooms Such a diameter is usually sufficient.
- If the basement is located in front of a car garage or in front of another home place, in this case as an exhaust opening, it is allowed to use the entrance opening.
IN in this case, 2 doors are made, one insulated - for winter, and the second - in the frame version, with a small mesh attached to it. The fence is needed to prevent small rodents from getting into the cellar.
The insulated opening is removed in the summer for continuous ventilation of the cellar. If the room above the basement is insulated, then ventilation sessions are allowed during the winter period.
Version - cellar in the basement under the house

Supply pipe narrowed by a grille
- It is recommended to install dampers in these two pipes that stabilize the inflow and outflow of air, which is especially necessary in the winter. They can help measure the arrival of cool air in extreme cold and, therefore, the decrease of warm air, to strengthen the required local climate in the cellar.
Umbrella for the exhaust pipe head
If the pipe heads are placed exactly in vertical position, they should be protected from precipitation, dust and debris getting inside by placing a metal umbrella or ventilation deflector on top. 
 Natural ventilation is based on the difference in pressure and temperature indoors and outdoors. Effective operation largely depends on the correct location of the pipes. So, the supply opening must be at the top at a maximum of 250: 300 millimeters from the floor, and the exhaust opening must be 100: 200 millimeters below the ceiling.
It is currently unacceptable to place it lower, otherwise the ceiling will begin to get wet.
This method of ventilation may undoubtedly be insufficient for a large cellar room, or if it consists of many rooms.
IN forced ventilation method There are always the same channels (pipes), but fans are installed in them to generate forced air movement.
In the lightest forced modes, the cooler is discharged to the exhaust duct. In a similar way, an artificial thinning is formed in the room, facilitating the proactive entry of cool air into the basement through the supply passage. The performance of the propeller you choose will depend on the size of the room.
They do it differently - they install fans on both the supply and exhaust paths. This happens significantly in voluminous, complexly configured basement rooms. Here you will definitely need the support of a professional to calculate the consistency of the inflow and outflow of the atmosphere, that is, the diameters of the channels and the power (performance) of the fans installed in them.
 For each type of ventilation, be sure to wisely make your choice regarding the diameters of the pipes. The calculation methods used by high-class designers are very difficult, and presenting them in their entirety has practically no meaning. However, when installing ventilation in a small private cellar, it is permissible to use a simple calculation methodology.
Thus, with certain assumptions applicable in the information criteria, it can be assumed that for the purpose of 1 square meter of the cellar area, 26 square cm of ventilation duct section is required. So, for a sample, you can estimate what pipe diameter will be needed for a cellar on a scale of 3 times 2 meters.
Finding the area of the room:
S = 3 by 2 and = 6 square meters
According to the confirmed compliance, it will require a pipe of the following size:
T = 6 times 26 = 156 square centimeters
It remains to find this radius of the pipe:
R = root (T divided by PI) = root (156 divided by 3.14) will be approximately 7.05 cm
Therefore, the diameter of the supply pipe is:
The diameter will be approximately 14 cm = 140 millimeters.
 If only a supply pipe is introduced into the basement, and the role of the exhaust pipe will be played by a hole, in this case it is possible to slightly increase the profile of the inlet channel by defining a pipe with a diameter of 150 millimeters.
To guarantee air exchange, it is customary to install a pipe with a diameter of 10, we expect 15% larger than at the entrance, on the exhaust duct.
Dв = Dн add 15% = 140 add 21 and it will be approximately 160 millimeters.
Ventilation installation
After spending necessary calculations, taking into account all the nuances described above, it is allowed to proceed to the installation of ventilation.
Approximate location of supply and exhaust pipes.

The supply pipe is permanently placed below.
- In another corner of the cellar, a passage is made in the ceiling or wall, and a supply pipe is inserted and fixed into it, which is lowered down to the floor. It must be placed no lower than 200 millimeters from the floor and no more than 500 millimeters;
- On the street, the supply pipe does not need to be placed high. If it comes out through the ceiling, it is sufficient to increase it by 200–250 millimeters. It is necessary to take into account that the difference in pressure at the inlet and outlet is much more powerful and has sufficient pressure, and therefore the flow of atmosphere into the cellar;
- If the supply pipe is inserted through a wall, then a fan fence or a plastic reflector is placed in it.
Possible location of the supply pipe.
However, in order for food to remain in it for a long time, it is necessary to ensure effective ventilation. In this article we will tell you how to properly make a hood in the cellar.
How it works?
Natural ventilation must have 2 pipes: supply and exhaust. It is best to use a galvanized or asbestos pipe when constructing a structure.
It is also important to correctly calculate the diameter: 1 sq.m of basement should be provided with 26 sq.m. cm duct area. Necessary for entering the cellar Fresh air 
. For greater efficiency, it must be installed in a corner that is located on the opposite side from the installation site of the hood. Important!
The supply air duct should be placed so that its open end is at a distance of 40-60 cm from the floor. It should completely penetrate the ceilings and rise above the roof by about 80 cm.
Thanks to it, there will be an outflow of stale air from the cellar. It is recommended to install it along the corner so that the lower end is under the ceiling.  It should pass in a vertical position through the entire cellar, the roof and extend beyond it by 50 cm.
To ensure that less condensation or frost collects in the air duct, it is insulated - another one is inserted into it, and the distance between them is filled with insulation.
Ventilation in a cellar with two pipes is carried out thanks to different specific gravity warm air inside and cold air outside.Whenever big difference temperatures there is a risk of a draft, which will lead to freezing of the cellar.  To prevent this, during construction they use gate valves on the air ducts, which allow air circulation to be adjusted.
Types of systems
Today, two types of ventilation systems are installed: natural and forced. The choice of one option or another is influenced by the volume and layout of the basement.
Forced
Design compulsory system includes pipes, but in order to ensure forced air movement, fans are built into them.
Did you know? The need and benefits of ventilation were known many centuries ago. However, then there were no special structures - just ventilation was carried out.
Typically, the fan installation location is the exhaust duct. With its help, it is possible to achieve artificial vacuum in the cellar, thanks to which fresh air can enter the room through the supply opening.
Depending on the volume of the cellar, fans of different power are selected. If the basement has complex configurations, fans are installed on both channels.  When constructing a forced exhaust, you cannot do without the help of a specialist who will help you correctly calculate the intake and output of air flows, the diameters of the required air ducts and the power of the fans.
Natural
The main idea of creating a natural hood is to take into account the difference in pressure and temperature in the cellar and outside it. It is very important to correctly determine where the pipes will be located.  It is better to place the supply opening at a height of 25-30 cm from the floor, and the exhaust opening should not be lower than 10-20 cm from the ceiling. If you place it lower, dampness and mold will soon appear on the ceiling.
How to make calculations?
If you decide to make a hood in the cellar with your own hands, you should pay important attention to calculations related to pipe diameters.
 During construction professional ventilation are used complex calculations and formulas that are inappropriate for homemade design. We suggest that you familiarize yourself with the methodology that will be suitable for constructing homemade ventilation.
. For greater efficiency, it must be installed in a corner that is located on the opposite side from the installation site of the hood. Be sure to cover the opening of the draft pipe with a metal mesh, since without it rodents and insects can enter the cellar.
S=3x2=6 sq.m.
Taking into account the ratio that we took as a basis, the cross-sectional area of the pipe channel will be:
T=6x26=156 sq.cm.
The radius of the ventilation duct is calculated using the formula:
R=√(T/π)=√(156/3.14)≈7.05 cm
D≈14 cm=140 mm.
If available only supply ventilation(the exhaust is represented by a hatch), the cross-section of the inlet pipe can be slightly increased - an air duct with a diameter of 15 cm is quite suitable.
 To provide efficient air exchange, it is recommended to install an exhaust pipe whose diameter is 10-15% larger than the inlet pipe.
An air duct with the following diameter is suitable for the exhaust duct:
Dв=Dп+15%=140+21≈160 mm.
Installation of ventilation pipes
In this section we will tell you how to properly ventilate the cellar and what you should pay special attention to.
Where to place

The supply air duct is led outside from the surface of the ground. Its lower end should be located almost near the cellar floor, at a distance 20-30 cm.
To install the exhaust pipe, choose the opposite corner of the basement and place it close to the ceiling. One of its ends is led out through the ceilings onto the roof.
To increase the efficiency of the ventilation structure, use next advice:place a deflector on the pipe above the roof surface.
By covering the pipe with a cap, you can create negative pressure, which will increase the efficiency of the ventilation system.
Did you know? In ancient Egypt, ventilation was first actively used. Cheops Priramid has a huge number of air ducts.
Material selection
The following materials are usually used to construct a hood:
 Asbestos cement pipes are very similar to slate pipes, which is why they received the same name. Both materials are quite durable, highly reliable and durable. Installation polyethylene pipes easy to do on your own.
 Installation
When installing the ventilation system, pay attention to such moments:
- When installing the system in a ready-made cellar, you will need to make a special hole in the ceiling.
- It is necessary to lower a pipe into the basement through this hole - it will draw out air. Fix it at the top, next to the ceiling.
- The part of the pipe that is located outdoors must be raised at least 1500 mm above the ground or above the roof.
- In the opposite corner of the basement, you need to make a hole in the roof and install a supply pipe through it. It should end at a distance 20-50 cm from the floor.
- The supply air duct should not protrude too much from the roof. It will be enough to raise it to 25 cm.
- When installing the supply pipe in the wall on its outer end you need to put on a deflector.
- If the house has a fireplace or stove, the outlet pipe should be installed near the chimney.

. For greater efficiency, it must be installed in a corner that is located on the opposite side from the installation site of the hood. Improper ventilation or lack thereof will lead to stale air, which is sure to leak into the house and can negatively affect people's health. To prevent this, check regularly for traction.
There is nothing complicated in installing a ventilation system; the main thing is to follow all the rules and recommendations.
In order to maintain the cellar in good condition And long time To store food in it, you need to take care of the microclimate.  It is very important to maintain low humidity in the basement. To do this, it is worth periodically ventilating the room. IN summer time It is recommended to keep doors and dampers open. Gusts of warm wind will quickly dry out the cellar.
The cellar is a useful and functional room that can be filled not only with canned garden food, but also with fresh vegetables and fruits. We all want to eat healthy foods, how good it is to eat an apple or cabbage grown on our own in the winter season. summer cottage... So that the cellar does not interfere, but, on the contrary, helps to preserve vegetables and fruits for a long time with the maximum amount useful substances, in this utility room it is necessary to provide high-quality ventilation.
The need for ventilation in the cellar
From time immemorial, a cellar was provided during construction residential buildings. In the absence of refrigerators, it helped keep food fresh for a long time. His can be roughly imagined as a covered pit with reinforced walls. Very often this is part basement buildings equipped for storing agricultural products or other items.
The presence of ventilation is one of the main conditions for the long-term and uninterrupted functioning of the cellar.
Properly equipped ventilation is designed to solve the following problems:
- Helps avoid accumulation of damp air.
- Increases deadlines useful storage fresh fruits and vegetables.
- Helps establish comfortable temperature and humidity.
- Prevents the appearance of fungus and mold.
- Makes the cellar safe to use.
- Slows down the aging process of load-bearing building structures.
If there is no ventilation system in the cellar or it is installed incorrectly, then there is a possibility of spontaneous combustion due to the high concentration carbon dioxide. This is especially true for heated rooms, in which heating devices are most often installed in ground floor. The emergence of fungi also poses a significant danger.
Moldy formations not only spoil appearance premises, they pose a threat to human health. By inhaling spores from mold or mildew that penetrate from the cellar into living spaces, a person may suffer from asthma, chronic respiratory diseases, and may experience allergic reactions that are inexplicable at first glance.
Ventilation is a whole system that includes various devices to create proper air exchange in residential and non-residential premises.
The diagram clearly demonstrates everything existing methods air aeration
Classification of ventilation systems can be carried out according to different signs, which are based on:
- method of pressure and movement of air masses;
- purpose (inflow or outflow of air);
- coverage of air exchange area (local or general);
- component design.
Natural
Ventilation can be divided into natural and artificial. The first method of ventilating rooms is based on the simplest physical laws. Air exchange occurs as a result of the difference between the temperatures of the atmosphere and the room, as well as different meanings pressure.
Special equipment for natural ventilation not necessary, the whole process is organized using air ducts. As a rule, not a single building construction project can be completed without taking this point into account.
Natural ventilation directly depends on the materials used in construction. Wooden and brick buildings are better ventilated naturally than concrete ones. Air permeability can be reduced by layers of paint and mortar. To aid natural ventilation, open windows and doors periodically.
The natural ventilation system can be spontaneous or organized. Holes made at different heights and different diameters, cope with the air exchange system in the second case.
This type of natural ventilation option is perfect for cellars. But it has a significant disadvantage - dependence on climatic conditions.
Artificial
An artificial type of ventilation system is resorted to when the natural method of air exchange is not enough. In this situation, special devices are installed to help replace used air in the room with clean air.
Filters, heaters, dust collectors, air ducts, fans, etc. do an excellent job of cleaning the air, humidifying it, and creating a comfortable temperature.
Designing rooms with this type of ventilation involves installing these devices on the most initial stages construction.
Positive points artificial ventilation:
- independence from external natural factors (pressure, temperature, humidity);
- the possibility of differentiated selection of the desired characteristics of the state of the room (humidity, temperature, etc.).
It is clear that the creation of artificial ventilation requires more material investments and physical costs. This option, as a rule, is not used for small cellars.
Very often builders and designers create mixed type ventilation system that combines the advantages of both natural and artificial ventilation.
Supply and exhaust
If we base the classification of ventilation on its purpose, then we can talk about supply and exhaust options.
In the first case we are talking about forced submission air into the room. Exhausted air masses exit naturally.
The exhaust ventilation system is created specifically to improve the natural one. The basis of such ventilation is made up of fans, which help remove exhaust air from the room.
Optimally for good air exchange should be used supply and exhaust ventilation. This way you can minimize the dependence of ventilation operation on changes atmospheric pressure, on the direction and speed of movement of air masses.
Comparative characteristics of different types of ventilation
The table below clearly demonstrates all the pros and cons of different ventilation systems.
Table: positive and negative points of different ventilation
| Ventilation type | pros | Minuses |
| Natural | Does not require installation of complex components. Saves energy resources. Operation does not require significant material costs. | Air exchange is directly dependent on the climate - on the direction and strength of the wind, pressure drop and other aspects of the external environment. |
| Artificial | The air exchange process can be regulated and automated by making necessary settings. The entry of already purified air into the room. Insignificant indicators of noise “accompaniment” of ventilation operation. | Considerable cost of equipment. High price to conduct installation work. Creating this type of ventilation yourself can lead to improper operation of the system (it is better to seek the help of professionals). System devices do not always fit into the interior of the premises. |
| Combined | Independence from external factors. Work stability. | Creation of a complex system of ventilation ducts. Energy dependence. |
| Supply and exhaust | Reducing space heating costs in cold period. Possibility of cleaning and filtering air masses. Automatic operating mode. | Complex design. Dependence on uninterrupted operation of energy sources. Costs of installation and purchase of devices included in the system. High price work on installing the ventilation system. |
To arrange ventilation in utility rooms, the natural type is most often used, since this is a less expensive method in many respects.
When planning long-term operation of a utility room, you should take care of a reliable ventilation system. The choice of the type of structure for air exchange depends on the purpose of the cellar, material opportunities, climatic conditions and some other points.
Already at the stage of laying the foundation, channels are made in the proposed location of the cellar, into which ventilation pipes are subsequently installed.
To ensure uniform distribution of air masses, ventilation pipes must be of the same diameter. It is best to install pipes on opposite walls or corners, then the air will not stagnate inside and the circulation will be constant.
DIY natural ventilation
The advantages of self-construction of natural ventilation are low cost, no need for professional knowledge, and ease of installation.
If at the design stage a decision was made to create natural ventilation in the cellar, then special openings are installed in the base of the foundation - vents, vents. To protect against various small animals (especially rodents) entering the basement, the openings are covered with bars.
The presence of a grate will help protect the cellar from small rodents getting into it
The vents can be made adjustable by placing dampers with doors on the outlet openings.
The presence of a door will help to participate in the process of air exchange regulation
The principle of natural ventilation in the cellar dictates the installation of two openings in this room - for air access and for air outlet. The exhaust pipe is mounted in the upper part of the cellar wall, and the supply shaft is mounted in the lower part. This arrangement of pipes allows cold fresh air to enter the room through the supply duct, heat up and exit through the exhaust pipe. The distance between the supply and exhaust pipes should not be less than half a meter.
Such air exchange obeys the laws of physics - warm air rises up. The lower the temperature of the incoming air, the faster the ventilation process occurs.
In warm climates, natural ventilation will be difficult.
Materials and tools
Asbestos pipes are the most suitable material for creating natural ventilation.
Such pipes are often used when installing ventilation in the cellar.
There are other popular materials for ventilation shafts- pipes made of polyvinyl chloride and galvanized sheet. All connections and transitions to plastic pipes do with the help auxiliary materials: adapters, PVC corners. It's very simple and convenient.
Galvanized pipes are much more difficult to connect. When installing such pipes, there is a high probability of rusty areas forming at the joints, so galvanized pipes should be especially carefully treated with anti-corrosion agents.
In preparation for work, it is necessary to stock up on cement or similar material. When drilling a place for pipes, voids are obtained, which, after placing pipes in them, should be filled with mortar.
If a void forms between the pipe and the wall, it must be cemented
Fasteners, metal mesh, and protective caps for pipes will also come in handy.
Tools you will need:
- hammer;
- Bulgarian;
- drill or hammer drill;
- trowel or spatula.
Schemes and calculation options
A diagram of natural ventilation will help you understand the essence of the operation of this system and determine the location of the pipes.
Based on the diagram, you can get a visual representation of the work of natural aeration
The diameter of the ventilation pipes is an important quantity on which the efficiency of the system will largely depend.
1 cm d pipe = 13 cm² section. For 1 m² of cellar, a 26 cm² section is sufficient.
This means that in order to purchase pipes for a cellar with an area of ten square meters, you should make the following calculations:
- 10 m² multiplied by 26 cm² = 260 cm²
- The cross-sectional diameter of the pipe is calculated using the circle formula S =πR²
R² = S: π = 260:314 = 82.8 When extracting the root, we obtain a value of R = about 9 cm
D= 2R The pipe diameter should be 18 cm.
This is a simplified calculation formula for normal air exchange in the cellar, without taking into account the intensity of air mass exchange. Construction professionals install ventilation systems using more complex calculations.
Step-by-step instruction
Having determined the required pipe diameter, having prepared necessary materials and tools, you can begin to build natural ventilation.
- We place the exhaust pipe in the corner of the room. The open end of the pipe should not be too high or too low from the floor. It is optimal to place the air exhaust pipe at a distance of 140–150 cm from the floor surface. If the cellar is separate standing room, then the exhaust pipe is brought out through a hole made in the ceiling. If it is built under the residential part of the building, then it is advisable to place the exhaust shaft in the place of the common building ventilation duct.
For better hood It is advisable to place a tip of a larger diameter at the end of the pipe
- In the opposite corner we install a supply pipe, which we place much closer to the floor - 45–55 cm from the surface. Ventilation duct supply air supply must pass through the ceilings; it must be raised from zero level floor by 0.8 - 1 m. In a cellar built independently, this pipe is brought to the roof of the building, but it is installed below the exhaust pipe. If the utility room is located in a residential building, then the opening of the supply pipe is led outside into the wall of the building.
When constructing such a pipe, be sure to position it correctly in relation to the bottom of the cellar
- All holes and voids formed during the installation of pipes are covered with a solution; after it dries, the covered areas can be painted.
Improving the aesthetic appearance and ventilation is achieved by getting rid of holes formed during installation
- Valves are installed inside the pipes. This is done in order to influence the intensity of air mass movement by changing the clearance using a damper. Canopies are mounted on the pipes outside,
This appearance not only improves the perception of the structure, but also performs a protective function.
closing the openings with a valve to prevent precipitation or small animals from entering.
- Pipes are insulated using special materials(mineral wool, ecowool, foil penofol and others suitable materials) in order to reduce the formation of condensation. Sandwich pipes can be used = two pipes different sizes, placed one inside the other. To free the accumulation of condensate inside the pipe, taps are installed at the bottom of the outlet channel to drain the water.
In such pipes the likelihood of condensation formation is minimized
Forced ventilation
There are practically no fundamental differences between the natural type of ventilation and forced ventilation. In the forced version of the air exchange of the cellar, there is an element that forces the air masses to move.
Materials and tools
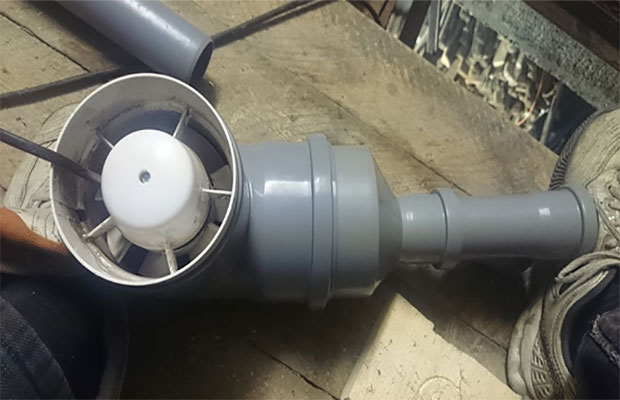
Most often, a fan acts as an air blower. This device should draw out excess moisture, unpleasant odors, which may be present in the cellar with fresh fruits and vegetables.
Such tasks are easily handled by one or two medium-power fans, which are installed in the exhaust duct (very rarely - in the supply shaft).
Installing such a device will increase air exchange in the cellar
Single-pipe and double-pipe installation of fans depends on the area of the cellar. As a rule, the second option is applicable in rooms with large volumes. Fans are built in exhaust and supply shafts; they can operate in one or different modes.
Owners of buildings can independently regulate the parameters of air outflow and inflow; with such devices it is easy to control the humidity and temperature conditions in the cellar.
The choice of fan depends on taking into account a number of parameters:
- air volume;
- type of output device;
- specifications.
Fan brands from manufacturers such as Electrolux, Vents, Silent, Blauberg, Systemair are very popular among consumers. They perfectly combine low price and good quality. These devices are equipped with functions check valve, they have control units, humidity sensors, and time relays.
When using a fan, you will need reliable electrical wiring; compliance with safety rules in this case is mandatory!
In some cases, other devices - deflectors - are used for forced ventilation. This option is good because using deflectors does not require electricity.
Deflector - special device, mounted on the exhaust pipe instead of the protective cap. The operating principle of the deflector uses the power of the wind. Inside the duct with the reflector, rarefied air appears, which helps improve ventilation.
Electrical supply to improve the aeration of such a cellar is not necessary.
Deflectors are produced by industrial enterprises, but some craftsmen make such devices on their own.
The effectiveness of the deflector is significantly increased if its diameter is twice the diameter of the ventilation pipe.
Necessary calculations Diameter exhaust fan
can be determined based on regulatory documents: SNiP 3.05.01–85 - Commissioning Certificate and SNiP 32–105–2004 - Acceptance Certificate for Ventilation Units. These sources are, of course, used by designers and builders for production purposes. But calculations can also be made for small rooms
Similarly.
For effective ventilation of a room with a volume of 16 to 32 m³, you will need a fan with d = 10–20 cm. In this case, the air exchange rate will be 1 cubic meter of air per hour of operation.
Pipe diameters are calculated in the same way as for natural ventilation.
Installation
The construction of a forced ventilation type is a sequence of steps that are taken in the installation of natural air exchange, with the only difference being that fans are placed in one or both pipes or deflectors are attached.
Combined cellar ventilation system This type of air exchange is suitable for any premises with the most different characteristics
. A combined ventilation system with the installation of fans in the supply and exhaust ducts is required for thorough drying of the utility room.
The system may include equipment that will provide the most acceptable “climate” in the cellar. An automated climate control system handles this best. This is especially true in wine cellars
, which require a certain temperature and humidity to ripen and store wine.
In this case, a split system is installed, the installation of which should be entrusted to specialists.
If the humidity in the cellar increases, you can dry it using traditional methods. Most easy method - just open the hatch in the summer. But the effectiveness of this method is low. It is best to use proven and reliable methods
- using:
- fryer;
- dry alcohol;
- candle;
- electrical appliances;
box of salt, etc.
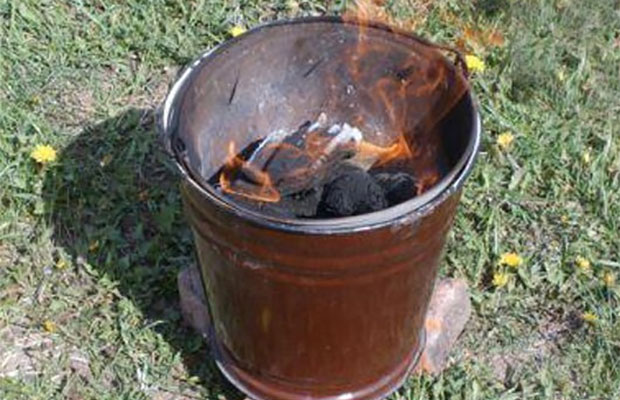
A regular metal bucket with holes can be used as a roasting pan. Burning coals or firewood placed in a brazier should be lowered into the cellar on a cable and kept burning for 10–12 hours. Compliance with safety rules is mandatory!
To create strong traction, you need holes in the bucket. Hot air will help disinfect and dry the cellar.
An iron jar with a lit candle is another option for improving the microclimate in the cellar. A jar with a candle is placed next to the ventilation exhaust pipe, without closing the hatch and front door. If possible, the exhaust pipe is extended. The flame of an ordinary candle is enough to speed up the process of aeration (air exchange) and eliminate negative aspects in the microclimate of the cellar.
They act in a similar way when using dry alcohol or gas burner without forgetting maximum safety.
To remove excess moisture from the cellar, you can use a gas burner
An alternative way to dry the cellar is less dangerous, but more expensive. We are talking about the use of electrical appliances.
To distribute heat evenly in the room, place it in the center. heat gun, heater or some other device for heating the room.
A box of salt can also be an excellent way to absorb excess moisture.
You can check the quality of a ventilation system that has only been installed or has been in operation for a long time in the following ways:
- Take a piece of notebook paper or printing paper and bring it to ventilation grille. If the leaf fluctuates slightly, then everything is in order with the hood.
- Place smoldering coals in the cellar. If air exchange rates are poor, an unpleasant odor and condensation may appear.
By periodically checking the ventilation, you can avoid various negative aspects in the cellar
To increase the efficiency of cellar aeration, you can “work” with the valves by adjusting the air movement. To improve exhaust, the outlet shaft pipe is lengthened.
To eliminate musty air, place a fan (with a power of at least 100 W) in the cellar and increase the speed of movement of air masses, promoting better ventilation cellar
Video: principle and arrangement of the ventilation system
An air ventilation system in the cellar is necessary for long-term operation of this room. Before independent construction ventilation should be studied possible options aeration and choose an acceptable one. It is advisable to do this at the building design stage in order to immediately provide for the necessary communications. By building reliable ventilation in the cellar, you can be sure of the safety of food and effective use this utility room.
Having a cellar in the house allows you to store vegetables and preserves for a long time. Most an important condition for this room is to maintain optimal temperature and humidity conditions. After all, moisture can have a detrimental effect not only on food, but also on other things stored in the cellar.
To avoid negative consequences important attention is paid not only to waterproofing and insulation of the foundation, but also proper organization ventilation.
Effective use of the premises is possible only by maintaining comfortable conditions fruit content. To provide them long-term storage it is necessary to create a microclimate in which it would be possible to regulate the level of air humidity ().
A poorly ventilated room is filled with moisture, which later settles in the form of condensation on the walls and boxes of fruit. All this causes vegetables to rot and develop a characteristic odor.
It is important to know how to properly ventilate the cellar, since a draft also has a detrimental effect on the fruits, drying them out.
Main factors for stable system operation
The operating principles of the system are:
- air movement due to heating of the ventilation duct;
- the influence of wind blowing air masses out of pipes.
That is, to ensure quality work circulation, when installing the main elements with your own hands, you need to create traction. The deflectors used in this case become less effective in calm conditions. However, the effectiveness of ventilation is not lost, since the main role is played by thermal impulse.
Despite the presence of many advantages, such a system still has some disadvantages associated with the influence of temperature. So, during hot weather, due to the lack of wind, the ventilation of the cellar of the house may deteriorate. IN winter period Frost may form on the pipes, so it is recommended to additionally insulate them.
Arrangement of natural ventilation

This system is ideal for small spaces. Its installation does not require much effort and significant financial costs. Among its advantages are also such indicators as: reliability, low price, durability, the ability to combine with artificial air circulation using an air conditioner or fan, as well as maintaining operability in the absence of electricity.
Natural air circulation installation technology
The installation process is not labor intensive. Everyone can do all the work with their own hands without the help of specialists.
Let's figure out how to ventilate the cellar. For this work we will need pipes made of plastic or metal, as well as deflectors and clamps with which the pipes will be secured.
The diameter of the ventilation ducts used affects the volume of air passing, and the speed of its movement depends on their height. Since air circulation depends on weather conditions, then it is difficult to determine the exact parameters of the pipes.
For a cellar with an area of 40 sq.m, pipes with a diameter of 120 mm will be required. However, to increase the speed of air flows, it is recommended to take pipes of larger diameter.
The following instructions describe the system installation sequence.
- In the case of arranging ventilation during the construction stages of a house, difficulties should not arise. All you need to do is arrange holes in the house design of a diameter suitable for pipes.
- After this, pipes are installed in these openings and fixed polyurethane foam or cement composition.
- The exhaust ventilation duct should be located under the ceiling, as shown in the photo. The pipe itself rises above the roof, at a distance of half a meter from the top of the roof. The supply channel is completely located in the room so that there is 500 mm between the outlet and the floor, and the inlet is located half a meter above the ground.

- Since condensation tends to form in the supply pipe, its end is equipped with a special moisture collector equipped with a tap for draining water.
Advice! If the decision to organize ventilation was made after completion of construction, then it will be necessary to break through channels for installing pipes. To do this, they dig out a foundation, in which holes are then made for installing pipes. In this case, the exhaust ventilation duct is attached to the wall with clamps, and a deflector is placed on top of it to prevent the penetration of precipitation.
Arrangement of forced ventilation
To enhance air exchange and bring the microclimate as close as possible to natural conditions resort to the use of artificial circulation. The operating principle of this option is based on inducing air to move through the influence of special devices ().
Installation of a forced system
The result of this circuit depends on the type of fan used.
Forced air circulation is carried out in the following ways.
- Automatic is characterized by autonomy. The system operation is monitored installed sensors, therefore, if necessary, it can turn itself off or on.
- Mechanical ventilation requires human intervention to turn on and regulate fans. Also in this case, it will be necessary to regulate air flows using valves, which is especially important in the cold season. Strong draft can lead to freezing of fruits.

Homemade forced ventilation The cellar provides the same arrangement of pipes as in the first option. A fan is installed in the exhaust pipe, through which the air will move. Rush outward air flow creates a vortex that provides fresh air from outside.
Ventilation in the cellar plays a very important role, because in the absence of regular air flow in the storage room fresh products dampness will appear. Setting up a hood in the basement is quite simple. And this can be done not only at one of the stages of construction, but also in an already finished building.
On what principle does the ventilation system work?
Before making ventilation in the cellar, study the principle of its operation. It is based on the laws of physics, which are relied upon when creating a scheme for arranging ventilation. According to it, to create ventilation, 2 holes must be provided. Fresh air leaks into one of them into the basement. Through the second hole, air, along with vapors, exits the cellar to the street. The scheme is quite simple, but for greater efficiency you need to run pipes to the holes. In addition, the operation of the system is greatly influenced by the location of the pipes for air supply and exhaust, as well as their level above the soil surface.
Ventilation pipes should be located directly in the basement walls. It is also common for residents to install a hood in the garage cellar. In the latter case, the pipes must pass through the room and exit above the roof of the building. A very important factor when creating a diagram is the height of installation of pipes from the cellar to the street. If calculated incorrectly, the cellar hood will suck in too much a large number of cold air, which will negatively affect shelf life fresh vegetables. Experts also do not advise making too small holes for piping, as this will not allow evaporation to be completely removed, which will lead to loss of food.
There are a lot of opinions and advice on how to make a hood in the cellar. Let's explore the most useful recommendations concerning the creation of a diagram and the air circulation system itself for the basement. Many experts advise to provide a ventilation system during the construction of the basement. At this time, you can leave holes in the walls of the room into which pipes will be installed in the future. To avoid choosing a suitable place for laying channels later, we recommend including an exhaust system in the initial basement design.

The pipes used to circulate air must be the same size. If the room has high humidity, the exhaust pipe can be taken with a diameter slightly larger than that of the supply pipe. One of the main rules is not to do the opposite, otherwise it will lead to air retention in the room. Another helpful advice– do not place both pipes next to each other. In such a situation, the basement will not be fully ventilated. It is best to place the ducts in opposite corners so that the air passes through the entire room. The exhaust vent must be installed under the basement ceiling. This is due to the fact that the spent hot air will quickly rise to the top. This position of the pipe will contribute to uninterrupted air purification without the slightest stagnation under the ceiling.
The exhaust pipe should rise 1.5 m above the ridge. This will ensure sufficient air draft.
To equip the exhaust system, plastic pipes are most often used. Ventilation of the cellar in the garage should be arranged using pipes with a minimum of turns and bends. It is best that the channels are perfectly smooth and straight. In addition, each channel must have the same diameter along its entire length. Before ventilating the basement, install special dampers on the pipes. Their presence is especially important in winter, when you need to independently regulate the air supply and outflow. If the pipe heads are vertical, they will need to be protected from rain and snow. This can be done by using a decorative metal plate in the shape of an umbrella.
Types of exhaust systems - natural or forced?
Also, before you make ventilation in the basement, decide on the type of system. It can be natural or forced. You can choose the most suitable option taking into account the layout and volume of the basement. The first type of hood is based on a small difference in temperature and pressure inside and outside the room. Ventilation efficiency is greatly influenced by the location of the pipes. The air intake hole should be at a height of about 30 cm from the floor, and the exhaust hole should be at a distance of 20 cm below the ceiling. It is impossible to leave the latter lower, as otherwise the ceiling will very quickly begin to become damp. Such a system will not be enough for arranging large basements that consist of several rooms.
Ventilation of the second type also consists of pipes, but special fans must be installed in them to force the air to circulate in the room. The most simple system includes installation of a fan only in the exhaust duct. In this case, a vacuum is artificially created in the room, which helps to quickly draw air through the inflow hole. The fan power must be selected taking into account the area of the cellar. Often homeowners do things a little differently. They put fans on both channels. This is especially true for basements with several small rooms.
Ventilation installation - detailed algorithm
Almost every inexperienced person wonders how to properly build a cellar. To do this, you need to follow a certain algorithm:
- 1. If the ventilation system is installed after the construction of the basement, then a hole must be made in its ceiling for air circulation.
- 2. After this, a pipe intended for exhaust is lowered through the hole.
- 3. Fix the pipe under the ceiling surface no more than 15-20 cm below it.
- 4. Outside, the pipe should be raised 1.5 meters above the ground or above the roof.
- 5. In the corner of the ceiling opposite, you also need to make a hole and stretch a pipe into it for air flow. Place it at a height of at least 20 cm from the floor.
- 6. The outside supply pipe should not be too high. If it passes through the ceiling, then its upper part should be located no higher than 25 cm above the surface.
- 7. If the inflow pipe is led through the wall, then you will need to put a deflector or grill on it.
- 8. If ventilation installation is carried out inside a residential building with a stove or fireplace, then the exhaust pipe rises near the chimney. This will promote more active removal of air from the basement due to the difference in temperature.
- 9. At the end of installation, control valves must be installed on the pipes. They will allow you to enter the premises required quantity air.
After installing the system, you will need to check it for traction. To ensure normal air pressure at the inlet, a paper sheet is applied to the supply pipe. If it starts to tremble, it means that air is actively entering the room. The second method is to set fire to paper in a bucket inside the basement. Based on the direction of the smoke, it will be possible to determine where and how fast the air is moving.
What needs to be done to maintain the indoor microclimate
Having considered how to properly make ventilation, we suggest you understand further measures to care for the room. To maintain a comfortable microclimate in the basement, you need to perform certain procedures from time to time. So, to help reduce humidity in the room, ventilate it regularly. In the summer, be sure to open the doors and hatches of the room, as well as the valves on the pipes, once a week. The hot wind that gets inside will dry out the floor, walls and ceiling of the basement well.
Often, owners are faced with situations where they need to quickly increase the humidity in the room. To do this, you need to spray it with water from a regular spray bottle. You can also place a container with wet sand or sawdust in the basement. If you need to dry out the basement, then first of all you need to remove all the shelving and other furniture from it. All racks must be dried naturally under straight sun rays. Open the hatches and door wide and turn on the fan. The room must remain in this condition for at least 3 days. After this, proceed directly to drying the basement.
To get rid of moisture in a room, bring and leave several boxes of quicklime or large table salt. These substances absorb moisture very quickly. In addition, they effectively disinfect the surfaces of the room and the air in it. More old method is to use a candle. Install and secure it next to the exhaust vent. Light a candle and wait a couple of days. The flame generates better draft, due to which more processed raw air comes out.
Another way to quickly and effective drying- This is the use of a fryer. It is easy to do it yourself using a regular metal bucket. First, make several holes in the container, then fill it with birch firewood. Next, light the logs and leave to burn for at least 12 hours. During this time, the room will quickly dry out, after which you can store your food in it without fear of losing it.
Processing the cellar to protect it from moisture is an important procedure for the freshness of food
The measures for caring for the cellar do not end with just drying the room. To extend the period of preservation of the cellar without moisture, the surface of the floor and walls must be covered with waterproofing compounds. If the walls in the room are made of concrete, use impregnation deep penetration. It must be applied in several layers, each of which will seep into the slabs and close the holes and cracks in them.

Sometimes a dried cellar is covered with roofing felt. He is considered good insulator, however, to use it, the walls and floor must be perfectly level. To do this, first mastic is applied to the surface, which needs to be heated, and then the insulator itself is laid on top.
Ecologically safe material Clay is used for waterproofing. It must be very oily, otherwise there will be no benefit from its use. Before applying the material, the basement floor must be laid out with stones, on top of which clay mixed with sand is poured. The layer should be approximately 10–12 cm. After application, the clay must be compacted between the stones, after which a layer of coarse sand must be poured on top. It will also need to be compacted. The only disadvantage of this method is that it takes a long time for the floor to dry. On average, this takes approximately 30–40 days.
Drying the basement using household appliances - fan or heater?
You can also get rid of excess moisture in the food storage room using household heaters and fans. In the first case, “wind-blown” and convector heater models are suitable. To dry wall and floor surfaces, install the heater in the center of the room. This way, the device will distribute heat evenly and none of the corners will remain damp. Don't forget that this drying method takes a lot of time. In addition, you will have to spend a lot on paying for electricity.
Often, basement owners use powerful steam generators. Due to its radiation, the food storage room dries out very quickly. As a result, you will spend a little less, because drying will take less time. Due to the effectiveness of this method, it is often used even in basements that have survived a flood.
To get rid of moisture using a fan, the device must be placed in the center of the room and turned on. Complete drying in this way will take at least 4 days. Often, an ordinary old potbelly stove helps cellar owners. In such cases, the stove outlet pipe is led to the basement hood. You will have to heat the potbelly stove for at least 5 days before completely dry basement surfaces. If exhaust vent is missing in the cellar, then this method will not work.