Construction of a cellar for storing vegetables. How to make a cellar with your own hands in the country: types and proper design. Semi-buried cellar made of bricks or blocks
Cellars can be recessed (underground), semi-recessed (semi-underground) and above ground. As additional types, we can distinguish the simplest storage facilities - piles, glaciers, pits, etc. We will tell you about the main types of cellars and introduce you to drawings and descriptions of construction.
Underground cellars
First, we will consider the construction of in-ground cellars, that is, those located completely underground. They can only be built in places where groundwater is at great depth.
Earth cellar construction technology
This guy has a lot simple design, but despite this, it has excellent operational properties. This cellar technology requires minimal material costs; mainly local materials are used for their construction. In Fig. The structure of an earthen cellar is shown.
It can be built if the groundwater lies at a depth of at least 2-2.5 m, since the height of such a cellar from the base to the ceiling is 1.8 m. If the groundwater is located a little higher, it is permissible and recommended to make a backfill so that raise the bottom of the cellar.
The pit is dug in such a way that its walls have a slight slope - in this case they will crumble less.
At the bottom of the pit it is necessary to lay compacted crushed stone, impregnated with hot bitumen, in a layer 5 cm thick, which will serve as the base of the cellar floor. This is done in order to eliminate capillary humidification. Next, an adobe floor with the addition of small crushed bricks, 8~10 cm thick, is installed.
Earthen cellar: 1. - bins; 2. - drainage ditch; 3. - ventilation pipe; 4. - shelves; 5. - adobe floor.
The walls of the pit are usually lined with boards, slabs or wattle, especially in sandy soil, it’s clear why. It is best to make a removable covering so that in the summer you can disassemble it and dry it in the sun. This will increase its service life and, consequently, improve the quality of stored products.
The ceiling is made of poles or podtovarnik, which are covered with clay-straw lubricant on top and covered with earth for the purpose of thermal insulation. The thickness of the earthen layer is approximately 0.3-0.4 m. The roof is made gable, lowered to the surface of the earth so that the overhangs overlap the pit by at least 50 cm on all sides. The material for the roof can be hewn slab, clay straw, branches, reeds and any other local material. In case of severe frosts, the roof can be insulated with peat, dry leaves, etc. The roof ridge is made from edged boards. Strips of roofing felt or roofing felt are placed under the ridge.
The design provides for one ventilation pipe made of boards tightly fitted to each other. The inside of the cellar is equipped with bins and shelves.
It is convenient when the bins are placed on one side of the aisle, and the shelves on the other.
The bins have a lattice floor for ventilation. Optimal height bins - 1m. The shelves are placed at a distance of 50-60 cm from each other in height. Finishing touch- a drainage ditch around the cellar is about 50 cm deep, and the cellar is ready for use.
Technology for building a cellar from asbestos-cement sheets
Such a cellar can only be built in dry soils. It is made not only quadrangular, but six-, octagonal and decagonal.
Construction takes only a few days.
Asbestos cement sheets or slabs have standard sizes: 1200 X 900 X 10 mm, so the area of the cellar can be calculated based on the number of its sides. The hexagonal cellar will have an area of 4.3 square meters. m, octagonal - 5.7 sq. m, decagonal -7.8 sq. m.
Asbestos cement sheets can be joined together using metal corners size 40 X 40 mm (50 X 50 mm) or strip iron.
Fastening is carried out using bolts. The sheets are cut with a hacksaw.
The construction of the cellar begins, as usual, with a foundation pit. After the excavation is ready, the lower row of asbestos-cement slabs is installed. They are connected to each other using angles on bolts and nuts. The result is a closed structure that has the shape of a polygon in plan.

Cellar made of asbestos-cement sheets: 1. - asbestos-cement sheet; 2. - corner; 3. - bolt; 4. - shelf; 5. - cross member; 6. - hatch.
The base is made of concrete. While the concrete has not yet hardened, assembled asbestos-cement walls are carefully and evenly pressed into concrete base floor to a depth of about 10 cm. Then it is left for 5-7 days so that the concrete hardens and the lower tier of the walls is firmly fixed, after which the slabs of the next tier are attached to it. The number and height of the slabs depend on the selected cellar depth. The seams between the slabs are rubbed with cement mortar.
If the floor of the cellar is earthen, then a foundation is made around the perimeter of the cellar under the lower tier of asbestos-cement slabs. The depth of the foundation is 30 cm, width - 40 cm. The outside walls are covered with a layer of hot bitumen in two stages. The surfaces are pre-cleaned and primed.
The ceiling is also made from asbestos-cement sheets: two channels are laid on the ends of the corners of two oppositely lying slabs parallel to each other and to the cellar axis passing through the middles of these opposite sheets. Floor sheets are attached to the channels. They should also be primed and covered with two layers of hot bitumen.
The entrance hole in the form of a hatch is located in the ceiling of the cellar between two channels. It is made double from sheet steel 1.5-2 mm thick, and the strapping is made from angle steel. Some known heat-insulating material is placed between the hatch covers. The hatch does not have to be made by welding; it can be assembled using bolts and nuts. The dimensions of the hatch are 60 X 60 or 75 x 75 cm. A metal or wooden ladder is attached to the hatch.
Ventilation is provided by two pipes. One is brought higher out, the second is installed so that it is located 5-10 cm above the ceiling. The diameter of the pipes is about 10 cm. The lower pipe is sealed metal mesh with small cells to protect against rodents entering the cellar. The inside walls are covered water-based paint or lime mortar. Along the inner perimeter of the cellar, you can make shelves on brackets from metal corners. They are cut and bent so that it turns out required form. The cellar can be divided into cells; the same asbestos-cement sheets will serve as partitions.
If the cellar is not located under the house, but stands separately on the site, a canopy is placed over it to protect it from precipitation, and around the perimeter there is a blind area made of clay or concrete. The blind area has a slope in the direction opposite to the cellar at an angle of 2-5°.
Technology for building a cellar with a cellar
A cellar with a cellar, or, as they also say, with a cellar, is a time-tested structure, quite often found in individual construction. It consists of two parts: aboveground (cellar) and underground (cellar itself).
The cellar is buried approximately 2 m underground, so it is always cool in the summer and much warmer in the winter than outside. In addition, the cellar creates an additional screen from the penetration of precipitation and the effects of low and high temperatures.
The cellar is usually used as additional temporary storage for vegetables and as a storage room for gardening tools, lumber, etc.
The cellar is designed for long-term use, so its walls are constructed from durable materials, monolithic concrete 20-30 cm thick, stone or brick (walls 25-30 cm thick), from slabs 6-8 cm thick, logs with a diameter of 12-18 cm. All materials are reliably insulated. The method of waterproofing is determined by the specific conditions of the construction site.
The space between the walls of the cellar and the walls of the pit is called the sinus. This space is filled with clay, filling it in layers of 20-30 cm and compacting the layers, that is, they make a side clay castle.
If a cellar is built in damp soil, then pits are usually made along its perimeter - small depressions for collecting water, 20-30 cm deep. As water accumulates, it must be scooped out of the pits. 
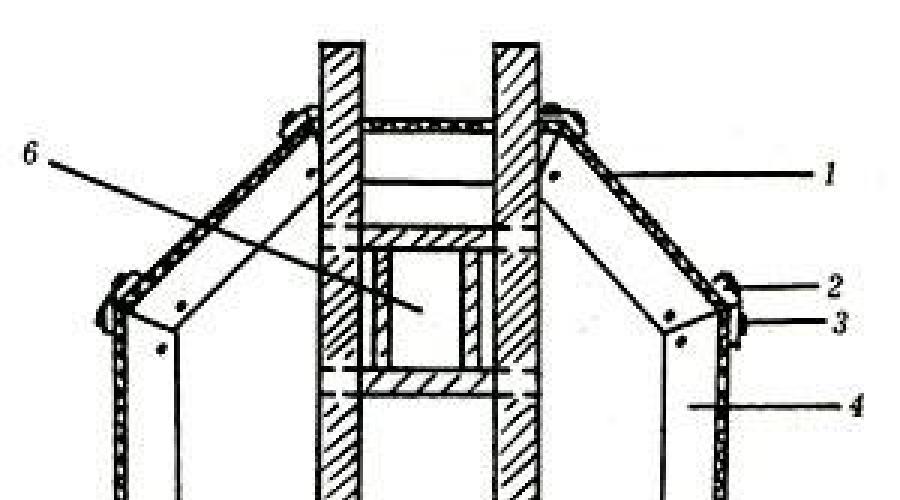
Cellar with cellar: a - general form cellars; b - cellar plan; c - section; 1 - insulation; 2 - whitewashing; 3 - blind area; 4 - hot bitumen coating (2 mm); 5 - clay castle; 6 - rubble concrete.
The base is made multi-layered in two steps. The bottom of the pit should be leveled and compacted tightly. For drainage purposes, a layer of crushed stone 8-10 cm thick is poured onto the bottom prepared in this way, on which a layer of crumpled clay 2-3 cm thick is laid. Oily clay is more suitable for this purpose. The clay layer should also be leveled and compacted. Then they do concrete pouring 10 cm thick. After the concrete has set, which will take 10-15 days, concrete preparation put cement-sand screed 5 cm thick and smooth it with a steel trowel. The overlap is made durable. To insulate the ceiling, expanded clay, crushed brick (pre-sifted) are most often used, or moss can be used. Thermal insulation materials laid on clay grease 3 cm thick. The cellar is equipped with a hatch measuring 70 x 70 cm. A ladder is installed under the hatch. For greater stability and ease of use, it is recommended to install the ladder at an angle.
Cellar walls can be made from a variety of materials. The most commonly used are brick, shell rock, stone; cellar walls made of wood (sanded slab about 5 cm thick), adobe, etc. are allowed. The roof of the cellar is usually gable, lightweight.
An important rule: to protect the walls from precipitation, wide overhangs are made.
The roof is made of solid plank sheathing covered with roofing felt or asbestos-cement sheets.
On the outside of the walls of the cellar, a clay-crushed stone blind area is made at least 1-1.2 m wide with a slope of 1:10. The walls of the cellar are buried by 50-70 cm. The door for the cellar is made of thick, tightly fitted boards at least 4-5 cm thick.
A few more words about ventilation. In order to create a favorable temperature and humidity regime, such a cellar must have a two-channel ventilation pipe. Only in this case can we expect effective air exchange.
Cellar in the garage: construction technology
A cellar in a garage saves land space; in an urban environment, this is an almost unique opportunity to have one. A small comment for motorists: such a cellar can be adapted into an inspection hole.
Its depth is usually 1.8-1.9 m.
If the soil is moist and the groundwater level is quite high, then the walls of the cellar are made of monolithic concrete of increased density and water resistance.
In dry soils, lightweight walls can be made. Standard asbestos-cement corrugated sheets are suitable for this purpose. roofing slate, which are laid out in at least two layers and attached to wooden frame screws. This is done to make the walls stronger. The sheets are glued together with bitumen mastic or cement-casein glue.
Waterproofing work involves coating the enclosing structures twice with hot bitumen. Surfaces are pre-primed.
Ventilation is provided either by a ventilation pipe with two channels, or by a hatch, which, in addition to the usual lid, is equipped with a grille through which air circulates.
Especially when low temperatures the hatch can be insulated by covering the grille with an old cotton blanket or something similar.
Stone cellar construction technology
A stone cellar is the most reliable and durable storage for various types of agricultural products. Previously, such cellars were built in every peasant yard, which is why they are sometimes called peasant cellars. There are known cases of such cellars being used for more than a hundred years without any overhaul. This is the extent to which the art of the masters was developed! Let's try to build a stone cellar, which will also serve our grandchildren.
The best material for construction is flagstone - a limestone common in the central black earth regions, where it is cheap and available. It is laid on a clay mortar, to which no sand is added, but chaff and a small amount of lime are added. The solution is so strong that not every nail can be driven into it.
The durability of the building will be guaranteed if it is installed in a dry place where groundwater does not reach the floor level by at least 70 cm.
There is one thing quite a lot important condition which must be completed to obtain the desired result, construction can only be done in the dry season, so that the open pit does not get wet or be washed away by rain. A clay castle is installed on all sides of the walls and foundation for waterproofing. The thickness of the clay castle is 20-25 cm. The floor in the stone cellar is made of adobe with compacted crushed stone or pieces and fragments of quarry stone ranging in size from 2 to 8 cm.
The ceiling is made in the form of a vault. To lay the vault you need a special wooden formwork with circles. This formwork has an arched shape convex upward and rests on circles - specially cut boards the length of a span.
The arch is laid out simultaneously on both sides from the edges to the center. There must be an odd number of stones (bricks) in the masonry. In the center, the masonry is completed by the so-called keystone, which wedges the vault, which provides the entire structure with strength and reliability. The main thing in this matter is the ability to calculate the design of the vault and lay the keystone with a steady hand. If you want to tilt the bricks, you need to place small flat stones under them.
From the outside, the vaulted ceiling is filled with thick lime mortar, a layer of clay grease 8 cm thick is placed on top, then - wood ash together with coals 10 cm thick for thermal insulation, and on top of everything - clay or dry earth. To go down to the cellar you need a staircase with stone steps, but, in extreme cases, made of durable lumber. In addition to the usual cellar with earth embankment, you can make a cellar above the stone cellar, which will provide additional amenities for use. The cellar is laid out from the same flagstone on a clay mortar. Thus, it will reliably protect the cellar and become an additional storage room for food and equipment. On all sides of the cellars, shallow drainage grooves are installed to protect against the accumulation and penetration of melt and rainwater, as well as a wide sandy or clay-crushed stone blind area. Modern stone cellars are built according to the same model, only the material is red burnt brick. The ceiling is made of slabs; thermal insulation is provided by clay grease and layers of earth on top. 
Brick cellar: a - section; b - cellar plan; 1 - wall; 2 - concrete; 3 - soil compacted with crushed stone; 4 - waterproofing layer.
Above ground cellars
Ground cellars are constructed if groundwater lies at a depth of less than 0.5 m from the surface of the earth.
Wall cellar construction technology
The name of this cellar speaks for itself. Such a cellar is attached to the main wall of the house. In Fig. shows one of the options for such a cellar.
The walls of the cellar are made of red burnt brick, monolithic concrete or flagstone. The thickness of the walls is 25 cm, that is, one brick. When laying, a regular masonry cement-sand mortar is used.
The walls on both sides are plastered with cement mortar, and on the outside they are additionally waterproofed with hot bitumen coating in two layers. For flooring earth foundation level, clean and make a concrete preparation with a thickness of 10-15 cm. After the concrete has hardened (approximately within a week), a cement floor with a thickness of 5 cm is installed.

Wall cellar: 1.- ventilation pipe; 2. - roofing material; 3. - wall of the house; 4. - overlap; 5. - bin; 6 - compacted crushed stone; 7 - blind area; 8 - bitumen coating; 9 - embankment; 10 - brick wall of the cellar.
To cover the cellar, a thick slab with hewn edges is used.
A layer of crumpled clay and two layers of roofing material are placed on top. Then they make a bund with peat or dry soil, which is sown with grass. A blind area and a drainage groove are made on all sides of the cellar at a distance of 1 ~ 1.5 m. Potatoes and vegetables are stored in lattice bins, which are raised above the floor level by 10 cm. For non-bulk products, the cellar is equipped with shelves.
Cellar-storage construction technology
This, one might say, is a classic of the genre, conjuring up pictures of merchant Moscow. A vegetable storehouse is an indispensable thing in conditions of high groundwater levels and in low-lying, waterlogged areas. The design of the storage shed is simple and accessible, proven by many years of experience. It can be successfully used not only by gardeners, but also by small vegetable farms, since the size of the storage shed can vary quite widely.
On personal plots, the land space is usually small, so the recommended dimensions of the storage shed are 3-4 m in length and 3.3-3.8 m in width.
In collective farms, large storage sheds can be made for storing vegetables, measuring 20-24 m in length and 7-8 m in width. Storehouses larger area It is not recommended to do this, because it becomes difficult to maintain the required temperature and humidity conditions in them and it is inconvenient to use.
The height of the storage shed should not exceed 2 m in its highest part, because otherwise the vegetables will freeze. The storage shed looks like a squat structure like a hut. In Fig. depicts a vegetable storehouse and some elements of its design.
For ease of use, passages are arranged inside the warehouse: in large warehouses there are two, in small warehouses - one. It is enough to make passages 60-70 cm wide. The storehouse has a frame structure. The frame is made of logs with a diameter of 13-18 and 18-22 cm. The log-pillars must be sanded. They are dug into the ground to a depth of about 1 m, and the upper ends are tied together with long longitudinal poles or logs. To make such a strapping, the tops of the log pillars are hacked into a tenon, and then strapping logs (poles) are placed on them. 
Vegetable storage: 1. - bin; 2. - soil embankment; 3. - roofing material; 4. - sheathing; 5. - hatch.
Those parts of the logs that come into contact with the ground must be coated with hot bitumen or burned. This applies to the lower ends of the frame logs and the lower trim logs. Such measures will extend their service life by several years.
The storage shed design does not include a ceiling, and this circumstance significantly reduces the material and time costs of its construction.
If you have minimal construction skills, a storage shed can be erected in 7-10 days.
The roof of the storage shed is constructed from boards on which continuous lathing from a hewn slab. For waterproofing, roofing felt sheets are placed on top in two layers. The roof is covered with earth or peat with a layer 30-40 cm thick. The ground is sown with grass or covered with turf. The roof is made with wide overhangs and is lowered almost to the ground so that in winter snow remains on it, providing additional thermal insulation. The end sides of the structure are sheathed with boards in two rows. A layer of roofing felt is laid between the boards to prevent drafts in the room. On one of the end sides there is a small door with a vestibule. The manhole door is also insulated.
Ventilation in the storehouse is carried out through exhaust device: a wooden box with a valve-regulator located near the roof ridge. In the case where the storage shed is too elongated, two ventilation pipes are made: supply and exhaust. To protect the structure from melt and rainwater, a shallow drainage ditch is made around it.
Construction technology of a cellar with embankment
If soil conditions do not allow you to build a buried or semi-buried cellar, you can build an above-ground cellar with a bund and even give it a decorative function by planting ornamental plants on top or arranging an alpine slide.
At the base of the cellar, sand and crushed stone preparation is arranged, on which a waterproofing layer of crumpled clay is placed. The floor is laid out of baked bricks on an edge, which is called a Christmas tree. The consumption of bricks with this method of laying is 64 bricks per 1 m2 of floor.
The walls are erected from wood (logs or thick slabs) with hewn edges. The cracks are caulked with moss to protect against drafts. In addition, moss has the ability to absorb unpleasant odors. For the purpose of waterproofing from ground and capillary moisture, external walls are coated with hot bitumen or bitumen mastic in two steps, then covered with sheets of roofing material. The ceiling of the cellar is made of boards or hewn slabs, covered on top with a layer of about 5 cm of clay straw and sheets of roofing material, or, in extreme cases, with plastic film. Then the entire cellar is covered with earth, which is either sown with grass or covered with turf.

Ground cellar with embankment: 1 - sand and crushed stone preparation; 2 - embankment; 3 - clay-straw; 4 - walls made of wood (slab); 5 - brick floor; 6 - waterproofing layer; 7 - clay castle.
Ventilation is carried out through a ventilation pipe with two channels. The entrance to the cellar will be equipped double door. Lattice bins and shelves are installed inside the cellar.
Operation of cellars
In order for the cellar to serve for a long time, it is necessary to maintain it in working order. There are some rules for caring for cellars that must be followed to extend their life.
Temperature and humidity control
The condition of the air in the cellar requires constant monitoring. One of the most important characteristics - relative humidity air. It is known that for storing potatoes the characteristics of the air condition are as follows: temperature + 2 -5 ° C, relative humidity 85-95%. If the humidity is below the set point, the potatoes dry out and wrinkle. With higher humidity, condensation may form, which promotes the germination of tubers and the development of rotting processes, especially when the temperature rises. To control the air temperature, it is advisable to hang a thermometer in the cellar.
In addition to the temperature, for normal operating conditions of the cellar it is necessary to maintain a certain humidity.
An increase in humidity can be noticed by a musty smell, dampening of the walls and ceiling, and fogging of food.
To detect the transition to negative temperatures, you can use the old grandfather’s method - put a saucer of water in the cellar. When the temperature drops below 0° C, the water in the saucer will freeze.
Cellar gas pollution
Cellar gas pollution is serious problem, which its owner occasionally has to deal with. Most often, gas contamination is caused by concentration carbon dioxide(CO), which has toxic properties, causing suffocation. A concentration of carbon dioxide in the air of more than 10% is dangerous for the human body. You can judge with confidence the presence of carbon dioxide if a match does not light up in the cellar or a candle goes out.
Even more dangerous is the accumulation of swamp gas in the cellar. A swamp gas breakthrough can occur if the cellar is built in a low-lying swampy area. Swamp gas, consisting mainly of methane, forms an explosive mixture with air. At high concentrations it has a nerve-paralytic effect on human body. If gas contamination is detected, it is urgent to ventilate the cellar as thoroughly as possible. If ventilation is not working well and there is no air circulation, you need to create it artificially. To do this, you can lower a sheaf of straw or a blanket into the cellar on a rope and create air movement by quickly raising and lowering it.
Fighting condensation
The formation of condensation in the cellar is very often caused by poor ventilation or poor ceiling insulation. It is necessary to combat this harmful phenomenon immediately, since the presence of condensation affects both the room itself and the products stored in it.
First of all, measures are taken to insulate the ceiling. To do this, you can use any material that has moisture-absorbing ability and dries quickly. Such materials include forest moss or artificial expanded clay material. Sometimes it is necessary to insulate the walls as well. If this does not help, then condensation and drops from the ceiling are removed using umbrellas made of galvanized iron or plastic film. You can also use drainage plywood. Special gutters are attached to them to drain water and divert it into water intake wells. If the cellar design does not provide for these, you can use a regular bucket. In this case, in the summer the cellar must be carefully examined and repaired.
The main purpose of the cellar is to store canned goods, vegetables and fruits. But not every cellar can guarantee the shelf life of food. Therefore, it is worth paying attention to the construction of your subfloor. Special attention. The main thing is to decide for what purposes it is needed.
In a cellar with a temperature of -7 degrees, you can store various products for about one year. Therefore, many housewives value and use such premises for long-term storage vegetables and fruits. After all, its main advantage over a refrigerator is capacity.

Such construction is a serious step, so the work must be based on diagrams and drawings of the cellars. To understand which option is most suitable, you can look at the photo of the cellar. There are many options on the Internet. The picture will show a finished layout of the building, all that remains is to match it.

What is important during construction?
When building a cellar with your own hands, you should adhere to the following recommendations:
- the use of wood materials requires pre-treatment by special means. This procedure protects the room from moisture;
- summer is the ideal time to install a cellar, since groundwater is low;
- It is advisable to immediately equip a ventilation system;
- It is best to build two doors inside the storage room. This will save the correct temperature regime;
- for optimal temperature it is recommended to provide thermal insulation;
- think about all the equipment in advance, so as not to delay construction work due to their absence.


Instructions on how to make a cellar
Place
It is necessary to choose a place for the future cellar. Dry, elevated areas are best suited; in the future there will be no need to install waterproofing. In this case, there is no risk of moisture ingress. The choice of depth depends on the desire of the owner, approximately 2-3 meters.

A certain distance between the base of the cellar and groundwater (50 cm) must be ensured, otherwise flooding may occur.


Material
The construction of a cellar should be approached responsibly, taking into account all the nuances, otherwise troubles are inevitable. Another main point is the choice of material for construction.

Natural stone, wood, red brick and others are suitable for such purposes. Wood lining is required when building an earthen cellar. Metal constructions It is best to avoid, as they are picky about climatic conditions.

Ventilation
This element is necessary to combat moisture and gas accumulation. Most often a pipe is used that connects inner part and the surface of the cellar. But you can install two pipes that will serve as an exhaust hood.


Advantages
A cellar under the house, built with your own hands, has many advantages:
- site saving;
- ease of use. Especially in winter time, you can quickly go down and just as quickly go up;
- waterproofing and underground drainage help you forget about dampness;

Characteristics of the above-ground cellar
When building an above-ground cellar, it is important to consider the soil level. Such a room is built on the surface of the earth, as opposed to underground structures. The above-ground cellar occupies less space, does not flood, functions all year round, has an impressive size and is very convenient to use.

However, such an extension requires hydraulic engineering work. The storage needs maintenance: periodic cleaning and disinfection.

There is a ground cellar three types: above ground, semi-buried, buried. You can build such rooms with your own hands using bricks, logs or concrete.


Features of building a wine cellar
Wine drinks require special storage, because this affects their taste characteristics. Construction wine cellar very popular.

In such a room it is important to provide a thermal insulation system. Closed-porous materials are ideal for building a wine cellar. They are responsible for maintaining temperature.

Entrance door should be well compacted. Excessive air penetration will negatively affect the quality of the wine. Any materials are suitable for the floor, as long as they do not emit harmful chemical elements.

Drink bottles are stored horizontally and it is not recommended to move them. All necessary equipment must be of good quality using natural materials.


Construction must take place in compliance with all necessary instructions to avoid additional work and product damage.

DIY cellar photo


Living in a private house, we are constantly faced with the question of where we can put potatoes, cabbage, pickles, jams and other preparations for the winter. Sheds and outbuildings on the site are good until the first frost, but best place There is a cellar for storing food.
Types of cellars
There are two types of cellars: free-standing (on the street) and located inside the house (under the house).
Standing separately
 Such a cellar is simpler in terms of its design. Imagine a small (1.0 x 1.2 x 1.2 m) hole in the ground, with reinforced walls and a lined bottom, in which there are roughly knocked together shelves and racks. That’s all the technology on the topic “How to make a cellar on the street.” Photo similar design presented below.
The complexity of constructing such a structure will involve carrying out heavy excavation and construction work (dig a hole, strengthen the walls, lay out the bottom, put together boards). In addition, it is necessary to provide mandatory ventilation and waterproofing of walls (this is especially true for soil requirements in areas with above-average groundwater levels).
In addition to being completely underground, the cellar can be semi-buried (when part of the storage is located above the ground, see drawing below) and completely above ground (built on the ground, but well covered with soil and turf as an imitation of a “dugout”).
 As a rule, it is equipped at the stage of construction of a private house, when the basement is being built. Such a cellar is more acceptable because it does not require financial and time costs. The premises for it have already been laid out and equipped, in addition, land area is saved. An example of such a cellar in timber house shown in the photo.
The main disadvantage is the need for waterproofing and insulation of the walls.
Conditions for normal functioning of the cellar
- Cool. It is easy to ensure coolness in the cellar - in basements in contact with external walls, the temperature is always low.
- Darkness. The absence of windows and a sealed hatch ensure a constant low air temperature in the room.
- Ventilation. This is the first (and main) condition that must be observed when building a cellar with your own hands. Along with low temperature, there must be fresh air in the room. Otherwise, the basement will have a musty, damp smell, and the basement walls will “leak” from constant condensation. By preventing the appearance of condensation, you can avoid dampening of the walls and the formation of fungus on them, which affects building structures.
- Humidity. The extreme level is considered to be a humidity of 90% - it creates the most favorable temperature conditions and conditions for storing preparations and products for the winter.
Construction of a separate cellar
An earthen cellar is the easiest to construct. When choosing it, take into account the ease of construction, the level of groundwater and the terrain. If the soil is dry, then an earthen cellar The best decision. If the groundwater is shallow, then it is better to make an above-ground (or at least semi-buried) one.

How to make an earthen cellar with your own hands, necessary steps:
- Dig a pit (take the dimensions yourself).
- Carefully compact the bottom of the pit, fill in the “cushion” and make a “castle” of clay - so that underground moisture does not seep through the floor (the thickness of the “castle” should exceed 200mm).
- Arrange a floor in the cellar - from soil with a layer thickness of 150 mm (which is then carefully compacted) or cement screed.
- Strengthen the walls (with bricks, boards, cinder blocks) - always on a slope to prevent soil collapses.
- Properly waterproof walls and floors.
 Using the same “technology” you can build a semi-buried cellar - the difference will only be in the additional arrangement of the above-ground part (canopy). The above-ground part can be built from brick or clay. The main thing is to cover the above-ground part with soil and turf (to maintain a constant temperature regime).
A semi-buried earthen cellar is good because a small pit (up to 1 m in size) is suitable for its construction, which reduces construction time. For the base, it is advisable to choose brick or concrete, which after installation must be completely waterproofed.
Such cellars should be equipped with ceilings.
Important: the entrance to a semi-buried cellar should be with north side so that the door is not overgrown with moss. The entry device on the “wrong” side is common mistakes many amateur builders.
Waterproofing: types, features, application technology
 The cellar is equipped, now we need to “finish” it. And the first point is its waterproofing (especially for cellars located in the basement of houses), because... basement walls exposed to groundwater.
Houses are built in areas and on foundations as far as possible from the groundwater level. But sometimes it turns out that this level rises due to the abundance of precipitation. In this case, the walls may collapse faster due to the mold that has formed, dampness appears in the room and the products become unusable. To avoid this, you need to waterproof the walls and floor of the cellar.
Important: Even the highest quality waterproofing in a stone house can turn out to be poor if the ventilation of the cellar is poor. That's why good is so important organized system supply and exhaust ventilation.
Types of waterproofing materials
- Bitumen (mastic). This is a paste-like solution that is applied to the prepared wall surface. Optimal quantity layers - 2, and each of them should be sprinkled with dry sand after application. Before application, bitumen must be heated, and it is advisable to plaster the walls.
- Penetrating waterproofing. Its consistency is a liquid, creamy solution, which is also applied to the prepared base (cleaned of cement and dust). It is advisable to scrape concrete structures with a metal scraper - this way they become clean and the adhesion to the waterproofing increases. The solution should be applied to a moistened base, and then the surface should be kept moist for 2-3 days so that the solution saturates the walls.
- "Liquid rubber". This type is considered no less effective than penetrating waterproofing. Before application, the surface is cleaned of dust and cement residues and the surface is leveled as best as possible. Then it is primed - the primer will increase the adhesion forces of the insulation to the enclosing surfaces; after the primer has dried, the insulation is applied with a spatula, carefully leveling the layers. After application, it is better to complete the finishing work on the cellar no earlier than a day later.
- Cement-polymer. This insulation differs from previous types in the composition of the insulating material. The application method is the same as when using " liquid rubber" The difference lies in the use of a mixture consisting of a polymer substance and cement powder. After treatment, the layer should be left until completely dry, then apply a second layer of insulation with a spatula.

Ventilation
Its main function is to ensure good air exchange in the cellar to maintain optimal microclimate. Thanks to it, food will be preserved better (and longer). However, there may be some pitfalls here too.
According to the requirements of SNiP, ventilation in cellars is made with supply and exhaust natural circulation. This means that air flows must pass naturally through specially equipped ventilation holes and air ducts.
Important: Insufficient air exchange will lead to dampness of food, the formation of dampness and a musty smell. As a result, the walls of the cellar may collapse and the products placed there for storage may quickly deteriorate. And too much ventilation (both supply and exhaust) will lead to the formation of drafts, so raw vegetables and the fruit will dry out. It is important to comply with all conditions for properly functioning ventilation.
An asbestos pipe of the required diameter can be used as an air duct. The size of the section will depend on the cubic capacity of the room. The same SNiP provides an accurate calculation of the required air exchange per hour and the selection of air ducts of the required sizes based on the obtained value. Simply put, the larger the room, the larger the diameter of the pipes you will have to use. Minimum diameter asbestos pipe for a cellar with a volume of 7-8 m3 - 200 mm.
Advice: the minimum size of the ventilation pipe is calculated based on the proportion 1 to 26, where 1 is 1 m2 of cellar area, 26 is 26 cm2 of pipe area.
The exhaust air duct must be made 150 mm below the level of the cellar ceiling (measurements are taken along the upper edge of the air duct), along one of the corners of the room. The hood passes in transit through all rooms and floors of the house, “pierces” the roof and exits onto the roof.
There the pipe is “sewn up” into a ventilation shaft, the end of which should rise 0.5 m above the highest point of the roof (at in this case, this is a strong point). To reduce the formation of condensate in the pipe during the cold season, it is advisable to lay the air duct in the ventilation shaft coaxially, i.e. according to the “pipe in pipe” principle, insulating the cavity between them. The pipe can be lined with mineral wool or glass wool.
The supply air duct is necessary for the supply of fresh air. The lower end should be located in the corner opposite the exhaust duct. Moreover, the “inlet” hole should be placed in the lower part of the cellar - at a level of 0.5-0.6 m from the floor.
The upper end should remain open for air flow, located at a level of 0.8 m above the ceiling.
Advice: To prevent debris, small rodents, and birds from entering the supply and exhaust ventilation pipes, the upper ventilation holes can be covered with a fine-mesh mesh.
These are the requirements of SNiP. To understand how to arrange cellar ventilation in the basement, you can look at the drawing.
Important: During the cold season, a large temperature difference occurs due to different densities of warm and cold air. The result may be a draft that freezes the warm cellar, so it is advisable to install special dampers on the air ducts. With their help you can regulate the amount of air exchange.
How to check the effectiveness of ventilation?
The easiest way is to attach a sheet of paper to the ventilation grilles. If the paper sways slightly, it means air flows through the air ducts.
Another method is to use smoke. You need to light the “checker” and see if condensation forms on the walls and ceiling from the smoke. If the walls begin to “sweat” and the air becomes damp and musty, the ventilation should be re-equipped (for example, from natural to forced, by installing a duct fan in the air ducts). If, after the “checkers” smoke, you can breathe just as freely, the ventilation is working!
Construction of a cellar - separate, semi-buried, above ground, or located inside the house in the basement - is not a very labor-intensive process, but requires careful attention.
A cellar is a mandatory extension in a country house or near a private house. This room is kept all year round optimal temperature for saving vegetables, fruits, canning and preparations. It is quite possible to build a cellar yourself. To do this, it is necessary to assess the condition of the soil, determine optimal type structures, select materials and adhere to the chosen technology.
Requirements for arranging a cellar
The optimal place for canned food and grown crops is the cellar. This room supports natural conditions and temperature about +4°C. Favorable microclimate necessary to preserve the presentation and taste characteristics of fruits and vegetables.
Some people confuse the concepts of cellar and basement. However, these are completely different structures. The basement is located in the basement of the building. The cellar is arranged separately - separately on personal plot. The design is made invisible, or vice versa, protrudes bright element landscape design.

Practical use of vegetable storage is possible subject to certain conditions:
- the presence of low temperature - the cellar is built underground or arranged in a basement in contact with the external wall of the house;
- darkening - windows are excluded from the cellar design;
- constant filling with clean and fresh air thanks to natural and supply and exhaust ventilation;
- air humidity is about 80-90%.
Selecting the optimal design and materials
Depending on the depth of burial, the following types of cellars are distinguished.
Ground structure rises above the surface, the depth of the structure is no more than one meter. Essentially this is a small bin for vegetables. A storage shed can be erected anywhere, even in small lowlands.
Construction of a “garden” storage shed - optimal solution for waterlogged areas and low-lying areas. A distinctive feature of an above-ground cellar is the lack of overlap. As a rule, a gable roof made of boards is installed. Thanks to this, the time and final cost of constructing a vegetable storage facility are reduced. An additional plus is the ease of building such a cellar with your own hands.
A more spacious above-ground cellar - externally the building resembles a small house. Earth is poured on top of the ceiling, covering the ceiling with a thick layer. The end side with the door remains unprotected. Planted on top of the backfill lawn grass, decorating the territory and keeping the soil from crumbling with its roots.

Semi-buried cellar- the most popular type of structure. The structure is externally similar to a ground structure, but part of the room (about 1.5 m) is located underground. The entrance door to the bins is located below the ground surface, so it is necessary to provide a system for draining melt/rain water. Door design thoroughly insulated.
Deep cellar well suited for compact areas. However, its construction is possible only when groundwater is low or with thorough drainage and waterproofing. The entrance can be covered with a heat-insulating removable cover or decorated with a special cellar - a small house with a hatch in the ceiling. The cellar can be used as utility room to accommodate gardening equipment, various household items or vegetables.
Cellar walls are built from different materials: stone, brick, concrete or asbestos-cement sheets. It is not advisable to build a building from metal, since it is difficult to achieve a suitable temperature regime.
When using earth as the main material for the walls, the inside of the bin is lined with wood. The wooden slats must be thoroughly dried, sanded, treated with an antiseptic and dried again.
Making a cellar with your own hands: video on selecting materials
How to make a cellar with your own hands: recessed design
Assessment of terrain and soil conditions
The best location for the cellar is a hill, hillock or hill. Groundwater in such cases passes far from the surface of the earth. When placed on a hill, rainwater ingress is reduced. In addition, you will be able to save on waterproofing materials.
Many people prefer to build a cellar next to residential building, to quickly reach and take the necessary products in the cold season, in the rain, etc.

Before starting construction, you need to find out the type of soil and the possibility of constructing a buried/semi-buried vegetable storage facility. To do this, you need to do a little test:
- At the site where the bin is being built, place a scrap of natural wool and a raw egg on top.
- Cover the “structure” with a jar and leave for one night.
- Evaluate the result of the experiment:
- if the wool has dew droplets, then groundwater is located nearby;
- if the egg and wool are dry, then the water is deep and you can safely start working.
Before building a cellar with your own hands, it is advisable to evaluate the type of soil:
- Peat is the optimal type for bunding. This soil minimizes food spoilage, which is especially important when storing root crops.
- Quicksand is heaving soil that is not suitable for building an “internal” cellar. This soil contains loam, sand and sandy loam. To be able to build a vegetable storage facility, you will have to replace the soil and add sand.
- Sandy soil is well suited for arranging the foundation. This natural material often added to reduce heaving and reduce moisture content.
Materials and tools
To build a cellar in your country house with your own hands you will need:
- crushed stone and gravel;
- rack sand;
- clay mortar;
- rolls of roofing felt;
- brick;
- cement;
- boards for arranging the floor frame;
- concrete grade 100;
- molten bitumen;
- grid for reinforcement.
Tools you should prepare:
- concrete mixer;
- manual tamper;
- shovels;
- screws, screwdriver, nails, hammers;
- welding machine;
- grinder;
- primer;
- brush;
- hacksaw
Pit preparation
The construction of an underground storage facility begins with digging a pit. The work is performed in the following sequence:

- Clear the area of stones, sticks and vegetation.
- Mark and dig a hole. Traditional cellar dimensions: length/width - 2.5 m, depth - 2.3 m. To dig a pit, it is better to use the services of an excavator.
- Level the walls of the pit with a shovel, scraping off excess soil and giving them a flat surface.
- The depth of the pit depends on the type of cellar being built. When determining this value, it is necessary to take into account that the space will be partially occupied by a hatch or entrance, shelving, and a ladder. In view of this, the pit must be dug with a certain reserve.
- Compact the bottom of the pit, pour sand and gravel into the hole. The thickness of the sand cushion is 20 cm, the gravel cushion is 10 cm.
Arrangement of the subfloor
It is better to screed the floor using clay mortar. To prepare it, you need to combine clay and quartz sand in a ratio of 90%/10%. Dilute with water until it becomes thick sour cream. Pour the prepared solution into the gravel to a thickness of 3-4 cm.

To increase the strength characteristics of the base and provide better insulation from the penetration of groundwater, it is recommended to additionally strengthen the bin with concrete. Procedure:
- Prepare a mixture of rack sand and concrete in a ratio of 5:1, respectively.
- After drying, fill the clay base with concrete mortar 5 cm thick.
- Smooth the surface and leave until completely hardened.
Construction and waterproofing of walls
The technology for constructing brick walls is as follows:

- Build a foundation for the masonry with a width of 1 brick and a height of about 15 cm.
- Leave the foundation to dry.
- The laying is done from the corner of the wall where the doorway is provided.
- The bricks are placed in a checkerboard pattern.
- When laying brick, you need to tap it with the handle of a trowel - this will help get rid of excess mortar and improve the adhesion of the materials.
- After the construction of each row, its evenness must be checked with a building level.
- The working solution is prepared from sand and cement in a ratio of 4:1, respectively.
- In parallel with the masonry, the cracks and spaces between the brick and the earthen wall are filled with clay mortar. This technology provides additional waterproofing for vegetable storage.
- After all the walls have been erected, leave construction for 1 week until the mortar hardens.
Brick walls require waterproofing. For this purpose, hydroglass insulation is usually used, roll insulators or bitumen mastic. Sequence of insulation work:

- Treat all surfaces with a water-repellent compound.
- Attach sheets of roofing felt to the walls - the material is fixed using heated bitumen mastic. To ensure high-quality insulation you will need 2-3 layers.
- Plaster the walls with cement.
Construction of the floor
Arranging the ceiling is a responsible undertaking. The supporting structures must withstand heavy loads. Often the ceiling is made of a monolithic block made of concrete and reinforcement cage. It is important that the roof of the cellar exceeds the size of the room, since the walls will act as load-bearing supports.
Algorithm for performing the work:
- Install supports on which the wooden formwork will subsequently rest.
- Before pouring, the formwork must be carefully sealed so that the solution does not leak out through the cracks.
- After preparing the formwork, make the frame of the concrete slab from reinforcement. The spacing of the reinforcing bars is about 25 cm, the height of the frame is up to 30 cm.
- At large area For cellars, it is recommended to double reinforce the slab.
- The reinforcement mesh should protrude beyond the cellar wall by 5-10 cm from different sides.
- The resulting frame is evenly filled with concrete mortar.

After pouring the slab, you need to wait 3-4 weeks. The coating will completely harden and take on its final form.
Ventilation system and electrical supply
Good air exchange is an important condition for the safety of products in the cellar. Lack of normal ventilation will lead to rotting of vegetables, and too rapid circulation of air flows will lead to drying out of root crops.
IN technical room it is preferable to create natural ventilation - it is less expensive, and its proper organization will provide sufficient air exchange. To implement this, you will need to install a supply and exhaust air duct. The exhaust element is placed at the top near the ceiling, and the supply opening is on the opposite wall at a distance of half a meter from the floor.

The procedure for creating natural ventilation in the cellar with your own hands:
- Select an air duct based on 1 sq. m bin area - 26 sq. cm pipes.
- The pipe is installed from the corner of the room, and its lower end should be located under the ceiling. The air duct passes through the entire room, the roof, towering above rafter system half a meter.
- To prevent condensation from collecting in the pipeline, it is necessary to carry out thermal insulation exhaust pipe according to the sandwich principle. One pipe is installed into another, and the space between them is filled with mineral wool.
- The open end of the air pipe is located at a distance of 50 cm from the lower floor level. The exhaust duct penetrates the ceiling, ending 80 cm above the base.
- Cover the outer hole of the pipe with a mesh.
- It is advisable to put valves on the pipes to regulate the air flow.
Electrification of the cellar is carried out using copper cable with double or triple insulation.
Interior decoration of the cellar
Upon completion installation work You can begin to improve the cellar. There are several design options:

- make the walls with racks with spacious shelves;
- hang metal shelves;
- set up prefabricated racks.
Important! All wood structures must be coated with an anti-insect compound and a protective impregnation against moisture.
Do-it-yourself above-ground cellar: step-by-step instructions
At your dacha, you can equip a simple cellar with your own hands if the groundwater level is high. Inside the bin, the air temperature can be maintained at 2-3°C. Let's look at an example of building a vegetable storage facility like a storage shed, with the following dimensions:
- height at the center of the structure - 2 m;
- width - 3.3 m, length - 3 m;
- passage width - 0.6 m.

Sequence of work:
- Coat logs resting on the soil with hot bitumen mastic.
- The ceiling is made of boards, and the sheathing elements are made of hewn slabs, obapol, clay straw, and pine trimmings from the sawmill.
- The roof overhangs must rest on the ground. Such an installation provides additional thermal insulation in the form of snowdrifts during the cold season. As a result, a structure is formed, like a tent.
- On one side, the storage shed is sewn up with two rows of boards, between which insulation is laid. At the other end there is an insulated door.
- From the outer part of the lobaza, dig a drainage trench along the entire perimeter to prevent the ingress of natural water.
- Make a hood near the ridge - a wooden box with an adjustment plate.
Building a cellar with your own hands: video
A cellar in the country with your own hands is good opportunity ensure long-term and high-quality storage of products. And since, if the cellar is built correctly, it stably maintains the same temperature all year round, it is simply irreplaceable for storing not only canned goods and pickles, but also vegetables and fruits. Cellar in the country - absolutely necessary thing for those who have a vegetable garden or orchard at their dacha.
Cellar in the country: main types
Despite design features construction, cellars can be divided into three types (diagrams of cellar construction, depending on the type, are shown in Fig. 1):
- ground - arranged in the case of a very high (0.5 m) groundwater level. It could be simply an insulated box made of wood, a wall cellar (attached to the main wall, in fact - another room, only with an embankment of earth, the diagram is shown in Fig. 2) or a brick storage with embankment (Fig. 3)
- semi-buried cellar– arranged in places where the groundwater level is located within 1.5-2 m from the ground surface. A diagram of a semi-buried cellar is shown in Fig. 4.
- To build it, you will need to dig a pit 0.8-1 m deep. The base is erected from brick or concrete, raising the walls to a height of 2-2.2 m. The ceiling is made of wood, concrete or slate. The entire structure is sprinkled with soil on top. The entrance to such a cellar is arranged at ground level, with a vestibule, a staircase and a second, necessarily insulated, the door. In principle, all construction operations, including waterproofing, ventilation and insulation, are similar to those carried out during the construction of a deep basement.
- deep cellar– the most common type, it can be either separate (having its own cellar, Fig. 5) or located under the house, summer kitchen or a garage. Therefore, we will consider in detail below how to build a cellar with your own hands at the dacha.
For the construction of a semi-recessed, and especially a recessed cellar, it is very important to accurately determine the location of construction, and more precisely, to determine the level of groundwater. To do this, you can use the help of professionals (expensive, but reliable), or you can try folk method, which gives a fairly accurate result. To do this you will need a glass cap, a piece of wool and a fresh egg. In the place where you planned to build a cellar, place a piece of wool on the ground, an egg on top of it and cover them with a glass cap. Leave this “construction” overnight, and evaluate the results in the morning:
- wool and egg in dew– the level of groundwater is insignificant, here you will have to limit yourself to an above-ground cellar
- there is dew on the wool and the egg is dry– groundwater lies deep enough for the construction of a semi-buried cellar
- dry egg and wool- an excellent place to build a deep cellar.
Advice! The best time to build a cellar is in the summer, when the groundwater level is lowest.
If the construction of a cellar is planned in a house (more precisely, under the house), then it is better to place it under non-residential (unheated) premises, ideally under a veranda (the temperature there is lower than in the rest of the house, it is easier to arrange ventilation, and in winter the veranda will protect from frost). If the layout of the house allows you to arrange a cellar only in the heated part of the building, additional thermal insulation of the ceiling will be required (for example, lay foam plastic 5 cm thick on the ceiling) and good ventilation, otherwise ensure optimal mode food storage is impossible.
After this, you can begin the practical part of construction.
Digging a pit
The construction of a cellar at the dacha with your own hands begins with marking the foundation pit, while adding from 0.5 to 1 m to the planned dimensions - this will make it easier to waterproof the cellar. First, the top fertile layer of soil is removed - it can later be used to create flower beds, terraces, alpine slides etc. After this, the pit itself is dug (Fig. 6).
Advice! To prevent the earth from crumbling down and the soil to hold stronger, the walls of the pit are made not vertical, but with a slight slope, and the steepness of the slope is selected depending on the type of soil (the harder it is, the smaller the slope).
To make sure that water is not seeping through the walls somewhere, the pit is allowed to stand for some time. Places where water has appeared are sealed with so-called “clay tampons” - they dig out a ditch (up to 50 cm deep) and trample it with crumpled fat clay, while compacting it tightly.
Cellar base
To obtain the base, the bottom of the pit is leveled and compacted, after which a sand and gravel cushion is made and the first layer of concrete 5-10 cm thick is poured. Ruberoid is laid on top of the first layer in 2-3 layers or melted bitumen is poured (waterproofing layer, Fig. 7) , after which they are concreted again, pouring a layer 10-15 cm thick. If walls are built from brick (half a brick thick), then this base will be quite enough as a foundation. If the walls are made of concrete blocks or some of the walls of the cellar are continued as load-bearing walls of the house, then pouring a separate foundation will be required.
Walling
For the construction of cellar walls you can use different material. Most often, brick is used for this, concrete blocks(Fig. 8, most often they are used to build load-bearing walls of a house on them), rubble, cinder block (Fig. 9). Another option is pouring a monolithic concrete walls, in this case, the walls can be integral with the base, for which purpose the reinforcement for the walls is initially fixed in it (Fig. 10), then the formwork is installed and the mortar is poured (Fig. 11).
Floor installation
The choice of material for flooring is largely determined by what loads it will have to withstand during further exploitation. It can be produced:
- wood - beams or logs on which boards or beams are laid on top. Since there is always high humidity in the cellar, all wooden elements must be treated with an antiseptic
- metal beams on which concrete slabs can be laid. In this case, it is necessary to especially carefully process and seal the seams (joints of plates)
- monolithic concrete floor– poured in the same way as monolithic walls
Ladder
The simplest, but very inconvenient option is ladder, welded from pipes or knocked down from wood. It is advisable to include in the project a stationary staircase made of iron, concrete or metal; it is both more convenient and safer to use:
- the minimum width is 30-40 cm, but better order 50-60 cm, it will be convenient to climb
- if you plan to lower heavy, large-sized loads into the cellar that need to be carried together, then the width of the stairs should be at least 80 cm
- the maximum permissible slope is 75 degrees, but such a staircase will be within the capabilities of the young and energetic. To make the stairs comfortable, but not take up much space, the optimal slope is 45 degrees - it’s quite easy to climb (the flight is not very long) even with a load in your hands
- step height – 15 – 20 cm, width – 25-30 cm
Waterproofing basement walls
To ensure waterproofness, concrete and brick walls additionally plastered with cement mortar. After the layer has completely dried plaster With outside Bituminous mastic is applied to the walls, onto which roofing material is glued (Fig. 11), after which soil is backfilled.
Advice! To improve waterproofing, instead of backfilling with soil, you can make a clay castle. To do this, clay is mixed with water and coarse sand until a plastic mass resembling plasticine is formed. The resulting mass is placed in a pit between the walls and the ground, compacting it very tightly.
Ventilation device
Properly organized natural ventilation will avoid excessive humidity and dampness, maintaining optimal temperature and humidity conditions in the cellar. To do this, two pipes are installed in the cellar (metal, ceramic, asbestos-cement, plank, etc.):
- exhaust - installed at the top, almost under the ceiling, and it must be insulated
- supply air – located at a height of 50-60 cm from the floor
To ensure maximum air exchange, the pipes should be located as far apart as possible. The cross-section of the pipe is selected in accordance with the size of the cellar, for example, for normal ventilation of a cellar with an area of 8 m2 and a height of 2 m, a pipe with a cross-section of 12X12 cm is required. The main signs of poor ventilation: the appearance of condensation on the ceiling, dampness, signs of mold, musty, unpleasant air . Figure 12 shows a diagram of the organization of ventilation for a separate cellar
Figure 13 shows a diagram of the organization of ventilation for the cellar in the basement of the house.
It is worth paying attention that it is necessary to install a grill on the supply pipe, which will prevent rodents from entering the cellar.
Advice! If natural ventilation is not enough, to combat excess humidity, you can install boxes with substances that actively absorb moisture ( quicklime, salt).