Do-it-yourself sewerage installation in a one-story private house. Do-it-yourself sewerage installation in a private house. Artificial treatment station - a septic tank with forced air supply
Read also
For a comfortable life in a modern private home, it is simply necessary to have amenities. In this, the main role is given to proper sewerage. Making it with your own hands is not easy, but it is possible. To do this you need to have some knowledge.
Sewer installation should begin by drawing up a design for internal and external systems for the removal of wastewater.
Scheme of the internal sewer system
This system must be thought through before the construction of the house begins, at the design stage. The first thing you need to know is how big the container will be where all the waste received for recycling will be processed.
The average volume is from 200 to 250 liters. The next step is to decide on the type of sewage system. According to the rules for building houses, all rooms with high humidity should be located in one corner or on top of each other. For example:
Basic rules for organizing internal sewerage
- No other equipment should be connected to the sewer pipe between the toilet and the riser. This is due to the fact that during flushing, water will be sucked out of all siphons connected to the system. This is why the toilet must be connected to the riser with a separate connection.
- In order to better clean sewer pipes, their slope should be from 2 to 15 degrees, this corresponds to 2-15 centimeters per meter of length.
- You should definitely take care of the ventilation of the risers. Without it, an unpleasant odor will appear after a while. In addition, this will lead to the emptying of siphons and the appearance of air pockets in the pipes, preventing the drainage of water. Ventilation should take place separately from the general natural exhaust channel of the house. In order for the ventilation of the risers to work properly, it must be installed half a meter above the roof. A sewer aerator is perfect for this purpose;
- Sanitary fixtures located on the same floor must be connected to the riser above the toilet connection point. If the fixtures are lower, dirty water will get into them when the toilet is flushed.
- The riser must have a diameter of 10 centimeters (if a toilet is not connected to it, then it is possible to use a pipe from 5 centimeters).
- The riser must be soundproofed. To do this, it can be covered with plasterboard, placed in a wall niche or covered with mineral wool.
- Pipe bends should be made smooth, 30-60 degrees. It is strongly recommended to avoid 90 degree turns.
- Each riser must have an inspection hatch at the bottom.
- All sanitary fixtures, except the toilet, can be connected to a common pipe for discharging water into the sewer.
- It is important to install the outdoor pipe below freezing point. In addition, it needs to be insulated. An inspection well is installed next to the house for it. To prevent flooding, a non-return sewer valve is installed in the pipe. General tips for sewer design
To properly design a sewer system, it is important to take into account the location of the house and calculate the distance to the proposed cesspool.
- The best option would be 5-10 meters.
- You also need to keep in mind that the law provides for the installation of a septic tank at a distance of 4 meters from the neighbor’s property.
- If you build a cesspool too close to your own home, this can lead to the destruction of the foundation. If you make a cesspool further than 10 meters from the house, this will cause blockages and other problems in the sewer system.
Important: when drawing up a sewerage diagram, you need to take into account the location of the collector pipe and riser, the topography of the site, its area and soil composition.
It will be necessary to order the preparation axonometric scheme systems, which will help identify and solve installation difficulties. You need to think about turns, pipe sizes, junctions, connections, angles of inclination and elevation.
All risers in the house must be discharged into the central sewer system. In cases where this cannot be done, you need to:
- Set up local treatment facilities near your home. The wastewater will be discharged into the ground. This option is expensive to construct, but cost-effective.
- Water must be drained into a septic tank, and waste must be periodically pumped out and removed. This method will not require large installation costs, but during operation it will cost a pretty penny.
Effluents are cleaned in several ways:
- Aerobic devices-septic tanks- special bacteria that purify wastewater during their life processes. This method is also called septic tanks without pumping.
- Treatment ground structures— equipped with a filter and drainage through the soil layer. Here it is important to take into account the composition of the soil (soil made from sandy loam and sand showed itself to be a good filt, and soil made from clay and loam - according to chemical indicators). This method is suitable for economy class houses.

If up to 1 m3 (the norm for 4 permanent residents in a house) of wastewater is produced per day, then you can arrange filtration well, if more than 1 m 3, then - drainage well.
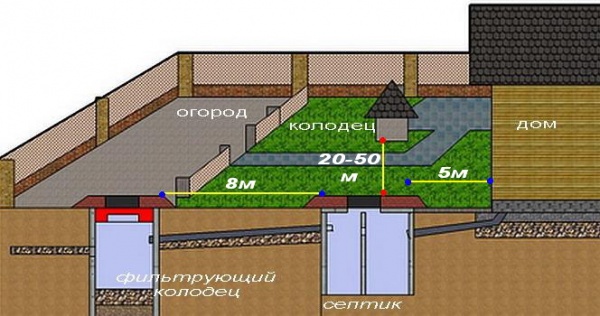
Design of a sewer system with a filter well
This sewerage option is suitable for areas where it is possible to place a well at a distance of more than 30 metrov wells, the distance from the house and the fence should be at least 2 m, from large bushes and trees - 3 m. Also, the soil must have high filtering properties, so you can use any type of soil except clay. In addition, groundwater must flow at a depth of 1.5 m, that is, be lower than the drainage level.
Local sewerage project, provided that it is laid in the ground with low filtration rates and with a high groundwater flow:

- As a result, accumulates in the well warm purified water, which can be used for watering or simply drained in a convenient place.
Design of a treatment system in sandy soil
 Sewage scheme for sandy soil
 - This option is designed for low water levels in the ground, where treated wastewaterpours straight into the water. Crushed stone is needed only to improve the efficiency of the entire system (if absorption goes well, then you don’t need to use it). The outlet pipe goes below the freezing point and must be insulated.
External sewerage project with gravity drainage organization

- Most economical option. Due to the absence of pumps, wells and other additions, the cost is reduced to a minimum. This option can be used if the terrain allows and the distance is short.
Design of sewerage with drainage system
This version of the sewerage system is easy and easy to design and install yourself, and it convenient to use. Example project:
The system has a cesspool, with its own installation rules. The septic tank is placed next to the house so that the water entering it does not have time to cool. Under influence increased temperaturedrainsare intensifying decomposition processes waste. If the septic tank is sealed, then it can be installed even in the basement of the house.
Important condition: it is necessary to have a hood through the sewer riser.
In addition, there are leaky cesspools. They must be located at a distance of more than 5 meters from the house.
We will send the material to you by e-mail
Having your own home is the dream of many people. There is nothing better than your own corner, provided with all the amenities. However, everyone wants to surround themselves with comfort, and the outdoor toilet, along with the need to carry water from the well, are becoming a thing of the past. In this regard, the question became relevant: “How to create a sewerage system in a private house with your own hands?”
Creating a sewer system for a private home is not as difficult as it seems
Before starting construction, you need to decide on the type of sewerage system in a private house. With your own hands you can create several varieties that will have their own pros and cons.
The most popular varieties are:
- Drain well. Simply put, an ordinary pit that accumulates all waste and wastewater. Such a structure is inexpensive and does not take much time to construct. The sequence of actions is simple - dig a hole at a distance of twenty meters from the house. The calculation of its volume is based on 0.7 cubic meters per person. To strengthen the walls, it is recommended to use brickwork or concrete rings. After this, for additional sealing, the seams are coated with bitumen. The bottom of the pit can be filled with concrete so that wastewater does not poison the soil. Upon completion of construction, install a hatch for subsequent removal of liquid. This is the simplest sewerage scheme in private houses, created by the owner with his own hands. However, such an arrangement is more relevant for country houses than for a full-fledged living space;
- An equally well-known method is digging in a closed container. This structure operates on the same principle as a drainage pit. A special tank is buried in the ground, the volume of which is calculated according to the number of people living. The main waste lines are connected to the tank hatch. Drain water accumulates in the tank without polluting the surrounding area. A significant disadvantage of this method is the need for constant cleaning.

- A septic tank is difficult to construct, but at the same time the most reliable sewer system in a private house, the layout, depth of filling and components of which can guarantee effective operation for many years. During construction, it is necessary to choose a suitable location for the future well. The distance from the house should not be less than twenty meters. Next, the walls of the pit are securely reinforced with bricks; the recommended masonry thickness is twenty-five centimeters. We carefully concrete the bottom, after which we proceed to laying the drain. Place its level above the water. Do not forget to provide a hole through which the liquid will be removed.

Helpful information! You should decide which option to choose based on the funds you expect to spend during construction. The examples given differ in both the high cost of the elements and the time required.
In addition, installing a sewer system in a private house with your own hands depends on the layout of the home and the number of people regularly living in it. Experts recommend placing rooms such as the kitchen, bathroom and toilet nearby. This configuration makes it possible to allocate a single collector for their maintenance, through which the waste liquid will flow into a septic tank or waste pit.
If the house turns out to be too large, and its layout involves a significant distance between the kitchen and other rooms with drainage, it will be necessary. It is necessary to take care of separate drainage, and also provide the possibility of pumping out waste water. Owners should take care to install risers to provide water to the upper rooms.

Related article:
In the article we will look at options for drainage installation, how to make a reliable system with your own hands, and the average cost of specialist work.
Components that make up a sewer system for private houses with your own hands
The drainage system consists of basic elements, each of which performs its own functions. The first place on the list is occupied by the communications of the premises. Pipes and hoses located in rooms and performing the function of drainage. Laid in rooms with running water, at the outlet they are combined by a collector, through which the waste liquid leaves.

Next, the main functions are taken over by external communications. A pipeline installed outdoors is most often dug into the ground or protected by a casing. Separate drains from utility rooms can be connected to it, for example. The main task of this unit is to deliver wastewater to the receiving device.
The final stage in the chain is a storage tank, the main function of which is to store water and other waste. Depending on the complexity of the system, the receiving device can either simply be filled with water or filter sewage.
Do-it-yourself sewer installations in private houses: video tips and more
At the first stage, you should carefully examine the soil layer for special characteristics. When looking for a site for installing a drain well, you need to pay attention to:
- Slopes, potholes and other natural depressions on your site;
- Free access for vehicles to clean the storage tank;
- Distance from utility buildings and fences.
In most cases, country houses are used seasonally and people do not live there regularly. Therefore, do-it-yourself sewerage in private houses can be done with a small receiving tank.
Helpful information! If you adhere to sanitary building standards, the waste pit must be located at a distance of at least five meters from other buildings. Experienced builders recommend increasing this distance as much as possible to isolate the house from unpleasant odors.

It is best to dig a hole in a low-lying area of the surface, thereby providing a natural slope for drainage. Try to avoid such an arrangement to prevent accidents.
This video will help you understand how to draw up a diagram and plan for a drainage system:
Selection of parts and fittings for sewerage
The next step in construction is the selection of components. The durability and quality of operation of the entire system will depend on the quality of the fittings and other parts you choose.
When going to a specialized store, you need to know that the pipeline is divided into external and internal. The first combines high conductivity, resistance to high and low temperatures, as well as chemical and biological substances. These communications must allow water to pass freely and be hermetically connected to the outlet manifold.
The external pipeline has the same qualities, with the addition of specific features. Its surface can withstand the load of the earth, because such communications are buried to a depth of two meters. In addition, these pipes are absolutely sealed and meet international technical parameters.
When choosing communications, pay attention to the material from which they are made. The following types exist:
- Cast iron;

- Steel;

- Copper;

- Reinforced concrete;

- Asbestos-cement;

- Ceramic;

- Plastic.

Each material has specific characteristics suitable for certain conditions.
In addition to the main “arteries”, fittings are important. These parts are used to connect laid pipes into a drainage system.

To perform various functions, the following varieties are provided:
- Couplings - used to connect pipe sections;

- Reductions – for connecting ends of different diameters;

- Inspections - to remove blockages and dirt;

- Tees - for creating branches;

In order for living in a country house to be as comfortable as possible, main communications in the form of sewerage and water supply must be installed.
Of course, sewerage in a private house with your own hands is possible without any problems.

If you do not live in a house outside the city on a permanent basis, then there is no need to purchase expensive equipment. You can easily get by with a septic tank.

Importance of sewerage
Very often in practice, the function of collecting waste is assigned to a cesspool. In the case when the house does not have a plumbing system, the use of this option is quite logical, however, in the case of a large volume of drained water and the installation of various plumbing fixtures, this will certainly not be enough.
In principle, absolutely anyone can install sewerage into a house, and it is only important to follow at all stages the project, which was developed in advance and included various schemes for internal and external piping.

DIY sewerage diagram inside a country house
First of all, these are all the places where plumbing fixtures are connected, such as a sink, toilet, as well as a bathtub or shower.
The external network is all the pipes that drain wastewater from the house and the storage or treatment plant. Of course, the installation of proper sewerage means the correct implementation of a huge number of various nuances.

After the project has been prepared, you can proceed to calculating the size of the pipes, the amount of necessary material that may be needed for the work, as well as the selection of the sewer collector.

As soon as you have a diagram of how each point from the system will be located, you can purchase the material that will be needed in the future and proceed to installation.
First of all, if you do not know how to make a sewer, then the main riser must be installed. To ensure that all gases are removed, a small part from above is slightly noticeable above the existing level near the roof, or the second option is to be removed to the top at the end of the work.

Types of pipes
Made from PVC material. The main advantage of this type of pipe is that the material is absolutely not susceptible to overgrowing or unwanted corrosion.

Their internal surface is quite smooth, which allows the unhindered passage of waste. Installation is most often performed using the socket method. The price of such pipes allows everyone to buy them.

Cast iron pipes are a durable and always reliable option, however, due to their fairly large weight, their installation is quite difficult. Also, the price for such pipes is much higher than for ordinary plastic ones, to which everyone is almost accustomed.

You can look at a photo of a sewer system in a dacha, and you will see that, in principle, there is practically no external difference between these two options. Then why overpay?

Ceramic pipes stand out from the rest with their amazing characteristics, but not everyone can afford their cost, so they are chosen less and less every year.
After the installation of the main riser is completed, the next stage is the laying of horizontal pipelines. During installation, it is very important to avoid various 90-degree turns, as this will only interfere with the movement of drains.
If you are interested in sewerage from concrete rings, then keep in mind that this is not only a fairly expensive option, but also extremely difficult to install.

It will be enough that all plumbing fixtures include siphons with an additional water seal. This will act as an obstacle to the penetration of various unwanted odors into the room.
Note!

An important condition when connecting the pipe from the toilet is that the diameter of the pipe should not be less than 10 cm.

A septic tank made of reinforced concrete rings has many different advantages. For example, this option is one of the most affordable, but at the same time completely unpretentious during use.

However, speaking of the disadvantages, one cannot fail to note the mandatory cleaning of the chamber from solid waste using sewage disposal equipment.

DIY sewer photo


Note!


To ensure a high-quality standard of living in your country house, you need to take care of the convenience of the outflow of used water and waste products. A properly calculated sewer system at the design stage and subsequently installed in a private home is the key to long and trouble-free operation. You can install such a structure yourself, with your own hands, if you approach this issue thoroughly. The design of the house plays a key role in drawing up the internal pipeline diagram, but for laying external sewer networks you need to adhere to several rules.
Where to place the sewer system on the site
The installation of sewerage in a private house must be carried out in accordance with all rules and regulations so that its operation is long and problem-free. Internal - combines all the pipes that are located inside the house and plumbing fixtures. Its main purpose is to remove wastewater generated during human activity. Installation of the internal sewerage system is carried out taking into account SNiP according to a pre-agreed plan. But the main thing in this project is the construction of a cesspool, septic tank or other container for collecting wastewater.
The main rules for constructing a cesspool:
The distance to the accommodation facility should be 5-12 meters. If the distance is greater, then difficulties may arise with the outflow of liquid from the pipes.
The distance between outbuildings and the septic tank must be at least 1 meter.
The distance from the neighbor's fence is 2-4 meters.
The distance from ornamental and garden plants is 3-4 meters.
The sedimentation tank with sewage must be located at least 30 meters from wells and boreholes.
The depth of the hole is determined depending on the level of groundwater, but not less than three meters.
The bulk of sewage should be below the freezing point of the soil. The tank can be filled with a gap of 35 cm to the top cover.
Sewage options
Which treatment systems to install directly depends on the desires and capabilities of the owner. There are the following types of sewer systems:
Septic tank - allows you to ensure not only the collection of wastewater, but also its processing. In the chambers of such containers, wastewater settles and is processed by special bacteria that feed on organic matter.
Biological wastewater treatment using a special station. This option is characterized by a high degree of wastewater treatment and high productivity. However, the station depends on electricity and is quite expensive.
Dry toilet - this option is only suitable for a dacha where the owners do not live permanently. A dry toilet is not able to solve the problem of drainage in their kitchen and shower.
Cesspool - this option was previously used most often. But due to technological progress, against the backdrop of which the number of household items interacting with water (dishwasher and washing machine) has increased, the amount of waste has increased noticeably, and the volume of the cesspool can no longer cope with it. And the risk of soil contamination in this case is much higher.
You can make a sewer system in a private house with your own hands in all of the above cases, except, perhaps, for installing a treatment station. Here you cannot do without the help of specialists.
cesspool
To install a cesspool, a long and voluminous hole is dug in the ground, into which wastewater from the toilet, kitchen and bathroom is drained through pipes. In some cases, the pit is lined with bricks. The advantages of this design include low cost and ease of installation. However, the cesspool still has more disadvantages:

It all depends on which pit the owner chose. A structure with an earthen bottom is more dangerous in an environmental sense and can lead to poisoning of the entire area. A sealed pit is a brick-lined structure with a concrete bottom. This option is safer and requires cleaning 1-2 times a year. A structure made of concrete rings is also considered a sealed pit.
Sealed tank
A popular option is a sealed storage tank, which can be metal or plastic. The first option has significant disadvantages - it is susceptible to corrosion and requires replacement over time, especially in such an aggressive environment as wastewater. Also, a metal tank requires a waterproofing procedure.

Sealed tank
A plastic container is a more suitable option, which has many advantages:
The disadvantages of a plastic container include its rather high cost.
Single chamber septic tank
This option is suitable for a small family of three people, where the total volume of water for local sewerage does not exceed 1000 liters. The design of a single-chamber septic tank is a sealed container or structure with a filter for discharging water into the soil. The last option is the construction of concrete rings with periodic addition of biological preparations to the container to improve the quality of cleaning.

Advantages of a single-chamber septic tank:
Low price and ease of installation;
The ability to do all the work yourself;
Environmental safety;
No unpleasant odor;
A reinforced concrete septic tank, like a plastic container, is resistant to aggressive environments;
Durability of use.
The operating principle of this design is very simple: wastewater flows through pipes into the septic tank chamber, and solid particles settle to the bottom. From the settling tank, water goes into the soil and ground for purification. The main thing is that the location of the drainage area is correctly selected, the installation depth of the septic tank is correctly determined and the volume of the container is calculated.
The disadvantages of a single-chamber septic tank include the need to install it at great depths in order to prevent sewage from pouring into water resources.
Two-chamber septic tank
When is it advisable to install a two-chamber septic tank in a private house? The first chamber of this design serves to settle water and purify it. All impurities settle in it, and only water, oil and the remains of household chemicals remain on top. In the second chamber, secondary wastewater treatment takes place. Oil and household chemical products already settle here. Only water remains at the level, which is 65% cleaner than it was before. When the container is overfilled, its top layer falls into the soil. But due to the low level of contamination of the liquid, it does not pose a danger to the environment. A two-chamber septic tank for sewage in a private house provides a high level of wastewater treatment and safety. This design is suitable for installation in a large house inhabited by 5-8 people.

Advantages of a two-chamber septic tank:
High quality wastewater treatment;
The container does not rust and lasts up to 50 years;
You can install a two-chamber septic tank yourself.
The weak side of such structures is the need to sometimes clean them of silt. It is worth knowing that this must be done carefully, without completely getting rid of siltation, because microorganisms that feed on organic compounds from the wastewater and live in it participate in the separation.
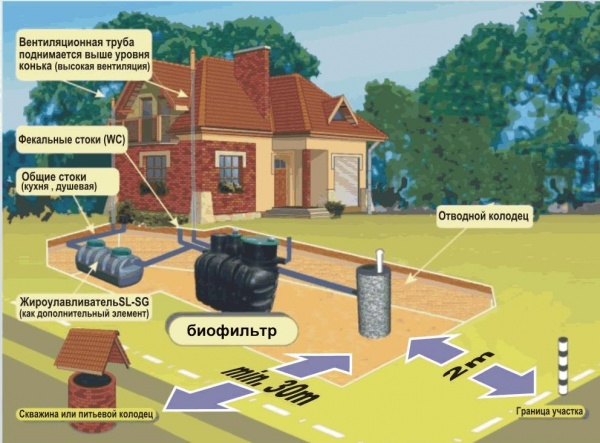
Septic tank with biofilter
A biofilter in a septic tank is a container filled with inert material (expanded clay). How does a biofilter work:
The sewage masses enter the settling tank, are cleaned and enter the biofilter;
Aerobic bacteria living in the biofilter break down and oxidize organic compounds from the wastewater;
The water is cleared of contaminants and enters the drainage pipe.

Diagram of a septic tank with a biofilter
Without sewerage, life in a private house can hardly be called comfortable. It is usually installed during the construction of a house. However, there are exceptions when owners, for some reason, are forced to return to the issue of laying it later, when the house has already been built. Such installation will be more complicated and will entail additional costs. For example, you will have to lay an internal sewer system based on the existing layout of the house, and it will not always be possible to fit all the pipes into one sewer pipeline or into one sewer riser. But all installation-related issues can be resolved correctly if certain requirements are met. After this, the level of comfort in a country house will be different, and no damage will be caused to the environment.
Important! In large private houses with a significant load on the sewer system (there are several bathrooms in the house, a washing machine, a dishwasher), experts recommend using a scheme with two or more septic tanks.
Experts also recommend connecting to a central sewer system, if such a possibility exists. The connection itself will cost more, but in the future it will relieve you of almost all problems. And now we will talk about local (individual) sewerage, which also consists of internal and external.
Installation of internal sewerage
Work on laying internal sewerage includes:
- Installation of the riser.
- Distribution of pipes to plumbing fixtures throughout the premises.
- Installation of a vent pipe. The drain pipe maintains stable atmospheric pressure in the sewerage system, connecting the riser to the atmosphere, and prevents the creation of a vacuum above the wastewater flowing down the riser. The vacuum can lead to the release of unpleasant odors from the riser into the premises, because the “water locks” in the siphons will be drawn into the riser. It is usually installed in houses with two or more floors, or two (or more) bathrooms.
Internal sewerage diagram
When developing a project for a private house, the placement of premises to which sewerage needs to be connected is usually carried out in one zone on each floor. This layout simplifies the installation of sewer pipes. At the same time, the sewage system is designed individually for each house.
To install a sewer system in an already built house, ordering a design solution is quite expensive. You can draw up your own internal sewerage diagram. Of course, you will not be able to develop a diagram in the same detail and professionalism as the “Sewerage” section in a house project is prepared. But it will help you correctly lay a sewer pipeline or install a riser, and calculate the needs for equipment and materials.
Stock up on a tape measure, a pencil and a house plan. If you don’t have a house plan to scale, measure all the necessary distances and put them on graph paper. Determine the location of the sewer pipeline or riser(s), as well as plumbing fixtures. Mark on the diagram the fittings (for the pipeline) and the distances from the fittings and the riser to the plumbing fixtures. With the help of fittings you can change the diameter and direction of the pipeline. Calculate the number of connecting elements required. This work will need to be repeated on each floor.
The diameter of the riser or sewer pipeline (bed) and the diameter of the outlet for draining wastewater from the bathroom is 100-110 mm. For drains from the kitchen and bathroom (they are called gray), a pipe with a diameter of 50 mm is used. Turns in the sewer system to avoid blockages are made by two elbows located at an angle of 45°.
Calculate the need for pipes of different diameters and connecting elements, and you can get to work.

Which pipes for internal sewerage should I choose?
For the installation of internal sewerage, cast iron, polypropylene (PP) or polyvinyl chloride (PVC) pipes are used. Cast iron can be called a “classic” of the genre; they can withstand heavy loads, are durable and reliable. However, today polypropylene and polyvinyl chloride pipes, which have a recognizable gray color, are popular. They are much cheaper than cast iron and the installation process is simpler. Polypropylene ones are especially popular due to their flexibility and low weight. In addition, PP pipes can withstand high wastewater temperatures. One can argue about the reliability and durability of all these pipes, but both will serve you for a long time.


Very important! We remember that for risers and sunbeds we need pipes with a diameter of 100-110 mm. The same diameter is required to drain wastewater from the bathroom. We lay pipes with a diameter of 50 mm to the kitchen sink and to the bathroom. Gray polypropylene or polyvinyl chloride pipes are used only for installation in the house; others are used for external sewerage.
Pipe laying. Keeping the slope
We will lay pipes for mixed gravity sewerage. According to use, sewerage is divided into mixed and separate; for a private house we choose mixed. Depending on the method of discharge of wastewater, sewerage can be either gravity or pressure. Pressure is quite expensive and is rarely used.
An assistant will be needed to lay the sewer. It will be much more difficult to cope with this work alone, and it will go slower. We buy diameters of 50 and 100 mm, elbows, tees and revisions. We will need sleeves for installation in those places where the system passes through the ceiling or walls. In addition to using the obligatory rubber cuffs, the connection points are additionally insulated with plumbing sealant.

When starting work, remember that sewer pipes, in accordance with SNiP, must be laid at a slope. Slopes for internal, external and storm sewerage differ. For gravity internal slope is from 2 to 3%, which depends on the diameter of the pipe. A slope of 2% is a slope of 2 cm per 1 running meter. For pipes of smaller diameter, the slope should be 3%. Without observing this rule, we will not be able to install a properly functioning internal sewerage system.
The slope cannot be made less than 2% and cannot exceed 3%. In the first case, in a gravity sewer, solid particles will remain on the walls of the pipes and cause clogging. In the second, the maximum permitted flow rate of wastewater in polypropylene pipes will be exceeded, which will lead to the division of wastewater into fractions and the sedimentation of solid particles.

For installation work we will need:
- Polypropylene pipes with a diameter of 100 and 50 mm.
- Elbows, tees and revisions according to the sewerage diagram.
- Shells.
- Clamps for fastening pipes to walls during installation.
- Rubber cuffs.
- Glue.
- Soldering iron (polyvinyl chloride pipes are connected using glue or rubber seals).
- Hammer.
It is recommended to start work from the outlet - the junction of the internal and external sewers. By starting installation from the outlet, it will be possible to avoid inconsistency between the two systems. The outlet is mounted through the foundation. If installation is carried out at a depth less than the freezing depth in the region, thermal insulation of the pipe is provided. Otherwise, the outlet will freeze and you will be left without sewage until spring.
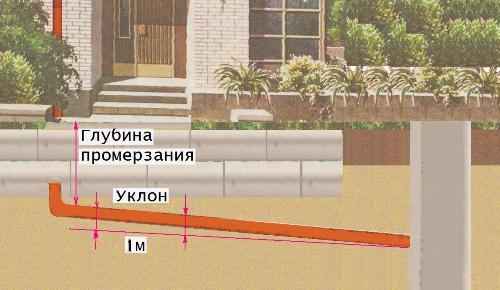

If a hole for release was not provided in the foundation, it will have to be punched. The diameter of the sleeve (this is a piece of pipe larger than that of the outlet, with a diameter of approximately 130 mm). The sleeve protrudes from each side of the foundation by at least 150 mm. The hole and installation of the sleeve must be done in such a way that a slope of 2% is ensured for the external sewerage leading to the septic tank. The diameter of the outlet itself must be equal to the diameter of the riser. In our case it is 100 mm.
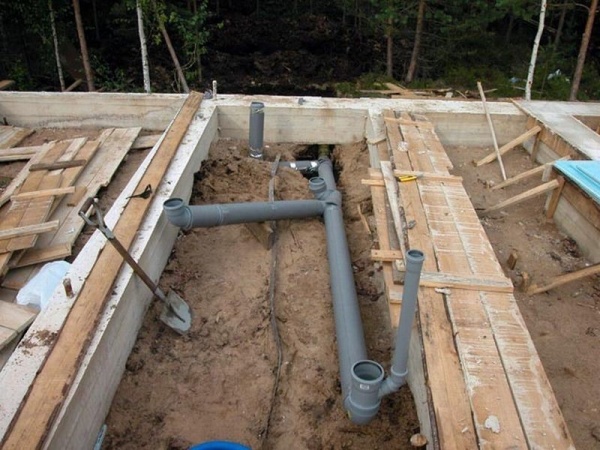
When choosing a place to install the riser, try to install it in the bathroom. In this case, the outlet for draining wastewater from the toilet (Ø 100 mm) will be installed short. There is a simple rule - the larger the outlet diameter of a plumbing fixture, the closer it should be located to the riser.


You choose the laying method yourself: in boxes, in an open way, in walls, etc. The pipes are connected to the riser using oblique tees. If your circuit has a point where the outlets from the shower, bathtub and sink intersect, a collector pipe with a diameter of 100 mm is installed at this location. Installation of water seals is mandatory - they will protect the house from unpleasant odors.
Important! Remember that an inspection is installed on each riser, and after each turn of the sewer, cleaning is installed. In the future, if the drain becomes clogged, it will be easy to clean it.
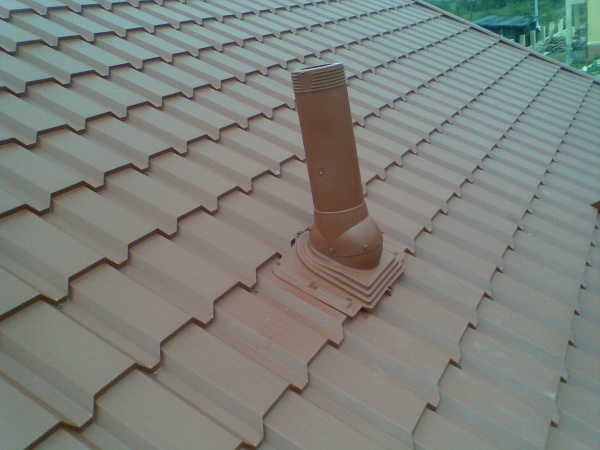
The fan pipe is an upward continuation of the riser. First, an inspection is installed at the point of its connection, then the vent pipe is brought to the roof. It should not be combined with home ventilation. The exit must be higher than the roof ridge (but not less than 700 mm from the roof) and at a distance of at least 4 meters from the windows. It is recommended to place the house ventilation, chimney and vent pipe at different heights.
After completing the installation of the internal sewerage system, it is spilled with clean water to check the tightness of all connections.
External sewerage diagram
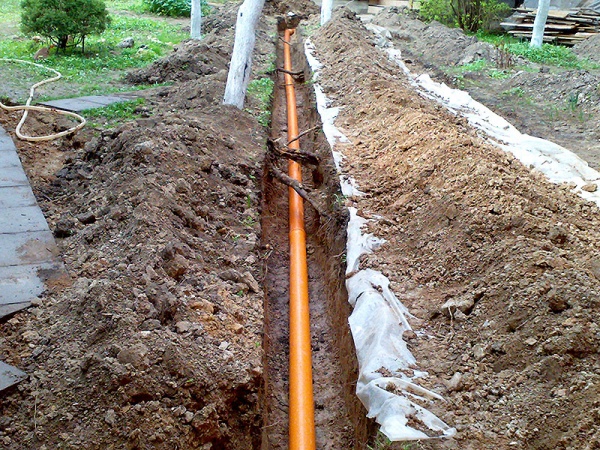
External sewerage is a system of pipes from the outlet to the septic tank or deep cleaning station. For installation in the ground, pipes with high rigidity are used that can withstand soil pressure. Pipes painted orange are often used - they are clearly visible in the ground. Their diameter is 110 mm.
There are several external sewage systems, but we will not consider cesspools and sealed containers for collecting wastewater (these are storage systems) as possible options. Cesspools have faithfully served people for hundreds of years, but this is the 21st century and it is necessary to use more modern devices to equip a private home, especially since they are affordable. We are talking about various septic tanks: with a biofilter, with two and three chambers, simple single-chamber ones with soil treatment, as well as deep cleaning stations.


To choose a septic tank that will fully meet the needs of your family, you need to take into account the number of people living in the house, the nature of residence (temporary/permanent), the approximate daily water consumption for each family member (depending on the number of plumbing fixtures in the house and the availability of household appliances). In addition, experts will take into account the groundwater level in your area, the size of the area, which determines the size of the area allocated for treatment facilities, the type of soil and climate in the region of residence.
What type of septic tank you choose, or perhaps opt for a deep biological treatment station, depends on your financial capabilities. And, of course, recommendations from specialists. When considering a decision, take into account the existing restrictions on the placement of such objects:
- The distance between the septic tank and the garden should be at least 8 meters.
- The minimum permissible distance from the septic tank to any source of water (well, borehole, reservoir) is 20 meters. And here the principle “the further, the better” applies.
- The minimum permissible distance from the septic tank to a residential building is 5 meters.
The main problem in installing external sewerage is the correct choice of treatment facility. You can handle excavation and laying without much effort.
Two obvious conclusions. Firstly, it is advisable to design the sewer system simultaneously with the development of the house project, and install it during the construction stage. You don't have to dig into the walls and foundation. Secondly, even if you were unable to install a sewer system during construction, there is nothing wrong with that. Carry out the necessary calculations, draw up a diagram and get to work. It’s a lot of work, but you can definitely install a sewer system in a private house with your own hands.