A device made of wood for sawing logs. Attachments and accessories for chainsaws. Chainsaw - a universal summer resident tool
Any construction project is incomplete without the use of wood. If you have logs, you can cut it into boards yourself. This way you can save money, and the log will go to work.
First you need to prepare the log for cutting. To do this you will need to remove the bark. The simplest and most effective tool for this purpose is considered to be a stapler. Because the scraper, when removing the bark, does not touch the tree.
To remove the bark, you can use a shovel or an electric jigsaw. When using a shovel, you need to remove the bark “from yourself.”
There are three ways to cut a log. We will not consider one of them, namely, sawing obliquely. Since this method is used for specialized projects and developments.
Let's consider two methods that suit us: cutting logs lengthwise and crosswise
- Cross cutting is used to produce parts in the form of disks or cylinders.

- And the longitudinal method is used to dissolve logs into boards, bars, slats. For this purpose, many devices are used in production. We will look at how you can cut a log at home, on your own.

For cutting you can use:
- Circular
- Grinder with attachments
So, we have already removed the bark from the log, so we move on to the next steps:
- We fix the log on the guides or bed
- We saw off the slab on one side to get a smooth surface.
- Turn the log over onto the bed with its flat side and remove the second slab
- Next we cut the log into planks

How to cut a log into smooth boards and beams
It is quite difficult to cut wood straight along a log. After all, the same thickness must be maintained along the entire length. For this, there is special equipment that is attached to the log.
Many people make their own sawmill to cut logs at home.
How to make a home sawmill with your own hands
Let's consider the two most used manufacturing options sawmills.
Option one
- We weld the frame from channels and profile pipes
- We attach a saw with an electric or gasoline drive to a carriage with vertical feed
- Attach a ruler to a vertical stand to make cutting onto boards as accurate as possible
- Use a polished pipe or rod as a guide for the carriage; they are needed for the carriage to move vertically.
- We install a screw in the bearing so that it moves the carriage when moving
With this option, it is the saw that is set in motion, on a specially attached frame, and the log remains in place. In this case, a chain saw will cope with the task faster. If you plan to use a reciprocating saw, the process will take longer because it works in one direction.

Option two
- We weld the frame from metal plates and angles
- We attach the engine to the bottom of the frame
- At the top we place a shaft with pulleys
- We attach one or more circular saws to the shaft
- We attach a guide from a square (metal) to the table
- Feed the log by moving it forward and pressing it against the guides

Boards are actively used for various construction and repair activities. This material can be made independently from any suitable log using a regular chainsaw.
Chainsaw - a universal summer resident tool
A chainsaw, often also called a chainsaw, is a chain-operated hand tool equipped with a two-stroke (in most cases) internal combustion engine. This popular mechanism is indispensable in any homestead. The chainsaw is compact and yet powerful. It works without breakdowns for a long time in autonomous mode, due to which it can be used in any location and in a position convenient for the user. The chainsaw has other advantages:
- Equipped with mechanisms for selecting operating speed and smooth starting. This reduces the risk of chain breakage to a minimum.
- Can be used in high humidity conditions.
- Does not require electrical energy.
- It is characterized by high power indicators (noticeably greater than those of a power tool).
- Has a quick-acting inertia brake.
The main advantage of a gasoline saw is the ability to equip it with various attachments. It is they who make it a universal tool, indispensable for the home craftsman. Using a chainsaw, you can saw logs, cut stone, metal, brick, tiled building materials, remove bark from wood, cut out mounting grooves and various recesses in bars.
The functionality of the tool can be expanded even further, the main thing is to choose the right attachment or equip it with a special device.
We will not describe all the capabilities of the chainsaw. In this article, we are only interested in the issue of sawing logs using a chainsaw. More on the features of doing such work with your own hands.
Attachments and accessories for sawing – the home craftsman will appreciate them!
Cutting a log with a gasoline saw can be done after it has been equipped with various types of devices and special attachments. It is not difficult to obtain relatively smooth boards from the trunk of an old, dried tree in your summer cottage if you install a standard attachment for longitudinal cutting of wood on your chainsaw. Important point. You won't get perfect boards when using this attachment. But the cut products can be used to build a fence around the site or a simple shed.

It will be easier to cut a log more efficiently if you add to the nozzle a device for holding the wooden workpiece and a guide. You need to mount a metal frame on the saw bar. It is sold in construction stores. If you wish, you can actually make it yourself, using legs from an old school desk or ordinary metal corners. The distance between the tire and the frame is adjustable. Due to this, it becomes possible to saw logs into boards of different thicknesses.
If the tool will be used permanently, the chainsaw guide is made of a flat wooden block or a metal profile. It should be as tough as possible. The ends of the homemade guide are mounted on sawhorses. And then a log is placed under this structure for sawing. The process of processing it will occur quickly and without unnecessary labor costs.
It is worth noting that the described technique is used exclusively for cutting trunks of small length. If you take a longer log, the guide will begin to bend. As a result, the trunk cannot be cut efficiently and evenly.
We take a log and get boards from it!
Impeccably even cutting is obtained by using a leading ruler (a special guide is often used instead), which is usually called a straight template. It is, in fact, a small machine recommended for cases where woodworking is done more or less regularly. Such a miniature sawmill for longitudinal sawing costs from 10 thousand rubles. If you use it “once every hundred years”, it is better to do as described above.

Both the factory device and the DIY design cut logs according to the same pattern. Longitudinal cutting is carried out using a special chain. Finding her can be difficult. But there is a way out. Sawing trunks lengthwise can be done with a regular chain. You just need to carefully sharpen it at a 10-degree angle. Important point! The tool quickly loses its original sharpness during use. Therefore, it must be constantly sharpened so that cutting logs into boards does not cause difficulties, and the geometry of the resulting products meets the stated requirements.
Sawing logs into flat boards with a chainsaw equipped with a device is performed as follows:
- 1. Take two straight and strong boards. Connect them at right angles to each other. The result is a reliable straight template.
- 2. Make simple supports from wooden blocks. Use them to support the template you made.
- 3. Place the barrel on the device.
- 4. Fasten the frame to the tire, attach the supporting elements supporting the leading ruler to the ends of the log. The last operation requires horizontal installation. Use a building level for control.
- 5. Secure all existing elements with self-tapping screws. Some craftsmen use nails for these purposes, which is undesirable. After cutting the logs into boards, you will have to remove the used fasteners. It will be difficult to do this without significant damage to the structure.
- 6. Fix the template to the supports and adjust its height. Nuance. The cut will go somewhere 10 mm above the level of the ruler, and not strictly along it. Take this into account when adjusting the height.
- 7. Rotate the log. Turn on the chainsaw. You make the first cut.
Then you need to free the log from the stops and boards, fix the template on the cut surface so that it faces in the direction of the second cut. The ruler can be attached with supports to the ends or directly to the surface of the barrel. Make a second cut. In relation to the first, it will be perpendicular.
Next, turn the log and fix it. The ruler can be removed. We will carry out further sawing without it - one of the cut sides of the trunk will serve as a guide. You need to adjust the thickness of the cut on the frame, saw off the log to get a beam with bark on only one side. Now turn the barrel again. Set up the frame. You carry out the final sawing and get the boards at your disposal. If their width is not important to you, there is no need to cut the trunk to fit the timber. Simply saw the workpiece to the middle, turn it 180°, then continue the operation you started.
We cut the trunk across - there will be no difficulties!
As you can see, longitudinal sawing with a chainsaw is a rather labor-intensive process. If you want to get logs by sawing the trunk crosswise and then make boards from them, the operation will be impractical due to the large expenditure of effort. Most often, cross-cutting is used when it is necessary to make country street furniture from wood - tables, benches, small benches. It is also recommended for preparing firewood and for decoration using sawn logs. In such situations, logs are cut into disks of small thickness (up to 15 cm).

The cross cutting process is as follows:
- 1. Place the trunk on trestles 70–80 cm in height (they should be as stable as possible).
- 2. Remove the bark from the wood, if any.
- 3. Make a small cut. It will play the role of a guide groove.
- 4. Rotate the barrel being processed 90°. The tire of a power tool must run strictly along the intended groove.
- 5. If you need logs, make notches on the tree with an ax.
- 6. Sawing the trunk.
Transverse and longitudinal cutting of logs must be carried out in compliance with safety standards. It is advisable to carry out work in thick clothing, gloves, glasses, and headphones. Prepare a first aid kit in advance - a chainsaw is a potentially unsafe tool that can cause serious injury to a person. Always move the saw forward along the guide and do not try to push it harder. The tool should move freely.
The chainsaw must not be raised above the shoulders. The tool must only be run on the ground. In this case, the chain brake must be in the engaged state. Its release is carried out just before the start of cutting logs. Do not fill the gasoline container if the saw has recently been used. You should wait until the tool and fuel tank cool down. Take care to carry out work safely. And then sawing up tree trunks on your own will not lead to dire consequences. Good luck.
 A huge number of household and industrial tasks require sawing wooden logs. For this purpose, a whole arsenal of auxiliary equipment has been created, most of which are very expensive, which is why they are used only as a last resort. It is much easier to use a chainsaw for this, for which all sorts of auxiliary means have also been invented, greatly simplifying not only the process of collecting firewood, but also cutting logs into boards, even without the help of a stationary sawmill. In this article we will talk about what they are and what is required to make them yourself.
Classification of chainsaw accessories for sawing logs
Depending on the direction in which the sawing will be carried out, all existing chainsaw attachments are divided into 2 broad groups:

- for longitudinal cutting of wood;
- for cross sections.
Both categories represent a range of industrial adapters that allow you to obtain boards and lumber of the required size, which can then be used for construction or repair.
When there are no factory options available, the only sure way is to make their analogues at home.
It is based on a fairly simple design - a regular frame, which is attached to the guide on both sides. If you make fastenings with only one, the accuracy of the cut will be impaired, but this will not prevent you from adapting such boards for the construction of utility rooms or wooden fences. Let's look at it step by step.

- As in any other case, we begin our work with drawings. They are the basis of factual material and the source of the correct progress of work.
- We are looking for a frame for the future device (it can be an ordinary children’s desk or a square pipe). It is desirable that the cross-section be at least 2 x 2 cm, or even slightly larger.
- We begin to make the clamping elements. Their size should be at the level of 0.5-0.6 m. One of the end sides of each of them should become the basis for the aggregation of the next mechanical unit - the crossbar. It is best to weld it for greater reliability.
- In the already welded cross member, a series of holes and bolt ties are made using an electric drill. There should be a small protrusion in its center so that the tire can be fully clamped.

- We also weld similar fasteners on top, photos of which you see on the right of the text.
What else should you take care of at this stage? When designing such clamps, it is desirable that the height of the busbar be somewhat less than the width of the bolt fastenings. - We begin to assemble the support frame. It does not have to be an exact square shape. Ideally, its length is 1 dm greater than the width.
- It is necessary to attach two structural parts with a length of at least 0.1 m to its two sides in a perpendicular plane. This size is determined by the need to supplement them with clamps and tightening bolts. For this purpose, a hole is again made using a drill, and the nuts themselves are welded to the base. For ergonomics, it is worth thinking about the handle, which can also be welded from available metal material.
- The moment of assembly itself, but here too there must be clarity of the technological concept. First of all, clamps are inserted into the groove elements, after them - the guide of the gas-powered tool, which must be very precisely fixed. How to choose the right distance? This is already regulated purely individually, depending on the thickness of the material you want to get at the output.
Agree that this course of action is very simple, and the most difficult thing, surprisingly, may be the lack of electric welding at home, on which the entire home-made cycle is based.
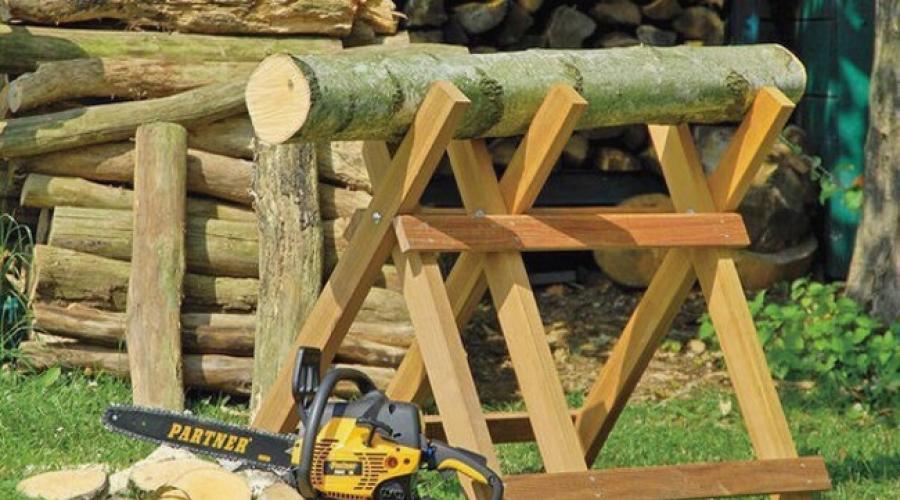
Making sawhorses for cutting wood with a chainsaw yourself
Wood processing, the purpose of which is to prepare firewood for the winter, cannot do without a well-known device - a goat, which not only facilitates this manipulation, but also allows you to do it yourself without the involvement of additional human resources. Every self-respecting homeowner who is faced with such moments is simply obliged to acquire such a “helper,” which does not mean buying it. Like other devices, you can make it yourself, but let’s look at how in order.
- We draw up a work plan with a detailed drawing so that this machine comes out geometrically correct. To simplify things, we suggest that you familiarize yourself with the design, the leading parameters of which have already been calculated and marked in the photo below.

- We select durable consumables, including:
- wooden beams;
- pillars made of strong wood;
- metal profile;
- metal pipes, rods, etc., which constitute the group of “household scrap metal”.
- By combining the above materials or choosing only one of the types according to the drawing, we proceed to the assembly of this auxiliary equipment.
- The optimal height of a goat is considered to be 1 meter, although this parameter is adjusted depending on the height of the sawyer, the power of the chainsaw and the size of the wooden trunks that will be laid on it.
- We select durable consumables, including:
Each of the described methods, although it will lead to the final goal, still has one significant drawback - the lack of guarantees of personal safety, so additional care must be taken about this.
Boards and timber are one of the main building materials. Funds do not always allow you to buy ready-made boards. Many people have the opportunity to take a plot from a forestry department and harvest wood themselves.
Sawing logs is done using a sawmill, electric or chainsaw and additional accessories. When choosing tools, be guided by the amount of work.
The cheapest stationary sawmill with all components will cost you no less than 150 thousand rubles. If you do not plan to run a small business, purchasing such equipment is not practical.
A more affordable tool is a chainsaw. A chainsaw is more convenient than an electric one for several reasons.
- No electricity is required for operation - this allows you to work with a chainsaw on plots.
- Has higher power compared to electric.
- It has a smooth start and convenient speed adjustment, which reduces the risk of chain breakage.
- The inertia brake operates faster than an electric saw.
- Long working time without interruption - up to 1 hour.
- Allows you to work in conditions of high humidity.
To cut a log lengthwise with a chainsaw, devices for fixing the log, a special frame-attachment for the chainsaw and a guide will help.
When sawing with a chainsaw, the tool is subjected to heavy load. A household chainsaw will quickly break down. It is better to use a professional tool. A good option is the Stihl MS 660 or Stihl MS 880 chainsaw. These models have a power of more than 7 horsepower, which is enough for long-term work under heavy loads.
A special metal frame is attached to the saw bar. The distance between the frame and the tire is adjustable, which allows you to cut the material into boards of the required thickness.
Having metal corners or legs from a school desk on hand, it is feasible to make a frame yourself.
The video shows how to make a frame with your own hands.
When working in stationary conditions, a rigid metal profile or a long, flat board is suitable for the guide. The ends of the guide are fixed on the trestles, and a log is placed underneath. This method is only suitable for cutting short-length trunks - there is a possibility of the guide bending. This will lead to uneven cutting of the trunk.
How to cut a log lengthwise
To ensure an even cut, you will need a straight template - a leading ruler or guide.
A good help in the work is the BigMill Timberjig mini-sawmill (Logosol). Manufacturer Sweden. The cost of such a set is considerable - about 9,000 rubles. Calculate how profitable it is for you to purchase such a tool. The ability to saw logs on site will help reduce transportation costs.

Sawing is done with a push-pull saw with two nuts for mounting the tire. The device allows you to secure and cut logs with a diameter of up to 60 cm.
In order to cut a log into boards, you will need a chain for longitudinal cutting. If you cannot buy such a chain, sharpen a regular one at an angle of 10°. Do not forget that the chain loses its sharpness during operation and needs periodic sharpening. A well-sharpened chain will make your work easier.
The kit includes tools and parts that will help you install the wooden guide. The frame attached to the chainsaw slides along the guide and does not allow the tire to move to the side.
Operating procedure:

How to cut a log crosswise
If you plan to saw the trunk crosswise and then cut the logs into boards, this is not practical. Usually a log intended for preparing firewood is sawn crosswise.
Logs sawn crosswise are often used to make garden benches and tables. Garden paths decorated with sawn wood look beautiful. In this case, they are cut into discs 10-15 cm thick.

- Place the log on strong, stable trestles 60-80 cm high.
- If you plan to remove the tree bark, do it before cutting.
- Make a shallow cut that will serve as a guide groove.
- Rotate the log 90º so that the saw bar fits in the groove.
- When cutting logs into logs, first make notches with an ax.
- Cut the log. Further processing of the material depends on its area of application.
Safety rules when sawing wood
- Use headphones, glasses, a respirator, gloves and thick clothing.
- Keep children away from the work area.
- Have a first aid kit on hand - circular saws and chain saws are high-risk tools.
- Do not use the circular saw without the protective guard.
- Do not pour fuel into a hot chainsaw tank; wait until it cools down a little.
- Run the chainsaw on the ground with the chain brake engaged. Release the chain brakes only before starting to cut.
- When working, hold the saw by the arc handle and move it forward along the guide. Do not press hard on the saw - it should move freely.
- When pruning trees with a chain saw, take care of ladders - when working, the saw should not be raised above shoulder level.
- If you are not left-handed, place the log on your right side.
How to properly cut a log. Video lessons.
Work using the Timberjig sawing system.
Is your band sawmill installed and all the necessary settings made? So it’s time to proceed directly to the sawing process itself. In order to obtain truly high-quality material, it is necessary to correctly install the log and secure it with special clamps.
The quality also depends on the correct calculation of the quantity and type of material you want to get from this log.
Having gained further experience, one glance at a log will be enough, and you will already know how much and what kind of material can be obtained from it. Learn to accurately determine where the top is and where the butt part of the log is. The butt part is usually larger in diameter than the apex. And this largely affects the thickness of the slab.
How to calculate a log
So, you have measured the diameter of the log, and it is measured from the top. We calculate the approximate amount of material according to the diameter and proceed to further actions.

Firstly.
We pay attention to all the bends and bulges of the log - a perfectly straight trunk is rare. Therefore, we try to turn it so as to get as little waste as possible from it, such as croaker. When the log is laid and fixed, you should make sure that it passes freely between the guide rollers.
Set the diameter size on the ruler of the sawmill, and to this size add the greatest height of the convexity of the log. This is the bulge that is higher than the diameter of the top or narrowest part of the log.
Using a regular tape measure, measure the height of the highest part, and from this size you begin counting the dimensions of the required material, taking into account the size of the cut, which ranges from 2 to 5 mm.

Secondly.
As soon as the width of the cut reaches the required size, and the remaining height of the log has reached the desired size, it is turned over. That is, if you cut a beam, for example, at 150, then both the width of the cut and the height of the remaining log should correspond to this value, even be greater, taking into account the removal of the slab.
To do this, after turning the log over, start calculating from the final size until the full height of the log is used, but do not forget to take into account the size of the cut, which, as we already know, ranges from 2 to 5 mm.
For example, you have a log on your overpass that you have cut to a size of 260 mm. Let's turn the log over and continue.
The final result we want to achieve is a carriage with a thickness of 150 mm. Next, in a simple way, calculate that 260 mm-150 mm = 110 mm. We get as much as 110mm of extra material thickness. And it is precisely this that needs to be calculated correctly.
We take this additional size and calculate it to get the block, which has a size of 50 mm, 110-50 = 60, don’t forget the cut, and ours is 2 mm, 60-2 = 58 mm, then the plank, equal to 25 mm, 58 -25-2=31 mm, hump 20 mm, 31-20-2=9 mm.
As you can see, from our calculations, we get 9 mm slab, 20 mm slab, 25 mm gorge and 50 mm block. And the final size will be 150 mm.
Possible mistakes
As you can see, there is nothing complicated here. Often, inexperienced sawmills make mistakes in calculations when they start counting from zero. For example, if the final size of the material is 150 mm, then there is no need to add 2 mm to it for the cut, otherwise it will be 150 + 2 = 152. There should not be such an error, the cut is calculated only between the material, for example, 50 mm board and 150 mm carriage, we get it as described above, 150 + 50 + 2 = 202 mm.
If it is necessary to obtain edged material, we turn the log 90 degrees and perform the same manipulations as described above.

So you have cut your first log, look at the quality of the material and the accuracy of the dimensions. Make sure your calculations are correct. The main mistake when making calculations is that they forget to take into account the size of the cut. Try to take this fact into account. And don't make such mistakes.
In the future, when you gain experience, the calculation will happen automatically in your head; it will be enough to look at the log.
We are sure that everything will work out for you, we wish you success in your work.