Installation of central sewerage in a private house. Installing a sewer system in a private house with your own hands - tips and recommendations. How to correctly draw up a diagram of a sewerage system in a private house with your own hands
Read also
1.
2.
3.
4.
5.
6.
When settling in country house Many communications are often installed with your own hands. There is nothing surprising about this: the process itself is quite simple, and performing the work does not require any special skills. Of course, there are certain rules that must be followed: for example, it is worth designing the structure carefully and ensuring that one communication line does not interfere with another. How to install a sewer system in a private house will be discussed in this article.
If we talk about sewerage, the first thing you need to know is this system consists of internal and external parts, and the arrangement of each of them is carried out in its own way. External sewerage is installed somewhat easier, since the work is carried out on open space. From the inside, everything is a little more complicated, so installing a sewer system in a private house with your own hands begins with it.
Installation of internal sewerage in a private house
The first stage of arranging a structure is planning. It is necessary to know exactly how much plumbing fixtures will be installed and where it will be installed. When carrying out work, be sure to have a pre-compiled project on hand. One rule can be immediately deduced: when installing a riser, it must be positioned as close as possible to the wall under which the sewer outlet is located. Naturally, this wall should be located on the side where the sewer well is located, which, in turn, is installed as low as possible so that it is easier for the drains to move there on their own (read also: " ").The riser is usually made of a 110 mm pipe made of plastic. All drainage pipes are connected to the riser, through which wastewater is collected from plumbing fixtures. To connect the toilet to the system, straight sections made of 100 mm pipes are used, and other devices can be connected through various fittings using pipes with a diameter of 32 to 80 mm.
Do-it-yourself sewer installation in a private house is usually done parallel to the water line. This installation is especially convenient when communications will be installed in the walls. To do this, it is necessary to prepare grooves intended for laying pipes. There is one caveat here: plumbing system operates under some pressure, so the slope of the pipes is not a necessary condition.

The sewer system requires a slope, otherwise it simply will not work: the structure operates on a gravity principle, so the slope must be maintained in all its sections, regardless of the length of the pipelines or the location of the devices. According to regulatory documents, the average slope should be within 2-3 cm per 1 meter of pipeline. When creating a slope, you need to carefully monitor compliance with this value, otherwise the system will very soon begin to create problems.
To connect plastic pipes, it is necessary to use fittings made of the same material: such a connection will provide the structure with sufficient strength and tightness. At hidden gasket Sewerage systems need to not only lay pipes in prepared grooves, but also fix them with clamps for reliability. The grooves themselves are subsequently masked with a special solution.
Do-it-yourself installation of external sewerage
The elements of the external sewer system include all parts located outside the building.Installing a sewer system in a private house requires attention, especially in the following moments:
- The design should have a minimum of bends and turns, so the entire highway should be made as straight as possible.
- If plastic pipes were used in the house, then the external sewage system should also be made of this material.
- Large volume earthworks . It is necessary to lay external sewerage systems, taking into account the level of soil freezing: pipes must be below this level in order to negative temperatures did not provoke stagnation or rupture of the system.
- Creating a sewer well. Before creating a sewer system in a private house, you will need to accurately calculate the amount of drainage, which is affected primarily by the number of residents. The large expected volume of waste indicates the need to create large tank, therefore the depth of its arrangement should be quite large.
- Selecting a system type. The quality of collection and disposal of wastewater, as well as the ease of operation of the sewer system will be directly influenced by its type. Each design has its own nuances: for example, a conventional cesspool has extremely low efficiency, but is very cheap, but a powerful station biological treatment will be expensive, but its performance indicators will be at top level. Read also: "".

In any case, the external sewage system presents special requirements to its arrangement, and they must be taken into account in order for the design to be as efficient as possible.
Carrying out excavation work
Excavation work is one of the first stages of sewerage installation. You can carry out this work either independently or with the involvement of additional forces (a team of workers or special equipment). Naturally, before work it is necessary to mark the area through which the trench will pass.In addition, it is important to pay attention to the slope of the bottom of the trench: when using technology, the required value will not be achieved, so everything will have to be leveled yourself. In any case, after preparing the trench, its bottom must be covered with a small layer of sand.
Construction of a sewer well
This design can be made from different materials:- brickwork;
- metal tank;
- reinforced concrete rings;
- plastic septic tank.

- Devices made of bricks or blocks are quite good elements of the sewer system, but their installation takes a lot of time. With little experience construction work It can take several days to create a brick well.
- Metal structure compares favorably with brick in ease of installation and lower cost, but the service life of the device is in this case will be much less: metal is easily susceptible to corrosion, and very soon the device will become faulty.
- Reinforced concrete wells are quite common structures, since their advantages include strength, reliability and durability. The disadvantage of a well made of reinforced concrete rings is complex installation: ready-made rings have considerable weight, so it is almost impossible to install them with your own hands.
- Plastic septic tanks can also be considered reliable and quality designs: they are durable and much lighter than reinforced concrete counterparts, so they can be installed with the efforts of 2-3 people. True, the cost of the design is slightly higher than the cost of previous devices, but the money spent will pay off in the very near future. In addition, if we take into account the labor costs for arrangement, for example, concrete wells, then the price will be almost equal. Read also: "".
How to install sewer pipes
Pipeline installation usually starts from the house - this makes it easier to ensure that the slope of the structure is maintained. When laying pipes, they must be connected with couplings. When connecting several drain systems into one, it is necessary to use tees or other appropriate fittings.Final stage laying the pipeline - connecting the main line to sewer well. For this purpose, couplings are also used to connect all pipes. external sewerage with each other and with the internal sewerage system. When the pipes are assembled and installed in their places, the trench is filled with earth, and the work is completed.
Subtleties of sewerage arrangement
There are some nuances that you have to deal with when installing a sewer system:Soil freezing level too deep. With this phenomenon, the pipes must be laid too deep, and the volume of work will increase greatly. This phenomenon can be avoided by using thermal insulation.
It can be done in two ways:
- using thermal insulation materials that perform well this work;
- with help electric heating, implemented through a cable stretched along the entire sewer main.
Design selection. Selecting a sewer system is an individual question, and there is no universal answer to it. To make the choice of sewer more clear, it is worth reading the article about the types of sewer systems.
Conclusion
Installing a sewer system in a private house can be done with your own hands - even inexperienced craftsmen will not have any problems. And if you stock up on some knowledge and carefully prepare for the work, the design will turn out to be reliable and will be able to function for a very long time and with high quality.
If it is not possible to connect the house to the central sewer system, the only option is an autonomous sewer system in a private house - it is not too difficult to do it yourself, but if necessary, you can attract specialists and special equipment to perform some work. The cost of the project as a whole and the time for its implementation depend on individual characteristics.
Wastewater disposal is one of the determining issues when choosing an autonomous sewage system. The comfort of living largely depends on the correct choice and efficiency of the treatment or storage facility.
In order to compare possible options it was simpler, we will briefly list the features, advantages and disadvantages of each of them.
DIY buildings
Sealed cesspool, on the one hand, is a classic, on the other, this classic is increasingly giving way to more advanced and economical designs due to its main drawback - the need to periodically call a sewer truck to pump out the contents. The services of vacuum cleaners are not only a hassle, but also an inevitable expense. At the same time, during the construction phase, a cesspool is the cheapest option.
Self-built septic tanks depending on the design, they can significantly increase the time intervals between pumping out wastewater or allow you to do without sewage systems altogether, limiting yourself to cleaning the structure once a year or even less often. Undoubtedly, you will have to buy materials for building septic tanks yourself, but from an economic point of view there are certain advantages:
- You can use used materials,
- the cost of materials is lower than the finished structure,
- there is no need to spend money on work (with the rare exception of the necessary use of lifting equipment).
Materials for the manufacture of tanks for self-construction can serve:
- concrete rings,
- concrete (for poured construction),
- brick,
- large plastic containers (Eurocubes).
Ready solutions
Ready-made septic tanks can be energy-dependent or autonomous. Requiring and not requiring pumping.
There are two main categories of sewage disposal equipment available on the market.
1. Non-volatile factory septic tanks differ in their operational capabilities and, accordingly, in cost. The more efficiently a septic tank operates (performance, degree of purification), the more it costs, however, the higher the level of comfort and the less effort required for maintenance.
 The photo shows an autonomous sewage system based on a non-volatile septic tank with wastewater treatment in filtration fields
 2. Local treatment stations (LTP) are quite expensive, but more efficient structures with the ability to purify wastewater, removing up to 98-99% of impurities and obtaining water suitable for irrigation. Balanced systems and bioremediation methods used make VOCs safe and easy to use. The main disadvantage of VOCs is the high cost of equipment and the need for electricity consumption.

Most popular models ready-made treatment structures are:
- Tank,
- Unilos,
- Tver,
- Topas.
For independent device treatment plant may be useful to you if you decide to choose this material.
And about the construction of a brick septic tank.
How to install a septic tank Tank, as well as about its structure, we described on this page
System design
An autonomous sewage system in a private house will work flawlessly only if during its construction all the nuances of operation are taken into account as much as possible, including:
- average daily volume of water consumption (the volume of the tank must be at least three daily norms),
- number of drain points,
- terrain (it is better to place a treatment or storage facility at the lowest point),
- level groundwater(the design of the container and its operation must exclude the possibility of contamination),
- location of key facilities on the site (there are sanitary standards, defining the minimum permissible distances to sources drinking water, windows and doors of a residential building, fruit trees and vegetable garden, highway, etc.).

When you design an autonomous sewer system with your own hands, the diagram includes:
- external communications and treatment facility,
- internal pipelines and equipment,
- ventilation system.
To ensure that the developed system fully complies with operating conditions and does not experience overloads, the following items are included in the project:
- number of residents (including a separately calculated number of possible seasonally visiting relatives in the house),
- the possible number of short-term guests visiting the house at the same time,
- number of water intake points and their type (equipping them with one or another equipment),
- layout of the site (optimally if a diagram indicating linear dimensions, area, location of the house, outbuildings, sources of drinking water).
Installation of sewer system
In order to understand how to make an autonomous sewer system in a private house, you can consider the entire complex of work, dividing it into separate blocks.
External communications
An external pipeline is a pipeline from a residential building to a collection or treatment site Wastewater. The ideal option would be a straight line from one point to another, made with the necessary slope, however, it is not always possible to lay a highway in this way.
In addition, it is possible to insert additional outlets into this main line (drains from a shower room, bathhouse, etc.). All bends and tappings pose a potential risk for blockages, since changes in flow speed can cause solids to become trapped on the pipe walls.
Due to this Certain rules must be followed:
- To avoid sudden changes in the direction of movement of drains, which can cause blockages, oblique crosses and tees, as well as bends with angles of 15, 30 and 45 degrees, are used for installation.
- All places of direction changes and insertions are supplemented with inspection wells.
One more important point is selection of pipes for outdoor system . It is possible to use products from:
- plastic,
- cast iron
 Plastic pipes made of PVC for external sewerage must be orange color, and for the inner one - gray
 When choosing, not only the cost, but also the characteristics of the pipes are taken into account.
- If there is drainage from a dishwasher and washing machine down the drain, it is better not to use polymer materials, sensitive to high temperature at least at the beginning of the highway, where the drains have not yet cooled down.
- In areas laid under paths, sidewalks and, especially, under the road, only the strongest cast iron pipes are used for vehicles to enter the area.
There are other nuances that should be taken into account when deciding how to install an autonomous sewer system in a private house.
- Too high as well as too low speed flow can cause blockages, so it is important to ensure that stable slope 2%(2 cm of level decrease for each meter of length).
- External communications are laid in trenches, the depth of which should be greater than the depth of soil freezing in a given region).
- Communications require mandatory thermal insulation if it is not possible to lay them below the soil freezing level. When laying in a non-freezing layer, you can do without additional protection
- For the longevity of the system, all pipes except plastic ones must also be protected from moisture.
- In addition to inspection wells in difficult places systems, similar structures are installed along the entire length at the rate of 1 well per 10-15 meters of highway.
Internal system
Do-it-yourself internal autonomous sewage system in a private house is made from polypropylene or PVC pipes. In this case, the temperature of the effluent and the susceptibility of the material must also be taken into account.
The diameter of the pipes is selected depending on the volume and type of waste at each point. For washbasins, outlets with a diameter of 50 mm are sufficient, and for toilets and general collectors - 110 mm. The amount of slope required for the flow of waste without delays and the formation of traffic jams depends on the diameter of the main: for pipes with a diameter of 50 mm it is 3% (3 cm for each meter of length), and for pipes with a diameter of 110 mm - 2% (2 cm).

To prevent backflow if a blockage occurs It is recommended to install check valves(for each branch separately or common to the collector pipeline). When installing internal sewer systems also water seals are used or that can prevent entry into the premises unpleasant odors from the sewer.
The most important element of the sewer system is the connection point between its internal and external components, the so-called outlet from the house, which is the transition of the intra-house collector with the main line transporting wastewater to the septic tank.
- If the sewerage system is installed in an already built house, it is possible to install the outlet above the ground surface. In this case, high-quality thermal insulation will be required to prevent freezing.
- Release through the foundation below the soil freezing level reduces the risk and is preferable. The possibility of drilling a hole for laying a pipe after the construction of a building is determined individually. It is best to arrange such an exit at the construction stage.
- The exhaust pipe must pass through the wall with the installation of a sleeve, which protects the exhaust pipe from damage and deformation. As a rule, the sleeve is a piece of pipe with a larger diameter (10-15 cm), which allows the exhaust pipe to be laid in it and protrudes 10 cm beyond the foundation on both sides.
- When drilling a hole and installing a sleeve, it is important to take into account the need to slope the communications towards the septic tank. The position of the sleeve can determine the magnitude of this slope.

Ventilation of the sewer system
How the autonomous sewage system of a private house works largely depends on efficiency. The latter is designed to normalize the pressure in the pipelines, which changes when water is drained, and also to remove gases from the system. The presence of ventilation also allows you to extend the life of the system, eliminating the possibility.
In addition, the timely flow of air into the rarefaction zone that occurs when water is drained eliminates the possibility of its capture from siphons, which is usually accompanied by unpleasant sounds. Classic solution is with its free end leading to the roof.
During construction, certain requirements and features should be taken into account.
- The vent pipe should be located on the roof higher than the others (smoke pipe, house ventilation).
- Distance from fan pipe the horizontal distance to the nearest window or balcony should be at least 4 m.
- The optimal diameter of the fan pipe is 110 mm (the same as the diameter of the internal riser). On the one hand, it provides the necessary traction, on the other hand, with such a value, partial narrowing of the passage due to the formation of ice in frosty weather is not critical for the system.
The installation of an autonomous sewer system in a private house is increasingly supplemented, which can replace general ventilation or work together with it. Diaphragm or rod designs respond to changes in pressure. Depending on the model, the valves can operate only for inlet or for inlet and outlet of air. Valves can be installed on a common pipeline or on branches of individual plumbing structures. It is often advisable to install such a device only on the outlet washing machine, since it is she who drains water with a certain pressure, thereby sharply changing the pressure in the pipeline.
Gone are the days when in country and private houses all amenities were located on the street. Now, to create basic comfort, it is necessary to lay a sewer system in a private house. This very important task is not difficult.
To lay a sewer system in a private house with your own hands, you need to start by creating a competent project. When constructing a new building, it is important to design drains not on a residual basis, but in conjunction with all systems, since sewerage is one of the most important life support points for a modern home.
It is also necessary to first clarify whether it is possible to connect private housing to a centralized sewerage system. This will save money and time on construction. You need to know what soils may lie near the house; geological exploration will help with this.
A project for the sewer system of a private house should include the following items:
Installation of external sewerage
According to SNiP 2.04.03-85 “Sewerage. External networks and structures" from bearing capacity soil depends on the type of cushion for the sewer pipeline. In trenches in rocky soils, a cushion with a thickness of 100 mm or more is provided from carefully compacted sand or gravel. In peat, silty and other weak soils, an artificial base is made. For other types of soil, it is sufficient to thoroughly compact the immediate bottom of the trench.
The depth of the pipes depends on the level of soil freezing in the area. The top of the water supply must be below the freezing point. With a soil layer height of less than 700 mm drainpipes must be insulated and protected from damage if ground transport is expected to pass from above.
The bottom of the trench must be cleared of debris and large stones, the foundation is being prepared. The pipeline must be led to the house from the sewer discharge point with a minimum number of turns. If they cannot be avoided, then smooth pipe bends are used. Pipes and fittings are connected to each other using sealant.

The sewerage supply to a private house must be as required:
- for a pipe with a diameter of 160 mm, a slope of 0.008 is required;
- for a supply pipe measuring 110 mm – 0.02;
- a pipeline with a diameter of 50 mm must be laid at a slope of 0.03.
At the exit from the building, a metal sleeve is inserted into the foundation hole to lay pipes in it. The remaining space must be filled with insulation, for example, mineral wool.
By fulfilling these simple conditions, you can protect yourself from a sudden break in the external sewage network or its freezing in winter. For example, the process repair work V cold period year is complicated by digging a trench in frozen ground.
Collection and storage of wastewater
If this is not possible, several options for a local system for discharge, storage and treatment of wastewater are used:
- cesspool;
- septic tank
Traditional cesspools are not the best option from an environmental point of view. But they are the most in an economical way organize an autonomous storage facility for household wastewater. When choosing this method, it is important to correctly organize the placement of the pit:
- The distance between the cesspool and the well should be more than 25 m.
- The well for drainage should be located further than 5 m from the house.
- With a sewerage capacity of 8 sq.m. meters, the distance increases to 8 m.
- The distance from the cesspool to the border of the site must be at least 1.5 m.
- The cesspool is located downstream groundwater to prevent wastewater from entering wells.
- The sewage well is located below the level of the house.
The material for building a cesspool is traditionally red brick. If access is possible, special equipment will construct a pit using ready-made ones with a pre-concrete bottom. The structure is covered with a slab with an inspection hatch and a built-in pipe for ventilation.
A more progressive solution for organizing wastewater collection is a septic tank. It usually consists of two or three cameras. In the first chamber, the solid fraction settles and decomposition occurs with the help of bacteria. The filtered liquid is sent to the next tank for further purification. In the last chamber, the purified liquid seeps through the gravel base into the soil. The septic tank must be equipped with a ventilation pipe with an umbrella. The structure must be emptied of settled solid waste every 5–10 years. Such designs are purchased ready-made.

Internal wiring
In addition to arranging external sewerage, it is important to know how to properly lay pipes inside the house. There are many nuances:
- Water intake points should be located as compactly as possible for optimal organization of the sewer system.
- The toilet is connected to the riser separately from other appliances to prevent them from sucking up drainage from the toilet.
- Drains from sinks, sinks, showers and more plumbing equipment must be connected to a common riser higher than the drain from the toilet.
- The slope of the pipes should be 2–9°.
- Every four meters of the riser, revisions must be installed at a height of more than 1 m from the floor.
- If sewer pipes are not hidden under the floor, then before each turn it is necessary to install revisions.
- The riser is equipped with a ventilation pipe with its outlet above the roof level from 70 cm. This will protect the home from unpleasant odors.
- In unheated rooms, the pipeline must be insulated.
- Parts of the pipeline at the joints are coated with sealant.
- To organize drains from sinks and sinks, a pipe with a diameter of 50 mm is sufficient; for toilets, bathtubs and showers - 110 mm.
- The diameter of the riser must be at least 110 mm.
- The smaller the diameter of the pipe, the greater its slope should be.

Connection diagram of the riser with the external sewer pipe
It is advisable to soundproof sewer pipes (this will increase the level of comfort of the home) by arranging a plasterboard box and filling it with mineral wool.
If you choose a sewage system under the floor in a private house, then additional conditions according to SNiP must be observed. In addition to the fact that with such installation the height of the room is lost, it is not possible to install underground sewerage everywhere. It is prohibited to install it:
- in food storage rooms;
- V living rooms(bedrooms, guest rooms or children's rooms);
- in rooms for long-term stay of people (offices, classrooms);
- into rooms with installed electrical equipment.
Important! The configuration of the underground sewer system should be as simple as possible, without unnecessary turns, transitions and fittings.
When installing a drainage system under the ceiling, a number of rules must be observed:
- The diameter of the pipes should not be more than 110 mm.
- The fittings are mounted at an angle of 45°.
- Fasteners are installed at a distance from each other, equal to diameter pipes multiplied by 10.
- The presence of underground wiring in the bathroom should not create an excess of the floor above other rooms.
- The quality of materials used is subject to increased requirements, since repairing the laid network will require breaking the ceilings.
Installing the internal wiring of sewer pipes in a private house with your own hands is quite a simple task, but it requires care and a serious attitude to the details that distinguish high-quality repairs.
Sewerage in a private house is a pipe distribution consisting of two parts: internal and external. Therefore, when sewerage is installed, the process itself is divided into two stages: assembly of the internal sewer system and the external one. Everything is done separately, taking into account calculations of the diameter of the pipes and the choice of material from which they are made. Gone are the days when the sewage system of a private house was assembled from cast iron or asbestos pipes. They served their purpose by handing over the reins to plastic pipes. Therefore, first of all, it is necessary to choose the right sewer pipes.
Types of sewer pipes
Today, to assemble sewer systems in private homes, they use polymer pipes two types: PVC and polypropylene. The first are used for the external system, the second for the internal.
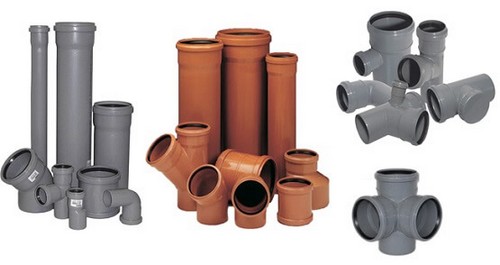
Sewer pipes
Polypropylene sewer pipes have grey colour and scatter standard diameter from 20 mm to 400 mm. Moreover, their connection is bell-shaped using a rubber cuff, which ensures the tightness of the joint. Manufacturers offer various fittings to facilitate the installation of the sewer system: elbows, bends, crosses, tees, adapters, plugs and other profile products of different diameters.
Concerning PVC sewer pipes, then everything is the same here as far as connections and fittings are concerned. But they are orange or red, so it will be impossible to confuse them. Plus, a diameter that starts from 50 mm and ends at 1200 mm. For external sewerage of a private house, diameters of 110-200 mm are most often used.
Internal sewage system of a private house
Installation internal sewerage a private home is more complex than an outdoor one. The thing is that inside the house there are a large number of water consumers: taps, mixers, showers, washing machines, washing machines, toilets. And they are all located in different rooms. Therefore, the piping has complex circuit which is going to unified system and is discharged outside, connecting to the external part of the sewer. If a house is built on several floors, then each of them has its own system, and all floors are united by one vertical riser, which is assembled from a pipe with a diameter of 110 mm.
Typically, the riser is installed in the place where the sewage system will be discharged to the outside of the house. It is important to observe one thing here important rule– the shorter the distance, the more efficient system works. Therefore, the riser is installed near the wall of the building, which will be closest to the sewer well or septic tank.
As for the piping of the internal sewer system, you have to take into account the volume of water that must pass through it.
- A pipe with a diameter of 25-32 mm can be drawn from the sink.
- From kitchen sink 32-40 mm.
- From shower or bath 32-50 mm.
- From a washing machine or dishwasher 40-50 mm.
- From the toilet 110 mm.
And the more connections are made into one system, the larger the diameter of the pipe that unites them. For example, if a washing machine and Dishwasher in the kitchen, then a pipe with a diameter of 40 mm is installed under each of them. But they are connected when they are led out of the kitchen into a pipe with a diameter of 50 mm, which is then, for example, combined with a sink and a bathtub, which in the final result will give a combined pipe with a diameter of 110 mm.
Therefore, it is very important to first draw a wiring diagram with precise installation plumbing fixtures, and only then calculate the dimensions of the pipework with precise definition diameters of purchased products.
 Sewage layout diagram for one floor of a private house
Installation process rules
There are certain rules for installing sewer pipes that are installed in the internal wiring.
- The socket of the sewer pipe, which is connected to the very first and last consumer, must be located at least 80 cm from the floor level. That is, this is the consumer farthest from the riser. If there are not many fittings along the water path, then you can lower the installation level to 30 cm.
- The toilet must be connected to the riser with a pipe of the same diameter as the riser itself. And its length should not exceed 1 m.
- Each plumbing fixture must be equipped with a water seal (siphon).
- The slope of sewer pipes should be 2-3 mm per meter of pipe length.
- Fastening to the load-bearing structures of the building is carried out using special clamps, of which there should be two for each element. Clamps are usually installed at socket connections.
 Internal sewerage in a private house
The plastic pipe is easy to trim, so it can be cut to the required length using a hacksaw or a grinder. All connections, as mentioned above, are socket. Therefore, it will not be difficult to assemble the sewer system yourself. The main thing is to strictly follow the installation diagram of the sewerage system.
Attention! Where to start installing the sewer system: from the riser or from the plumbing fixture, everyone decides for himself.
If a private house has a basement in its design, then all the wiring of the first floor can be carried out there. This is convenient in terms of installation and maintenance. Secondly, the pipeline will not be visible, which will increase the space of the premises and their aesthetics appearance. It is not recommended to install sewer pipes into walls. Boxes of their different types are usually built for them. finishing materials with a frame structure.
 Installation of sewerage in the basement of a house
External sewerage of a private house
It is simpler than the internal one in terms of its installation. But in addition to pipes, the sewer system includes a septic tank or well, as well as several inspection wells. The installation of the sewerage system (external) begins with excavation work. Using shovels, a pit is dug for a septic tank or a well, or there may be several pits if the septic tank is built in the form of several overflow wells. Next, a trench is dug from it to the house. The main requirement for it is straightness without large quantity twists and turns, plus adhere to the slope towards the well.
By the way, about the slope of the pipeline for the external system. It all depends on the diameter of the pipe used. For example, for pipes with a diameter of 110 mm, the slope should be 20 mm per linear meter assembled pipeline. For a pipe 160 mm – 8 mm slope, for 200 mm – 7 mm.
 Slope of installation of sewer pipes
Concerning minimum quantity bends, then this is an important component on which the efficiency of the entire system depends. The thing is that any, even the slightest, turn from the straightness of the pipeline is a place where a blockage can form. And if the angle of inclination is chosen incorrectly, then it is guaranteed to form in exactly this place.
Installation rules
If a standard septic tank made of plastic or metal is installed, then there should be no problems with its installation. The bottom of the pit is leveled horizontally, covered with sand 15-20 cm thick, and compacted. After which you need to lower the septic tank into it.
Attention! The inlet pipe of the septic tank must be oriented exactly along the sewer pipe. It is optimal if they are located on the same axis. Deviations are possible, but small.
 Installed septic tank
If a well or septic tank is built from different materials, that is, an unfinished option, then the complexity of installing a sewer system in a private house increases sharply. For example, a well made of reinforced concrete rings. It is necessary to dig a pit, fill it with a sand or crushed stone cushion 15-20 cm thick, compact it, pour a concrete layer at least 7 cm thick, and, if possible, lay a reinforcing frame of metal mesh or fittings.
Then you need to wait a few days to concrete base dried out. And after that, assemble the reinforced concrete rings themselves using a crane. And before this, the rings are additionally waterproofed from the outside. All this is difficult and expensive. Therefore, the easiest option is to install a ready-made septic tank, or, at worst, a sealed or leaking container.
 Connection of two sewer pipes
Now regarding the installation of sewer pipes itself. With their bias everything is clear. But there is one important process - their thermal insulation. Until recently, sewer pipes were laid below the freezing level of the soil. Why was a huge amount of excavation work carried out, because in many regions this figure is more than 1.5 m. Today, this method of sewer insulation cannot be used. Application of thermal insulation materials different types solves this problem.
Of course, many people are faced with the question of which pipe insulation to choose. To date perfect option– these are heat-insulating cylinders (shells), which are made from almost all types of insulation: mineral wool, foamed polymers various kinds and so on. The shell is simply put on the pipe and secured with clamps or tape. By the way, internal sewerage pipes located in an unheated basement also need to be insulated with this material.
 Thermal insulation of sewer pipe
If external sewer system is very long, it is necessary to install it in inspection wells. One well per 50 m of straight pipeline length. A well must be installed near branches or connections (for example, when a branch from outdoor pool or summer kitchen). Their purpose is to monitor sewer flows and, if necessary, carry out repairs and cleaning of the system through them.
You can purchase ready-made wells, such as those offered by sewer pipe manufacturers today. Or you can make them yourself from the same pipes only large diameter, for example, from 400 or 500 mm. They are installed in trenches in a vertical position and connected to the ends of the connected pipes.
Attention! Where to start installing sewer pipes: from a septic tank or from a house, everyone decides for themselves.
Installation diagram
- The bottom of the dug trench is leveled taking into account the slope of the sewerage system. Great precision is not required here.
- A sand bedding 15-20 cm thick is made. It is this that will need to be strictly leveled to the slope of the pipe laying.
- After this, the pipe installation itself takes place. And at this stage, the angle of inclination of the system is checked using a long level.
- Connection of a pipe with a septic tank and a pipe in the internal part of the sewer system of a private house.
- As for insulation, the cylinders are put on before the connection is made. That is, first the pipe is aligned strictly along the slope, then insulation is put on it, and after that it is laid in the trench.
- The trenches are filled with soil.
 Installation of pipes on a slope
The outdoor toilet with a cesspool is gradually becoming a thing of the past. New house and even small dacha should delight owners with comfort and amenities normal for the 21st century. The device is a completely affordable and safe event for construction if you approach the design wisely and use it modern materials and technology. When building a house, the drainage system is laid out at the design stage, along with other engineering communications, but even in an old house it is quite possible to organize the construction of a bathroom with an urban level of comfort.
All private houses can be divided into two categories - those that can be connected to a centralized city or village sewerage system, and those that cannot. The progress of work and the installation of communications inside the premises will be the same for these cases; the only significant difference will be in the organization of wastewater disposal.

General principles for installing sewerage in a private house
Fundamentally, the sewer system in a private house, as in a city apartment, consists of a vertical riser and pipes of smaller diameter, through which wastewater from a sink, toilet, etc. flows into it by gravity. Then the wastewater flows into horizontally located large-diameter pipes, and from them into a centralized sewerage system or local autonomous treatment facilities.
When planning a sewer system in a house under construction, it is worth placing the kitchen and bathrooms nearby, better nearby with the place where the sewer goes out onto the street. If the house is two-story, then the bathrooms should be located one below the other to reduce the number of risers and simplify the installation of the system and its subsequent maintenance.
IN big house With big amount bathrooms, with a complex sewer system, rational installation sewage pump. A pump may also be needed if the area has absolutely no slope.

When designing a sewer system, the following are also taken into account:
- landscape of the site - wastewater flows down and the septic tank or cesspool should be located at its lowest point,
- the type of soil, its freezing and the height of groundwater - the depth of external sewerage pipes and the choice of treatment facilities depend on this
Selection of materials
On modern stage polypropylene or polyvinyl chloride - best option. They are inexpensive, easy to transport and install, and do not require assembly. welding machine. In addition to pipes, you will need connecting elements: elbows of various configurations, fittings, tees, inspection hatches. The joints are additionally treated with sealant.
The diameter of the pipes depends on the volume of wastewater and the number of devices connected to the system. In any case, the pipe diameter is from plumbing fixture must be equal to or greater than its drain pipe. The diameter of the pipe for the riser should be from 100 mm if a toilet is connected to it, and from 50 mm if there is no toilet. The length of the pipes from the device to the riser should not exceed 3 m, and from the toilet - 1 m. If this distance needs to be increased, then pipes are taken of a larger diameter.

Installation of pipes and plumbing connections
Before assembling the system, it is better to draw it in detail or design it in computer program. All horizontal pipes of the internal sewerage must slope from the device to the riser at the rate of 2-15 cm per 1 m. If you need to turn the pipe 90 degrees, it is better to do this smoothly, using 2 elbows at 45 or 3 elbows at 30 degrees, for prevent blockages.
The toilet is connected to the vertical riser separately to avoid emptying the siphons in the plumbing when draining the water. Moreover, the remaining devices must be connected above the toilet to prevent waste from entering them.
The sewer risers on each floor in the lower part are equipped with inspection hatches. For sound insulation, they can be wrapped in a layer of mineral wool or covered with a plasterboard box.

Sanitary fixtures are connected to the pipes through a U-shaped siphon, Bottom part which always contains some water. Foul gases from the sewer system cannot pass through this barrier. Some sinks and bathtubs are sold already with a siphon, for others you will need to purchase it additionally; toilets have a built-in siphon.
The riser with external pipes is connected using horizontal pipes of the same or larger diameter, located in the basement, basement or under the floor. Such pipes are also equipped with inspection hatches (mandatory at turns). When connecting them, you should avoid right angles and complex turns. If the pipe runs in the ground or unheated room, then it needs to be well insulated. At the exit point from the house, all sewer pipes are collected together and connected to the external sewer system through a hole in the foundation.
Sewer pipes are attached to the walls using clamps. Additional fastenings are installed near the points of insertion into the riser, connections and transitions.
Sewage ventilation
A large amount of abruptly drained water, for example from a toilet cistern, moving through a pipe, creates an area of discharged space behind it. If there is no air entering the system, water leaves the siphons of plumbing fixtures along this pipe, and an unpleasant odor appears. For this reason, the sewer system must be equipped with its own ventilation.
For the pipe, the risers are extended to the roof; the upper end is not closed, but is reliably hidden from precipitation and debris. You can do it differently; an aeration valve is installed at the top of the riser, which does not release odors, but conducts air inside, which prevents the air from being discharged in the pipe.

External sewerage
Outside the home, it is also optimal to use polymer pipes. To lay them, a trench is dug to the depth of soil freezing, a sand cushion is poured onto its bottom, and then pipes are laid at a slope of 2-3%. If it is impossible to ensure a sufficiently deep burial, then it is necessary to carefully insulate the pipes.
At the point of connection to the house and near the junction with the central sewerage system or autonomous treatment facilities, they are installed inspection hatches. It is advisable to install it in a pipe check valve. It will protect the house sewer system from the ingress of sewage from the outside, for example, when the cesspool overflows, and from the penetration of rodents through the pipes.
Treatment plants
An autonomous sewer at the end may have:
- cesspool,
- biological treatment station.
Each of these options has its own advantages and disadvantages, but, in general, a cesspool can only be recommended for dachas where people do not live permanently, or for small houses for 1-2 people. A biological treatment station is expensive, but after its installation, maintenance and emptying will have to be resorted to extremely rarely. The septic tank is the best option, you can buy it ready-made or make it yourself.
A properly designed and installed sewer system will make living in own home even more comfortable.