Installing a lock on a door: how to do it yourself? Installing a lock on the door with your own hands. Types of door locks, detailed technology for self-assembly, recommendations from specialists Rules for inserting a lock into interior doors
Read also
The reliability of metal doors will never replace the beauty and environmental friendliness of their wooden counterparts. However, such products have their own characteristics, including the installation of locks. You can even do this kind of work with your own hands if you know how to do it.

Required tools and components
Inserting locks into wooden panels requires the use of:
- wood drill;
- a set of steel crowns;
- a set of chisels;
- roulette;
- construction pencil;
- screwdrivers - slotted and Phillips;
- drills;
- screwdrivers;
- hammer.

The selection of the lock plays a very important role. In this case, they focus on the size of the structure. An excessively thick lock will not allow the required mass of wood to be provided on the left and right sides. If there is less than 1 cm of wood left there, the door will not be strong enough. A kick is enough for the entire canvas to crack.

Additionally, it is necessary to control the depth of the lock entry. Some of the canvases are thicker on the outside than in the center. The glazed part can also present difficulties. If you have to prepare a place to insert a large lock, it is easy to deform the material. As for fasteners, they must be selected in accordance with the instructions from the manufacturers.

Often you can't get by with a drill or angle grinder. The optimal device for inserting locks into doors made of solid wood or other wooden materials is considered to be a manual router. Although "almost ready" lock mortise kits are relatively inexpensive, professionals advise choosing each tool individually. This allows you to finally be sure of its quality (both when purchasing and when renting). In addition, this solution helps to save money.

Sequence of work
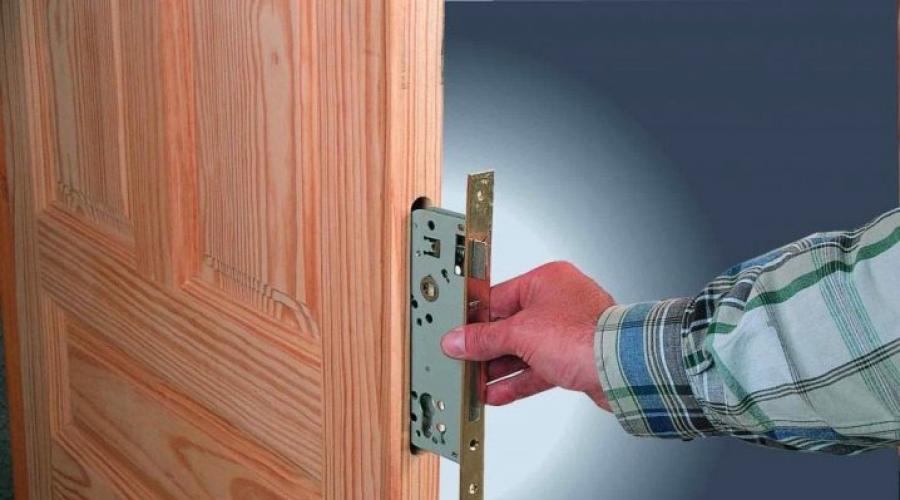
If the product is selected properly, you need to correctly embed the lock into the wooden door. They start by applying the lock to one of the sides, in the right place. Using a construction marker, trace the part - using the drawn lines you can finally determine whether the choice of lock and location is correct. If there are no errors, the position is marked on the end face of the door. When the set contains a special paper template, use it.

Take a feather drill, the thickness of which is chosen very carefully. Then, using a screwdriver, passes are prepared to form a vertical line. The outer edges of the holes must be mutually adjacent. If the required drill is not available, smaller drills can be used. They arrange holes in 2 or 3 tiers.

Now you need to take a chisel, which allows you to remove excess wood. A slotted screwdriver is a substitute for a chisel, but such a tool is not convenient enough. Then they insert the product into the prepared place, trace the end strip with a marker and pull out the closing part. Strictly along the line, 0.2 - 0.3 cm of wood is removed. This will allow the lock to be deepened into the door, placing the bar flush.

This technique is used when installing locks to prevent the strip from hitting the surface of the box. If the gap is large enough, you can skip this stage. The next step is to mark on both sides the space for the key hole or for the lock cylinder. If the structure has handles, marks are also made for them. The lock is pulled out and drilled in the marked places.

Now you can insert the lock back and evaluate the correctness of the prepared holes. The larva (if any) is fixed with a screw from the end. Next, insert the square base from the handles, screw the handles themselves. The key is inserted and the lock is immediately checked. Opening and closing should be easy, without the key rubbing against the wood.

Then it’s time to mark the holes for the crossbar elements and the striker plate. The easiest way to do this is to do it yourself using paste. When the door is fully open, the lock is locked and the end of one or more bolts is lubricated. Next, you need to open the bolt, close the door, and lock the lock. Normally it will not lock, however, paste tracks will appear. They will indicate how and where to make the holes for the counter block. They are drilled immediately to eliminate mistakes.

A counter plate is applied to the holes and a mark is made along its contour with a pencil. Using a chisel, remove part of the wood. This will deepen the bar. All that remains is to secure it. Now the door is closed and the lock is checked again. When everything works fine, decorative overlays are installed. That's it, you can enjoy excellent results. There is nothing complicated about it.
To ensure an exact match between the actual and planned depth of the holes, electrical tape is glued to the drill. You can select the remaining wood with a chisel. Later the walls are leveled with a chisel. We must strive for groove sizes that will allow the inserted lock to coincide with the end face of the door. This means that when hollowing out a socket, periodic fittings of the product are required.

To make a shaped groove for a keyhole, you need to use a hacksaw. The edges are brought to an ideal shape using sandpaper. Since they are not comfortable enough to work by hand, you can attach the paper to a screwdriver. It is best to use a thin drill bit. The installation of the strike plate for mortise and overlay mechanisms is no different.

It is recommended to choose a drill bit that is thicker than the lock. Usually several notches are drilled so that the web filler can be removed. When the drilling is finished, use a chisel and chisel to remove the excess debris. But all these rules may turn out to be useless if one more principle is not followed: as soon as something is measured with a tape measure, you must immediately mark it with a pencil or marker. Relying on your memory in such a responsible matter is extremely frivolous.

Handle type lock mortise
This manipulation definitely deserves a separate analysis. Experts recommend playing it safe and sealing the end of the door, as well as its surface, with masking tape. This should be done to prevent possible damage. As practice has shown, it is much more convenient to apply individual marks on the tape. And it will also serve as a clearly visible boundary, which you absolutely must not cross during work.

It is recommended to install lock handles at a height of strictly 100 cm above the floor. This type of lock must always be supplied with a template. Therefore, there are no special problems in marking. Since cylinder mechanisms can be different in size, you need to look for a suitable crown only after purchasing the lock. When using a template, do this:
- it is bent carefully along the line of the door protrusion;
- applied from the end side;
- make marks showing the centers of the holes.

In these places a hole is drilled in the plane of the door. It is not advisable to pierce through it. As soon as the guide drill comes out from the opposite side, they pause and start drilling with a crown from the inside out. This approach is truly professional and avoids splitting the wood. Then it's time to prepare the holes for the latch.

At the same time, they work in the marked places with a 2.3 cm drill bit. You need to go to the previous hole. The drill is held strictly at an angle of 90 degrees to the door. Otherwise, there is a high risk that the latch will jam and work poorly. When the passage is ready, the latch is inserted into it.

Now you need to align the location of the element with respect to the edge. A pencil will help you trace the outline of the decorative frame. Next, removing the latch with a utility knife, cut the canvas along this line. When this work is done, use a chisel to select a secret cavity, which should be slightly smaller in size than the latch frame. You cannot clean out the cavity initially; this may result in damage to the film with a chisel.

Having prepared the groove, return the product to its place, tightening the latch with self-tapping screws. The holes for them are drilled in advance with a 2 mm drill. If the part moves slowly, you need to trim the contacting places. The assembly of the handle itself is done according to the manufacturer's instructions. It is imperative to pay attention to how the tongue is positioned (normally it always faces inside the room).
To learn how to embed a lock into a wooden door with your own hands, watch the following video.
Along with high decorative properties, the interior door performs an important function - protective. Therefore, installing a lock on an interior door from the manufacturer is carried out when it is necessary to prevent unauthorized people from accessing an important area. This activity can be done with your own hands, but first you need to decide on the type of lock. The features of its installation will depend on the functionality and design features of the fittings.
What types of locks are there?
Depending on the type of construction, the following types of locks are distinguished:
In addition to classification according to the shape of the lock, you can divide the types of fittings according to the type of locking mechanism:
- latches with a locking element;
- invoices;
- scuppers;
- fall;
- mortise;
- magnetic.
The last type of fittings is considered innovative. It is suitable for any type of modern door, does not make sounds during operation and therefore the demand for them is growing rapidly.
Features of choosing a lock for doors made of various materials
There is a wide range of interior doors on the market, but the following types of doors are most often used:
- from MDF with a width of 35 mm and 45 mm;
- retro wooden doors with plank frames;
- wooden panels of a modern device with panels 50 mm wide.
If you know the design features of the lock and door, then the process of installing the hardware will be simple.
Features of using flat locks
Flat locks can be inserted into wooden interior doors of new and old design without restrictions, even when finishing with platbands.
If the door is made of MDF and has a width of 35 mm, then a flat lock of reduced size can be installed on it, in which the size of the larger wide tongue is no more than 15 mm. Also, the width of the end adjustment of the fittings should not exceed 25 mm. This is caused by the structural features of the MDF board, which is not able to take on dynamic loads. Therefore, the lock can only be inserted into a wooden frame.
The nuances of using round locks
Despite the abundance of handle shapes for round locks, the installation principle is the same for all. The fitting mechanism is made for canvases with a thickness of 35-45 mm. Round locks for large wooden doors are not always commercially available, but the peculiarity of this type of hardware is that it can be adapted to any thickness of wood. For these purposes, it is enough to replace the short latch carrier, which is a steel plate 2-3 mm in cross-section with a hole at one end, with a longer similar element.
Depending on the door material, you can independently set the position of the latch exit toggle switch. For a wooden door this figure will be 70 mm, and for an MDF panel - 60 mm. The fittings designed for insertion into an interior door have a special feature - a cylinder located on the inside, which increases the convenience of locking.
If it is necessary to correctly insert a lock into a door that opens to the left, it is recommended to swap the cylinder and the latch, which is only possible when disassembling the structure. However, this option is not acceptable for offices due to its ease of hacking even without special equipment.
Instructions for installing a lock on an interior door
The event consists of several successive stages, the first of which is preparatory.
Preparation
Depending on the type of lock you choose, you will need a different set of consumables and tools. The latch handle is easier to install: you just need to make a hole of the appropriate diameter.
The installation of a twist lock with a lock (with a handle and a cylinder) is more complicated, since in addition to two holes for the handle and the cylinder, it requires creating a socket in the end part of the blade.
Choosing the height at which the lock will be inserted is an important point, especially for a frame structure. A lock can be inserted into a wooden door at any desired point, but in frame panels it is necessary to install the fittings in a specially laid beam, which is located at a height of 90-100 cm from the base.
Installation of fittings can be carried out before installation or on an existing interior structure. If an electric milling machine is used during the installation process, the blade is securely secured in a horizontal position using a slipway. In this case, the side being processed should be facing the master.
Tool preparation

To install the locking structure, prepare the necessary tools:
- Measuring tools: carpentry triangle, tape measure, pencil.
- Carpentry tools: flat and Phillips screwdrivers, hammer, chisel, slipway, chisel.
- Mechanical and electrical tools: screwdriver and set of bits, feather drills, drill for working with wooden materials (6 mm), suitable size bits, electric router.
Every home master has in his arsenal almost the entire list of necessary tools.
Features of installing a lock using a milling machine
Step back 1 m from the floor and mark the point where the lock will be installed to the canvas. In this case, the handle can be located at a different height, depending on user preferences.
The mortise depth of the fittings is determined by a triangle by measuring the lock body. It is necessary to put the resulting value on the canvas with a pencil, and outline the upper part of the castle along the contour.
Next, select a location for the latch and the well. To do this, measure the distance from the center of the keyhole to the end of the lock. The appropriate markings are applied to the door, after which holes for the keyhole with a latch are drilled using a feather drill.
Next, mark the recess into which the lock will be installed. To do this, the fittings are leaned against the end of the canvas with a crossbar. A cutter of the required circumference is installed in the tool and the recess is drilled. In this case, the crossbar must fit completely into the door leaf.
Next, a recess is cut for the lock well. A groove cutter inserted into the router is used to cut out a groove of such a size that the locking mechanism fits into it perfectly. The boundaries of the resulting recess are processed with a chisel and hammer for aesthetics.
The chips are blown out of the recess and the lock is immediately placed. The crossbar is fixed to the door using self-tapping screws, after which the fittings are installed directly.
Installation of a locking mechanism without a router
To install the locking mechanism without this type of tool, you will need a measuring ruler and a pencil, as well as chisels of various widths and round files. The main working tool is an electric door and a set of 10-14 mm drills. Detailed instructions will help you take further actions:
- Mark the desired location of the handle on the canvas, 70-100 cm away from the floor. Place the locking mechanism sideways on the face of the canvas. Holes deep into the door, made with a drill, are made at a slight angle.
- Use a chisel to level the surface of the nest. Place the lock on the face of the door, mark the core, make two holes and line them up with a file. Carry out these actions on the opposite side of the canvas.
- The structure is inserted into the groove, and the rod for the handles is threaded through. The lock tongue must be exposed. Marks for it are placed on the door frame, along which a groove will be made for the mating part of the lock. The bar is attached when the locking mechanism is ready.
How to mark up correctly?
Markings are most often applied according to certain patterns or based on the main dimensions of the parts of the locking mechanism that must be attached to the canvas. Experts recommend applying marking lines using a pointed awl or needle. Thus, it is possible to work directly along the contour. The pencil line has its own thickness, which gives an error.
When installing a round lock
A priori, it is necessary to accurately determine the location of the round lock on the door. After this, markings are applied using the product installation instructions and template. The height from the floor should be equal to 965 m. The markings are applied from the side of the cylinder, taking into account the thickness of the canvas and the length of the locking mechanism tongue.
Two dots are applied on the front side of the canvas. To obtain the first, you need to measure a distance of 60 mm from the edge of the door, and for the second - 70 mm.
A hole with a diameter of 50 mm is drawn on the canvas, which is necessary for mounting the handle. At the end of the door, opposite the main hole, a second diameter of 23 mm is outlined, which will be the basis for the hole for the latch.
When installing a flat locking mechanism
On the door jamb you need to draw a vertical and horizontal axes with a pencil. The transverse line is drawn at a height of 965 mm from the finished floor point. If the door is made of solid wood or has a retro design, then the horizontal axis should be drawn at a height of 800 mm. The markings are applied to the lock attached to the door with a pencil and the lock is selected according to this drawing. The resulting socket will be slightly larger than the required size, which will allow you to adjust the gap for the mechanism.
There are certain nuances when marking holes for mounting the cylinder and spindle. This is done by attaching a lock to the side. The holes are made with an additional indentation from the end of the door. The width of these holes should be equal to the same parameter as the end plate.
Installation of a flat type lock

When installing this type of lock on a solid wood door, you can vary the height as desired. An MDF door has an area suitable for inserting fittings at a level of 1 m. You can quickly install a lock by pre-drilling the holes with a feather-type drill, the diameter of which should be 1-3 mm greater than the thickness of the lock structure. Drilling is recommended to be done with single holes in 2 passes. After this, a socket is arranged using a chisel, according to the instructions, the contour of the groove is marked when inserting the lock and the hole for the groove is selected.
The recess for mounting the cylinder is made as follows:
- A round recess of slightly larger diameter is drilled for the cylinder.
- A round hole of smaller diameter is made to install the bottom of the cassette and pins.
- Remains are removed with a chisel.
Once these steps are completed, the lock is ready for installation. Remove the cylinder and handle from it, insert it into the socket, and then return all parts to their original positions. An unsecured lock assembly has 1 mm of play on all sides.
The next stage is identifying and marking the screw points. After marking is applied, holes for self-tapping screws are drilled. Once they are fully screwed in and the lock is secured to the door, install the handle on the locking mechanism as well as the tab cover.
The handle of the lock can be round or L-shaped. To install this element, you must perform the following steps:
- Decorative overlays must be attached to self-tapping screws on the front and back sides of the canvas.
- Insert and secure the handle mounting rod.
- Cover the canvas and make a mark on the box corresponding to the position of the tongue.
- Using a ruler, measure the length of the tongue and make the corresponding marks on the box.
- Place the overlay on the marks and trace around it.
- Along the boundary of the contour line you need to make holes with a drill, the shape of which is adjusted to the desired shape using a chisel.
- At the last stage, a tab is installed in the lock structure and fixed with hardware.
After installation, be sure to check the smoothness and accuracy of the lock. If an error is identified, the location of the tongue can be changed.
Installing a lock with a cylinder
The insertion diagram for this type of fittings almost completely repeats the option described above. Having drawn marks on the end of the door, drill the recesses vertically, keeping the distance between them to a minimum. Using a chisel, the jumpers between the two rows are removed, preparing a large nest. Holes are drilled in the canvas, one on each side for the cylinder and for the handle.
Then, using a chisel, the door material is selected for arranging the well, the lock, its handles and the counter part of the strip are inserted.
A router can greatly facilitate the work, allowing you to obtain a smooth surface without errors and preserve the aesthetics of the canvas.
Installation of a round lock
To drill holes according to the applied markings, you will need a crown of suitable diameter. The diameter of the hole must be large enough to accommodate the mechanism and sufficient to cover it with decorative overlays. You can use ready-made sets of crowns.
When drilling holes, cracks and chips may form on the surface. To prevent this, holes should be made from two deep to the center. Then, using this method, a hole is made in the end part of the door for the mechanism. A hole for the tongue is drilled in the central part of the marking.
Install a lock in the prepared socket, remove the latch and trace the contour of the fittings, remove the latch. Using a chisel, make a hole large enough for the outer plates to pass through. When carrying out this exercise, extreme care must be taken to cut the required height and maintain the aesthetics of the door. Check the door and fittings for functionality.
Not all interior door sellers provide additional lock fitting services. In this case, installing locks and handles on wooden interior doors by a master in Moscow is more than convenient: you can always consult which handle is best to choose. If you need standard models, you can use a ready-made kit for installing door locks, which we have in stock: a specialist will bring them with him.
If your door already has a handle and lock, but they do not work well, close or open with force or are loose, we recommend installing a new, reliable set. In this case, tell the operator which lock is already installed on the canvas, or send its photo to the master.
Inserting into a wooden door leaf: choosing the type of handle
Don't underestimate the importance of choosing door hardware. After all, the entrance door to a room should make a solid visual impression. And this depends not only on its design and color, but also on the type, size, material and color of the fittings. The following models can be installed in the canvas:
Stationary handles (like furniture handles). They are not equipped with built-in locking mechanisms, in which case the lock must be mounted separately;
Push handles. The simplest and most convenient option. The door opens and closes by pushing the handle down. This model is practical for children and the elderly.
Rotary mechanisms and knobs (round models). To open the latch, you need to rotate the product around its axis. Knobs are often equipped with a built-in locking mechanism in the center; simply turn it to lock or unlock the door.
Our master will offer to buy a kit (set) for replacing the handle at a competitive price.
Material and shape of the product
The choice of handle design is directly related to the type of apartment interior. Laconic and stylish push models are optimal for most modern styles, especially for minimalism and hi-tech. But for classic and romantic interiors, it is better to give preference to rotating products that look solemn and elegant.
The best option is metal products with high-quality finishing, protected from corrosion and scratches. They are usually produced in standard “silver” and “gold” versions, but if desired, you can also find models with bronze and other metal finishes, matte and chrome-plated surfaces. To give the desired color, a polymer coating is used. Exotics in the form of tempered glass, of course, look beautiful, but such models are quite fragile.
Using noobs will be difficult for small children. This increases safety, but complicates the comfort of their use.
Cost of installing a door lock on an interior door
Isn’t it easier to save money by installing the lock and handle yourself or asking a friend, relative, or a locksmith from the housing office to do it? Logical question. The price for installing locks on interior doors in Moscow starts from 500 rubles. At your service are many years of experience of our craftsmen, the ability to work with locks of any type, as well as professional high-precision power tools (drills and milling cutters), which allow you to make cuts and holes without damaging the coating.
Installation using available tools in the form of a hammer and chisel is fraught with inaccurate choice of material, and most importantly, you can easily damage the expensive decorative coating. Chips, scratches, cracks are common consequences of handicraft work. And the lock itself may end up being skewed and difficult to close. In a word, if carpentry and plumbing work is not your thing, it is better to trust the professionals.
Services of the masters of our company
We provide a full range of lock installation and maintenance services:
installation and adjustment of the locking mechanism;
simultaneous dismantling and replacement of old locks and handles with new ones;
We provide kits and spare parts.
You can check the price for the set (handle and lock) in Moscow when ordering from the operator or directly from the master. You don’t have to waste time going to stores to choose the right fittings or wait several hours for a technician. We work quickly and are ready to complete work of any complexity in a short time. Decide whether you buy accessories yourself or want to take advantage of our offer. Inform the operator whether left or right handles are needed, what shape and color, and in what quantity. Place your order at a time convenient for you. Our masters are not late! In 20 minutes your doors will be transformed. Everything is simple, convenient and very affordable!
Reading time ≈ 3 minutes
Installing a locking mechanism in an interior door allows you to increase the comfort of your stay. To carry out installation, you need a small number of tools: drill, screwdriver. Any homeowner can do the job. It takes about 15-30 minutes to insert a lock into an interior door with your own hands.
What tools are needed to install the lock?
The accuracy of installing a lock on an interior door depends on the correct preparation, tools and components used. The use of amateur or professional equipment will increase the reliability of the design and simplify the installation procedure. To work, the owner will need:
- set of handles and lock mechanism;
- chisel;
- self-tapping screws (included) and a screwdriver;
- feather drill for wood 23 mm;
- drill and hole saw for wood (diameter 5 cm).
If you don’t have the tools, it is recommended to borrow them from friends or neighbors. It is impossible to carry out the work carefully without the use of auxiliary equipment. A detailed study of photo instructions and advice from craftsmen will help you learn how to embed a lock into an interior door.
Step-by-step instructions for installing a lock on an interior door
After purchasing the kit and preparing the tools, you can immediately start working. Additionally, it is recommended to study the requirements and recommendations of the lock manufacturer. Direct insertion of the lock is carried out according to the following instructions:
1. 95 cm is measured from the bottom of the canvas, 6 cm is measured from the edge. The intersection point is marked with a pencil on the canvas itself.


2. The mark from the canvas is transferred to the center of the end part (using a square).


3. At the point marked on the end, using a pen drill and a drill, a hole is drilled for the locking mechanism.


4. Using a hole saw, a hole for handles is prepared on the blade at the previously established mark.


5. The locking mechanism is inserted into the hole prepared at the end of the door, traced around the perimeter with a pencil, and removed from the hole.


6. Using a chisel, an area for the lock is prepared in the end part (along the marked perimeter of the outer part of the mechanism). The thickness of the cut-out section should be equal to the thickness of the lock latch (approximately 0.5 cm).


7. The lock is installed and fixed in the prepared hole using self-tapping screws.


8. The handle with screws is installed first. First, the screws are unscrewed, then the handle is installed in the door.


9. From the second part of the element, remove the handle itself and the decorative trim (using the key from the kit). This procedure is well demonstrated in the attached video instructions.


10. The second part of the handle is inserted into the door and secured with screws. A decorative overlay and the handle itself are installed. The installation work is completely completed.


After the installation is completed, the contractor will only have to check the operation of the elements and remove the resulting debris. In the future, it will be necessary to periodically adjust the handles (every 3-4 years) due to their loosening as a result of use. The lock is lubricated in case of severe jamming (ingress of dust, debris). The mechanism is disassembled and processed according to the manufacturer's instructions.
When installing a lock on an interior door yourself, you should remember to carefully drill holes and cut out the area for the latch. Drilling holes with a cutter must be done on both sides of the blade. This will help you prepare the required diameter and easily install the components. It is also important to gradually tighten the screws holding the handles together. When tightened too tightly, the likelihood of the elements fitting too tightly and the difficulty of opening the door increases. Compliance with these requirements will help you install a lock efficiently without professional help.
Video of inserting a lock into an interior door with your own hands
Despite the widest range of doors, almost all of them are sold without door hinges and locks. We'll tell you how to embed a lock into an interior door from DIY MDF. In our case, the push handles with the lock and latch latch were jammed.
To embed a lock into a door, you will need the following materials:
The work begins with markings on the door.
Marking the position of the lock on the interior door
The distance from the floor to the door handle will be approximately a meter. A lock is applied to the door from the outside and the place where the lock mechanism will be installed is marked - there will be corresponding groove . Along its boundaries, mark with a pencil 2 horizontal lines and one axial line between horizontal. Also mark the width of the groove. This value is equal to the thickness of the locking mechanism. 
The next stage is selecting a hole for the lock.
The drawn rectangle is removed using a hand router or chisel. You can also take advantage drill.
Having tried on the lock, the hole must be adjusted to the required size so that the groove matches the size of the lock. 
The next stage is installing the lock on the door and fixing it.
Insert the lock, check its vertical position and mark the places for the screws on which the face plate will be attached. Carefully drill the required holes and tighten the screws. Make sure that the lock is securely fastened and does not wobble.

Then push the lock faceplate flush with the door edge. Use a knife to make a cut along the line of the plank, so that a trace remains. After this, we remove the screws, then the lock and use a chisel to select the canvas along this mark to the depth of the plank. At the same time, try on the lock, keeping an eye on the position of the level of the bar relative to the canvas - it should not go deep into the canvas, but it should not stick out either.  By the way, you can learn not only how to embed a lock into an interior door with your own hands, but also how and how to hang it correctly. All these points are very important for the door to open and close well.
Installing handles and latch lock
We mark the holes for the sockets of the handles and the latch lock using an awl.
After this, you need to drill through holes in the door using a No. 5 drill. We start drilling first on one side, and then on the other, avoiding the formation of chips. Then drill holes with a larger diameter drill. Drilled holes must be cleared of sawdust.  Then you need to insert the lock into the door and secure the front plate with self-tapping screws. Then install the handles and clamps and secure them with self-tapping screws.
Next, screw the mounting socket of the handle with self-tapping screws. 
And install a decorative trim. 
According to the same scheme, is installed and locking handle.

Then we check how the mechanism works. 
And the last stage:
Installing a striker on the door frame
To the place of insertion strips into which the lock tongue will go, We put tape on the door. Close the door and mark the position of the tongue with a pencil. We open the door and, in accordance with the marks, mark the position of the strike plate.

Using a drill and a chisel, we select the material according to the marked dimensions of the plank. 
Then the bar is inserted, slightly fixed with self-tapping screws and adjustments are made so that the closed door is tightly fixed with the tongue in the striker bar. To do this, remove the bar, adjust it and put it in place. After which the screws are finally tightened.
Now that you know how to fit a lock into an interior door, you can do this work yourself, rather than inviting craftsmen who will have to pay for this work.