Installing an external filter in an aquarium. How to install a filter in an aquarium How should an aquarium filter be installed
To purify water in an aquarium, submersible filters are used, which are located in the water column, and external filters, the canister and filter cartridges of which are located outside the aquarium. Before choosing a type, it is recommended to correlate its technical features with the parameters of your reservoir and installation capabilities. To do this, use the recommendations of specialists and experienced consultants; sellers at poultry markets and sellers in pet stores do not always turn out to be good advisers on the correct installation of a filter in an aquarium. But the decisive choice remains yours, because no one knows better than you how and where it is more convenient for you to place the filter.
Which aquariums require an internal filter?
Installing an internal filter is appropriate in small and medium-sized aquariums with a volume of up to 200 liters, in which they usually try to combine the cleaning function with additional aeration of the water.
These devices are quite compact and operate relatively quietly, so beginners tend to purchase them for small bodies of water; many are frightened by the difficulties of installing external models or the risk that the external filter will be dropped by an animal or child. In addition, submersible equipment is chosen by aquarium owners who often suffer from power outages; such equipment will not leak or flood the floor. And it’s easier to clean the internal filter. But if the aquarium is very tiny, and the submersible model takes up the useful space of the reservoir, what should you do then? A corner filter may be a partial solution to the problem.
How to install the internal filter
Installing an internal filter in an aquarium is easy. This device does not require the purchase of additional equipment or upgrades, therefore, regardless of the model, it is assembled in full accordance with the user manual.
1. Familiarization with the device. Correct installation of any filter begins with checking its completeness and reading the instructions. We recommend doing this before purchasing the cleaner. If you doubt your design abilities, it is better to ask a consultant to clearly demonstrate the assembly process to you or carefully describe it.
2. Filter assembly. Almost all internal filters are assembled using the same algorithm. The first step is to place the filter material in the glass of the device. Then, if the design allows for it, insert the rotor into the pump. Attach the pump to the glass and connect the aeration tube. If recognizing parts is difficult for you, check out the video attached to the article.
On some models, the mounting panel is separated from the body. Insert the fasteners on the glass into the grooves provided on it and place the suction cups in the corresponding slots. Everything is ready to install the filter in the aquarium!

3. Securing the device. Almost all aquarium filters are attached to the wall of the container using suction cups. Simply press them against the glass and press well. Submersible filters must be completely under the water surface; under no circumstances turn on the device if it protrudes from the water. The correct depth for placing the filter is 2-5 cm from the surface. One of the ends of the aeration tube must certainly be in the air. If possible, place it outside the aquarium, with access to the room, so oxygen will dissolve in the water more efficiently, because under the lid its content is reduced. If the plastic tube with the factory fastening slips off, it can be attached to the side with a regular office clip.
4. First start. Turning it on after installing the filter in the aquarium essentially involves working in testing mode. For this reason, it is recommended to observe the operation of the filter. Adjust the immersion depth.
5. Power setting. At the time of first switching on or immediately after it, it is recommended to turn the power regulator to medium settings. Further adjustments should be made taking into account the volume of the aquarium, the degree of contamination and, of course, the habits of its inhabitants. Some fish, particularly those with small and weak fins, cannot tolerate too strong a current.
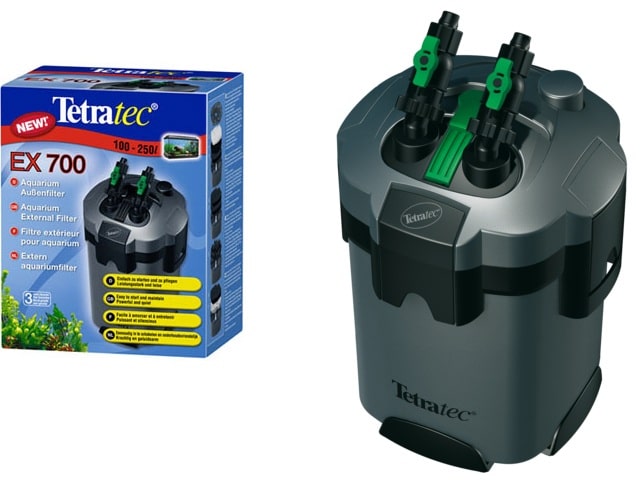
Which aquariums require an external filter?
An external filter contains a larger amount of filtration material, therefore, as a rule, it provides not only mechanical and chemical, but also biological water purification. The larger area of the filter membrane provides housing for more nitrifying bacteria and nitrobacteria, colonies of which decompose dissolved organic matter into less toxic compounds. For this reason and due to the high performance of the devices, the installation of an external filter is recommended for aquariums over 200 liters. Some aquarists equip smaller reservoirs with them, but not less than 100 liters.
However, the only drawback of canister devices is the risk of water leakage from the external tank. This can happen if the gaskets wear out. Some manufacturers have taken care of this problem and developed leakage protection systems.
How to install an external filter
Despite the relative high cost, external filters are simple in design and installation. The myth about the difficulties of installing an external filter in an aquarium should not push you to choose familiar, but less effective submersible models.
1. Choosing a location for the canister. The design of the filter allows for two ways to place the canister: above or below the water level. The first option allows you to hide the device body in an aquarium cabinet and not clutter your apartment with bulky equipment. The second is to save electricity and reduce noise levels. It is believed that for the filter to work effectively, it is necessary that its upper point be no higher than 20 cm from the water level.
2. Filter assembly. The filter is assembled according to the instructions. The process is quite easy. It is necessary to place a filter sponge or other cartridge, as well as a layer of biomaterial, in the flask of the device, in the lower half of the canister. Assembly of the mechanical part of the filter is usually not required - the manufacturer packages it ready-made. Then the suction and exhaust hoses are inserted into the device.
3. Placement of hoses. Hoses for collecting dirty water and supplying filtered water are placed in opposite corners of the aquarium, this increases operating efficiency and creates the necessary circular circulation. Once all the elements are inserted into the device, you need to open the suction hose and wait for the filter to fill. After this, the first hose is closed and the second, outlet hose is inserted into the hole. When the air comes out of the tubes, you can test the equipment.
4. Turn on the device. Before turning on the filter, you must open the valves on both hoses. It is highly desirable, although not essential, to remove the fish before loading the filtration system. After this, the power of the device is precisely adjusted.
An aquarium filter is an indispensable part in any aquarium. It performs biological and mechanical cleaning, and also helps saturate the water with oxygen.
The selection of filters in stores is huge, so buying a device will not be difficult. But installation may be difficult.
Installing an aquarium filter For many beginning aquarists this becomes a real problem. Unfortunately, it is not always possible to understand the details using the instructions supplied with the device.
Usually the question how to install an Aquael filter, occurs less frequently than with filters from other lesser-known brands. In this case, you should adhere to the average algorithm of actions.
The installation procedure will be different for external and internal filters, but everyone can cope with the task.
Before you begin installation, you need to understand which filter you need.
Manufacturers offer external and internal filters. The first are attached outside, the second - inside the aquarium. Choice correct filter should be based on the characteristics of a particular aquarium, its size and volume, as well as the abundance of living plants and fish.
Internal filters are the simplest type of filter, held on by hooks or suction cups. Water enters the lower part, passes through the filter layers (synthetic wool, foam rubber) and exits through the upper part.
The jet is directed towards the surface, due to which the water is enriched with oxygen. This option is suitable for beginner aquarists with small aquariums who want to independently learn the features of its operation and installation.


- affordable price and the ability to purchase at any pet store,
- low energy consumption,
- sufficient water filtration for fish to live in a compact aquarium.
Flaws:
- takes up space in the aquarium,
- Suitable only for small aquariums,
- To clean, you need to put your hands into the aquarium, which can lead to infection of the fish with microbes.
External filters are significantly more expensive, but they will provide high-quality water filtration even in a large aquarium.
Advantages:
- high quality filtration,
- ease of replacement of filter material,
- the presence of additional compartments for various fillers,
- are installed outside, so they do not take up space in the aquarium.
Flaws:
- quite bulky
- high price,
- When the power is high, be sure to put a mesh on the end of the tube, otherwise the device may suck in small fish with water.
The installation procedure will directly depend on its type. The connection diagram for external and internal filters is somewhat different, but both can be installed on your own without special skills.
VIDEO INSTRUCTION
- Before you begin installation, you need to fill the aquarium at least halfway with water, since the filter should not work in an empty container.
- All parts of the device must be thoroughly dried before assembly.
- Many people are concerned about the question At what depth should the filter be installed in the aquarium?. The internal filter is attached to suction cups at approximately a distance of 3 cm from the surface, but so that it does not touch the bottom. If the depth is small, then try to leave more distance on top, but in no case should the device lie on the bottom. The water will constantly evaporate, so the position of the filter must be checked regularly.
- The device is immersed in water with it turned off.
- The air intake pipe is vented outside, and it will be a plus to have a mount for fixing the pipe.
- After this, you can plug the device into a power outlet, and if a current appears, it means everything was done correctly. The wire should hang freely downwards from the outlet.
 Using the damper, you can regulate the pressure and direction of movement of purified water. But before you adjust anything, do not forget to unplug the filter from the outlet.
In order for the device to serve for a long time and properly, it is necessary:
- regularly clean it from dirt,
- do not leave it in the water turned off, otherwise all the inhabitants of the aquarium will be poisoned,
- turn off the device before putting your hands in the water,
- It is permissible to turn on the device only after complete immersion in water,
- Before cleaning the device, turn off all electrical appliances in the aquarium and only then can you remove the device from the water.
VIDEO REVIEW
On the market today you can find a huge variety of filters, some even combine two functions at once - cleaning and aeration. But experts still recommend purchasing these mechanisms separately.
Regardless of the choice of filter, it is important to pay attention to the manufacturer. For many Chinese devices, it is impossible to buy spare parts, so if the device breaks, you will most likely have to throw it away.
In this regard, it is better to overpay a little, but purchase a reliable filter with the ability to repair it.
 The internal filter, as mentioned above, is placed inside the aquarium. This simple design is usually chosen by beginning aquarists. The filter material is often cheap foam rubber. The material must be periodically removed and washed.
Such devices are good at a low price, they are not difficult to purchase at any pet store, and they can also be easily repaired.
External filters are a more complex device. Due to its large size, it is not placed in the aquarium, but outside. It has several stages of mechanical and biological purification and is used by experienced aquarists to keep particularly demanding fish.
Such a device can operate for quite a long time without special maintenance. And the cleaning procedure involves only washing the stages of mechanical water purification.
The “residence” of beneficial bacteria should not be touched so as not to damage the bacterial colony.
During operation of the device, it is necessary to periodically check the reliability of fastening of all elements in order to prevent possible water leaks. Such devices should be purchased only from well-known and trusted manufacturers who have service centers, and you can easily buy spare parts for repairs.
 Installing the internal filter will not take much time, the problem is quite simple, so even novice aquarists can cope with the task.
- Choose the appropriate filter option in the store; if necessary, consult with the seller, who will help you select a device for your aquarium.
- Unpack the device and read the instructions.
- Fill the aquarium with water, but it is better to temporarily remove the fish.
- Immerse the device in water so that the layer of water on top is at least 15-20 mm.
- Install the device on the wall of the aquarium using hooks or Velcro, which should be included in the kit. This will allow you to fix it at the desired level.
- Make sure that the tube to which the hose is attached extends to the surface.
- Plug in the device and make sure the filter works.
All that remains is to regularly check the functionality of the device and carry out cleaning to ensure that the fish are comfortable.
 Each manufacturer may have its own nuances in installation, but in general the installation algorithm is as follows:
- Prepare a few rags in case of leakage and a stand made of soft material.
- Unpack the box with the device and remove the contents. The device itself, hoses, internal sponges, filling, and plastic water outlets must be available.
- We assemble the external filter according to the manufacturer's instructions. The order of connecting the parts to each other should be indicated there. The taps on the device cover must be closed for now.
- We proceed to the preparation of external elements - for release and for water intake. The part for the fence is a long tube with a curve, which at one end is lowered into the aquarium. The outlet element is a short, curved tube that is installed at the other end of the aquarium. You also need to calculate the length of the hoses so that it is enough for the distance to the cabinet.
- The next step is to start the device. It is necessary to fill the filter with aquarium water by gravity. To do this, you need to connect the water intake hose with a threaded clamp (located on the cover of the device). Now you can open the tap and water will flow. You need to make sure that water does not start flowing out of the second hole. As soon as the device is filled, you need to close the inlet hose. All you have to do is connect the outlet hose, and almost everything will be ready to start.
- The water release hose also needs to be filled with water. To do this, connect it to the filter and close it. You need to fill the free end with water and then connect it to the plastic outlet in the aquarium.
- All that remains is to open both taps on the filter and plug the device into the outlet. If everything was done correctly, you will see the water begin to mix.
 After installation, many people encounter a problem - the water does not flow. The reason for this may be an air lock in the filter tubes. To solve the problem, you need to turn the device on and off several times. If this does not help, then the hoses need to be emptied of water and filled again.
An external filter, especially if it has a large capacity, is extremely important for an aquarium. When choosing a model of equipment, you need to take into account the quality and method of operation. But, in addition, you should choose a suitable model depending on the volume of the aquarium. How to choose an external filter and how to install a filter in an aquarium can be found in the article.
[Hide]
External filter characteristics
This unit is designed for one purpose - filtration. It can be mechanical, chemical and even biological, so aquarium filters are universal. The best aquarium filters come with an auto-start mechanism. This means they are easy to fill and start working right on the spot.
Principle of operation
Water purification equipment consists of a sealed canister. It should be installed outside the aquarium and connected at the inlet and outlet using a hose. Waste from the aquarium is drained into the sewer thanks to a sewer pipe that leads from the aquarium. Inside the canister, the water undergoes several types of treatment, including chemical.
They themselves are larger and more powerful. They can hold more filter media and offer better cleaning and support for more fish. That is why most aquarists purchase these filters for large tanks, for example, 200 liters.

Advantages and disadvantages
External devices are produced by many companies, so the disadvantages may vary. If it is budget, it may wear out in 1-2 years, and leaks may occasionally occur. Better quality gear costs a lot of money.
There are many advantages:
- Does not take up space in the aquarium. This allows you to add more decorations or equipment.
- It can be removed from view, for example, placed in a cabinet. But you need to take into account the size of the structure.
- very convenient, because you just need to disconnect it from the tubes.
- It is important that the filter can be used in large aquariums with 200 liters of water. Therefore, fillers may be different.
The disadvantages include:
- Volume.
- We must not forget that at high power the tube can suck small fish inside. To prevent this from happening, you need to put a mesh on the end of the tube.
Criterias of choice
The filter is the basis of the aquarium, because it purifies the water and enriches it with oxygen. When choosing it, you should take into account, because for small tanks you can purchase an internal filter, for large ones - with a volume of 200 liters - an external one.
Tetra
The Tetra external filter is one of the most popular.
This is explained by the advantages:
- it has a convenient and simple design that will be understandable to any aquarist;
- Some models are able to operate absolutely silently, others with little noise.
The disadvantages include plastic tubes that are installed at the inlet and outlet of the filter. This material requires careful handling and does not withstand heavy loads.
Eheim
The Eheim external filter is also popular because it has an affordable price and convenient design.
Eheim external filters have many advantages:
- Water, traveling through the levels of the canister, passes through all stages of purification.
- The absence of additional buttons, including those for quick start and tubes, guarantees protection against leakage.
- Models of this brand can be used for a marine aquarium.
At the same time, some advantages can turn into disadvantages:
- External Eheim filters will occasionally have to be launched in a strange way. Holding the outlet hose from the filter in your mouth, take a long breath into the tube.
- The noise level is quite low, but still different from most other brands.

JBL
Some external JBL filters are used in aquariums up to 200 liters of water, others up to 800 - there are a lot of options, which is why filters from this brand are attractive.
Of course, the benefits don't stop there:
- they can save energy consumption
- It works silently, which is good news.
Reviews from aquarists say that it is worth purchasing fillers, for example, filter sand, separately.
Aquael
The Polish-made Aquael external filter cannot but inspire confidence.
Its advantages:
- Silence. Even the most powerful models will not damage your hearing.
- Contains all modern external filter options.
- The canisters are equipped with wheels (filled with water, they are by no means lightweight).
The only disadvantage of this brand is the volume of the canister. There may not be enough space for it in the cabinet and you will have to install the equipment next to the aquarium.

A filter that purifies water should be in absolutely every aquarium. Otherwise, there can be no question of normal life in a small home pond. Special equipment performs mechanical, chemical, and biological water purification. This creates comfortable conditions for the life and reproduction of aquarium inhabitants. Therefore, it’s time to talk about how to properly install a filter in an aquarium.
You need a good water filter for an aquarium. And it’s better to look for it in specialized stores. This is the only way to be sure that the equipment will rid the water of sludge particles, remove waste products of fish and their neighbors, remove medications, and, if necessary, normalize the chemical parameters of the water, adjusting its acidity and hardness.
They produce internal and external filters. How they differ from each other and how to install each correctly - we will consider further.
Internal filter and its installation
This type of water filter is only placed inside the aquarium. The equipment is divided into pump and airlift. The peculiarity of each is that they are available to anyone, that is, they are sold at a budget price. Therefore, it is not surprising that internal filters have many disadvantages. For example, devices need to be cleaned every day, they take up space in the aquarium and make noise.
However, such filters are very common. Before purchasing, you need to find out from the sales consultant whether the model is suitable for your aquarium.
Beginning aquarists may not install an internal filter the first time. And this despite the simplicity of the device’s design. However, difficulties can be avoided by knowing how to properly install a filter in an aquarium. The device is placed in the aquarium when it is half filled with water, soil has been laid in the home pond and plants have already been planted. Before connecting the equipment to the network, it must be assembled according to the instructions and secured in the aquarium.
It is important to know that internal filters must be completely immersed in water. Moreover, you need to pour another 2-4 centimeters of water over the device. But it shouldn’t reach the bottom of the aquarium.
As a rule, the device is attached to glass walls using suction cups. A small flexible hose is included with the internal filter. It is necessary for air supply. One end of it is attached to a special hole in the device, while the other is brought to the surface of the water and fixed using a special fastener to the upper edge of the aquarium wall. The hose must be above the water level, otherwise air intake will not occur correctly.
There should be an air supply regulator on the hose or on the filter itself. The strength of the current in the aquarium that the equipment creates depends on how it is located. Once the filter is installed, it is best to set the regulator to the middle position. Next you need to keep an eye on the fish. Some may like a strong current, while others may like it the other way around, and they will begin to hide from it.

The aquarist must remember that the internal filter can only be turned on when it is completely immersed in water. But before removing the filter from the water, it must be turned off. It is important not to forget that it is not recommended to leave the device turned off in the water. Moreover, you cannot turn it on after inactivity if it has not been cleaned.
External filter and its installation
An external filter differs from an internal one, primarily in price. Purchasing and maintaining such a device takes a toll on your wallet. However, the financial costs are more than compensated by the numerous advantages of the equipment. The main ones are filter materials and special fillers, which do not need to be changed frequently.
The external filter will not irritate because it operates almost silently, this is especially noticeable if it is designed for large aquariums with a volume of 40 to 80 liters. This device already has biological filtration.

It is worth noting that such filters are usually purchased by experienced aquarists, since several important rules must be followed when working with the device.
The external filter works according to the following principle: water from the aquarium slowly flows through a special container of the device, which is filled with a filler with filter materials, then this water is returned through the hose back into the aquarium.
The external filter is cleaned completely differently than the internal one. And you need to free it from dirt only in aquarium water (it is poured into a separate container). Here you need to completely replace the filter material. This is done in stages. This is necessary so that the biological balance in the aquarium is not disturbed.
Before properly installing the filter in the aquarium, you need to study the accompanying instructions and strictly follow the recommendations. First you need to assemble the filter, put all the fillers and internal sponges in place. In this case, both taps where the hoses are to be connected must be closed.
The internal filter will work properly and clean the aquarium if it is installed significantly below the water level (no higher than 20 centimeters). Two hoses come with the external filter; they are designed to take in and release water. Both should be mounted at opposite ends of the aquarium.
As soon as all the elements are connected to the device, the filter needs to be filled with water from the aquarium (gravity is used for this). Otherwise, the air in the hoses may interfere with the operation of the device.

To release air locks, you must first connect and open the water intake hose. Wait for the filter to fill. Water may leak out of the hole for the second hose, so you need to be careful here and prevent this from happening. As soon as the filter is full, you need to close the inlet hose.
Next, a hose is connected that releases water, its valve is closed and the hose is filled with water. Only after these manipulations can you connect it to the water drainage system from the aquarium. Next, you are allowed to open both taps and plug the filter into the outlet. And here the main thing to remember is that only if all the rules are followed can you count on proper and productive operation of the filter. This means guaranteeing comfortable conditions for the inhabitants of the aquarium.
Organizing a home aquarium is always associated with the need for installation. It is simply necessary for the normal existence of fish, as it saturates the water with oxygen, improves water circulation, and mechanically purifies the water. But for beginner aquarists this often becomes a problem, and they wonder how to install an aquarium internal filter.
How to properly install an aquarium filter?
The internal filter is called internal because it is completely immersed in water. The water level above it, depending on the depth of the aquarium, should be from five to eight centimeters.

The filter is attached to the wall of the aquarium using special suction cups, which in most cases are included in the kit.

A flexible transparent tube, which is called an air outlet hose and is designed to supply air, is connected to the filter spout at one end, and to the outside of the aquarium at the other. The end of the air vent hose located outside the aquarium should be located above the one that is attached to the filter spout.

In addition, during installation, you should pay attention to the fact that the air supply power can be changed using a special regulator, which is located either at the tip of the air outlet hose or at the filter spout. Place it in the middle position at first. And you can adjust the position you need by looking closely at the fish. There are species of fish that love strong currents, and there are also those that do not tolerate it well. At a low power level of the filter, there may be no bubbles; in this case, a slight ripple of water will indicate its proper operation.
Once the installation of the aquarium filter is completed and all parts are attached, you can connect it to the mains. And for the future, you should remember that any manipulations in the aquarium should be carried out with the filter unplugged from the outlet.