Installing a slatted ceiling in a bathroom: list of materials and instructions for performing the work. Installing a metal slatted ceiling in a bathroom How to install a slatted ceiling in a bathroom
Installing a slatted ceiling in a bathroom is a relatively inexpensive and fairly easy solution. What you need to know so that everyone can assemble it with their own hands, and in absolutely any room.
You decided to start a renovation and decided to first solve the problem with the ceilings - this is right. Quite recently, slatted ceilings have appeared on the market, which look great not only as a solid ceiling structure, but also as a separate element of the bathroom. Slatted ceilings have many advantages and are excellent in places where there is high humidity, as well as high requirements for room hygiene.
Helpful information:
Yes, one of the advantages is that they are completely unaffected by rust and dampness, frequent exposure to harmful microflora and various fungi. They are quite easy to clean and can be treated with all kinds of cleaning products. In addition, slatted ceilings are one of the varieties of existing suspended ceilings, so it is not necessary to prepare the original surface.
We calculate materials


After the color has been determined, it is necessary to calculate the required amount of materials needed to install the slatted ceiling in the bathroom.
We measure the entire room around the perimeter - you will calculate the required length of the profile, the fastening of which will determine the height of your ceilings and the slats will be inserted into it.

The area of the ceiling covering will be equal to the area of your room. By completely relying on the calculations, you can safely purchase materials and begin installing the slatted ceiling yourself.
Marking the slatted ceiling


The most important point is the precise marking of the future ceiling. We mark a line along the perimeter of the room along which our U-shaped profile should be attached. If you have a multi-level ceiling, then you will have to try a little to ensure that the line of the U-shaped profile is fairly even relative to the ceiling levels.
The minimum gap that is recommended to be left between the rough ceiling and the new slatted ceiling is 5 centimeters. If you plan to install ventilation hoses or other communications there, such as lamps, then calculate the required indentation in advance.


The next step will certainly be to mark the stringers. It is imperative and quite accurate to draw the lines strictly parallel to each other and always relative to the side wall. Also, all finishing panels must go strictly perpendicular to the end wall, otherwise any unevenness between the ceiling slats will be clearly visible.
Correct installation


Using dowels, we fix the guide profile to the wall. In order for the U-shaped profile to fit tightly to the wall, it is necessary to drill holes for dowels exactly from the outside of the profile.


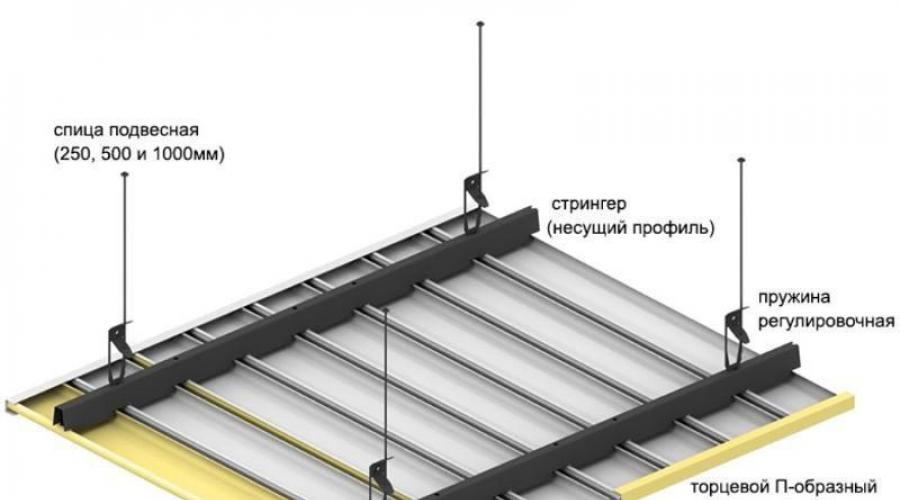
Once you have secured the profile, you need to install the hangers according to the markings. The best option would be adjustable hangers, which will give you the opportunity to more accurately align and level the entire surface of the slatted ceiling. The edge points should be placed at a distance of no more than 40 centimeters from the wall, but one step of the distance between each other can be increased to 1.5 meters.


Next, we mount stringers on the hangers - these are tires with grooves into which the slatted ceiling panels will be inserted. The distance between the stringer and the U-shaped profile should be approximately one centimeter to compensate for possible deformations.
Video on assembling slatted ceilings
Stages of assembling a slatted ceiling


Before you begin inserting the slatted ceiling panels into the stringers. you need to cut them to the required length. The ends of the panels must be inserted into the U-shaped profile on both sides. Therefore, we cut each panel 3 or 4 millimeters less than the distance between the guide profiles. Do not cut all the panels at once, because due to the unevenness of the walls they may turn out to be a little shorter - and this will damage the good material.


After the slatted ceiling panel is inserted into the grooves of the guide profile, we insert it into the grooves of the stringer until a characteristic click occurs, which will indicate that the edges of the panel are tightly fixed to the stringers.

If the edge panel does not fit your width, you need to cut it, or, if the panel is aluminum, it can be broken off. Using a knife, we make a deep scratch along the entire length of the panel, make cuts in the end part and, by straightening and bending, break off the required piece. The cut side of the panel is inserted into the profile on the wall, and the other side is fixed on the tongues of our stringers.
Each panel is inserted into the wall profile diagonally. We shift the latter to the side in order to bring one edge into the profile as much as possible, then insert the second edge into our profile and return the slatted ceiling panel to the position we need. Only after this we begin to fix it on the stringers.
Nuances during installation

When marking or planning a slatted ceiling, you must take into account that in a narrower room, if you place the panels perpendicular to the walls, this will visually expand your room.


If the room is square, then the diagonal placement of slatted ceiling panels will look more impressive.
If the room in which you decide to install a slatted ceiling is quite large, then you will have to splice each panel. It is for this purpose that the kit should include special liners that are installed at the joints, which gives a more neat look to your ceiling.


On slatted ceilings, it is the spotlights that will look great, for which you will need to make the holes yourself. We mark a circle of the required diameter in the required place and, using good metal scissors, cut a hole for the lamp. From the center to the circumference we make cuts in the form of many radii, and bend the petals formed in the process inward. All petals should be narrower - the better for fixing a spotlight.


Handle all river ceiling panels with care as they are quite easy to scratch and each scuff will be clearly visible once assembled. Slatted ceilings are the most durable and most stable coating, unlike other types, and claim to be the best decorative finish.
Many people like slatted ceilings, but most begin to get scared when they think about the complex structures that they will have to face during the installation process. However, not everything is so scary. Thanks to our tips, you can easily assemble a slatted ceiling with your own hands, thereby giving your bathroom not only a new look, but also a certain charm.
Tweet
Stammer
Like
Selecting the right materials for the ceiling in the bathroom is not such an easy task. A bath is a place of high humidity; not every coating can withstand such pressure. Slatted ceilings not only look beautiful, but are also able to withstand large amounts of water without damage. Therefore, below we will discuss how to install a slatted ceiling in a bathroom.

Before installing this or that type of ceiling, you need to understand what types of material it is made from. Slats for structures are made of three types of materials: wood, PVC and metal. Using wood in a bathroom is quite absurd, so we don’t take this material into account, but the rest are quite suitable.
Plastic slats. PVC materials are very often used in bathroom renovations. Its performance characteristics allow it to be installed anywhere, it does not spoil the overall appearance and is cheap. It is easy to work with, which means you can complete the installation operation yourself. Caring for such a ceiling will be easy and simple. The modern market offers a wide selection of different colors and patterns.

But plastic also has undoubted disadvantages. It doesn't last long. For some reason, many people think the opposite. Probably due to the fact that it takes a long time to decompose, but this does not affect its service life. Plastic quickly loses its attractive appearance and is afraid of strong mechanical influences. It may be cheaper, but think about it, you will have to change the ceiling about once every 5 years, which negates the savings. Of course, you can live with yellowed, cracked ceilings. But here the choice is yours.
Metal slats. Made from two types of alloys: aluminum and steel. Aluminum ceilings are indifferent to water and high temperatures. The service life is very long. It will fit well into a small room, as the mirror surface will visually expand the space. The only drawback that can be found does not even relate to the material itself, but to the type of construction. Suspended ceilings always take up a few centimeters in height. Although for aluminum ones this is not such a big minus due to the mirror surface, as mentioned above.

Steel slats. Its advantages and disadvantages are identical to aluminum, but the price will be more expensive. The steel used is stainless, and this greatly increases the price of the structure. But nothing can kill steel ceilings. Whatever you do with them, steel is steel.
The slats are also divided according to their appearance. There are no color restrictions. You can choose any one. With or without a picture. But the coverage is different.
Mirror. Such ceilings will visually double the space. But not everyone likes this bathroom coating, so think before you choose.
Glossy. More moderate shine than mirror. When choosing such a surface, it is better not to choose powerful lamps. The gloss will reflect all the light.
Matte and semi-matte. More moderate design. Such ceilings do not shine or shimmer and create more comfort.

In terms of dimensions, the slats have standard sizes: 3 cm, 4 cm and 6 cm length. Width from 25 mm to 400 mm.
The slats differ in the type of connection to the guide (the shape of the panels). There are three types: Strict straight slats in the shape of the letter P. Round slats with rounded walls. And an adjacent type in the shape of the letter P, but with rounded edges.
And the last type of difference is the type of connection. Open: planks in the shape of the letter U; after installation, the gaps at the joints are closed with special planks. The closed joint lays the slats according to the lining principle. Gapless. There is no need for additional strips and there will be no distance between the slats.

Advantages and disadvantages of slatted ceilings
Above we have already looked at what materials the slats are made from, but since PVC is not the best material for a bathtub, further we will talk mainly about aluminum ceilings.
The slatted ceiling masks all imperfections.
The suspended structure does not require additional finishing of the ceiling; all that is needed is to treat it with an antifungal compound so that mold does not form under the structure. Aluminum itself does not rot and does not oxidize.
Its service life exceeds 15 years.
Taking care of it is as easy as shelling pears. If a stain appears somewhere, just wipe it with a rag. Although it is not the cheapest finishing option, installation is quite simple. You can install a slatted ceiling in the bathroom with your own hands.
In terms of design, it will suit almost any style. Designers are now creating beautiful multi-level structures from slats, and a slatted ceiling allows you to bring all your fantasies to life.

Despite all the advantages, there are still a number of small disadvantages.
If one of the planks becomes deformed for some reason, the entire structure will have to be disassembled down to the desired plank. This is unlikely, but still a minus.
The appearance of such structures does not differ in “warmth”. For the bathroom this is not such a minus, but not everyone likes cold-looking rooms. Properly selected lighting and other interior items will help add a touch of coziness.
Installation of slatted ceilings
The slatted ceiling for the bathroom is installed in several stages, but first it is necessary to carry out preliminary work.
An important stage in the installation of any ceiling structures is measurements. They should always be produced before purchasing the material. The definition of “by eye” will greatly disappoint you later. Measure the length and width of the ceiling perimeter with a tape measure. Before purchasing, you also need to measure the volume of all lighting fixtures. All wires must be brought to the points where the lamps will be installed.

In order to calculate how much material is needed, add the length and width and multiply by 2. This number determines the length of the frame. To calculate the area, multiply the length by the width, and then divide the resulting number by the area of the slats. To this number, add about 20 percent of the total, since damage may occur during the work or the length is not what is needed.
After this, apply the markings with a marker or pencil. Decide how many centimeters from the ceiling the structure will be located. The spacing is based on the width of the fixture housing. Since spotlights are most often placed in the bathtub, the required distance is approximately 5 cm. If the body is wide, then you need to retreat more.

Use a tape measure to find the lowest angle. The required distance is counted and installation begins precisely from this point. Draw an installation line along the entire perimeter of the walls.
After this, it’s time to purchase materials. We have already talked about different types of structures above, so choose which one suits you. For installation you will need:
- aluminum slats;
- starting profile;
- pendants;
- stringer.
In addition to materials, you will also need tools, so if you are missing something, buy more.
- perforator;
- screwdriver;
- metal scissors;
- dowels and screws.
Now it’s time for the actual installation. The first step is to install the frame. Attach the supporting profiles to the wall and mark the holes. The distance between the holes is approximately 50 cm. Drill the holes, and then fix the profile with screws.

The next step is attaching the hangers. The approximate distance between them is 100 cm, the very first one should be located no further than 30 cm from the wall. Mark the location of the holes and drill holes. Secure the hangers with self-tapping screws and bend the edges. The structure must be level, so after installing some elements, check the levelness with a level. The supporting rails are installed on self-tapping screws perpendicular to the suspension at the level with the profile. The frame is ready, then the slats themselves are installed.

Install the slats carefully, since they are the front side. Remove the protective film from the slats. On some slats at the back, mark the location for the lights and cut out holes. If you need to shorten the slats, you can use a hacksaw. The length should be 1 cm shorter than the distance between the walls. Often in apartments the walls and ceilings are uneven. Never cut all the planks at once. Adjust each strip to its length separately; this will save you from unpleasant surprises and you won’t have to throw away the damaged strip.

Insert the first rail all the way, you will hear a click. Depending on the type of rack engagement, you may need additional strips. If they are necessary, then install them alternately with the slats. If not, then the slats are inserted close to each other. Fill the entire ceiling like this.
As the work progresses, install the lamps in place, connecting them to the wires. Then check if they work. The ceiling is ready.
If you ever need to dismantle the ceiling, simply remove 1 strip at a time from the mount.
The frame is removed by unscrewing the screws. And if you are going to make some non-standard designs, then the profiles for the slats are installed in the same direction. Those. if their location is diagonal, then the profile is installed in the same position.
Rack ceilings in various interiors
Slatted ceilings can be used in several colors; this will dilute the interior and make it more interesting. But choose colors so that they are in harmony with the overall colors of the design. Those. whatever color predominates in the room should also predominate on the ceiling.
Two-level ceilings look unusual and impressive. But be careful when choosing multi-level structures with an abundance of details, such ceilings significantly reduce the height; if you have low ceilings, you should not experiment.

For those who are not afraid of experimenting with the interior, there are interesting design solutions combining different materials. The photo below shows slatted ceilings in combination with suspended ceilings.

Mirror ceilings are the most common type, thanks to which they are widely known. Gives the room shine, and in combination with the right lighting will make your bath simply shine.

Depending on the geometric shape of the bathroom, the slats will look different. So, for example, in a square room it will be more effective to place slats diagonally, and in a rectangular room along.

All work on arranging the ceiling in the bathroom is carried out last.
In the bathroom, a good solution would be to install a slatted ceiling. Before installation draw a diagram of the room, mark where the lamps will be and calculate the required number of wall corners, support rails (stringers), hangers and panels.
The next step is to prepare the ceiling space, the surface is treated with an antifungal primer or anti-mold solution.
To perform installation, you need to purchase the following materials and have the following tools:
- , its kit includes load-bearing combs, a wall profile and slats;
- pendants;
- dowels;
- perforator;
- screwdriver;
- water level;
- building level;
- scissors or hacksaw for cutting metal;
- measuring instruments;
- marker.

If you are creating a multi-level ceiling, then the calculations and markings will be more complex.
The distance between the main one will depend on what you plan to place there, if only electrical wiring, then 5 cm will be enough, if built-in lamps are installed, then this distance will be increased.

Apply markings under the load-bearing combs, we draw the lines parallel to each other, and in relation to the panels, at right angles.

The wall profile is fixed to the wall in increments of 40-50 cm, after that, according to the completed markings install hangers. The outer hangers should retreat from the wall by 30-40 cm, and the distance between adjacent elements should be from 1.2 to 1.5 meters.
After installing the hangers, they tires with grooves are fixed.

The stringers should be shorter than the length of the room and not reach it by approximately 1 cm, this will compensate for their possible expansion.
Panel installation
You need to cut the panels, keep in mind that they are made several millimeters shorter than the distance between the supporting profiles. Into the grooves of the carrier comb panels are inserted until a characteristic click occurs, which indicates their fixation.

It is rare that the entire last panel can be installed; it is usually cut off. To make the installation process easier, the cut panel is installed next to last, and the length of the latter is made 14 mm less.
In order to ensure a long service life of the slatted ceiling, it is necessary to perform its installation efficiently and properly care for it:
- plastic and metal panels are not afraid of water, they can be wiped with a damp cloth soaked in a non-abrasive detergent;
- for the kitchen, aluminum construction is best suited;
- metal elements are environmentally friendly, therefore they are used in both residential and non-residential premises;
- For the kitchen you need to choose panels with a protective film.
Conclusion
Since the installation of a slatted ceiling is simple, any home craftsman can handle it with his own hands. The main thing is to follow the instructions, carry out the markings correctly and securely fasten the hangers.
Useful video
Installation of slatted ceiling, video:
In contact with
Suspended structures on the ceiling in the shower room not only allow you to decorate the room, but also perform practical functions. The functional frame reliably hides unaesthetic communications. Another question is, which design or model should you choose? To do this, certain conditions must be met, for example, the possibility of DIY installation. In addition, you need to consider that the bathroom is a specific place.
The operation of finishing materials, as well as household items in the shower room, is complicated by the peculiarities of the room. As a rule, difficulties arise with high humidity, temperature changes, the occurrence of fungus or mold, as well as other negative factors. In addition, the future slatted ceiling for the bathroom must have durability, strength, reliability and other advantages. Therefore, the choice of suspended structure should be approached carefully.
Strengths
Slat ceilings for the bathroom must have many advantages in order to successfully withstand various negative circumstances. Separately, it is worth noting that the appearance of the ceiling covering must meet high standards and fulfill its direct functions. It is desirable that the installation can be done by hand. After all, installation of the frame is one of the most important activities.

Advantages of ceilings:

These technological and operational characteristics help the rack floor to remain one of the leaders in the domestic market. The main advantages in the form of ease of installation with your own hands, as well as low maintenance requirements, allow the frame to remain a desirable purchase. In addition, the attractive appearance and wide variety make it possible to experiment with design in the bathroom. Which ceiling is better to choose?
Varieties
A slatted ceiling in a bathroom can surprise not only with its variety of shapes and sizes, but also with the variety of materials used. The coating is covered with various products. In order to correctly decide which material is better, you need to know all the advantages and disadvantages of each of them.

Wood
Wood has always been considered the most popular material for finishing work. Currently, wooden products are used not only as flooring, but also as ceiling partitions. A striking example of the successful use of wood is a bathhouse. Different species are used for use under suspended ceilings, so their qualities are generalized. Strengths:
- Environmentally friendly material.
- Natural color and structure.
- High level of sound insulation.
- External aesthetics.
Wooden flooring is suitable for lovers of a rustic or natural style in decoration. However, in addition to its advantages, like any other material, wood has its weaknesses. Minuses:
- Low degree of fire resistance.
- High price.
- Short service life.
- Absorbs water well.
- Weakly fights microorganisms.
- Special formulations are needed for care.
- Additional lighting required.
Aluminum
Today, metal suspended ceilings have turned from an exotic option into commonplace. If previously it was difficult to imagine that the ceiling in the shower room would be made of aluminum, now this is par for the course. This material has a whole list of advantages that allow it to be used in the bathroom.

Strengths:
- Withstands high loads.
- Long service life.
- Easy care.
- Extensive range.
- Presentable appearance.
- Fire resistance.
- It is a source of additional lighting due to the reflective surface.
- Does not collect dust.
- Has good noise insulation properties.
- Not subject to corrosion.
Aluminum products can be installed with your own hands. Installation is relatively easy, since the elements are assembled in a similar way to a construction set, only in larger sizes. In addition, the metal ceiling can be decorated with various images and decorative patterns, which allows the design to have an additional effect. But all the advantages will not hide the shortcomings of the frame. Weak sides:
- Quite a high price.
- When processing the material, certain difficulties arise.
- Some multi-level structures will require the participation of specialists.
Typically, buyers of aluminum floors are wealthy people. However, even less wealthy citizens can afford to purchase a metal ceiling, as it will pay for itself over time. Externally, aluminum looks impressive and is suitable for those who prefer high-quality and durable materials with a certain amount of sophistication or even luxury.
Plastic
What other material can you choose if not plastic? These products are characterized by high performance properties, attractive appearance, and functionality. Assembling the structure with your own hands is a real deal. Installation can be carried out without hiring workers, which adds fans to this type of ceiling.

Advantages:
- low price;
- ease of processing of products;
- easy care;
- high water resistance;
- a wide range of;
- ease of installation.
In order to choose plastic, you need to weigh all the pros and cons. The possibility of installing it yourself attracts many, but you will have to try to correctly assemble the entire structure. Although there shouldn’t be any special problems with this either. However, the plastic ceiling still has its weaknesses and not always pleasant ones. Flaws:
- fragility of the material;
- short service life;
- flammability;
- poorly withstands mechanical load.
Most consumers choose a plastic ceiling for their shower room. This is explained by the low cost of the product compared to its analogues from other materials. It is worth noting that there are other advantages in sufficient quantities. In addition, ease of maintenance and long service life are also on the side of the plastic construction.
Video instruction
5986 1 0
Slatted ceiling in the bathroom: 5 efforts, after which your family will proclaim you “a great master with golden hands”
A slatted ceiling in a bathroom is no longer an “overseas” novelty, but a very popular and effective option for updating the interior, which you and your loved ones will surely like. But for this you will first need to show some effort when performing installation work. I will introduce you to them in detail based on my own experience.
Reasons for popularity
Such an interesting method of arranging the ceiling came to us back in the very nineties, along with the craving for the so-called “European-quality renovations”. The first sets of aluminum slatted ceilings were straight from Germany, which was strikingly reflected in their cost towards a fabulous increase.
Therefore, this finishing method did not immediately become popular, although it showed itself to be very good, demonstrating the following positive aspects:
- High moisture resistance, which is the initial requirement for bathrooms;
- No tendency to ignite. Of course, on the one hand, we are talking about a room in which the probability of a fire occurring is very low, but on the other hand, firstly, increasing the level of fire safety is never superfluous, and secondly, no one prohibits the installation of a rack structure, for example, in the kitchen, where non-flammability becomes much more important;

- Resistance to temperature changes. That is, for a country house that you do not visit and, therefore, do not heat in winter, the type of finishing in question is also completely suitable;
- High strength parameters. It won’t fall on your head at the most inopportune moment;
- Has a dust-repellent coating. Plus to keeping it clean;
- Environmental friendliness, which is also quite important for the place where water procedures are taken;
- Easy to care for, during which you can use any household chemicals;
- Easy installation, easy to do with your own hands. This is what we will discuss in more detail below;
- Aesthetic appearance, fits into almost any interior design;

- Possibility of masking communications. All wiring is perfectly placed behind the slats.

The price today is also has become much more accessible thanks to the presence of domestic production:

The only drawback is the peculiarity of all suspended ceilings, which is that after installing the entire structure the room will be 50-150 mm lower.
If you want to visually compensate for the decrease in ceiling height, then I recommend purchasing chrome models, which will easily “stretch” the room upward due to the mirror effect.

You have probably already noticed that we are talking specifically about aluminum. And you may have a completely reasonable question: why not make a plastic slatted ceiling? After all, it will certainly be cheaper. The fact is that a plastic rail can simply bend under its own weight, and only metal can provide sufficient strength.
Let's get started
Before installing a slatted ceiling in the bathroom, you need to make an effort to complete some preparatory steps:

Effort #1: Measurements
This is a very short point, but I definitely want to focus on it, because, Without knowing the size of the ceiling in your bathroom, there is no point in going to the store for materials. No, you, of course, can go and skimp, estimating “by eye” the area of the room, but in this case, it is almost certain that either there will not be enough slats, or there will be extra ones left.
Both situations are quite unpleasant, so pick up a tape measure, climb on a stepladder and take all the necessary measurements in advance.

Effort #2: Going to the store
After I found out the exact area to be covered with slats, I went shopping. And the first thing I had to choose from was what the finished structure would look like:
- Closed. In this case, all the planks are installed close to each other, which as a result resembles a wooden lining. This option seemed boring to me and I immediately discarded it;

- Open. In this case, there remains a gap between the products, which, again, is completely unsuitable for a bathroom. Typically, such a design can be observed in rooms where the ceiling height exceeds five meters;

- With inserts. But this is exactly what you need for the bathroom. Here, just like in the previous version, there are gaps, only they are closed with special beautiful inserts that perfectly complement the overall design of the structure.

I settled on the last option. It includes the following elements:

When purchasing materials, do not forget about screws and dowels. If you don’t have them on your farm, be sure to buy them; they will be needed during installation work.
The range of panels is quite large, and it is very important to choose the right size. Here's how I approached this issue:
- Length. The standard is 300-400 cm. There is nowhere to go, and if, according to the measurements taken, you do not need such long products, then you will have to shorten them with a hacksaw;
Sometimes stores themselves offer a service for cutting sections, in which case I recommend taking advantage of the offer, as this will greatly simplify the entire installation process. For example, I did exactly this.
- Width. Standard – 9-20 cm. For a small bathroom the best option is ten-centimeter samples, which look most organic in such cramped spaces. If you have a spacious bathroom, then you can experiment with wider slats, but I don’t recommend getting carried away in this direction, so as not to spoil the overall interior;
- Thickness. Half a millimeter is ideal, which guarantees the stability of the rail, eliminating the possibility of it sagging, and at the same time allows it to remain graceful and light.
Well, decide which color to choose in accordance with the rest of the bathroom interior.
Never buy products without a protective film, as their coating will most likely be damaged during transportation. And in general this is a sign of low quality product.
Effort #3: Preparing Tools
To complete all the necessary work, I needed the following accessories:

Effort #4: installing the frame
The actual installation of the slatted ceiling in my bathroom began with the installation of the frame:
- Before installing load-bearing structural elements, I took care of the electrical wiring. To do this, I routed the wires to the points where I planned the installation and tied them up so that they would not interfere with further work. I also advise you to complete this step in advance;

- Then he stepped back 150 mm from the ceiling and, using a spirit level, drew a straight horizontal line around the perimeter of the entire room;

If the installation of a slatted ceiling is carried out in a spacious bathroom or in another room altogether, then I recommend renting a laser level. With it, the markings will be applied much faster and more accurately.

- Along the marked lines with a punch made holes in the wall in 50 cm increments, which were then filled with dowels. A hammer may also come in handy here if the plastic cylinders become difficult to fit in;

If the walls in the bathroom are tiled, as is often the case, then do not forget to use a special drill. Otherwise, you risk damaging the cladding.

- Marked the guide profiles, after which he cut them and drilled them;

- Before attaching them, I checked again that all the holes matched. And only then did it fix it with self-tapping screws using a screwdriver;

- Now I marked the placement of hangers so that there is a gap of 100 cm between them, and 30 cm between the outer fasteners and the wall;
- Drilled holes in the ceiling and filled them with dowels;
- To the first attached the suspension and secured it with a self-tapping screw;

- He bent its edges. The result is a kind of bracket, as shown in the photo:

- I installed the remaining fastening elements in the same way, checking the operation with a spirit level;
- I took the first support rail, placed it strictly perpendicular to the suspension at the same level as the nearest guide profile and secured it with self-tapping screws;

- I also accurately installed the rest of the traverses. It is very important here to create an even structure, so use a building level at every step and correct all inaccuracies in a timely manner.


Effort No. 5: installing slats
Now the most important process begins, the result of which you will have to admire for many years. I did it like this:
- Moving on to working with slats, removed the protective film from them;
- Carefully marked on the back side where there should be holes for lighting fixtures. If you have products of standard sizes, and you did not order them to be cut to fit your bathroom, then you also need to mark the required lengths;
- Inserted the bit into the screwdriver and made seats for LED lamps, also drilling from the back. Here you will also have to work with a hacksaw in order to shorten the slats;

- Starting from the wall inserted the first rail into the mounting rails until a characteristic click was heard, bringing its edges into the grooves of the guide profiles;
- Then he placed the next bar at some distance and installed an insert between them;
- Likewise filled the entire ceiling;

- I fixed the fillets around the perimeter using a special one. In this case, corner products should be cut at an angle of 45 degrees so that their joining has an aesthetic appearance;
- I connected the lighting fixtures to the pre-prepared wires and inserted them into the seats, securing them with spring mechanisms. He flicked the switch, checking that the lighting was working;

- I called my family to applaud the results of my work. Although, to be honest, I first sat down to rest.
If you are wondering how to disassemble the installed structure, then all you need to do is remove the bars from the fastenings, and then unscrew the tires themselves with the suspensions. That is, dismantling will also not be difficult, which can be attributed to the additional advantages of this type of finishing.
In general, it was precisely thanks to the simplicity of the described actions that I did not have a choice: a suspended or slatted ceiling, since in the first case, most likely, I would still have to invite specialists, but here even a person whose professional activity is not related at all can cope with everything with construction or finishing works.
Conclusion
A slatted ceiling is an ideal option for a bathroom. It will provide both a modern, beautiful design and durability. In addition, with a little effort, you will be able to handle the installation work yourself, which will not only save your family budget, but will also elevate you in the eyes of your family and friends. The main thing is to be careful and extremely attentive during the work process so that the result is decent.

The video in this article will be able to provide you with a certain amount of additional information regarding the materials presented. If you have any questions on the topic, then ask them in the comments.