Installing a sink in the kitchen: video instructions on how to do it yourself correctly and photos. Self-installation of countertop and mortise sinks in the kitchen - instructions Installation of a mortise kitchen sink
Read also
To properly install a kitchen sink into a countertop, you need to choose the right method of mounting the structure. Depending on the type of washing, experts recommend adhering to certain rules. The cut-out countertop is considered the most popular type of sink. To install it correctly, you will first have to cut a hole in the tabletop. It is important to correctly calculate the dimensions of the structure, otherwise it will not be possible to install it properly.
What do you need to know about installation?
There are several rules that are important to follow when installing a sink. They will help improve the operation of the finished structure. The point is that:
- It is best to install the sink near the work surface;
- it should divide the tabletop into two parts, on one side of the sink they cut the products, on the other they serve;
- the height should correspond to the height of the housewife or those who will use the kitchen in the future.


All installation work is divided into two stages:
- Preparation;
- installation work.
At the first stage, it is necessary to collect all the tools that will be used in the work process. To do this, you will need a screwdriver of different sizes, a jigsaw, an electric drill, and a drill bit of the same size that works on wood. Pliers and screws will also come in handy. A pencil is needed to outline the outline, sealant, and a rubber seal. If the countertop is not ready for installation, you should measure the dimensions of the sink and correctly cut the hole for its installation.
If the countertop is made of stone, then you should prepare the tools that are used to work with this material. The same goes for hardwoods. If a countertop made of such raw materials is used, then the connector for the sink must be cut out in advance, otherwise it simply will not be possible to install it.


How to properly secure a sink?
To securely secure the sink, you should use high-quality sealants. It is also important to carry out preliminary measurements correctly, otherwise the structure simply will not fit into the hole. Before inserting the sink into the countertop, it is necessary to apply sealant along the edge of the product. The rubber seal will help get rid of cracks where moisture can appear. We must not forget that sealant is also first applied to the seal. It must be attached around the entire perimeter of the structure. After the above steps are completed, you need to install the sink in the hole and press it well. Only after this are the hoses and mixer connected.


If the size of the sink is larger than average, then it is necessary to use additional fastening materials; in this case, sealant alone is not enough. The weight of dishes placed in the sink can cause the sink to fall into the cabinet.
Internal sheathing or auxiliary bars will help strengthen the structure. But this is only necessary if the size of the sink is very large or a double design is used. In other situations, regular sealant glue is sufficient.


Installation details
Experts say that installing a built-in sink is a more complex process. Usually the kit always comes with a cardboard template that shows exactly what hole should be cut in the countertop. If it is not there, then you will have to use the design itself. To begin with, the template is placed on the surface and its contours are traced using a pencil. First you need to secure the cardboard tightly with tape.
After the template is outlined for the first time, you should step back one or one and a half centimeters and re-outline the template. It is the second line that is used when working with a jigsaw. Then a drill is used in the work, with its help a connector for the jigsaw is made. The drill must have exactly the same parameters as the tool itself.


Following the jigsaw, sandpaper is included in the process. With its help, you need to thoroughly clean the surface and completely get rid of sawdust. Once the hole is cut, the sink is fitted.
It is important that it fits tightly; the dimensions must correspond to the cut hole. Only in this case will it be possible to install the structure correctly.

How to install a faucet?
The next important step is to embed the faucet into the installed sink. The cutting process depends on the type of product. The most commonly used kitchen sinks are stainless steel. The first step is to wind FUM tape onto the threads of the flexible hoses. If the latter is not at hand, you can use a polymer thread. This process will ensure complete sealing of the structure. The hoses are then connected to the housing.
Someone may think that the presence of a standard rubber seal makes it possible not to use tape; this is a rash opinion. Rubber does not provide 100% leak protection. When screwing in the hose, do not hold it by the whip. Otherwise, it can be torn in the area adjacent to the sleeve. To avoid this, a special key is used when installing the mixer.


It is important to first put the union nuts into the hole in the sink. And only then stretch the mixer body to the installed sink. For this purpose, a nut with a stud is used; if necessary, it can be replaced with a wide plate.
For maximum tightness, it is necessary to install an O-ring before screwing the sink. Experts recommend that when installing the trim, do not apply much force, otherwise you can tear out the insides of the sheathing.

Step-by-step instruction
The process of installing a kitchen sink consists of several stages. Following these tips, you can install the sink and install the faucet yourself. And also cut a hole in the tabletop. The preparation stages consist of the following steps:
- first of all, you need to stick the tape responsible for the seal, retreating 3 millimeters from the edge of the sink;
- It is important to apply silicone sealant around the perimeter; it should extend beyond the boundaries of the tape;
- the next stage is installing the sink in a pre-prepared hole in the countertop;
- remove excess sealant around the edges of the structure.


After the above manipulations, you can begin to connect the flexible hoses through which water is supplied. Then a siphon is installed. But at the very beginning you should cut a hole in the tabletop. Its dimensions must correspond to the dimensions of the sink. Therefore, the measurement is carried out carefully, it is better to measure several times and ensure the accuracy of the data obtained
The sequence of instructions may vary depending on the type of sink. But the main steps remain the same.
To learn how to install a sink into a kitchen countertop yourself, see below.
Anyone who has purchased a new kitchen set or decided to replace an old sink with a new one asks the question - “How to attach the sink to the countertop?” There are a few fairly simple rules that will allow you to do this work yourself, without resorting to the services of a specialist.
Choice of material – porcelain stoneware or metal?
If you are just planning a purchase, it makes sense to take a close look at the options presented on store shelves. Kitchen sinks can be overhead, mortise or wall-mounted according to the type of fastening. The first two options are the most common. They can also be made from various materials:
- stainless steel;
- enameled metal;
- porcelain stoneware;
- artificial stone;
- acrylic;
- glass
The next point in the classification of kitchen sinks is their shape. Today, you can find not only traditional rectangular sinks or sinks that are located in the corner, but also round and more intricate bowls. When choosing an extravagant configuration, make sure that it does not affect the ease of maintenance and cleanliness of the kitchen. It also makes sense to decide on the number of bowls (often there are two), the location of the mixer and the presence of additional functions, such as the possibility of installing an additional tap for filtered water or an overflow.
But if the shape and the presence of additional “options” are still a matter of taste and comfort, then the material from which the sink is made directly affects its durability, practicality and ease of use. Let's consider the two most popular options: metal and porcelain stoneware (artificial stone). Both have their advantages and disadvantages. Knowing them, you can choose the most suitable one for yourself.
A metal sink is a time-tested classic; it fits most interiors, is simple and reliable to use, easy to clean, can withstand hot boiling water and impacts (if a pan falls, for example). Among the disadvantages is the noise that is created by both the water from the tap and the dishes if it is moved along the bottom of the sink. It is also quite difficult to achieve the initial shine: drops leave marks on the surface.

The porcelain stoneware sink looks expensive, it is durable and strong, environmentally friendly, and comes in a wide variety of colors and configurations. But you will need to be much more meticulous about cleaning it. Well, the main argument not in favor of this option remains the rather high price. Analogues made from artificial stone are much more affordable, but are inferior to sinks made from stone chips in many respects.
Installing a sink in the kitchen - cut in or overlay?
Installing a sink in the kitchen largely depends on whether the structure in front of us is an overhead one or a mortise one. Until recently, the vast majority of sinks were metal and countertop, standard in size. The kitchen cabinets corresponded to the same dimensions. The sink was simply placed on the side vertical walls, and it became the top horizontal surface. The new generation of bowls, as mentioned above, are varied in both shapes and sizes, so most of them are mortise-mounted: a suitable hole is cut out in the durable and monolithic countertop of the kitchen unit and the sink is installed.

Since, due to the plumbing line, sewer pipe and siphon, and sometimes several siphons, the sink cabinet does not have a back wall and additional stiffeners, its assembly and installation must be done with special care. All open sections should be treated with water-repellent agents, otherwise the material of the housing will be deformed due to moisture, creating a favorable environment for the development of fungi and mold.
So, to install an overhead sink with your own hands, we will need:
- sink and cabinet;
- electric drill;
- wood drills;
- screwdrivers;
- pliers;
- silicone sealant (preferably transparent);
- tape measure or ruler;
- masking tape;
- self-tapping screws;
- L-shaped fasteners with oblique slots.
If the sink is light, it can be secured using only one sealant; it will simultaneously act as glue and will not allow drops of water to flow under the metal surface. A more reliable way would be to fasten the washbasin using self-tapping screws. On the assembled cabinet you need to install 4-5 special L-shaped fasteners, which are sold in specialized stores. To do this, secure them with self-tapping screws in the center of each wall of the cabinet; for reliability, you can make 2 fastenings. The main thing is to correctly calculate the length of the screws - they should not be visible from the outside of the structure. All fastenings must be placed at the same height.
It is much easier to install a sink on which a siphon and faucet are already installed, since this will be inconvenient to do afterwards. Especially when it comes to a corner structure.
If you have not done this before, treat the cabinet sections with a sealant or moisture-repellent compound. After this, the sink is inserted into the cabinet, the fasteners are tightened, securely fixing the structure. In modern versions of overhead sinks, even more elementary fastening is provided, when self-tapping screws are fixed vertically in the upper sections of the cabinet walls. The sink, which has corresponding holes, is put on the heads of the screws and pushed in in a given direction. In this case, the main thing is to correctly measure the places where the screws are attached.
How not to make mistakes during installation - do you need a partner?
If you purchased an undermount sink, carefully read the instructions on how to install a sink in your kitchen. Installing a sink into a countertop requires precision and accuracy. Otherwise, you risk ruining the surface, which is quite expensive. You will also need a marker, template cardboard, a wood or jigsaw, a cloth or a special sponge to remove excess sealant.
You can mark the hole directly on the tabletop, but if you do not have sufficient experience in such work, it is better to first make a template from thick cardboard. So, carefully measure the inside of the sink and transfer these measurements onto cardboard, cut out with a small margin, attach the template to the bowl, and make adjustments if necessary. If the sink has a wing - a working surface on which you can place washed dishes, decide which side is more convenient for you to place it on. The template is convenient because it makes it easy to imagine what the installed sink will look like, where the faucet will be, and whether wall cabinets will interfere.
All this needs to be cleared up before creating the hole. Once you have decided, secure the template with masking tape, outline with a marker and remove. It wouldn’t hurt to cover the perimeter of the future hole with tape; this will protect the decorative coating of the tabletop from mechanical damage. Use an electric drill to drill several holes close to each other. Choose a comfortable place, such as a corner. Connect them using a chisel and start cutting out the hole using a manual or electric jigsaw. Constantly check the correctness of the cut line. Since modern countertops are quite thick, the jigsaw blade may break, so have a spare one ready just in case.
It is advisable to use the help of a partner who will hold the blade of the hole being cut from below, otherwise it may fail under its own weight and the fracture will come out crooked. Observe safety precautions and do not injure the assistant’s hands. Seal the edges of the resulting hole from moisture. Assemble the sink, install the siphon, mixer, and install the necessary gaskets. Apply caulk around the entire perimeter of the hole, right up to the edge. Install the sink and press it firmly. The sealant will securely fix the bowl; remove any excess immediately with a damp cloth or a special sponge.
Allow the glue to set and do not move the shell. Next, connect the communications and make sure there are no leaks. In a similar way, you can install a stone and metal mortise sink. For metal ones on the inside of the kitchen table, sometimes special fasteners are also used that press the bowl and wing to the wooden structure. Installing a stone sink does not require them, since the heavy sink is quite securely fixed to the sealant.
How to install a sink in the kitchen - drill a hole for the faucet
Sometimes manufacturers give the buyer a choice of where and how to mount the kitchen faucet. This often applies to sinks made of natural or artificial stone with a wing or an additional small bowl. For some it is convenient to place them on the right, for others on the left. It happens that in such sinks at factories they make two holes on both sides and put a plug in the kit for the excess. But much more often you have to drill a hole yourself, and it’s good if a cutter of suitable diameter is hidden in the box with the sink.
Such a cutter or crown will be needed in any case. Many craftsmen, especially when working with sinks made of artificial stone, are afraid to make a hole, they are afraid that the bowl will burst or the edges will turn out sloppy. If you follow all the rules and take your time, problems should not arise in such an important matter. Stock up on tools and get started. But first, here are two helpful tips. Drill the hole in a ventilated area, as resins emit a rather pungent odor when heated. Place the sink itself in the box in which it was sold or in another suitable size. This will help you easily keep your house clean, since the process produces a great many shavings.
- Carefully measure the location of the future hole and mark it with a marker.
- Drill a hole in the center with an electric drill. Start slowly, at low speed, to prevent the drill bit from slipping and damaging the decorative coating.
- The hole in the center is necessary because the cutter or crown has a point in the center and is thus fixed in one place.
- Place the cutter on the drill, start drilling a hole, take your time, hold the tool strictly vertically, and securely fix it so that there are no chips or scratches.
- In the case of a porcelain stoneware sink, it is necessary to additionally protect your eyes with glasses, and add water to the cutter, which will become very hot, to cool it.
- Install the mixer into the finished hole and finish as described above.
The main thing to remember is that not only the aesthetics of your kitchen, but also its durability and safety depend on compliance with basic rules and the sequence of work. And the money saved on the services of a master can be spent on something more pleasant.
But it still occurs in cheap kitchens. It is installed on the box from above, and the box must have standard dimensions that exactly match the dimensions of the sink.
The most common standard sizes of sinks are 600x600 mm and 800x600 mm, small-sized 500x600 mm are also found, they say there are also 1000x600, but I haven’t seen them.

For fastening we will need plastic clamps (4 pcs.) These are corners with a jagged slot ending with a hole for the screw head on one of the sides. You need 4-5 of them. (often you have to take them separately, since they are not included in the kit).

Now we move on to marking the clamps: place the clamp on the box and draw a line in the jagged slot with a pencil.

Move the clamp to the side and tighten the short self-tapping screw (not all the way) 5 mm above the marked hole for the cap. This manipulation is repeated for each clamp.

To waterproof the edges of the sink, as well as to attach it to the box, we coat the edges of the box with silicone sealant.

Before installation, it is advisable to assemble the sink, that is, install a mixer and siphon on it, since this will be much more difficult to do later. We place the sink on the box, aligning it along the edges. We place the clamps on the edges of the sink (which lie on the end of the box), insert the heads of the screws into the holes and move the fasteners forward (as shown in the photo). The self-tapping screw, moving along the toothed slot, lowers the clamp along with the sink, pulling the sink to the box.
When purchasing kitchen furniture, it is often necessary to replace the old sink with a new model. Installing a sink in the kitchen without the use of outside help is possible - the procedure is simple, but you need to know certain features and rules of different installation methods.
Main types of sinks and installation methods
The modern market of plumbing fixtures offers a large selection of sinks for the kitchen. They have different installation options and are made from different materials:
- stainless steel;
- stone;

- ceramics.

According to the installation method, the following types are distinguished:
- invoices- mounted directly on top of the cabinet, instead of the countertop. This option is the easiest to install with a modular kitchen design. Overhead models are almost never used for solid countertops, so as not to create a gap between the cabinets;

- mortise- a common option for the kitchen, suitable for installation in countertops or cabinets. In the first case, you will need to cut a hole for the sink of the required size;

- integrated- the sink and the cabinet are a single whole, this method is used during the manufacture of the set;

- under-table- a modern installation option in which the sink will be slightly lower than the countertop. The ends of the working area are under constant exposure to water, so you need to choose moisture-resistant materials; MDF and chipboard are not suitable; glass or stone are preferable.

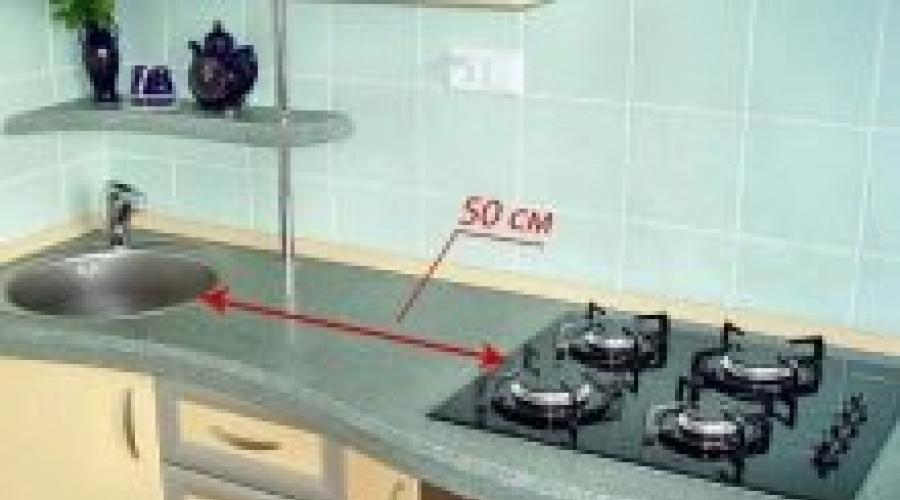
The kitchen must be ergonomic so that it can be used quickly and comfortably. When installing a sink, you need to take into account that the distance from it to the refrigerator and stove should be at least 40 cm; a similar rule applies to the hob and refrigerator.
For right-handers, it is better to place the sink on the right and the dryer on the left. The sink should be located in close proximity to the water supply and sewerage system.
When choosing a sink, you need to consider several important features:
- capacity, which determines the number and size of dishes in the house that will be used most often;

- functionality, which is characterized by the work carried out in the kitchen. For example, you can buy and install a sink with several bowls, with wings, drainage and other accessories. Such elements will simplify work if cooking, washing dishes and other activities are carried out very often;

- ease of use- it depends on individual characteristics, the housewife should be comfortable using the product;

- wear resistance- determined by shell materials;
- combination with style kitchens.

To perform high-quality installation work with your own hands, you should understand the basic rules and errors of installation, the stages of work for different types of installation.
Rules for installing kitchen sinks

When deciding on the method of installing a sink in the kitchen, you need to understand that you will be able to do the work yourself with an overhead or mortise version. Other models require not only specific knowledge and skills, but also additional tools. Before starting work, a siphon for water drainage, a mixer are installed, and all materials and tools are prepared.
During installation, it is important to consider additional rules:
- The sink divides the workspace into 2 zones. On one they carry out dirty work, on the second they carry out clean work;
- the sink should be placed close to the work area to simplify the process of cleaning, cutting and other actions;
- you need to use the “golden triangle” rule - place the sink at a standard distance from the refrigerator, stove and other appliances;

- the height of the sides of the bowl should be level with the cutting part, the standard size is 82–86 cm;
- be sure to use a level when placing the sink to prevent distortion and align it strictly horizontally;
- installation is possible only after installing water pipes and sewerage;
- the brackets must tightly fix the plumbing fixtures, eliminating any backlash;
- all water supply hoses must be placed freely, without fractures or bends;
- you can install the sink opposite the window;
- if the kit includes rubber seals, it is better to use sealant instead, this will increase the service life and tightness of the structure;
- Stone sinks are best installed by two people due to their heavy weight.
In fact, plumbing fixtures are placed next to water and sewer pipes. This is done in one of the corners of the kitchen or on a certain wall. Modern materials and installation methods make it possible to install the product anywhere in the room. The choice of installation type depends on the individual preferences of the owners and the style of the kitchen.

To install overhead models yourself, you do not need professional tools. If the mortise type is used, then you need to prepare in advance:
- drill and drill bits of different diameters;
- screwdrivers;
- tape measure, ruler and pencil;
- sealant, sealant;
- hacksaw or jigsaw.
Now you can begin the actual installation work.
Assembling the sink, faucet and siphon
The easiest way to install is with the sink assembled with a faucet, hoses and siphon. The assembly of the structure is carried out according to the following scheme.
- Initially, a pin is placed on the faucet and secured with a nut; these elements are always included in the kit.
- Hoses are connected to the mixer. The short needle is connected first, then the long one. They are screwed in by hand and tightened with a wrench with medium force to prevent damage to the gasket.
- The hoses are passed into the hole on the sink, the mixer itself is inserted using a moon-shaped gasket, everything is secured with a nut clamp.
- Next, the siphon is assembled and connected. At this stage, it is enough to secure the drain and overflow parts.

Having assembled the main parts, you can begin installing the sink into a cabinet or countertop.
Installation of an overhead sink
Such models are most often made of stainless steel. On either side of the sink there are curved edges that match the thickness of the cabinet slide. To simplify fastening, a frame made of wooden blocks is often placed in the middle. If the cabinet is of standard sizes, then there are no difficulties with the entire procedure, but, depending on the type of sink, there are several installation options.

Glue mounting
The installation scheme is the simplest, even beginners can handle it. The sink is placed on a prepared cabinet, and the sanitary ware itself should be wider than the underframe, and the ribs will cover the slide of the cabinet. The ends of the furniture must first be coated with silicone-based sealant around the entire perimeter, the sink must be installed and pressed down.

After the adhesive mixture has completely dried, a tight fixation will be obtained. In addition, silicone will prevent water from getting under the cabinet.
Bracket mounting
In this option, the sink is fixed with fasteners, which are sold separately or included with the plumbing fixtures. First of all, screw the screws inside the cabinet, put the brackets on them, but do not clamp them. You should tighten the screws on the sink and place it, move the fixing corners along the screws so that the self-tapping screw fits into the recess and the sink fits tightly to the furniture. Finally, tighten the fasteners and, if desired, lubricate everything with sealant.

Mounting on a wooden frame
If standard fasteners are not suitable or are not available at all, then make a wooden frame with your own hands. The bars must be placed in the cabinet around the perimeter, and metal corners must be screwed in. The height of the slats can be adjusted so that the sink is level with the rest of the furniture. The kitchen element is placed on the finished frame and additionally coated with sealant.

Any fasteners should be tightened manually with wrenches, without using electric tools, to prevent damage to the plumbing. If you use a sink made of artificial stone or other heavy materials, then you need to prepare additional fasteners. For this purpose, a metal or wood strip is suitable, which is placed on the back wall along the length of the sink.
When a ceramic sink is used, it can be installed without a cabinet, directly to the wall. For this, special fasteners are used. The execution procedure is as follows.
- The height is marked on the wall, the standard size is 80 cm, but it is important to take into account the height of the owners and the location of the furniture.
- A second line is drawn a little lower, and the distance between them indicates the thickness of the back of the sink where the fasteners will be located.
- The distance between the holes in the plumbing for its fastening is measured and the data is transferred to the wall.
- The wall is drilled, a bracket is inserted, and the sink is fixed on it.
When using the described installation rules, overhead kitchen plumbing fixtures will be installed independently in a short time without any particular difficulties. A properly performed process will ensure a long service life.

Installation of mortise sinks
Built-in sinks are equipped with fastening parts, as well as a cardboard template for marking the countertop, thereby simplifying the entire process. If there is no template, then the sink itself is used to correctly draw the contours. Similar to the instructions already described, it is necessary to assemble all the elements in advance. The scheme for doing the work is as follows.

Leave the plumbing for 3-5 hours so that the silicone dries, then connect to the sewer. The corner sink is mounted in a similar way; there are no special features other than placement in the countertop.

Installation of other types of sinks and connection to sewerage
In addition to the overhead and mortise models of sinks, there are other types. Their installation is often carried out by specialists, due to the need for experience and special tools. For the under-counter option, you will need to make a neat and even cutout in the countertop according to the clear dimensions of the sink.
The sink is lowered into the cut hole, and its edges should fit tightly, this will prevent moisture from entering. A special fastener or frame is made under the countertop, on which the plumbing rests. All joints must be sealed with sealant. The main difficulty lies in cutting out even and clear dimensions, as well as in fastening. Any mistake will result in the need to replace the countertop.

For an integrated type, the rules are almost the same; it is very important to make an accurate hole and properly seal the parts. Installation begins in a similar way to the mortise type, since a cutout is created in the countertop, with the exception of the sides of the sink.
They go around the perimeter with a rebate cutter to make a recess for the side of the sink. The plumbing fixtures are placed on the sealant, and after it dries, they are fixed with brackets. This option is perfect if the sink and countertop are made of stone - in this case, the perfect combination is obtained.

After installation by any method, the plumbing must be connected to the water supply and sewerage system. First, you need to insert the corrugation from the siphon into the sewer pipe and seal it with a gasket or cuff. Then connect the flexible hoses to the cold and hot water pipes and tighten the nuts. Be sure to monitor the presence and position of gaskets.
Having connected all the elements, open the water, check the quality of assembly, possible leaks. If everything is normal, then the work was done efficiently, does not require any modifications, and the kitchen sink is ready for use.

Selecting a sealant
The sealant plays an important role in installation. The building materials market offers several options for this product:
- acrylic- does not contain harmful substances, excellent for metal, chipboard and MDF, dries quickly. The main disadvantage is strong shrinkage and rigidity; joints can crack over the years and will let water through;
- polyurethane- suitable for places with high humidity and unstable temperatures, has excellent adhesion to almost all materials. The sealant is elastic and practically does not shrink, but it is better not to use it for MDF, chipboard, or plastic. The polyurethane composition is ideal for sinks made of stone, granite, and metal;
- silicone- elastic, does not shrink, has excellent adhesion.
Apply any sealant to clean materials to improve adhesion. Without preliminary preparation, cracks may appear and moisture may enter.

Possible mistakes
When placing kitchen sinks yourself, mistakes are often made that lead to undesirable consequences. People often save space by not taking into account the requirements for the distance between the sink and other equipment, which should be at least 40 cm. There are also other miscalculations:
- incorrect choice of kitchen sink size;
- tilting of the installed sink - occurs if you work without a level;
- incorrectly selected pipes and siphon;
- poor access due to inconvenient location;
- insufficient sealing during mortise-type installation;
- poor-quality fixation of fastening parts, which leads to mobility of plumbing fixtures;
- water penetration under furniture.
To avoid errors and correctly perform the process yourself, it is recommended to familiarize yourself with the video, which describes in detail the work processes and all the intricacies of mortise-type installation:
To preserve its original appearance and for long-term use, it is recommended to monitor the sink, providing it with the necessary care. After each dishwashing, you should wipe the product dry and do not place hot or very cold surfaces. The appearance of an unpleasant odor and leaks leads to the need to inspect the siphon, pipes and mixer - cleaning may be required. If parts are damaged, they are repaired or completely replaced.


Hello, friends.
In this article, we will look at one very serious operation, which greatly affects the quality of the kitchen set.
We will talk about installing a sink. We will look at this entire process from start to finish with all its nuances.
Before installing the sink, you need to decide in which part of the countertop it should be located.
To do this, the countertop must be placed on the lower modules of the kitchen, and the box in which the sink should be placed must be traced from the inside with a pencil (along the countertop) to determine the internal space for it.
After this, you need to place the table bottom up and mark the place for cutting the hole. This is done as follows:
- Then, using a tape measure, you need to measure the distance from the edge to the eyelet into which the fastener is attached.


- Having made 8-10 such “notches”, through them, using the same sink, we draw curves (in parts), which form inside the circle we have drawn, another circle, the radius of which is less than the radius of the main circle at a distance from the edge of the sink to its lug . This will be the circle that needs to be cut out with a jigsaw.
- We make a hole on the inside of this circle with a large drill (usually a drill with a diameter of 10 millimeters).
- We insert a jigsaw file into this drill and cut out a hole. Remember, when the hole is almost cut, to support the cut part of the tabletop, as it may break off, breaking the plastic from the face.
 When the hole is made, its inside needs to be covered with silicone, since this place is the most problematic place in the kitchen. It should be protected as much as possible from moisture getting inside the tabletop, since in this case, the tabletop can simply “tear” from moisture - and this is its complete replacement.

 So, after the hole is “siliconized”, we begin to prepare the sink for insertion.
To do this, you need to stick adhesive tape on its inner surface, which is always included in the kit (plus fasteners and plus plastic tubes for draining).
 Please note before you buy a sink: The adhesive tape (which needs to be glued inside) should not be glued to it. It should come included. In almost all sinks that had adhesive tape pre-applied, it was not applied correctly.
And it is glued correctly so that there is a small distance between it and the side of the sink itself (it looks like a gutter there) where the silicone is poured.
 It turns out that there are two barriers at the same time: adhesive tape and silicone.
So, when all this is done and the silicone is poured, the sink is inserted into the hole cut in the countertop (from bottom to top). If the tabletop is located, for example, on two chairs, then one of them can be immediately placed under the sink, thus fixing it.
 After this, fasteners are inserted into it.
I would like to note that this is one of the most popular kitchen units to install.
The fasteners that attach it to the tabletop are usually poor (meaning poorly thought out). Problems almost always arise with it (for this, you must always have spare versions of this fastener for installation).
 There are situations when it simply does not fix the countertop, but slides off to the sink (which is what happened during the installation, photographs from which are posted in this article as an example).
No matter how much we bent the tendrils of the fastener itself, it stubbornly jumped off the tabletop (and, of course, did not fix it).
The easiest way out of this situation is as shown in the pictures: you need to insert a piece of chipboard, or something else, between the sink and the fastener itself. Thus, the fastener is fixed and, twisting, attracts the sink.

 But, you shouldn’t forget one detail: you need to practice installation, if possible, not for very long, since the silicone that was poured inside the sink, when it was pressed to the countertop, partially “came out” out. It should not have time to harden, since in this case, when removing it, you can also remove part of the silicone located under the sink.
When it is pulled to the tabletop, you need to make sure that there are no gaps between it and the tabletop. If they are, it means she is poorly attracted.
 At the end, you need to wipe off the silicone that has protruded from under the sink and the sink itself.
That's basically all.
This is where I end, see you in new articles.