Installation of a heated towel rail. Step-by-step installation of a heated towel rail with a bottom connection. How to make bends and how to change the riser
Read also
The bathrooms of all apartments have special equipment called a heated towel rail. Installing a heated towel rail or replacing it is a technological process that can be done with your own hands. Of course, for this you need to have certain plumbing skills.
Connecting a water heated towel rail yourself will save money from the family budget and place this system exactly where it is convenient for you. Within the framework of this article, we will talk about the types of modern heated towel rails and the practical replacement of an old dryer with a modern design.
Types of heated towel rails
A heated towel rail is a shaped piece of metal water pipe that is filled with hot water and functions not only as a towel or clothes dryer, but also as a heating system in the bathroom. In houses with a centralized water supply, the dryer crashes into the hot water supply line, and in old-type houses, where hot water is produced by an autonomous gas water heater, the heated towel rail, if necessary, crashes into the heating system of the apartment.
In both the first and second cases, the most convenient time to install a heated towel rail is summer, when all boiler rooms are closed for maintenance.
Choosing a heated towel rail
These systems are made from brass or stainless steel. Previously, dryers had the shape of the letter “P” or “M”, and modern designers offer, in addition to standard shapes, many different options from a chrome “design radiator” ladder to square designs. When choosing a dryer, you should pay attention to the metal from which it is made.
The fact is that the pressure in domestic hot water supply systems can reach 8 Bar, and foreign systems made of brass are not designed for such pressure, therefore beautiful “design radiators” made of brass are best used in private cottages, where the pressure is system does not exceed 5 Bar. For multi-storey residential buildings, stainless steel heated towel rails that can withstand pressures of up to 10 bar are best suited.
Installation of a heated towel rail
Connecting a water heated towel rail begins with removing the old system, provided that a new model has already been purchased and all the necessary tools are prepared. If you have planned this work in the autumn-winter period, when hot water is supplied to the main line, then the first thing you need to do is submit an application to the house management company to turn off the vertical riser of the hot water supply for the time specified by you. This is a paid service, and the amount depends on various factors. After turning off the water, you can start working.
In old houses, such as Khrushchev, the heated towel rail is built into the heating system, and the bathroom is very small, so a new heater is usually installed in place of the old one. Installing a heated towel rail in the bathroom of small apartments is convenient because there is no need to extend the pipes; you just need to remove the old system, cut the threads, install fittings and connect a new heated towel rail.
If the product is very many years old, then it will not be possible to unscrew it, then, using a grinder, the old dryer is simply cut off, but you should keep in mind that it is necessary to leave pipe sections sufficient for cutting threads. Use a file to carefully remove the burrs at the cut points, then, using a parallel tool, cut a new thread and install the fittings. To seal threaded connections, you can use FUM tape made of thin Teflon or Tangit-Unilok thread.
Before installing a new system, you also need to remove the old fastening systems, prepare the holes with a hammer drill, hammer dowels into them and place the fastenings at the required points. Installing a heated towel rail using this scheme takes a little time.
Connecting a water heated towel rail using a more complex scheme will require the installation of additional plumbing equipment. Let's consider this option in more detail and sequentially:
- From the vertical hot water supply riser, remove the old heated towel rail
- We cut the thread and screw on the “L”-shaped fittings for the side connection of the heated towel rail
- We install tee fittings at the top and bottom, between which a bypass is placed parallel to the riser
- Ball valves are mounted on the free ends of the tees, to which the dryer is docked
If necessary, small sections of pipe are installed between the fittings. Bypass (bypass) is an optional element, but desirable. It is also equipped with a tap and is designed to exclude your dryer from the hot water supply system if suddenly water begins to leak from the connection points or you decide to install a more interesting model. The diameter of the bypass pipe must correspond to the diameter of the riser.
Installing a heated towel rail in the bathroom
If the hot water supply or heating system is made on the basis of polypropylene pipes reinforced with aluminum, then the thread cutting tool is replaced with a soldering iron, and an additional tool will need a pipe cutter or a hacksaw. We do not consider the principle and technology of welding polypropylene pipes, since this is the topic of a separate article. If you use the side connection of the heated towel rail, then all work is carried out according to the method indicated above. This fits standard "U" or "M" shaped systems.
If a different type of heated towel rail is installed in the bathroom, then there may be several connection options. Let's consider possible options for connecting a dryer in the form of a ladder. These are two parallel pipes with several “steps” running between them. The entire structure is made of chrome-plated stainless steel. Vertical pipes have four threaded holes into which plumbing elements are screwed, depending on the connection diagram. This:
- Two taps at hot water connection points
- Mayevsky crane (air vent). It allows air to be released from the system, preventing water from leaking
- Stub
Heated towel rail connection diagram
Connection to the hot water supply system :
- Serial connection . The hot water supply pipe breaks and the dryer is installed in the gap. This connection is limited by the diameter of the riser pipe (1/2 inch)
- Parallel connection . The integrity of the pipe is not compromised, and the heated towel rail is connected to the outlets embedded in the pipe
- Diagonal connection . A type of parallel connection, but the hot water inlet and outlet points are located diagonally
Connection to the heating system :
- Diagonal connection . Hot water connection taps are located diagonally
- Bottom connection . Hot water connection taps are located at the bottom of the vertical pipes
- Direct connection . Hot water enters and exits into the left vertical pipe
When installing such a heated towel rail in the bathroom, you should keep in mind that the Mayevsky tap should always be located in the upper part of the vertical pipes, and the free hole should be closed with a plug. In addition, when performing all installation work, special attention should be paid to the tightness of all joints and threaded connections.
The bathroom will become much more convenient if you equip it with such a functional device as a heated towel rail.
Its installation allows you to solve several significant problems at once:
- drying towels and small items;
- maintaining optimal temperature conditions;
- preventing the formation of dampness.
Installation of a water heated towel rail
First you need to assemble it - install shut-off valves with a detachable connection on the supply line, which in the future will ensure easy replacement of the heated towel rail or elimination of some defects without draining the riser. The assembled dryer can be attached to the wall anywhere by connecting pipes from the riser to it.

Important. When installing a heated towel rail, you must act strictly in accordance with the instructions supplied with it.
Connection order:

Features of installing a combined heated towel rail
Since water dryers usually work only during the heating period, many residents of high-rise buildings solve this problem by installing a universal heated towel rail, which can operate from a heating system or hot water supply, and from electricity. To do this, you will need a drying ladder, in the lower left inlet of which an electric heater with a thermostat is mounted. The installation of the heated towel rail itself is carried out in the manner described above.

Thus, the following scheme of work is obtained. When closing the shut-off valves and filling the device with water through the left upper inlet (where the Mayevsky tap is installed), the heated towel rail can be heated by electricity. When you disconnect it from the outlet and open the shut-off valves, heating will be provided by hot water from the central system.
Important. Connecting an electric heated towel rail requires fulfilling some requirements regarding electrical wiring.
The energy consumption of such devices is quite high (1 kW or more), which requires a separate outlet, which is connected with a cable with a cross-section of at least 2.5 square meters and powered directly from the electrical panel. This wiring line must be protected with a separate “automatic device”.

It is necessary to provide space for a grounded socket for the heated towel rail
A very important point is grounding. Manufacturers took care of connecting ready-made heated towel rails and those manufactured independently (with a “ladder” equipment with a heating element with a thermostat) to the protective grounding. Therefore, it is enough just to install a special socket with grounding, laying a three-core wire. If there is no grounding in the apartment, then you can perform “grounding”, when the ground wire and the neutral in the wiring are bridged with each other. This re-grounding must be done as close to the electrical panel as possible.
This is how to install and connect a heated towel rail. Before starting work, you need to decide whether you can handle this work on your own or not. Even if you decide not to do it yourself, you will at least understand the installation sequence, which will help you control the quality of the work of hired specialists.
The bathroom is a room where elevated temperatures are required. Firstly, it feels more comfortable, and secondly, warm air will quickly remove excess moisture after taking a shower or bath. Heating in the bathroom is done infrequently - it is not accepted. A more common method is to install a heated towel rail, which we’ll talk about next. For everything to work without problems, you need to choose the right connection diagram, and even implement it correctly. And you will have to figure everything out on your own. After all, even if you don’t do everything yourself, you will have to keep an eye on the plumbers. This is the only way to be sure that you will be left with a properly functioning dryer.
What designs are there?
Heated towel rails come in different shapes. When choosing them, people are often guided solely by aesthetics, which is not entirely justified. These devices work normally with good water circulation, but not all models provide such circulation. With some you have to spend a long time trying to find the right connection diagram, otherwise they simply refuse to work.
So, all heated towel rails can be divided into four groups:

It often happens that after installing a heated towel rail it simply does not work. If the error is serious, the riser to which it is connected also stops working. Therefore, it is necessary to know and follow the connection rules.
Where to connect and where to hang
You can connect a water heated towel rail to both the hot water riser and the heating system. If both of these options are available, DHW is usually chosen. There are three reasons for this: there is less hassle with permission to connect, you can connect at any time of the year (agree with the management company to turn off the riser and that’s it) and, most importantly, such a heated towel rail heats up all year round.
If there is no hot water supply in the house, you will have to connect to the heating riser. This requires permission from the Criminal Code and a project. Buy a heated towel rail (preferably a simple design), go to the housing office with its passport (copy), write an application. If permission is given, order the project (you will also need a copy of the passport with connecting dimensions). Then, according to the project, you do it yourself or hire performers (plumbers from the housing office, as an option). Call representatives of the Housing Office for acceptance.

To ensure that the “towel” always warms up without problems, all connections are straight, without arcs or pockets
When determining where to install the heated towel rail, questions may still arise about what height it should be hung. If you have a choice, it is most convenient to place it so that it is at head level and below. This is if you install a U-shaped or snake. If we are talking about “ladders” of great height, the top bar is placed at the level of the heat of the raised hand (approximately 190-200 cm).
When choosing a location for installing a heated towel rail, you must also take into account the distance from the riser. In principle, the closer to the riser, the better - the greater the chance that it will work. But, it can be attributed to a meter or so only if the following conditions are met:
- low hydraulic resistance of the heated towel rail (simple shape and cross-section 1″ or 3/4″),
- sufficient pressure (2 atm or more)
- drain pipes of normal diameter (one step smaller than the riser).
At the same time, be sure to follow other connection rules. Then there will be chances that such a “remote” device will work normally.
How to make bends and how to change the riser
If the riser is metal and you are not going to change it, then installing a heated towel rail is possible with steel or. If you change the riser (the best option) and install polypropylene, there is no choice - PPR pipes are also used for bends. Use polypropylene for hot water, preferably reinforced with fiberglass.
Why is metal-plastic not suitable? Because its fittings have a very narrow clearance. This has a very bad effect on circulation. As a result, even 100% efficient circuits do not provide normal heating.

A little about why to change the riser. It makes sense to do this in old houses when renovating a bathroom or toilet (depending on where your riser is located). Firstly, the pipes are usually already old and worn out. Even welding an outlet to them can be problematic, the metal is so worn out. Secondly, modern renovations involve hidden installation of communications and you will want to too. Hiding an old pipe and then destroying everything again a few years later... is not a good solution.
A little about how to change. You need to come to an agreement with the neighbors below and above, as well as with the housing office (DEZ, UK). With your neighbors that you will cut off their riser and install a new one on the thread. Why do they have it? Because leaving an old pipe in the ceiling is dangerous: it will collapse and leak. It will flood you or your neighbors below. Therefore, it is better to pass through the ceilings with a new pipe.

With this connection, the dryer is part of the riser and there cannot be any taps
Having agreed or not with your neighbors (their riser may already be closed), you go to the housing office and agree on the date of replacement and the time for which the riser will be turned off. The work can be done by “local” mechanics, you yourself (if you have welding qualifications) or people you hire. After the connection, the water is turned on, you check the functionality of the heated towel rail and the system as a whole. If it doesn’t start to cool within 30 minutes, it means it’s set correctly. This completes the replacement or installation of the heated towel rail.
With or without bypass
Let's start with what a bypass is. This is a jumper between the input and output of the device, which ensures water circulation when the device fails or is turned off.

The jumper between the input and output of the heated towel rail is the bypass
If the circuit has a bypass, shut-off ball valves can be installed at the inlet and outlet of the device. This is convenient - you can turn it off if necessary (during repair or replacement) and not block the entire riser.
If there is no such jumper, no taps can be installed. In this case, the heated towel rail is part of the riser; by closing the taps, you completely shut off the riser.

The bypass can be direct (as in the first photo in the chapter) or offset (in the photo below). An offset jumper is installed at the top supply of coolant for better performance (circulation improves). With bottom feed, the offset only gets in the way. If you don't know where the water is coming from, it's better to do a direct bypass.

Bypasses (straight or offset) are also made narrower. Tapering, as well as displacement, improves circulation, but only in the case of top feed. The narrowing is made with a pipe that is one step smaller than the main one (if the riser is inch, the bottleneck is made 3/4″). You can't do less. The insert size is at least 10 cm.
Once again: an offset and/or narrowed bypass only works with top water supply. At the bottom, it interferes with circulation. If you are not sure, make the bypass straight and untapered.
It is strictly forbidden to install taps on the bypass. Each tap is a loss of pressure, which means it worsens the circulation of the entire riser, the water flows no longer so hot. For all neighbors above or below (depending on the direction of supply), the pressure noticeably deteriorates. Sometimes it also falls on the owner of the bypass with the tap. In addition, this is an absolutely unnecessary detail that only causes harm, and no noticeable improvement in circulation in the heated towel rail is observed. Well, and besides, this is a violation of SNiP 01/31/2003 (clause 10.6) - interference with public communications, for which a (considerable) fine may be issued.
How to place taps (connection methods)
For lateral and diagonal connections, the outlets should be located at the same level as the heated towel rail inlets or slightly higher/lower. What definitely won’t work is installing a heated towel rail if the outlets are located at a distance less than the distance between the inputs. The photo below is an example of a non-working diagonal connection with closely spaced taps. The option for correcting it (top feed) is indicated in black.

When connecting, the taps must be positioned strictly horizontally or slightly at an angle. Slightly at an angle - this is from 2 cm per meter (2%) or maybe a little more. The direction of the slope depends on the connection diagram and which end this outlet will be connected to. To make it a little clearer, let's look at several typical connection diagrams for heated towel rails.
Universal bottom connection for heated towel rail "ladder"
This circuit works regardless of the direction of hot water supply. Connection type - bottom, both outlets should be located lower than the bottom edge of the dryer. With top feed, the option is acceptable when the edge is between the bends, but the work may not be so efficient (it may heat up worse).

In this scheme, you can install shut-off valves. For its normal operation you need:
- Mayevsky valves (air vents) installed on the upper outlets to release air accumulated in the upper part. They will need to be periodically opened and vented (as the heat begins to worsen). There is an option - install automatic air vents. They are also compact. This will make it easier to use.
- The bypass is straight and narrowed. The narrowing size is a pipe of one step smaller in diameter.
- Bends are made with a pipe of a step smaller in diameter than the main riser.
If this option suits your height, do it. The scheme works in any conditions, with ladder-type heated towel rails of any type.
Possible bottom connection for top supply
When pouring hot water from above, you can make the upper outlet higher than the bottom edge of the dryer. With the bypass displaced and narrowed, it should heat up normally. This method is not the best, but it works.

The presence of air vents and bleeding of air after the system is stopped are mandatory.
Universal side connection
You can connect the pipes from the side to the heated towel rail in any of the standard shapes - U-shaped, snake and ladder. The connection itself does not depend on the form. The standard version comes with a straight, unnarrowed bypass. The branches are either strictly horizontal or with a slight slope. There is a slope in the figure: the end of the upper branch is inclined slightly downward (2 cm by 1 meter), the lower one is tilted slightly upward. The diameter of the outlets is not less than the diameter of the heated towel rail.

This connection diagram is good because there is no need to install air vents on the “ladder” (they install plugs), since the air simply goes into the riser.
With the top supply on the bypass, you can narrow it and/or move the jumper towards the heated towel rail. This will improve circulation and the dryer will heat up better. But once again: such a scheme will only work with top water supply.

With this scheme, it is also possible to make bends at a slight angle or strictly horizontally.
Possible side connection option (not the best)
A lateral connection scheme with the top outlet located below the top edge of the heated towel rail is acceptable. But with such a connection, Mayevsky taps are needed, through which you will have to bleed the air after turning off the hot water supply for repairs/maintenance. It may also be necessary to periodically remove air during the process.

Diagonal connection
There is no particular point in the diagonal connection of most heated towel rails: their efficiency is no different from the side one (in any case, there is no significant improvement), but the pipe consumption is greater, longer grooves are required, and this is labor-intensive. Although the scheme is workable.
The diagonal works fine if the water supply comes from above. Then the upper outlet is connected to the far edge of the “ladder”, and the lower one to the near one.

In this case, you can also make a narrowed and offset bypass, but even without this everything should work with a bang. With bottom supply, the bypass is not narrowed, exactly along the riser, connection
Heated towel rails with complex shapes: how to connect
In the case of connecting heated towel rails of complex shape, in addition to the usual means, it is also necessary to take into account the structural features of each specific model. They must be considered from the point of view of hydrodynamics - where water flows best, water is supplied there. For example, the popular model “Elegy” from Sunerge. This is not a ladder or a zig-zag.

Installation of the Sunerzhi Elegy heated towel rail was chosen from the side, since with any other installation the circulation will be disrupted. There are no options at all.
Another model with a bottom connection and a complex design has three installation options. Provided water is supplied from above, the second one will work best, the first one will work a little worse, and the third one will be the most ineffective.

When feeding from below, options 1 and 3 remain, but only without narrowing the bypasses - it will interfere, not help. We exclude the second option completely.
What not to do
All the above schemes work stably. As you noticed, all bends go straight, without bends in the form of an arc or rings. This is not accidental - air accumulates in all irregularities, which interferes and sometimes completely blocks circulation.

The installation of the heated towel rail in the photo is incorrect. At least two mistakes were made:
- the bends are made narrower than the center distance of the heated towel rail;
- They are made with a metal-plastic pipe with loops.
This connection simply cannot work. Metal-plastic pipes are an excellent material, but not for connecting heated towel rails. Their fittings have a very narrow lumen, which has a bad effect on circulation. Plus, air accumulates in the loops, and the flow along the upper loop, even when supplied from above, will not flow - too much hydraulic resistance to the water must be overcome.
Unstable circuits
The following two schemes may work, but not always. At the bottom of the heated towel rail, the water stagnates and, given any difference in height, cannot rise. No one can say specifically when it will work and when it won’t. Depends on the pressure in the riser, the diameter of the pipes and the design of the dryer itself.

With such a connection, even a working connection may suddenly (usually after stopping) stop working. Everything is simple: the pressure has changed, the pipes are clogged, the water from below is not “pressed”, the heated towel rail does not heat.
Another option for an unstable circuit is with a loop on top. Again, it will work under certain conditions. But sooner or later the highest point will become airy and block the circulation. The problem can be helped by installing an automatic air vent at the highest point, but if the pressure drops, it will not save you.

Not true at all
The photo below shows examples of what not to do. Schemes without a tap on the bypass are inoperative. What this threatens is known. In addition, after several years of use, they will stop functioning altogether. Most likely this will happen after the next shutdown - the system will become clogged with dirt. This is because the entire flow of hot water is directed through the heated towel rail. After repairs, the water carries a huge amount of dirt, which safely settles in the bends (in the lowest areas first). Within a few years everything becomes completely clogged. Fortunately, everything needs to be redone and connected correctly, but only flushing can help the fire.

It is necessary to wash both the heated towel rail and the connections to it. To do this, remove the dryer and wash it in the bathroom, and wash the outlets one by one by connecting a hose to the free outlets, the other end of which is taken to the sewer. By manipulating the taps, pass a flow of hot water through one outlet, then through the other. After washing everything is put back in place. It may be possible to start the system after this.
Installation process
The connection of the heated towel rail to the finished outlets is standard for plumbing - suitable fittings, flax and packaging paste or fum tape. For mounting to the wall, there are brackets or special holder clamps into which the pipe is pressed. The process is shown in detail in the video.
Nowadays, a bathroom is rarely without such a useful attribute as a heated towel rail. Indeed, in addition to drying towels and various linens, a heated towel rail creates a favorable microclimate in the room, allowing you to avoid the formation of dampness, unpleasant odors and fungus. Modern heated towel rails have a stylish look and impressive design. To ensure normal humidity and comfortable temperature, they must function all year round. You can install a heated towel rail with your own hands or by hiring professional plumbers. Whichever of these two options you choose, you should read this article: it describes in detail the installation and connection of the heated towel rail, describes the step-by-step installation technology and provides a general understanding of the installation process.
Selecting the appropriate connection method
Currently, the market offers three types of heated towel rails: water, electric and combined. The most common type is water heated towel rails. We will focus on them.
There are two options for connecting water heated towel rails:
- to the heating system;
- to the hot water supply.
Most often they choose the 2nd option, because in this case round-the-clock and year-round heating is guaranteed. Connecting to the heating system is undesirable, since hot water is available only during the heating season. In addition, the question arises: how to replace a heated towel rail in the bathroom in winter, because no one will allow you to make an insert into the heating pipes - you can freeze the entire riser.
Installation of a heated towel rail with side connection is a little more complicated, but it looks very aesthetically pleasing
Before installing a heated towel rail in the bathroom, you need to choose a method for connecting it. When replacing an old Soviet-style heated towel rail, you will need to select a new model of the same diameter, designed for a bottom connection. If, during renovations in the bathroom, the pipes were “recessed” into the wall, and only the outlets remained outside, then in this case you can install a water heated towel rail with a side connection. Its installation is more complicated, but such a model will look incomparably better.
Important! Installing a heated towel rail of this type requires careful insulation of the connections, since eliminating leaks in a heated towel rail whose pipes are hidden in the wall is very labor-intensive work.
Work technology - step by step
Replacing a heated towel rail involves the following sequence of work:
- dismantling an outdated heated towel rail;
- installation of bypass (jumper) and ball valves;
- installation of a heated towel rail.
Let's take a closer look at the steps listed above.
Removing the old heated towel rail
Replacing a heated towel rail in the bathroom begins with removing the old one:

The first stage of work on installing a heated towel rail is dismantling the old version that you want to replace
- Turn off the hot water by closing the corresponding valve. This issue needs to be agreed upon with the housing office.
- When there is no longer any water in the riser, we remove the old heated towel rail. If it is not integral with the hot water supply pipe, unscrew the threaded connection and dismantle it.
- If the heated towel rail is simply welded to the pipe, it should be cut using a grinder. We carry out trimming in such a way that the length of the pipe is sufficient for threading
- We remove the used heated towel rail from the brackets.
Installation of bypass (jumper) and ball valves
A jumper (bypass) is a piece of pipe equipped with connecting elements. It is a lifesaver in unforeseen situations. To install a bypass, ball valves are placed at the ends of the heated towel rail, which, if necessary, will stop the flow of water through it. At the same time, when the jumper is installed in the riser, the circulation of water does not stop even when the heated towel rail is turned off.
This allows you not to shut off water to the entire house in case of repair work.

Cutting threads on a pipe using a thread cutter - more information about the technology of work can be found

The bypass is equipped with three valves: two of them are installed at the junction of the heated towel rail pipe with the bypass, and the third stops the water in the bypass itself
Installation, fastening and connection of the coil
We continue installing the heated towel rail with our own hands. The next step is attaching the brackets and securing the heated towel rail to the wall.

When attaching the heated towel rail to the wall, you will need to drill holes in the tiles, which requires some care
We screw the brackets to the heated towel rail, which are usually included in the kit (if they are not available, you need to purchase them separately). When placing it at the location, we make marks with a pencil for the holes. To level the device using a building level, you need an assistant.
In the wall covered with tiles, holes are made using a drill with a special drill bit for tiles. We insert plastic dowels into the holes, then place the heated towel rail against the wall and fasten it to it with screws using a screwdriver or screwdriver.

The distance from the wall to the axis of the heated towel rail pipe is regulated and depends on the diameter of the pipe
It is important to know! The distance from the wall cladding to the axis of the heated towel rail pipe is regulated and is:
- 35 mm for pipes with a diameter of up to 23 mm;
- 50-55 mm for pipes with a diameter of up to 50 mm.
Next, it remains to connect the heated towel rail to the riser. To do this, we connect it to the valves on the jumper using fittings (straight or angled, depending on the type of connection of the heated towel rail).
Tighten the fasteners carefully so as not to damage the threads. We seal all threaded connections using linen winding.

When making the connection, you may have to purchase special fittings to connect the heated towel rail to the water supply pipe
Note! Water must pass through the heated towel rail from top to bottom, so the supply riser should be connected to the upper socket of the heated towel rail.
After completing the above work, you need to check the tightness of the connections: when you feel the seams, there should be no drops or leaks. All that remains is to smoothly open the taps so that the device is filled with water gradually and water hammer does not occur.
That's all. Now you can safely say that you have an idea of how to connect a heated towel rail. Decide whether you can do this work efficiently yourself, or whether it is better to invite a specialist.
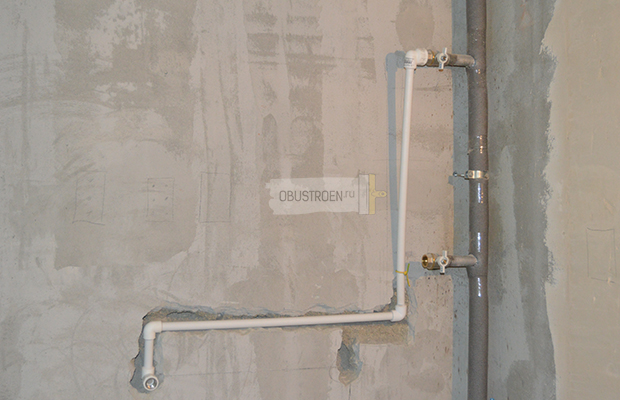
In this step-by-step master class we will learn how to install a ladder heated towel rail with a bottom connection. We will install and route pipes to the riser and secure the plumbing in accordance with regulatory standards.
Step 1: Marking and scoring the wall
One of two types of heated towel rails is purchased for the bathroom: electric or water. The first option is easier to install, but it requires more energy. Therefore, most often a water heated towel rail is installed. It is connected to the general heating system or hot water riser.
Connecting a heated towel rail to heating is impractical. The duration of the heating season is 6 months; it will be impossible to keep the pipes hot all year round, unlike connecting to a hot water riser. There may also be difficulties with this option. You will need to obtain permission to shut off the water to your entire home. During the heating season this will be problematic, and there is a high probability of an emergency. Therefore, we recommend connecting the heated towel rail to the hot water riser.
Replacing an old Soviet-style heated towel rail in the bathroom is done using a grinder, cutting out the coil along with the riser.
After dismantling and shutting off the water, we make markings. We mark with a pencil the places of the lower connection and the location of the pipes for distribution. When installing this plumbing, we adhere to SNiP. According to the regulations, the installation height of a heated towel rail should be at a distance of 1.2 m from the floor level and located at least 0.6 m from the sink, bathtub and other plumbing equipment.
The heated towel rail can be installed above the washing machine, providing unobstructed access to the equipment. A ladder-type dryer, as in our case, is mounted at such a height that a person of average height can easily reach the last rung. When marking, also keep in mind that the heated towel rail should not be located at a distance of more than 2 m from the riser, otherwise the installation will provoke large heat losses.

Next, we hollow out cavities for pipes in the marked part of the wall. To make a groove, you can use a special wall chaser or a regular grinder with a drill. Wear a protective mask and goggles while chipping. If you are leaving the pipes exposed, skip this step. We install ball valves at the ends of the riser under the outlet of plastic pipes, thanks to them you can turn off/resume the water supply at any time.

Step 2: Routing and piping to the heated towel rail
The general connection diagram for a heated towel rail is the same for all types of device. Water is supplied from one end and water is removed from the system from the other. Let's start wiring. We solder polypropylene pipes from the ball valves to the water supply to the dryer. We prepare additional tools and materials that will be needed during work - a soldering iron and scissors for polypropylene pipes, connecting fittings (angles and American couplings). To install the heating system we use plastic pipes with fiberglass d=20 mm. We screw on the plugs.
Temporarily screw the heated towel rail into place without final fixation or winding, set it level horizontally and vertically, and attach the plumbing fixtures to dowel screws. American couplings should protrude from the wall to the thickness of the tile with which it will be faced.

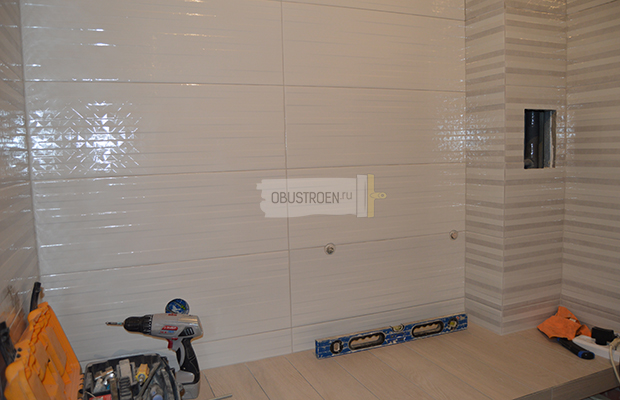
Step 3: Sealing the fines and facing
After installing the heated towel rail, we wet the wall from dust and seal the groove with putty.

We leave the outer part of the polypropylene fitting with threads on the outside, and putty the rest.

As soon as the putty hardens, remove the heated towel rail. We will finally install it when we cover the walls with tiles.

Step 4: Installing Cams and Fasteners
The tiles are laid, now comes the final installation of the heated towel rail. On the side of the riser, we cut a window in the tile for the inspection door. Through it we make sure that the taps are closed, unscrew the plugs.
The heated towel rail comes with eccentrics with narrow and wide threads, ½ and ¾ inches with offset. We screw the eccentric manually into the thread coming out of the wall, inserting it with the narrow part, having previously wound the sealing thread. We install it evenly, without distortions, slightly too far, so that you can adjust the position of the heated towel rail. Tighten the connection with a wrench.

Don’t forget about installing gaskets; we put reflectors on top that will hide the junction of the pipe and the plumbing. We screw the heated towel rail on by hand, level it by turning the eccentrics.

We screw the device and make marks where the top mount of the heated towel rail to the wall will be located. For the last time, remove the heated towel rail and drill holes for dowel screws in the marked places using a special tile drill to avoid cracking of the tiles.
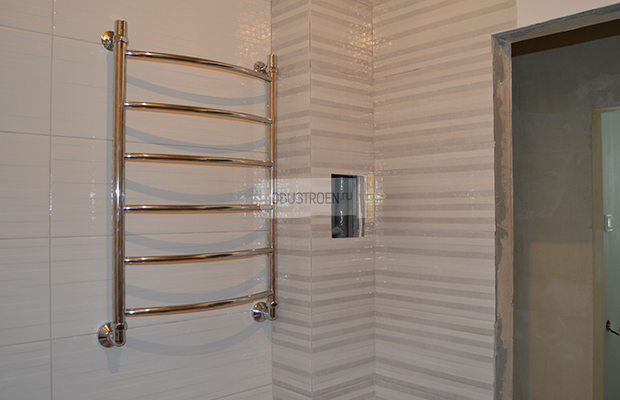
To attach the plastic, we will use Point 96 liquid nails. This is a crystal clear fixative that, after application, creates an invisible seam and is suitable for almost all surfaces. Another feature is the primary contraction. There is no need to use additional bolts or fasteners.

The hatch is installed; if necessary, it can be easily opened for inspection and turning off taps.
