Installing a PVC window with your own hands: installation technology, instructions, tools. How to install a plastic window yourself How to install plastic windows
Until 2003, the installation of PVC windows and balcony blocks was not regulated by the state. Window installation specialists were guided by the technology proposed by the manufacturers of these structures. Whether she was wrong or not is difficult to judge. But the number of complaints about freezing, blowing and leaking frames exceeded acceptable limits. In order to eliminate these problems, GOST 3071-2002 was adopted at the beginning of March 2003, and the installation of windows in accordance with GOST became mandatory.
What is installation of a PVC window according to GOST
The introduction of a document regulating the installation of window seams and connections at one time caused a lot of controversy and disagreement. Companies specializing in window installations were unhappy with the upcoming costs of purchasing additional materials and increased labor costs.
The fact is that the state standard has approved several standards requiring the use in installation of materials that were not previously used, or were used reluctantly. This entailed an increase in the cost of the work of the performers and, accordingly, the consumer. Which, it was believed, could lead to a decrease in demand for window services.
But the worries were in vain. It was consumers who were the first to appreciate the benefits of GOST. Which is not surprising, since the document is entirely focused on improving the operating conditions of window and balcony units. What are these improvements?
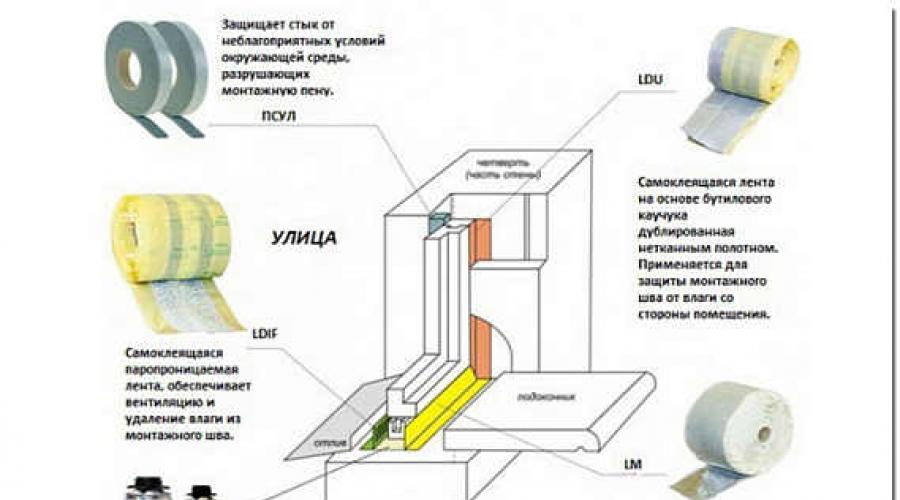
- Installation of plastic windows in accordance with GOST with steam and waterproofing of gaps. The document provided a definition of an assembly seam, indicating the materials required for its construction. Now the correct seam should consist of three layers: outer, waterproofing and vapor-permeable.
- Recommended clearance parameters are indicated.
- Requirements for surface preparation have been determined.
- Acceptance rules have been established.
- The maximum permissible distances between attachment points are indicated. For a plastic profile this is 70 mm.
- A list of actions for testing the quality of structures is given.
- The maximum service life of the materials used is indicated: at least 20 years.

We also did not ignore such an important element of the window design as the ebb. According to GOST, it is now protected from below with diffusion tape made of polyester. This ensures strong fixation of the metal sheet to the wall and frame. The presence of a tape on the lower ebb plane significantly reduces the noise from raindrops.
Application of standards in practice
Since March 2003, installers began to work in accordance with accepted standards. But for a consumer unfamiliar with the intricacies of this work, the question inevitably arises: what does it mean to install a window according to GOST? Knowing the answers will help you track the correctness of the installation and ensure its quality. The first thing you need to know is that all seams of the window unit should now consist of three parts.
- The central one is made of polyurethane foam, which has high frost and moisture resistance.
- The outer one is made of waterproofing tape.
- The inner one is made of vapor barrier tape.
The basic principle of installation can be explained as follows: the inner part of the seam must have low thermal conductivity, and the side parts protecting it must have vapor permeability. In this case, if moisture penetrates the polyurethane foam, it will freely escape in the form of steam and will not cause harm to the insulating layer (spray foam).
Advantages of installation
There are several advantages compared to conventional professional installation. But they are all so important that it is unwise to ignore them.

- Subject to compliance with all Gosstandart standards, freezing and leakage of seams is excluded. Consequently, and window frames.
- The possibility of mold and mildew formation is excluded.
- The insulating layer (spray foam) is protected from moisture and will not collapse prematurely. If installed incorrectly, with no protective tapes, yellowing of the foam can be observed. Under the influence of moisture, its structure becomes loose and destruction processes begin. Such foam loses its thermal insulation properties with all that it entails: the windows begin to freeze, leak, and are no longer a reliable barrier to the wind.
- The ebb is connected to the wall more tightly by the frame, which provides an additional thermal insulation effect and increases the service life of the window unit.
There is another important advantage of complying with the requirements of Gosstandart. If the consumer remains dissatisfied with the quality of installation and orders an independent examination service, the company that installed this window will, at best, face re-installation. And the worst thing is considerable expenses.
Materials required when installing windows
Among installers of plastic windows, GOST 3071-2012 is called “tape”. This is due to the fact that, in accordance with the requirements of this document, it is necessary to protect the seams with “ribbons” - narrow-width products: vapor barrier, self-expanding and diffusion.

Materials for installing plastic windows according to GOST:
- PSUL tapes (self-expanding sealing);
- GPL (vapor barriers), made of butyl rubber or aluminum foil, for internal protection of seams;
- diffusion polyester for external protection.
PSUL tapes are a self-expanding material and are sold in rolls. During installation, it is extremely important to choose the degree of increase in the volume of the tape. This indicator is always indicated on the packaging. So, for gaps 10 mm wide, you need to choose a tape with an expansion range of 30-40 units. The most popular brands of tapes are Profband, PSUL-EUROBAND, Liplent, Robiband.

Polyethylene tape GPL (water vapor barrier) is made on the basis of foam rubber. On one side there is an adhesive base, in the middle there is a vapor-permeable material, on the other side there is a laminated base and inserts made of metallized material (foil). The purpose of these tapes is to reflect heat back into the room and protect the polyurethane foam from moisture. Popular brands: TYTAN Professional, KLEBEBANDER, “Germetic-Abris”.

Diffusion tapes are laid under the tide to protect the seam from moisture on the outside of the window. These materials are also made from butyl rubber, but they have two adhesive bases: on each side. Therefore, the protective material is firmly glued to both the ebb and the opening. Popular brands: HAUSER, Robiband, Ultima, WS.
Installation technology according to GOST
Installation of plastic windows in accordance with GOST 30971-2012, the step-by-step technology of which is proposed, can be done independently.
Step 1: Use a stiff bristle brush or paint brush to sweep away dust and debris.
Step 2. The seams between the bricks are leveled with moisture-resistant putty.
Step 3. Cover the putty with a layer of primer.
Step 4. Open the window unit and remove the sash.
Step 5. Remove the stand profile from the bottom of the frame.
Step 6. Glue the PSUL at the junction of the frame and the stand profile.
Step 7. If you are installing a balcony block, remove the connecting profile from the outside of the frame. At the junction with the opening, PSUL tape is glued along the entire perimeter. If you install a window, immediately glue the tape around its perimeter.
Step 8. Take a simple pencil and a tape measure. Mark the attachment points on the PVC profile. In accordance with the requirements of the standard, the distance between these points should not exceed 70 cm. The hole should be 150-180 mm from the corner of the frame.
Step 9. Drill holes. The diameter of the drill must be smaller than the diameter of the bolt or self-tapping screw.
Step 10. Support blocks are installed on the opening, which will be located under the frame.
Step 11. Insert the frame and fix it with self-tapping screws.
Step 12. From the street side, mark the places where the PSUL is attached.
Step 13. Remove the frame and, with a shift of 0.5 cm from the markings, glue the PSUL.
Step 14. Install the starting profile for the slopes on the frame.
Step 15. Cover the frame with GPL tape on the inside.
Step 16. Install the frame and level it. Drill holes in the wall for dowels and perform final fixation.
Step 17. Install the sashes.
Step 18. Fill the seam with polyurethane foam.
Step 19. After 15-20 minutes, the GPL tape is aligned along the slopes.
Step 20. GPL is installed under the window sill.
Step 21. Install the window sill.
Step 22. A diffusion tape is installed under the ebb.
Step 23. Attach the ebb.
Installing a window according to GOST, the instructions for which are given above, is a simple task. If you comply with all the requirements of Gosstandart, the window openings will be reliably insulated and sealed.
P.S. And for dessert, I suggest watching a video: Window installation according to GOST
Despite all the apparent complexity, installing plastic windows with your own hands is a fairly simple process. Installation of PVC windows in a private house (and not only) can be done independently. The technology for installing plastic windows, in fact, is a set of fairly simple operations performed in a certain sequence. For ease of perception, when presenting the material, I will adhere to this principle.
In this article we will look at the technology of installing PVC plastic windows into an existing window block.
The main feature of a wall structure made of wood is the settlement of the walls. The settlement of the walls for each specific house depends on many factors, for example, on the degree of humidity of the material (wood) at the time of installation of the log house, on the quality of the caulking work performed, on the quality of assembly (adjustment of mating surfaces) of the log house itself, etc. Wall shrinkage - The process is quite lengthy and individual for each specific structure. Therefore, before installing windows in a log house, or indeed carrying out any finishing work in general, it is recommended to wait at least 1 year for the log house to settle. This is due to the fact that the most intense shrinkage occurs in the first year or two after the installation of the log house. But even after this period, shrinkage continues, although not so intensely. Therefore, the installation of windows in wooden log houses is carried out with the obligatory use of a window frame, which protects the window frame from possible mechanical influences during wall shrinkage. This issue will be covered in more detail in.
In the meantime, you need to keep in mind the following circumstance:
- Under no circumstances should a plastic window be installed directly into the frame of a house.
Preparatory part
Preparation for window installation includes:
- Preparation (purchase) of necessary tools and materials.
- Preparing the window itself.
- Preparing the window block
Since the technology for installing plastic windows is quite specific, the set of tools and materials used is also specific, and without it it is impossible to carry out all the work correctly. Here there may be a problem with acquiring the necessary materials. For example, I bought something in stores, and what I couldn’t find, I bought for cash from workers (installers) of window companies. They supply the material as consumables and there were no problems with purchasing. So, installing plastic windows with your own hands will require you to:
Tools
- (household spray cans definitely won’t work)
- Hydraulic level (at least 7 meters) to level the horizon of the common line of windows along the wall (facade) and/or adjacent walls
- (if you make the plums yourself and don’t buy ready-made ones)
Materials
- Professional (for gun) mounting foam in cans - for the central layer of the mounting seam
- Water vapor-proof tape - to protect the central layer of the assembly seam (foam) from moisture vapor from the room side
- Hydro-vapour-permeable tape - to protect the central layer of the assembly seam (foam) from water from the street side, but capable of conducting steam (removing moisture out) from the seam itself
- Construction self-tapping screws - for fastening the window frame to the window block, length - 120 mm, diameter - 6 mm (with anti-corrosion coating)
- Hydro-vapor-moisture-proof tape, laminated with foil, to protect the central layer of the assembly seam in the lower part of the window in the window sill area, for installation from inside the room;
- Construction mounting wedges
Additionally
- Rolled steam, noise and moisture insulating material
- Galvanized iron sheets (for making external window drains)
Thus, for high-quality and correct window installation, it is necessary to prepare tools and materials. As an illustration, the photo shows some of the tools and materials needed to install windows.
The preparation of the window itself is as follows.
It is no secret that in the design of a window, the stand (bottom) profile is the weakest point in terms of thermal conductivity, which subsequently, during installation, will also be drilled to attach the drain (which will lead to a further deterioration in thermal conductivity parameters). Therefore, in order not to deteriorate the heat-insulating properties of the window, it is advisable to foam it, especially since this does not require time and large expenses (see photo).
You need to foam the entire internal volume of the bottom profile, to its full depth (using nozzles on the mounting gun). It is better to perform this operation on the day before installation, so that the foam has time to polymerize.

This operation is not provided for by GOST; window companies also do not practice foaming the bottom profile.
After dismantling the old frames, it is necessary to prepare the existing window block for the installation of new windows. Here you need to perform three operations:
1. Inspect the window block for its condition; if there are damaged areas (rot), remove (plane, cut down), treat the block with fire protection, since another such opportunity will not present itself soon.
2. Next, make markings on the window block, the window mounting plane. To do this, you can use both a building level and a plumb line. The last one is even better. From the point of view of the thermal operating conditions of the window structure, it is recommended to install the window along the depth of the window frame opening, at a distance equal to 1/3 of the frame width from the street. On the other hand, if you plan to do external insulation of the house after installing the windows, then you can shift the window installation plane closer to the outside. Due to this, you will gain in the width of the internal window sills (aesthetics, functionality), and the design of the window and the installation seam (due to subsequent insulation of the wall) will not lose its heat-shielding functions.
3. Since we are talking about installing a window in a wooden frame (accordingly, the window block is also wooden), it is important to take into account the following circumstance. Wood is a breathable material; accordingly, it both absorbs (into itself) and releases moisture. If you do not take additional measures, limit yourself only to the requirements of GOST, which states that the inner layer of the installation joint (foam) must be protected both from inside the room and from the street, then the inner layer of the installation joint (taking into account the wall material) can be moistened from the side internal surfaces of the window block itself. To exclude the possibility of moisture entering (leaking) into the foam from the adjacent surfaces of the window block, it is necessary to install an additional layer of vapor and moisture insulation around the perimeter of the window block itself. For these purposes, I used rolled insulating material along the bottom side of the window block and polyethylene foam tape around the perimeter of the block in the plane of installation of the window in the window block.

This operation is not provided for by GOST.
PVC window installation technology
Preparing a PVC window for installation. After delivery of the window to the customer, the windows are assembled, as shown in the photo (frame, double-glazed windows, glazing beads, protective film).

If you enlarge the label, you can see that energy-saving glass is used in the window design. The bottom line is deciphered as follows: 4M1 (glass class M1, thickness 4 mm), 10 - the distance between the glasses of the first chamber (in mm), 4M1 - the same as above for the next glass, 10 - the same as above , but between the second and third glass (in mm), 4 LE - energy-saving glass 4 mm thick.
Thus, the decoding of the double-glazed window formula will be as follows: a two-chamber double-glazed window is used (three glasses with a thickness of 4 mm: 4M1+4M1+4LE), with energy-saving glass, the total width of the double-glazed window is 32 mm (4+10+4+10+4).
To attach the frame to the window block, it is necessary to remove and dismantle the double-glazed windows.
Remove the glazing beads starting from the longer sides of the window, then from the short sides, and assemble in the reverse order. How to shoot? Place the chisel at the joint between the glazing bead and the frame in the central part of the glazing bead, and with gentle blows on the handle of the chisel, knock the glazing bead out of the groove. Remove sequentially all the beads holding the glass unit in the sash.

If there is an opening transom in one of the frame doors, the double-glazed window does not need to be removed; It’s easier and faster to remove the transom assembly itself.
After the operations are completed, only the frame itself will remain.
To attach the frame to the window block, you need to mark and drill holes with an electric drill on the side and top sides of the frame (when you drill, do not forget about the presence of steel reinforcement in the profile: the drill must be for metal). The number of holes and their location depend on the size of the window, but the outermost holes from the corners of the frame should be located at a distance of at least 15 cm. The corners of the frame should not be rigidly fixed, since the window material noticeably changes its linear dimensions with temperature changes.
It took me 6 self-tapping screws to install each window measuring 90x120 cm. After removing the beads, removing the double-glazed windows, drilling holes for the screws, the frame is ready for installation.
Installing the frame into the window block. For mechanical fastening of the frame, I used construction screws (self-tapping screws), as the simplest and most affordable method. Fastening on anchor plates must be used if there is a thermal break in the structure of the window block, when there is no possibility of mechanical fastening of the frame in the installation plane.

The photo below is a view of the same frame from the street.

Despite the preliminary marking of the window installation plane, all subsequent operations must be done very carefully. Pre-align the frame in the installation plane on the mounting wedges, check with a level the horizontal position, vertical position of the frame and the deviation of the frame in the plane.
The horizontal position of the frame is achieved by adjusting the height of the building wedges, by moving them relative to each other; the horizon itself is checked by the building level.

If everything is aligned correctly, using self-tapping screws and a screwdriver, secure the frame in this position without screwing in the screws along the top side of the frame.
Do not tighten the screws immediately until they stop, do not tighten them, the screws are about 1 cm each. Why? Firstly, the frame will not fall anywhere. Secondly, after preliminary fastening the frame, you need to check the uniformity of the gaps on the sides (you may have to move the frame to the right or left). Thirdly, no matter how strong the window structure is, self-tapping screws of the specified sizes can make a barrel-shaped frame from a rectangular frame. After the frame is installed, the uniformity of the gaps is considered satisfactory, the horizontal and vertical of the window is maintained, fix the upper side of the frame with self-tapping screws, carefully tighten the remaining screws on the sides of the frame and check the horizontal and vertical of the frame again. It is already pointless to check the inclination of the window in the installation plane after attaching the upper screws, but it is not superfluous to make sure that the frame is not barrel-shaped.
We put the double-glazed windows in place. The operation is exactly the opposite of removing them. Do not forget about the reverse sequence of installing beads. First short, then long. It is better to fix the final position (knock) of the glazing beads with a rubber hammer.
After mechanically fastening the window frame to the window block, it is necessary to replace the previously removed glass unit and transom. These operations are performed in reverse of their removal.
Assembly seam construction.
Having read “smart” recommendations (I had never dealt with windows before), when installing the first window, I placed protective tapes on the frame before attaching it to the opening. But, since the tapes are sticky, I had to struggle with them a lot. Next, I installed all the protective tapes on the frame after fixing the window and installing the double-glazed windows in place. It turned out to be much more convenient and practical.

So, the window is installed and fixed in the window block.
We cut it off (with an overlap) and install a vapor- and moisture-proof tape from the inside of the room along the perimeter of the window frame.
It is necessary to take into account when installing the tape that at the junction of the tapes, the tape located above should be overlapped with the bottom one, so that in the event of condensation, moisture does not collect at the junction, but rolls down. After installing the tapes from inside the room and fixing them, there should be no leaks between the window frame and the wall opening so that when foaming, the mounting foam does not come out into the room. I additionally secured a beam wrapped in plastic film along the bottom side.
We install protective tape on the outside. Here we do almost the same thing as from the inside, but we don’t fix the tape, but on the contrary, we move it into the plane of the window in such a way that it does not interfere with the subsequent foaming of the central layer of the seam.

- Foaming. The foaming technology is usually described in some detail on the can of polyurethane foam itself. I draw your attention to something that, as a rule, window companies do not do. For high-quality foaming, it is necessary to spray the foaming areas with water, before foaming and after foaming. The meaning of this operation is that the polymerization process of the foam occurs due to atmospheric moisture. Lack of moisture leads to poor quality polymerization. Do not try to fill the cavity of the entire assembly seam with foam from the first go; firstly, this can be corrected later, and secondly, cutting off excess foam is an extra consumption of foam, and the quality of the assembly seam will only worsen.
- After foaming the seam, spray the surface of the foam with water again and leave the entire structure in this state while the foam polymerizes.
- The next day, we inspect the foamed seam; if no additional work needs to be done, we straighten the protective tape and fix it in its final position. To fix the tape, I used a spot application of polyurethane foam and a construction stapler
- We install tape with foil along the bottom side of the window to seal the installation seam where the window sill is installed. The installation of the window sill itself can be done later, for example, when finishing the window slopes.

- Drain installation. Unlike a window sill, a drain must be installed when installing a window. The drain can be either homemade or purchased. During installation, it is necessary to take into account that the drain must be attached with self-tapping screws to the stand (bottom) profile, and the protruding (overhanging) lower part of the window frame must protect the place where the drain and stand profile are connected from the ingress of atmospheric moisture and moisture flowing down the plane of the window during side rain. . After installing the drain, the space between the drain and the bottom profile of the window is additionally foamed.
- We remove the protective films that are designed to protect the profile during transportation and storage.
From the point of view of the technology for installing window structures, all installation operations have been completed. The assembly seam is protected from the inside and from the outside. Taking into account the properties of the wall material, we protected it from capillary leakage of moisture from the walls along the perimeter of the installation joint. The base profile was additionally insulated. Installed drain.
Another question is that after installation, from an aesthetic point of view, leaving the window in this form is hardly reasonable. To complete the work, finishing of the slopes, installation of a window sill, etc. is required. But this is already beyond the scope of both the article and the GOST requirements for the installation of window structures; secondly, there are so many finishing options and finishing features in relation to a specific option that this question is a separate topic.
Plastic windows deservedly enjoy a reputation for functional, reliable, durable and aesthetic designs. They are becoming more and more popular and are confidently replacing the wooden windows that are familiar to many people.
Plastic windows have gained a reputation as strong, durable and reliable structures.
Their additional advantages include the fact that, with a strong desire, almost anyone can install plastic windows themselves. And this is a big plus, because... For installation, specialists ask quite a lot of money. In addition, having figured out how to install a plastic window, you will independently control the entire process and will be able to do everything in accordance with technology.
How to determine the size of a future plastic window
Before ordering plastic windows, you need to figure out what exactly the design should be. And this preparatory stage begins with taking measurements. When taking measurements independently, the home master should know that there are window openings without and with a quarter. The procedure for measuring two different types of openings will also differ.

The quarter option involves taking measurements in the following order. First you need to measure the opening between the quarters at the narrowest point and add 3-4 cm to the resulting value. This will be the width of the structure. Additionally, make sure that the specified width of the future plastic window exceeds the largest distance between the vertical quarters. To determine the height of the future window, measure the distance between the bottom plane of the opening and the top horizontal quarter. This way you will determine the amount you need.
In the case when a plastic window is installed in an opening without the above-mentioned quarter, to determine the appropriate size, you simply need to subtract 5 cm from the height, and 3 cm from the width.
Additionally, determine what size the window sill and flashing should be if you plan to replace them. There should be no complications with this operation, you just need to consider the following important factors.
When determining the width of the ebb, future thermal insulation or cladding must be taken into account. According to the standards, the ebb should protrude from the vertical wall by 5-10 cm. The width of the window sill is calculated taking into account its future functional purpose. For example, if you want to install potted flowers on it, it is better to order a wider design. In most cases, when selecting a window sill, the calculation is carried out so that the free part of this element covers the heating radiators.
The length of the window sill should be 8-10 cm greater than the width of the opening. The edges must be recessed into the slope cavity by at least 5 cm.
Return to contents
Ordering a window and preparing for work

At the next stage, you need to go along with the obtained measurements to a company specializing in the production of plastic windows. By the way, if you don’t want to waste time on measurements or doubt that you can do everything correctly, order this service from the same company. Most companies offer it free of charge, provided that the window is ordered from them.
In addition to the window size, you need to determine the following parameters:
- The number of cameras in a double-glazed window.
- Number of cameras in the window profile.
- Availability of fittings and necessary fasteners.
The consultant will tell you in detail about the features of each option. You can prepare in advance. So, if winters in your region are not very cold, and the street outside the window is not very noisy, a window with two glasses and a profile 60 mm wide will be quite sufficient. Next, focus on the climate and environment.
To install a plastic window yourself, you will need the following:

To install windows you will need: a hammer, a drill, a screwdriver, a building level, etc.
- A gun for polyurethane foam and the foam itself.
- Drill with variable speed control and perforation mode.
- Small ax and hammer.
- Metal scissors.
- A sharp knife, a stationery knife will do.
- Building level.
- Chisel.
- Sander.
- Nail puller.
- Jigsaw. If you don't have one, you can use a hacksaw with fine teeth.
- Putty knife.
Additional materials you can buy:
- Multi-purpose construction adhesive.
- Wooden beam with a total length of 150-200 cm and dimensions of 2x4 cm.
- Dowels.
- Plastic corners and panels made of the same material.
- Self-tapping screws of different sizes. Typically used are 6x40, 2x16, 2x80.
- Solvents.
- Mix for plaster.
- Silicate glue.
Return to contents
Do-it-yourself dismantling of an old window

At the very initial stage of changing windows, it is necessary to dismantle the old window structure.
If there are already windows installed in the room, then before you begin installing a new window, you need to get rid of the existing structure. If you don’t plan to install the old window anywhere in the future, you don’t have to try to be careful, but caution won’t hurt. Do everything possible to avoid getting hurt or dropping the window outside. The last rule is especially relevant for apartments in multi-storey buildings, because a window could fall on someone or damage someone else's property. And even in a private house, cleaning glass will not give you any pleasure.
First, remove the opening windows and sashes. Remove all glass from the structure, first removing the retaining beads. Take a grinder with a concrete wheel or a hacksaw. Using the tool, make cuts along the horizontal and vertical elements of the window frame.
Using available tools - a pry bar, a crowbar, or a hammer - remove the product from the opening. In some cases, when the owner wants to preserve the old window, the structure can be removed without deformation or damage. But this will require much more time and certain skills.
At this stage, both the external ebb and the window sill are dismantled. At the end, the window opening is thoroughly cleaned of dust and all kinds of construction debris.
Return to contents
Step-by-step instructions for installing a plastic window

Gradually you have come to the main stage of the work - installing a new window. This work requires careful and consistent implementation of a whole list of various activities.
First, the window is prepared for further installation. At this stage, you need to attach mounting plates to the end of the top and sides of the frame. In the future, it is thanks to them that the structure will be held in the required position. Quite often, installers replace plates with hangers, which are usually used when installing various plasterboard structures. But when installing a plastic window, it is much more advisable to use plates. They are stronger than pendants.
The planks must be securely fixed to the end of the frame. During installation, the fasteners will need to fit into the body of the metal profile of the block. And this should be done in such a way that the glass unit does not deform. Fastening is done using self-tapping screws. Select the diameter of these products taking into account the size of the window. Standard-sized structures are usually installed using self-tapping screws with a diameter of 4 mm. For larger blocks (from 2x2 m), it is best to use larger self-tapping screws - 5-6 mm in diameter.
Attaching the anchor strips to the end of the frame should be done so that they are installed in increments of 6-8 cm at a distance of 10-15 cm from the corners of the product.

After this, you need to correctly position the prepared window structure. At a superficial glance, this procedure may seem quite simple, but take it seriously. It is best to enlist the help of an assistant at this stage. One of you will support the block, and the other will level it.
Place the block in the opening and adjust its position using pre-prepared wedges. It is important to position the block strictly vertically and horizontally. At this stage, follow the recommendations:
- Wedge the module not only from below, but also from the sides.
- Make sure that all vertical frame elements are in the same plane.
- If there is an impost, place wedges under it as well.
Check that the unit is installed evenly using a level. If there are the slightest deviations, correct them. And only after that proceed to fixing the module. To do this, use anchor bolts or dowels to fix the anchor plates to the opening cavity. It is important that the elements are attached strictly to the enclosing structures. To do this, it may be necessary to remove a layer of plaster where the anchor plates are attached.
After you securely fix the module, seal the seams using foam specially designed for this job. It is important that the material is intended specifically for the installation of plastic windows. Carefully read the instructions and make sure that it can be used at the humidity and temperature where the module is installed.
Before applying foam, moisten the joint surface with water. If you need to fill an area wider than 3 cm, do it in 2 stages with a half-hour break.
Hello readers! I haven't written on the blog for a long time. The season for installing and adjusting windows before winter has begun. Everyone wants to stay warm.
So, many clients are interested in how we attach plastic windows. I’ll say right away that there is no single fastening.
It all depends on where the window is installed. Therefore we can use anchors or plates. In general, I got tired of answering the same questions and I decided to put them in one article, a link to which they will give to all their new clients.
I hope you find this information useful too. Read, get acquainted.
The choice of fasteners for windows primarily depends on the material of the wall into which you will mount your window:
- Brick;
- Tree;
- Aerated concrete, foam concrete, cinder block;
- Concrete.
Secondly, on the type of design and technical installation conditions:
- Loggias;
- Entrance doors;
- Window;
- Stained glass.
How to fix plastic windows. Types of fasteners
1. Anchor or frame dowel. It comes with a diameter of 8 mm, but practice shows that the optimal diameter of the frame dowel is 10 mm. In my opinion, the most reliable and convenient fastening for windows.
Available in different lengths: 72 mm, 92 mm, 112 mm, 132 mm, 152 mm, 182 mm, 202 mm. Used as follows:
A hole is drilled in the window frame using a metal drill with a diameter of 10 mm. Then, using a hammer drill, a hole is drilled in the concrete, right through the frame.
I consider this optional. Therefore, as for the dowel head, there is even a special decorative plug. And the fastening strength in both cases is almost the same.
For each type of window profile, especially popular ones, a certain type of anchor plate is produced. But since, according to the technology, the plates need to be screwed to the window frame, you can use any window plates (only for the sake of economy, of course).
 By the way, regarding screwing the plates into the frame. There are so-called crab plates. That is, they cut or snap into the profile.
So, if there is a quarter in the opening, many installers do not screw such plates. The window will not fall out, and this is the most important thing. After all, a quarter holds the window.
It must be said that there are cases (nowadays less often) when window installers, grossly violating installation technology, do not use fasteners at all. Simply fix the window with wedges and fill it with polyurethane foam.
I hope such cases will pass you by.
3. Wood screws. Used for attaching windows to wood. The cheapest fasteners, and this is probably the only plus.
4. Screw for concrete. I think it is only used in Europe. I went to the professional store “Fixtures” in St. Petersburg, where you can buy a lot of things, and talked with the sellers. They don't have these screws.
How to attach plastic windows to brick?
 Brick is a good material for building buildings. But attaching plastic windows to brick is sometimes problematic. What exactly is the difficulty?
If you use a frame dowel, then it is better to drill holes in the frame for this dowel not in advance, but locally.
This is necessary in order to get the anchor directly into the middle of the brick, and not into the mortar between the bricks. Of course, no one does this (by the way, neither do I). After all, this is a waste of time.
It is advisable to choose a frame dowel of the longest possible length (minimum penetration into the brick is 6 - 10 cm). If the brick is hollow, then use the 202nd anchor.
You can use anchor plates in brick if you are sure that the brick is not hollow. But even solid brick can be of poor quality. And it will be very difficult for a non-professional to attach the plate into it.
How to attach plastic windows to wood?
 The ideal option for fastening windows for wood is anchor plates. And no one can convince me of this. Frame houses or timber, plates only.
From my bitter experience, I’ll tell you how I fastened windows with screws to the top of the frame in a house made of timber. And there was a casing, and a gap of about 4 cm. A year later, the timber began to shrink, and these screws, together with the timber, went straight into the double-glazed windows.
As a result, several double-glazed windows were replaced under warranty. Got the money. After this incident, if I use screws, then only in exceptional cases, and only in the side parts of the window frame.
By the way, even when building frame houses, professionals do not recommend using hardened screws. Wood is a living material and when moved, screws break, and a nail, for example, bends. The same principle applies to the anchor plate.
Anchor plates for wooden houses are good for the following reasons:
- Quick installation;
- Compensates for thermal expansion;
- They do not affect window structures during shrinkage.
How to attach plastic windows to aerated concrete?
The aerated concrete wall is loose. Can be mounted on a frame dowel with a maximum length of 202 mm. This is the easiest and fastest way.
But it is more correct to attach plastic windows to anchor plates through a special dowel for aerated concrete. It's a little longer and more complicated. In addition, you need to buy or have a hex bat in your arsenal.
How to fix plastic windows in concrete?
If you mean good quality concrete, from which, for example, lintels are made over window openings, then drilling such concrete with a diameter of 10 mm under a frame dowel is a bit difficult, but it is possible.
In this case, it is better to use anchor plates. But it is more efficient to attach panel and block houses to a frame dowel. It's more reliable and faster.
At the beginning of the article, I said that the choice of fasteners for windows also depends on the type of structure. So I want to talk about this type of glazing of loggias and balconies.
Typically, the window fastener hits the very edge of the top concrete slab or the edge of the brick bottom and side walls. Therefore, attaching loggias to the edge of the wall using a frame dowel can be quite dangerous.
Anchor plates are a great way out of the situation.
And finally, I would like to say about the big advantage of anchors, which is at the same time a disadvantage for anchor plates.
When the window frame is attached to anchors, at the time of drilling you level only one vertical plane. And you adjust the second vertical plane after inserting the anchor.
When fastening with anchor plates, you will have to set two vertical planes at once and only after that make holes with a hammer drill. This requires certain skill and skill.
Currently, more and more people are choosing metal-plastic windows. Regular apartments, country houses, and luxury country mansions are equipped with such double-glazed windows. And quite often people install new windows with their own hands. Depending on the chosen installation method and the skills of the installer, the process of installing one window will take from one and a half hours to half a day. The technology for installing windows is extremely simple and straightforward. It does not require the use of any complex tools. The main thing is to adhere to the installation procedure and comply with all the requirements dictated by the installation technology.
Necessary measurements before ordering plastic windows
Correct installation of new windows requires accurate measurements of the window opening. In addition, it is important to know the features of installing windows in openings with a quarter. Such window openings are usually found in foam concrete buildings. They help to significantly reduce heat loss. The main difference is that a window 50 mm shorter than the length of the opening is installed in an opening without a quarter. Subtract 30 mm from the measured width. Leave 15 mm gaps along the contour of the opening for foaming. In accordance with current GOSTs, 20 mm should be left around the perimeter. Leave an additional 35 mm below the window sill.
If the installation of PVC windows will be carried out in a window opening with a quarter, measure at the narrowest place. When ordering, add 30 mm to the window width. There is no need to change the length.

As a rule, the window is not installed in the center of the opening, but at a distance of approximately 1/3 deep from the outer plane. If the installation of PVC windows is done with your own hands, then the owner can move the structure in any direction convenient for him. Think about the offset in advance and take this parameter into account when ordering the ebb and window sill.
Add 50 mm to the width of the ebb and sill determined in accordance with the location of the window. When calculating the width of the window sill, additionally take into account such an indicator as the location of the battery.
The window sill should cover the radiator halfway. Add 20 mm to place the product under the base of the PVC window. The length margin must be at least 80 mm. But it’s better not to save too much and add 150 mm so that in the future you can cut out the window sill beautifully without any problems. Along with the ebb and window sill, you will be offered to order side plastic plugs. There is no need to give them up.
Return to contents
Which frame mounting method should I choose?
The installation of PVC windows does not depend on the chamber size of the glass unit or on the number of internal chambers in the profile. The order of installation of the product can only change taking into account the material of the walls and the size of the window. Suitable fastening and method of installation of PVC windows is selected in accordance with the listed parameters. To secure the window structure you can use:
- Dowels or anchors that cut into walls through existing or pre-prepared through holes in the profile.
- Serrated plates. They press into profile. They are fastened to the wall and secured with screws.

Practice shows that the most reliable option is the first one. It is most often used when installing heavy and large windows. In the case of through-mounting, the window will normally withstand multiple shock loads that inevitably occur when turning and tilting the window sashes. In addition, with the help of anchors, the installer has the opportunity to accurately adjust the horizontal and vertical alignment of the product being installed.
Those who install windows with double-glazed windows, i.e. without turning and folding sashes, you will be more interested in installation using anchor plates. These products are hidden under slopes, so they will not spoil the appearance. If the walls of the house are made of brick or concrete, then it is recommended to pre-prepare small recesses for the plates. They will eliminate the need to apply a leveling layer before installing slopes.
Sometimes both methods are used in combination. Anchors are sunk into the walls through the lower profile and side parts of the frame, and plates are used to secure the structure. If windows are installed in a wooden structure, it is better to avoid using plates, because They become loose after a short time. In this case, galvanized screws are more preferable.
Return to contents
What does the owner of a wooden house need to know?
The process of installing a PVC window is very dependent on the material used to make the walls. In the case of structures made of brick and foam concrete, the differences come down only to the depth of the anchors. With openings made of timber and logs, everything is a little more complicated.

If the walls of your house are made of wood, you need to remember a number of important rules. Firstly, it is recommended to start installing PVC windows in a wooden house no earlier than a year, or even better, 2 years after the completion of the house. This requirement is dictated by the fact that during this time the material shrinks. Glued laminated timber is characterized by the smallest shrinkage value and period. Secondly, windows are not installed directly into the opening. The product can only be mounted in a wooden box. It will protect the PVC window from deformation. The block should not have any defects, signs of damage by insects and rot, etc. Before starting any work, the wood must be treated with an antiseptic.
After 1-2 years, the shrinkage does not stop completely, but is no longer as strong. After installation of PVC windows and completion of finishing work, this will also happen. That is why at the top between the box and the opening you need to leave a gap of 30-70 mm. The size of this gap is selected taking into account the type and humidity of building materials. After installation is completed, this gap must be filled with jute and covered with platbands.
Building regulations do not make any clear recommendations regarding materials for window sills and flashings. As a rule, standard sills are used that come complete with a PVC window. The window sill can be made of wood or polymer. The lower profile can be rested directly on a wooden window sill, i.e. If you wish, you can install this product before installing the window. Or you don’t have to get rid of the old window sill if it is in good condition.

Experienced builders give a very useful recommendation, which is not in the regulatory documents, but it will be useful to any person who decides to independently install a PVC window. Wood allows vapor to pass through. If no action is taken about this, these evaporations will gradually deteriorate the properties of the polyurethane foam. And to prevent the foam from getting wet, polyethylene foam foil tape should be glued along the line of its application.
Return to contents
Preparing the opening and window for installation
Before proceeding with further work, prepare the tools for installing PVC windows. You will need the following:
- Screwdriver.
- Foam gun and foam itself.
- Level.
- Jigsaw.
- Hammer.
- Set of hex keys.
- Pencil.
- Yardstick.
- Stationery knife.
After you remove the old window, thoroughly clean the opening of paint and debris. If the walls of your house are made of wood, you will have to additionally plan the top layer if the new window is installed in a frame that has already served for some time. Such pre-treatment ensures stronger adhesion of the foam to the top layer.

Builders recommend using foam to fill the gap only if the gap between the opening and the frame does not exceed 40 mm in size. If the gaps are larger, it is better to partially fill them with polystyrene foam, drywall and other available materials. For example, in a house made of timber, you can use sections of the same timber.
First you need to remove the sash from the frame. To do this, remove the pin from the top hinge. You can carefully pry it off using a screwdriver or pliers. After this, remove the sash from the bottom hinge. If the window is solid, you need to remove the glass unit from it. First, the longitudinal beads are taken out, followed by the transverse ones. Glazing beads can be easily removed using a spatula or a wide knife. It is enough to insert the auxiliary tool into the gap and begin to gradually move it. Be careful and do everything so as not to damage the glass.
If the window is small, you can insert it using mounting plates without having to first remove the glass units or sashes. If it is possible not to violate the integrity of the factory structure, then it is better not to do this. Take a sash or a double-glazed window and lean the product against the wall at a slight angle, placing it on a flat horizontal surface, previously covered with thick cardboard or some soft material.

Do not place double-glazed windows and sashes flat under any circumstances. It is also prohibited to place them askew. Even the smallest pebble under the base can cause a crack to appear in the product. Remove the protective film from the outside of the frame. It's better to do this right away, because... In the future, this process will require much more effort.
Mark the locations for installing fasteners. Builders recommend installing fasteners in increments of 40 cm. In accordance with current GOSTs, the increment should not exceed 70 cm. Standard distances from the impost and corners are 15 cm. If you are installing a PVC window using plates, attach them to the frame in advance. Self-tapping screws are used for this. Prepare holes for long screws or anchor bolts. Use a metal drill for this. Drill from the outside of the frame.
Most instructions indicate that before installation, you need to fix it using PSUL protective tape. However, practice shows that gluing it before installation is quite inconvenient. Therefore, you can do this after the installation is completed, nothing bad will happen because of this.