Installation of a canopy over the porch. Canopy over the porch. How to make a hanging gable canopy
I made the canopy over the porch near the house myself. True, a friend helped me. At first, I spent a long time choosing which canopy to prefer. After all, it was possible to make it single-pitched, arched, single-pitched with a valance, elongated dome-shaped, straight, concave, gable. You can make it from wood or metal, and cover it with polycarbonate, metal tiles or ondulin.
PROS AND CONS
I puzzled over this for a long time, weighing the pros and cons. For example, if you make a canopy from metal, you need welding, or you need to cut the metal base with a grinding machine. If you make it from wood, then you need to paint or varnish the canopy to make it more durable. I thought about both its shape and the material that should then be laid on top of it.
Polycarbonate, like metal tiles, will last a long time, but it transmits light, which, on the one hand, is good, but on the other, not. Ondulin too good material, but you also need to make a leveling surface underneath it so that it lies evenly.

CHOOSING WOOD
In general, after much thought, I came to the conclusion that I would make a canopy out of wood, install it on supports, and make the most ordinary roof - a gable roof. This option seemed to me the most correct. It’s easier to work with wood, but somehow it’s more reliable with poles. I decided to cover the roof with metal tiles.
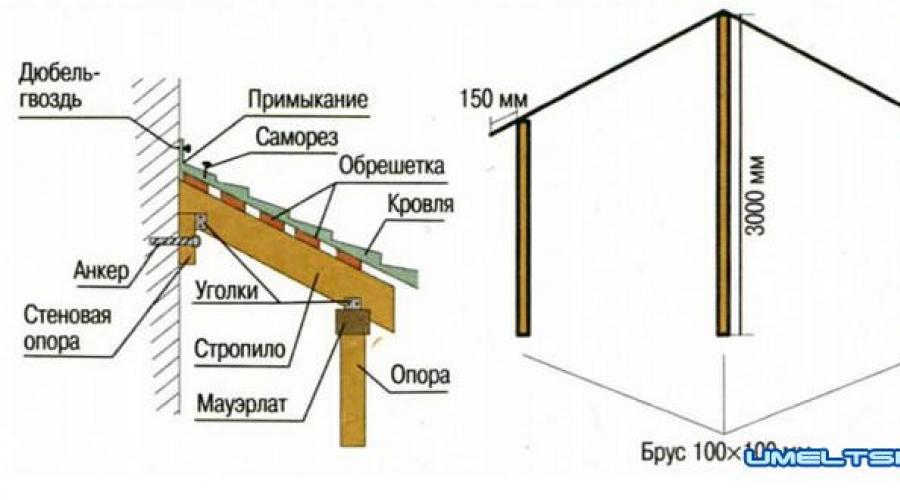
To begin with, I installed three wooden beams measuring 100x100 mm at a distance of 2000 mm from the entrance. The middle beam is 3000 mm high, and the two beams at the edges are 2000 mm high. I bought them in the store because I didn’t buy simple pillars, but ones with carvings. The distance between them is 2000 mm, and only 4000 mm. Since my house has a wooden porch, sewing them to the floor boards was no problem. I used special metal corners that are sold in stores, and then sewed them with slats on top to make it look aesthetically pleasing.

CONSTRUCTION OF STRUCTURE
On top of all 3 beams I put 3 more beams, sewing one of the ends to the wall of the house. Since the walls of the house are wooden, this did not cause me any problems. However, I had to make small supports; for this I used beams measuring 100x50 mm and 500 mm long. I sewed them to the wall of the house.
Next, I sewed the rafters to the beams that I laid on top of the supports. Then I made the sheathing. I used timber measuring 50x50 mm for the rafters. A total of 8 were required, that is, 4 beams on each side. I made them with a 150 mm offset. I also laid the beams that lie on top of the main supports with a 150 mm offset. I used self-tapping screws for fastening. You can, of course, use nails, but the fastening turned out better this way and the wood does not crumble. I used 20 mm thick boards for the sheathing.
SINGLE COMPOSITION
I attached metal tiles to the boards, which I ordered from the store according to size. Since the roof of our house is also covered with metal tiles, the porch turned out to be a single composition with the house. Therefore, I did not regret at all that I chose this option.
I then painted all the pillars and ceilings with decorative impregnation. Inside, I lined the roof of the porch with clapboard, so the room began to look somehow more comfortable and cohesive. Made between the pillars on three sides small fence from slats, connecting them crosswise and leaving an entrance on one side between the first and second pillars. The porch has been transformed!
On a note
One of simple options for a canopy over the porch - a semi-arched canopy made of polycarbonate.

It is recommended to install a canopy at least 80 cm wide (for proper water flow). The length of the product should be 50-60 cm wider than the front door (25-30 cm of space on both sides).
Modern canopies over the video entrance
The porch is partly open design, which, without providing sufficient protection, quickly loses its performance characteristics and is susceptible to damage.
To protect the front door and porch area, awnings are used that are mounted above the entrance group.
The canopy over the porch can be made with your own hands, without the involvement of third-party specialists, which significantly reduces the costs of arrangement and external finishing Houses.
Requirements and standards
A visor, like any hanging structure, must perform the following functions:
- Protective – ensuring a sufficient level of protection for the front door and porch area from precipitation in the form of rain and snow;
- Decorative – recommended use suitable design a canopy over the porch, in harmony with the general exterior of the residential building and the surrounding outbuildings;
- Ensuring comfort - the protective canopy should not in any way interfere with or impede the free entry and exit from the residential building.
When designing or drawing up a layout future design It is important to consider that the width of the canopy should be 50-70 cm larger than the width of the front door. That is, on each side the visor should cover the space by at least 25-30 cm.
Otherwise, even with slightly slanting rain, all the moisture will get under the canopy, which will cause unnecessary discomfort and reduce the service life of the coatings.
For uniform and natural snow removal from outer surface, it is recommended to use a slope angle of at least 20 degrees.
For thin coatings and coatings prone to the formation of dents, it is advisable to provide a load-bearing sheathing along the entire frame area. This will avoid sagging under the influence of snow formations.
Device and components

General device hanging frame made of wood
The installation of a canopy over the porch involves the use of common structural elements characteristic of various standard structures.
For example, device wooden frame will consist of the following elements:
- Wall element or abutment – provides reliable abutment and fastening of the structure to the load-bearing wall;
- Rafters and sheathing provide reliable fastening outer covering, help avoid sagging and dent formation;
- Support, Mauerlat, brackets - evenly distributed total weight designs;
- Wall support – additional support strip for weight distribution and fastening;
- External covering - provides drainage and removal of precipitation, protects the porch from moisture and snow.
The structure of a forged or metal frame is practically no different, with the exception that some elements are already included in the design. That is, the fastening of some elements occurs at the stage of manufacturing the canopy over the porch and is carried out by means of welding.
How to make a canopy over a porch

Canopy structure with polycarbonate coating
In order to make a canopy over the porch with your own hands, without resorting to the help of specialists, you should familiarize yourself with general technology its arrangement:
- Creation of a diagram and preliminary sketch;
- Selection of materials and coatings;
- Development of a sketch according to given dimensions, taking into account the selected materials;
- Porch preparation and load-bearing wall, procurement of materials;
- Making a visor;
- Installation and finishing designs.
If we say “ in simple language”, you should choose the shape and desired design, select materials, manufacture and install the structure.
Basically, for residential buildings it is customary to use the following forms of canopies:

Arched canopy with metal frame
- Metal profile;
- Metal hollow tubes;
- Forged elements;
- Wooden beam.
The following materials are suitable for arranging the external covering of the canopy:
- Polycarbonate;
- Profiled sheet;
- Galvanized iron with polymer coating;
- Roll materials and wood.
Manufacturing technology of a single-pitch canopy

General diagram of the structure of a single-pitch suspended structure
The single-pitch configuration is the most affordable design, both in terms of labor costs and cost. The frame of such a visor can be made of metal profile, tubes or corners.
It is best to use polycarbonate, metal tiles or corrugated sheets as an external covering.
The technology for manufacturing and installing a single-pitch canopy over the porch will look like this:
- First of all, you should take the necessary dimensions - measuring the width of the porch or front door, measuring the distance from the front door to the first step, measuring the required height. It is important that the width of the canopy should be 60 cm greater than the width of the porch.
- The drawing is made in the required scale, according to pre-taken dimensions.
- The prepared materials are used to manufacture rafters, struts and wall beams. If wood is used, the structure is assembled using screws and screws. For a steel frame, it is more advisable to use welding.
- Preparing the load-bearing wall before installing the frame - all damage or irregularities that may interfere with the fastening of the structure should be eliminated.
We have already discussed the manufacture of a lean-to canopy over a polycarbonate porch in a separate article. For getting additional information you can study this material.
Manufacturing technology of a gable canopy

General diagram of the structure of a gable suspended structure
The gable form has a much more reliable level of protection from precipitation and a more complex and rigid structure.
The manufacture of a gable canopy can be done using the following technology:
- Removal required sizes and making a schematic sketch to the required scale.
- Calculation of the required dimensions for triangular brackets, sheathing and rafters.
- Manufacturing of brackets according to the required parameters. After manufacturing, the beams are attached at an angle of 90 degrees to each other and connected by a brace.
- Installation of ready-made brackets on the surface of a load-bearing wall. Fastening is done using stainless steel screws or anchor bolts. Final fastening is recommended only after checking all components by level.
- Making rafters from wooden beam or metal corner. With a canopy overhang of 60-90 cm, two pairs of rafters, which are attached to each other using crossbars, will be sufficient.
- The installation of the rafters is carried out on the upper strips of the brackets. To connect adjacent rafters to each other, use ridge element made of wood or metal.
- Installation of sheathing made of wooden beams or metal corners.
- The external covering is laid according to the manufacturer's recommendations. After installation, fasteners under the gutters and installation of the wall element should be performed.
- Installation of gutters and eaves strips. It is desirable that the strip covers the joint between the canopy and the gutter.
- Processing all wooden elements structures with impregnating compounds.
Arched canopy manufacturing technology

General diagram of the structure of an arched suspended canopy
Making an arched canopy with your own hands is not difficult to do, but it can cause some difficulties, since you will have to bend the metal parts.
This can be done manually, fixing the pipes against the stop and gradually bending the blade, or using special equipment.
The manufacturing technology will consist of the following stages:
- Taking the required dimensions, making a sketch and calculating the dimensions of the frame.
- The frame is made from metal hollow pipes of round or square cross-section. It is advisable to use pipes no thicker than 16 mm. Bending is carried out according to the specified dimensions until the required arc is formed.
- The arcs are connected using straight strips using welding. To create a more rigid structure, a connecting strip is welded from the back of the frame.
- Using welding, canopies are attached to the rear arc, which will hold the frame on the wall. If desired, side decorative elements can be attached.
- The resulting structure is sanded, primed and finished painting the product. After drying, you can install the frame on the wall. For this, galvanized screws and self-tapping screws are used.
- As an external covering, you can use polycarbonate, which is fastened using self-tapping screws with a wide head.

Canopy frame made of metal tubes
Do-it-yourself manufacturing, although it has a lot positive points, but may cause some inconvenience later.
This is largely due to assumptions in the calculations and incorrect installation technology:
- Insufficient Overhang – The overhang size should be 20-25% larger than the overhang of the porch itself. That is, the visor must at least cover the first stage. In this case, even precipitation in the form of slanting rain will be less likely to fall on the porch area and the front door;
- Insufficient safety margin - if the strength is insufficient, the outer covering may sag under the influence of the weight of fallen snow;
- Insufficient protection against corrosion and decay processes - in the absence of additional treatment or anti-corrosion coating, open areas structures quickly deteriorate. It is recommended to carry out additional processing once or twice a year;
- Saving on fasteners and fastenings - metal or forged structures are quite heavy, which, in the absence of good fasteners and connections, leads to the destruction of the frame and load-bearing wall.
How to make a canopy over a porch with your own hands - requirements, design and manufacturing technology
To reliably protect the front door, a do-it-yourself canopy over the porch must meet following requirements... Otherwise, it is possible ...
Do-it-yourself canopies over the porch: photo examples
 The canopy over the porch of the house, or, as it is otherwise called, a canopy, has an important function. It protects the walls of the house from rain or snow. In addition, the canopy is an important part of the overall design of the house, which is certainly the first thing people pay attention to. On the Internet you can see canopies over the porch that are very diverse in terms of appearance, photos of examples of harmonious and stylish design can be easily found using a search engine.
Of course, such canopies can be purchased ready-made in a specialized store or ordered an original canopy from a specialist, but if desired and able to work with tools, anyone can build a canopy over the porch with their own hands.
Naturally, when wondering how to make a canopy over a porch, you will look for the main rules and requirements that apply to the creation of this detail of the interior of the house. We present the main points on this issue:

What types of canopies are there over the porch?

The design of the canopy over the porch can be supporting, if its frame is attached with the help of pillars, or suspended with mounting on the wall. The choice of material partly depends on the design, for example, supporting structure able to withstand a heavier canopy and the snow lying on it. And here suspended structures are made of materials and are designed so that snow does not accumulate on the canopy.
According to its form canopies can be:
- single-pitched, with the upper part adjacent to the wall;
- gable;
- arched;
- tent.
If you want to build a single-pitch canopy, you can sew up the wall on one or both sides for maximum wind protection. You can see what each of the above types of canopies looks like in the photo. Any of these designs can be done with your own hands.
How to choose the right material for a canopy over a porch
In the photo you can also see that, depending on the shape of the canopy over the porch and its material, you can create quite different design solutions. So, for creating single-pitched and double-pitched canopies over the porch, the following are suitable: materials, How:
And if you want to equip the porch with more complex design, then choose the following types roofs:

These materials will make the canopy not only light, but also durable, and it will have an attractive appearance. Moreover, in specialized stores the materials are available in different color scheme, so you can easily choose the option that best harmonizes with the interior of your home.
If you have decided that you will install the canopy over the porch with your own hands, then do not forget before installing the roof sheathe the rafters using lathing. Materials for the canopy must be laid on the sheathing, observing a pitch of approximately 300 mm, also equipping it with waterproofing. If the roof is too soft, then the rafters are covered with a continuous sheathing in the form sheet materials or slats tightly adjacent to each other.
If you wish, you can decorate your canopy using cast iron, wood carvings or overlays. All this decor can be purchased ready-made, or you can also make it yourself. You can see examples of the use of decor for a canopy over a porch in the photo.
Technique for making a single-pitch hanging canopy
A suspended single-pitch canopy is a simple and lightweight design; you can also choose the support option for installing a single-pitch canopy. For the frame, it is best to use wood or a metal corner, and for the covering, use a material similar to that used for the roof.
The work algorithm will be as follows:

If the visor was attached to multilayer wall, then it is secured to the supporting layer with stainless steel material. The places where beams and struts pass should be sealed so that the insulation does not get wet.
How to make a hanging gable canopy
It will be more difficult to make a gable canopy over the porch with your own hands, but it will be more reliable in case of precipitation. It is also more rigid and will be better protected from wind. This is how you do it yourself:

Algorithm for installing a polycarbonate arched canopy over a porch
An arched polycarbonate canopy is the simplest design that you can make yourself. The frame for the visor can be purchased ready-made or do it yourself according to the following scheme:

If you attach such a canopy over the porch in a house with one floor, then the roof overhangs should overlap it by at least 20 cm to prevent moisture from getting into the places where the canopy is attached to the wall.
The most popular canopy structures are polycarbonate with finished frame base. The base is made of metal or forged.
Canopies made of metal tiles are best suited for stone and brick houses, as well as for concrete buildings, but wooden awnings will perfectly complement a log house or a house equipped with a “wood-like” facade. You can review the photo if you wish. harmonious combinations certain types of canopies with structure.
How to make a canopy over a porch with your own hands: photo and video instructions, photo gallery of successful examples, advice from experts
Do-it-yourself canopy over the porch, how to make a canopy yourself, choice of material and design shape, photo examples of combinations of canopy design with a house
How to make a canopy over a porch with your own hands
 It's hard to imagine a private house without a canopy over the porch. This beautiful addition, in addition to decorative functions, also has a practical side. Firstly, this design will protect the porch and front door from the effects of precipitation. And secondly, the canopy will help protect the owners of a private house from the rain. This article will talk about how to make a canopy over the porch with your own hands.
Types of canopies and requirements for them
Before we talk about how to make a canopy over the porch on your own, it’s worth finding out what requirements the canopy itself must meet. Yes and choose suitable model better in advance.
So, the visor must meet the following requirements:

Now let's talk about the types of visors. You can make the following types of canopy over the porch with your own hands:
- single-slope design. In this case, the upper part of the slope is adjacent to the wall;
- gable canopy. In this case, each slope will be directed to the sides of the porch;
- arched canopy. Performed in the form of a semicircle with lower parts on the sides of the porch;
- tent It is made in the form of a sectional or round structure that covers the porch flooring on all sides.
 To make canopies over the porch you can use different materials. The choice will depend on the overall design style of the entire house and the amount of finance that can be spent. For frame metal structures and wood are often used, and various roofing materials are used as covering. The only thing worth considering is the design of the visor. So, it is better to make an arched and hipped canopy from soft tiles or polycarbonate. These materials are easy to bend, which means you can create structures of almost any complexity and configuration.
Single-pitch design
A do-it-yourself canopy in the form of a lean-to structure can be made either suspended or with supports. This type of canopy is lightweight and easy to implement. Let's look at the construction step by step:

As you can see, making a lean-to structure with your own hands is quite simple. During work, do not forget to cover the frame elements with a protective layer. Otherwise, precipitation will quickly disable them.
Gable visor
The gable canopy over the porch has a more complex design. But such a device reliably protects from slanting rain, and the snow will not accumulate much. In addition, the gable structure is more resistant to wind loads.
Building a gable canopy with your own hands looks like this:

Arched design
This design looks beautiful and elegant. It will easily and harmoniously fit into almost any style. To make such a canopy over front door use polycarbonate metal pipes for the frame and a device to bend them. The progress of work will consist of the following stages:

This canopy is quite durable, but does not have much weight. Instead of polycarbonate you can use soft tiles. In this case, it is necessary to additionally install a continuous sheathing.
As can be seen from all of the above, making a canopy over the front door is not very difficult. This will require very little material and time spent. And as a result you will receive reliable protection from bad weather for covering the porch and for the door itself. In addition, by showing imagination, you can complement the facade of the house with a beautiful and original canopy. This means that entering such a home will be much more pleasant.
Do-it-yourself canopy over the porch: types and materials for canopies, single-pitch, gable and arched structures
How to make a canopy over the porch of a house with your own hands? What types of awnings over the front door exist? What materials are they made from?
DIY canopy over the porch
The canopy over the porch is not only protection from rain and snow, but also an important design detail that allows you to fit the front door into the overall style of the building. Having the skills to work with tools, you can make a canopy over the porch with your own hands, using various materials and technologies.

DIY canopy over the porch
Requirements for the canopy over the porch:
- the canopy must reliably protect the front door and porch flooring from precipitation, so it is better to make it protruding beyond the porch by at least half a meter;
- it must have strength and wind resistance, as well as the ability to withstand snow loads for a long time;
- the canopy should fit into the overall style of the house.
Types of visors
The design of the canopy can be a supporting one, when the frame of the canopy is attached to support pillars, or a suspended one - with fastening to the wall. The choice of material directly depends on the chosen design: the support pillars, due to the redistribution of the load, can withstand a significantly greater weight of the canopy itself and the snow lying on it. Hanging canopies are often made from lightweight materials, choosing a design that is accessible for snow removal.
Depending on the shape, the visors are:
- Single-pitch canopy adjacent to the wall with the upper part of the slope;
- Gable canopy with slopes directed on the sides of the porch;
- Arched - in the form of a semicircle, the lower parts of which are located on the sides of the porch;
- Tent - in the form of a round or sectioned canopy covering the porch on all sides.
When installing support canopies, sometimes the wall is sewn up on one or both sides to give them greater wind protection, and fences and railings are also installed.
Materials for building a canopy
The canopy consists of a frame, support pillars and a covering. Depending on the style of the building itself and financial capabilities, the frame of the canopy is usually made of wood or metal, and the covering can be any roofing material.
Single-pitch and double-pitch canopies can be made using any roofing covering; for an arched or hip-type canopy, polycarbonate or flexible tiles are more suitable. The canopy may well become a decorative element of the house if you decorate it with cast-iron forging, wooden carvings or overhead elements.

Canopy over the porch decorated with cast iron forging
Single-pitch hanging canopy
The single-pitch visor has simple design And light weight, it can be made in a suspended or supported manner. The frame of a single-pitch canopy is made of wood or a metal corner. It is better to choose the same coating as on the roof.
- Measure the width of the porch, add 30 cm on each side to the resulting value and get the width of the canopy. Measure the distance in front of the entrance that the canopy should cover. The height of the canopy is determined based on the structure of the building, and the angle of inclination should not be less than 20 degrees. Draw a sketch and determine the length of the slope.
- Rafters equal to the length of the slope, struts and a wall beam are made of wood or metal. Assemble the parts together using self-tapping screws in case wooden version frame or by welding if the frame is made of metal.
- The frame is attached above the porch. The wall beam is secured above the entrance using stainless screws, and the struts are secured with anchors.
- Lathing is laid on the rafters from edged boards or bars. If slate or profiled metal sheet is chosen as the covering, the distance between the lathing slats should be 20-40 cm. For flexible tiles required continuous lathing from boards or waterproof plywood.
- Lay on the rafters roof covering, securing it in accordance with the manufacturer's recommendations.
- To protect against precipitation, planks are attached: a plank adjacent to the top of the slope and the wall and cornice strip on the bottom of the slope.
- Install a gutter, pipe or chain.

Single-pitch canopy for porch diagram
If the canopy is attached to a multi-layer wall, it is secured to the load-bearing layer of the wall using stainless steel shoes. The places where beams and struts pass through the outer cladding layer of the wall are sealed to prevent the insulation from getting wet.

Visor mounting diagram
Gable hanging canopy
The gable visor has a more complex design, but at the same time better protection from slanting rain and more convenient conditions for clearing snow. In addition, this design is more rigid, which means it has higher windproof properties.
- Measure the dimensions of the canopy in the same way as a single-pitched canopy. Perform a sketch. The dimensions of triangular brackets and sheathing are calculated based on the length of the canopy, rafters - from the width and height of the canopy.
- Two brackets are made of wood or metal: two perpendicular beams are attached to each other and connected by a brace at an angle of 45 to 60 degrees.
- The brackets are attached to the wall at a distance equal to the width of the canopy. For this vertical beams The brackets are applied to the wall, leveled using a level and secured with three or four stainless screws.
- If the canopy is used as a supporting one, then wooden or metal poles. To do this, they dig holes under them at the required distance, make a sand cushion, add crushed stone, install a pillar and fill it with concrete. The top of the pillars is connected by load-bearing beams.
- Rafters are made from wooden blocks or edged boards. For a small hanging canopy, two pairs of rafters are sufficient. Fasten rafter legs each other using crossbars. The rafters are secured to the upper beams of the brackets and a ridge beam is installed.
- A sheathing made of timber, boards or plywood is installed on the rafters.
- Attach hooks for gutters. Lay the roofing material, securing it according to the manufacturer's instructions. Install a wall connection strip and wind strips in the front part of the canopy to protect against snow and moisture.
- Install the gutter, and then the eaves strip, while the lower edge of the strip should fall inside the gutter. Fasten drainpipe or chain.

Arched polycarbonate canopy
This design is perhaps the easiest to implement and is accessible to anyone. The frame for such a visor can be purchased at the store or made independently.
- After measuring the porch, a drawing or sketch is made, determining the dimensions of the frame.
- The frame is made of square pipe 12-16 mm or aluminum pipe, bending it in an arc with the required radius. The visor requires two arcs.
- The arcs are connected to each other by straight pipe sections at both ends. To add rigidity to the structure, a connecting beam can be welded at the back.
- Canopies are welded to the rear arch, for which the canopy will be attached to the wall.
- Clean the frame from scale, rust, prime and paint.
- After drying, the frame is installed above the porch, attaching it to the wall with screws.
- The polycarbonate is secured using self-tapping screws. If desired, decorative elements are also attached.

Scheme for creating an arched canopy
When attaching a canopy over a porch one-story house it is necessary to fasten it so that the roof overhangs overlap it by at least 20-30 cm, this will prevent water and snow from getting into the place where the canopy is attached to the wall and will extend its service life.
Do-it-yourself canopy over the porch - instructions for creating a Photo!
Find out more about - Do-it-yourself canopy over the porch, detailed description and cool photos will help you understand the topic!.
What kind of sheds do we build?
Order canopies over the porch from us!
We suggest you familiarize yourself with the prices:

Model No. 1 from Fence Style

- Select material: Polycarbonate 8 mm standard
- Area, sq.m. thirty
- Price with installation: p 105,000
Canopy model No. 1
Please select your canopy size below:

Model No. 2 from Fence Style
Examples of our projects with this profile

- Roof canopy size, m. 5.4 x 6.3
- Select material: Polycarbonate 8 mm standard Polycarbonate 8 mm premium Metal tile 0.5 mm
- Area, sq.m. thirty
- Price with installation: p 91,000
Canopy model No. 2
Posts 80*80 mm or 100*100 if the width is more than 5 meters or 120*120 if the width is more than 8 meters
Price with installation per 1 sq.m. from: p 3 000
Please select your canopy size below:
Canopy size at the outer posts, m: 5 x 6 5 x 7 5 x 8 5 x 10 6 x 6 6 x 7 6 x 8 6 x 12 7 x 7 7 x 9 7 x 10 8 x 8 8 x 12 9 x 9 9 x 12

Model No. 3 from Fence Style
Examples of our projects with this profile

- Roof canopy size, m. 5.4 x 6.3
- Select material: Polycarbonate 8 mm standard Polycarbonate 8 mm premium Metal tile 0.5 mm
- Area, sq.m. thirty
- Price with installation: p 91,000
Canopy model No. 3
Posts 80*80 mm or 100*100 if the width is more than 5 meters or 120*120 if the width is more than 8 meters
Price with installation per 1 sq.m. from: p 3 000
Please select your canopy size below:
Canopy size at the outer posts, m: 5 x 6 5 x 7 5 x 8 5 x 10 6 x 6 6 x 7 6 x 8 6 x 12 7 x 7 7 x 9 7 x 10 8 x 8 8 x 12 9 x 9 9 x 12

Model No. 4 from Fence Style
Examples of our projects with this profile

- Roof canopy size, m. 5.4 x 6.3
- Select material: Polycarbonate 8 mm standard Polycarbonate 8 mm premium Metal tile 0.5 mm
- Area, sq.m. thirty
- Price with installation: p 91,000
Canopy model No. 4
Posts 80*80 mm or 100*100 if the width is more than 5 meters or 120*120 if the width is more than 8 meters
Price with installation per 1 sq.m. from: p 3 000
Please select your canopy size below:
Canopy size at the outer posts, m: 5 x 6 5 x 7 5 x 8 5 x 10 6 x 6 6 x 7 6 x 8 6 x 12 7 x 7 7 x 9 7 x 10 8 x 8 8 x 12 9 x 9 9 x 12

Model No. 5 from Fence Style
Examples of our projects with this profile

- Roof canopy size, m. 5.4 x 6.3
- Select material: Polycarbonate 8 mm standard Polycarbonate 8 mm premium Metal tile 0.5 mm
- Area, sq.m. thirty
- Price with installation: p 91,000
Canopy model No. 5
Posts 80*80 mm or 100*100 if the width is more than 5 meters or 120*120 if the width is more than 8 meters
Price with installation per 1 sq.m. from: p 3 000
Please select your canopy size below:
Canopy size at the outer posts, m: 5 x 6 5 x 7 5 x 8 5 x 10 6 x 6 6 x 7 6 x 8 6 x 12 7 x 7 7 x 9 7 x 10 8 x 8 8 x 12 9 x 9 9 x 12

Model No. 6 from Fence Style
Examples of our projects with this profile

- Roof canopy size, m. 5.4 x 6.3
- Select material: Polycarbonate 8 mm standard Polycarbonate 8 mm premium Metal tile 0.5 mm
- Area, sq.m. thirty
- Price with installation: p 91,000
Canopy model No. 6
Posts 80*80 mm or 100*100 if the width is more than 5 meters or 120*120 if the width is more than 8 meters
Price with installation per 1 sq.m. from: p 3 000
Please select your canopy size below:
Canopy size at the outer posts, m: 5 x 6 5 x 7 5 x 8 5 x 10 6 x 6 6 x 7 6 x 8 6 x 12 7 x 7 7 x 9 7 x 10 8 x 8 8 x 12 9 x 9 9 x 12

Model No. 7 from Fence Style
Examples of our projects with this profile

- Roof canopy size, m. 5.4 x 6.3
- Select material: Polycarbonate 8 mm standard Polycarbonate 8 mm premium Metal tile 0.5 mm
- Area, sq.m. thirty
- Price with installation: p 91,000
Canopy model No. 7
Posts 80*80 mm or 100*100 if the width is more than 5 meters or 120*120 if the width is more than 8 meters
Price with installation per 1 sq.m. from: p 3 000
Please select your canopy size below:
Canopy size at the outer posts, m: 5 x 6 5 x 7 5 x 8 5 x 10 6 x 6 6 x 7 6 x 8 6 x 12 7 x 7 7 x 9 7 x 10 8 x 8 8 x 12 9 x 9 9 x 12

Model No. 8 from Fence Style
Examples of our projects with this profile

- Roof canopy size, m. 5.4 x 6.3
- Select material: Polycarbonate 8 mm standard Polycarbonate 8 mm premium Metal tile 0.5 mm
- Area, sq.m. thirty
- Price with installation: p 91,000
Canopy model No. 8
Posts 80*80 mm or 100*100 if the width is more than 5 meters or 120*120 if the width is more than 8 meters
Price with installation per 1 sq.m. from: p 3 000
Please select your canopy size below:
Canopy size at the outer posts, m: 5 x 6 5 x 7 5 x 8 5 x 10 6 x 6 6 x 7 6 x 8 6 x 12 7 x 7 7 x 9 7 x 10 8 x 8 8 x 12 9 x 9 9 x 12

Model No. 9 from Fence Style
Examples of our projects with this profile

- Roof canopy size, m. 5.4 x 6.3
- Select material: Polycarbonate 8 mm standard Polycarbonate 8 mm premium Metal tile 0.5 mm
- Area, sq.m. thirty
- Price with installation: p 95,200
Canopy model No. 9
Posts 80*80 mm or 100*100 if the width is more than 5 meters or 120*120 if the width is more than 8 meters
Please select your canopy size below:
Canopy size at the outer posts, m: 5 x 6 5 x 7 5 x 8 5 x 10 6 x 6 6 x 7 6 x 8 6 x 12 7 x 7 7 x 9 7 x 10 8 x 8 8 x 12 9 x 9 9 x 12

Model No. 10 from Fence Style
Examples of our projects with this profile

- Roof canopy size, m. 5.4 x 6.3
- Select material: Polycarbonate 8 mm standard Polycarbonate 8 mm premium Metal tile 0.5 mm
- Area, sq.m. thirty
- Price with installation: p 95,200
Canopy model No. 10
Posts 80*80 mm or 100*100 if the width is more than 5 meters or 120*120 if the width is more than 8 meters
Price with installation per 1 sq.m. from: p 2 900
Please select your canopy size below:
Canopy size at the outer posts, m: 5 x 6 5 x 7 5 x 8 5 x 10 6 x 6 6 x 7 6 x 8 6 x 12 7 x 7 7 x 9 7 x 10 8 x 8 8 x 12 9 x 9 9 x 12

Model No. 11 from Fence Style
- Roof canopy size, m. 5.4 x 6.3
- Select material: Polycarbonate 8 mm standard Polycarbonate 8 mm premium Metal tile 0.5 mm
- Area, sq.m. thirty
- Price with installation: p 95,200
Canopy model No. 11
Posts 80*80 mm or 100*100 if the width is more than 5 meters or 120*120 if the width is more than 8 meters
Price with installation per 1 sq.m. from: p 2 900
Please select your canopy size below:
Canopy size at the outer posts, m: 5 x 6 5 x 7 5 x 8 5 x 10 6 x 6 6 x 7 6 x 8 6 x 12 7 x 7 7 x 9 7 x 10 8 x 8 8 x 12 9 x 9 9 x 12

Model No. 12 from Fence Style
- Roof canopy size, m. 5.4 x 6.3
- Select material: Polycarbonate 8 mm standard Polycarbonate 8 mm premium Metal tile 0.5 mm
- Area, sq.m. thirty
- Price with installation: p 95,200
Canopy model No. 12
Posts 80*80 mm or 100*100 if the width is more than 5 meters or 120*120 if the width is more than 8 meters
Price with installation per 1 sq.m. from: p 2 900
Please select your canopy size below:
Canopy size at the outer posts, m: 5 x 6 5 x 7 5 x 8 5 x 10 6 x 6 6 x 7 6 x 8 6 x 12 7 x 7 7 x 9 7 x 10 8 x 8 8 x 12 9 x 9 9 x 12

Model No. 13 from Fence Style
- Individually
Canopy model No. 13
Posts 80*80 mm or 100*100 if the width is more than 5 meters or 120*120 if the width is more than 8 meters

Model No. 14 from Fence Style
- Roof canopy size, m. 6.3 x 3.5
- Select material: Price from stock Polycarbonate 8 mm standard Polycarbonate 8 mm premium Metal tile 0.5 mm
- Area, sq.m. 18
- Price with installation: p 89,600
Canopy model No. 14
Posts 80*80 mm or 100*100 if the width is more than 5 meters or 120*120 if the width is more than 8 meters
Price with installation per 1 sq.m. from: p Individually
Please select your canopy size below:
Canopy size at the outer posts, m: 6 x 3 6 x 3.5 6 x 4 9 x 3 9 x 3.5 9 x 4

Model No. 15 from Fence Style
- Price with installation: p Individually
- Individually
- Price from stock Polycarbonate 8 mm standard Polycarbonate 8 mm premium Metal tiles 0.5 mm Individually
Canopy model No. 15
Posts 80*80 mm or 100*100 if the width is more than 5 meters or 120*120 if the width is more than 8 meters
Price with installation per 1 sq.m. from: p Individually
Color shades of polycarbonate
Metal tile options *:
* For other colors of metal tiles, please contact our managers
RAL 1014
(Ivory)
RAL 3009
(Oxide red)
RAL 3011
(Brown red)
RAL 5005
(signal blue)
RAL 6002
(Leaf green)
RAL 7004
(Signal gray)
Soft roof options:
Structures above the porch – necessary elements buildings that perform several functions simultaneously. Their main task is to ensure a comfortable stay on the porch, protecting it from precipitation. In addition, such structures protect the front door from the negative effects of moisture, and also perform an aesthetic function, giving the building a complete look.
The ZaborStil company offers the manufacture and installation of a canopy over the porch made of cellular polycarbonate and metal tiles. You can choose one of the standard models in our catalog or order a canopy at individual project. To make the right choice, familiarize yourself with the features of various models of visors and the properties of the materials for their manufacture.
Basic requirements for visors
A canopy over a porch has a number of requirements related to its functionality, safety and appearance.
The design of the canopy must be reliable; it must withstand snow and wind loads without creating a danger of collapse. All canopies produced by our company “ZaborStil” have durable steel supports and fully meet safety requirements.

An example of a canopy over a porch from “Fence-Style”
Coating materials
The canopy over the front door should not violate the stylistic unity of the building. When choosing a canopy material, it is recommended to focus on the roofing of the house. For buildings with a metal tile roof, canopies made of metal tiles of the same color are suitable. If the building has a soft roof covering, then it is desirable that the canopy over the porch be covered with identical material. The exception is polycarbonate, a canopy from which can harmoniously fit into the exterior of any home. The main thing is to choose the right color so that it fits into the color scheme of the building.
Cellular polycarbonate
This clear honeycomb plastic is great for making canopies. Cellular polycarbonate has many advantages, thanks to which the choice in its favor is being made more and more often:
Wide selection of colors and degrees of transparency;
Lightweight and durable, due to internal stiffeners it can withstand significant loads;
Flexibility, thanks to which a variety of canopy shapes are achieved;
Resistance to adverse weather conditions, no corrosion;
Does not support combustion.
The only thing in which polycarbonate is inferior to metal coatings is that scratches from hail can remain on its surface. It is also susceptible to aging under the influence of UV rays, but this disadvantage is eliminated by the use of a special protective film.
Metal tiles and corrugated sheets
It is advisable to select canopies using these metal roofing coverings according to the type of roof. Their advantages include:
Long service life;
Aesthetic appearance (especially for metal tiles);
Resistance to atmospheric factors and high loads.
The disadvantages of metal canopies include their noise during rain.
Soft roofing coverings
Canopies using them last a long time, create deep shade and do not heat up as much in the heat as coverings made from metal sheets, and do not make noise when it rains.
The cost of this type of canopy is higher due to the more complex installation, which is done using sheets of plywood.
Materials for making the frame
Frames for a canopy over a porch can be made from:
profile pipe;
wooden beam;
Each of these materials has its own characteristics.
Wooden base inferior to steel frames in strength and durability. It can withstand less load, is affected by fungus and mold, and is susceptible to burning. A canopy with a wood base would be appropriate only over the porch of a house with wooden walls. This combination will be the most harmonious. In all other cases, it is better to give preference to a strong and durable steel frame.
Frames made of forged elements look beautiful and impressive, but their cost is too high. The costs of installing a canopy with forged elements may be unreasonably high, especially if it has a large area. Much more affordable alternative– designs from steel profile.
Frames made of profiled steel pipes are most often used for canopies. Their advantages are high strength, durability and affordable prices. A special feature of the canopies is their high windage capacity under wind loads, as well as the fact that large masses of snow can accumulate on them. Therefore, the strength of the foundation for them is subject to increased requirements. Welded structures made from steel profiles fully satisfy them.
Our company produces structures based on high-quality domestically produced steel profiles. For racks we use steel pipes square section 80x80 mm. The cross-sections of the remaining parts are selected to ensure a sufficient safety margin at maximum loads. The frame is assembled using electric welding, after which anti-corrosion protection. The covering is mounted with high-quality fasteners. We guarantee high quality and the reliability of our designs.
Visor sizes
Having chosen the material for making the visor, you need to decide on its size and shape. The dimensions of the canopy should, at a minimum, provide protection from precipitation of the entire porch. But now more and more homeowners are choosing more spacious canopies.
The canopy, stretching along the entire facade, provides many advantages and conveniences for those living in the house. This is also an opportunity to go out and sit on fresh air at any time without the risk of finding yourself in the rain or scorching sun, and the pleasure of having lunch in the yard, chatting with friends, having a barbecue or tea party with the whole family, or simply unloading things from the trunk without fear of getting them wet in rainy weather.
You will significantly expand the functionality of your home and get all the benefits of owning a veranda without any reconstruction or additions, simply by ordering the production and installation of a canopy from our company. If necessary, we will lay the floor flush with the porch area; this is not difficult to do.
A spacious canopy along the facade will allow you and your family members to significantly increase the number of pleasant moments in life, and therefore improve its quality. Moreover, such pleasure will not cost much.
Shapes of canopies
The most simple form canopy - single-pitched. The flat, sloped canopy can be made from any material. But more often, single-pitch canopies over the entrance are made from roofing materials, because polycarbonate provides more opportunities in this regard, which would be a remiss not to use.
Flexibility polycarbonate sheets allows you to give canopies arched, concave and wave-like shapes. This shape is defined by the upper part frame structure, on which polycarbonate is mounted. Arched configuration polycarbonate canopy has its advantages - less snow lingers on it. In addition, since a convex surface tends to reflect Sun rays, it is comfortable to be under such a canopy in hot weather.
A gable canopy is usually made of roofing covering - metal or soft. Gable canopies over the entrance to houses with the same shape and roofing material look especially attractive.
A three-pitched canopy made of metal or bitumen tiles that follows the shape of the roof can become stylish architectural element, giving the house a special charm.
The most difficult ones to make are dome canopies. No matter how flexible cellular polycarbonate, it is impossible to give it a dome shape. To obtain this configuration, you have to assemble the canopy from cut out parts.
Examples of awnings over a porch
Examples of awnings over a porch

A well-designed central entrance in some cases attracts more attention than the building itself. the main role on the exterior of the building there is a canopy over the porch. But its main task is not to create a spectacular and attractive looking, and protection of the front entrance from adverse external influences.
Norms and rules for installing visors
The canopy over the porch of the house is designed to perform the following tasks:
- Protecting the front door from ultraviolet rays and atmospheric precipitation.
- Protection from snow and rain for people leaving the house.
- Decorative decoration facade of the house.

The term of perfect operation of this building element can be extended if it fully complies with the following standards:
- The canopy must withstand the load from its own weight and the weight of precipitation. When performing calculations, you should take into account the expected weight snow mass, rolling down onto the canopy from the main roof and the weight of the vegetation entwining the structure.
- The finished canopy should protect not only central door, but the entire porch area.
- One of the structural elements should be a water drainage system. For this purpose, any container, gutter or storm drain can be used.
- The canopy should fit perfectly into the exterior, in harmony with the porch and roof of the building. A combination can be achieved not only by selecting appropriate materials and parameters, but also by reasonable contrast.
When drawing up the diagram, the main parameters of the visor are determined:
- The place where the canopy will be located: above the front entrance or above the back porch of the house.
- Design size. It can cover the entire veranda or just the front door.
- Canopy type: single-slope, double-slope or complex shape.
- Material used to make the visor. It is very important that it is durable and at the same time combined with the architecture of the house.
Types of canopies over the porch
Hanging canopies over the porch are not a complex design, so they can be made with your own hands in a short period of time from common materials. Complexity installation work depends on the intended shape of the structure.

Most often, the roof above the entrance to the house is designed using the following:
- Mono-pitched structures with a suspended or supporting roof made with a slight slope, allowing melt and rain water to be easily drained.
- Gable canopies consist of two inclined slopes. The convenience and reliability of the design is determined by the uniform distribution of the load between the two elements.
- Tent canopies are made in the shape of a semicircle, the ends of which hang from both sides of the porch.
- An arched canopy completely surrounds the porch.
Features of the roof over the porch made of different materials
It is very important to know what porch awnings are made of. These designs can be made of various materials, with their own advantages and disadvantages.
Polycarbonate visors
Polycarbonate has a wide range of applications, it can be fencing structures, greenhouses, shop windows, balconies and gazebos. Very often this material is used to create canopies or awnings.

Thanks to the properties of polycarbonate, the structure over the porch made of this material receives some advantages:
- Passing through the coating, the sun's rays are scattered, which ensures normal natural lighting.
- Under influence strong wind or a sudden change in temperature, the shape of the polycarbonate structure remains unchanged.
- The polycarbonate visor does not change color, is not affected by rust and does not burn.
- The surface is resistant to the growth of fungus and mold, therefore, does not rot.
- You can create canopies of any shape from polycarbonate due to the flexibility of the material.
- Various shades and sheet thicknesses allow you to choose the material in accordance with the exterior and operating conditions.
Plastic
Very often, special PVC plates are used to make canopies, intended for outdoor use. Plastic and polycarbonate have many similar qualities, but the first option is lighter and cheaper.

Plastic presented wide choice shades, but if desired, you can change the color of the visor using multi-colored film.
Metal
The simplest and inexpensive option can be called a metal visor. The structure is assembled by welding, but if you do not have experience with welding equipment, you can connect the elements using rivets or bolts with nuts.
The advantage of a metal roof canopy is its strength, durability and flawless operation. But such structures also have a drawback: the metal is very easily affected by corrosion and has a significant mass. Therefore, it is very important to correctly calculate the design and strength of the fastening.

Replace heavy ones metal sheets It’s quite possible to use corrugated sheets. This material is protected polymer layer, which increases resistance to negative impacts natural phenomena. Profiled metal sheets can have different sizes And different thickness. A wide range of colors and shades, including patterns imitating wood, brick or stone, allows you to choose a coating in accordance with general style. Corrugated sheeting is easier to use than metal tiles or sheet metal.
Sheds made of corrugated sheets are very popular, but they are not without disadvantages:
- Sunlight does not pass through profiled metal, which limits their use.
- Low impact resistance can cause marks from mechanical shocks or hail, so preference should be given to thicker material.
Forged
Luxury and presentability - this is the main difference between forged canopies and canopies over the porch of a private house with your own hands. Forged decorative structures become central element exterior. Forged Products differ high cost, therefore, if desired, you can make a visor with forging elements that go well with polycarbonate, plastic, metal tiles and sheet metal.

Heavy weight and the complexity of installation are the main reasons why it is best to entrust the work to an experienced craftsman. Poor quality work can cause the entire structure to collapse.
Wooden
Massive buildings made of timber or rounded logs can be decorated with a wooden canopy. Moreover, only the frame of the structure is made of wood, and the roof is covered with slate, tiles or roofing felt. Plastic or polycarbonate in this case does not quite fit with a wooden frame.

To protect the wooden elements of the canopy over the porch from rotting, insects and mold, they are treated with antiseptic agents.
Metal tile for canopy
The difference between canopies made of metal tiles is decorative qualities and strength. But this design may not be used for all buildings. The best option The use of the same type of materials for the roof of the canopy and the main roof is considered.
If you simultaneously install the roofing material on the main roof and on the canopy, you can use remnants or trimmings of the covering, which will allow you to get some savings.

Metal tiles as a roofing material have the following advantages:
- Attractive view.
- Insignificant mass.
- Resistant to temperature changes.
- Long service life.
Construction of a polycarbonate canopy - dimensions, angle of inclination
Before making a visor, you need to draw up a diagram or drawing of it, where you must indicate all the dimensions. This will help you choose the right roofing covering and calculate the amount of materials.
When developing a drawing of a visor, it is important to consider the following:
- The width of the structure must exceed the width of the entrance door by at least 0.5 meters.
- The minimum length of the visor should be about 0.8 meters.
- The angle of inclination of the canopy over the porch is selected taking into account that snow, rainwater and debris will roll off the roof without hindrance.
The most effective parameters for the canopy are those that provide reliable protection for the front door and porch. But it should be taken into account that a large roof area collects more snow in winter, which can cause deformation and destruction of the visor. Therefore, it is important to know how much precipitation falls in a year in a certain place.

Porch installation with pitched roof performed using the following tools:
- Screwdriver and electric drill with nozzles.
- Welding equipment.
- Bulgarian.
- Building level and roulette.
- Marker or pencil.
To make the visor you will need the following:
- Cellular polycarbonate with a thickness of at least 1 cm.
- Steel profile pipes.
- Self-tapping screws with plastic washers.

You can make a visor with your own hands according to the following instructions:
- Mark the places where the supports for the canopy are supposed to be placed on the wall of the house slightly above the top level of the doors.
- Frame elements are made from a profile pipe and connected to each other by welding.
- The frame is reinforced with stiffeners, the number of which depends on the parameters of the visor.
- Using a drill with an attachment, holes are drilled in the frame to attach the canopy to the wall. The number of fasteners is determined by the size of the structure, but there should not be less than four.
- The frame is fixed to the wall and treated with a primer. Dried structures. Needs painting.
Mounting polycarbonate is done as follows:
- The ends of the sheets are sealed with sealing tape.
- Be sure to leave a gap between the installed panels so that the material does not deform as a result of thermal expansion.
- Assembly is best done with split profiles.
- The junction of the canopy and the wall is sealed with sealant to prevent water from entering the porch.
- Upon completion of installation work, remove the protective film from the polycarbonate.
Do-it-yourself canopy for a private house on supports
Canopy on support pillars It has undeniable advantage: You can use different materials to make it.
The installation process involves the following steps:
- Installation of supports. To do this, you need to place two racks at a distance of 1.5-2 meters from the wall. The supports can be brick, concrete or metal.
- Installation rafter system. Opposite the supports, recesses are made in the wall, into which beams are inserted at one end, and the other end is laid on the support. Using studs and nuts, fix the beams to the supports. The visor may have flat shape or a house. For the first option, boards are sewn across the beams; the second option involves installing a full roof with a ridge, sheathing and waterproofing.
- The canopy is sheathed with roofing material.
- Hemming the bottom of the roof above the porch. For this purpose, you can use plastic panels or siding. During the cladding process, you can install spotlights.
The unique design of the entrance to the house makes a more encouraging impression about the house itself. Without such a canopy, the entrance to the house seems completely empty and incomplete, as if something is missing. In addition to the aesthetic aspect of this structure, the canopy also has considerable practical applications.
It will protect from rain when entering the house or in cases where you have to stand at the front door waiting for something. The same situation applies to clear sunny weather; a canopy will help provide shelter from the scorching sun.

The visor also ensures the safety of people, because there are situations when two-story house or in a multi-story building, an object fell from a window or roof.


Without a canopy, people standing under the door may be seriously injured. It follows from this that the canopy over the front door ensures the safety of human life.

In general, such structures are very useful. If you are going to install one, then you need to decide which one you need; on the Internet you can find many photos of canopies over the porch.

Types of visors
Visors can be made in the most various variations, but with all this it is necessary to take into account the style of the building itself and work out everything to the smallest detail in order to match the exterior. Almost every visor is unique, especially if it is made to order, but their shapes can be divided into several groups.

One of the types of canopy is “dome”, as the name itself implies, such a canopy is made in the shape of a dome. The main difference among all others is the savings on materials and compactness.

This canopy covers the same area as others, but requires less materials and resources. One of the most popular materials is a polycarbonate visor.

The “arched” visor is very economical solution, because this design requires a very small amount of materials. Such canopies are distinguished by natural drainage and, in addition, perfectly withstand the weight of melted snow.


Flat visor - the name speaks for itself. The main difference is the ease of execution. To do this, you need to fasten together several wooden boards and decorate with some decorative elements.

Materials for manufacturing
There are no restrictions on materials here, the main thing is to take into account the practical part, so that it is strong and can withstand a certain weight. However, there are many popular materials from which these same canopies are made.

One of the most popular metal structures are forged visors. Of course, such canopies will cost a lot of money, since such a pleasure is often made to order from experienced craftsmen of your business.

Forged canopies give solidity not only to the entrance, but also to the house itself. To prevent it from seeming too dry, you can optionally add some decorative elements in the form of forged lanterns or tied baskets with flowers.

The only problem is installing such a structure yourself; if you fasten the visor incorrectly, it can simply collapse and it is better to entrust this matter to professionals. So, best advice will purchase or order ready-made visor with installation service above the porch.


Metal canopies
The metal visor can without a doubt be considered budget option protective canopy. After all this design made of stainless metal requires minimum costs to create and install, it also does not weigh as much as a forged one and you can install it yourself.

Another advantage is strength and durability, stainless steel has such qualities as resistance to temperature changes and is less susceptible to corrosion.

Canopies made of metal tiles
A canopy made of metal tiles immediately has decorative design, however, such material is not very popular among designers; according to them, such material is not suitable for use due to its bulkiness. However, many people use metal tiles, since they practical properties take over design.


A frequent case is the replacement of metal tiles with bitumen ones. Bituminous shingles much lighter and also excellent at blocking hits extraneous sounds from outside.


Photo of the canopy over the porch


