Installing basement siding with your own hands: advantages, preparatory work and installation technology. Sequential instructions for installing basement siding DIY basement siding
Read also
The construction of any buildings is a step-by-step process that must be completed to the end. At the final stage, it is necessary to cladding the building, which will ensure its durability and attractive appearance. Now one of the popular types of facing material is basement siding.
First, a few words about what accounts for this popularity:
- Low
- A simple technology for installing siding on a plinth. Even a non-professional can work with siding
- The shortest terms for facing work. You can cover your house with siding in a couple of days.
- Stylish appearance, large selection of textures and colors
- It is these indicators that made basement siding so attractive to home owners
Description of material
 Modern basement siding is a material made in the form of panels. The panels are made of vinyl, and this is what ensures its durability; vinyl does not deteriorate for fifty years. The material is not afraid of various atmospheric conditions, ultraviolet rays and frost. Plinth panels are not exposed to temperature changes ranging from + 50 to - 50.
The physical characteristics of the material include its lightness; the material does not create a load on the lined wall. The material does not require additional investments, does not require painting or coating with any substances. These indicators indicate that the siding is installed once and does not require any maintenance during further operation.
Material calculation and purchase of additional parts
 To start finishing the basement of a house with siding with your own hands and carry it out effectively, you need to carefully consider purchasing the necessary materials and fasteners. you need to start by calculating the area of the wall that will be covered. The area is calculated as follows:
The height of the wall must be multiplied by its length.
Thus, it is necessary to measure all the walls and the results obtained. The final calculation figure must be divided by the square footage of the siding, which is indicated on one pack. We get the approximate number of packs of siding that will be needed for cladding. To avoid troubles, panels should always be purchased with some reserve.
What else is needed to cover the base with siding?

- Metal profile for sheathing.(Its calculation is carried out piece by piece, the length of the wall is measured and it is estimated how many profiles are needed to lay them to the top at a distance of 40-50 cm. The height profile is also calculated in the same way.)
- Self-tapping screws.
- They need to be purchased in sufficient quantities, since they will be needed for both sheathing and siding. Additional details.
- (Angles, modules, sockets, etc.)
- Insulation.
(In case you plan to lay it under siding. Calculation of the amount of insulation is also done based on the square footage of the walls.)
Tools. (Screwdriver, grinder, assembly knives, hammer, scissors, tape measure, level, metal ruler)
 It is better to purchase materials immediately so as not to be distracted from work later. It is also better to calculate the costs of these acquisitions in advance, at least approximately. For example, the price of siding for a basement ranges from 400 rubles to 1200 rubles per square meter.
How to prepare a house for siding installation
Another positive characteristic of this material is the fact that no special preparation is required before installing the base with siding. That is why old houses made of adobe or shingles are often covered with siding. Such walls cannot be plastered or mounted with any heavy materials, and siding is an ideal material in this case.
The walls that are going to be covered with siding do not need to be peeled, plastered or covered with any material. You just need to check that there are no protrusions or sharp protruding objects on the wall plane.
After the wall has been inspected and all bulging areas have been eliminated, the creation of the frame or sheathing begins. In most cases, siding is mounted on a sheathing made of wooden blocks or metal profiles. Sometimes siding is mounted directly on the wall, but this is only possible if the wall surface is perfectly flat and the wall material allows the installation of fasteners.
 You need to start installing the sheathing directly from the ground, or directly from the ground. The first guide profile must be leveled and strengthened at a distance of approximately 5-10 cm from the ground surface. If there is a concrete blind area around the building, then it can be mounted directly from the blind area.
The distance of the sheathing from the wall will also depend on the purpose of installation. If you intend to lay insulation between the wall and the siding, then you need to retreat as many cm as the thickness of the insulation. But if a simple installation of siding is carried out, then the thickness of the profile will be sufficient. The profile is mounted in the form of a lattice, that is, it is mounted parallel and perpendicular. The result should be squares approximately 50 cm by 50 cm.
Tip: Particular attention should be paid to the corners of the building; if you wish, you can create curly or protruding corners; they are also made from their profiles.
Installation instructions for basement siding
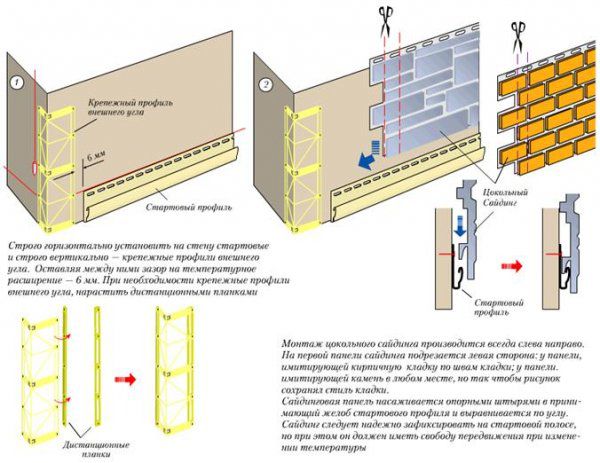
The installation of this material must begin with the installation of the first panel; special attention must be paid to this. The first panel should be aligned very level so that all other panels are also level. To do this, the corners of the sheathing are equipped with starting rails, to which the panels are attached. The starting rail is mounted on the profile using metal screws. After this, a panel is inserted into the starting rail and secured with self-tapping screws.
Tip: The screws should not fit tightly to the panel, that is, they do not need to be scrolled all the way. The screw head should be at a distance of 1 mm from the surface of the panel.
 Installation instructions for basement siding
 Installation of siding panels
 Siding panels should always be mounted from left to right, the panel should be inserted into the previous one and clearly rest it against the groove on the previous panel. Then the panel must be secured with several screws, and so on. The main thing is to carefully insert the next panels and make sure that there are no gaps at the joints. There are some nuances to this process:
- The final row of siding is installed only after installing the final strip
- To avoid swelling and deformation of the siding in the future, it is necessary to avoid strong tension on the panels during installation
- Installation of siding panels must begin from the bottom up
- When installing siding under eaves or window sills, you first need to attach a couple of finishing slats and then just start installation
- If you need to cut holes in the siding panels for gas pipes or heating pipes, then the hole should be approximately 6 mm wider than the diameter of the pipe
 By covering an old wooden house with basement siding, you can breathe new life into the appearance of the house. Finishing with this material will give a unique design to the building. Knowing and following all the rules, siding will last for many decades.
Basement siding goes well with other types of siding, for example, metal. Read about installing metal siding yourself. This material is reliable and also resistant to the vagaries of nature.
Final finishing
 The final stage of finishing with siding will be to give the entire structure a finished look. To do this, you need to use all kinds of corners, both internal and external, small modules and small parts.
Video about installing basement siding
How to cover the base of a house with siding.
Video instructions for installing basement siding. Basic principles of installation.
Basement siding installation technology. How to turn an ordinary country house into a beautiful fortress using basement siding.
Basement siding is a very attractive finishing material. It is distinguished by its resistance to ultraviolet radiation, durable surface, immunity to chemicals, easy cleaning capabilities, and has a number of other attractive characteristics. Today on the market you can find panels of any color and texture, imitating various natural materials, brick and stone masonry, as well as the American style of finishing with wood chips. Installation of basement siding, if simple requirements are met, can be done with your own hands, which will make the house stylish and beautiful.
In what format is basement siding sold?
Various companies offer their own panel format. Depending on the thickness, you can purchase finishing material cheaper or more expensive. For example, the following panel formats are available:
- 1090 mm long and 455 mm wide, these indicators characterize the products of the Tekhosnastka company. Decorative coating imitates stone, wood, brick;
- format 116 x 49 cm, for example, from the company Nailit, USA.
There are other panel sizes; they depend not only on the specific manufacturer, but also on the finishing pattern. Therefore, even one company may offer different dimensions of individual elements. A simple conclusion follows from this: in order to install basement siding with your own hands, you will need to carefully approach the preparatory work.
Preparing the wall
When it comes to interior decoration, do-it-yourself basement siding can be installed directly on the surface of the wall. To do this, it must be perfectly even and smooth. Although the panel has good rigidity, significant bumps will be reproduced on the finishing surface.
This issue is not considered if the house is finished with SIP panels. Its walls are perfectly smooth, the surface is oriented particle board, into which self-tapping screws fit and hold perfectly. Finishing the base with siding yourself looks similarly simple if you are decorating a house made of SIP with a cement-bonded particle board.
In all other cases, if it is impossible to ensure that the wall is perfectly smooth, you will need to do lathing. This is especially important if old wooden buildings covered with shingles or other similar objects are being finished with basement siding.
The sheathing can be made from a metal profile, or processed wooden planks with a perfectly smooth surface are used for this purpose.
useful in work
When choosing wood as a sheathing material, you should carefully take care of the durability of the created base for the installed siding. To do this, the humidity of the planks should be within 20%, each part is treated with antiseptic or antifungal impregnations.
By the way, an alternative to basement siding is a ventilated facade covered with clinker panels, the service life of which is ≥50 years. True, the cost of such a solution is many times higher. 
Purchase of materials
Before deciding how to attach basement siding, you will need to determine the exact amount of finishing that will have to be purchased. To do this proceed as follows:
- carefully measure the laying areas. In the case of a private house, this will be a separate base and wall surface. By measuring the width and height and multiplying the resulting values, you get the area of the treated zones;
- Each manufacturer in the characteristics of the panels indicates the usable area and the total area, while giving the number of elements in the pack and the total square footage that can be finished with its help.
Further actions are clear. We divide the total area of the treated zones by the indicator given for the pack and get the exact quantity. The only thing that needs to be done is to take into account the waste, since the siding is installed in rows and at the same time it is almost impossible to accurately “get” into the dimensions of the installation area. Therefore, the total area, which was calculated by measuring the house, increases by 10%. Only after this should the resulting figure be converted into “pieces of panels”.
You will also need to purchase the necessary components for the job. The instructions for installing basement siding precisely require the use of certain elements. You will need:
- the starting plate from which the finishing of the basement of a private house begins;
- finishing profile that outlines the installation area from above;
- J-profile, placed on the side of the siding block.

Also, before starting work, you should count the number of internal and external corners, determine their length in order to buy the appropriate connecting elements in the required quantity. Also, to decorate the door and window areas you will need platbands, window profiles, and wind strips.
Since the cost of additional elements is quite significant, you should accurately calculate the quantity so that decorating a house or basement with siding does not cause unnecessary expenses. How to calculate the amount of metal profile or slats for sheathing will be described in the following sections.
To install basement siding with your own hands, you will also need:
- screwdriver or screwdriver;
- self-tapping screws with a flat push head;
- corner and marking tool;
- metal hacksaw or jigsaw.
The choice of many instruments is individual. However, there are subtleties of working with siding panels that clearly limit the use of self-tapping screws with a flat pressure head. You will need to buy them in very significant quantities, since they are also used to create sheathing.
Calculating the amount of material and creating a base for installation
Creating the sheathing is the first step in covering a house with basement siding. There are several recommendations for creating this framework.
Horizontal strips
It makes sense to use horizontal jointing of the sheathing if the wall geometry has several window openings, doors and other similar elements located at the same level. Using one long strip, you can form a base close to the window sill, for example, similarly, you can place the strip on top of a window or door. The distance between the sheathing elements at which they are recommended to be installed is half the height of the finishing panels used. 
Important detail:
On the lowest strip of the sheathing you will need to install a starting strip, from which you will begin attaching the basement siding with your own hands. Therefore, it is placed at a distance of approximately 5-7 cm from the ground and carefully checked for level.
Vertical lathing
It is more convenient to work with vertical slats on a large blank wall. It is easier to make such a sheathing; in addition, it is easier to work with if you plan to lay insulation under the siding. The distance between the planks is chosen to be half the size of the panels that will be used to cover the house with siding. When performing vertical sheathing, you need to place additional strips at a distance of 5-10 cm from the line of internal and external corners. 
Combined sheathing
A simple and at the same time the most labor-intensive and expensive way is to create a grid of slats or profiles with a cell size of approximately 50x50 cm on all surfaces of the walls and plinth. In this case, you will need to make a contour around the doors, windows, and also position the base for mounting the panels (slats) vertically at a distance of 5-10 cm from the internal and external corners. To create such a structure, a galvanized corner and a hat profile are usually used.
Depending on the chosen scheme for joining the sheathing, the required amount of metal profile or wooden planks is determined. When creating the sheathing, it is also worth considering whether insulation will be provided.
If the answer is yes, you need to provide free space for laying the selected thermal insulator. If the cladding of the base is done without additional measures or using insulated panels, the height of the sheathing strips can be minimal; the only requirement is to hold the screws along their entire length. 
Beginning of work
To know how to properly install basement siding, it is important to understand one key thing. Further installation depends on how accurately the bottom row is laid. Therefore, work begins with the installation of the starting bar. Its position is checked by level. This element is located along the entire perimeter of the building, and you need to ensure that all parts form one line. The plank is fastened with self-tapping screws; in order to compensate for thermal expansion (especially in the case of metal sheathing), they are not screwed all the way, leaving a gap of about one and a half millimeters.
It is important to know
If the configuration of the house or the soil surface does not allow creating a single line from the starting profile, you will have to create a reference level from the first row of panels. They are trimmed so that the top forms a perfect line. The process is labor-intensive and time-consuming; when installing the starting bar, it is located close to the ground, and the cut panels are inserted into it with a cutting line.
After the starting profile is installed, you can begin attaching the panels. There are rules on how to install basement siding and get the perfect wall surface.
- Laying begins in rows, from bottom to top, from left to right.
- The siding that is mounted in its place is also secured with self-tapping screws with a flat push head with a mandatory gap of one and a half millimeters. The fasteners must be screwed strictly perpendicular to the surface of the panel into the slots provided for this purpose.
- Insulated siding has a large mass, so each panel must be secured with additional screws.
- The finishing elements are inserted into each other, each having its own protrusion and groove.
- During work, you need to constantly check the installation level of the siding panels.
- If, when installing basement siding, it is not possible to achieve a perfectly straight line in the upper zone, parts of the trim will have to be trimmed. To do this, only a hacksaw is used, and the visible line of “shortened” panels is covered with a finishing strip.
When working in the areas of windows and doors, the appropriate components are used - these are wind bars, window sill profiles, and trims. Grilles and other elements are installed in the right places.
Working in corners
While finishing the wall is not difficult, working in the corners requires some skill. Those who are not confident in their abilities can take simple paths.

A difficult way is to form a zone where the corners converge using lathing. This will require fairly high skill in working with the instrument and dexterity, but you can get interesting artistic solutions. The resulting base is covered with siding panels. Another disadvantage of this method of designing corners is the need to use a large number of special profiles in order to mask the cut lines on the panels.
Conclusion
As you can see, if you follow simple recommendations for carrying out preliminary work and check the correct installation of each element during installation, you can cover a private house with high-quality siding. This finish will look just great, will not require maintenance and will retain its characteristics for many years.
general information
Dachny basement siding is installed on the sheathing. It is fixed horizontally over the entire surface of the walls, individual bars are installed around the openings of windows and doors, along the upper and lower edges of the cladding, and at the corners of the building (vertically). For the sheathing, wooden blocks of 40x40 cm are used. They are pre-impregnated with an antiseptic and fire retardant. Wood moisture content is up to 20%. For the first row, the distance between the bars is 43.5 cm for facade panels of the “Wild Stone” series and 42 cm for the “Large Stone” series. Subsequent bars are fastened in increments of 44 cm. Insulation can be placed between the sheathing bars, and other insulating elements can be placed underneath them.
The façade panels are high. To make the cladding more rigid, Westmet employees recommend installing additional horizontal slats between the main sheathing bars. When installing bars and slats, check the correctness of their position horizontally and vertically. They should form a flat plane.
Fasteners for facade panels - nails or self-tapping screws made of galvanized steel. The length of the leg is such that it fits into the sheathing bars at least 3 cm. The cap is wide, 9-10 mm, the leg is 3 mm.
Fastening and its components are carried out through perforation holes (made along the edges of each element). The leg of the fastener must fall strictly into the center of the hole and enter perpendicular to the plane of the cladding. It is not allowed to hammer nails or screw in screws at an angle, skew, or bend them.
Facade panels are not fixed rigidly: the fastener must fit so that a temperature gap of 1-1.5 mm remains between its head and the surface of the basement siding (see Fig. 4). Each panel is fixed at least at five points.
Country base siding is made of polypropylene and can slightly change linear dimensions when heated by sunlight or cooled in winter. To avoid deformation due to temperature changes, compensation gaps are left between the ends of the row panels and the components during installation. If work is carried out in summer, the gap is 5-6 mm. At negative temperatures it is increased to 9-10 mm. Installation is possible at temperatures down to -10° C. When carrying out work in cold weather, the basement siding is first kept warm for 10 hours (in a heated room, but away from heat sources).
Fastening vertical profiles, corners, slats starts from the top. The leg of the fastener should be located at the top edge of the hole so that the element hangs on it. The remaining fasteners are placed in the center of the holes (see Fig. 6). The fastening step is no more than 25 cm.
The order of fastening row panels on the main surface of the walls is shown in Fig. 3. They are placed horizontally, starting from the bottom row, moving from left to right.
Installation of basement siding Dachny
The cladding elements are installed in the following order:
- starting bar;
- corner elements, auxiliary profiles;
- ordinary panels.
Installation of the starting strip:
- located along the lower edge of the cladding, along the entire perimeter of the building;
- fastened strictly horizontally (checked by building level);
- interrupted by 30 mm at the edges at the corners of the building 30 cm from them to avoid temperature deformations (Fig. 1);
- The mounting lines of the planks are checked at each corner (must be on the same level and coincide);
- the bar is placed at the level of the first bar of the sheathing;
- fastening is carried out in increments of 30 cm.
If the foundation line is uneven, cladding is performed without installing a starting strip. To do this, the panels are cut at the bottom. Holes similar to perforation holes are drilled in their lower part. The panels are attached to the wall material.
Installation of external corners:
- at the corners of the building, the cladding is assembled from several corner elements installed one above the other;
- The lower outer corner is attached first. It is installed on the starting bar, nails are driven into the upper perforation holes at their upper edge or screws are screwed in;
- the second and subsequent corners are inserted into the locks of the lower element and secured at the upper edge (Fig. 2.);
- each of the corner elements is attached to at least 6 points (three screws or nails on each side);
- the fasteners should not press the corners tightly against the sheathing (a gap of 1-1.5 mm is left between the head and the surface of the cladding). The corner elements should move slightly - this will protect them from deformation due to temperature changes.
Installation of internal universal corner:
- installed at the junction of walls approaching each other at right internal angles;
- attached to the sheathing through perforations in the same way as an outer corner;
- The façade panels that fit the corner are fixed in its grooves, as shown in Fig. 5.
J-profiles can be used as a frame for door and window openings and a finishing strip (see Fig. 6, 7).
Installation of row panels:
- the first row is installed on the starting bar;
- the panels are connected to each other and to the starting strip using L-shaped locks (located on the inside);
- The first panel is inserted into the starting strip with its lower edge, moved to the corner, leaving a temperature gap. The next panel is inserted in the same way and connected to the previous one using grooves (see Fig. 2, 3);
- The first and last panels in a row are installed with preliminary trimming. It is performed at right angles so that the seam lines in adjacent rows do not coincide, and the last panel in the row is longer than 30 cm;
- the remaining scraps can be used as the beginning or end elements of subsequent rows;
- Before trimming, the panels are assembled in a row; fastening with nails or self-tapping screws is not performed. Mark cutting lines;
- if the edge of the panel goes under the outer corner, it is cut at a right angle in place.
After finishing is completed, additional elements (canopies, shutters, etc.) can be installed on the façade. To install them, holes similar to perforation holes are drilled in the basement siding. They are placed so that the fasteners fit into the sheathing bar.
For facade panels "Wild Stone"


The method of exterior finishing of a house is a complex issue that requires significant financial and labor costs.
Solving it requires an understanding of the meaning and features of the functioning of the finishing layer.
One of the most convenient and relatively inexpensive ways to decorate a home's exterior is siding.
It has high decorative qualities, provides reliable external protection of wall materials and promotes ventilation of the wall cake and timely release of steam. In addition, siding installation can be done with your own hands, as carefully as possible, without dirt and stains from various solutions.
- This is a cladding material, the original purpose of which was to finish the lower part of the walls of the house - the basement. Typically, the plinth is the part of the house's foundation that protrudes upward. It is made of stone or concrete, so basement siding mainly imitates various options for brick or stone masonry.
NOTE!
This, as well as its size, is the difference from conventional siding, which is made in the form of wooden elements - timber, logs or ship planks.
Basement siding turned out to be suitable for complete finishing of facades, and the level of cladding from a design point of view is much higher than that of conventional samples. The variety of shapes and colors of the panels, the high realism of the canvas, which even up close cannot be immediately distinguished from real stone or brick, quickly found their fans and earned popularity among consumers.
In addition, the difference in panel sizes contributes to convenient installation, which can be done alone. This makes it possible to save a lot of money, so the demand for basement siding is constantly growing.
Today the following options for plinth panels are available::
- Under facade tiles.
- Under the tree (shingles, planks, etc.).
All types of panels have many of their own. Options for imitation stone walls are especially widely represented, where there are forms of wild stone, rubble, boulder, granite, etc. There are many panels that replicate brick walls - from smooth clinker to antique handmade brick.
In addition, for each type of panel there are several color options, allowing for additional design opportunities in home decoration.

Basement siding kit
In addition to the panels that form the wall covering, basement siding is equipped with additional materials used for finishing architectural elements (corners, openings, etc.), fastening panels and decorating the edges of the canvas.
These additional elements are called extensions and are produced in full accordance with the main panels - both in color and shape. When installed, extensions completely match the panels, but the use of elements from different manufacturers can lead to discrepancies in size or appearance, so you should purchase only the same type of elements from a single manufacturer.
The number of additional elements for basement siding includes:
- Corner profiles.
- Starting bars.
- J-bars.
- Metal corner elements.
- Subsystem elements for creating sheathing, etc.
Depending on the manufacturer, basement siding can be equipped with additional elements that make installation better and the appearance more complete and realistic.

Where to start installing basement siding
The beginning of any installation work should be a careful calculation of the required amount of material, components and fasteners. If external wall insulation is planned, then the estimate must necessarily include insulation that is optimally suited to the climatic or technical conditions.
CAREFULLY!
Errors in calculations will result in work being stopped and time wasted searching for the required material. When making calculations, you should take into account a small reserve of material in case of damage, erroneous cutting or other unforeseen circumstances.
If there is a plan to use several colors, then for each type of panel you also need a certain margin (usually 15-20%), which allows you to get out of a difficult situation.
Preparing the wall for siding installation
Before starting installation work, you should prepare the surface of the walls. This procedure is very important, because after installing the siding, access to the walls will be impossible and it will not be possible to perform any actions.
The following operations should be performed:
- Free the wall from all hanging elements - street lights, CCTV cameras, air conditioners, brackets, etc.
- Remove trim from door or window openings, disconnect all gutters, window sills, etc.
- Inspect the surface of the wall and assess its condition.
- Existing cracks or potholes must be sealed. Peeling or crumbling areas are removed as much as possible and completely sealed. In the most difficult cases, it is recommended to apply a full layer of plaster.
- To install the insulation, you will need to use a special glue, so the surface is cleaned of old paint and covered with a layer of deep penetration primer (primer) 2 times.
- All applied materials must be allowed to sit for the required amount of time to achieve a working degree of drying.
If you plan to install insulation, the condition of the walls is of particular importance, since for high-quality operation of the wall pie, close contact of the insulation with the surface of the walls is necessary.

Which lathing is best suited for basement siding, installation procedure
Installation of siding requires a support system of planks that supports the sheathing fabric. Traditionally, wooden blocks were used to create the sheathing, the work with which is simple and does not raise any questions.
However, the quality of the material does not stand up to criticism - wood is fire hazardous, susceptible to rotting, fungal infections, insects, etc. For sheathing whose service life is 50 years or more, such sheathing is not suitable.

A more modern type of lathing is based on the use of metal plasterboard guides installed on the wall using direct hangers. This material is not subject to corrosion because it has a reliable protective coating - a galvanized layer.
The planks have straight, even lines, they are completely fire-safe, neutral to microbiological manifestations - mold, mildew, algae, etc. In addition, the installation of such systems is much more convenient and faster, since setting up a flat plane is much easier and is done in a matter of seconds.
For some types of basement siding, manufacturers produce their own version of the sheathing, which is most suitable for the corresponding panels. This option is optimal in terms of strength and reliability of installation, but it is not suitable for all types of panels and has a higher price.

Installation of the sheathing occurs in the following sequence:
- The walls are marked and the installation locations for direct hangers are marked.
- Insulation is attached to the wall with installed hangers. The pendants pass through it, for which cross-shaped cuts are made in the material, which are then carefully tucked in.
- A waterproofing membrane is installed on top of the insulation, and the petals of the suspensions are passed through it by piercing.
- The sheathing strips are attached to the protruding petals of the suspensions. First, the two extreme ones are installed - on the left and on the right, and the vertical is carefully drawn out. Then a cord is stretched between them, with the help of which it is easier to adjust the position of the intermediate strips.
- All other strips are installed. Their position is constantly monitored, and any errors noticed are corrected immediately.
If the thickness of the insulation is too large and the length of the suspension petals is not enough, then you have to make a two-layer sheathing using an older method.
Procedure:
- Marking the wall, installing hangers.
- Installation of horizontal strips at the bottom and top.
- Installation of the remaining horizontal strips along the cords. The distance from the wall surface to the top of the plank should be no less than the thickness of the insulation.
- Installation of insulation between planks, waterproofing.
- Installation of counter-lattice - a system of vertical slats. They are installed in increments of 35-40 cm (optimal for basement siding). Since the first layer has a flat plane, adjusting the position of the counter-lattice strips is not required.
NOTE!
The second method is more labor-intensive and costly, so it is used only when necessary.

How to attach siding
There are rules for attaching panels and additional elements of basement siding. They mainly ensure the presence of temperature gaps between all elements of the canvas and accessories, otherwise when heated in the summer, the canvas will begin to swell or go in waves.
The rules for attaching siding are as follows::
- To fasten the elements, nails or self-tapping screws with a protective coating are used.
- The installation point of the self-tapping screw should be exactly in the middle of the oblong mounting hole, allowing some movement of the part.
- You cannot fix parts into self-drilled holes; for this purpose you must use a special notch.
- The panels should only be fastened through the holes in the nail strip.
- Self-tapping screws are screwed strictly perpendicular to the base.
- The screws cannot be screwed in tightly; the part should move slightly. To do this, a gap of approximately 1 mm is left between the head of the screw (or nail) and the part..
- When installing vertical parts, the upper self-tapping screw is located at the top point of the mounting hole, and all subsequent screws are located in the middle according to the usual pattern.

Installation of basement siding
- Installation of basement siding begins with the installation of a starting strip. For some types of material, the starting bars are made of metal for greater strength. Subsequently, they will be hidden by the canvas. The installation of the starting bar is carried out strictly horizontally, which should be checked at the building level. Longitudinal joints cannot be made tight; there must be a temperature gap of 2-6 mm (depending on the time of year or temperature).
- After installing the starting strip, the corner strips are installed. They are installed on corners and window or door openings.
- Installation of panels starts from the lower left corner. The panel is cut vertically to obtain a straight line, inserted at an angle into the starting strip, and pushed firmly to the left until it makes full contact with the corner strip. then you should move it back by 5 mm - create a thermal gap.
- The panel is fixed with self-tapping screws, after which the following is mounted I.
- The next row of panels should be installed with a shift of approximately half the length so that the joints are spaced apart.
- The top row of panels ends with a J-bar.
You cannot install one corner, mount the panels and then cover the canvas with a second corner. Corner strips must be attached in the standard manner.

Useful video
In this video you will learn how to install basement siding:
Conclusion
Installation of basement siding is simple, but requires compliance with certain conditions. The main thing is compliance with temperature gaps and loose fastening of elements, which gives the entire system the opportunity to move when expanding or contracting when heating or cooling. In addition, you will need the usual accuracy and thoroughness in working out the details, then the finish will be stylish, aesthetically pleasing and will delight the owner for a long time.
In contact with
The construction market is saturated with various types of siding: copper, aluminum, cement, wood, steel, ceramic, basement. Each type has its own advantages and disadvantages, but one thing they have in common is an attractive appearance, strength and durability.
What is basement siding?
Basement siding consists of artificial panels of various textures and colors. They are used to clad buildings to improve their appearance. Installation of sheets can be done without the involvement of professionals.
The work can use combined siding options, for example, base and vinyl or with a metal version.
Description
The finishing panels have convenient locks, due to which the seam is invisible. Siding strips have different sizes: 2-6 meters long, 3-10 mm thick, 10-30 cm wide.
The canvases are mounted on a frame box, which consists of profiles. They, in turn, have two versions: “herringbone”, “shipboard”. An interesting feature is the texture of the panels, which imitates brickwork or natural stone. To protect the material from scratches, impacts and corrosion, paint or a polymer coating is used.

Application
The material is widely used for cladding various parts of the building: walls, pediment, pipes, roof, base. The ease of installation of all types of finishes is its distinctive characteristic. for cladding the base.
Functions
For several decades, siding can retain its properties and original appearance. The building is perfectly protected from the influence of atmospheric phenomena. The panels used are light in weight, thereby not loading the foundation of the building.
Finishing panels perform an aesthetic and heat-saving function. To protect the lower part of the house from moisture and frost, basement siding is used.
Advantages and disadvantages of finishing the base with siding
Pros:
- Long service life of the material (50 years).
- Lack of careful care.
- Various colors and beautiful views.
- Easy to install structure.
- Use of panels for exterior and interior decoration.
- Lighter than cement.
- Prevents the appearance of mold and mildew.
- Large selection of prices.
- Easy to install and dismantle.
- Specialists are not involved.
- Resistant product to frost and mechanical damage.
Minuses:
- The material is flammable and deforms due to temperature differences (if the panels are vinyl).
- Heavy sheets and high price (if the panels are metal).
- It is difficult to hide seams and fragile sheets (if the material is cement).

- Border.
- Insulation, if required.
- J-profile.
- Starting bar.
- Outdoor corner.
DIY installation
- Preparing the base.
- Construction of sheathing.
Detailed step-by-step instructions

Types of basement siding
- Stone imitation.
- Brick imitation.
- Vinyl.
- Metal.
- Imitation of rubble stone.
- Imitation of burnt brick.
- "Alpine granite".
- Imitation of rocky stone.
- With insulation.
Which to choose
The price should not be too expensive, but it should not be too cheap either. The golden mean will be the best option. Reviews about the product play an important role. Many companies have established themselves in the market as good manufacturers producing quality products. 
Prices
Products from Alta Profile (Russia) are not inferior in quality to European ones. Specializes in the type that imitates natural stone. The price ranges from 138 to 500 rubles per panel. The FineBer company uses German technology, their products cost 470 rubles per piece. The Canadian manufacturer Remico sells panels for 270-310 rubles per piece. The American company Nailite is famous for its high-quality material. Color saturation lasts 25 years, based on the type of imitation p
Required materials and tools
- Border.
- Self-tapping screws for each joint of the panel and profile, one. Dowel and nails at the rate of 2 for each suspension.
- Additional parts (sockets, modules, external and internal corners).
- Insulation, if required.
- J-profile.
- Starting bar.
- Outdoor corner.
- Tools (metal ruler, level, tape measure, grinder, screwdriver, construction scissors, hammer).
In order not to be distracted while working, you should take care of purchasing material in advance.
DIY installation
- Preparing the base. The strength of the façade brick is observed, and deficiencies are eliminated by replacing the brick or plastering it using a metal mesh. Only after the wall has completely dried can you proceed to the next stage.
- Construction of sheathing. First, the starting bars with J-rails and corners are set up. You can move from right to left or vice versa, there is no fundamental dependence here.
- High-quality installation depends on correctly executed lathing from a high-quality frame. It is mandatory to use a metal profile rather than a wooden beam. If you need to level the bar, you should use plastic.
- The location of the sheathing can be horizontal or vertical, but the vertical method is more acceptable. Since the use of vertical fastening creates natural ventilation, and air circulates freely under the thickness of the finish. The pitch of horizontal fastening is 45 cm, vertical fastening is 70-90 cm. The distance of the bottom bar from the ground is 15 cm.
Detailed step-by-step instructions
- The panels that will be attached to the sheathing should be left outside for 3 hours. This is done to adapt the material to the external environment.
- The preparatory work for installing the sheathing is ready. Now you can move on to the main work.
- We take the sheets and cut them to the required sizes. Be careful with this procedure so that there is not a lot of waste.
- You need to cut the sheets with a grinder containing diamond discs for stone or metal (115 and 125 mm). The cut turns out to be a little melted, but you can remove it by hand.
- The next step is to install the sheets. Fastening is done with self-tapping screws with a press washer, 3 cm long. Do not forget to leave a gap of up to 6 mm between the wall and the sheet. Since the sheets expand from heat, they contract from cold. This will allow the material to “walk” without deforming the surface. When installing sheets in winter, the gap should be increased to 10 mm.
- In order not to push through the panel, you need to tighten it tightly, but do not overtighten. The slabs are fastened from the center to the edge.
- Installation of the first plank begins from the corner part, then you need to fix the sheet with self-tapping screws, while 1 mm is not screwed in. Again, to keep the slats moving.
- Having reached the next corner opposite, you should secure the corner strip with self-tapping screws and prepare a starting profile where the sheets on the other side are mounted.
Detailed diagram of covering the foundation of a house with stone siding Types of basement siding
- Stone imitation. It is slightly thicker than regular vinyl siding, as it is mainly used in the basement of the building. And it needs reliable protection. The rough surface of the material resembles a stone wall.
- Brick imitation. The product is made in such a way that it is impossible to distinguish it from the natural one when viewed from the outside. This is not surprising, because it is made from a cast of natural brick. The product is very compact, so it is perfectly used in hard-to-reach places.
- Vinyl. It is a durable material and is made from PVC. It is convenient to work with because it is light in weight.
- Metal. The preparation involves galvanized steel, coated with a protective layer, and on the back with a layer of varnish.
- Imitation of rubble stone. The outer side is covered with stones of different sizes, which makes the final result on the wall look original and sophisticated.
- Imitation of burnt brick. Ideally matches the color and structure of baked brick. It is chosen by those home owners who want to show wealth and luxury.
- "Alpine granite". The basis of this type is propylene. A distinctive feature of the finish is its long service life, compared to the natural material from which it is made (30 years).
- Imitation of rocky stone. The collection offers decor from Tibet, Altai, and Pamir.
- With insulation. Polyurethane foam is sprayed onto the siding.
Which to choose
When thinking about choosing basement siding, you should adhere to one of its main characteristics - strength. The thickness of the panel fades into the background here. You should pay attention to the quality of the connection. The reliability of the design will depend on this.
The appearance of the sheet surface should not have dents, cracks, or scratches. Make sure the color scheme of the sheets is the same.
The price should not be too expensive, but it should not be too cheap either. The golden mean will be the best option.