Do-it-yourself installation of a household air conditioner. Installing an air conditioner yourself: installation tips. Freon circulation system
Read also
Many people would like to spend a minimum amount of money on good project. In fact, this is reality, not a myth. To test this, you need to know how to build adobe house on one's own. To implement such a project you will need desire. Construction materials, one might say, are already underfoot.
Is everything so rosy?
Before taking the first steps towards the implementation of the project, it is necessary to analyze, having learned everything about the pitfalls that you may encounter on the way to the desired goal. The following arguments can be put on the positive side of the scale:
- free components of building blocks;
- there is no need to use special equipment;
- excellent thermal insulation;
- ideal vapor permeability;
- ease of construction;
- good sound insulation;
- service life can be 100 years.
The other side of the scale:
- poor resistance to moisture;
- in some cases there is a high probability of ignition;
- high labor costs in the manufacture of blocks;
- such designs are loved by rodents;
Building such a house is more of a creative process. There are basic principles, but there are no perfectly precise guidelines to follow. You are not tied to any particular form. There is an advantage of complete independent design literally everything.
What is adobe

Construction technology arose several thousand years ago, when there were no factories for the production of concrete floors, cement, etc. People used what was available and widespread. But it cannot be said that construction from adobe is an outdated method. On the contrary, there are names that are used in everyday life: clay concrete, raw brick, etc.
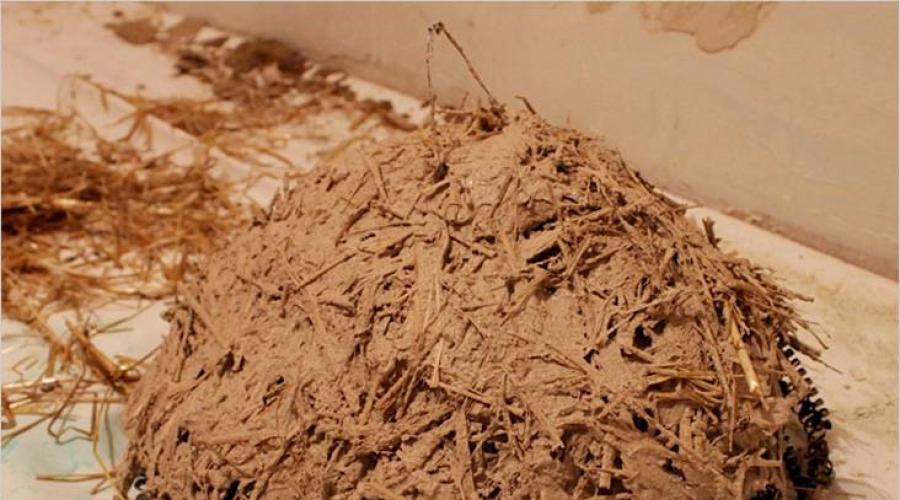
So what is it? In the classical sense, it is a mixture of water, straw and clay. Various plant stems (usually fibrous) can be used as filler. Additives from sand, animal manure, lime and ordinary soil may be present. Today they began to add cement, plasticizers, synthetic fibers, antiseptic compounds and much more. All this is in order to improve certain qualities and compensate for shortcomings.
Component analysis

As noted above, the main component is clay. But not every one is suitable for high-quality work. To prevent cracks from forming later, the clay should not be too greasy. Also, it should not be too dry, otherwise there will be no good setting, and all efforts will go down the drain. It can be brought to order or obtained independently. In the second case, you will save significantly, but you will need to analyze its quality. To do this you will need:
- Determine at what depth the clay layer is located. This can be done empirically, digging a hole and looking at the cut. Or you can obtain data from land managers in your area.
- For further actions You will need to take 3 or more glass bottles, liquid soap or salt and water.
- In several places of the planned fence, wells are made using a hand drill. Usually it is necessary to go deeper by 1-1.5 m.
- A sign is installed on each pit so as not to confuse the place from which the sample was taken.
- The clay is crushed and placed at the bottom of the jar. Each vessel is also marked with a mark that corresponds to the well used.
- Add 40 g of salt or 200 g liquid soap, the jar is filled to the top with water and closed with a plastic lid.
- It is necessary to shake it with sufficient force for 10 minutes so that the clay dissolves well. If there are still pieces of soil inside, then you need to leave the suspension for a while so that it soaks well.
- Now you need to select the most flat surface possible and place the jars on it. It is better if it is some kind of elevation, for example, a table, then it will be more convenient to conduct observations.
- After waiting a minute, you can see the first sediment that has fallen - this is coarse sand or silt. Now you need to make a mark using a marker, electrical tape or other suitable material.
- After 10 minutes or a little more, the next layer begins to settle - this is fine sand, the last one to sink to the bottom is clay.
- When the water has already become as clear as possible and there are no floating particles left in it, another mark is made for the upper level of sediment.
- Measurement is taken from the bottom to the top mark. Where the value is greatest, that material is the best. By the number you can determine from which well the fence was made.
This method does not take much effort and time, but makes it possible to assess the composition of the building material as accurately as possible. The highest indicator is the composition that contains the least amount of fine sand impurities. The ideal option is an area where there are layers of red clay; it has excellent plasticity, which makes preparing the solution much easier.

There are some signs by which you can determine the places where clay exactly lies:
- Near rivers and lakes.
- Swampy area where there is a small layer of water. The liquid is held in place by a layer of clay, which prevents it from being completely absorbed.
- You can determine it by the water level in the well. If it is low, then most likely this area is also suitable.
- Clay soils are a favorite place for sedge and mint to grow. Therefore, if they are abundantly present, one can judge the possible presence of high-quality material.
- It would be useful to ask those who have already built a house from adobe or are engaged in laying stoves.
Clay is the main, but not the only component. The filler plays an important role. His choice must also be taken seriously. The most the best option there will be stems from winter wheat. This is due to the presence of a large amount of waxy substance. It repels moisture and prevents rotting, which is a must. The same cannot be said for spring crops. The stems must be from a fresh harvest.
If it is not possible to prepare stems from a fresh harvest, then the main requirement will be that they are well dried and free from fungus or rot. In the absence of straw, hay can be used, but it must be made from grasses that have a hard stem. Linen can be used, but it is advisable not to use synthetic fibers.
When choosing sand, do not stop at sea sand. The fact is that it has rounded shapes, which will have a bad effect on the viscosity of the final product. Usually, quarry coarse grain is chosen. It doesn’t matter if in your case you can’t find such an option. It is undesirable, but it can be replaced with ordinary river one.

The clay itself has a high viscosity, so it is a little problematic to dig it out and then mix it with the necessary components. To make your task easier, you need to think about the preparation in advance. This is usually done in the fall. In winter, under the influence of frost and absorbed moisture, the material breaks down into smaller parts that are easier to work with. The preparatory stage is carried out as follows:
- From an edged board (you can use another durable material, which will be resistant to moisture) the box is knocked down. Its dimensions can be, for example, 1x1.5x2 m (height, width and length).
- Clay is placed in the middle. In order to ensure the required effect in the future, it must be placed in layers of 30 cm. After laying each, the surface is generously moistened with water.
- You need to leave a gap of 20 cm to the top. It is closed with straw. It will serve as a barrier to liquid evaporation in warm weather.
- The entire structure is covered with roofing felt or thick polyethylene film. In this state, the material is left throughout the winter so that the required natural processes can occur.
- In the spring, when the temperature begins to rise and is not below freezing during the day, it is necessary to open the pile and remove the straw. After this, you need to tighten the film again. In this case, some semblance of a greenhouse effect will occur, which will contribute to the rapid freezing of the material, and will also prevent it from drying out, maintaining elasticity and adhesiveness.
Exists a large number of tables that show what ratio of components should be. But the fact is that depending on the area, the clay itself will differ significantly. What would be an ideal in one case may be a negative solution in another. This is explained by the fact that it is often difficult to predict shrinkage parameters.

It is better to determine the quality of the prepared mixture experimentally. First of all, clay and sand are mixed. Water is added in portions so that the composition remains sufficiently thick. Take a small part and roll it into a ball in your palms. If during this procedure the product sticks and some remains on your hands, then you need to add more sand. If it is not possible to form a lump, then you need to add more clay. The second part of the test is carried out after the ball has frozen. It must be thrown up and allowed to fall freely to the ground. If its shape has not changed and no cracks have appeared, then you can begin making the main blocks. In the case when it crumbled into pieces, you need to add clay, changed shape, but remained intact - more sand.
These steps helped determine the optimal proportions for specific case. Next, you can move on to preparing the bulk for construction. Kneading can be done in a construction trough, on dense plastic film or tarpaulin. It will be most convenient to do this in a pit. It is necessary to dig a hole 50 cm deep. The length of the hole is 1.5 m, the width is 2.5 m. It should not be filled to the brim, but to a height of 30–35 cm. If you make the layer larger, then it will be difficult to mix efficiently, which will lead to To low quality final product. If the specified dimensions are observed, in one output it will be possible to produce about 60 blocks with dimensions of 20 × 20 × 40 cm.

Before laying each component, it is necessary to prepare the hole well. To do this, its bottom and walls are compacted using available means. The entire area is covered with film so that there is an overlap on the surface, which will prevent it from slipping. First of all, clay is poured in; its layer should be 20–25 cm. The space on top is covered with water so that the clay is completely submerged. Everything is left in this state overnight. This is necessary so that the material becomes as pliable as possible and all lumps are softened. The next day, before starting preparations, you need to trample the clay well so that the water passes to the lower layers. Next, sand is added, mixed well, then straw.
In order to speed up the process, the pit can be made large, and the mixing of the components can be done not by people, but by animals, for example, horses. But we must remember that it will have to be constantly directed, because it will follow in its own footsteps, as a result of which the kneading will not take place. Can be used mechanical means, for example, a walk-behind tractor, but it is worth considering that a large amount of clay will stick to the wheels, which is difficult to clean. If this is to be done in a concrete mixer, then 2 or 3 stones up to 10 kg are placed first, they will ensure good mixing of sand and clay. Straw will need to be added not in containers, but during external mixing.

As written above, the optimal size for blocks is 20x20x40 cm. But before moving on to making the final form, you need to make a trial one. Usually it is made from edged boards 3 cm thick. The internal space must correspond to the size of the future brick. The surface must be well sanded so that the solution can be easily separated. A small batch is made and several blocks are made. They are left for 7 days, after which the sides are measured to calculate how much drying has occurred. The final molds can be made to accommodate this gap.

Before pouring the mixture into the mold, it is necessary to moisten the walls with water and sprinkle with sawdust or other suitable substance. Inside, the clay is well compacted to remove all voids as much as possible. After removing the molding sample, the bricks are left for 3 days; it is better to cover them with film, roofing felt or slate. There must be space between them so that they do not lie end to end. After this period, all elements are transferred under a canopy and stored for another 10–15 days until fully prepared.
What's at the bottom

Ultimately, blocks made from clay are lighter in weight than similar ones made from cement or silicate. Therefore, there is no need for them to build a massive foundation, but we must not forget that the condition of the soil in a particular area is also a determining factor. In order to make a base with a slight recess, you will need to carry out the following work:
- The site is marked according to the plan drawing. And it is cleared of debris.
- A fishing line is stretched and secured, which will serve as a guide when excavating soil. It is best to stretch two for each side to the width of the future foundation. In this case, it is more difficult to move and easier to maintain the required dimensions.
- The diagonals must be checked, because they allow you to maintain the correct geometry.
- A trench is dug to a depth of 70 cm. adobe is a very plastic material that can be molded as you go, that is, it is possible to make semi-arches or rounded corners.
- The bottom is well compacted, sand is poured to a height of 20–25 cm, compacted, moistened with water, the missing level is filled up and compacted again.
- The internal walls are closed using roofing felt. It is laid in such a way that it can be folded onto the surface with an overlap of at least 10 cm.
- Formwork is displayed, which can be made from edged boards or laminated plywood. It is well secured with spacers and jibs.
- Stands under the sheathing are placed on the bottom. Their height should be at least 5 cm so that the concrete covers it from below.
- The metal frame is made of reinforcement with ribs, the diameter of which is 12 mm. Its height is selected taking into account the size of the foundation, and also so that it is at least 5 cm recessed into the concrete. Transverse rods are attached every 40 cm. The fastest way to connect all the components is with a knitting wire.
- Poured concrete mixture and is well compacted using a vibrator. It also needs to be leveled with a trowel or a rule so that you get approximately the same plane around the entire perimeter.
- It will take about a month for the structure to reach its full strength. This time can be spent on making the required number of blocks.
- Several layers of roofing material must be laid on top, which are coated bitumen mastic. This will prevent the walls from getting wet.
We build walls

It is a pleasure to build from such material. It can be easily cut to the required size using an axe. In order for the walls to be smooth, the following requirements must be met:
- Masonry, like any other block material, starts from the corners. To do this, you must first determine the highest level. This is done using a hydraulic level. One part of it is installed in one of the corners, and the second moves along the rest, where the spread is higher, and you should start from there.
- With help bubble level the first block is set in all planes. It will serve as a guide. The rest are already being exhibited based on it. This is done using the same water level.
- A mixture of clay and sand is used as a binding solution. Their ratio is 1:1.
- The thickness of the seam should not exceed 1 cm. In this case, ideal thermal insulation properties can be ensured.
- As you move forward, it is necessary to ensure that the seams are interlaced, as is done in conventional masonry. Then the wall turns out to be monolithic.
- In every fifth row you can lay a metal mesh, which will give greater strength.
- The horizontal plane is controlled with a stretched string, and the vertical plane with the help of a building level.
- At the masonry stage, it is necessary to determine the location of window and door openings and mark them. Jumpers are made from boards 10 cm thick or more. Its length should be such that it extends 15 cm into the masonry on each side. At first, it is supported by beams from below; after the mortar has dried, they can be removed.
- After the walls have been completely demolished, they need to be plastered as quickly as possible to protect them from the effects of adverse weather conditions.
- The outside walls can be sheathed with any facing material. It is advisable to install a vapor-permeable barrier underneath it, which will prevent moisture accumulation and provide the necessary drying.
- On the inside, the entire area is also covered with a vapor barrier; its throughput should be lower than that of what is located outside.
- It is advisable not to install windows and doors right away. It is necessary that the entire structure undergo drying and shrinkage, only after this it will be possible to select the required parameters.
It is better not to build more than two rows in one day. This is due to the fact that each new one adds weight, which can lead to the destruction of the lower blocks. The height of the walls must be made with a margin, by which shrinkage will subsequently occur. The approximate figure was obtained during the manufacture of trial blocks.
Lightweight design

In addition to the method described above, which requires the production and laying of blocks, there is another option. Its construction is much faster and the costs of organizing a foundation for it will be much lower. But in this case, you will additionally need to stock up on wood. General principle will be similar to the construction of a frame building.

In this case, a columnar or pile foundation can be used as a base. For the second option, you can purchase ready-made screw elements. They dive to a depth below freezing of the soil. They should be placed at a distance of one meter from each other. A separate line should also be made for the partitions. Their upper part should be approximately 30 cm above the surface level. The ends are leveled and a square penny measuring 25x25 cm is welded on top. All elements are connected to each other using a wooden grillage. To make it you will need a beam measuring 15x15 cm or 20x20 cm.
For columnar foundation At a distance of one meter, holes are dug to a level below freezing of the soil. Formwork is installed inside and laid metal lathing. The solution is poured and compacted well. The size of one element can be 40×40 cm or 50×50 cm. The same is done on top wooden base, as in the previous case.
Light walls

To build walls you will need beams measuring 5x7.5 cm or 10x7.5 cm, for corner beams - 15x15 cm or 20x20 cm.
- First, the corner supports are installed. They are fixed using a tenon joint and nails or metal corners.
- Additional vertical racks are installed. Two beams of the required height are connected by a crossbar, the length of which is equal to the width of the grillage. Such crossbars are mounted every meter. The space between them will subsequently be filled with adobe.
- Performed top harness, which will connect all the racks together.
- The roofing system and decking are being installed.
- A liquid solution is made from clay and water.
- The prepared straw is soaked in this composition and left for a while to drain a little.
- Formwork made from edged boards is installed on the walls.
- Moistened straw is placed inside this formwork and compacted well.
- As the formwork dries, it is moved higher and higher. This is how construction is carried out.
- The finishing is the same as in the previous case.
Roof

For such designs optimal solution there will be a straight gable roof with an angle that exceeds 30°, it can even be equal to 45°. Thanks to this, it will be possible to minimize the load on the walls. But it is important to remember that such a design is subject to gusts of wind, so it is necessary to analyze how things are in a particular area. The overhang of the slopes should be at least 70 cm. This will protect the walls from flying splashes during precipitation. You can use any material you like as flooring.
Additionally, it is necessary to make a blind area and install a water drainage system to prevent the walls from getting wet.
Using this guide, you will easily cope with self-construction future place of residence.
Video
In this video, a young family shares their experience of building a classic adobe house:
This video is about how to build a house from adobe yourself:
Photo


In this article: the history of adobe house building; what components are included in adobe; differences between heavy and light adobe; positive and negative characteristics of adobe; how to choose raw materials and make an adobe block with your own hands; strength test of adobe bricks; construction of houses from clay blocks - details; what explains the popularity of green building in the world.
Home construction- the event is expensive. The building materials alone for the construction of the walls will cost a significant amount, but you also need to attract craftsmen to lay and finish them. Yes, with all the expenses on high-quality construction and finishing materials, you still need to make sure that they are environmental characteristics- You must agree that today this criterion is important. Meanwhile, it is quite possible to build a full-fledged house not only with your own hands, but also from structural material created, again, independently and directly on the construction site - for production adobe brick no chemical components are required. Let's find out what adobe is, how to build a building from it and, finally, how comfortable it will be to live in such a house.
History of adobe houses
To shelter himself and his family from bad weather, a person needed a house. Several thousand years ago, people developed various construction technologies, primarily dependent on the availability of the simplest building materials - stone and wood. For many peoples who inhabited the Earth along the perimeter of the equator before our era, wood and stone were in great short supply; they had to look for other building materials. About 6,000 years ago, a solution to the problem was found - bricks were made from wet clay mixed with straw, dried in the sun, and buildings were erected from this simple structural material.

Molded and sun-baked bricks first appeared in Ancient Egypt— for their production, Egyptian builders extracted clay from the bottom of the Nile River. Subsequently, the technology for creating clay bricks was borrowed from the Egyptians by the peoples Ancient Persia, from where it spread throughout Asia, and then, together with the Moorish armies, penetrated into Spain. By the way, it was the Arab builders who gave clay brick its name at-tob, changed centuries later by the Spaniards to adobe— in Russia its Turkic name “saman” is better known.
The oldest architectural complex in Asia, made entirely of adobe, until 2003, was the Persian “fortress of Bam” (Arg-e Bam), created around the 6th-4th centuries BC. e. Achaemenid dynasty. Unfortunately, at the end of 2003, the ancient Citadel was completely destroyed by an earthquake of magnitude 6.3, the epicenter of which fell almost on the territory of the old city. Note that the Iranian city of Bam suffered from the earthquake not only in the historical part, but also in the modern part - about 80% of the buildings collapsed.

The construction of buildings from mud (i.e. clay) developed independently among the peoples of the American continent. Indians from the Anasazi (Pueblo) tribe built multi-story complexes of clay and straw in the southern part of North America, although they did not make bricks - prepared construction material when wet, it was laid along the perimeter of the future building; as it hardened, a new tier was formed on top, and so on.
 Adobe house in the city of Taliouine, Morocco, North Africa
In the state of New Mexico (USA), buildings built from adobe about 1000 years ago still exist and are used for living.
Composition of adobe
This clay building material can consist of a variety of natural components, most often in its composition: water, which acts as a solvent; clay of medium fat content, the basis of the mixture; filler, which can be played by chopped straw or fibrous plant stems, manure; other additives.

The purposes of introducing certain additives into the adobe mixture, their list:
- Cellulose fibers provide increased tensile strength. Cut straw is used (cutting length is from 90 to 160 mm, depending on the size of the brick), chaff, firewood, wood shavings, cattle manure;
- to reduce shrinkage when bricks dry, sand, fine gravel, crushed stone or expanded clay are introduced;
- Lime and cement will help increase resistance to water and speed up curing;
- to improve plasticity, the composition can be added liquid glass, bone glue, casein, molasses, slurry (the characteristic smell of manure completely disappears after the adobe dries), starch.
The adobe mixture does not require the mandatory introduction of chemical components used in building materials - the clay that forms the basis of the mixture already has most of the characteristics common to modern construction and finishing materials. Construction chemicals are introduced as necessary - to speed up the hardening of bricks, ensure maximum resistance to microorganisms, rodents and high temperatures arising from fire.
Heavy and light adobe - what's the difference?
Light adobe is very familiar to the population of the southern regions of Russia - the walls of mud hut houses are made of this material. Light adobe solution contains a smaller percentage of clay - about 10%; bricks are not created from it, since the mixture is applied directly to frame walls according to reinforcing wooden sheathing or placed between the inner and outer wall cladding made of edged boards or OSB boards. The advantages of constructing buildings from light adobe are: high speed construction work, small range of building materials, work can be performed by non-professional builders. Flaws - high consumption wood materials, which increases construction costs.

Blocks and bricks made of heavy adobe allow you to build a much stronger and safe home than when building from light adobe. During the masonry work, pre-dried adobe bricks are used, so it is not necessary to spend a lot of time drying the walls, and they can be finished immediately after construction. The disadvantages of heavy adobe, as well as the advantages, are associated with clay bricks— the process of their manufacture is quite labor-intensive; until complete curing, the products must be stored in large volumes, carefully protected from getting wet.
Characteristics of adobe
The exact characteristics of adobe and products made from it depend on the composition of the mixture and percentage it contains light fillers:
- heavy adobe has a density of the order of 1500-1800 kg/m 3, i.e. it practically coincides with the density of building bricks;
- the thermal conductivity coefficient is half that of building bricks - about 0.1-0.4 W/m °C. The more straw contained in heavy adobe and the higher its density, the lower its thermal conductivity;
- compressive strength is about 10-50 kg/cm 2, this strength range is close to the characteristics of foam and aerated concrete.
Advantages of adobe construction:
- the cheapest construction material, since the raw materials for its production - clay and water - are found everywhere and in abundance;
- absolute environmental friendliness of adobe buildings;
- low heat transfer and high sound insulation of walls;
- fire resistance;
- ability to absorb excess moisture in rooms.

- poor resistance to humidity, especially at low temperatures - required external plastering or covering walls with facing bricks;
- impossibility of carrying out construction work in winter conditions;
- buildings erected in temperate climatic zone, dry for a long time and gain strength;
- adobe walls create favorable conditions for rodents, insects and fungi to live in them.
A house made of adobe takes longer to build than houses made of traditional materials - it takes more time for the walls to gain strength characteristics. However, the final cost estimate for construction will be at least half as much as for a building made of building bricks of a similar area.
DIY adobe brick
First of all, you need to select the clay that will be used in the adobe mixture, determining its fat content. To do this, you will need a sample of clay and two planed boards 100-150 mm wide. Having placed the clay in a small container, add water to it and, thoroughly mixing with your hands, achieve the formation of a homogeneous clay dough - its consistency should be thick enough so that the clay does not stick to your fingers. Then we take out a piece of clay dough, roll it in our palms to form a 50 mm ball, place the ball between the prepared boards, with even force and slowly press on the top board. It is necessary to squeeze the clay ball until cracks appear on its surface: the diameter of the ball before cracks appear has decreased by half (to 20-25 mm) - the clay is oily; cracks with a decrease in diameter by 1/3 (to 13-17 mm) indicate clay of medium fat content; if the ball crumbles into pieces at the slightest pressure, the clay is thin and not suitable for adobe.

Clay occurs near bodies of water; in addition, the location of its layers near the surface of the earth is indicated by the following external signs:
- slightly swampy areas in the area - the layers of clay located underneath do not allow water to be absorbed into the ground;
- well water level- if the water in the well is particularly high, then there are layers of clay;
- patches of soil with mint or sedge growing in abundance, although there are no visible sources of water nearby.
Finally, the easiest way to detect clay layers required quality- walk around the neighbors who built adobe buildings some time ago or laid out a stove (fireplace).

The easiest way to make bricks from adobe is from medium-fat clay, because it is easier to work with - less effort will be spent on preparation. If only fatty clay is available, then you will need to change its composition to medium-fat by adding 15-16 kg of sand per 100 kg, thoroughly mixing the resulting mixture. Only clean sand of a coarse fraction (about 2 microns) is needed - mountain sand is better, river sand is worse, because it contains silt particles that reduce the degree of adhesion of sand grains to clay.
Preparing clay for the adobe mixture must be done in the fall, then lay it in a pile up to a meter high and cover the top with a dense, 100 mm layer of straw. The clay heap is formed and left in the open air for the whole winter, due to which it will be soaked by rains and spring snowmelt and frozen low temperatures cold season - by the beginning of spring its plasticity will increase, which is what we need. As soon as the thermometer is firmly established above the zero mark and there is no more frost, remove the straw that covered the clay pile and cover the clay with plastic film, pressing its edges with stones around the perimeter. Polyethylene flooring will allow the clay pile to thaw faster, while preventing the formation of a dry crust on its surface.
Straw for the adobe mixture is required either fresh, remaining after harvesting winter varieties of wheat and rye, or last year's dry straw, without traces of rot. In the absence of straw, coarse-stemmed grass hay is suitable.

In order to have time to build the foundation, walls and roof of the house before the onset of cold weather, it is necessary to begin producing adobe bricks in early to mid-spring, as soon as warm weather sets in. The site for creating adobe bricks should be close to the place where the house is built - finished bricks are heavy and quite large, and it will be difficult to move them over significant distances.
Before mixing the mixture for adobe, we will prepare a platform and molds for bricks. You should not make the mixture on bare ground - debris and soil will certainly get into it, reducing the strength of the bricks. A molding platform is required - a dense flooring made of boards, measuring 2000x2000 mm or more, or a recess covered with waterproof thick fabric. Clay is placed on it in a volume of no more than 2/3 of the flooring area, large lumps are broken up with a shovel, a depression is formed in the center of the pile, and water is poured in. Then the clay is mixed with shovels and kneaded with feet, if it is high in fat, sand is added, then pre-soaked straw is introduced, the mixture is kneaded again and kneaded with feet until it becomes homogeneous in structure and looks like a thick porridge. You will need about 13-15 kg of cut straw per cubic meter of clay, the exact amount is determined experimentally. At this point, the preparation stage of the adobe mixture is completed; it is collected with shovels into a pile and left for two days to “ripen.”

It should be noted that it is necessary to knead the adobe mixture only with your feet, since any other methods do not work here - an attempt to knead the mixture with the help of a horse will be ineffective, since the animal will prefer to step on the tracks already made by its hooves, and the use of a caterpillar or wheeled tractor will be accompanied by bringing earth and dirt into the adobe.
While the adobe mixture gains viscosity, we begin creating molds for the bricks. To do this, you will need a planed board 30 mm thick, from which boxes without a bottom are knocked together, containing two, three or four cell sections - their number depends on overall dimensions bricks. Adobe brick usually has three standard sizes: small - 300x140x100 mm; medium - 300x170x130 mm; large - 400x190x130 mm. The larger the adobe brick, the longer it will take to dry, so its dimensions are determined primarily by local climatic conditions. During curing, molded adobe bricks lose moisture, their linear dimensions decrease by 10-20%, so the internal dimensions of the cells of the wooden form should be 50-60 mm larger than the desired size of the finished brick. To simplify the removal of “raw” bricks from the mold during the molding process, you can give the cells a slightly conical shape - the distance between the upper walls of the cells is 7-10 mm greater than between the lower ones. Each wooden form must be equipped with handles at the “narrow” ends - just nail bars with a cross-section of 50x50 mm to them.

Before starting the production of adobe bricks in the volume required for construction, it is necessary to test several samples of bricks for strength. To carry it out, make several mixtures of adobe in a small volume (based on two bricks), maintaining the following proportions in each batch: 3 parts clay to one part sand; 2 parts clay and one part sand; clay to sand ratio is 1:1; one part clay to 2 parts sand; one part clay to 3 parts sand. Make two bricks from each mixture, keep them on the platform under sun rays, then place them under a covered shed, placing them on edge and keep them there for another week (do not confuse which bricks are from which mixture!).
After a week, before testing adobe products for strength, inspect their surfaces, try to pinch off a piece from the edges, break the bricks with your hands:
- if the product crumbles easily under your fingers, there is not enough clay and too much straw in the mixture;
- if the surface of the adobe is covered with deep cracks, then the mixture is too rich in clay or the clay is too greasy, i.e. there is not enough sand filler in it - increase the sand content in proportion by one part;
- If you managed to break a brick with your hands, there is not enough straw in it, you need to increase its content in the mixture by 1.5 times.
After spending preliminary inspection, proceed to the strength tests, using one of the two proposed options or both at once: 1st option - drop one brick from each batch from a height of more than 2 meters to the ground; 2nd option - wet 120 mm nails with water and drive them into the remaining bricks. Bricks that split after falling mean that the adobe composition for them was chosen incorrectly, the same applies to split and crumbled samples when trying to drive nails into them. A nail fits into high-quality adobe in the same way as into dense wood (for example, oak) and stays just as firmly in it.
Having chosen the most successful proportion of the adobe mixture, we begin to produce bricks in large quantities. The operations of introducing components, mixing, kneading and maintaining the batch are carried out according to the scheme described above - to create 1000 adobe bricks you will need about 10 m 3 of clay. It is necessary to prepare a site for pre-drying of products a day before molding - cut off tall grass and protrusions on the ground, remove debris with a rake in several passes, ensure the outflow of water in case of rain, cover its surface with a layer of straw.

The finished adobe is taken from the flooring with shovels and placed into mold cells, previously moistened along the inner walls with water, sprinkled with a mixture of fine straw and sand - a measure that makes it easier to remove raw bricks from the mold. The adobe is placed in cells with excess, after which it is compacted with a shovel and a board; after compaction, the excess material is cut off with the same board and returned back to the batch. Further wooden mold rises, is transferred to the drying area, the mold is carefully turned over, 4-5 through holes are made in the removed bricks using wire with a diameter of 1-1.5 mm central axis products - they will relieve stress in the material caused by drying. The products remain on the site for 24-36 hours - they must dry and harden so that they can be moved under the canopy. After a day or two, they need to be turned over on their edges, leaving them in place for further drying.
The molded bricks are covered with tarpaulin or roofing felt on top - the coating will protect them from rain and uneven drying under the sun's rays. At this stage, adobe products should not come into contact with each other; it is necessary that air freely penetrates to their walls. Next, the bricks are transferred to a barn or under a shed, where they are stacked on top of each other in pairs on an edge (in a “well”) with a distance between them equal to the thickness of the products - the storage room for adobe bricks must be well ventilated. The correct way to lay adobe on wooden pallets, absorbing excess moisture. The complete drying time for adobe bricks, depending on the weather, will be from 10 to 15 days - ready product has a uniform color throughout its entire thickness, does not break when dropped from a height of two meters, and does not lose its shape after being kept in water for 48 hours.
The nuances of building houses from adobe
Exposure to the destructive effects of moisture imposes a number of conditions that must be met during the construction of an adobe house.
Foundation. Ideal for adobe construction strip foundation, the width of which exceeds the width of the masonry walls by 200 mm - to protect the fences of the house from splashing water and to allow the application of a thick layer of plaster. Concrete, rubble stone and brick are used as foundation materials; the base is raised to a height of 500 mm and above. It is important to lay a waterproofing layer between the foundation and the walls - for example, several layers of roofing felt or roofing felt.

Walls. Thickness external walls from heavy adobe should be at least 500 mm, internal - at least 300 mm. Along the perimeter of the openings in the walls, above the lintels and in the areas where the walls meet (500 mm vertical pitch), reinforcement made of reeds or brushwood must be laid. The masonry is carried out using the technology usually used for the construction of block walls, with joints about 10 mm thick. You need to lay no more than two per day brick rows(with a height of no more than 400 mm) so that the solution sets and dries overnight - following this technique will speed up the drying of the walls and somewhat reduce their shrinkage, allowing you to begin plastering the walls immediately after construction. Masonry mortar- adobe dough in which the ratio of clay to sand filler is one to one or four to three. If necessary, you can reduce the size of adobe bricks using a regular hatchet. The construction of walls and roofing must be carried out only in dry weather, and the work must be completed before the onset of autumn frosts.

Wall decoration. Walls made of adobe without exterior finishing will quickly become unusable, so it is extremely necessary to complete it. The layer of plaster should be 50-100 mm, which will reliably protect the walls from bad weather and protect them from penetration of rodents and insects. Acrylic, lime and silicate compounds are suitable for plastering walls - the plaster layer must be waterproof, but permeable to steam. Cement plaster not suitable, because it practically does not provide adhesion to unfired clay. You can line the walls from the outside with brick, board or other materials, but you must ensure that there is space between the adobe wall and the cladding. air gap 50 mm, otherwise the adobe will get wet. The connection between the outer cladding and the adobe wall is done with 150 mm long nails. Interior wall finishing is carried out gypsum plaster, can be tiled using gypsum-based adhesives.

Floors. They are mounted on wooden beams placed on the walls by more than 150 mm. Beams must be treated with waterproofing impregnation (for example, two or three layers of drying oil) or wrapped in roofing felt, then embedded in adobe walls. In order to effectively distribute the load, a board is laid under each floor beam, and areas at the support points of the beams are also reinforced with reeds or brushwood.

Jumpers. Window and door lintels are made of boards, the width of which is equal to the width of the wall, and the thickness is 50 mm. The lintel boards must be impregnated with waterproofing compounds or wrapped in roofing felt.
Window and door frames. It is better if these frames are made of wood, which will reduce the risk of condensation accumulation. When installing window and door frames, a waterproofing layer is laid around the perimeter of the openings.
Roof. It is better to install a steep roof, at an angle of 35 or 40° - in this case, the thrust load on the walls will be lower. The minimum length of an overhang that can well protect walls from rain flows is 700 mm. As roofing Light materials are more suitable - metal tiles or sheet roofing. If an attic is installed under the roof, then under roofing material It is necessary to lay 50 mm hard mineral wool. The insulation of the attic space is carried out with light adobe or other materials of natural origin.

Floor. It is finished with ceramic tiles on a ground base pre-insulated with expanded clay or light adobe.
Growing interest in building houses from adobe or made of straw, which has established itself over the past decades in Europe and America, is explained not only by the fashion for ecological housing, but also by the constantly growing cost of buildings from modern materials. Why get into debt bondage with banks and developers if you can save money and build a full-fledged house from natural materials, V literally lying under your feet?
The almost complete absence of building standards for such buildings is not at all due to their low performance characteristics, but rather with a reluctance to develop these standards, with the traditions of constructing buildings made of stone, brick and reinforced concrete, common for the 20th-19th centuries.
The question of whether it is possible to install an air conditioner with your own hands worries the minds, first of all, of owners of brand new split systems who have already managed to get acquainted with installation prices climate control technology. Indeed, numerous air conditioning installation companies rate their services quite highly, citing the complexity of installation, the need to use expensive highly specialized equipment and the mandatory high qualifications of specialists. WITH last statement can not argue. Only new owners of air conditioners are still interested in the opportunity self-installation, firstly, as a prospect of real savings on installation services (we are talking about a considerable amount), and secondly, as an opportunity to consolidate your own skills and learn something new. Is it possible to blame our man’s desire to get to the bottom of the issue in order to understand how to install an air conditioner on his own and do the installation himself, no worse than a real master? If aspiration is accompanied by the ability to realistically assess the level of one’s skills and capabilities, then it has no price! The information we have presented on how to properly install an air conditioner will help you realistically assess the amount of installation work and balance your skill level with the required one.
Before you begin to study the detailed installation instructions, please read the list necessary equipment.
Required tools and equipment
- Hammer with drills.
- Electric drill.
- Vacuum pump.
- Pipe cutter
- Rolling.
- Reamer (beveler).
- Level.
- Torque wrench.
- Gauge manifold.
Using a vacuum pump, remove moisture and air from the system
Locksmith tool for installing air conditioners it will also be useful (pliers, screwdrivers, hammer, etc.)
Choosing a place for installation
When choosing an installation location for both indoor and outdoor units, consider the following points: it is important to consider the possibility of free access to the device (for ongoing work on cleaning and replacing filters).
Also take into account the feasibility of the shortest communication between the indoor and outdoor units (the point is not so much the economic benefit of using less Supplies, how much in reducing the efficiency of the entire system with increasing the length of interblock communications). Do not place the indoor unit above a cabinet or tall furniture (obstructing the flow of cooled air will cause the unit to operate less efficiently). For the same reason, observe minimum distance from the ceiling and walls (15 cm). Coordinating the installation of the air conditioner with your neighbors is also very desirable, in order to avoid misunderstandings in the future. The installation of an external unit does not create any particular problems for residents of neighboring apartments, but it is very likely that someone may not like the noise of a running fan or dripping condensation. And the last point, the most obvious, is that the flow of cold air should not create discomfort for people in the room, so consider the direction air flow during installation. Once the locations of the blocks have been determined, we proceed to installation work.
- installation indoor unit;
- mounting the outdoor unit;
- drilling a channel in the wall;
- laying and connecting connecting communications;
- vacuumization of the circuit;
- connecting the air conditioner to the electrical network;
- system startup.
Correctly installing the indoor unit
The internal unit of the split system is mounted on a special plate supplied with the device. To ensure reliable operation of the unit and prevent condensation from leaking out of it later, it is very important to secure the plate level. Therefore, to determine a strict horizontal line when marking, you must use a level. In the marked places, dowels are driven into the holes pre-drilled with a hammer drill. Then, using self-tapping screws screwed into dowels, we attach the mounting plate and install the indoor unit on it.

A mounting plate is attached to the installation location of the indoor unit
Installing the outdoor unit
Outdoor unit placed on pre-installed brackets outside the building, usually under or to the side of a window for ease of maintenance. For effective airflow, the distance from the block to the wall must be at least 10cm. If it is not possible to secure the brackets from the window, then to carry out the work you will need to rent an aerial platform or use the services of climbers.
Interblock communications - how to do it?
A hole in the wall for the passage of communications is drilled using a hammer drill with a drill with a diameter of 4-5 cm. If the interblock route includes a drainage pipe for condensate removal, then the channel must be made with a slope (5-10 degrees towards the street). It is advisable to hide the section of the route from the indoor unit to the point where it enters the wall in the wall. When gating, a lot of dust is generated, so if renovations have already been made in the room, then it is better to lay the route outside, subsequently covering it with a decorative box.

Interblock communications can be hidden in a decorative plastic casing
The inter-unit communication route includes copper freon pipes, power supply and equipment control wires, as well as a drainage pipeline (according to the rules, condensate from the indoor unit must be drained into the sewer system, but many simply drain it outside). The required length of wiring and pipelines is determined by measuring the total length of the route (plus a small margin of 30-50 cm).
For cutting copper tubes It is necessary to use a pipe cutter, and not a grinder or a hacksaw, to avoid the formation of sawdust, which can subsequently lead to breakdown of the air conditioner. Before installation, the pipelines are placed in a heat-insulating shell; to prevent debris from entering, the pipeline openings are closed. plastic stoppers. All components of the route are laid together, rewound with vinyl tape, after which the route is installed in place.
After laying the interblock communications, they begin to connect the wires and the freon line. The installation instructions for the air conditioner must contain a wiring diagram that must be followed during operation.
The length of the tubes is adjusted (cut off right size), then you need to remove the burrs (remove the chamfer using a reamer). After threading the nut, each edge of the tubes is flared by rolling. Then the edges are connected to the fittings of the indoor and outdoor units, tightening the nuts with a torque wrench (the connections must be absolutely tight).

After checking the tightness, air is removed from the line using a vacuum pump; a manometric manifold makes it possible to control the pressure
Having finished connecting the route, check the tightness of the line and “vacuum” it (remove moisture and air) using a vacuum pump. To do this, a vacuum pump is connected to the service port of the outdoor unit through a manometric manifold, which, by pumping air out of the system, creates a vacuum in it. This process lasts about 20 minutes (depending on the volume of the circuit). After turning off the pump, observe the change in pressure for half an hour; if the pressure gauge needle does not deviate, then the system is sealed. Only after a thorough check of the tightness is it possible to open the taps of the outdoor unit and fill the circuit with freon. Attention, a freon leak can cause a compressor breakdown, but it is more important harmful effects freon on human body.
So, the system is assembled and filled with refrigerant, all that remains is to connect the air conditioner to the electrical network and check its operation. The air conditioner connection diagram is simple, most household split systems The power supply is connected to the indoor unit; to do this, you only need to connect an outlet to it.
Now you have a general idea of how to install an air conditioner yourself. We were talking about installing a split system as the most efficient type of household air conditioners. The video instructions below will help you figure out how to install an air conditioner.
Installation mobile air conditioner does not require the intervention of highly qualified specialists: you just need to place the device within 2m from the window (to remove hot air), and then connect it to the network.