Install wooden windows yourself? No more difficult than plastic ones! How to install wooden windows in a wooden house - step-by-step instructions Do-it-yourself installation of wooden double-glazed windows
How to install a wooden window in a house? Until recently, this issue worried few owners of apartments and houses. There was a period of time in the construction industry when everyone decided to replace old wooden frames in an apartment or house with a plastic version of Euro-windows. Let's try to figure out how the installation is done wooden windows,
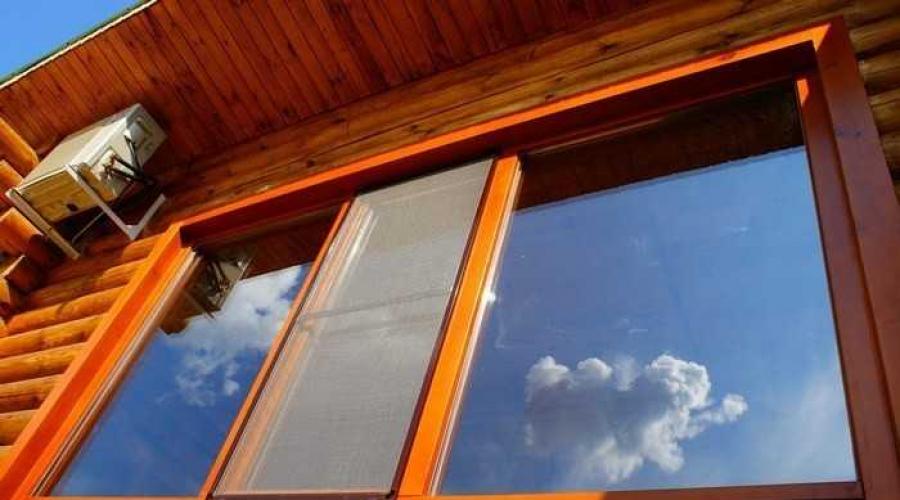
Modern technology ensures decent quality wooden double glazed windows.
It seemed that plastic windows save us from many problems and inconveniences associated with regular renewal of the surface of wooden frames, insulation in winter period; they have the convenience of opening and closing and so on.
Plastic windows in the house guaranteed reliable noise and heat insulation, which is also important.
Care plastic version eurowindows comes down to minimal effort. Simply put, until recently, plastic windows were considered the best option. But every barrel of honey has its own fly in the ointment. In order to produce a number of plastic profiles, some unscrupulous manufacturers use low quality materials, which are capable of releasing into the atmosphere toxic substances, which means having an adverse effect on human health. To a greater extent, the newly increasing popularity of wooden frames (windows) is associated with this circumstance. Many people simply love everything natural, which is why they prefer wooden windows in their homes. Modern technology ensures decent quality for wooden windows, in no way inferior to their plastic counterpart.

Wooden windows have a number of advantages over their plastic counterparts. Thanks to special coatings, they are resistant to various atmospheric conditions.
Installation of double-glazed windows is also possible for wooden frames, various compositions for processing allow you to protect wooden surface from moisture and rotting, which allows the frame to maintain its original condition (not to swell, not to deform), and modern painting materials have qualities such as durability and resistance to various atmospheric phenomena. Simply put, the quality of wooden frames (windows) in the house is not at all inferior to plastic window structures, and even on the contrary, has a number of advantages that are not typical of plastic. It is also possible to install wooden windows yourself.
Should you entrust the installation to professionals or do the installation yourself?
In order for the quality of the window in an apartment or house to be high, it is necessary to carry out the installation correctly, observing the requirements imposed by the technology, and with skill. If you make the slightest mistake, your wooden window may disappoint you with a short service life or insufficiently impressive appearance. Basically any installation work you can do it yourself, the main thing is that the technology must be followed. Saving on components is not allowed, and it is better to familiarize yourself in advance with the features that the installation of wooden windows implies.
- The first thing that needs to be done is to prepare the window opening for the subsequent installation of window frames in the house (apartment). The window opening must be fairly even (rectangular), free from distortions, large potholes, cracks, and so on. When replacing an old window with a new one after implementation dismantling works the surface of the window opening is cleaned from dust, dirt and other debris;
- at the next stage it is necessary to take measurements of the opening. Measurements must be taken both outside and inside, at three points. These include the edges and middle of opposite sides;
- if the window opening is skewed and cannot be corrected, it needs to be widened window sizes to the extent that the value is exceeded maximum level(in the outer opening) was at least 10-20 mm in height and 25-40 mm in width.

This can be done by installing additional profiles. This will help prevent gaps from appearing between the opening and the frame in heavily skewed areas. Another way to get rid of this defect is to increase the size window box, but it is better if this work is performed by specialists. If you decide to install wooden windows yourself, then you will need the following tools and materials:
- building level;
- drill or hammer drill;
- roulette;
- screwdriver;
- screwdriver;
- hammer;
- anchor bolts;
- dowels;
- polyurethane foam.
As well as a number of other tools and materials, the set of which depends on the type of window and installation method.
Installing wooden windows with your own hands in the house
The finished wooden window structure is inserted into the opening in several ways. These include:
- method using mounting blocks;
- method using mounting plates;
- "through" method.
The installation of wooden windows, or rather frames, is carried out on a beam that has a height equal to the height of the window sill. So, the first of the listed methods is not suitable for every case. Since when fastened using blocks, the opening must be absolutely even. Such evenness of the window opening is not always achieved.
If you still have an absolutely flat opening, then first you need to cover it with waterproofing, and after this layer you can attach the mounting pads parallel to the window frame. After the box is inserted, the vertical and horizontal alignment is carried out using wedges and using a level. The second method involves attaching mounting plates to the sides and top of the frames; in this case, their location should be approximately 250 mm from the edge. Initially, the plate is installed in such a way that it looks into the room, after which it is bent and secured to the inside of the opening using self-tapping screws without tightening them. If the size of your window is more than 1.5 m, then there is a need to install additional plates, one or two.

After using this method, just as in the first case, the window is adjusted using wedges, aligned and finally fixed with self-tapping screws. The next method is considered one of the most reliable, but more labor-intensive. When using it, it is necessary to remove glass or double-glazed windows. To do this, you need to carefully remove the glazing beads, after which you can expose the glass. Then on the side and top internal surfaces The frame is marked with future holes and their subsequent drilling. The frame is set in place, but the wall holes are drilled only after the frame is completely level using a level. We do not screw in the screws completely, as it may be necessary to adjust the position of the frames both horizontally and vertically. Leveling is done in the same way as in the other two cases, using wedges.
We eliminate cracks and install a window sill
In order for the thermal insulation of your window in the house to be sufficiently high, you need to prevent the presence of gaps between the opening and the window frame. Most often, polyurethane foam is used for this. In order to properly seal cracks, you need to have sufficient skills. A large amount of foam causes deformation of the frames and the possibility of skewing the window as a whole. If you doubt your abilities, it is better to use another material for insulation. To install the window sill correctly, you need to position it so that it extends slightly under the frame, but at the same time its protrusion relative to the wall must correspond to 50 mm. Then it is leveled using a level and fits tightly to the frame. Then we remove the window sill and fill the subframe space polyurethane foam. Having installed the window sill in its place, the space available under it is filled with foam. To prevent the window sill from moving from its place when foaming is performed, a load is placed on its surface, which can be used as several containers filled with water.
That's all. It remains to establish the ebb tides. This is even easier to do. The first step is to cut the required size (from a stock of about 60 mm). After that, using self-tapping screws, the ebb is screwed to the bottom of the frame, and then point fixation is made with inside using polyurethane foam.
Plastic windows have gradually replaced traditional wooden windows. This is understandable, because the installation of structures is faster, and the windows themselves do not need to be painted, varnished, or insulated for the winter. But not all plastic structures manufactured in compliance with technology and from quality materials. Most manufacturers, in order to cope with the plan and meet customer demand, make windows from cheap materials, Low quality. Such windows, despite their ease of use, can significantly harm human health, so most people again began to return to the well-forgotten old times and install wooden windows in their houses and apartments.
Mass popularity PVC window designs is quite understandable, because in addition to the fact that you do not need to pay attention to window frames every year, you can install metal-plastic windows in any opening, even in an old private or apartment building. Since the ease of installation is captivating, many owners give preference to expensive PVC windows. But if you compare wooden windows with metal-plastic ones, especially when we're talking about about installing windows wooden house, then modern metal-plastic structures will spoil everything appearance.
It is quite possible to install wooden windows yourself if you prepare necessary tool and know how to install a wooden window.
Wooden windows. Photo:


Preparing the window opening
Let's start with the fact that you first need to get rid of the old window, especially if the tree has long fallen into disrepair. You will need to first remove the window frames from their hinges and remove the window frame. What will await you - he can’t even say experienced specialist, because first you need to get rid of the old window in order to get your bearings and find out if there is window opening lintel This is part load-bearing wall, which can “lie” on the window casing. This is often found in old houses, so masons tried to save on building materials. Experts recommend paying attention to the materials from which the house is built, if it is stone an old house, then for sure, where there is no lintel, it is unlikely that it will be possible to install new wooden window structures. In order to still cope with the task and replace old windows with new ones, it is necessary to invite specialists who will recommend how to eliminate the defect in the window opening in order to continue the work. If you are faced with such a problem, you need to know that it is dangerous to live in such a house, unless, of course, the role of the lintel is played by a brick or stone castle. This design is just reliable, so you can begin to install wooden windows.
IN multi-storey buildings block type may also not have a lintel, since monolithic slabs Concrete is cast in factories with a ready-made opening for the window. Wooden houses- this is a separate conversation, it can be collected frame method or from a log frame, in this case the window does not carry any load on the wall, so there is no need for a lintel, and you can easily install windows in a wooden house.

We have dealt with this point, further no less important task– after you have removed the frame, you need to remove the slopes outside and inside the window around the entire perimeter. Next you need to dismantle the window sill. We need to find out whether there are mortgages in the wall (for attaching the window frame). To do this, insert the awl 1/3 into the wood and pull the handle towards you. If the awl does not go to this depth, or if it cannot be pulled out, then this is just very good, because the mortgages are strong and nothing will happen to the windows. If they turn out to be flimsy, you can replace the mortgages. When there are none at all, this is also not a problem, because you can insert windows into the opening without them.
How to take measurements correctly
To measure a window opening according to all the rules, it is important not to miss the following:
- Measure the opening both from the outside (from the street side) and from the inside - from the room side.
- Both measurements will allow you to determine the depth of the quarter of the opening; check your calculations again so that later it does not turn out that the size of the window will be smaller than the dimensions of the external openings, then it will not hold and will fall out.
Look at this drawing, it will be clearer to you how to correctly measure wooden windows:

What to do if the opening is severely skewed? It is impossible to correct such a defect, so it is necessary to increase the window size by 20 mm in height and from 25 to 40 mm in width. You can do it differently and install an additional profile in the window opening around the perimeter. In this way, installation gaps can be avoided at the same time. wooden structures in the place where the distortions are too large.
There is another way to get rid of the distortion - to increase the size of the window, but it is best to do this part of the work not on your own, but to resort to the help of professionals to do everything according to the rules.
You can see how to correctly take measurements and install a window in a skewed opening in this image:

Ideal when the internal dimensions of the opening are 25 mm smaller. Here the reserve is needed in order to install a gasket (any layer of insulation). In addition, it is necessary to take into account the thickness of the window sill, so for the lower part of the window opening you need to leave a margin of 60 mm.
The next thing is that it is important to immediately decide how the window will look from the street. Each person has his own ideas about this; some believe that the window frame needs to be “planted” in the wall so that it is not visible from the outside, while others, on the contrary, want to put the window outside. Both options are not suitable, you need to find golden mean and do not forget that if you wanted to do it your own way, the opening may become distorted. It is best when the window frame is open from the outside.
Pay attention to the picture:

What to consider when installing wooden windows yourself
Once you have decided on the size of the wooden window, do not forget that you need to install a drip at the bottom of the window so that rainwater didn't get on wooden box. Sometimes the low tide needs to be installed not only below, but also from above.
A drain must be installed at the bottom, and the connection point must be carefully filled with sealant to prevent water from leaking out.
You have already taken measurements of the window, and now you need to compare them with the dimensions of the opening in order to avoid errors in calculations and understand how much plaster needs to be put on inner part slope so that they are equal. It is also important to take into account that the window does not “dig” into the slope and easily falls into place. In any case, make your measurement calculations as accurately as possible to easily cope with the installation of wooden windows.

Selection of materials
To execute high-quality sealing wooden windows, pay attention to the popular material on construction market- polyurethane foam. It seals all cracks well and is excellent thermal insulation material In addition, the foam will allow you to evenly distribute the load (mechanical and strong wind). The insulating material is easy to use. But even here there may be some pitfalls. Under prolonged exposure to direct sun rays and unfavorable weather conditions, the foam begins to gradually collapse, so after you install a wooden window, you need to cover this material with a layer of plaster, apply sealant or paint it in several layers.
Remember that foam is not an insulating material and does not protect against moisture, so it is so important to cover it with a more durable material.
One of the disadvantages of polyurethane foam is that when it dries, up to 10% of the volume is lost, that is, it turns out that the window frame will constantly “walk”, which leads to the gradual destruction of the plaster and window mechanisms (the window may not open and close well, especially in bad weather).
How to insert wooden windows
There are several ways to install wooden windows. In principle, the technology is practically no different from installing metal-plastic double-glazed windows; wooden windows also need to be installed and secured correctly.
Let's consider options for installing wooden windows:
- The through method, when the window is first installed in the opening and then fixed with dowels and screws. This installation is simple. By the way, the reliability of the through method is quite high, because first you need to insert the dowel into the opening and screw a self-tapping screw into it. This design will last a long time and there is practically no chance that it will become loose. Install the window like this: you need to remove the glazing beads for now and remove the double-glazed windows. To lighten the weight of the structure, you can also remove the doors; this will also help you get the job done faster, since nothing will get in your way. Then you need to mark from the inside the place where you will insert the frame (in the upper part and on the sides) and drill several holes. You need to insert screws into them, but not firmly so that the window remains movable. You have to adjust the window horizontally. To do this, stock up on several wooden blocks to place them under bottom part window frame and adjust the position of the box, exposing most of the opening to the outside or hiding it inside. It is important that the window does not stand close to the wall, because it can deform over time from the load from the wall. The minimum indentation on each side is 2 cm, and at the bottom – 5 cm to align window unit horizontally and leave space for installing the window sill. If your window opening is large in width, then it is best to place the windows closer to the outside so that most of the structure remains inside, that is, warm.
- Installing a wooden window on mounting blocks. In order to install a wooden window yourself, you need to prepare the opening. It must be absolutely even. Not everyone has the opportunity to prepare it. If you are lucky and the window opening in your house is level, then first you need to install the pads on waterproofing material so that they are parallel to the window frame (on each side). Before installing the window, it is necessary to lighten the structure and remove the sashes. When the frame is inserted into the opening, check how level it is horizontally and vertically. This is best done using a building level. If everything is in order, then the window needs to be fixed with wedges.

- Installing the window on special plates (anchors). This option is most suitable for installation metal plastic windows, and for wooden structures. On both sides, special plates for mounting windows need to be fixed in the window opening, 25 cm away from the edge of the window frame. Fasten the plate with screws so that it faces inside the room, since we need to screw it to the inside of the window opening. If the window is more than 1.5 m, then install 2 anchors on each side and another one at the top. Then you need to insert the window block into the opening and secure it with wedges so that you have the opportunity to level the window and only then you are allowed to tighten the screws to the end. After this, the support wedges can be removed.

When the window is finally leveled, you can fill the openings with polyurethane foam. This method installation is suitable and for wooden windows for summer cottages. In any case, no matter what kind of house you install windows in, it is important to adhere to standard technology and install dimmer. First you need to cut a strip of material of the required length, plus 3 cm reserves on all sides, so that you can then bend the excess under the ebb. If you want, you can increase the dimensions and leave not 3, but 6 cm. The ebb must be screwed to the bottom of the frame with self-tapping screws (from the outside), and fixed from the inside using mounting foam. Just not very much, since the foam tends to increase in volume, so it would be best to put several points to record the ebb.
Window sill installation
Prepare the window sill in advance the right size. If you cut it out of solid wood yourself, keep in mind that the window sill must be placed under the frame, and the outer part must protrude.
We install the window sill in the existing hole, insert it from the bottom wooden blocks, so that we have the opportunity to level it and move it as close as possible to the window frame. That's all for now, the window sill needs to be removed to fill the entire space with foam and only then very carefully insert it into place and fill the available space again with foam. When doing this part of the job, it is important that the window sill sits tightly and does not move, so after you have filled all the cracks with foam, place a weight on it. The load should be distributed evenly, so 3 bricks will be enough or place 3 bottles of water.

To make it clear to you how to install wooden windows, we suggest watching the video:
The emergence of plastic windows pushed wooden ones into the background.
But this was short-lived and wooden windows are regaining their position, since, unlike plastic ones, they are made from environmentally friendly materials. pure material And do no harm human life and health.
Unlike plastic windows, wooden windows have enough simple design, which allows even an inexperienced craftsman to install them. Before installing a window, it is necessary to properly prepare the opening. He should not have such defects, How:
- Large potholes;
- Distortions;
- Cracks;
- Leftovers old window.
In order to installed window served for a long time, it is imperative to ensure that it there were no distortions. To do this, you need to measure the window opening along the edges and in the middle.
If you find a distortion, the only way to get rid of it is by increasing the window opening.
To install the window, you can use mounting blocks or mounting plates. It is also possible to install in a through way.
The frame of a wooden window should be installed on bars, which are the same height as the window sill. Installation should be carried out as close as possible to outside opening.
To install a window as reliable as possible, you need to pull the glass out of the frame and adjust it horizontally and vertically. This action is performed using wedges.
Wooden window frame

In order to protect window structures it is necessary make a joint. This element consists of a window sill or threshold, a top and a sidewall. Window frames are installed mainly in wooden houses or in houses that can sag, which can destroy the window opening.
Okosyachka done with circular saw, drills, grinding machine, screwdriver, jigsaw and chainsaw.
Initially it is necessary in logs that are adjacent to the opening, subtract grooves. After this, you need to insert the block into the grooves. A bar is one of several sides of a pigtail.
Initially you need to produce installation bottom beam , with the help of which the side parts will not move. Under this beam you must first lay an inter-crown sealant, which can be linen fabric or a layer of jute.
At the next stage it is necessary install the bars in vertical position . These devices also require pre-installation of the sealant. The top beam must be laid last.
Above the pigtail you need to do shrinkage gap, which is insulated using an inter-crown seal.
Installation of fittings on wooden windows

Wooden window fittings are used for their smooth opening and closing. It is necessary to attach the top and bottom loop respectively. Next, you need to install the latch, which is intended for the metal groove.
Window handles are also installed as simple as possible. Initially, you need to drill a hole in the frame where the handle will be installed.
If necessary, you can make installation of a micro-ventilation mechanism. It has a very simple design, which only requires attaching it to the window frame.
Also see:
- Useful information about the characteristics of wooden windows.
- Painting wooden windows - all the tips here http://mrokna.ru/derevo/pokraska-derevyannyih-okon.html
Installation of wooden windows and fittings is quite simple, which makes it easy to perform this action even to an inexperienced master. This is ensured thanks to the unique design of the windows. Good site here.
Also see interesting video about installing wooden windows
Tweet
- Preparing the opening
- Inserting a window
- Mounting methods
- Mounting on pads
- Mounting plates
- Pass-through option
The most elite and time-tested material is wood.
That is why the question about such a process as installing wooden windows with your own hands has been and will always be relevant. Well, let's look at its main nuances.
Preparing the opening
As with any type of work, installing wooden windows yourself cannot be done without proper preparation.
IN in this case we will talk about the opening.

Frame making
It is desirable that it be smooth, without distortions, cracks, or potholes.
Installation of wooden windows: options for mounting on blocks, dowels and anchors
If the old window is still there, it is, of course, worth dismantling. After dismantling, carefully remove the remaining solution and debris so that they do not interfere with your work.
If there are distortions, you need to get rid of them. Either increase the dimensions of the window frame, or increase the dimensions of the window so that they exceed the opening itself, but install additional profiles on the window itself.
And ideally, if the opening is normal, the window dimensions should be 25-30 mm smaller.
Inserting a window
Correct installation of wooden windows is carried out in three ways:
- On anchor plates
- On mounting blocks
- Pass-through option
However, when installing wooden windows with your own hands, keep in mind that you need to install the frame on pegs, the height of which should be equal to the height of the window sill, only then will the installation be of high quality.
Mounting methods
Let's consider the most uncommon option.
Mounting on pads
So, now we choose the mounting method.
The option for blocks is not suitable for every home, since one point is important here - the opening must be perfectly level, and this, as you know, is not always possible.

Through mount
However, if this rare case is yours, then first lay down waterproofing film, and then place mounting blocks on top, which are aligned parallel to the frame itself.
Their position is adjusted with a level, and then the frame is inserted, the position of which is also leveled using wedges.
Mounting plates
For this type of fastening you need to purchase special anchor plates. These plates are attached in the center of the frame, as well as on the sides at a distance of 20 cm from the edge (just keep in mind that maximum distance the distance between the plates should not exceed a meter).
The mounting principle is as follows:
- You install the plate so that the plate faces the inside of the room;
- Then you bend it, attaching it to the inside with self-tapping screws.
So, how to install wooden windows correctly?
Let's look at the stages:
- We place a homemade frame with fixed plates in the opening on wedges;
- Level the position with a level;
- Now we begin to attach the plates;
- First, the lower left one was secured and checked with a level;
- Then - the bottom right - and also look to see if the frame is warped?
- Next, foam the cracks.
Do not overdo it with the amount of foam, otherwise it will expand and warp the frame.
That's it, do-it-yourself installation of wooden windows is complete.
Pass-through option
This method is considered the most reliable, but here you will have to completely free the frame from the glazing, since you will be fastening it right through, through the frame to the opening.
This is the most common option for installing a structure such as do-it-yourself windows.
So, remove the glazing beads, carefully remove either the double-glazed window, or remove the glass.
Now let's go step by step:
- Insert the frame into the opening;
- Check with a level how the frame is aligned;
- Correct its position using pegs (the pegs should always be aligned at the bottom, since they should not “hang” only on the side screws);
- Drill through the frame, mark holes in the opening;
- Remove the frame, drill holes in the opening;
- Hammer the cork in there and cut off its head;
- Reinstall the frame in the opening, secure it with self-tapping screws;
- Foam the cracks;
- Reinstall the glass.
Do-it-yourself installation of wooden windows is done!
Do-it-yourself wooden window installation technology

Through installation technology
Using this technology, a wooden window is installed and fixed with self-tapping screws in dowels. This is a fairly simple but reliable method. A dowel in the wall is an excellent stopper for a self-tapping screw that is screwed into it. When the self-tapping screw is completely screwed into the dowel, such a structure cannot be loosened.

When installing a window, you need to separate the glazing beads from the frame and remove the double-glazed windows (you also need to remove the sashes so that they do not interfere and lighten the weight of the window).
Once the holes are drilled, you need to screw in the screws so that the window can be moved a little. This is necessary in order to adjust it vertically and horizontally.
Horizontal adjustment is made by placing blocks under the bottom of the frame, vertical is adjusted by moving the same bottom of the frame closer inward or outward.
Important! A wooden window should not be installed close to the walls, otherwise over time it may deform from wall loads. There should be a gap of 1.5-2 cm on each side, and 5 cm on the bottom, so that you can adjust the horizontal and leave space under the window sill.
If the opening is thick, then it is better to install the wooden window closer to the outside, so that most of the opening is inside and, therefore, warmer.
Installation technology using mounting blocks

First you need to attach the waterproofing pads to the sides of the opening so that they are parallel to the frame on each side.
Before installing the window itself, it is better to remove the sashes from it. After inserting the frame, the vertical and horizontal are checked. And finally, the window is fixed with wedges.
Mounting plate technology
Before installation, mounting plates are attached to the window from the sides and top at a distance of 25 cm from the edge of the frame (the plate should face the inside of the room, since it will be attached to the inside of the opening).
If the window dimensions exceed 1.5 meters, then it is necessary to attach 1-2 more plates to the window from the sides and top.

The plate is attached to the frame and to the opening with self-tapping screws, only to the frame on one side of the plate, and to the opening on the other side.
After inserting the window into the opening, you need to fix it with wedges, level it and then secure it to the end (screw in the screws and remove the wedges).
After final fixation of the window, all cracks must be foamed with foam.
Low tide installation

First, the ebb is cut to the required length with a margin of 3 cm on each side (if you need 100 cm, it will be 106 cm).
Later, these 3 cm will bend under the tide.
Installing wooden windows yourself is not difficult, but delicate.
On the outside, the ebb is screwed to the bottom of the window frame with self-tapping screws; on the inside, it is fixed with mounting foam, but not tightly, but pointwise (so that the foam does not raise the ebb).
Installation of a wooden window sill
First you need to cut the window sill to size window opening. Keep in mind that the window sill will be placed slightly under the frame, and should protrude about 5 cm from the outside.
Using blocks, we level the window sill and at the same time make sure that it fits snugly against the frame.

After leveling, you need to remove the window sill to foam the area under the frame and around the blocks.
And then quickly but carefully insert the window sill and place the blocks closer to the ledge. We check the horizontal position and place jars of water on the windowsill, and then foam the entire space under the window sill.
Installation of wooden slopes
If you bought windows with slopes, then the slopes must be installed in special grooves in the frame.
Start installing slopes only the next day after installing the window.

After cutting three internal slopes of the required length, insert them into the grooves.
Wet the wall with water, apply mounting foam to the slope or walls, and lean the slopes against the wall. Fix the position of the slopes mounting tape, gluing it onto the slope and then onto the wall (so that the foam does not push out the slope, but evenly fills the entire void under it).
Modern wooden windows- these are not the windows that until recently were the only solutions for the design of window openings in urban housing. These windows are equipped with high quality glass double glazing, which combines all the advantages of both natural material, wood and modern technology. However, their high-performance windows, called Euro windows, can only display if they are installed correctly. Therefore, our company, manufacturer high quality windows with double glazing, offers you a service such as installation of wooden windows.
It should be noted that the installation of such window designs V different buildings has its own characteristics.
For example, installation technology in an apartment will differ significantly from installation technology in a wooden house. However, in any building where Euro windows are installed, a number of important rules must be taken into account.
And the first one is that the size next window should be determined by all concerns. The problem is that in many cases the measurements are taken to create the next window when the window window is still the old windows.
And this does not make it possible to assess the appearance and condition of the wall itself. Therefore, when installing a wooden window, we cannot rule out gross mistakes that may lead to poor performance in the future.
Measurements should not be carried out exclusively by the operator, but by a person who has direct experience in such a case as installing Euro-windows.
Few buyers wooden glass with double glazing they know it Measurements should be taken not only from the inside, but also from the outside. This will allow you to objectively assess the depth of the opening.
Installing a wooden window with your own hands
In this case, we must remember that sometimes an existing discovery does not have correct form. In this case, care must be taken not to create cracks between the edge of the window to be installed and the edge of the hole. Usually the window size is a little larger size diaphragm. You can use two working scenarios to successfully complete the installation: the window is made slightly larger than the aperture size, or expanded using additional profiles.


When installing a wooden window, we offer two options for external (from the street) windows:
If the first option is used, sometimes you should carefully not only hide the box, but also part of the glass itself.

The box is not visible because the wall is in the wall
The box remains visible from the outside
When installing a wooden window, there are many subtle things that are well known to our craftsmen.
For example, this installation of the bottom edge of the box is at a level that is not lower than the outside edge of the opening. This is necessary to install a reflux system to drain rainwater. Ebbs should be installed under a window to prevent water from leaking in at the connection point. Likewise, under the window, not with the butt, it is also necessary to install a window shelf. Silicone should be used to seal the joints.
Whenever our craftsmen install window structures, all calculations are carefully checked.
In particular, the external and internal dimensions of the hole should be compared. Thanks to this, you can estimate the thickness of the plaster layer that will be used on the internal slopes. It is because of this approach The window will have dimensions that perfectly match the dimensions of the opening.

When installing wooden windows, you can use two types of frame fastening.
You can install it directly through the box or fix it with a special metal anchor. There is a plastic lock on the outside of the box for this purpose.
Both methods have their advantages, as well as some disadvantages. For example, if Eurowind is installed using the first method, the double glazing of windows and doors must be removed during installation.
However, with this method, installation can be performed in all holes, and the loads during operation will be transferred to the profile, but not to the plastic.
Using another method will make it easier to level the window, and the installation will not leave marks at the end of the profiles.
In the future, the installation of wooden Euro-waves is carried out as follows. At first Empty frame set on level and level then using spacers Holes are drilled in the frame and walls for fixing elements.
The frame is captured using screws or fasteners dowel The double glazed doors and windows are then suspended and the seam is sealed with polyurethane foam.
Next time Holes and thresholds installed, plastering joints. This completes basic installation. However, the installation of Euro-windows can be considered complete only after this individual fittings. This approach to installation ensures long-lasting, smooth operation of wood windows.
Some time ago, the appearance of plastic windows on the construction market created a real sensation. Of course, they outshone the wooden ones in almost all respects. People no longer had to paint their window frames every year to bring them into proper shape, and insulate them with the onset winter season. Double and triple glazed windows became a reliable barrier to street noise and drafts, and maintenance plastic frames wasn't much of a problem.
Wooden windows are making a comeback
But still, everything is not so rosy. Some manufacturers, in order to reduce their own costs and the cost of their products, use low-quality plastic that emits, although not a large number of toxic substances, but still has an effect Negative influence on people, animals and even plants.

That is why the installation of wooden windows is gradually regaining its lost popularity. People, surrounded by many artificially created things, which are not always safe for health, give increasing preference natural materials. Modern technologies make it possible to produce wooden windows that are practically no different in other characteristics from plastic ones. Double-glazed windows are now installed in wooden frames in the same way, reliably protecting the room from cold and noise, modern compositions They perfectly protect the wood from rotting or getting wet, leading to swelling and deformation of the frame, and the painting materials are durable and resistant to climate change.

Is it worth installing wooden windows yourself?
It should not be forgotten that in many respects excellent quality windows (and this applies not only to wooden ones, but also to any others) depends on how accurately the technology for installing wooden windows is followed. Even a small deviation from the rules can cause rapid failure or negate the expected effectiveness.

In principle, installing wooden windows with your own hands is not particularly difficult, therefore, if you need to install ready-made frames in the opening, then if you have minimal construction skills, you can handle this work yourself. But it should be borne in mind that in this case no one except yourself guarantees good quality work, and if suddenly something goes wrong, then you will have to correct the defects only at your own expense.
Where better to start...
Of course, it is necessary to begin installing wooden windows from the manufacturer by preparing the window opening. It should be an even rectangle, without distortions, large potholes, cracks and other defects. If the old window is still installed in the room, dismantle it and thoroughly clean all surfaces of the opening from construction debris, dirt and dust.

How to get rid of distortions in a window opening?
The next stage should be taken very seriously - after all, these are measurements of the window opening. All measurements are taken both inside and outside, and in three places: along the edges and in the middle of opposite sides. If the opening is significantly skewed and it is not possible to straighten it, then it is necessary to increase the size of the window so that it exceeds the maximum level of the external opening by at least 10-20 mm in height and 25-40 mm in width. This can be done by installing additional profiles on the window. This measure will avoid the appearance of gaps between the frame and the opening in places of strong distortion. There is another way to get rid of this common defect - by increasing the dimensions of the window frame, but it is better to entrust it to professionals who can do this correctly and accurately.
Ideally, the size of the new window should be smaller internal dimensions window opening by 25-30 mm. Such a reserve is necessary to accommodate insulating materials. In addition, you should also take into account the presence of a window sill, so it is better to leave 50-60 mm at the bottom of the opening.
Putting the window in place correctly
Insert finished design into the opening in three ways, and the cost of installing wooden windows will be approximately the same in any case:
- Using mounting blocks.
- On mounting plates.
- "End-to-end" way.
The frame should be installed on bars whose height is equal to the height of the window sill.
It is better to install wooden windows closer to the outside. This will keep most of the opening warm.
We fix the window into a perfectly straight opening
The first method is not suitable for every window. The fact is that for fastening with blocks you need an absolutely even opening, and this is not always possible to achieve. If the opening meets the requirements, then it is first covered with a waterproofing layer, and mounting blocks are attached to this layer parallel to the window frame. After inserting the box, the vertical and horizontal are leveled using wedges.

We fix the window with mounting plates
In the second case, special mounting plates are attached to the sides and top of the frame, and they should be located at a distance of 250 mm from the edge. First, the plate is installed so that it “looks” into the room, and then, bending it, it is attached to the inside of the window opening using self-tapping screws, but without tightening them.
If the window dimensions exceed one and a half meters, then you will need to install one or two additional plates.
After installation using this method, the window, as in the previous case, is adjusted with wedges, leveled and finally fixed with self-tapping screws.
The most reliable way to attach a window frame
In this case, you will have to face the need to remove glass or double glazing. This is done very simply: first, the glazing beads are carefully separated, and then the glass is removed. Holes are marked and drilled on the side and upper internal surfaces of the frame. Now the frame can be installed in place, but holes in the walls can only be drilled after it is completely level.
We screw in the screws, but in such a way that they can be easily moved from place, since you first need to adjust the position of the frame both horizontally and vertically. This is done in the same way as in the two previous cases, that is, with the help of wedges.

A good window should have no cracks
To prevent cold air and moisture from entering the room, it is necessary to eliminate all gaps between the window frame and the opening. The most common way to get rid of cracks is foaming with polyurethane foam. With a lack of experience, it is almost impossible to do this efficiently. Too much foam can warp the frame and cause the entire window to warp. Of course, you can use wooden spacers to prevent deformation, but it is better not to risk it and purchase any other insulating material.

The window sill and sills can also be installed independently
When installing the window sill, it must be placed slightly under the frame, but it must protrude 45-50 mm relative to the wall. After this, it needs to be leveled and adjusted to the frame as closely as possible. Now we remove the window sill, and foam the entire space under the frame with polyurethane foam. After installing the window sill in place, the space under it is filled with foam.
In order not to move the window sill from its place when foaming, it is recommended to place a small load on it, for example, several containers of water.
Ebb tides are even easier to install. First, they are cut to size with a margin of 60 mm (30 mm on each side). Next, the ebb is first screwed with self-tapping screws to the bottom of the frame, and then point-fixed on the inside with mounting foam.

Basic installation rules
So, let us repeat the basic rules for installing wooden windows, the observance of which will allow you to independently install a wooden window efficiently and reliably:
- High-quality surface preparation.
- The angles must be equal to 90°, and the difference in the length of the diagonals should not exceed 10 mm.
- Gaps are required: below - 50-60 mm, on the sides - 15-20 mm.
- It is better to install the frame in the second quarter of the window, counting from the outside.
And finally, to make the whole process clear, we bring to your attention short video- installation of wooden windows, in which all the main stages are competently considered.
IN
Our age of comprehensive PVC and silicone, the occasional tree that comes across pleases the soul with its subtle, discreet pattern and the warmth inherent in natural materials, which cannot be bought from a plastic window company. That's why, DIY wooden window installation Not only does it actually save money, but it also leaves you with the feeling of creating something healthy and reliable. Installing wooden windows with your own hands is not nearly as complicated an art as it might seem to a person who has little knowledge of carpentry and joinery, and therefore this article may open up some new facets of your abilities and skills and tell you how to install a wooden window.
Content
1.
2.
3.
4.
5.
6.
Window selection
Also, when thinking about which window to choose, it is worth considering that modern wooden blocks are equipped with the same double-glazed windows as, so from the point of view of thermal protection they are in no way inferior to the latter. As well as sash fastening systems that allow you to open the window in several positions. Add to this the best thermal protection itself wooden frame, its higher strength, and you will see that the only thing that speaks in favor of plastic is its lower price. Well, people have long said: “a cheap fish, but a bitter ear!”
Currently, it is more difficult to buy a good wooden window than a window made of plastic profile, and its installation is much more expensive. Moreover, for the most part they take money not for the complexity of the work, but for the notorious “pieces”. In fact, installing a wooden window is no more difficult than a regular one.
Preparing to install a wooden window with your own hands
But let's move on to installing a wooden window with our own hands. Even in standard houses“Brezhnev”, “Khrushchev” and even “Stalin” construction era, window blocks rarely exactly matched window openings. Window blocks manufactured in accordance with GOST had exact dimensions, determined by the project specifications, but those carried out by a careless mason could be more than required, and the error had to be compensated for by a greater thickness of the slopes. Sometimes the opposite happened and the block had to be trimmed and almost hammered into its intended place. That is why the installation of wooden windows with your own hands begins with careful measurements, and we measure not the old window block, but the window hole.
 When taking measurements, first of all you should pay attention to general form opening. It should have the shape of an exact rectangle, with vertical sides and horizontal top and bottom sides. What exactly a window opening is and what components it consists of can be seen in the figure below.
To determine the dimensions of the window filling, it is advisable for us to determine the dimensions indicated in the figure as “an - bn”, that is, the external dimensions of the opening and, “av - bv” its internal dimensions.
If the opening has quarters, i.e. protrusions on the outside, the outer edge of the window block should be covered with them by 1-1.5 cm along the entire edge. Based on this, we determine the required block sizes.
It happens that there are no quarters on the opening. Typically, such a device can be seen in homes old building, private houses where the walls are made of “savage”. Often, quarters are not made when constructing walls made of cinder blocks, large masonry stones, etc. The junction of the window block to the wall is closed with this option only by slopes, internal and external, in contrast to the solution with quarters, where external slopes may not be made . With this structural solution, the dimensions of the window filling are determined based on the required gap between the wall and the block. This gap should not exceed 1-1.5 cm, but should not be less than 1 cm.
Making a wooden window block with your own hands
You can buy a wooden window block, or you can make it yourself. Of course, making high-quality, complex wooden windows with your own hands is not easy; you need good carpentry tools and appropriate skills. But, make simple, unpretentious windows for country house or verandas, quite capable home craftsman, having at hand a hacksaw with a fine tooth, a carpenter's square, a measuring tape or meter, a chisel, a drill with a set of drills, and, of course, a hammer.
Since it is very difficult to choose grooves and recesses for a tight fit between the frame and window sashes, and even more so opening sashes and vents, at home, proceed as follows: the desired profile is assembled from bars, fastening them with screws and glue. You can see how this looks in the figure below, which shows profiles made in a professional workshop (“a”) and independently (“b”). At the corners, the frame is fastened “tooth”, connecting with dowels and reinforced with metal plates. Of course, you will have to buy accessories for a homemade frame, canopies, handles, latches, etc., as well as self-tapping screws.
 Now, finally, let's move on to the installation. As already mentioned, installing wooden windows yourself is not particularly difficult. If it is also decided to replace the window sill board (and this usually happens), then first, strictly horizontally, we install new window sill. Then we put on it window frame, with pre-removed bindings and glazing. On the wall side, we protect the frame from condensation moisture with a strip of waterproofing (aquaizol, roofing material) and secure it with a stapler, or, in extreme cases, with buttons or small nails.
We secure the frame with wooden wedges, ensuring that it stands strictly vertically. In this case, we are guided not by the opening, but by the plumb line ( construction level). If the opening is uneven or skewed, by moving the frame, we try to at least approximately maintain the dimensions indicated in the previous paragraphs. After the frame is aligned, we fix the wedges with light blows of a hammer, ensuring that they do not wobble.
Additionally we strengthen the frame metal plates— anchors secured with self-tapping screws to the frame and “quick installation” nails to the wall (the places where the anchors are attached to the wall are subsequently covered with slopes). As such anchors, you can successfully use a “direct hanger” plasterboard fastening, which is a perforated strip of galvanized steel.
 We install the frames and glazing, fill the gap between the block and the opening with polyurethane foam.
There is no need to get carried away with the last operation; excess foam can even deform the window. It is better, after the foam has set, to go through it again and fill in the places where there is not enough of it. Of course, it is advisable to use professional foam. So if you plan big renovation and changing several windows (or even doors), it would be a good idea to buy a special gun for working with professional foam.