Outdoor toilet from the foam block. Bathroom and toilet from foam blocks: how to do it yourself. Which toilet to build: types and features
Read also
Building a country toilet with your own hands is a vital necessity caused by the natural needs of a person. Most often this is caused by the lack of a central sewerage system in the village, but even if it is available, a separate closet will not hurt. Sometimes, after all, they can turn off the water, and in this case, an outdoor toilet will come in handy. The garden design is not the height of engineering, so anyone can master its construction. To do this, you need quite a bit - desire, skillful hands and simple tools.
Building a toilet in the country with your own hands, drawings and a project for a country toilet
Choice of design and installation location
There are four main types of country toilet: backlash-closet, powder-closet, dry closet and a regular toilet with a cesspool. The best option for residents of the northern regions is a backlash closet. This design is a mixture of a conventional domestic and classic toilet with a cesspool. In the southern regions, where sewage rots faster, such a system will not work. It is possible to replace it with a dry closet or a traditional outdoor booth.


The construction of a wooden toilet is most often carried out from boards, but can also be made from bricks, foam blocks and other commonly used materials. Considering that the toilet cubicle is most often used in the summer and does not need to be insulated, it is wiser to build it from boards, sheets of metal or slate and other inexpensive but reliable materials.
Before you build a toilet in the country, it is important to determine its location. According to sanitary standards, the minimum allowable distance from a well with drinking water is 25 meters and 15 meters if it is a residential building. If the site is uneven or located with a slope, then it is advisable to put the toilet in the country with your own hands in a lowland. At the same time, the cesspool must be well insulated so that the waste does not mix with groundwater and does not poison nearby water bodies. If they lie only 3 meters from the surface of the earth, then the only possible structures are a peat powder closet and a modern dry closet.
Construction of a country toilet
Consider how to make a toilet in the country from economical materials. For construction, you will need a beam 100x100 mm 3000 mm long, nails and screws, boards, a slate sheet for the roof, foam for insulation (if necessary), as well as working tools, such as:
- a hammer;
- drill;
- screwdriver;
- hacksaw;
- roulette;
- building level.
First of all, you need a drawing of a country toilet, a standard sample can be found on the Internet. According to this drawing and all sanitary standards, a cesspool is dug and isolated. Its surface area should be slightly larger than the area of the booth. This is necessary for the arrangement of the hatch.


The process of building a standard toilet in the country, the photo of which you could see above, is standard: first, a frame is erected from beams, which are recessed into the ground by 1000 mm and concreted, after which it is sheathed with boards. A sloping roof is laid on top, and inside there is a podium with a functional hole and fastening for a toilet seat.
Do-it-yourself wooden peat toilet in the country house, device and construction stages
The difference between a peat closet and a classic cabin is the absence of a cesspool. A peat toilet for a summer residence is instead equipped with a container into which sewage is collected and periodically removed. For a standard family of three, a 700 liter tank is recommended. It can be sunk into the ground, taking it out as it fills up.
The effluent solvent in the classic design of the compost toilet for summer cottages is peat. One kilogram of this substance processes 10 liters of sewage, turning them into fertilizer. By the way, in cesspools, the same solutions as in septic tanks can be used as a disinfectant.
Do-it-yourself wooden peat toilet in the country house is built in the same way as a regular closet house. First, the frame is erected, and then the boards are nailed to it.
If you are using new dry closets that look like plastic toilets, then you can not build a cubicle for them. Such a toilet is usually located in an extension to the house. Here the solvent is a special reagent. In this case, sewage can only be poured into the sewer.
About the types of country toilets and their construction
How to build a powder closet, what are its features?
The construction of a toilet, a type of which is called powder-closet, can be carried out anywhere in the summer cottage. In this design, there is no traditional cesspool - instead, a liquid-impervious container is installed, which is emptied as it is filled, so contamination of the soil and groundwater does not threaten, which means that it is not necessary to keep a distance of 25 meters from the source of drinking water when building a toilet.
The dimensions of the powder closet can be arbitrary. On the back side of the frame, holes are made for ventilation and for cleaning work. A box with filling is installed in the toilet cubicle: ash, sawdust, peat, with which sewage is “powdered” after each visit to the powder closet. This measure prevents the reproduction of flies. As the waste container fills up, its contents are taken out to the compost heap. Do not know how to build a toilet in the country? The scheme of the device of a simple powder closet is presented below.
Powder closet drawing:
1. Support pillars; 2. Asbestos-cement pipes; 3. Box with backfill; 4. Hatch for cleaning; 5.Toilet; 6. Washstand. 
Which is cheaper: build a toilet house or buy a ready-made one?
Despite the presence on the construction market of offers for the sale of ready-made toilet houses or a dry closet, the price of which varies from $ 200 to 1000, it is still more profitable to build a toilet cubicle from boards or a brick toilet with your own hands.
In fact, building a toilet in a summer cottage does not require special building knowledge, skills and abilities. Having in your arsenal building material: timber, plywood sheets, sheet foam, slate, hacksaw, planer, screwdriver, hammer, nails, self-tapping screws, the ability to use all this and certain building skills, you can effortlessly build an excellent country toilet with your own hands.
A guide to the phased construction of a toilet house with a toilet is not difficult to find. Its essence lies in the construction of the frame, its upholstery and the installation of the roof. Such a design, although it requires certain physical costs, will cost 2-3 times cheaper than the finished one. 
Outdoor toilet type backlash-closet
Backlash-closet designs are very popular as a toilet in a summer cottage. They build toilets in a country house of this type only if it is possible to clean the cesspool with a sewage machine. This design is essentially an ordinary wooden toilet with a cesspool at least 1 m deep.
The pit pit for an outdoor toilet is built entirely of brick or concrete to prevent contamination of the ground and groundwater with waste. The bottom of the pit is constructed with a slope towards the hatch, which simplifies cleaning. The pit is smeared over the entire height with a layer of clay of 20-25 cm.
In backlash closets, the exhaust ventilation system of the pit is interesting. For its device, an exhaust ceramic or asbestos-cement pipe with a diameter of 15 cm is connected to the backlash channel. When building a backlash closet, the main condition is the complete tightness of all connections.
Backlash closet device (pictured)
1. Ventilation pipe; 2. Backlash channel; 3. Wooden roof; 4. Cast iron cover; 5. Hood; 6. Clay layer; 7. Brick. 
Need a simple design project?
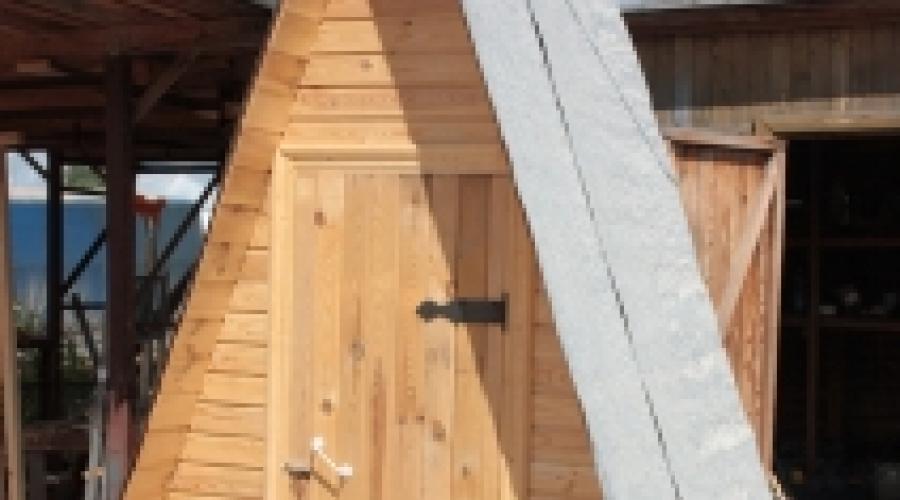
An interesting project for a country toilet can be a wooden house such as a hut or a toilet-hut. Its side walls are the roof. Compliance with the style of the transom for ventilation, which is located under the roof, is triangular in shape. The hammered platform-floor is installed on the base. Next, the front and rear walls are constructed, which are sheathed with clapboard and installed on the floor using technological boards. The roof is mounted from boards with an overlap, and is closed from above with a ridge. For the construction of the roof, you can use corrugated board, slate or galvanized corrugated sheets.

Foam block toilet construction
The advantages of any foam block toilet design, including the toilet, include the absence of the need for a deep foundation and the cheapness of the material. indeed, a foam block construction will be inexpensive, and a cesspool made of bricks can serve as the foundation. High-quality masonry will ensure the absence of drafts. Foam blocks are much larger than bricks in size, so less mortar will be spent during masonry. But this design also has its drawbacks. In addition to the fact that such a toilet, like any other unheated one, will be cold, but in such a design there will be increased humidity in spring, autumn, spring and on rainy days. To avoid this, it is imperative to plaster it inside and out - this will help prevent moisture absorption by the blocks. 
Features of the outdoor toilet device
The arrangement of a toilet in the country is a necessary and important matter, but its construction cannot be carried out in any place you like. There are several sanitary and hygienic requirements for the location of the toilet, which must be taken into account. For example, the minimum distance from the well is strictly regulated. In this case, the interests of the owners of nearby sites must be taken into account. It is required to choose a place for the future building, which is at least 20-25 m away from the water intake facilities.
The device of the toilet in the country, as a rule, is not carried out in the center of the site. For this purpose, choose a remote location. But even under the fence of a neighbor, it will not work to install the structure - the distance to the boundaries of the site must be at least a meter. If there is a height difference on the site, the toilet is built in a lowland. It is important to take into account the wind rose of a particular area, which will avoid the spread of unpleasant odors throughout the territory. It is important to consider the possibility of accessing the sewer truck to your structure, and specifically to the cesspool to clean it from sewage.

How to make a peat toilet with your own hands?
The principle of the peat toilet is based on the separation of solid and liquid waste. The cesspool, or rather a container for sewage, is divided into two parts: for feces and urine. Once in a specially designated place, urine is discharged through a special hose into the drainage, where it turns into organic fertilizer. Faeces and toilet paper are dried by a compressor and accumulated in a container built into the body, which can be emptied every three to four months. The waste disposal process is carried out without water, and the air ventilation system prevents the formation of unpleasant odors inside the toilet.
A prerequisite for installing a peat toilet is the presence of electricity, from which the compressor and fan will operate. In order to properly equip it, special skills and abilities are required. Therefore, it is better to turn to specialists.
1. Housing; 2. Toilet seat; 3.Cover of the peat tank; 4. Dispenser handle; 5. Peat tank; 6. Exhaust pipe; 7. Dispenser. 
We build ourselves: a drawing of a country toilet
The construction of any structure requires the preliminary creation of a project. So for the installation of a closet in a summer cottage, you need a drawing of a country toilet of the type that you have chosen. The final result, that is, the design that you will eventually receive, depends on the correctness of the calculations. If you do not have the skills to draw up various building diagrams and drawings, then it is best to look for ready-made projects on the net.
If your project is “special” and you can’t find its drawing, then try to put on paper the approximate shape of the toilet frame, and next to it is the alleged finished view of the structure. Based on the proportions, put all the details that you would like to see in your toilet on paper, but remember that an incorrectly executed drawing can lead to skewed construction or wasted materials. Therefore, it is better to use ready-made drawings or order an individual one from specialists. 
You can’t argue about the need to build a toilet in a summer cottage. Installing a summer shower in the country is also an equally important and necessary part of comfort. But buildings built separately take up a lot of space, and if the summer cottage is small, then they try to build them in small sizes. This option is inconvenient and uncomfortable. To solve this problem, you can build a toilet and a shower combined in one building with your own hands.
Features of design and operation
The main feature of the design of the toilet with a shower is a single building and a common dividing wall. Each room is equipped with a separate door.
The design of the toilet, separated from the shower room, is equipped with a tank for storing and supplying water. Plastic pipes supplying water are connected to this reservoir. In the shower room, the tube is connected to a watering can. Adjustment of water supply is carried out using a tap. It enters the toilet room through pipes that are connected to the washbasin and toilet bowl. In the latter case, it is supplied when installing the appropriate plumbing.
Such a construction saves the territory of the cottage
The cesspool should be located no closer than 15 m from a well or water well. The most acceptable distance is 25 m. This is necessary to avoid the possibility of foreign impurities entering the water used.
When choosing a site for the construction of this structure, it is necessary to take into account the possibility of access for sewers to pump out sewage. If the cesspool is deep and wide, it will take longer to fill. We must not forget to equip it with a hatch to drain the contents.
If the pit is located closer than 15 m from a well or water supply station, its walls and bottom must be carefully sealed.
Advantages and disadvantages over separate structures
The following criteria should be included in the parity property:
- It is more expedient to design the construction of a toilet and a summer shower in one building. Each meter of land in a summer cottage is fertile soil on which you can grow vegetables, plant a tree or break a flower bed. The construction of separate structures will take up much more space than a single frame.
- During the construction of individual structures, a larger amount of material is needed, since each of them requires an individual foundation, a roof and the construction of additional walls (in the combined version, only a partition wall is needed). This will also affect financial costs.
- The construction of a combined toilet and shower will reduce the construction time, since in this case, work is being done for both structures at the same time.
- If you build everything separately, then for both structures you need to equip your own drain pit. In addition, the walls of each of them must be reinforced with bricks, roofing felt, slate or concrete, which will additionally entail financial waste.
The disadvantages include the following points:
- Unpleasant smell from the cesspool, the risk of contamination of soil and groundwater with sewage, as well as the high cost of pumping out its contents.
- If you do not connect a pump to the summer shower tank, then in order to swim, you will have to carry water in buckets and pour it with your hands into a container on the roof.
- In the absence of sunlight, water will not heat up well in all seasons. And in order for it to become warm on hot days, it must be prepared in advance.
Preparation of a project for a shower room combined with a bathroom
The design of a combined toilet with a shower should, above all, be functional and comfortable. It is designed in any shape, size and color. Comfortable to use will be a house with a size of 2750x200x2520 mm. In such rooms it is convenient to install rectangular benches and shelves. It is not difficult to build a frame of this form. The diagram and drawing below show the optimal parameters for the construction of this structure.
Optimal parameters presented
Here is a separate toilet with a shower in one building. The structure is located on a columnar foundation. Its dimensions make it convenient to use the structure for its intended purpose. The shower and toilet rooms are large enough to accommodate additional furniture and plumbing. In the toilet, you can place a washbasin and shelves, and in the shower room - benches and a bathing cabin. With a width of 130 cm and a length of 200 cm, each room will not be crowded. The height of 2.5 m makes it possible to use this building even for a very tall person.
The length and width of the structure is selected individually
If the door opens as shown in the drawing, then it is better to place the washbasin on the right side. In this case, when entering and leaving the toilet room, the sink will not interfere. The bench in the shower room can be installed in the same way.
Material selection
For the construction of a toilet with a shower, various materials are used. In our case, it will be a frame structure on a columnar foundation with a gable roof. For frame construction, a deep foundation is not needed, since it has a relatively small weight. Thanks to the pillars, the structure will rise above the ground. This will protect the lower trim of the structure from dampness and fungus. Water will not linger under the base. A gable roof will allow you to equip a cold attic for household needs. Water from such a roof flows faster than from a shed.
When purchasing bars and boards, you need to take into account their humidity, the degree of which should not exceed 22%. To determine this, use a needle moisture meter.
To build a country toilet with a shower, you need to prepare the following materials:
- For the lower and upper strapping: four beams 2750 mm long and the same number - 2000 mm each, all with a section of 100x100 mm;
- For vertical supports, bars with a section of 50x100 mm are needed, in the amount of 24 pieces, each of which is 200 cm long;
- Wooden edged boards with a section of 10x100 mm, for lathing;
- Bars with a section of 50x100 mm, 200 cm long, in the amount of 12 pcs. - for the roof frame;
- For flooring (in the toilet), boards with a section of 40x150 mm are required in the amount of (minimum) 20 pieces. OSB sheets are used as a finishing floor;
- If the floors in the shower room will be covered with tiles, then an amount equal to 2 m² is required;
- Plastic pipes and sewer drain;
- Concrete mix (M-200) in the amount of one and a half cube;
- Plywood sheets for the manufacture of formwork;
- Sand and gravel;
- Metal tile.
All wooden elements must be free of knots, cracks, mold and insect damage.
- Sheets of plywood, chipboard, fiberboard or OSB boards are used as a draft ceiling.
- For the convenience of fastening the bars, metal corners and plates are used.
Required Tools
When building a country toilet with a shower, you will need the following tools:
- Shovel bayonet and shovel;
- Electric jigsaw or hacksaw;
- Concrete mixer;
- Electric welding machine;
- Large container with water;
- Buckets or a wheelbarrow for carrying concrete mix, gravel and sand;
- Pliers and cutters.
- Screwdriver or Phillips screwdriver.
- Axe.
- A hammer.
- Building level.
- Square.
- Yardstick.
- Cord.
- Self-tapping screws and nails.
- Plane.
- Pencil.
Do-it-yourself step-by-step instructions for building
When all the necessary materials have been purchased, and the tools have been prepared for work, you can start building a country toilet with a shower:
- First you need to choose the right place for this structure. The site should not be in a lowland or pit.
- For this building, a columnar foundation will be used. To install it, you need to make markings on the ground with a tape measure and a cord.
- After that, it is necessary to dig a pit for a cesspool. Its depth should be from 1.5 to 2 meters or more. The width and length of the pit can be different. Usually these values \u200b\u200bare equal to 100x150 cm.
The cesspool can be either round or square.
- Once the hole is dug, it needs to be reinforced. To do this, we lay out the walls of the pit with bricks. We use cement mortar as an adhesive.
- When the walls are ready, cover the bottom of the pit with a mixture of sand and gravel, and then concrete. The result is a concrete container that does not let the contents through its walls.
Brickwork will prevent soil and groundwater pollution
- Next, you need to install a columnar foundation. To do this, we dig holes 80 cm deep and 20 cm in diameter.
- Their bottom should first be covered with a 10-centimeter layer of sand, which must be compacted.
- On top of the sand, pour a layer of gravel 10 cm thick, which must also be carefully compressed.
The correct foundation device will create a rigid foundation for the structure.
- After that, from plywood sheets or boards, you need to make formwork for pillars, which should rise 30 cm above the ground.
- Insert 3 to 5 rebars in the middle of the hole to strengthen the concrete. Connect the elements of the metal frame with a wire.
- Mix concrete and pour it into the formwork. In the case of construction work in hot weather, the formwork with uncured concrete must be covered with something. If this is not done, the concrete may crack.
- Leave the future foundation for a couple of days to solidify.
- After the specified time, remove the formwork.
The formwork gave the column a square shape, and the metal reinforcement - strength
- Next, you need to install a drain pipe under the shower. Place the drain in the specified place, and bring the other end of the pipe out.
Thanks to the removal of wastewater, moisture will not accumulate under the shower
- For the lower trim, use bars with a section of 100x100 mm. Connect wooden elements in a half-tree way. Lay two layers of roofing material between the wood and the concrete pillar. Connect the frame with a concrete base to metal studs with nuts.
- Use a metal channel as a frame above the cesspool.
- Now you can move on to the construction of frame walls. To do this, you need to install bars with a section of 50x100 mm in the corners. Check their vertical position using the building level. As connections, vertical supports and bottom strapping, use metal corners and plates.
The ends of the beams are connected in a way in half a tree
- In the frame, install two pillars 1960 mm high in place of the doors. Make the distance between them 770 mm.
- After all the vertical supports are installed, it is necessary to make the upper harness from the bars with a section of 100x100 mm. Fix it to metal plates and corners with self-tapping screws.
Wooden braces temporarily strengthen the structure
- On the upper harness, in the middle, install three vertical racks, on top of which fix the ridge board.
The height of the pillars will determine the angle of the roof
- From boards with a section of 10x40 mm, make rafters for a gable roof with a step of 65 cm. The length of the rafter legs should be 20 cm longer than the edges of the walls of the structure. Fix all elements with self-tapping screws.
- Then make a crate from the edged board in increments of 20 to 30 cm. Connect it to each other on the ridge element. The length of the boards should be selected so that they protrude by 20 cm.
The protruding parts of the crate will serve as a visor for the construction
- Nail the wind boards. Cover the roof with sheets of metal tiles, which are fixed to the crate with self-tapping screws. A vapor barrier layer is not provided for this design, since it will not be heated.
- Now move on to installing the floor in the toilet. Cut the bars of the desired length from boards with a thickness of 40 mm, which are fixed on the bottom trim with self-tapping screws. The length of the floor from the entrance to the pedestal with the seat is 100 cm.
- Cut 5 bars 40 cm long, and use metal corners and self-tapping screws to screw them to the floorboard. Parallel to them, also install 5 vertical bars on the channel, connecting them with the same boards. Attach the same bars to the side supports (of the future toilet room) and the back ones. As a result, you should get a frame that looks like a large step. This construction of wooden beams is designed for a pedestal.
This design is reinforced with metal corners, which make it more durable.
- Sheathe it with a board 20 mm thick. Then you need to insulate the walls of the toilet and shower. To do this, upholster the inner side of the frame of the structure with boards 20 mm thick. Then, between each vertical support, firmly insert foam plates 10 mm thick. Fill the gaps between them with mounting foam. It is also necessary to insulate the ceiling.
Styrofoam will reliably protect the walls from cold and heat
- Then you need to upholster the outer walls and the inside of the ceiling with boards 20 mm thick.
- Now you can start building the soul. In order for the water to go into the ground not under the building, you need to make a drain system. To do this, dig a small ditch in which to lay a regular sewer pipe with a diameter of 10 cm. One end of this pipe should lead to a right-angle outlet to connect to the sewer drain.
- Cover it with polyethylene and attach to the pipe.
- In the shower room, fill the floors with a layer of rubble. This is necessary in order to spend less concrete. Crushed stone must be positioned so that its level around the drain is less than along the perimeter.
- Top with concrete and level it. As a result, the surface along the entire perimeter will have a uniform descent to the place of drainage for water. This base should be without pits and protrusions so that it flows freely.
Slope of the floor towards the drain
- Wait until the concrete base hardens, then cover it with a layer of bitumen-rubber mastic. Before use, it must be heated to a liquid mass. Then, using a brush, apply to a dry and dust-free concrete floor. In the same way, it is necessary to process the lower trim of the structure.
- When the mastic hardens and cools, you can proceed to install the wooden floor in the shower. To do this, it is necessary to cut boards 40 mm thick into fragments 137 cm long.
- Lay the indicated boards on the strapping and fasten with self-tapping screws. In order for water to leave through the floor, it is necessary to leave a distance of 15 to 20 mm between the wood.
The gaps between the boards contribute to a better outflow of water.
- Upholster the inside of the shower room with boards 20 mm thick. Treat everything with a moisture barrier. Cover the entire shower with yacht varnish in two layers. After the first time, let it dry and only then proceed to the second application. Cover all the outer walls of the building with the same boards.
- Using a grinder, clean the wooden surfaces of the shower and toilet.
- Then you need to secure the foundation from water flows. To do this, you need to install a drainage system. Attach drain channels to the edges of the rafters, to which drain pipes are installed on each side.
Thanks to pipes and gutters, water will not accumulate near the walls of the structure
- Now you need to pay attention to ventilation in the toilet and its pit. To do this, you need to make a hole with a diameter of 10 cm in the lid of the cesspool section, into which to insert a plastic pipe. Its height must be made 70–100 cm higher than the ridge part of the roof.
- For ventilation in the toilet room, it is necessary to drill a hole in its wall with a diameter of also 10 cm. Insert a plastic pipe into it and bring it out parallel to the previous one. On top of each pipe, fix umbrellas from precipitation.
Installing a ventilation system will create conditions for the release of methane
- To use the country shower and toilet in the dark, it is necessary to conduct electricity. To do this, drill a hole in the partition between the toilet and the shower, into which to lead the wires and connect them to the junction box. Attach the lamp to the ceiling and screw the cover of the closed type. Put the switch on the wall. Do this in both rooms.
Wiring connections must be carefully insulated from moisture.
- Now we need to install the doors. They must be treated with the same compounds and varnish as the shower room.
Installation and nuances of use in the country
When the design of the country toilet and shower has been erected, you can proceed to the direct installation of a water barrel, attaching a tube with a shower head to it. It is also necessary to install a place for a seat in the toilet.
A flat roof is most suitable for installing a water barrel. Since in our case it is gable, it is necessary to build a stand for this container. It must be made from metal pipes, a channel or a corner, using electric welding. In our case, a metal corner with sides of 50 mm and a thickness of 3 mm was used. To strengthen the structure, it is necessary to weld the amplifiers perpendicularly, every 100 cm. The total length of the frame is 4 m. The result should be a solid stand in the form of a tripod. Then, near the shower wall, drill three holes 1 m deep. Lower the tripod into them and pour concrete.
In order to save material, the frame is made of three metal corners
As a barrel for water, a plastic container 20 cm high, 100 cm long and wide was used. Due to the small height, the water in such a container heats up quite quickly from the sun's rays. Under it, you need to make a wooden frame. In our case, it is made of bars with a section of 50x50 cm, 100 cm each. It is necessary to connect their ends in a half-tree way and secure with self-tapping screws.
The shape of this tank holds a lot of water, which quickly heats up in the sun.
The wooden frame must be attached to the rack with self-tapping screws.
Now you can proceed to the installation of pipes for the shower. For this, it is better to use plastic ones with a diameter of 25 mm. Carefully drill a similar hole in the barrel, into which, using locknuts and rubber seals, install the fitting. Attach a pipe to it, in which, after 50–60 cm, connect a ball valve. It is necessary to shut off the water in case of any repair or construction work. Then drill a hole in the ceiling and stick a pipe into it. Using tees and fittings, place it in the shower. Install a watering can with a tap in the tube under the ceiling.
Now you need to install a seat in the toilet. To make an even hole, you need to attach a bucket to the middle of the pedestal and circle it with a pencil. Using a jigsaw, cut a hole in the marked area.
The bucket will hide the edges of the hole
Insert a bucket into it and fix it with self-tapping screws. In the case of using the toilet in winter, it is necessary to purchase a foam seat. In any weather, it will be warm, which is important for health.
The appearance of the finished building will fit well into the territory of the suburban area
Video: stages of construction of a country toilet with a shower under one roof
With little effort, you will build the necessary and convenient building with your own hands. Rest and living in the country will become much more comfortable. To swim after working in the garden on a hot day, you do not need to heat water and waste electricity. Thanks to various materials for exterior decoration, a toilet and a shower combined in one building will not disturb the architectural ensemble of summer cottages.
After acquiring a private house, first of all, you should think about a bathroom on the street, even if there is one in the house itself. An outdoor toilet is a very profitable building in the warm season. At the same time, when working in the garden, you do not need to go into the house in dirty clothes. It is built quite quickly and the construction will cost quite inexpensively. Walls can be built from various materials: boards, slate, brick, cinder block, etc., but do not forget about the external beauty of the bathroom.
We bring to your attention the option of building an outdoor bathroom from cinder block.
Necessary materials
1. Red brick (depending on the size of the cesspool).
2. Old boards.
3. Fittings.
4. Sand, crushed stone, cement.
5. Hatch for a cesspool.
6. Concrete blocks (12 cm thick).
7. Frame for the doorway.
8. Window frame.
9. Door.
10. Window.
11. Plastic (for interior decoration).
12. Tiles (for interior decoration).
13. Toilet bowl with a cistern.
14. Decorative mesh (for vent).
15. Decorative stone.
16. Slate or other roofing material.
17. Decorative stone for exterior wall decoration.
To begin with, it is worth deciding on the place of the future bathroom. It must be removed from the recreation area, but the path to it should not be difficult.
It is necessary to dig a hole 2x2.5 with a depth of 1.5 m.

The bottom is not concreted, and the walls are laid out of red brick. Why from red? Because it is more resistant to moisture. At the same time, do not forget about the gaps between the bricks, which should be quite a lot. They are needed so that moisture goes into the ground.
Along the upper perimeter of the walls of the pit, formwork should be laid and a hole of 150 mm should be left for mounting the drain. At the back of the pit, provide a hole with a diameter of 50 cm for the hatch.
Reinforcement, old boards should be laid on the formwork and poured with pre-prepared cement mortar (cement, sand, crushed stone and water). This is the future floor of the summer bathroom. For reliability, it should be 10 cm high.
The floor freezes for several days. If the weather is hot, then to prevent cracks, it should be watered periodically.

Then the walls of concrete blocks are laid out, but first you need to install and secure the frame for the doorway. If desired, you can also consider a window.
On top of the walls, it is necessary to install logs and formwork for the future ceiling with a slope to drain water.
Fill the ceiling with cement mortar and, after complete solidification, cover with any roofing material of your choice.

A door is hung and a window is installed.

The interior work begins. The walls and floor can be tiled, and the ceiling can be sewn up with plastic.

A toilet with a cistern is installed. An outlet should be made in the wall and covered with a decorative mesh.
Then water and light are supplied. Plastic or metal-plastic pipes for water must be laid through the air in order to drain water for the winter period.

An exhaust pipe is installed from the cesspool so that unpleasant odors do not get into the bathroom.
It is necessary to install a sewer hatch.
August 6, 2016Specialization: facade finishing, interior finishing, construction of dachas, garages. The experience of an amateur gardener and horticulturist. He also has experience repairing cars and motorcycles. Hobbies: playing the guitar and much more, for which there is not enough time :)
The toilet is one of the most necessary objects in the country. Therefore, experienced people always advise starting the arrangement of a bare area from it. But, how to make a toilet on your own, without having any experience in such work?
Next, I will try to help in this matter. Of course, we will not consider how to install an installation in a house or perform any other complex operation. Below I will only describe a few of the simplest ways to build an outdoor closet, aimed at beginners. We will also touch on some aspects of arranging a restroom in a house or inside another building.
Options for building an outdoor closet
You can build a toilet in the country from almost any material that you have at hand. For example, if you are going to build a country house, and have purchased building materials with a good supply, then the toilet can be built from the same materials, for example, from foam blocks. bricks, etc. In this case, a capital building with solid walls will turn out, however, it will take a relatively long time to build.
If you want to build a toilet with minimal time and effort, it is better to make it framed from a bar or metal profile, and then sheathe it with any material that you have at hand:
- boards;
- clapboard;
- polycarbonate;
- corrugated board, etc.;
If there is already a building on the site with free space sufficient for a toilet, then you can not build a booth. Below I will tell you how to make a toilet in the garage, in the house or any other building that is on the site.
Regardless of how you build the toilet, this procedure will include several basic steps:

Let's take a closer look at each of these steps below.
Toilet design
So, first of all, we need to draw up a project for the future building. This stage involves the solution of several important tasks at once:

In fact, there is nothing complicated about this, however, each of the stages has its own nuances.
Cabin design
The simplest is the frame structure of the toilet. The frame, as a rule, consists of four racks, as well as the lower and upper trim. To increase the strength, braces and crossbars are additionally used.
Of course, if you wish, you can use a more complex frame, for example, to make a closet in the form of a tower. Also, sometimes a toilet and an outdoor shower are combined under one roof, which is also very convenient. Moreover, the layout may include a locker room so that things do not get wet while taking a shower.

On our portal you can find other ideas for the toilet. The main thing is that the level of their complexity is commensurate with your skills. If you are doing this kind of work for the first time, then it is better to perform a simple rectangular booth.
The project of a brick or block closet is simpler, since all walls are built by laying bricks or blocks. Therefore, the drawing should indicate only their location and the number of rows on each wall for the convenience of further work.
However, before drawing up a drawing of a structure, it is necessary to determine its dimensions. The latter, of course, can be taken arbitrarily at will, however, there are some generally accepted standards:
- height - 2 meters. This is usually quite enough, however, if there are tall people in the family, this parameter can be increased;
- the width according to the norms should be at least one and a half meters;
- length - 2 meters, this is also enough to position the toilet seat and provide a spacious area in front of it.

When drawing up a drawing, it is necessary to indicate not only the overall dimensions of the toilet, but also the dimensions of all parts in millimeters in order to avoid mistakes during the construction process. After that, you can calculate the amount of materials.
toilet type
After the design of the cabin is ready, you need to decide how the waste will accumulate or be processed. Depending on this, outdoor closets can be divided into several types:
- with a cesspool - in this case, there is a pit under the toilet, which is usually cleaned every few years;

- powder closet - in this case, there is a small container under the toilet seat, which is taken out and emptied from time to time;
- dry closet - in fact, this same powder closet, but in this case, waste products are sprinkled with peat, as a result of which they immediately begin to be processed. After filling the container, the waste is poured into the compost pit, where over time an excellent fertilizer for plants is formed.
I must say that the dry closet can be placed even in the house or any other room. In this case, no additional plumbing for the toilet is needed. The only thing you have to do, for example, from drywall.

On sale there are ready-made dry closets in the form of plastic toilet bowls with a tank. Instead of water in the tank is peat. The price of these products starts from 4500-5000 rubles.
The most common is a pit latrine, since after its construction, you can forget about any care for several years. The pit is necessarily made with sealed walls and a filter bottom to remove the liquid constituents of the waste. A layer of sand and gravel is used as a filter.
Groundwater should be located at a depth of at least six meters from the soil level. Otherwise, the bottom of the cesspool must be sealed.
As for the volume of the well, two cubic meters is enough for a family of three to clean it every few years. If you have a large family, and you will spend a lot of time in the country, you can increase its volume to 2.5 cubic meters.
Of course, it is much easier and faster to make a powder closet, however, it is less convenient in terms of operation, since you will often have to empty the container. But, if you have made such a decision, put a bucket of peat near the toilet seat so that after each visit to the restroom you can sprinkle the contents of the bucket with peat. Thus, you will get a dry closet.

Location selection
The final step in designing a toilet with your own hands is to determine its location. You can place a dry closet or powder closet in any place convenient for you.
If there are level differences on the site, then the toilet should be located as close as possible to the highest point in order to exclude the possibility of it being flooded with melt or storm water.
But when choosing a place for a toilet with a cesspool, certain rules must be observed. The fact is that according to sanitary standards, a certain distance must be observed from the toilet to important objects on the site:
You need to place the toilet on the site so that unpleasant odors do not interfere with your rest or the rest of your neighbors.
In addition, it should be borne in mind that sooner or later the pit will have to be cleaned out. Therefore, it is desirable place the toilet closer to the outer fence so that a sewage truck can drive up to it.
After preparing the project, you can proceed to the practical part - construction.

Building a block or brick toilet
Pit and foundation preparation
First of all, consider how to build a capital toilet from blocks and bricks. Work should begin with the implementation of a cesspool, which in our case will serve as a foundation. The instructions for doing this work look something like this:
- First of all, you need to mark the site. It is desirable to arrange the pit so that it is at least 30-40 centimeters longer than the booth. In this case, behind the toilet, you can make a hatch for pumping waste.
In the process of marking, it should be borne in mind that the minimum width between the walls should be one and a half meters. Those. the width of the pit must be indicated taking into account the thickness of the walls; - then you need to dig a hole to a depth of about one and a half meters;
- then the bottom is covered with sand and gravel, after which it is carefully rammed. If groundwater is located nearby, the bottom should be reinforced and angered with concrete;

- then the walls of the pit are completed. They can be built of brick or poured with concrete.
This operation is performed according to the same principle as the strip foundation. On our portal you can find detailed information on how this is done; - when the walls are ready, it is necessary to pour a concrete floor with a thickness of at least 5 cm. At the same time, do not forget to make a hatch over the toilet seat, and also leave an open area that will be located behind the toilet.
After each stage of pouring, i.e. pouring the bottom, floor, walls and ceiling, you need to stop work so that the concrete gains the necessary strength.
This completes the process of building a cesspool. Now you need to wait until it gains brand strength.

Building walls and roofs
The laying of the walls of the toilet has no features and is performed in the following sequence:
- along the perimeter of the concrete slab, several layers of roofing material should be laid to waterproof the walls;
- then the laying of bricks or blocks is carried out. There is nothing particularly difficult in this procedure. The only thing is that you need to carefully lay each row so that all the bricks are located in the same horizontal and vertical plane.
To do this, you need to use the level, as well as pull the ropes that will serve as beacons. In addition, try to ensure that all joints have the same thickness (about 5 mm) and are completely filled with mortar;

- lintels must be made above the door and window openings. For these purposes, you can use two metal corners located so that a brick or block can become on them;
- when the walls are "raised" to the required height, you need to complete the roof. To do this, lay boards that can be fixed to the walls with dowels. A waterproofing film is laid on top of the boards and lathing is carried out with slats.
Any roofing material is attached over the crate - slate, corrugated board, metal tiles, etc.
The back wall of the toilet should be 15-20 centimeters lower than the front to ensure the slope of the roof.
On this, the construction of the capital toilet is almost completed. Now you need to make a toilet seat from the boards, which is a box with a hatch, as well as install a door and make a cover for the pit from the boards. Below I will tell you in more detail how the door and the toilet seat are made.

Arrangement of a cesspool and foundation
If the toilet will be your first construction experience, then it is better to make it framed, as it is much easier. In this case, the cesspool can be made from car tires.
To do this, follow these steps:
- First of all, you need to mark the site and dig a hole in the back of the toilet. Its dimensions must be such that it is possible to lay the tires flat;
- then the bottom of the pit is made according to the scheme described above, after which tires are stacked on top of each other until they reach ground level;
- now you need to complete the columnar foundation. To do this, you need to dig pits according to the size of concrete blocks at each corner of the structure to a depth of about 40 cm. After that, the bottom of the pits needs to be covered with sand and gravel about 30 cm thick, carefully compacted and then laid concrete blocks.
The blocks must be located in the same horizontal plane, so use beacons and a level during their installation; - At the end of the work, several layers of roofing material must be laid on the blocks.
Now that the pit and foundation are ready, you can start arranging the frame.

Frame construction
The easiest way is to build a frame from a bar with a section of 50x50 mm, since this does not require a welding machine and any special tools. It is made as follows:
- a grillage in the form of a rectangle of timber is laid on the foundation. You can fasten the timber together with self-tapping screws and metal corners;

- further, according to the same principle, vertical racks are installed, which can be strengthened with braces;

- a cross member is mounted at the base, which will separate the toilet seat area from the floor. On this crossbar, the toilet seat racks will be located in the future;
- from above, the upper strapping is performed, which is also fastened with corners and self-tapping screws;
- now you need to fix the racks and crossbars at the locations of the door and window openings;
- at the end of the work, you need to complete the frame of the toilet seat, which also consists of racks from horizontal crossbars.
sheathing
Now that the frame is ready, it needs to be sheathed. As mentioned above, it can be made from any "improvised" materials. For example, polycarbonate sheathing looks original.
If the exterior of the site is made in a rustic or Russian style, make it from a lining or at least from boards. Sheathing is also attached to the frame using our favorite self-tapping screws. By the same principle, the toilet seat is sheathed.

The roof is made according to the scheme described above. As for the door, it can be made from boards of suitable length, which are fastened together with Z-shaped slats. Boards are simply laid on the floor of the toilet.

That, in fact, is all that I wanted to tell you about the construction of an outdoor toilet. I note that the presence of a restroom on the site does not at all mean that you need to abandon the amenities in the house. On the contrary, if the toilet was not originally planned, you can allocate space for it at the expense of the living room.
The dry closet in this case is not the only way to equip the toilet in the house. If you want to create the most comfortable conditions, you can perform an autonomous sewage system and install a septic tank.
In this case, even the installation of an installation in the toilet can be realized. However, this is a separate topic for conversation, which we will talk about next time.
Conclusion
Building a toilet is a task that every home craftsman can handle. Moreover, you can build a frame structure yourself in just a few days. I hope the above information was helpful to you.
For more information, see the video in this article. If you have any difficulties during the construction process or have other questions, ask them in the comments, and I will be happy to answer you.