Outdoor cages for rabbits by hand drawings. Cages for rabbits: drawings with dimensions and descriptions. The feeders themselves are divided into three key types
Read also
For successful keeping and breeding of rabbits, it is very important to choose the right cage for them, because the well-being of the animals and their ability to reproduce directly depend on its structure and type of material. Good, warm and comfortable housing is the key good health pet and good set weight. There are two options - buy a ready-made cage in a specialized store or make it yourself. It would seem that the first option is easier and simpler, but it is preferable to do it yourself, taking into account all the necessary dimensions, depending on the expected number of individuals and the breed of pets. Having decided to breed rabbits, it is important to decide on the place where their cage will be located.
First of all, you need to take care of protecting your pets from cold wind and sunlight in the summer. Ideally, it is better to make the roof removable, this will facilitate the process of disinfecting the cage. So, how to make cages for rabbits with your own hands: all dimensions and drawings are presented below.
Types of cages for keeping rabbits
The main types of cages, mainly used by rabbit breeders in practice, are presented in the list below:
- a cage with an enclosure for walking a rabbit;
- standard cells with and without queen cell;
- a cell built according to the method of I. N. Mikhailov;
- cell according to the method of N.I. Zolotukhin.
Each cell has a standard base - walls, floor, ceiling and frame, door. Let's take a closer look at cell types.
An example of a drawing of a two-section cage for rabbits can be seen in the photo below.

Regular cell (with or without queen cell)
A standard cage, usually on high legs, with a mesh floor and tray, with two compartments separated by a partition with the ability to move from compartment to compartment. They provide a nest for the female rabbit and a place for feeding. The entrance to the cage is closed with doors. The high legs of the structure allow maximum protection of animals from moisture and drafts; they are usually made about half a meter. The mesh floor will allow the waste products of the rabbits not to linger in the cage; with the help of a tray, everything can be easily removed and the animals will be clean. Such cells can be found very often, they require minimal costs and do not large quantity materials. Often designs with a mesh floor are used when breeding, since the paws of this breed of animal are resistant to damage.
Cage with aviary for walking rabbits
It is a regular cell (discussed above) made of wooden frame, often on legs, an enclosure for walking is attached to such a cage.
Considering the mobility of pets and their love for an active lifestyle, having a place to walk has an extremely positive effect on the health of rabbits and improves their reproductive qualities. During the summer months, it allows the animals to enjoy fresh grass and soak up the morning sun. It is necessary to take into account all the details so that pets cannot escape from the enclosure and cats or mice do not get into them.
Do-it-yourself cages for rabbits: drawings according to Zolotukhin
The main difference between such a cage and other designs is the following: it does not contain a queen cell for the rabbit. It is assumed that the best option it will be if she chooses a suitable place for herself. The feeder and sippy cup are located above front door. These cages do not have a tray or a mesh floor; instead, only the back side of the structure is covered with mesh.

A small metal mesh is used. Analyzing the behavior of rabbits, you can notice that they relieve themselves at the back of their homes. These cages are built using slate or planks. To make the frame and partitions, boards up to two centimeters thick are used. The floor and roof are made of slate; if this is not available, it is made of the same boards as the cage frame. Wooden surfaces upholstered with thin sheet metal.

Let's look at the construction of such a cell step by step:
The first floor of the structure should be located at a distance of fifty centimeters from the ground to protect rabbits from moisture and cold. The cage frame itself is made using four two-meter beams; the finished width of the frame should be two meters, and the depth should be eighty centimeters. Thus, three floors are built.
- The floor of each floor must be inclined at a slope of five centimeters towards the back of the cage to allow animal feces to drain off. Each floor is divided into two halves by wooden slats, the distance between them should be about thirty centimeters; in the future there will be a hay barn. The walls of the structure are made of wooden planks. Each floor is half covered with boards or slate, the resulting gap is closed with a fine mesh.
- The back wall must be made of moisture-resistant material, polycarbonate is good, it can withstand quite high humidity, and does not deteriorate or rot. The grid of the upper floor ends and a polycarbonate sheet is attached to it at an angle.
- It is convenient to make caged doors that are common to all floors; metal hooks are attached to the doors.
- Additionally, each floor can be equipped with side doors for fattening; bolts must be attached to each door.
Considering that rabbits love to chew everything and do it well, for protection everyone internal corner upholstered in metal.

The roof of the cage is made in such a way that it protrudes forward from the common part of the frame by at least five centimeters on all sides, in order to prevent rainwater from entering the room with the pets.
Cages for rabbits using the Mikhailov method
Rabbit cages using the Mikhailov method are the most complex and expensive, but at the same time the most convenient to use. They provide unified system waste from the vital activity of rabbits, heating of the queen cell with baby rabbits and a female rabbit, separate shelves for animals and a ventilation system. Their main feature is sectionality - they include from two to four separate sections with a single compartment for collecting rabbit waste.
The first cages of this type were designed for two adult animals, improved designs are designed for several teenage rabbits or two rabbits expecting offspring. There are two-tier and single-tier cages. The construction of a cage of this type is tied to the cardinal directions; for protection from cold winds, the back wall is made blank and placed to the north. Apart from the back, the other three are made of mesh material. The mechanism for heating the queen cell must be turned on, and ventilation of the premises is provided.
The floors of the cage using the Mikhailov method are made of slats laid diagonally. To simplify the design, such cells are conventionally divided into three parts:
- the upper one, consisting of one or two tiers;
- the lower part is a sealed part for collecting manure;
- stand-up

Thanks to the stand, the entire structure is fixed to the ground; without it, the cage can tip over. The total height of the legs is 140 cm; additional beams are installed at a distance of 40 cm from the ground for maximum strong fixation. Feeders and drinking bowls for rabbits are located inside the building, queen cells are in the center. To perform such a design with your own hands, you must have correct drawing With exact dimensions. The dimensions of the cage made using this method are relatively small, for two adult individuals total area the structure will be 1.4 sq. m. The height of the building is 210 cm, the width of the sections is 80 cm, the height is 70 cm. The angle of inclination of the lower section is 45 degrees. The sippy cup in the cage can be installed in any size, depending on the size of the section in which the pet lives. Let's consider the principle of constructing such a cage for four adult rabbits. The animal feeder is 15 cm long, 12 cm wide, and 30 cm high.

So, in order to make it yourself at home this design, you must have:
- bars;
- slats;
- boards;
- metal mesh;
- automatic drinking bowls for pets;
- queen cell heater;
- box for animal feces;
- staples;
- self-tapping screws;
- stapler;
- screwdriver;
- drill;
- nails of different sizes and a hammer;
- sheet iron;
- material for protecting internal corners;
- slateruberoid.
Let's look at the construction of such a cage step by step. For example for detailed description construction, let's take a single-tier cage with three compartments. Having understood the principle of the method, it will not be difficult at all to complete the upper floors. We assemble the cage frame in accordance with the required dimensions and drawings.
- We start building the frame from the frame, then we build the cage itself and lay the floor in it diagonally with slats. Separately, we prepare the doors for the cage and install them, not forgetting the latches.
- We install automatic drinking bowls for animals inside the living quarters, and hang pre-prepared drinking bowls outside (also made in accordance with the dimensions of the drawings).
- The queen cell for the female rabbit and the little rabbits is separated by a partition in which there is supposed to be a door for exit. Do not forget that the queen cell should be as dark as possible for the comfort of newborn rabbits.
- We make a roof, strengthen the slate with self-tapping screws.
- We make a sloped surface for manure in the shape of a rectangular funnel. A container is installed under the funnel to collect waste and waste products of rabbits.
An important point in such cages is that little rabbits are not separated from their mother. They are constantly with her in a heated queen cell and have the opportunity to receive mother’s milk for as long as possible, which significantly increases the animals’ immunity.

Mikhailov's method is based, first of all, on the fact that rabbits do not have direct contact with humans; for them this is a very serious stress. The idea of such an automatic house, where pets have round-the-clock access to a feeder and water bowl, has achieved incredible results. Rabbits living in such cages practically do not get sick, reproduce well and gain weight very quickly. There are even four-month-old individuals weighing up to six kilograms.
Video. DIY rabbit cage
In this article we will tell you how to make a rabbit cage with your own hands ( step-by-step instruction). Creating cells with your own hands can easily be done from scrap materials, such as waste boards, pieces of plywood or chipboard, etc.
The design of the cages can vary greatly, but it is best to choose one whose construction will not take much time and will be suitable and practical for feeding rabbits, inspecting them and cleaning them.
Simple rabbit cage design
Most effective way breeding rabbits are Mikhailov's mini-farms, which can provide intensive breeding of rabbits with minimum costs time for the farmer to care for the animals.
The design of Mikhailov's cages is very well thought out and provides for automatic cleaning and provision of food for animals, water heating in drinking bowls, which is really important in the cold season, as well as heating of the queen cell in order to increase the survival rate of newborns in the winter.
In order to start breeding rabbits you do not need any special costs: You can make rabbit cages, water bowls, and feeders yourself, hay and branches can be prepared in the summer, root crops and vegetables can be taken from your garden.
 Mikhailov cell design
 The largest part of the costs will go to vaccinating animals and concentrating feed.
It is best to place adult rabbits and female rabbits with baby rabbits in two-section cages. These dimensions are usually used as a guide for building cells: cell length one hundred twenty centimeters, cell height fifty centimeters, cell width seventy centimeters.
Young animals
The young should be kept in a large group cage, the size of which will correspond to the number of rabbits.
For example, for eight rabbits, a cage with the height and width as in the picture above is suitable. It is necessary to take into account the fact that in each cage you need to place rabbits of the same sex, approximately the same age and weight.
DIY rabbit cage step by step instructions:
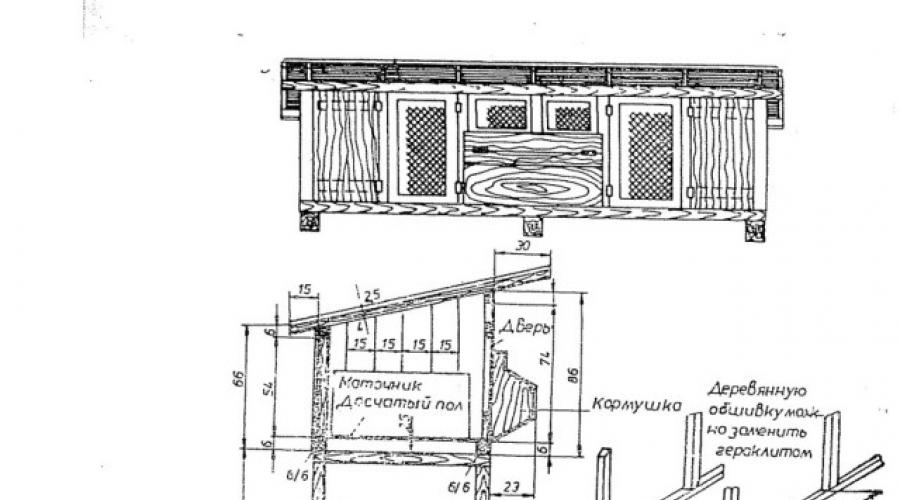
 First you need to make a frame from wooden beams, its height should be 55 centimeters, its length should be 240 centimeters, the back part should be thirty-five centimeters, and the front part should be fifty-five centimeters;
It is necessary to provide for the presence of nesting compartments inside, where a queen cell for the rabbit will subsequently be inserted or a small house will be placed;
A partition with a hole for the passage of rabbits is placed between the nesting compartment and the feeding compartment;
- The roof is made on hinges so that it can be raised if necessary;
- In the nesting compartment the door must be made solid, made of wood, and
- in the aft compartment the doors are made of metal mesh with small cells;
- the floor must be laid with slats, with a gap of one and a half centimeters;
- in the nesting compartment the wooden floor must be solid;
- you need to install a tray under the cage;
- after making a cage for breeding rabbits, you need to equip it from the inside: feeders for grain are made, shelves and mangers are installed;
If rabbits are kept outdoors, the cages should be installed on bars so that they rise above the ground by about seventy centimeters. This should protect the rabbits from rodents and other animals.
 This is the step-by-step instructions for creating a cage for rabbits with your own hands. Through simple materials and a little effort, you can create your own rabbit farm and run a fairly successful farm.
There are special rules that should be taken into account when building a rabbitry, regardless of its size.
1. The size of the cage must be just such that the rabbits can move freely and do not interfere with each other to eat, sleep and especially play. If there is not enough space in the cage, the rabbits will begin to be lazy, and this will have a very negative impact on them. Perhaps such individuals will have no offspring at all.
2. For three to four rabbits, it is necessary to allocate a separate space. At the same time, it should be quite spacious. If a person decides to start breeding rabbits, he needs to keep the little rabbits with their mothers because they feed them.
3. One of the cages should always remain free, since not all rabbits reach required size and weight. In order to fatten them up the right size they are simply housed and fattened separately, and this naturally requires a separate cage.
DIY rabbit cage video collection
https://youtu.be/addXcSFhn8g
Owners of fluffy, charming rabbits ask themselves, first of all, the question of what conditions their pets should live in.
How to choose a place to install the cage
Let us first dwell on the homestead keeping of eared animals. There are two options:
- open content (in the air);
- placing cages indoors (for example, in a barn).
To select the location for installing the cages, you must follow the rules.
- Air humidity should not exceed 60-75% (hence, the cages are installed in a dry, elevated place away from water bodies).
- Because the rabbits categorically do not accept direct Sun rays , then the cells should ideally be located among trees that provide shade, or protected by an artificial fence that diffuses direct sunlight.
- Drafts are common cause rabbit diseases. Therefore, air movement exceeding a speed of 30 m/s is undesirable. However, cell ventilation is one of the rules that must be strictly observed. Otherwise, the evaporation of the secretions will harm the health of your pets.
On winter time places where rabbits are kept should be insulated so that the temperature fluctuates in the range of 10-20 C. Particular attention is paid to the insulation of queen cells and compartments for rabbits.
If animals are kept indoors, it must be:
- must be plastered
- well ventilated
- illuminated in winter for no more than 10 hours.
IN ideal The room for keeping cages with animals should have a window on the south side that fills the entire wall.
Cells on open space It is also advisable to place it in accordance with the cardinal points - with the front side facing east.
And one more nuance - the cages need to be installed at a height of 0.8-1.0 m from the ground. This will protect the rabbits from being bitten by domestic rodents and will make it much easier for the breeder to maintain the cage.

The classic version of a cage for keeping rabbits is a design of the following dimensions:
- 50*70*30 cm – for young animals;
- 50*100*30 cm – for female rabbits.
The entire space of the cage is divided into a walking room and a remote nook, where rabbits of any age find refuge in moments of “danger” and bad weather. The length of the walking compartment can vary, but is usually up to 50 cm in length and width. The cubby favorite of rabbits is a box 25 cm long and 50 cm wide. It is sheathed tightly, and only on the front side is a removable door attached. The hole is located in the wall adjacent to the walking area and is usually 17*17 cm.
The specificity of the structure of a rabbit cage is that a mesh or slatted floor is usually installed to allow free passage of waste into a tray located under the floor.
The height of the front side of the cage is usually 55 cm, and back wall 30 cm. That is, the cage assumes a sloping roof, which, in the case of “tiered” arrangement of cages, will also be a pallet for the higher cages, in connection with which it is usually upholstered with galvanized iron.
Materials for making cells

When choosing materials for making cages, it is better to give preference to high-quality and ecological wood. Wooden beams are suitable for constructing the frame. Boards or plywood work well for cladding walls. Chipboard is unacceptable because it takes on water, swells and crumbles.
Used for flooring welded mesh with cells 1.7*1.7 cm, or wooden slats up to 3 cm wide. The slats are placed at a distance of 1.5 cm from each other, for free passage of waste into the pallet. If the distance between the slats is greater than specified, or the mesh cells are larger, then this is fraught with fractures of the paws when getting stuck in large openings. Floor slats can be plastic.
One condition must be strictly observed - the material for making cells must be smooth, without traumatic foreign inclusions.
Dimensions and drawings of a cage for rabbits
The size of rabbit cages is directly dependent on:
- rabbit breeds;
- selected housing scheme (mini-farms, “battery” type cages, according to Zolotukhin
- etc.);
- standard indicators required areas(for example, for rabbits - 0.5-0.7 sq.m.,
- males will need 0.17 sq.m., and young animals - 0.12 sq.m.).
In practice, houses of two connected cells measuring 100*55cm are often used. In these cages, the uterine compartments are adjacent to the outer walls of the cage and communicate with the feeding compartments through 17*17 cm manholes. On the front side of the house there are doors: two solid ones in the nesting compartments, and two mesh ones in the walking spaces. Between them there are nurseries and drinking bowls. Feeders are usually attached to the face of screen doors.

All wire cage
This type of cage is intended for placement in livestock-type premises and even in ordinary hay barns. The walls and ceiling of the cages are lined with a mesh with cells of 2.5-5 cm, the floor - 1.7 * 1.7 cm.
The main advantage of these cells is the simplicity and accessibility of cleaning and disinfection. For this you only need good brush and a propane torch, which will help you easily get rid of unnecessary microorganisms and accumulations of rabbit fluff.
All-wire cages occupy significantly less space, which is also their advantage when running a farm.
Difficulties in cell construction
The main problem when making a cage with your own hands is the lack of high-quality and detailed drawings, or the unjustified high cost of licensed options (for example, drawings from Rabbitax).
The second difficulty faced House master– this is the non-standard size of the building materials used. And as a result, the need to purchase materials to order. If we add to this the lack of experience in the manufacture of cells, then the cost of materials turns out to be prohibitively high.

Novice craftsmen make similar mistakes when building cells:
- saving material leads to crowding, which has a bad effect on the health and reproduction of rabbits;
- the uterine or nesting compartment must be stationary (the cuffs frighten the rabbit and can cause crushing of the rabbits).
To reduce stress when laying young animals, you can use a cage with a stationary cubbyhole for baby rabbits, in which a hole measuring 12*12 cm will not allow the mother rabbit to constantly be with the babies. And the moment of separation of the rabbits will no longer be so stressful.

N.I. cells are very popular. Zolotukhina. Their main the difference is the absence of pallets, i.e. solid floor made of flat slate , and the presence of a mesh only on the back side of the cells to a width of 15-20 cm. The staggered arrangement of one cell above another helps to get rid of waste from “ upper floors" to "lower". Characteristic feature There is also a lack of nesting compartments. The female rabbit is given the opportunity to build her own queen cell from hay. The door feeders are mounted on rotating nails and, thanks to their hinged design, are easy to clean.
On our website there is an article dedicated to it in which you will find everything practical advice and recommendations from the author, in addition you can familiarize yourself with the drawings and dimensions of the cells.
Cells from Tsvetkov
This is a kind of four-apartment house, with an equipped ventilation and “sewage” system. There are also mounted queen cells and gravity feeders and drinkers. The hay manger is covered with galvanized mesh and secured to the frame with nails. All vulnerable parts are reinforced with tin plates. In winter, the compartments for young rabbits and queen cells are heated with ordinary medical-grade heating pads. Unusual is the face of the cage facing south.
Rabbitax for beginner rabbit breeders
Cells from the Rabbitax company are distinguished by their unique decor and environmental friendliness ( their unique redirection system air flow ). They are mainly intended for large farms. But there are acceptable options, for example, a cage with two compartments. For a novice master, the drawings are still a bit complicated. And the main disadvantage is the high cost of production.
Author's designs
I would like to mention Mikhailov’s rabbit cages. The main advantage of mini-farms is their compactness (the ability to contain 25 individuals on an area of 25 sq.m., taking into account the distance between the houses of 70 cm). An undoubted advantage is also the automation of waste collection into a sealed container. Significant disadvantage Mikhailov cells can be called expensive materials for construction and the undoubted professionalism of the performer.
The design of E. Ovdienko attracts attention. Characteristic difference It is made up of special gates that protect the four-tiered structure, containing 24 cells, from the wind and vagaries of the weather.
DIY cage for decorative rabbits

Decorative eared creatures can also live well in a homemade cage. For simple solution you need to decide on the question of how often your pet is supposed to walk in open space. If the rabbit walks for at least 3 hours a day, then a cage size of 70*40 cm is sufficient. If your pet spends most of the time “at home”, then the cage size should be 100*50 cm. Otherwise, you should adhere to the same construction rules cages, as for farm rabbits.
Of all the above cages for rabbits, a novice master will be able to choose for himself best option, combining ease of execution, ease of maintenance and reasonable cost.
If you decide to get a decorative rabbit, we recommend that you read the same, no less important is and .
Watch also the video - how to make a cage with your own hands.
Breeding rabbits in a country plot or country house requires a lot of knowledge about the lifestyle and habits of these animals. Much attention is paid to their diet and diet. At the same time, we should not forget about rabbit houses, since clean and comfortable housing is the key to health and wellness furry pets. There are many designs of cages for rabbits, made from a variety of materials with your own hands. Offered to your attention wooden structures can simplify the care of animals and will decorate the economic area.
Simple Design Rabbit Hutch
Due to the simplicity of the design, such a cage can be made with minimal experience in working with carpentry tools. To make it you will need wooden slats and bars, plywood, metal mesh, bitumen shingles and plexiglass. Despite the fact that this type of cage is not particularly complex, it looks beautiful and interesting, which all members of your family will appreciate.
Assembling the cage frame for rabbits
To facilitate the process of feeding animals, the cage is installed on an elevated surface, constructing an additional stand. The height is selected so that both adults and children can care for the animals. To have feed and hay on hand and not have to look for extra space for food storage, the frame is equipped with a spacious shelf.

Cages for rabbits drawings
For support posts cells will be needed wooden beam with a cross-section of at least 60×60 mm and a height of 850 mm.


When cutting wood, do not forget process the edges of the slats. This will avoid splinters and increase the aesthetics of the rabbit cage design.
The base frame and shelf support are attached to the main posts. To do this, four boards are screwed into the upper part of the frame with self-tapping screws and at a distance of 372 mm from the floor. It is important to correctly mark and monitor the geometry of the structure using a carpenter's square and a level. The result should be a smooth, stable structure without distortions or crooked corners.


To make a cage with an additional compartment, a neat figured cutout is made in the front board of the upper frame. The cut out part is attached to the old place using a piano loop. A narrow hinged part will provide access to the inside of the cage in the future.

WITH inside the upper and lower frames are mounted as spacers additional slats. They eliminate the instability of the structure and serve as support for the flooring, so they require especially careful adjustment.

DIY rabbit cage step by step instructions. Photo


In the corners wooden shields or boards used as a shelf and the base of the cage, make a cutout for the support legs. The shields are installed in their places, after which the work at this stage is considered completed.
Main compartment assembly
A rabbit cage should please the owner not only with its durability and reliability, but also with its attractive appearance. Assembling a cage for rabbits begins from the front part, and step-by-step instructions will help you understand in detail all the nuances of the work with your own hands.

Cages for rabbits drawings
At the first stage they collect door box. To do this, a rectangular frame is assembled from slats using furniture dowels and self-tapping screws. A groove is cut out for vertical movement of the door. A sliding partition frame is made that is slightly larger than the height of the box. Dowels are installed from the outer surface, after which the door is installed in place by inserting the dowels into the prepared slots on the side jambs.


From wooden slats install compartments on both sides of the opening. Assemble the rear part of the structure, as well as side walls.

How to make a rabbit cage. Photo
The eight slats from which the roof rafters will be made are cut at an acute angle. The rafters are assembled by fastening the pointed elements in pairs, after which they are finally fixed with self-tapping screws. After this, the brackets are removed and the rafters are attached to the base of the roof.


Triangular elements are cut out of a sheet of plywood to block access from the doorway to the roof. They are attached with self-tapping screws to the central rafters in accordance with the attached diagram.


DIY rabbit cage step by step instructions. Photo
The roof is sheathed plywood sheets , cutting them according to the drawing. The rear slope is made with a cutout mounted on a piano hinge. The hinged roof section makes it easier to access internal space cells. To connect the central part of the front roof slope with the side elements, small sections are cut out in its corners.


After assembling the base of the rabbit cage with your own hands is completed, the structure is treated with drying oil, dried, and then painted in one or two layers oil paint. Despite more a long period drying, it will reliably protect the wood from moisture.
How to sheathe walls and roof

Cages for rabbits drawings
The inside of all the walls, as well as the door of the rabbit cage, are covered with your own hands using a screwdriver, self-tapping screws and metal mesh with a cell size of no more than 25×25 mm.

First, the ends of the cage are sewn up, and then the front wall is mounted above the doorway.

To make the design convenient to transport, folding handles are screwed onto the sides of the frame support frame.

Install on the front board of the upper support frame valve for fixing the narrow folding part.

The latch is also installed on the cage door.

Decorate The design can be made using the figure of a rabbit cut from plywood. It is painted and then glued or fastened with self-tapping screws to the front wall of the roof.


Protect the piano hinge, which ensures the mobility of the folding part of the roof, can be done using universal adhesive tape. Glued on top of the metal, it will prevent rust and ensure reliable operation of the part.

Using a stapler and metal staples from 8 mm in size to the roof sheathing rabbit house fasten bitumen shingles.

DIY rabbit cage step by step instructions. Photo

Taking advantage special glue For soft roof, from a long, narrow piece of bitumen canvas they equip roof ridge.

cut out plexiglass according to the size of one of the side walls, after which a latch is mounted in its upper part. If necessary, this element will be able to protect animals from drafts and rain. The plexiglass is installed on the frame, securing it at the bottom with furniture dowels, and at the top by fixing the latch bolt in a pre-drilled hole.


Small ladders are assembled for animals and inner house. After impregnation with drying oil, the parts are painted and placed inside the cage.


After the paint is completely dry, the cage is transferred to permanent place, prepare provisions and move the rabbits into their new home.


Despite the fact that rabbits are not particularly demanding animals, it is still better to rely on the opinion of experienced people in the manufacture and placement of the cage.
The main criterion for choosing a place to install a rabbitry is the absence drafts. Besides, in summer time It’s better for animals to be in the shade, so you’ll have to build a shed or place cages in a barn.
We must not forget that when breeding rabbits, you will have to resettle the young animals, keep pregnant females and males separately, etc., so you won’t be able to get by with just one cage. It is better to always have free space at hand, and the cages themselves should have walking areas.

Listen to the advice of experienced rabbit breeders, and you won’t have to correct your own mistakes and miscalculations.
Floor The rabbitry is best made from mesh or slats laid at a distance of 1.5 cm from each other. When using the cage outdoors, they also install a lower, folding floor tier made of boards.
The roof The cages installed in the room are made of the same material as the walls. Outdoors, the rabbitry is covered with waterproof roofing material. It is better not to use tin for this.
On the street, houses for animals are located on supports height from 0.5 to 1 m. It is best if inside the cage there is also a house with a cutout in the form of a “hole”.
Cells are divided into several branches, providing a passage for animals from one part to another, as well as hinged lids for cleaning individual “rooms”.
The dimensions of the rabbitry in which it is planned to keep the males are sufficient for them to roam freely. We must remember that males who lead a sedentary lifestyle can become infertile.

For every 3-4 females make separate spacious cage.
Baby rabbits kept in the same room with a nursing rabbit. At the same time, they keep one cage free nearby, placing the mother with the smallest animals there for additional feeding.
The best material for a rabbitry is wood - boards, slats, plywood, laminated boards. They make the power frame and roof. Depending on the climate and installation location, cage walls are made of mesh, plywood, slats or boards. In progress Special attention removed by finishing the materials so that animals cannot be injured by splinters, sharp parts of the mesh or protruding edges of nails and screws.
Rabbit cage sizes
The dimensions of cages for breeding rabbits vary widely depending on the size of the animals, breed, purpose of the cage (for males, females with children, rabbits, etc.).
For nursing rabbits The dimensions of the cages must be at least 1.70 - 1.85 m in length, 1 m in width and 0.6 - 0.7 from the floor to the lid. The cages are placed at a distance of 0.7 - 0.8 m from the ground on trestles or supports. Animals weighing over 5 kg require rabbit hutches 1.3-1.5 m long and up to 0.7 m wide. In this case, the height of the rear wall should be 0.4-0.45 m, and the front wall should be 10-15 cm higher.
Young animals rabbits are placed in group rabbitries, where they contain from 8 to 20 individuals. From 3 to 5 cubs who are under 3 months old are placed in individual cages. For older animals, no more than 2 - 3 animals per cage are placed. In this case, there should be at least 0.5 square meters per individual. m of area, and the height of the rabbitry should be more than 35 cm. In group cages, there should be at least 0.2 square meters per rabbit. m, which must be taken into account when making a rabbitry and placing animals.

Cage sizes for rabbits. Photo
An adult requires a room with a minimum size of 1×0.6 m and a height of 0.6 m, but it is better to increase these dimensions by 20 - 30%.
The cages are placed in one or two tiers (the so-called shed). Depending on the size of the animals, the width of the shad is made no more than 2 m, and the depth - up to 1 m, placing the cages at a height of about half a meter.
For breeding, a double rabbitry is used with a queen cell - a removable feed compartment for keeping animals up to 1 month. The cell is divided into sections wooden partition with a hole 17x20 cm.

The main thing is that animals in captivity feel comfortable, so it is recommended to follow all the advice on their placement and maintenance.
Cage designs for rabbits
With a two-tier rabbitry portable type makes caring for and feeding rabbits easier. It is enough from time to time to move the structure to a place with thick grass - and the animals are provided with food and a clean place to walk.

Photo of a cage for decorative rabbits
A wooden structure, on the roof of which there is a low box with a moisture-proof bottom, will allow you to grow seedlings or greens on the roof of the rabbitry. This solution is not only highly practical, but also looks impressive on the site. 
Rabbit cage. Photo
“Two-room” house for animals with common area for feeding makes it easier to care for animals and allows you to increase the space intended for their walking. 
Large cage for rabbits. Photo
Designs of cages for rabbits, in which animals have access to walk on the ground, are beneficial not only from the point of view of keeping the animals, but also from the economic side. If the cell volume is sufficiently large, its production does not require large material costs. 
A triangular hut cage with an aviary for walking is easy to make. For a day similar design placed in a place with thick grass, and at night the cage is removed to a stationary elevation. 
The spacious rabbitry, designed for two places, has a presentable appearance thanks to the spacious design, flexible roof and painting in light colors. Blacks complete the picture metal elements door hinges and valves. 
Big summer house for breeding rabbits allows you to keep up to ten individuals. The high door of the structure allows you to enter inside for feeding, cleaning and examining the animals. 
A cage of increased depth, divided into two rooms, allows you to keep several individuals in each half. An enlarged courtyard provides comfort while walking and feeding animals. The contrasting coloring and copper fittings of the cage add elegance and presentability to it. 
Cage for decorative rabbits. Photo
Rabbit cages installed at a height are often built in the same building as an enclosure. Common roof allows you to save material during the construction of a cage for rabbits and provides comfortable and spacious housing for animals. 
Rectangular rabbitry with pitched roof very easy to manufacture and provides all the convenience for animals and their care. A simple cell for rabbits can be made from wooden blocks and slats, boards and wooden lining, and cover the roof with slate or soft roofing. 
DIY Zolotukhin cells
Cages designed by a Russian rabbit breeder Zolotukhina have gained immense popularity due to their simplicity, low cost and ease of caring for animals.
The advantages of this type of cells include:
- sloped slate or plywood floor with mesh near the back wall;
- three-tier structure of six cells. Shifting the cells to the width of the grid in the floor makes cleaning easier;
- the possibility of arranging a queen cell in a regular cage;
- a specially designed feeder that does not require opening the door when dispensing food;
- low cost.
Improvements adopted by an experienced rabbit breeder-innovator bring the keeping of rabbits closer to the conditions in which they find themselves in the wild. natural environment a habitat.
Design Features
To make a cage for Zolotukhin rabbits, you can use wooden boards and slats, slate sheets, tin, polycarbonate panels, metal mesh.
The frame of the structure and partitions are made of wood, and the floor and roof are made of flat slate. The doors and a small part of the floor at the back wall are covered with mesh. The wooden structural elements are sheathed with tin to prevent rabbits from chewing them.
Rabbit cage size:
- cage width - 2000 mm;
- height of the three-tier structure - 1500 mm;
- depth - from 700 to 800 mm;
- doors - 400×400 mm;
- floor mesh width - 150-200 mm;
- the difference in the level of the front and rear parts of the floor is from 50 to 70 mm.

Drawings of Zolotukhin cells. Photo
Each of the three levels consists of two cages, separated by two board partitions, between which hay is stored. The floor, also known as the roof for the lower tier, is made of slate. The rear part of the floor up to 200 mm wide is made of mesh. Each upper cell is extended by the same amount relative to the lower one so that feces are removed onto the floor or ground. The back wall is made of polycarbonate and installed in an inclined manner.
Exact dimensions for making cages are not needed; the diagram given by the rabbit breeder is sufficient. This structure is a structure with a queen cell, so for the usual keeping of rabbits, the wall with the opening will need to be replaced with a solid wooden panel.
The queen cell door is not made of mesh, since the nest requires shade and shelter from drafts. To prevent the young animals from falling out when cleaning or feeding, a board 10 centimeters wide is nailed to the front of the shelter.
The design with a fenced-off queen cell makes it easy to expand the space for growing rabbits. To do this, just remove the board partition.
In winter, Zolotukhin installs in a cage queen cell-burrow. He is wooden box with increased rear wall height. This allows you to create the necessary expansion in the depths of the rabbit hole. The hole in the queen cell is cut out so that there is no threshold between the box and the floor of the cage.
Dimensions of the winter queen cell of Zolotukhin cage for rabbits:
- top and Bottom part- from 300×300 to 400×400 mm;
- front wall - 160 mm;
- rear wall - 260 mm;
- opening height - 150 mm.
The feeder is a long tray that takes up 2/3 of the length of the cage. Its front wall is twice as large as the back wall, and the bottom slopes into the cage at an angle of up to 35?. The feeder is mounted on a rod hinge, which allows you to install the tray in the door. This eliminates the need to open the cage when feeding and makes it easier to clean the feeder from leftover food.
DIY rabbit cages. Video
As you can see, making a rabbit cage with your own hands is quite simple. At the same time, it is important to ensure the comfort and safety of pets, as well as to provide for ease of feeding and cleaning.