Strengthening garage doors. How to strengthen swing and sectional garage doors
Read also
Gates and wickets made of corrugated sheets belong to the budget category: their production does not take much time and materials. True, if you choose a model of ordinary swing gates without artistic additions. There are also options with forging elements, but the complexity of the work is greater and the costs are much higher. Simple swing gates Even an amateur welder can make it from corrugated sheets with his own hands: there are few seams, they are simple.
Sash designs
Even such a simple design as a gate leaf or wicket can be made in different ways, and there are many options. First of all, the location of the jumpers differs:
- obliquely;
- horizontally;
- crosswise.
Each method is tested and works, providing a sufficient degree of rigidity. Here you choose what seems more correct or reliable to you.
There is a difference in the design of the gate itself - with or without a stationary frame (top crossbar). With a frame, the gate is more stable, but then there are height restrictions: tall vehicles - trucks or special equipment - will not be able to enter the yard. With proper reinforcement of the racks (pillars) and properly made doors (with reinforcement in the corners), gates without a frame will also be reliable.

When installing a gate with a frame, the metal consumption is greater - per the length of the lintel, but the pillars can not be additionally reinforced: the load on them is less.

To make it more convenient to attach the profiled sheet, a thin-walled sheet is welded along the outer (sometimes internal, as in the figure above) perimeter of the sashes. metallic profile 1 cm wide. This must be taken into account when determining the dimensions of the blanks for the sashes.
To make the structure as rigid as possible, so that it does not “walk” or make noise in the wind, reinforcements are made in the corners. And again there are two ways. The first is to weld the corners cut from sheet metal.

The second is to install short corner jibs from the same pipe that was used to weld the frame of the sashes.

There is also a difference during assembly: at the joints, the pipes are connected at an angle of 45° or simply butt-to-joint. More professional - at 45°, easier - end-to-end. Some assembly methods do not provide for the possibility of connecting at an angle at all (if both doors are assembled in one piece, and only those hung on poles are sawn into two parts).

Another subtlety that depends on the amount of snow in winter. As you can see in the photo, the bottom bar of the sashes is raised by different heights from the ground - somewhere a few centimeters, somewhere 20 cm and above. Depends on the height of the snow cover in winter: if snow piles up and the gate is as high as the ground, you won’t open it. To prevent any living creatures from climbing into this gap in the summer, after the snow melts, screw the bar onto the screws, late autumn she is removed again.
The material for the gate is the same as for the gate, and it is attached to the same screws. Before starting work, the metal must be prepared: remove all rust (with an angle grinder and a wire brush), prime with Anti-Rust and paint. After drying, you can start working.
Photo report on the manufacture and installation of gates
This is one of the options for how to make a gate from corrugated sheets with your own hands. The technology is not the best, but not the worst either: everything has been functioning without problems for the past six years.
TO installed poles 80-80 mm hinges are welded, mating parts are welded at the required distance on the vertical parts of the racks made of 40*40 mm pipe - on the right and left. We hang the posts on the hinges on the post, place them between them and the posts required thickness layer and fix it with a clamp.

We measure the required height and cut off the excess, from above to the racks, not to the posts, weld a cross member from the same pipe 40 * 40 mm. The quality of the welding is not important at this stage. For now, we are tackling the parts, not worrying about the thoroughness of the seam - then we will bring it up to standard. The main thing is that everything is smooth and stays together. Therefore, we grab it with dots in several places.

We grab the pipe at the bottom in the same way.

Find the middle of the cross beams. From the middle in both directions we set aside 3 mm. We make clear marks. We measure the distance between the upper and lower beams, cut off two sections, and weld them along the marks (there should be a gap of 6 mm between the two vertical pipes).

We measure the distance between the two posts of one half of the gate. They should be the same, but it is better to measure separately. Cut the pipes to the required length and clamp them at the desired height. If you need more crossbars, install them too.

Along the marked center with a grinder, we make through cuts at the top and bottom, dividing the gate into two halves. So very simply we got a gate that will open and close without any problems.

The gate frame is ready. We remove it, lay it on a flat horizontal surface and weld the seams well. This is where the quality of welding is important, we make sure the bath is full and try not to burn holes. We clean the finished seams, prime them, and paint them.

Let's start assembling the support for attaching the profile sheet. To reduce the windage, it was cut into two parts, so that the sheet was not whole, but cut. To do this, we use a profiled pipe 20*20 mm. We cut it into pieces of the required length, so that it can be secured along the inner perimeter.

We place them in the same plane with outer part— the sheet will be screwed from the inside. We fasten it with self-tapping screws, having previously drilled holes of the required diameter.


We paint the finished frame - inside with light gray paint, outside - red-brown, to match the color of the corrugated board. Leave to dry.

Let's start installing the profiled sheet on the gate. It is cut into a slightly smaller size than the main frame - there should be an indent of 2-3 mm around the perimeter. They are laid on prepared supports and secured from the inside around the perimeter with self-tapping screws.

Installation of profiled sheets on gates
You can take special ones, with caps and gaskets, but they put them on regular ones.

To save money, we used ordinary metal screws
We can say that the gate is ready.

All that remains is to install the locks. You can, of course, install a lock and a handle, but the quality of inexpensive ones is very low, and buying expensive ones is this moment unaffordable luxury. Therefore, bolts were welded from the remains of pipes and fittings. They definitely work under any conditions.

One (the top one) is mounted on self-tapping screws with a counterpart on the sash, the two lower ones are attached to the racks. In the ground in in the right places small holes were drilled in which sections were concreted round pipes, the diameter of which is greater than the diameter of the rod. The gate is made using the same method, only there is a lock embedded in it.

Do-it-yourself finished gates made of corrugated sheets
With this manufacturing technology, gate leaves are guaranteed to open and close. If there were some distortions when installing the pillars, they are taken into account. When presented step-by-step, the whole process does not look complicated, but it is. If you weld all the parts separately, the geometry must be ideal, and you also have to make sure that the pipe does not move during welding. Some different technologies For making gates from corrugated sheets, see the next section, where video lessons are collected.
How to make gates from corrugated sheets: video tutorials
If the work is new, then even after the photo report, questions may remain. Video tutorials on the topic can clarify some of them. To begin with, repeat the technology described above: we assemble the frame directly on the installed poles.
The same technology, in photo sequence.
The second video is about how to properly weld a frame when connecting pipes at an angle of 45°. The approach is professional.
Those who have not dealt with welding gates or doors before may have questions about how to weld hinges. It's not as simple as it seems. Let's watch the next video tutorial.
For a more precise explanation of what movements to make when welding gate hinges, where to direct the electrode and other nuances, see the following video.
Swing gates can be considered perfect design if not for one significant drawback- tendency to spontaneously close at the slightest gust of wind. The result is scratches and dents on your favorite car, and sometimes even injuries of varying severity on the body of their owner.
Allows you to avoid troubles simple devices– clamps for sashes, which are popularly called stops. Those who have not realized the need to use them can prop up swing gates with any object that comes to hand, or go to the store for a ready-made stopper. Or you can strain your own mind and make supports with your own hands.
Stoppers-constipations

The simplest and favorite option for home craftsmen. The stop works much the same as an old-fashioned window latch, but is much larger in size. Such a device is not yet commercially produced, but it is quite possible to make it yourself. For this you will need:
- two steel tubes (one for each swing gate leaf) about 15 cm long and 1.6 cm in diameter;
- steel plates 10 cm wide and 15 cm long;
- pins that fit freely into the pipe, at least 20 cm long.
The entire process of making a retainer with your own hands consists of several stages:
- Steel tubes are welded to the plates and then attached to the bottom of the gate. For doors sheathed in wood, this is done using self-tapping screws; the plate is simply welded to metal doors.
- A lever is welded to the upper end of the pin at a right angle, playing the role of a handle, or simply a pin, preheated at gas burner, which bends and is inserted into the pipe.
- Now we open the sash and find a place where it will be necessary to drive the reciprocal part of our “latch” to a depth of about 30 cm. We take into account that the pin must fit into it at least 10 cm. Do not forget that the gate leaf may be located slightly higher than the entrance level.
- To prevent the pin from interfering with opening the swing gate, we weld a hook above the lock on which the handle of the pin will rest.
But keep in mind the disadvantages of this device. The counter pipe into which the pin should be lowered may be covered with snow in winter and will have to be dug out, which is not always time. You can do without a mating part, but in this case the ends of the pins must be pointed. Such a latch will, of course, be less reliable than the original version, but in extreme cases it will do. If not steel pipes required diameter, you can slightly modify the device. Replace it with two or three loops. The result is a simple but quite effective design.
Stops on carabiners

Original and cheap solution DIY problems. For implementation you will need (for each swing gate):
- cargo sling with a metal hook at the end;
- small carabiner;
- eye bolt with M8 thread.
The tools you need are a drill with an F7 drill, an M8 tap and a wrench for it, and any adhesive-sealant. If you have experience using the above tools, then installing the clamp will take no more than half an hour. The process will consist of the following steps:
- On frame with inside two holes are drilled at the same height and threads are cut into them.
- The eye bolts are coated with sealant and screwed into the prepared holes.
- Carabiners are put on eye bolts, and cargo slings are threaded through them.
The hooks may be caught on the adjacent garage door. But nothing prevents you from using a bracket attached to a fence post or wall for these purposes. Can be attached to any nearby robust construction and get a cheap and reliable stop, devoid of the disadvantages of a locking lock. Unfortunately, the view of this device not very attractive, which many may consider a significant disadvantage.
Hook retainer for aesthetes

A very simple device, but it does its job perfectly. It has a respectable appearance and even allows you to fix swing gate leaves in two or more positions. For manufacturing you need (for both doors):
- metal corners 50 mm long, 80 cm and 15 cm;
- steel rod with a cross-sectional diameter of 12 mm, approximately 1.2 meters long;
- welding machine, screws, drill, vice.
Now let’s do a few simple steps:
- In the larger corner, which will act as a hinge, three holes are drilled on one side for fastening to the gate frame. On the other side, there are two holes at the edges, of such a diameter that the end of a steel rod can fit freely into them.
- Now the most difficult part is making the hook. One side of the heated steel rod is bent into a ring (don't forget to leave a gap so that the hook can be put on the canopy!). The other side is given a U-shape. It's difficult, but quite possible.
- Now a canopy is made from a smaller corner, for which two holes are drilled in it on one side for fastening to the sash, and in the middle of the other side - one hole for fixing the hook.
- We fix the corners so that the larger one is on the gate frame and the smaller one is on the leaf. You can use self-tapping screws for these purposes (for wooden gates) or welding (for metal). We put the hook on the canopy and finally bend the ring.
That's all, the length of the hook and the location of the holes will have to be calculated empirically, experimenting with gate leaves. The result is a simple but reliable DIY stop. It will allow you to open the gate completely or leave the swing gate ajar.
Stopper

A simple device that can be used by anyone whose gate is lined with wood. To make it yourself you will need wooden block and a window hinge. One end of the loop is rigidly fixed to the end of the bar, the other is movably attached to the gate leaf.
You can also do metal analogue of this device, consisting of a pipe movably attached to the sash. In the non-working position, the pipe rises upward and is held in place by a rope loop. To fix the gate, just lower the pipe. To increase the stop area, the top of the pipe should be cut at an angle.
Latch-trap with pawl and spring
A more complex device, which has the advantage that it allows the gate to be locked automatically. It consists:

The pipe with the dog is attached at the required distance from the wall. The bracket is attached to the gate leaf. The principle of operation is quite simple. When the sash moves, the bracket attached to it lifts the pawl, which then lowers and securely fixes the sash.
A similar device can be placed at the bottom of the gate, but you will have to equip it with a spring. It will return the dog to a horizontal position. To close the gate later, simply lower the pawl with your foot.
Latch-trap without spring
To make it, you will need a thick steel plate, which needs to be bent on one side and a handle welded to the curved end. A steel rod is welded to the bottom of the plate, which is subsequently inserted into brackets fixedly fixed to the ground.
Important condition! For proper operation the stop requires that the flat part of the plate be much longer, and therefore heavier, than the curved section. Then the gate leaf, when moving with its mass, will lower the curved end of the plate. Afterwards, the remaining flat part will lower under its own weight, lift the curved end with the handle and fix the gate. To close the swing gate, simply lower the handle down.
The described clamps are not all options for do-it-yourself wind stoppers for swing gates. Perhaps the devices described will serve as an impetus for your imagination, and you will come up with your own original way solving the problem. And we can only wish good luck to the master!
When building a garage, many nuances are taken into account. One of them is the height of the gate, and we're talking about not only about the height of the opening, but also about the height of the sashes above the ground level. The article will discuss the reasons why it is important to correctly calculate this height. In some cases you have to raise Garage Doors higher due to certain circumstances. The article will also describe several ways in which this can be done.
Why raise the gate?
When it comes to the need to raise gates, it concerns swing structures. There is no such problem for folding structures, since they are able to automatically change their level. There are several reasons why you have to resort to lifting the gate:
- hinge wear;
- frame deformation;
- incorrect design;
- violation of the integrity of the foundation;
- replacement of vehicle.

Old gate designs are made of sheet metal, which has a thickness of 3 millimeters or more. This gate design itself is quite heavy, so it is normal that over time they begin to sag. The reason for this may be low quality metal loops The rods lose their strength and the doors partially tilt forward. This makes it difficult or impossible normal process closing the gate.

Another reason why gates need to be raised is wear and tear. metal corner. In most cases, beams with a width of 20 cm are used, but to save money, small corners are used, which begin to deform under constant loads. In this case, the geometry of the frame is disrupted, which leads to problems with the gate. At correct design swing gates are never placed flush with the ground. Even with correct installation this approach can become a problem in winter. The metal can be deformed under the influence of low temperatures and the doors will not open because they will cling to the asphalt.

Another problem that manifests itself when the gate level is low is precipitation. If a significant amount of snow falls in winter, then you have to work hard to clear the area near the gate before entering or leaving the garage. If there is heavy rainfall, water will simply seep into the garage, which can create serious problems, especially if there is one in the garage inspection hole or basement. In some cases, due to ground movements, a problem with deformation of the lower part of the frame may arise. This also results in the need to raise the gate. Walls can also become deformed, which leads to sagging of the gate and the impossibility of opening it.
Gate lifting methods
In most cases, it is better not to lift the gate alone. By virtue of heavy weight You can get serious injuries to your hands and musculoskeletal system. There are several ways to carry out the ascent, the following will be discussed below:
- repair washers;
- reducing the jumper;
- decreasing the threshold level;
- gate trimming.
Each of these methods requires its own arsenal of tools.
Repair washers

This option for increasing the height of the valves above ground level can be considered one of the simplest. Repair washers will help in cases where the doors do not open well due to wear on the hinges. With proper skill, you can do the work of installing washers yourself. In this way, you can usually raise the sashes by 1 cm. To implement the idea, washers of the required thickness are selected or a selection of several elements is made. The hole in the washer must be such that the hinge rod can fit freely into it. The washer must be lubricated on one side only. The second should be fixedly fixed on the loop.

To carry out the operation, it is necessary to lift the flaps, but not remove them completely. It is enough to create a gap into which the washer can fit. It is necessary to select a jack that can be easily rolled under the sash. If there is no such option, then you can build metal loop, part of which will be under the sash, and the second is clearly fixed on the jack. Another way is to install a rolling jack under the sash by lifting it. To do this, it opens perpendicular to the wall and several wooden wedges are driven under it. While performing these actions, it is necessary to hold the gate so that it does not skew to one side.

Using a jack, you can repair deformed parts of the gate, which is causing the sagging. In this case, the jack is installed as far as possible from the hinges, and the sash is raised. As you climb, it is necessary to perform blows with a sledgehammer, which will help level out the deformed area. It is better to perform leveling in several small passes, then the result will be most effective. It is worth understanding that with severe deformation, an ideal result may not be achieved. If the frame was aligned, then the bend must be additionally reinforced with a corner that is welded on top.
Note! If you are aligning a gate that has a wicket, you should not remove it. If this is done, then after the procedure it may not return to its place. Instead, it is necessary to firmly fix the door with ties or welding tacks.
Jumper reduction

This option for lifting the sashes can be called one of the most difficult and costly in terms of time and effort. But the result obtained can be considered the most effective. This option is also called raising the frame. To implement this, you will need to completely remove the garage door leaves. In some cases, the frame does not need to be dismantled, but it is necessary to free it from the clamps that hold it in the wall. These can be metal pieces of reinforcement that are driven into the holes. It will be easier to lift if the upper part of the frame is used as a jumper brickwork. In this case, it will be enough to remove one or more rows. Everything will depend on the required lifting height of the garage door frame.

If there is a concrete lintel above the frame crossbar, then more effort will have to be applied. When using a standard element, it will be possible to raise the gate by about 10 cm. This is due to the fact that concrete is located at this level, and then reinforcement comes. You will need a hammer drill with a long drill bit. The diameter of the drill is selected to be 10 or 12 mm. The grinder marks the line along which the drilling will be carried out. It must be horizontal and located directly under the reinforcement. Holes are drilled in a row without a large gap. The next step is to install the chisel and begin beating the upper part of the jumper. Once the task is completed, it is necessary to remove the remaining concrete and level the surface of the lintel.

The next step is to raise the frame to the required height. If the metal fasteners have already been cut off, you need to use a hammer drill and a chisel in those places where the frame is concreted into the wall. It must be completely released and move freely. There are two ways to raise the frame:
- wedges from below;
- jack from above.
In the first case, you need to act starting from the middle. At this point, a strong crowbar is placed and a slow rise begins. You shouldn't start from the edges, because the gate frame will simply jam in the opening. After a slight lift, you need to place wooden spacers under the frame. Then you can move alternately to the left and right edges. As soon as one of them is raised, a wedge is also placed under it. It is worth understanding that the extreme points may be more difficult to give in than the central one. When it is possible to achieve a large gap, one or more rolling jacks are installed in it.

Further lifting is carried out using jacks. In this case, it is important to act synchronously with an assistant or lift to a small level on each jack in turn. You should not try to do everything quickly, because the frame may become warped. If this happens, then you need to lower one of the jacks and tap the garage door frame with a sledgehammer. The operation can be performed in another way. If it is impossible to place spacers and a jack under the frame threshold, you must do this under it. top bar. Jacks in this version are mounted as shown in the diagram above. High stands made of beams are made under them. A board gasket is placed on top of the head to prevent slippage. The garage door frame must also be raised evenly.

Note! In some cases, the threshold may be connected to the foundation, so it cannot be raised. Then the frame posts are cut off and the upper part is lifted separately. After this, small sections of the gate frame will need to be welded from the corner.
After such an operation, in most cases there is no need to digest the gate hinges, since they are mounted in their usual place. The question arises in relation to the lower part of the gate, because a gap is formed there, equal to the height of the frame. It can be closed by welding sheet metal onto the gate. It is also suitable for forming a threshold that will prevent rainwater from entering the room. The last option is necessary if the gate was initially too low.
Threshold level
This option for increasing the height of the gate with your own hands does not involve dismantling the gate and is one of simple options. It is worth noting that it can only be implemented if the height of the threshold is sufficient and there is a small margin. You should not resort to this method when Bottom part the frame is almost at road level. To implement this plan, you will need to install horizontal struts that will temporarily fix the frame. The gate leaves are opened and the lower part of the frame is dismantled.

You should not throw it away, because this element will be used in its place. For the next step, you need a jackhammer or a powerful hammer drill. It will be necessary to knock down part of the concrete threshold. After reaching the required level, the lower part of the gate frame is welded into place and the horizontal struts are removed. You can start pouring the threshold cement mortar.
Gate trimming

This method is the simplest and most undesirable. It can be implemented only if the total height of the gate is quite large and you do not plan to buy a large car. The method of cutting the gate is used only when it is necessary to understand the level of the threshold so that water does not get inside. To work you will need a grinder. The first step is to separate the sheet metal from the sash frame at the bottom. The bottom crossbar is completely cut out, but will be needed later. After this, it is necessary to determine at what height the gate will be trimmed.

Using a chockline or a thread with paint, the line along which you want to make the cut is marked. The lower part is cut off with a grinder sheet material goal along the marked line. In principle, this can be done by weight, but the best option will complete dismantling sashes and making the cut in a horizontal position. In this case, there is less chance of biting the canvas and causing injury. After trimming each sash, it is necessary to weld the lower spacer into place. Next, the gate is mounted in its place and the threshold is filled. A video about three options for lifting the gate is below.
Summary
As you can see, in some cases, lifting the gate is necessary due to certain circumstances. It can be done in several ways. Some of them can be combined to achieve optimal results. Another way to raise the gate is to replace the sash version with a roller version. In this case, the gate will rise rather than slide apart. In this case, before installing the gate, you can expand the opening to the required dimensions.
From this article you will learn how to strengthen swing and sectional garage doors to increase structural strength and the level of burglary protection. We will look at the most popular and effective ways. Tips and tricks will help you protect your car and other valuable property.
How to strengthen a garage door: increasing the protection of structures with swing doors
Before strengthening garage doors equipped with swing-type doors, identify all weak spots, which can be used by attackers.
List of most common problems:
- loose connection of the valves to each other;
- protruding loops for padlocks;
- the presence of handles and other elements to which the cable can be tied;
- hinges located outside, intended for hanging sashes;
- weak locks;
- sashes without stiffeners, made of thin sheets become;
- no alarm.
Ideally, a garage door should be free from all of the above disadvantages. Next, we will talk about ways to strengthen hinges and sashes, as well as the nuances of choosing and installing locks.
How to strengthen the hinges of swing gates
There is only one way to strengthen the external hinges. Weld special metal rods onto them. This will make sawing much more difficult.
Important! This method is used only in cases where it is impossible to install the gate so that the hinges are inside the garage. If the attacker is armed with an acetylene cutter, strengthening will not help.
To prevent the gate from being removed from its hinges, weld metal pins or plates to the gates as shown in the photo below.
Photo No. 1: reinforcement of swing gates to protect them from being removed from their hinges
When the doors are closed, the metal plates move out to the sides and fit into the holes in the walls. In this case, the gate will not open and will not fall out even after cutting off the hinges.
How to strengthen swing gate leaves
Let's start with the fact that for maximum reliability swing gates should be made of steel sheets minimum thickness of 3 mm, and the frame and frame are made of channels No. 6.
To strengthen the sashes, additional stiffening ribs are welded to them. For their manufacture they usually take:

How to further enhance the protection of swing gates from burglary
- It is better to remove loops for padlocks, handles and other elements to which a cable can be tied, or install them on internal surfaces.
- Make sure that the sashes fit together as tightly as possible. If necessary, weld a metal plate onto one of them. A tight fit is also achieved by installing eccentric locks and vertical bolts.
- For additional protection premises, you can install lattice doors behind the main gates, which will be locked to those inside the padlock. Weld a steel plate on the outside to hide the locking device from prying eyes. You will have to open the lock by touch.
Selection and installation features of locks for swing gates
When choosing locks, immediately ask the seller to show models designed specifically for garages. Such locking devices are marked with the letter “G”. Lever and disc locks are optimal. Burglary resistance must be at least class 3.
Basic rules for installing locks.
- Mechanisms and fastening elements must not protrude beyond the plane of the gate from the outside.
- For fixation, use reliable bolts (thickness - 8 mm and above).
Important! Install 2-3 locking devices different types at a distance of 30–40 cm from each other. Experts recommend additionally protecting locks with metal windows.
How to strengthen sectional doors
Sectional doors can be strengthened using steel profiles. The need to strengthen structures arises in three cases.
- The gate is installed in a room where significant temperature changes are possible or air humidity exceeds permissible values.
- Sandwich panels are subject to constant high wind loads.
- The entrance to the garage is located at sunny side(thermal deformations are possible).

Image No. 1: sectional door leaf with amplifiers
If steel profiles were not included in the package, you will have to buy them separately. Prices are at a more than acceptable level.
Important! If you order sectional doors with the option remote control, do not skimp on electronics and ask whether the equipment is equipped with remote monitoring systems, protection against signal interception and encryption.
To monitor the condition of structures, connect the automation to the Internet and install the application on your smartphone. This way you can monitor your garage in real time.
The protection of sectional doors from burglary is also enhanced by installing secret locking mechanisms. This method of increasing security is best suited for manual models, since hidden locks are not associated with automation.

Image #2: Secret locking mechanism sectional doors
Garage Door Alarm
Installing a security system is a great way to protect both manual and automatic sectional garage doors from burglary. In Moscow, alarm systems connected to centralized monitoring panels of private security agencies. When an alarm is received, rapid response teams go to the sites.
You can also equip the gate with a “howler” alarm that makes loud sounds when unauthorized entry is attempted. Don't forget to install and mask the switch.
A blind fence is needed to enclose and protect private territory land or summer cottage. Naturally, the fence must have an entrance. At first a gate was enough, then a gate was needed for the carriage, and then for the car.
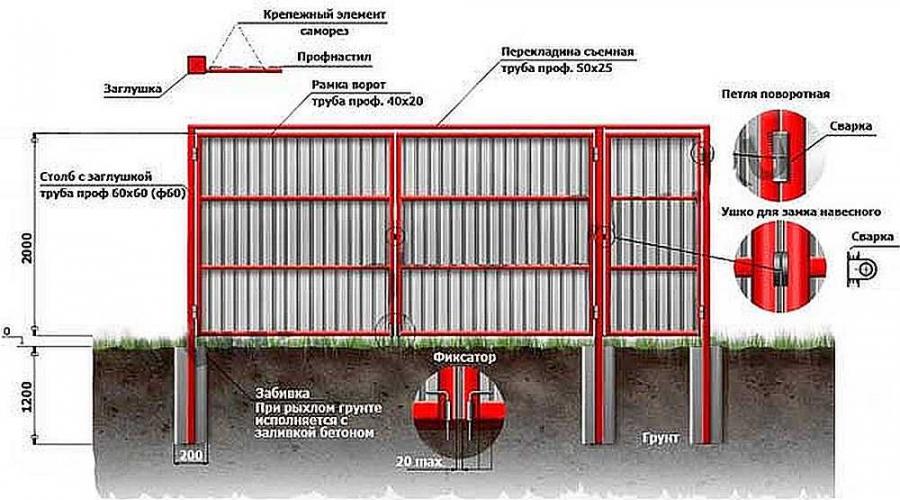
Metal gates and a wicket will provide entry/entry into the yard and guarantee safety for the residents of the house. Earlier iron gate sheathed sheet metal 3-5 mm, in modern conditions corrugated board is popular.
According to the method of opening, all types of metal/wood gates can be divided into two groups: swing and sliding.
By type of gate device: built-in (inside) and free-standing (nearby).
You can buy ready-made gates from corrugated sheets, order them made to size, or make them yourself. Let's take a closer look last option – homemade gate, as a cheap and accessible option.
Since swing gates are a simpler design to manufacture, we will describe how to make swing gates from corrugated sheets on your own. The strength and aesthetic properties of the profiled sheet, as well as the price/quality ratio, allow us to talk about the feasibility of such a choice of cladding. As for the gate, we will describe two options for the device.
Do-it-yourself gates made of corrugated sheets -
step-by-step instruction
Step-by-step technology for manufacturing a structure with a separate gate.
Stage 1 – dimensions of gates made of corrugated sheets with and without a wicket
Please note that the installation of swing gates requires taking into account the layout of the site/yard.
Width of corrugated gates
The width of the gate opening is determined based on the width of the car (including mirrors) plus one additional meter for reserve.
The width of the supporting pillars (columns) is also taken into account. When installing a gate with a free-standing gate, there will be three posts. In addition, you need to take into account the size of the gaps between the support pillars and the frame frame. As well as the size of the gap between the swing gate leaves, taking into account the parameters of the fittings.
- The optimal opening width for gates is 4500-5000 mm.
- The standard width of a gate made of corrugated sheets is 1200 mm.
Advice. Since you can’t get by with one sheet per sash, it is advisable to calculate the width of the sash based on the width of the corrugated sheet.
The table shows the dependence of the width of the gate leaf on the width of the profiled sheet.
Material prepared for the website www.site
Height of corrugated gates
The height of swing gates made of corrugated sheets is 2200-2500 mm. This is explained standard length corrugated sheet – 2,000 mm. Although the manufacturer can offer any length with a resolution of 50 mm.
In addition, the gap at the bottom (between the gate leaves and the ground) is taken into account, which is necessary to ensure the functioning of the gate during the formation of ice and high snow cover. The gap under the gate is 150-300 mm.
The height of the gate is influenced by the presence of decorative elements on top. For example, the use of forging allows you to increase the height of gates made of corrugated sheets and decoratively decorate the structure, as a result of which the entrance group looks more respectable.
Advice. If the gap from the ground seems too large, you can install a removable bar at the bottom of the gate, which must be removed at the beginning of winter.
Stage 2 – Drawing of a gate made of corrugated sheets
A diagram or drawing of swing gates is necessary to simplify the calculation of the amount of material and assess the rigidity of the structure.
Two ways to make swing gates:
- with one large leaf (single leaf). The disadvantage of this method is that it requires a lot of space to maneuver the gate, as well as its large windage. Reducing the windage due to additional frame parts leads to an increase in the load on the hinges, which in turn leads to misalignment of the sash. This method is only suitable for gates with a small opening width or for installing a wicket gate;
- with two doors (double doors). All the disadvantages described above are eliminated, but the manufacturing cost increases due to the addition of hinges and frame elements. It is possible to have a device with the same or different width sashes. Double-leaf swing gates have the advantage of being more resistant to wind loads.
The diagram of swing gates made of corrugated sheets should contain:


- the total width of the opening. It will be necessary to make a maneuver if necessary - when increasing gaps or changing the size of fittings;
- the width of each sash;
- number, width of racks and depth of digging of racks;
- frame configuration indicating the width of its constituent elements;
- location and width of the gate. This is an important aspect. Manufacturing a gate from corrugated sheets simultaneously with the frame for the gate will reduce the project implementation period. And if the gate is located inside the gate frame, the drawing will allow you to take into account its location when marking and cutting blanks;
- location for installing hinges;
- place and method of installing the lock;
- location of the internal door latch (vertical latch).


Frame reinforcement elements must be applied to the drawing of a gate made of corrugated sheets. It is the visualization of the future gate that allows you to understand which element to use and determine the location of its installation, taking into account the wind load.
Ways to strengthen gates made of corrugated sheets:
1. weld a corner for rigidity.
This method is suitable if the width of the sashes is small (up to 1,500 mm each). The corner can be solid (kerchief) or in the form of a corner jumper (spacer). The wider the corner or the closer to the center the jumper is installed, the stiffer the gate frame will be.


2. make a frame inside or above the frame.
 In the first case, workpieces of a smaller cross-section are placed in the cells of the frame and are tacked by welding in increments of 200-300 mm.
A continuous seam is not allowed to prevent deformation of the metal due to heating (to prevent it from leading and twisting).
 In the second, a pipe of smaller cross-section is welded over the main frame. The figure shows a top view of such a reinforcement.
 3. install transverse or diagonal jumpers.
It is important to install the jumpers correctly here. If the gate made of corrugated sheets has a slight windage and it is enough to install one crossbar perpendicular to the long frame elements, then with gates the situation is more complicated. In this case, it makes more sense to use a diagonal jumper.
Methods for installing a lintel on a gate made of corrugated sheets are shown in the photo.

Gate stiffeners – location options:
A) Despite its apparent simplicity, this option is quite thoughtful, since it guarantees the integrity of the gate leaves. On the one hand, it will be held in place by hinges; the possibility of deformation is eliminated from above due to the reinforcement of the corners. It will be held at the bottom by horizontal clamps (latches);
b) This is the most economical of the options presented, but it creates reinforcement only in the middle of the frame. The only advantage is that it makes it possible to install a lock on the jumper.
V) The disadvantage of this option is the weak reinforcement of the upper internal corners. Strong wind may deform the sash;
G) in this case there is no strengthening of the left inner corner;
d) in this case there is no strengthening of both internal corners;
e) perfect option. Places for inserting the lock, installing hinges, lower clamps and top corners strengthened. This method eliminates frame torsion.
Advice. The wider the sash, the more the frame is reinforced.
Stage 3 – tools and material for gates made of corrugated sheets
The drawing of a gate made of corrugated sheets is visual aid to calculate the material. To make it you will need:
- corrugated sheeting - for cladding. It is preferable to take a wall one, because it has a large working width.
- self-tapping screws or rivets for attaching corrugated sheets;
- metal pipe with a cross-section of 60x60 mm and above - for support pillars;
- pipe with a cross section of 40x40 or 60x20...60 mm. – for elements of the frame of the sashes (frame);
- pipe 20x20 to strengthen the frame (if necessary). 20x20 is suitable for a frame made of 60x20 pipe. 30x30 - if a 60x30 pipe was used.
Experts advise buying all pipes with a thickness of 3 mm, not 2. Their price is slightly more expensive, but it will be much easier for beginners to weld them. Metal heats up more slowly and does not deform as quickly.
- metal sheet for forming scarves (if necessary);
- hinges, locks (latches, latches, plugs), bottom clamps;
- metal primer and paint;
- decorative elements (forging).
Tools you will need: welding machine, grinder, screwdriver (drill and riveter), tape measure, level, plumb line, metal scissors, brushes and Consumables to the instrument.
Stage 4 – installation of support posts for gates made of corrugated sheets
Installation of corrugated gates begins with the installation of support posts. The most common way to install gate posts is by digging them in followed by concreting.


How to install gate posts correctly
- dig a hole with a garden drill. Using a shovel increases concrete consumption. The larger the diameter of the support, the larger the diameter of the recess should be. For a pipe with a cross-section of 60x60, the diameter of the drill should be 120 mm.
How deep should gate posts be buried? Installation depth is 1/3 of the support length
- pour a mixture of crushed stone and sand into the recess. The thickness of the pillow is 150-300 mm. The cushion is designed to prevent the influence of frost heaving of the soil and ensure the outflow of water from the base of the support, thereby slowing down its destruction;
- prepare the support (coat it with anti-corrosion primer);
- install the support strictly vertically. The slightest deviation will lead to distortion of the entire structure. Correct installation is checked with a plumb line or level;
- concrete the support. While the concrete is setting, you can begin making the frame;
- cover the upper part of the support with a metal plate or special decorative element. As a last resort, pour concrete into the post (concrete from the inside) to prevent water from getting inside and thereby prevent the pillar from collapsing.
What kind of corrugated gate posts can be used?
In addition to the supports from metal pipes you can install a concrete pillar or use piles. Supports decorated (lined) with brick or stone look beautiful ( brick pillars). When calculating the width of the gate opening, you should take into account the material of manufacture and the width of the support.
(banner_advert_2)
Stage 5 – manufacturing gate frames from corrugated sheets
Before starting production, you need to once again measure the width of the gate opening and wicket in order to make timely changes to the dimensions of the sashes.
Manufacturing technology:
- the metal is dissolved into blanks. It is advisable to make the cut at an angle of 45° for more reliable fastening. Although end-to-end welding of parts is also common, it is easier to cut workpieces and weld them;
Advice. Craftsmen advise welding the upper corners at an angle of 45 degrees, this will prevent water from flowing into them, and the lower ones can be butt welded.


- each workpiece is cleaned of dirt and rust;
- weld the frame elements together. Moreover, first the workpieces are baited, and after checking the geometry, they are welded with a continuous seam;
- the frame is strengthened (if necessary);
- Weld seams are thoroughly cleaned;
- degrease the frame, coat it with primer and paint the welding areas. After the paint has dried, paint the frame completely.
Advice. Making gates from corrugated sheets requires great precision in maintaining dimensions. When making a sash frame, it is better to make the frame a little smaller rather than larger. In the first case, in order to eliminate the gap between the swing gate leaves, it will be enough to weld the flashing onto one leaf of the frame, where it adjoins the second. In the second, you will need to cut the frame and reduce its width.
Stage 6 – installation of hinges for swing gates made of corrugated sheets
Garage hinges (awnings) are used to install gates.
How to properly weld hinges on gates made of corrugated sheets?
First the loop is welded to support post, then onto the gate frame at a distance of 200-300 mm from the edge of the leaf frame. Please note that the location of the hinge affects the position of the door when open. If it is necessary for the gate to open in both directions, the hinge is butt welded to the support. If there is only one, the loop is placed on the frame. To prevent the sash from reaching the fence, install a limiter.


How many hinges should be welded on the gate?
If the gate is reinforced, three hinges are required for each leaf. If you are light, two are enough.
Stage 7 – installation of corrugated sheeting on the gate
The corrugated sheet is mounted on one or both sides of the frame. The installation rules are not complicated, but knowing and following them will help you install the corrugated sheet on the gate correctly.
IN general outline: need to be provided reliable fastening sheet to the frame, fixing the corrugated sheet through one lower wave of the sheet. In this case, the profiled sheet is also screwed to the diagonal or perpendicular jumpers. And the two sheets are connected to each other at the top of the wave (at the crest).
Rivets or self-tapping screws are used for fastening. Rivets look more elegant (especially those matched to the color of the corrugated sheet), self-tapping screws eliminate the possibility of water flowing into the installation site. Of course, this is not as critical as on the roof, but rusty smudges cannot be avoided over time.
Stage 8 – installation of fittings (components for gates)
Additional elements:
- lock for swing gates made of corrugated board. It is installed after the sashes are hung.
Types of locks and how to install/install (installation rules):
- mounted It is necessary to provide loops for the lock when welding the frame and attaching corrugated sheets;
- overhead. Installed on a crossbar, most often on an additionally welded flat sheet metal Or it is screwed directly to the frame with hardware. Craftsmen do not recommend using welding to install the locking mechanism structure, because the lock needs maintenance and replacement;
- mortise The lock cuts into the plane of the pipe; a metal pocket is used to hide/decorate the installation site.
- lower lock of the swing gate leaf - needed to redistribute the load from the lock and additionally secure the lower part of the open/closed gate leaf from the wind (wind load).


- gate latch (bolt), designed to close the gate from the inside (locking). The latch is more suitable for a gate, and for swing gates a lock (bolt) is used.
- automation for swing gates. Allows you to open the gate remotely, which is very convenient when it’s cold, it's raining or dark.
- security system: external surveillance camera, warning light, alarm.
Swing gates made of corrugated sheets with a built-in wicket
We’ll separately tell you how to make swing gates with a wicket made of corrugated sheets. This option is used when the opening is not wide enough to install gates and a separate wicket.
Options for the location of the wicket in the gate
Locations:
 When making sash frames, they are made different sizes. Then the narrower sash serves as a gate.
This is the most a budget option, since the load on only one gate post increases, which will require the installation of an additional hinge and reinforcement of the frame. Overall costs will go down.
 In the middle of the gate leaf. The option with a location in the middle is good because the frame of the gate acts as a reinforcement of the frame of the sash. And installing hinges not in the center, but closer to the top and bottom of the gate will further strengthen the structure.
  Closer to the support pillar. In this case, the main load falls on support pillar, because both the gate frame and the wicket frame rest on it.
  Closer to the inner edge of the sash. This design is the most “flimsy”; its weak link is the junction of the two doors and the gate. In the last three cases, during the manufacturing process of the frame, an additional frame for the gate is provided. Moreover, it is made more reinforced than for a free-standing gate, since it accounts for wind load, which acts on gate leaves made of corrugated sheets. Please note that the gate will greatly overload the frame, which means that additional hinges and reinforcement of the sash frame will be needed.
 In general, the technology for manufacturing gates from corrugated sheets with a wicket inside is similar to manufacturing gates with a separate wicket. All the nuances are considered during the drawing process.
Advice. The lower clamp for such models of swing gates made of corrugated sheets is required.
Advantages and disadvantages of swing gates made of corrugated sheets
Advantages (pros):
- comparative simplicity of design and manufacture;
- low compared to sliding gates, price;
- ease of operation and maintenance;
- accessibility for installation of automation;
Disadvantages (cons):
- requirements to free space for maneuver (opening will require clearing an area equal to the width of the gate leaf);
- the need to take into account wind load;
- the need to provide for fastening open gates in order to avoid their unauthorized closing (latch, stop, locking devices);
- installing a limiter to prevent open gates from damaging the fence and blocking access to the gate;
- difficulty in caring for winter time year, which consists in the need to remove snow over a large area.
Approximate prices for swing gates made of corrugated sheets

Conclusion
As you can see, with some effort you can make and install swing gates from corrugated sheets with your own hands in 1-2 weeks, which will decorate entrance group and will serve reliably beautiful business card private house.