Laying new tiles over old ones. Laying a new tile directly on the old one: a proven method Laying a new tile on top of an old one on the floor
In the process of carrying out repair work with your own hands, you have to deal with many difficult questions, the correct answers to which will determine the quality and service life of the new finish. One such question is, can you lay tile on tile? Let's consider whether it is possible to use the old tile as a basis for a new coating or whether it is better to dismantle it to avoid possible problems.
Features of preparation of various types of surfaces. How to rub seams. Criteria for choosing tile coverings and laying patterns for the floor.
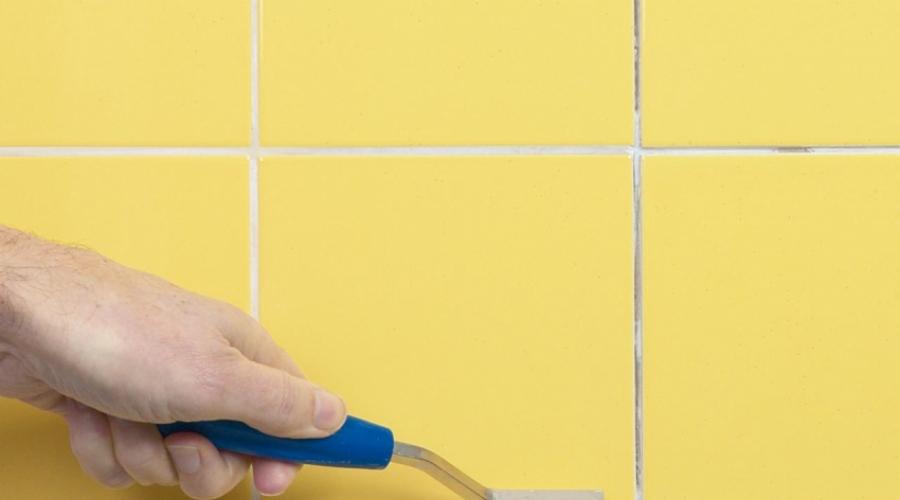
How to remove old grout from tile joints
Quite often you have to deal with a situation where the condition of the old tile is quite satisfactory, but in order to use it as the basis for a new coating, it is necessary to replace the grout for the joints. It is quite possible to carry out this procedure, however, it requires attention and time. Let's look at how to remove grout from tile joints correctly.

In order to remove old grout, there is a special tool called a “grout remover.” It can be used to remove grout mechanically. By itself, it is a blade with a comfortable handle, but as an alternative, you can use a regular knife.
The blade of a knife or embroiderer must be passed on both sides at an angle and straight. When doing this, you need to be careful not to chip the edges of the tiles. It is worth noting that this cannot be done quickly “by hand”, so you can use a drill with a thin drill bit or an electric chisel.
Important! If, in the process of removing the old grout, the tiles also begin to crumble, it is better to abandon the idea of laying another layer on top, even if there is new grout.
How to remove old grout from tile joints if it is silicone
Silicone grout also requires dismantling and replacement, especially if the room has not been provided with high-quality ventilation. Very often you have to deal with the fact that the seams are affected by mold, which is almost impossible to remove. Therefore, before laying new tiles over old tiles, you need to take care of the hygiene of the joints.

Removal of silicone sealant is carried out using a sharp knife or a special scraper. After this, additional cleaning is carried out using a vacuum cleaner.
Helpful advice! There are special products that allow you to remove silicone faster and with less effort. Such compositions are applied using a mounting gun, after which it is necessary to wait at least 24 hours. Then the seams are wiped with a rag or paper.
Is it possible to lay tiles on tiles on the floor: features of the work
Floor coverings, unlike wall coverings, are not subject to gravity. Therefore, in a sense, installation is easier. But in this case, another difficulty arises - the new coating will regularly be subject to serious loads.
Before gluing tiles to the floor, you need to carry out an equally thorough check of each element of the lower layer. To do this, you can use the same hammer for tapping, but you can try another approach: an object with a flat base (a box works well), you need to smoothly drag it across the surface, carefully observing that not a single tile falls even a few millimeters. It can be difficult to do this in a small bathroom or toilet, but for larger rooms this is a very effective way.

In general, all the recommendations provided in the previous section are also relevant when working with floors. It is only advisable to give preference to mineral compositions. Thus, the surface will be provided with greater elasticity, which will allow it to withstand heavy loads and temperature changes.
Helpful advice! Before laying floor tiles over an old ceramic coating, you don't have to do as much prep work as you would with a wall surface. But it’s still worth moistening the base before you start applying glue, as this will have a positive effect on adhesion.
Is it possible to make a self-leveling floor on old tiles?
As a basis for a new coating, you can also use a self-leveling floor, which is installed directly on the surface of the old tile. As in all previous cases, a mandatory procedure is a thorough check of the quality of fastening of the lower layer. All loosely fitting elements must be dismantled.

It is also worth paying attention to the fact that in cases where we are talking about working with a glossy surface, the top layer of coating is removed to ensure the necessary level of adhesion between the solution and the tile. Filling and further work are carried out according to the standard algorithm.
Helpful advice! Laying a new layer of tile does not require a thick layer of self-leveling floor. Its thickness should not exceed 5 mm. The main thing is to evenly distribute the composition over the entire surface.
Taking into account the opinion of experts, we can say that installing a self-leveling floor on top of tiles is possible only in extreme cases. In this case, the area of the room should be small, and the requirements for the operational characteristics of the surface should be minimal.
Is it possible to lay tiles on tiles outdoors?
A very interesting question that may arise is whether it is possible to lay a new layer of paving slabs on top of the old one. Of course, such a procedure is often unjustified, but still, in some cases, this technology is resorted to in the process of arranging garden paths, terraces and summer areas.

As in the case of tiles laid on old flooring inside the house, the main criterion is the quality of fastening of the lower layer. You can check it using a pry bar or a strong knife. Using such tools, you should try to remove one of the elements.
Important! If the tile was able to be moved using a knife, but this required serious physical effort, then such a coating can be used as a base. If the tile comes off easily, this may later cause deformation of the top layer.
A new cushion is poured on top of the old layer of tiles, which should consist of three layers - loose soil, gravel, sand. In this case, compaction of each layer must be carried out separately. On top, according to standard technology, a new layer of paving slabs is laid.

Thus, the answer to the question of whether it is possible to lay tiles on tiles on the floor in the bathroom or even on the walls is rather in the affirmative. Of course, in the process of work you will have to follow many rules and recommendations, and the end result can almost always be unpredictable, but in principle, this is quite possible.
Is it even possible to lay new tiles over old ones?
Is it possible to lay tiles on tiles? This question cannot be answered unequivocally. Because in rare cases you can be sure that the existing ceramics will hold tightly, have no voids and will not begin to fall off under the weight of the new tile.
Weigh the pros and cons and study the surface
In practice, you can put new tiles on top of old ones. But before installation, you should still weigh the pros and cons, and if, for some reason, you decide not to dismantle the previous coating, you need to carefully check whether it has a sufficiently reliable adhesion to the surface of the wall or floor. To do this, tap the tiles with a hammer and inspect them. If it rattles when tapped or has cracks and swellings, then there is no way to put a new layer on it. It will have to be dismantled. If the elements hold tightly, then you can proceed.

Simple and reliable installation technology
The methods that craftsmen use when laying new ceramic tiles on old ones vary. Many people advise making notches, cutting off the glaze with a grinder, etc. But if you use a special primer, then all these measures will be unnecessary. Concrete contact is exactly what is needed for surfaces with low water absorption.
Before applying primer to old tiles, it is thoroughly cleaned of dirt and grease. Concrete contact is applied with a roller or brush. The material is thoroughly mixed before use and during operation. Do not allow the primer to get into your eyes, but if the mixture gets into your eyes, wash it off with plenty of water.
You need to wear rubber gloves when working with concrete contact. The average primer consumption is 300 g per m².

They produce acrylic-based concrete contact. In addition to special fillers that increase the adhesion of the mixture, the soil contains sand and cement. Any hard-to-absorbent surfaces can be treated with concrete contact. After applying primer to the surface, it becomes rough. When the previous coating is processed, it is given three hours to dry.
After the primer has dried, the surface is suitable for laying new material on the adhesive solution. About how to do this.
Video: work technology
Do not forget that if you do not, but lay a new one on it, this will reduce the area of your room. Bathrooms in apartments tend to have a small area, so it’s worth considering whether you need to reduce it even more.
(No ratings yet)
Of course, the option is not the best to lay new tiles on old ones. It is better to dismantle the old tiles; it is possible that the plaster will have to be removed. In short, bring the ideal surface to an amazing look, so that later the tiles do not fall off when laying new tiles. Everyone chooses for themselves how it is most profitable for them to make repairs so that there is no loss.
By clicking the “Add comment” button, I agree with the site.
It is natural for a person to want to save money. Moreover, we are talking not only about money or consumables, but also about time, effort, and energy. Such desires can result in solutions to global problems. Or they can be much smaller and push a person to solve “narrow” questions. For example, can you lay tiles on tiles?
Is it possible or not?
In this case, as in that popular expression: “If you really want to, then you can.” Actually the answer to the question: "Can I lay tile on tile?" - depends on many nuances and details. And all of them must be taken into account, because otherwise, savings may result in excessive costs arising from the need to redo the work done.
Tap, listen, view
First of all, when deciding whether it is possible to lay tiles on tiles, you need to inspect every inch of the future base. To do this, first carry out a visual inspection: see if the previous coating is well preserved. If cracks appear, chips or other defects are present, this is already an argument in favor of removing the old coating. Although the number of defective tiles is taken into account here. Regardless of whether you are faced with a dilemma: is it possible to lay tiles on tiles on the floor or not, or are you planning to do it on the walls, if the damage to the tiles is a widespread phenomenon, then get ready to dismantle the old layer. If not, you can still make do with a little pain and remove broken or suspicious pieces by covering the resulting holes with mortar or tile adhesive.

But that's not all. You should, armed with a hammer, tap each tile, clearly listening to the sound it makes. If your ear catches a rattling, too ringing sound, it means that there are problems of an “internal” nature under this place. This is where there are defects in laying the tiles. Instead of cement, there is air, so such tiles are completely unreliable as an initial covering. If there are quite a lot of such areas, then the question of whether it is possible to lay tiles on tiles will disappear on its own.
Floor and walls
Their main difference is in the direction of the planes where they are located, and, accordingly, in the loads. If there is a large mechanical impact on the floor from above, then the force of gravity acts on the walls to a greater extent, pulling the tiles down. Because of this, for many craftsmen the question is: “Can I lay tile on tile on a wall?” - is quite controversial. Some clearly give a positive answer, others do not recommend doing this, while others have doubts about how a large tile laid on a small one and vice versa will behave.

But most craftsmen are still confident that there is nothing wrong with the second layer of wall tiles. You just need to meet all the necessary technological requirements and use high-quality materials. The preparation of the primary, soil layer is of primary importance.
Thorough wet cleaning

All doubts about whether it is possible to lay tiles on tiles on the floor or on the walls are already behind us. It's time to get to work. And you need to start by preparing the old tiles to turn them into a ground layer. Since the tile is covered with glaze, care should be taken to increase its adhesive ability. To begin with, you should, armed with either a rag with a solution of caustic soda, or organic solvents (gasoline, acetone, etc.), treat the old tiles, removing dust, grease and other contaminants from them. The second method is faster, but more harmful to health. The right to choose what to save on is left to you. When processing, remember that most of the dirt collects in the seams between the tiles. Therefore, these places should be given special attention.
To prevent the tiles from coming off
The main doubt when deciding the question: “Is it possible to lay tiles on tiles in the bathroom?” - increased humidity of the room. But again, modern technologies help solve this problem. The main thing is to increase the adhesion force between the new and old layers. And to do this, after thorough cleaning procedures, you need to start processing the base.
There are two ways to do this:
- mechanical;
- chemical.
The first one is quite simple. Take a grinder with a diamond blade and scrape the glaze off the old tile. Or, with another tool, we make notches, holes, grooves - well, as the hand fits. In short, we mock the old coating as best we can, just to damage the top layer. Because we remember - glazed tiles have a water-repellent property, but we need, on the contrary, for the adhesive base to be absorbed into it more firmly. Having finished the “act of vandalism”, do not forget to turn on the vacuum cleaner and thoroughly (you can even several times) vacuum the bathroom. Because dust is also the enemy of adhesive reagents.

If dusty work is not to your liking, take gloves, a roller and apply a special primer to the cleaned floor - traditional for this method “Betonokontakt” or “Ceresit CN94” or less known for now Ivsil Basis-Beton, “Plitonit-Grunt-Superkontakt” . It is a pleasure to work with Betonokontakt. Thanks to its color, you can always see whether the entire surface is well and evenly processed. Having finished the exercises with chemistry, we go to rest for three hours, until the coating dries and begins to resemble sandpaper. By the way, before treating the base with reagents, carefully close the pipes and other places where the primer is not intended to be used. Otherwise, you risk getting an indelible stain on the reputation of your bathroom.
What to glue with?
Puzzled by the question: “Is it possible to lay tiles on tiles in a bathroom on the wall?”, many are based on the expected savings in materials and, accordingly, money. But you should not save money by buying cheap adhesives for this work. After all, they must “work” under rather specific conditions. Durable fixation materials that can withstand increased loads in uncomfortable environments are more expensive than classic options. But it’s better to “plant” the tiles on them right away than to repeat this action several times later.
Thanks to its high level of adhesion, Ceresit CM-17 tile adhesive has gained good reputation. It works great on smooth surfaces. And another bonus from its use is that tiles can be laid on the wall from top to bottom.

Experts say that when using the Vetonit Renovation adhesive mixture, you don’t have to worry about roughening the bottom layer on which the new tile is laid. Although this is exactly the case when reinsurance does not hurt, especially for non-professionals.
Ivsil Profit adhesive composition is usually used for laying porcelain stoneware. And since it is designed to withstand this heavy material, it will handle the second layer of tile just fine. In addition, its price is lower than that of the adhesive materials mentioned above.
The process itself
It doesn’t matter which of the questions is facing you: “Is it possible to lay tiles on tiles in the bathroom?”, “On the floor?”, “On the walls?”, the main thing is that you do not need to forget about the small nuances of the work. Well, firstly, you should choose the location of the new tile so that its rows do not repeat the old ones, so that the seams between the tiles are different from those on the first layer. This will give the structure additional strength.

Secondly, there is no need to try to lay the tiles on a thick, thick layer of glue. This can lead to increased drying time, shrinkage of the tiles and other troubles. Well, we should not forget about the final grouting of the joints.
"Eat" space
The main disadvantage of laying a second layer of tiles is the reduction in the volume of the room. By the way, one of the reasons for refusing this action in the bathroom is raising the floor level after installation. In principle, it is possible to lay new tiles on old ones indefinitely, subject to technological standards and the use of appropriate materials. But, when thinking about whether it is possible to lay tiles on tiles in three layers, do not forget to measure how many centimeters your bathroom or kitchen will decrease.
It would seem, why put new tiles on old ones. However, there are cases when this simply cannot be avoided: sometimes the conditions of the construction site require it. It also happens that this approach turns out to be more budget-friendly.
Old tiles can still serve
Before deciding whether to dismantle the old one, think about whether it is advisable to remove the previous layer. Maybe the old cladding will save on preparatory work.
Justification of economic feasibility
If you cannot answer this question yourself, we offer you several significant “pros” of using old tiles:
- reduction of terms;
- savings on materials;
- labor costs are reduced;
- the amount of waste is reduced.

Contraindications for work
On the other hand, there are situations when it is impossible to do without dismantling the old coating. Let's name the main cases:
- the surface on which work is to be done has a slope;
- it is necessary to dismantle communications;
- voids under the old layer;
- the tiles are too thin and contain multiple cracks and chips;
Important! If the percentage of damaged coating is more than 10 - 15%, dismantling must be carried out without fail.

Is it possible to put tiles on tiles on the wall: technological nuances
Before you begin any preparatory work, examine the condition of the tiles on which you plan to lay a new layer of tiles.
The procedure for assessing the condition of the old coating
Make sure there are no visible defects or chips. Examine the coating for voids and dips. Indeed, in the absence of strong adhesion to the base, the bottom layer may simply crumble.
Advice! The presence of voids can be checked by simply tapping with a fist or a rubber mallet.
Pay attention to the quality, cracks may indicate a poor-quality building mixture, in addition, it is important to check for a slope, in this case it will not be possible to lay it evenly.
How to put new tiles on old wall tiles if the surface condition is considered satisfactory
And now from theory to practice. Let's look at the process step by step.
Roughening the old coating to ensure the desired level of adhesion
Before you start tiling, you should properly prepare the base:
| Illustration | Description of action |
 | The first stage is degreasing the surface. You can simply take soap and water and give the tile floor a good scrub. If you accidentally stain the surface with glue or mortar, you can clean the surface with a brush. In our case, we use a brush attachment on a drill. We pay special attention to the seams. Important! While working, do not forget to wear a mask and respirator! |
 | Using this, we level out those surface elements that had to be removed. Let's use the rule. We apply concrete contact to the washed and pre-dried surface with old tiles to improve adhesion. |
Installation using standard technology
Installation work should be performed in the following sequence:
| Illustration | Action Descriptions |
 | After our concrete contact has dried, we can begin laying a new one. Check the level in advance to see if there are any slopes. The floor must be perfectly level. Apply medium-thick glue with a comb, trying to avoid gaps. |
 | Place the tile and press gently. If necessary, adjust the position. We remove the excess glue and place it in the place where the next tile will be laid. The arrow indicates the angle along which we remove excess glue. |
 | We continue to work, checking ourselves on the level. We control the joints of the plates with limiters - crosses. |
Is it possible to lay floor tiles on tiles: a professional answer to a pressing question
Professionals do not exclude the need for such finishing work. As we noted above, this is significant, making it less expensive and dusty.
Assessment of the condition of the old coating
In addition to the above points that we talked about earlier, it is not advisable to lay it on old tiles in the following cases:
- if your home does not have high ceilings, in this case an extra layer can visually reduce the space;
- sometimes there is a need to replace the old one.
Important! If the surface of the tile is smooth, its adhesive characteristics should be increased. You can clean the glossy surface with a special brush.

We suggest watching the video to understand in detail how to lay tiles on tiles:
Is it possible to lay tiles on old tiles on the street: let's figure it out together
Higher demands are placed on the performance characteristics of roofs laid outdoors. Only when the old foundation is strong enough can such work be carried out.

Checking the strength of the old coating
The first stage is to check the strong adhesion of the street tiles to the base; if it was not possible to move the tiles with a stick or pry bar, then they can serve as the basis for a new coating.
How to lay paving slabs on the street if the strength of the old coating is not satisfactory
How to properly install tiles on tiles outdoors? This process has its own characteristics.

Construction of a new cushion of soil, gravel and sand
It is important to ensure a tight compaction of the layer. The thickness of the “pillow” should not exceed that which was laid in the old layer. The composition of the mixture in the base may vary depending on the thickness of the tile and the load that will act on the surface.
The ability to lay a new floor covering on the surface of the old one allows you to skip several repair stages and significantly save on this process.
Inspection of the old floor
If you do not remove old tiles from the bathroom floor then:
- no need to purchase a hammer drill or a number of other tools;
- it will be possible to avoid labor-intensive and dirty work of dismantling tiles and removing debris;
- no screed alignment will be required, which will greatly reduce repair time.
Before you begin renovating the bathroom floor, you need to inspect each tile of the old flooring. A visual inspection will be required first. If the tile is covered with cracks or its surface is swollen, this indicates poor adhesion of the material to the base of the floor. Such tiles cannot serve as a solid base for a new floor covering.
Important: When inspecting the floor, you need to pay attention to the condition of the tile joints. The crumbled grout is poured with cement mortar or filled with tile adhesive.
Tip: To ensure that the solution evenly fills the seams, it is best to use a trowel or spatula.
The absence of defects in the appearance of the tiles is not yet complete proof of the strength of the coating. If, when tapped with a hammer, a floor element produces a ringing or rattling sound, then it is poorly glued to the base. An old floor is suitable for laying tiles only if only a few defective tiles are found during the inspection process.
Preparing old flooring for tiling
Floor elements that have become unusable are completely removed. The resulting holes are filled with sand-cement mixture. Repairs continue after the solution has completely hardened.
Tip: You need to pay attention to the floor level in the bathroom, which should remain below the threshold after the renovation is completed.

This recommendation must be followed by everyone who wants to know whether it is possible to lay tiles on tiles on the bathroom floor and uses its paving variety for this. This type of tile is significantly higher in height than similar materials intended for tiling bathroom floors. Its use can significantly raise the floor level, which will allow spilled water to flow freely into the living space.
The glazed surface of ceramic tiles can significantly reduce the adhesive properties of the adhesive. To enhance the adhesion of the base of the floor to the adhesive, notches are made on it, holes are drilled or the glaze is completely removed, right down to the ceramics. Depending on the chosen method of influencing the surface of the tile, you will need the following tools:
- hammer and chisel;
- electric drill;
- grinder with diamond blade.

The second factor that negatively affects the adhesion parameters of adhesives is dust. To completely remove it, the bathroom floor is swept and vacuumed. Wet cleaning of the premises will also be required, without the use of detergents.
The invisible fat film is removed from the floor surface, otherwise it will become an obstacle to the glue. The degreasing procedure consists of thoroughly treating each tile with gasoline or acetone. Washing the tiles with caustic soda three times gives the same effect. The spaces between the tiles, where dust and grease always accumulate in large quantities, are washed with special care.
Floor primer
To improve the adhesion of the floor base and the tile covering, its surface is primed. It is recommended to use Betonokontakt, Ivsil Basis-Beton and Ceresit CN94 primers. This finishing material, along with sand and cement, also contains additional components. Their presence gives the plastered surface a pronounced roughness.
Tip: particles of hardened primer are difficult to remove, so before using it you need to cover walls, pipes and plumbing equipment with polyethylene.

Advice:
You need to buy a primer at the rate of 300 g per 1 sq. m. m. area. To apply it you will need a roller or brush. Using a tool, the primer is evenly distributed over the floor surface, trying not to leave untreated areas. The use of “Betonokontakt” simplifies the priming process, because the surfaces treated with it acquire a pinkish tint.
After priming, the floor must dry. This will take about three hours. A properly plastered floor surface, after drying, will resemble sandpaper in texture.
Choosing adhesive for tiles
Answering positively to the question whether it is possible to lay floor tiles on old tiles to obtain a durable structure, it is recommended to cover the floors with a thin layer of glue. Its thickness should not exceed 2 mm. This composition is applied to the surface as soon as the primer has dried. The next stage of repair begins after the adhesive mass has completely hardened.
- "Ivsil Profit";
- "Ceresit CM17";
- Vetonit Renovation.

Tip: To ensure that the glue structure is uniform, it is best to mix it using a construction mixer.
“Ivsil Profit” is intended for fixing porcelain stoneware. Its use allows you to always get a reliable tile floor covering. A similar result is guaranteed if the tile covering is mounted on a base made of old tiles.
The adhesive compositions “Ceresit CM16” and “Vetonit Renovation” have the highest adhesive characteristics. They are used to work with various complex surfaces. One option for their use could be old tile flooring.
Installation of new tile covering
The technology for laying tiles on tiles has some differences. The initial row is placed in such a way that the seams of the old and new coatings do not coincide. A spatula with a comb height of 1.5 cm is suitable for applying glue.
The adhesive mass is evenly distributed with a spatula over the entire surface of the tile. Then, it is pressed forcefully to the base of the floor. A small gap of 2-3 mm is left between adjacent tiles.
Tip: The distance between the floor elements will be the same if special “crosses” are placed between them during the installation process.

After laying all the tiles, the tile separators are removed and the processing of the tile joints begins. For the final process you will need a suitable color of grout and a rubber spatula. After the grout has dried, the floor surface should be wiped with a damp sponge or a well-wrung out soft cloth.
48 hours after installation of the tiled floor, you can begin to use it intensively. This floor covering will be durable, despite the fact that several stages of repair work were skipped during its creation. It is important that the laying of tiles on old tiles is carried out in accordance with all the rules given in this article.