Corner bench made of timber. How to make a bench for your home yourself: wood, stone, metal. Tools and materials for work
Read also
Benches for a summer house made of boards
One of the most necessary items in the country is an ordinary bench. It's nice to sit on the bench in the shade on a hot summer day or in the evening at the end of a hard day. Stores offer a wide selection of park and country benches, but a number of difficulties arise here. Firstly, the cost of such a product is quite high and the quality may not be satisfactory. And secondly, there is a problem with delivering the product to the summer cottage.
All these problems can be solved if you do DIY garden bench. The main advantages in this case are the availability of materials for manufacturing, as well as the ability to design a bench of a convenient configuration. Based on these tasks, we propose a design for a bench for your dacha, which you can make yourself. For this, 2 x six meters will be enough. By cutting them into pieces 1.5 meters long, they can be transported to their destination quite easily.
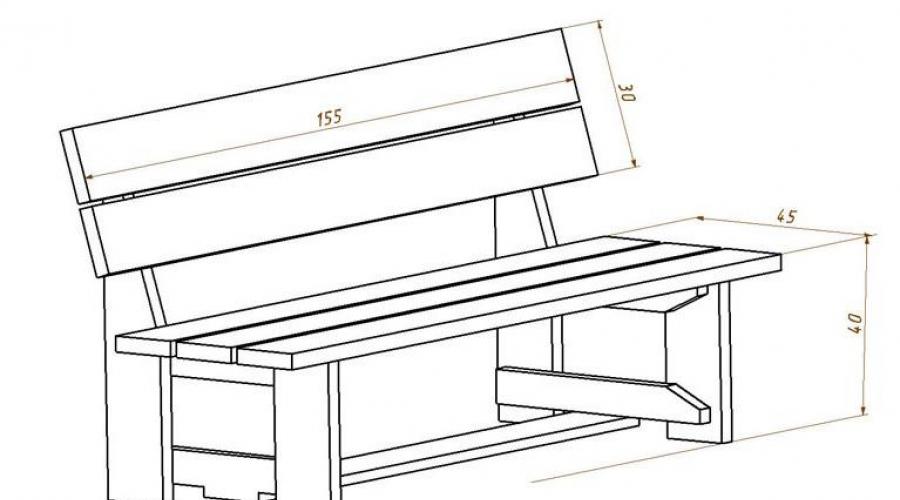
Get forty-millimeter boards to ensure sufficient reliability and strength of the bench. Considering the location of the benches on the street, gaps are made in the back and seat to remove rainwater. Therefore, the total seat width of the benches is forty centimeters, which ensures comfortable sitting on it. The 18° backrest angle is chosen for better ergonomics. The tools you will need are a hacksaw, a drill with wood drills, an electric jigsaw, a screwdriver (screwdriver) and available materials (a square, a pencil, a tape measure).

Dimensions for a wooden bench

Making a bench for a summer house
First, let's prepare boards and beams of the required size. You need to have 5 one and a half meter boards, 2 360 mm boards. and two - 52 cm each, which are then sawn into 4 beams, which we will use to fix the legs and seat. The legs and backrest holder will be two 720 mm boards on which the cuts are made. The cut boards are planed to remove burrs. After removing the fissures, you need to make the edges of the boards and beams smooth. Before installing the country bench, the wood is treated with an antiseptic to extend its service life. To give the desired shade, you can use a colored antiseptic.

Scheme - drawing: Bench with back

We will begin the installation of a bench made of boards with the legs, which we will connect to each other with crossbars and self-tapping screws. When using boards and timber to construct a bench for the dacha, you must be very careful about the correct formation of the legs. The stability of the structure itself depends on them. By deepening the legs into the ground you can significantly improve the stability of the bench. You can use hemp or log stumps as legs. It is advisable to connect the joints of the bench with wooden dowels (as shown in the video).

Self-tapping screws are used to attach the seat and back boards to the bench legs. If they are not long enough, you need to make a hole in advance larger than the diameter of the screw head. The fasteners are made on the reverse side to make the fasteners invisible. Having determined the most convenient angle of the backrest, we secure the stops with self-tapping screws using corners and plates.

Installation of bench backs
At the final stage, the legs of the garden bench are fastened together by installing the lower cross member. Treating them with mastic will help prevent your feet from absorbing rain moisture. To do this, a bucket with a protective composition is heated over a fire until the mastic becomes liquid. Turning the garden bench over, carefully brush the legs over the entire surface with a brush. For complete drying, you need to wait one day and only then further processing is carried out.

The assembled product is coated with yacht varnish or special impregnation to protect it from moisture. Naturally, the varnish coating looks much better, but at the same time the varnish surface becomes colder. Coating the surface of a garden bench with one layer makes it rough. You can achieve a smooth, shiny surface of the bench using special technology.
At the same time, after waiting for the first layer of varnish to dry, the board is treated with sandpaper and coated with varnish twice more; after drying, you can use the bench.
Note! If you want to save time and purchase a finished product, we advise you to contact the Kupistol company. It is famous for the quality of the furniture it sells, excellent service (fast delivery, same-day assembly, return options) and low prices. There is a huge assortment of furniture for home and garden, so every buyer will be able to choose furniture based on different criteria such as design, material, cost, etc.
At your summer cottage, you really want to have a corner where you can relax and enjoy nature. It is impossible to imagine such a place without a beautiful bench. A self-made garden bench can not only save money, but also fulfill the individual needs and ideas of everyone, because there are a lot of options and techniques for making it, and from them you can choose the one that suits you.
Step-by-step diagram for assembling a garden bench with a table


How to choose a place to install a country bench
Before you start making your own bench, you need to be very careful about where to place it. This issue is worth addressing because a bench is not only an object for the convenience of relaxation, but also a place where a sufficiently large amount of time will be spent, and therefore the view and atmosphere must be suitable. In addition, much in its design and installation process will depend on the selected area for installing a garden bench, as well as its type.

Examples of the location of garden benches from the design side.
A bench for a summer house made of wood combined with forged wood frame.  A bench made of logs with a stone base.  |
It will fit very harmoniously into a garden in which trees with large crowns and various fluffy shrubs grow. |
Romantic style bench, openwork  |
A garden of young trees or a vineyard would be a good place to place it. |
Miniature bench painted white  |
It would be ideal to be in contrast with a dense hedge of rich green color. Also a good option for such a bench would be a pond, flowering flower beds, or simply in a secluded corner decorated with flowers. |
Retro bench made of “old” wood  |
It can create a very mysterious atmosphere together with old trees with curved trunks located nearby, near which flowers of different types are planted. |
Bench combined with decorative items  |
A very popular place to place a bench is a veranda or gazebo. In this case, a do-it-yourself garden bench should be made in a similar style with existing decorative items and the veranda or gazebo itself. |
Combined benches and table  |
This design will be good on a small spacious plot of land, which can be decorated with floral vegetation, and can also be located next to the house or under a canopy. |
In addition to the options listed, you can install a bench in a place where children usually spend their leisure time, which will allow you to be close to them when they play. It will be especially good to organize a place to rest if there is a lone tree on the site, which has a spreading crown, by installing a bench directly under it.

In addition, you can organize a canopy near the house, under which you can place a garden bench. This will be a good vacation spot even in rainy weather. There is another option to simply locate a bench in the beds where crops are grown - it will be convenient for relaxing between work in the garden.
Important: It is best to choose a location so that there are no annoying objects or buildings, garages, fences, etc. in the field of view. It is worth remembering that the view should lift your spirits and promote relaxation, and not be a reminder of how much work remains to be done at the dacha.

There are a great many options and ideas for implementation that a DIY garden bench can allow you to implement. It’s quite simple to come up with a decorative composition with its participation; for example, it looks good on elevations, decorated with boulders or shrubs; a bench that harmoniously merges into a flower bed is also pleasing to the eye.

Preliminary steps
After the location of the bench has been determined, you need to start planning the future product. It is worth considering a few points:
- Size. If the bench is typical in size and you do not want to design an individual model, you can use the data from the table.
- Method of fastening the backrest.
- Leg layout. This criterion can be determined based on the mobility of the product. If the bench is a stationary structure, then it should be strengthened in the ground with cement, first digging a hole in the ground of the required size.

Table of standard bench sizes.
| Seat height, m | Seat width, m | Back height, m |
| 0,4-0,5 | 0,5-0,55 | 0,35-0,5 |


When the drawing plan is drawn up, you can easily determine the size of each part of the bench from it, and then begin its manufacture.

It is also worth asking about the material from which the DIY garden bench will be made. Each material has its own special nuances that can be used as advantages to achieve the desired result.


Mandatory requirements for the bench
In addition to the previous nuances in the process of designing a product, it is worth taking into account a certain list of requirements that it must meet. The following must be taken into account:
- Safety. You should not allow an unreliable design of the product, because this can bring a lot of troubles when using it. To ensure safe use, it is worth choosing only high-quality material, as well as fastening devices and any accessories.
- Convenience. Undoubtedly, such an item in the garden as a garden bench should be comfortable so that nothing interferes with the relaxation process. To do this, you need to approach the project creation stage very competently and carefully and think through all the details in advance.
- Immunity to influence of external conditions. To ensure long-term preservation of appearance and service life, it is necessary to select only solid material at the assembly stage of the product. Additionally, it is worth treating it (if made from wood material) with special means that can provide protection to the product.

Design options
There are quite a lot of variations in which a garden bench can be made with your own hands. If we are talking about products made of wooden material, then for this you will need the following list of tools and materials.
Any country bench has essentially the same assembly process. To more accurately understand such a process, it can be considered using a specific example, based on the material listed above.

Help: A similar principle is used when independently creating a bench from wood in any version of its design.
Simple bench
In order to avoid any problems in the process of drawing up a drawing, it is possible to use a ready-made one. This bench is very easy to make. It is only necessary to install additional support bars of three larger and smaller sizes. Assembly occurs according to the specified principle.


Help: You can diversify such a product simply by changing the color scheme, as well as by drawing various kinds of patterns. But at the same time it is necessary to carry out processing of the wood material.

Classical


It is also quite simple to design, plus it is possible to vary the backrest by changing the arrangement of the slats, for example, making them cross-shaped. If you approach the process of creating such a shop with all the specified nuances, then it will not be used for a long enough time. For the drawing, you can use an existing one, and take the dimensions from a standard sample.


Folding bench for the garden


Metal bench
A DIY garden bench can be made not only from wooden material. You can use a metal frame, which is not difficult for anyone to make, even if you have no experience in forging metal.

To construct a frame for a bench, you can also use cold forging, namely, to connect parts of a metal frame into a single structure. At the same time, you can complement the product with something, decorating it.

The table shows the principle by which you make a garden bench with your own hands.
| Process | Description |
| Sizing | If there is no design of a bench in which all the dimensions will be correctly compiled, then you can use the dimensions of the standard sample. It can be a seat length of 1500 mm, a width of 500 mm, and the backrest with such values will be 900 mm. If the task of creating a bench for the garden is new, then it is better to use a type of product that is one of the simplest in design and size. |
| Frame construction | The seat is made first. To do this, you will need several sections of pipes, 1500 mm and 400 mm long, two pieces each. If such segments are not ready-made, then you need to make them yourself. To achieve a more reliable structure, you can supplement the structure with stiffeners welded to the frame. |
| Designing the legs | The length of the legs should be 460 mm, this is exactly the size that the pipes need to be made for this. Also, in addition, it is necessary to ensure that the front and rear legs are connected to each other. This will provide a better degree of stability. |
| Making the back | The back is made in such a way that parts of pipes measuring 1.5 m and 44 cm are welded to each other. After this process is completed, you can start welding it to an already manufactured part of the structure. It is best to position the backrest at an angle of up to 20 degrees, this will provide an optimal level of comfort when sitting on the bench. Regarding the reliability of the backrest, stiffening ribs in the longitudinal and transverse directions will help here. |
| Polishing | To complete the construction of the metal frame, the existing joints should be cleaned, as well as the metal product should be polished and coated with primer. |
| Manufacturing of wooden elements | In order for it to take on a complete look, you need to make wooden parts that will be attached on top of the frame. Such elements can be easily completed using timber or boards. Depending on the size of the frame product, you should determine the dimensions of the wooden elements, as well as the direction of their attachment. You must also keep in mind that all parts must be smooth, without any kind of damage. |
| Connecting all the elements | To connect all the manufactured elements, you can use an electric jigsaw and make the required number of holes in the frame and wooden parts to attach them to each other. As fasteners, it is best to use bolts that have rounded heads, as well as nuts. |
| Completion of work | And the very last touch, before the garden bench is made on your own and ready for use, the woody areas should be treated with stain. You can also use varnish for such purposes. This procedure will protect the material from many undesirable factors. |
The good thing about this design is that due to the material that goes into the structure, it is light enough to be transported or moved to the desired location if desired. It is also important that such a product is stable to temperature changes, which is why it will be possible to use it for more than one year in a row.

Helpful information
When making a garden bench with your own hands, it is better to keep in mind the following rules, which will greatly simplify the work and help avoid difficulties:
- When purchasing material for construction, it is worth taking into account the percentage of losses when cutting out the required size of parts. It is about 10%.
- To avoid wastage of material, and possibly achieve savings, it is best to start manufacturing and cutting out elements and those boards that are the longest.
- If you want to make the seat wider than indicated in the standard dimensions, then you need to remember that deflections of the wood material are possible in the absence of a supporting frame structure.
- To avoid injury, it is better to initially take care of eliminating all angular and pointed areas.
- It is also worth remembering that wood material is prone to drying out, which must be taken into account when drawing up a drawing and leaving spaces for gaps.

Video - interesting ideas for making a garden bench yourself
A garden bench is an indispensable attribute of relaxation, necessary in any summer cottage. It can be very simple (consist of one board with supports) or have an unusual shape and design, becoming part of the landscape design and decoration of the yard.
Since the construction does not require special skills, many owners prefer to do them themselves. If you also like to make crafts for your home and are planning to set up a recreation area in your garden or yard, we suggest you familiarize yourself with how to make a bench with your own hands using available materials.
Types of benches
Rest benchThe first criterion by which they differ is the ability to move them from place to place, that is, they are portable or stationary. There are also differences in the design of the benches; on this basis, the following types are distinguished:
- Bench without back. This option is easy to implement, although not the most convenient to use.
- Bench with a back (folding or regular). This design is classic and is used more often than others. It is especially convenient to have a bench with a folding backrest that can be lowered onto the seat when it rains, thereby keeping it dry.
- Circular bench. It is usually arranged in the garden under shady trees. Due to the considerable seating area, circular benches are perfect for a large family or a group of friends.
- Decorative bench (with flower beds, made of non-standard materials or unusual shape). The best solution for decorating a site is an unusually decorated bench. Another advantage is the ability to use a wide variety of materials (stumps, logs, wheels from an old cart, etc.).
When deciding on the type of bench, you need to take into account its functional purpose and, in accordance with this, select the design and its location. For example, it is better to equip a bench for relaxation and privacy with a comfortable backrest and place it inside the garden or in another place with a beautiful view. And near the entrance to the courtyard, you can limit yourself to a simple bench without a back; it is ideal for taking a short break from the road or putting the bags you brought on it.
Bench made of pine timber
 Pine timber is an excellent material for a bench
 Pine is an inexpensive, easy-to-process type of wood, which explains its popularity. Let's look at how to make a bench from pine timber, using the example of a design with a back. Our bench will be spacious and will allow several adults to sit on it at the same time. To make it you will need a set of tools, which includes:
- electric plane;
- axe;
- drill;
- hacksaw;
- screwdriver;
- saw;
- roulette.
The bench will rest on two connected pieces of timber, which in turn are attached to paw-shaped legs. The beams are filled with ribs that serve as the basis for the seat and back, and the top of this frame is sheathed with sanded boards.
The first step is to saw off two 1.7 m long pieces from the timber for the beams and two more 60 cm pieces for the legs. Next, the beams are placed in the center of the legs and secured with nails and special staples (they can be made independently from wire with a cross-section of 6 mm).
When the support is ready, you should cut off blanks for the ribs, 3-4 pieces for the seat and the same amount for the back will be enough. They need to be given an ergonomic shape using a hacksaw and an ax, then sanded. The ribs of the seat and backrest are connected to each other with 120 mm nails, tightened with staples and nailed to the supports. To extend the life of the wood, it is recommended to coat the frame with acrylic paint.
 Finished design
 While the frame of the bench dries, we cut bars 2 m long, 10-15 cm wide and 2 cm thick for the seat and back. The blanks will need to be processed with a plane and laid on the frame, secured with self-tapping screws. It is advisable to varnish the surface of the wood or treat it with a water-repellent compound. The resulting bench, despite its considerable weight, can be moved to any convenient place on the site.
Bench made of oddly shaped driftwood
After uprooting old trees, the question arises - how to dispose of the remaining stumps and snags? It turns out that it is very easy to make a bench with your own hands from such waste. Thus, you will solve several problems at once - clear the yard of debris and get original garden furniture without spending practically anything except free time.
 Bench made of driftwood
 Driftwood is ideal for creating benches with a backrest. You just need to select curved branches of the desired size and diameter (at least 15 cm), clean them of bark and excess knots, and then sand them. The resulting blanks are connected into a single whole using nails or self-tapping screws. Then the structure needs to be treated with an antiseptic, varnished, and the unusual bench is ready.
Carved bench with armrests
Carved garden furniture emphasizes the good taste of the owners and creates a special atmosphere of comfort. Such benches are classic and will always look appropriate, both on the veranda and in the garden. Below we will tell you how to make a carved bench with your own hands.
The bench model in question is a portable structure, the peculiarity of which is a comfortable back and armrests. Its sides will be decorated with figured slots, the back and seat can also be covered with carved patterns.
 Drawing of a shop with dimensions
 To make a bench you will need to prepare the following materials and tools:
- boards;
- PVA glue;
- paint or yacht varnish;
- screws;
- milling machine;
- drill and jigsaw;
- screwdriver;
- lathe.
All the details of the bench are first made of cardboard, and then, based on the templates, they are cut out of wood. Let's start with the sides. For them, you need to make 2 identical parts, designed to fasten the seat and backrest, in which holes are drilled in the center using the cutting thread method, forming a trefoil. The sides of the parts are decorated with semicircular recesses, and their bottom is decorated with a pattern that partially repeats the trefoil. All patterns are cut out with a jigsaw.
The supports that give the structure stability are made of timber at least 4 cm thick. The material should be processed with a milling machine and then sanded, moving precisely in the direction of the wood grain. The edges of the supports and sidewalls should also be milled.
For the seat and back, a thinner board is suitable (allowable thickness - from 2.5 cm, width - 18-20 cm). The optimal length of the bench for this design is approximately 1.2 m; accordingly, the boards should be the same length.
 Design option for a carved bench
 To assemble the bench you will need a leg, as well as armrests and stands for them. Fastening of the listed parts of the bench is carried out using bosses located at the ends of the parts (protrusions with a diameter of 2.5 cm), by aligning them with recesses on opposite fragments.
Now all that remains is to connect all the parts, gluing them with PVA and securing them with screws. Having assembled the bench, the surface is sanded with sandpaper and covered with two layers of varnish or painted.
Stationary bench made of gabions
A gabion bench is a metal mesh reservoir filled with stones and equipped with a seat. You rarely see such structures in our area, but in Europe they are already quite popular and decorate the landscapes of many areas and squares. The unusual appearance is not the only advantage of gabions; they are also easy to implement and very inexpensive. We invite you to familiarize yourself with information on how to make a bench from gabions.
 Gabions as a base for a garden bench
 The filling for the gabion is usually stone - sandstone, diabase, limestone and other similar types. You need to choose a specific filler depending on the desired decorative properties, for example, limestone will make a light bench, diabase will add dark gray shades, and sandstone will make it brighter (red, green, yellow). If there is no need to save money, then it is better to choose stones that have already been hewn, since they are easier to lay than unprocessed ones.
The lattice box that will hold the stones should be purchased ready-made. Typically, for such benches, a mesh made of durable galvanized steel is used, and its individual fragments are connected to each other with special spirals (included in the kit).
The assembly sequence is as follows:
- The parts of the box are laid out on the ground in the selected location.
- The sides are connected to the bottom with spirals. This process is simple and does not require the use of additional tools.
- The side parts are fastened together. For convenience, you can first lightly screw them with wire.
- Stones or other decorative material are placed inside the resulting box.
- The lid is secured to the structure with spirals.
 Box assembly
 To prevent the bench from sagging, it is advisable to strengthen the sidewalls with additional jumpers attached to hooks or install a diaphragm inside. You can screw boards to the finished box or simply put a soft seat on top.
A simple bench made of unplaned boards
If the designs described above seem too complicated or such materials are not available, then you may be interested in how to make a bench with your own hands from an unplaned board. The model is very simple, but at the same time comfortable - a portable bench with a backrest.
 The boards should be processed with a plane
 The main material is unplaned boards, which should be pre-treated with an electric planer. The dimensions of the bench may vary, but the optimal height for it is 90 cm. Manufacturing begins with cutting out the back legs. To do this, draw a figured bench leg on a blank of a suitable size and cut it out with a jigsaw. Then we trace the first leg on the next piece of board and cut out the second part.
The back and front legs are connected by a rectangular piece of board, the length of which is equal to the width of the bench seat. To securely fasten them, you will need to cut grooves in the parts of the legs. We proceed as follows - we saw through several parallel, closely spaced grooves, remove all excess with a chisel, so that grooves are formed. We place a rectangular fragment of the board in them and fix it with self-tapping screws.
We have two sidewalls that need to be connected by transverse strips (front and back), also mounted on self-tapping screws. Now all that remains is to mount the seats and backrests onto the frame. The structure is almost ready, but before use it is recommended to varnish it, otherwise after 1-2 seasons the bench may begin to deteriorate.
 Even a simple homemade bench can brighten up your yard.
 Of course, novice craftsmen will hardly be able to do all the work perfectly at once. But don’t be upset if your bench doesn’t turn out as beautiful as in the picture. The main thing is that the design is reliable, and small flaws can always be hidden with original design. Don’t be afraid to experiment and create something new, because making a bench with your own hands means adding a special flavor and comfort to your yard that the same type of factory products cannot provide.
Each personal plot should have several benches and benches with backs, so that in good weather you can relax outside, sit under the gentle sun and just take a break from working in the garden. You can buy such a wooden or metal bench, or you can simply make it yourself. In this article we will look at what types of benches there are and how you can make one of them yourself, having all the necessary tools and materials at hand.
How are there species?
There are a large number of benches with a back, and each owner of a country house or dacha chooses for himself the option that is most suitable for the exterior of his personal plot.
Benches come in a variety of varieties depending on their scope of application.
- Ordinary benches with a back are suitable for any personal plot and will fit perfectly into the exterior of the yard. They are comfortable and very practical, as they have a simple design and are unpretentious in appearance. Suitable for installation near the house, in a gazebo, near a pond, etc. They can be made of wood, metal, stone, and also be combined (wood and metal, wood and stone, wood and brick, plastic and other building materials).
- Corner benches will look great where you can’t put a regular large bench with a back. They can be placed in the corners of the gazebo, in gardens, as well as in any convenient place in the garden. Such benches can be metal, wooden, stone or combined.
- Ordinary benches without a back can be installed anywhere, as they are universal and convenient enough for any country house. They can be easily made with your own hands, since they are made according to the most common standard drawing of the classical type.
- Oval, round or semicircular benches with and without a back will look great in the center of the same round gazebo, in the center of the garden or in another place where they will create an aesthetic exterior for the entire garden plot, as well as perform their direct functions. Also, in the center of a round bench there can be a tree, a green bush, a beautiful flower bed blooming, or even a children’s sandbox. Here everything depends on the imagination of the master and the functional needs of the owners of a country house or dacha. They can be made of wood, metal, stone, and also in a combined form from various natural materials compatible with each other.
Photo gallery: do-it-yourself garden benches with a wooden back - types and designs
Wooden bench with metal legs for the garden  Wooden bench with forged metal legs for the garden
  Corner wooden bench with brick support
  Semicircular wooden bench on a brick support
  Bench made of wooden beams for the garden with a back
  Decorative wooden bench for the garden with supports made from flower boxes
  Classic wooden garden bench with handrails and backrest
  Round wooden bench with back for the garden
  Original bench made from solid logs for the garden
  Wooden bench on supports made of natural stones for a personal plot
  Wooden bench with concrete supports in the form of flower beds
  Wooden bench with wooden supports in the form of flower beds
  Wooden bench with wicker back for the garden
  Stone designer bench for the garden
  Square wooden benches for the garden
Preparatory stage: drawings, dimensions, angle of inclination
Before you start making a bench for your personal plot from any type of material, you need to take all measurements and draw up an accurate drawing of the future structure. This is necessary so that it turns out smooth without distortions and rolls. Also, the design diagram will help to calculate the required amount of material for making a bench of any type.
To make wooden structures for a personal plot, pine, oak, birch boards or logs, as well as pear, hornbeam and durable larch are usually used. Almost any tree is easy to process, has excellent decorative qualities, and also aesthetically fits into the countryside landscape. The main advantage of wood is its beautiful aesthetic appearance. But meanwhile, it negatively tolerates exposure to sunlight, high humidity and low temperatures (severe frosts). Therefore, it is best to install wooden benches in closed gazebos, on terraces covered with awnings, or make them portable (collapsible) so that they can be put away in a closed room (pantry, basement, closet) for the winter.
Steel supports will be the most competent choice for making a bench with a wooden seat and back to place it on the territory of a summer house or country house. This bench will serve you for at least 15 years, and you will not need to remove it during snow or rain.
How to make a wooden bench with a backrest with your own hands
To set up a wooden bench we will need:
Before you start making a wooden portable bench, you need to cut the boards into certain elements:

- All prepared boards must be sanded, all side parts smoothed and thoroughly soaked with antiseptic. Then leave until completely dry.
- We mark the height of the bench at 40 cm. Starting from the very middle at the top of the elements of the longest legs that will hold the back, you need to make an oblique cut at a slight angle of about 20°. Then all the corners of the bars must be cut down and sanded on both sides. In this case, the back will have an inclined shape. The cuts must be strictly identical, otherwise the bench will end up skewed and have an unattractive appearance, and it will be uncomfortable to sit on.
- Assembling the bench legs. The distance between the legs should be about 28 cm. The front (facade) and rear wooden pairs of benches for support on the invisible inner side must be fastened using prepared bars and screws. We connect the legs with a beam, which we cut to cover the entire width of the structure - 50 cm. It is best to do a double strapping - top and bottom.
- In order to protect self-tapping screws and screws from premature corrosion, it is necessary to pre-drill the necessary holes and recess their heads slightly into the board.
- On the frame of the bench, as shown in the drawing, we nail or screw the planks at certain intervals (1 or 2 cm). Three planks will be used for the seat and two planks for the back. After all the elements are filled, it is necessary to check with a level the correctness and evenness of the entire structure. For greater reliability, stability and rigidity, the legs at the bottom are secured with strips on both sides. It is advisable to leave gaps of several centimeters between the slats for better air circulation and drainage. We attach the backrest (the first bar) at a distance of 20 cm from the seat, and the second - at a distance of 38 cm from the seat.
- The structure of the bench needs to be strengthened and for this it is necessary to make the lower strapping of the legs. To do this, we take two beams 1.5 meters long and screw them to the front and rear legs of the bench frame.
Bench decoration
After completing all carpentry work, the bench must be completely treated with fire retardant and then covered with several layers of waterproof varnish or regular oil paint.
If you want to make the bench more aesthetically pleasing and designer-friendly, you can simply saw the boards lengthwise and then stuff them diagonally, crosswise or in a herringbone pattern.
Making a garden bench from wood and metal
A bench with a back, a wooden seat and durable metal legs will be the best option for garden furniture that can be installed in your garden. This design can be left outside without any problems even in winter.
Material calculation and necessary tools
To make a bench we will need:
- One iron corner with a shelf measuring 40 - 50 mm;
- One beam for making a bench seat 40 mm thick;
- Special bolts;
- Hacksaw or grinder;
- Drill;
- Screwdriver;
- Electric or gas welding machine;
- Sandpaper or sanding machine.
Step-by-step instruction
- The metal corner must be cut into four pieces of one meter each to make vertical supports for the structure. Cut five pieces of half a meter and two pieces of one and a half meters to make a frame for installing a seat and back boards on it.
- To make the back and seat, we cut seven strips of timber, 1.5 meters long and 10 cm wide. We sand them and smooth all the side parts well. We soak all the boards well with an antiseptic and leave until completely dry.
- We cut the ends of the joining parts from the iron corners exactly at an angle of 45° and then connect them in series using hot welding. First, we make a frame for the seat and weld the iron legs well for the subsequent attachment of the backrest to them, as well as the stops. During the welding process it is necessary to use protective equipment.
- In the boards of the seat and back, where the fastenings will be located, it is necessary to drill holes for special bolts. After welding work, the metal structure must be well sanded at the seams in order to eliminate all irregularities and bumps. Then treat the metal with a special anti-corrosion coating and oil paint in two layers.
- We bolt the finished back and seat boards to the finished metal frame. We first impregnate the boards with a fire retardant (preferably saline) and then cover them with a good layer of water-repellent varnish or colored paint.
- It is necessary to make markings on the ground for the legs. To do this, you need to dig four holes about 50 cm deep and pour river sand (about 10 cm) on the bottom, and fine gravel (about 20 cm) on top. We lay pieces of roofing felt on top and put reinforcement mesh. We install the bench legs into the holes and check the horizontal evenness of the structure with a level. Then fill the legs with concrete (ratio of sand and cement 3:1).
- If you plan to place the bench on a regular asphalt or paved surface, then you do not need to make a concrete foundation. The legs of the structure are made from four pieces of iron angle, about half a meter long. For greater stability to the bottom of the corners, it is necessary to weld square “heels” or strengthen the entire structure using a lower metal frame.
Finishing
All metal structural elements must be treated with anti-corrosion agents and primed. Then paint with regular oil paint.
We impregnate the wooden elements with special antifungal agents and fire retardants, and then paint them with waterproof varnish or colored oil paint.
If desired, the metal parts of the bench can be decorated with various forged iron patterns, which you can forge yourself or purchase ready-made from special companies.
Bench for a personal plot on brick supports
Material calculation and tools
To make a bench we will need:
- Construction brick;
- Wooden boards (thickness about 40 mm);
- A pack of self-tapping screws and self-tapping screws;
- Several bags of cement, fine sifted sand (6 bags or more) and gravel.
Step by Step Actions
On stone-paved and concreted areas, the bench must be placed on a cement foundation. On soft ground it will be necessary to make a columnar foundation.
- We mark the area for the installation of brick racks and remove the top layer of soil (turf). We dig holes with a diameter of 20x20 cm and a depth of about 50 - 60 cm to construct the foundation. At the very bottom of the well we pour sand 10 cm thick and on top crushed stone 20 cm thick. We compact all this well, water it a little and leave it for a day.
- We put several pieces of roofing felt on top and place a bundle of five reinforcing rods in the hole. We fill it all with concrete and let it harden for about three or four days. To mix concrete, we take cement, sand and fine gravel (1:3:5).
- We place a small layer of liquid concrete (1–2 centimeters) on the prepared foundation. This will be the basis for the future brick decorative base. Next, we begin to lay the brick with the dressing. The masonry is made to the width necessary for the structure, that is, the same as the bench itself or a little narrower. The height of the brickwork should be about 50 cm. Inside the masonry on the top row we leave space to form a shelf for the subsequent installation of a bench seat.
- We fasten the seat boards together using boards and self-tapping screws. Then we install the finished bench on the prepared brick supports. We impregnate the wood with fire retardant, let it dry and cover it with a special water-repellent varnish or colored paint.
- Also, depending on how long the bench will be, you will need to make several brick supports. Corner or shaped (semicircular, round, oval) structures are best installed on a solid brick base, which will be located on a strip-type foundation.
Bench decoration
We treat all wooden planks with antifungal agents and fire retardants, and then prime and cover them with waterproof varnish or regular oil paint. Brickwork does not need additional finishing, as it looks quite beautiful and aesthetically pleasing in itself. If you still want to make it a different color, you can also paint it with oil paint.
Video: how to make a bench for a country house yourself
If you make a bench out of wood and metal with your own hands, you will be able to enjoy the fruits of your labor for many years and relax on it in the shade of fruit trees. With proper and timely care, such a wooden bench with metal or brick supports will serve for many years. But in order to prevent it from being damaged by heavy rains or snow in winter or autumn, it is best to put it indoors, if possible. Regular maintenance can significantly extend the life of your bench in your garden.
There is, perhaps, no such yard, no matter where there is a bench - an invariable attribute of relaxation and communication. This item is convenient and useful, found everywhere both outdoors and indoors. There are countless forms of bench designs, however, they are all united by two basic principles of construction: stability and comfort. You should build on them when making a bench with a backrest with your own hands.
Types and features of bench designs
The classic design of a bench is a seat, back and supports. It can be complemented by armrests, a built-in table, a canopy from rain and sun, and much more. The form can be simple, minimalistic or of unprecedented beauty and complexity, the main thing is that it harmoniously complements the surrounding space and is comfortable for relaxation.
The idea of what the shop will be like depends on the following points:
- Accommodation area:
- in the garden, near the house (they decorate the area, have a mostly stationary, convenient form);
- terrace (lightweight, convenient for tea drinking and socializing);
- barbecue or relaxation area (the form must be designed for a certain number of people);
- near water (corrosion- and rot-resistant material of the bench);
- The installation location is permanent or the bench needs to be moved, brought in/out;
- Shape: straight, round, semicircle, angular, curved;
- Materials of manufacture: wood, metal, stone/concrete, combination of materials.
At home, in the country, the material for constructing a bench is often improvised materials, used things, such as a bed, a door, a closet, pallets (pallets), chairs, logs, driftwood, cinder blocks and much more. The result is original, interesting items in a vintage or rustic style. Pallets and furniture made from them have become an “untilled field” for ideas, a fairly common creative material.
You can include useful elements in the design of a bench, for example, make the seat folding, and use the sewn-in space underneath as a storage container. A folding table would be useful as part of the design of a bench or shoe rack under the seat of a bench in the hallway.
Designing a comfortable bench with a back
Let's start looking at the design with the support posts. They are often U- or X-shaped, and their stability has been tested by experience. The shape can also be solid (wooden beams, stone slabs), cast (formed from cast iron or concrete, the back goes into supports), in the form of legs, curved from metal or forged elements.
The seat is a part of the bench that should be comfortable and resistant to stress. It is made continuous or with intervals (wooden blocks, metal pipes, rods). The solid seat is comfortable, however, it is necessary to ensure that water does not stagnate on it after precipitation. The edges of the seat should be rounded to avoid injuring your legs. The optimal length is 1500 mm, width 400–450 mm, length of one seat 480 mm (of course, all sizes are selected individually). There are designs where the seat and back are made in one line (the back smoothly transitions into the seat by means of a bend), such benches are comfortable, often found in city parks, their supports are cast from cast iron or concrete, this shape can be repeated in wood or bent from a profile pipe .
A significant part in the convenience of the bench is given to the distance from the seat to the ground (floor) level; it should be 400–450 mm. It is necessary that the feet touch the base.
The backrest turns the bench into an object for long-term rest; it allows you to relax not only the leg muscles, but also the back muscles. An important role here is played by the angle of inclination relative to the seat and the height of the backrest. Based on human physiology, 10–20 degrees is considered the most comfortable. angle of deviation of the back from the perpendicular, height from 360 mm (since the human spine has an S-shaped bend, the height of the back is divided into two parts: 180–240 mm to the fulcrum - the place where the back does not fit and + another 180–240 mm - segment of contact with the back). The back should not be massive and outweigh the bottom of the structure.
Advice! The gap (clearance) between the back and the seat should not be made large, if a small child sits on the bench and will not have the opportunity to lean his back.
Choosing material for making a bench with a back
The most convenient and inexpensive material for manufacturing is wood. The wooden bench combines a balance of beauty and comfort and looks great in any space. Wood is a pliable material for the manufacture of various shapes and decorative elements, has a pleasant tactile sensation, does not overheat in the sun and does not overcool in the cold.
A simple wooden bench can be made quite quickly with your own hands; a minimal set of tools is needed. You can use inexpensive types of wood. Resistance to moisture, ultraviolet radiation, fungus and insects is provided by modern protective agents for impregnation and coating of wood surfaces. The weight of the product is optimal for moving.
The disadvantage of wooden benches is their fragility; wood tends to dry out over time and the joints become loose. The structure can be strengthened by various assembly elements and fastenings made of metal (corners, threaded ties, self-tapping screws instead of nails) and strengthening joints with glue. If supports need to be dug into the ground, they should be protected from rotting by soaking them in oil/resin-containing products.
Advice! Wood is a flammable material, so a bench located near a fire (fire, barbecue, stove) must be treated with a fire-resistant solution (fire retardant), which will help resist fire for some time.
Metal is a reliable and durable material with proper care and operating conditions. It produces sophisticated, “airy”, “lace” designs. The main disadvantage is corrosion, which is eliminated by protective coating of surfaces with primer, paint, enamel, repeated periodically as necessary. Flexible metal can be shaped into different shapes. The design of the bench from square profile pipes will be stable, solid and light. The square section is the most convenient to install. The most beautiful benches are made from forged elements.
The assembly of the metal product is very strong, carried out using welding seams and threaded fasteners. The need to have a welding machine and the ability to use it makes installation at home somewhat difficult.
The seat and back of a metal bench are almost always covered with pillows, covers, or a blanket, since tactile sensations are not always pleasant. The thermal conductivity of metal is higher than that of wood, so it is difficult to achieve a comfortable temperature balance between the body and the metal surface, and it is pointless to heat the bench with yourself.
The concrete bench is practically a sculpture. In this case, any shape can be achieved with a lot of effort and effort. A frame assembled from metal is placed in formwork and filled with concrete (the concrete hardening period is 1–2 months). Basically they make some parts of the structure and combine them with other materials. It is heavy and not intended to be moved. There is no doubt about immobility. Resistant to any weather conditions, durable.
Concrete complexes of benches and containers for planting plants with the installation of lighting elements look great. Practical for placement near the water.
Advice! For heavy benches, a flat platform should be prepared from layers of sand, gravel, and crushed stone so that it does not sink into the ground.
The most common type of bench is a design with a combination of materials. It is preferred in most cases, since here you can combine a reliable frame (metal), a comfortable seat with a back (wood), while achieving beauty, durability, convenience and lightness of form.
When buying material, make sure of its quality; you need to choose a dry tree so that it does not leak; remember the size of the parts. If there is a drawing with the specified dimensions, the material can be cut at the place of purchase, which will facilitate its transportation.
Drawing, material calculation, preparation for construction
A do-it-yourself bench begins with an idea, which is first embodied in a drawing. The drawing must be accurate and detailed and will need to be referred to throughout the work. You can make two drawings: a bench frame and a seat with a back, if the materials are different. The option when the supports are dug in (concreted) must provide for an additional length of the supports.
The drawing of the bench will show the number of parts, and the dimensions will help determine the amount of material consumed.
Tools: saw, plane, drill, tape measure, angle meter, wrench.
Materials: pine board 25x75 mm, 40x80 mm, 40x120 mm, bolts with nuts 9 mm - 8 pcs., self-tapping screws, sandpaper.
File the parts in the required quantity to size and sand them. Proceed with assembly.
How to make it yourself: the order of connecting parts
- Assembling the bench supports: mark and drill holes for the bolted connection, before fixing the parts with clamps. Tighten the connections of both sidewalls;
- Connecting supports with jumpers: attach power jumpers to the structures of the side supports using self-tapping screws according to the drawing;
- Assembling the backrest and seat: screw the strips to the side supports with self-tapping screws, maintaining an even gap between them. Recess the heads of the screws into the strips;
- Grinding joints and sharp corners;
- Application of decorative and protective coatings.
If there is a desire to emphasize the texture of the wood, then the surface is treated with a non-water-based stain (untreated wood swells with water) of the selected color, then the surface is varnished in several layers according to the instructions on the packaging (the varnish should be for external purposes with good wear resistance, for example, yachts). varnish). Between applying layers, the varnish must dry (dust stage - when dust does not stick to the surface and can be wiped off). Before applying the next layer, the previous one needs to be lightly sanded; this will not affect the transparency of the varnish.
If you decide to paint a bench, then before painting you need to apply a base (a product for protecting and reducing wood porosity) to the surface; it will give a good adhesive effect and the paint will last longer. Then apply paint for exterior purposes in several layers.
All painting work should be carried out outdoors; a respirator must be used indoors.
To make it more decorative, you can brush the surface; the structure of the wood will become more expressive. The naturalness of wood is emphasized by the application of impregnating oil-wax products with a water-repellent and protective effect.
Today, the choice of products for protecting wood, as well as all kinds of paint and varnish coatings, is very wide. It will not be difficult to find a product that will combine the necessary qualities.
Whatever material and design is chosen, the bench will be unique because it was made by hand. Remember about safety measures; all work must be accompanied by the use of protective equipment.