Comfortable cages for rabbits: making them yourself. Homemade cages for eared animals - cheap, simple and convenient! How cells are made
Read also
Raising rabbits nowadays is quite a profitable business. Breeders create the most comfortable living conditions for their rabbits minimum costs. To do this, they prepare their own food and build rabbit cages. But how to build a rabbit hutch yourself? This article will discuss this issue in more detail.
Preparation
You can build cages for rabbits with your own hands. It's quite simple. Initially, you need to decide on the type of enclosure and make a drawing. Next, you will need to purchase materials and prepare tools. A homemade house can be made from scrap materials.
You can make your own cages from metal profiles or wood. For rabbit breeding, the most popular enclosures are wooden. There may be external cages for rabbits, as well as for rabbits that will live in the house.
The most popular are bunk cages for rabbits. They can be used simultaneously to keep adults of different sexes. You can also keep young animals in the same house. This will help save space in the room.
Cage dimensions
To make a cage for rabbits with your own hands, you must first make a drawing. The dimensions of a rabbit cage depend on the weight of the animals and their number. The dimensions of the rabbit cage are 130 centimeters long, 70 centimeters wide and 40 centimeters long. A cage for a rabbit can be smaller in size. The cage for a decorative rabbit is usually shorter. Its average length can be 90 centimeters.
Usually, young animals are kept separately to fatten them. You can also build an enclosure to keep it. How many rabbits can you keep there at one time? You can keep about 10-15 individuals. To do this, you need to properly place feeders and drinkers inside. Make the cages simple and spacious so that the rabbits feel comfortable in them. Enclosures can be made from profiles or use metal mesh.
Construction from profile materials or mesh must be carried out correctly. To do this, first draw a diagram of a cage for decorative rabbits. The enclosure must have sufficient area so that the baby rabbit or older rabbits feel free inside. This will affect the health of the animals.
Rabbit cage Zolotukhina
How to make this type of rabbit cage? The process is quite simple. Housing of this design is considered the most inexpensive and compact today. This cage for rabbits is made on your own. For this there is step-by-step instruction.
You can create a cage for domestic rabbits at home using a drawing. The rabbit cage is located in a place where the sun's rays do not reach and there are no drafts. It should also be placed at a height of 70-80 cm from the ground. This will protect the enclosure from rodents and also make the cleaning process easier.
To save space, you can make cages for rabbits at home in several tiers. The structures can be placed on pipes or thick timber beams.

Material
An enclosure for a decorative rabbit with your own hands must be built with high quality. It must be environmentally friendly. Timbers, slats and boards made of wood are used for the construction. In addition you will need:
- Net.
- Screws.
- Iron.
- Hooks and stuff.
Tools
Building a rabbit cage involves using tools. To make cages for dwarf animals with your own hands, you will need:
- Roulette.
- Pliers.
- Saw.
- Hammer.
Other tools may also be required. Everything will depend on the material.
DIY outdoor cages for rabbits made of mesh
When all the materials have been purchased and the tools are prepared, you can begin to make enclosures for dwarf rabbits. What are they? You can make an aviary completely different designs. It all depends on the owner. For rabbits like giants, it is necessary to create spacious enclosures.
The construction of a rabbit cage begins with a frame. Then the floor is laid. It is constructed from boards or fine mesh. If the floor is made of wood, then small gaps should be left between the slats.
When the structure is placed in the yard, all walls will need to be insulated. Some breeders make interchangeable structures that can be installed depending on the time of year.
The walls are made of plywood. It is necessary to construct the structure so that the front wall is higher than the back. This will help to slope the roof so that precipitation does not accumulate there.
When the cage is placed indoors, the walls are made of mesh. But experts note that animals will be more comfortable in a closed and secluded enclosure. In front they make a place for a feeder and a watering hole.
The roof must be created with a slope. The first floor ball is made of plywood, and then slate or corrugated sheets are placed on top. But steel sheets not recommended for use. They heat up and freeze quickly. Experienced breeders make the top on hinges. This will help you open the lid and gain access to the inside of the enclosure, which will make cleaning easier.

Hut for fawning
In such a house, chambers for queen cells are usually placed on the side. The walls must be solid so that there is no draft. If the enclosure will be placed indoors, then you need to choose a place without ventilation. When the house is placed on the street, it must be insulated.
The queen cell should be made removable so that, if necessary, it can be moved to another enclosure. The camera must be kept dry at all times. It is necessary to periodically lay fresh hay in it. You should not use sawdust for bedding, as small parts of it can get into the rabbits' noses.
When the female brings babies in winter, then you need to put a heating pad with warm water. You can also use a regular incandescent lamp for heating. It must be on all the time. With such heating, you need to take care of fire safety.
Some breeders lay a cable from the “warm floor” system in the queen cell. The cable must be placed intact in the enclosure; there should be no solders on it. Using this method, you can regulate the temperature in the box yourself.
House for young animals
A cage for a domestic rabbit should accommodate from 10 to 20 animals at a time. The walls need to be made 30-40 cm high. The offspring can be kept there for up to 5 months. The cage should be raised from the floor surface by 70-80 centimeters.
You need to put a net on the floor to prevent kids from chewing on the wood. You can make the entire floor from mesh, but such a house will have to be placed in a warm room. With a mesh floor, the house will be constantly ventilated, and feces will not accumulate there, which will help protect animals from various diseases.
Hay can be used for insulation. The layer thickness should be from 15 to 20 millimeters. Artificial bedding will have a bad effect on the young animals, and therefore they may get sick. It's worth giving up.
Inside
Depending on the breed of rabbits, the contents of the house may vary. When young animals or rabbits are kept inside, queen cells and nest boxes must be installed there. Sometimes they make an exit from the cage into the enclosure. Feeders for branches or hay can also be constructed.
Drinking bowls
These animals require that they constantly have pure water in the enclosure. Therefore, the watering hole must be installed at a height of 4-5 centimeters from the floor so that dirt does not get there.
You also need to choose the right material for the drinking bowl. It should not be made of plastic, as rabbits will quickly chew through it. There is no need to install metal watering holes. Currently there is certain designs drinking bowls that will be safe for animals and provide them with clean water.
Feeders
This design must be planned at the stage of drawing up the design of the house. Important condition The construction of a feeder is its size and installation.

Completion of the arrangement
Everyone wants a home-made cage for decorative rabbits to last for a long time. But at the same time, experts note that wooden elements cannot be processed various compositions, as it may harm animals. In order for the houses to be preserved, they internal walls can be covered with metal sheets.
It is noted that in order for the cage for a dwarf rabbit to be comfortable for him in one case or another, adjustments can be made to the design. It must be remembered that for the average rabbit it is necessary to provide living space within 0.5 square meters.
Rabbit hutch, step-by-step construction (rabbit-hutch)
DIY rabbit cage!!! Part 4!!! Final assembly!!!Rabbit-hutch.
Smart cages for rabbits
DIY rabbit cage!!! Part 2!!! Frame of one of the tiers!!!Rabbit-hutch.
Building a rabbitry with your own hands
Street cages for rabbits.
DIY rabbit cage!!! Part 3!!! Floor arrangement!!! Rabbit-hutch.
RABBIT CAGE or GARDEN CHICKEN COOP the story of one renovation
Best Budget Rabbit Cage | GELENDZHIK RABBIT
DIY rabbit cages-2
Brovchenko family. Do-it-yourself rabbit cage (Mikhailov mini-farm). Material and sizes.
Technology for making cages from mesh
How to make a rabbit cage. Two-story penthouse runaway bunny
Makrol video tutorial: assembling a cage frame for rabbits (Part 1)
Do-it-yourself cage for rabbits made of profile and mesh 1 PART
Rabbit cages with your own hands
Reading time ≈ 11 minutes
One of the important components of successfully keeping rabbits is providing the animals with suitable housing - cages. Cages are very convenient for breeding animals - they are the easiest place to feed, care for, house and, if necessary, treat the animals. At the same time, do not rush to buy industrial copies - you can make the cages yourself. We will look at how to build cages for rabbits with our own hands, as well as a series of photos of original building ideas.
Two-story cage for rabbits.
Features and Requirements
In fact, a cage is a box-like structure with opening front doors. Consists of a frame (sometimes with high legs), closed by walls, roof and floor. Inside there are compartments for food and rest, separated by a partition with a manhole. In the aft compartment there is a feeder and.
Size and design features cells depend on the age, breed, sex of the rabbit, and method of keeping. However, the design will be essentially identical for all groups of animals.

A common blueprint for rabbit hutches.
When viewed from above, the cell diagram looks like this. The floor of the cage can either be completely mesh or have a mesh insert for removing feces. The floor in the nesting section must be solid, windproof and warm.

Schematic representation of a cell from above.
Another version of cages is also in demand - in which there are sleeping compartments on the sides, and in the center there is an area for feeding and activity. Such blocks are longer (up to 1.2 m), the standard height is about 35 cm.
There are several types of cellular contents:
- in room;
- on the street;
- combined - part of the year indoors, part - outdoors.
- use of high-quality, durable, rough building materials;
- reliability and stability of the structure;
- no more than 3 tiers of cages (installation of a slanting roof for effective drainage of feces);
- presence of a canopy.
Important! IN winter time It is imperative to take care of the insulation of the cells. The boxes must be reliably protected from frost and wind, especially if you plan to breed animals.

Types of cells
As we have already indicated, the design of a house for animals is selected based on many factors. Therefore, below we will briefly consider the main distinctive features blocks for animals with different needs:


House for rabbits and baby rabbits.
In addition to standard cages, there are also options with an aviary. In the presence of free space You can install just such blocks. The enclosure is set up either under the structure or near the back wall. At least one of the walls of the enclosure should be mesh, but the option is also popular when the back wall is solid and the rest are made of mesh - as in the photo:

Two-story cage with an aviary.
With a large number of individuals convenient design for maintenance there will be a shed. It is a frame with 2-3 tiers of cells under a canopy. This whole structure looks like a mini-barn, but it greatly increases the efficiency and ease of care, allows for efficient use of space, while each animal can be provided with a separate block. You can also build a shed yourself.

Shed for rabbits.
Depending on the needs of the animal and your goals appearance The design can be absolutely anything. For example, for males, who are usually kept alone, you can build a very simple one-story block:

A simple one-story cage.
You can also make a frame and divide it into three compartments to accommodate several individuals under one roof.

One-story block with three cells.
If you have enough space and the number of animals is small, you can make bunk (two-story) apartments for animals:

A two-story cage in the form of a house for one individual.
Another option for a two-tier block with a symmetrical, attractive facade:
Please note: In all similar designs with an aviary, there is a tray below the upper tier for effective removal bowel movements.

A two-story cage in the shape of a house.
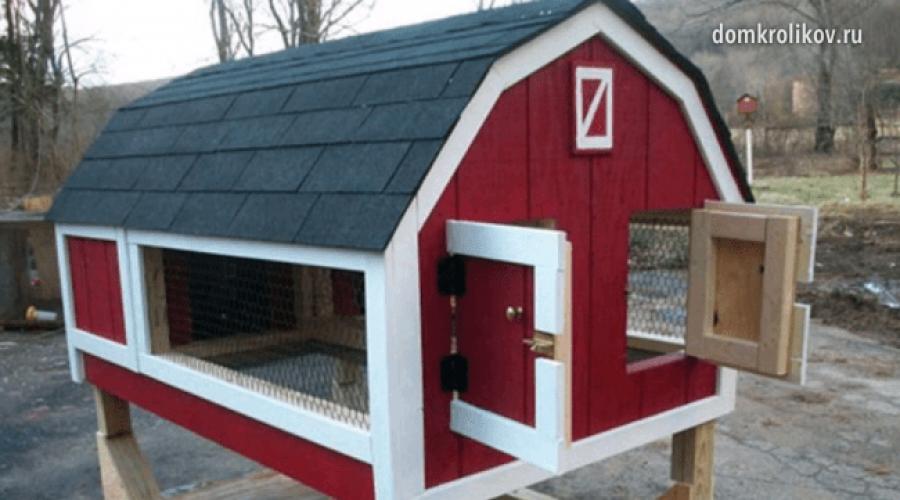
If you wish, you can use the most original ideas and make a cage for rabbits with your own hands like a mansion, as in the photo below. To descend into the walking area, the block must be equipped with a staircase.

Blue cage-teremok.
And here’s another extraordinary design: in order to make good use of the space, there are beds with herbs on the roof of the block.

Cage with seedlings on the roof.
Another example of the design - on the sides of the block there is a feeder and a drinking bowl. There is a nest in the center with holes on both sides. Thanks to the convenient door, babies can be accessed and perform care procedures without any problems.

House with compartments.
In the photo below we see a very original, practical and simple design according to the type of car. The animal house is equipped with a pair of wheels on the back side and a pair of holders on the front. If necessary, the cage can be quickly and without outside help transport to another place. At the same time, the block is equipped with a nest and there is enough space for walking.

Transportable house on wheels.
To make the economic part of the yard look aesthetically pleasing and original, houses for livestock can be built in oriental style Pagoda.

Pagoda style house.
If you need a spacious enclosure for walking young animals, you can make a metal structure, completely mesh with a small shelter.

Spacious enclosure for rabbits.
Before you start building a home for livestock, check out these simple recommendations. They will save you a lot of time during the creation process and allow you to avoid some mistakes:
- For year-round outdoor maintenance, it is better to choose thick boards for making walls. If the rabbits are kept partially outside, the sides of the cage can be made of plywood. If rabbits are outside only in the summer, then the walls can be made from durable mesh.
- When kept outdoors, the structure must be placed at a height of at least 0.7 m from the ground. This will protect the animals from cold, precipitation, as well as rats and other animals.
- The floor can be constructed from wooden slats or mesh. The size of the cells should be about 1-1.5 cm so that manure can pass through the holes freely, but the animals do not injure their paws.
- For the roof you can use boards or plywood. And on top, for reliability, put any available roofing material. The only thing worth considering is that the metal sheets can get very hot in the sun and overheat the cage, so you will have to install a canopy on top.
- On the front wall you need to install two doors on hooks, one mesh, the other wooden.
- The wooden elements of the house will most likely be chewed, so it is recommended to sheathe the most vulnerable parts of the cage with thin tin sheets, namely: the edges of wooden beams in the frame and doors, a manhole, a feeding trough.
- In case of bad weather, removable glazing should be provided. The frame with glass can be mounted different ways, for example, on hooks, and in sunny weather, remove.
Idea: the façade and external walls can be upholstered decorative material or paint it to give the house a decorative look.

Cage with supports.
Necessary materials
So, let's consider making a three-tier structure for group keeping of rabbits.
Necessary materials:
- timber with a section of 5*5 cm;
- aluminum plaster corner;
- screws;
- metal connecting corners;
- slats 24*12 mm (for the floor, you can use a metal mesh);
- galvanized sheets.

All fastenings in the cage will look like this.
Required tool:
- construction stapler;
- grinder (hacksaw);
- roulette;
- screwdriver;
- electric drill.
For construction we will use the following drawing. One tier is shown here; 3 of these structures will be required.

Drawing of a cage (one tier).
Manufacturing process
Below are detailed step-by-step instructions for making a house.
- First you need to prepare the material for work - cut the timber into the required sections. So, you will need 16 pieces of 1.9 m each (12 pieces need to be sheathed with corners on one side), 24 pieces of 0.35 m each, 18 pieces of 0.8 m each, 12 pieces of 0.45 m each, 6 pieces of 0. 7 m. All prepared sections must be sheathed on one side with a corner using a stapler. These parts will be in direct contact with animals, which means the wood needs to be protected from being chewed.
- To make the first tier, we assemble the frame. To do this, we connect 2 segments of 1.9 m and 0.35 m with corners. The result is a rectangle.
- Next, on a long section, measure 55 cm from the edges on each side, top and bottom. We make notes. Now we insert a beam 0.35 m long into the middle of the rectangle so that the marking line is closer to the center.
- This results in the following division:
- We make a hole for the feeder. To do this, find the middle along the long line and make a mark. On the opposite side, mark 0.7 m on the block from the right and left ends. We apply 45 cm long bars in a triangle for fitting, mark an angle and cut them with a hacksaw and attach them.
- Using the same principle, we construct the second part for the first tier. Using bars 80 cm long we connect both parts. The frame of the first tier is ready.
- Can be used for flooring wooden slats or metal mesh. If you use slats, you must first drill holes in them for screws, otherwise the thin slats may crack. Watch the distance between the slats - it should be about 1-1.2 cm so that the animals do not injure their limbs.
- The side parts of the structure, as well as the lintels, are made of plywood. Instead, you can use mesh or boards.
- For the roof we use galvanized sheets. They should be slightly larger in size than the frame, so that it is possible to make small canopies over the compartments.
- Using hinges on the front, you need to attach the doors made of mesh and plywood. At this point, one tier is completely finished.
- At the end of the cage, the wood must be treated with fire. Firstly, it will remove burrs and make the wood smoother. Secondly, roasting will eliminate most microorganisms from upper layers tree. Then the structure must be treated with a disinfectant, for example Brovadez, according to the instructions.

Preparing the bars.

We fold the frame.

Insert jumpers.

Caracas in the making.

We make a hole for food.

Finished tier frame.

Fastening the slats to the floor.
In principle, you can stop there if you do not need accommodation large quantities living creatures. But if there are a lot of rabbits, and there is not enough space, you can continue and fold the three compartments into a single three-story structure.
To do this, you will need strong beams 2 m long (4 pieces). The compartments must be secured using metal corners. The first compartment should be at least 30 cm above the ground. The distance between compartments should be kept at least 10 cm to accommodate pallets.

Ready design.
Thus, we have presented a selection of photos from original ideas designs, and also looked at the step-by-step production of cages for rabbits with your own hands.
Video: step by step construction cages for rabbits.
A prerequisite for breeding rabbits is the construction of housing, that is, a structure where animals can feel comfortable and safe. There are many options - these are houses with and without legs, enclosures and cages.
You can buy a design in a store, order it from craftsmen, or you can make cages for rabbits with your own hands, spending a little time and effort on its manufacture.
Let's look at a quick and economical option, in which construction will not be expensive, and the building can be used both temporarily and for long-term housing of any number of animals.
What do we need
To build reliable design, capable of serving as a shelter for animals under any conditions, you need to prepare the following materials:
- sheets of plywood or belt loop 2-2.5 centimeters, timber;
- galvanized mesh;
- caged doors;
- food trough;
- nails or screws weighing just over half a kilogram.
First, all the frame bars must be carefully planed. This way, all structural elements will fit tightly together, which will help avoid drafts that have a detrimental effect on animals. Step-by-step instructions will help you make the house comfortable, following which you will be able to complete the work correctly at each stage.
Cell assembly. Step-by-step instruction:
- We assemble the frame, attach a floor made of galvanized material to it, it is advisable to make it from mesh. The frame can be made as shown in the video.
- We install the wall at the back, fasten the bottom, grabbing the floor.
- We finish constructing the frame with side walls, including for nests.
- The cover is installed. If you plan to move the structure outside, then you need to make sure that the roof does not leak and that the animals do not suffer from sunstroke from overheating. For this, two sheets of slate or other roofing material will be enough.
- Can be installed cross beam, which will divide the structure into two or three sections.
- We make feeders.
- The bottom is secured with slats and nails on the inverted structure.
- It is recommended to make a bunker for feeders.
- For other feeds it is better to make a nursery.
- The lid is attached.
- It is better to make doors from frames and mesh; after installation, you need to check whether they work easily.
- A rotary flap is installed.
At this point, the construction is completed, and the cage is ready to receive your pets.
If it is not possible to move the cage into the shade, in order to protect the animals from the heat, on a sunny day, cover the roof of the cage with branches of bushes or wild trees.
This instruction is not a dogma. It can be changed at the request of the owner or due to personal preferences. If you are going to build such a structure for the first time, listen to the recommendations of experienced rabbit breeders and read the information on the Internet.
- Many experienced rabbit breeders recommend double roofing. It will not only protect the rabbits from drafts and precipitation, but will also save them from overheating on a hot sunny day, otherwise the animals will be susceptible to sunstroke.
- If you make a roof only from corrugated slate without using plywood, then not only winter drafts and frosts will pose a danger to animals, but also spring frosts, from which the offspring may die.
- The additional use of roofing material will provide a buffer zone between the roof and the plywood, so it will not be too hot in the cage on a sunny day.
- If you are installing the cage outside, raise it from the ground a short distance; you can use bars for this. This will protect your animals from rodents and make caring for them easier.
- You can build the cage differently, look, one of the floor options is shown in the video.
- You can use a cell model called “Sunny”, you will learn about it from the video.
Beginners in rabbit breeding will benefit from the information shared on You Tube by a user named Sunny Rabbit. Watch his video below. about the advantages of single-tier structures for rabbits.
If you need a house for temporary housing of animals, you can not build a cage, but do it as the Sun Rabbit advises, watch the video. and you will find out about it yourself.
How to make two-tier buildings
To make bunk cages for rabbits with your own hands, you don’t need to spend a long time working on complex design. It is enough to install the cages one on top of the other, place a tray for litter under the top one, and make the roof waterproof and moisture-proof. Such a mobile building will be installed in any place convenient for you, and if necessary, it can be disassembled and stored in a warehouse.
What to do if rabbits chew cages
First you need to figure out why this happens. This can be caused by two reasons:
- With the help of bars and boards, animals try to replenish their supply. minerals, which the body lacks.
- Animals need to wear their front incisors on something, so they chew on wooden objects.
Provide your pets with rational and balanced diet with sufficient amounts of vitamins, minerals and trace elements. Add chalk, mineral premixes or salt to the food.
Thin strips of tin can be used to cover all the places that animals choose - the edges of feeders, beams, protruding parts of the frame, etc.
Experienced rabbit breeders know very well how important it is for rabbit cages to have correct design, and were made from quality and safe material. Since their ability to reproduce depends on these factors. The cage can be purchased ready-made or made with your own hands. Last option preferable, since during construction the breed and the number of animals placed in it are taken into account.
Required materials and cage design
 Regardless of what type of nursery will be built, they all have the same basis:
- frame;
- walls;
- ceiling;
- doors.
A rabbit cage is made from wooden material or mesh, but in no case made of iron. In hot weather it will become very hot, and in cold weather animals can freeze to it.
The frame is built from thick beams, and the length of the legs must be at least 35 cm. If the nursery will be located outdoors, then it is better to make them even higher - from 70 to 100 cm. In addition, a cage of such a height is much more convenient to maintain, and the animals will be protected from predators. The walls are made of plywood, boards or mesh. For the floor in the feeders, slats or mesh are used, since waste spills through them well. The roof is made from the same materials as the walls. If the industrial rabbit cage will be located outside the premises, then an additional roof will be required to protect it from precipitation.
Every detail in the nursery must be smooth and safe, without splinters or sharp ends on the mesh, so that the animals cannot get hurt.
Types of cages for rabbits
Nurseries differ from each other according to the type of construction:
- regular with or without queen cell;
- I.N. Mikhailova;
- N.I. Zolotukhina;
- with an aviary for walking.
 In the first version, the cage has high legs and two individual places for feeding and nesting. They are separated from each other by a continuous partition with a hole. The door to the nest is made of solid wood, and the door to the feeding area is made of a frame with mesh. If there free place, then an enclosure for walking is added to the cage. You can enter it through back wall, or arrange it from below under the housing, as in the photo below.
Often, nurseries with an enclosure are used for mating, since active movement not only has a positive effect on the health of rabbits, but also improves their reproductive abilities.
 Mikhailov's industrial cells are considered the most complex and advanced; they look like small farms. They provide ventilation, shelves, heating of the queen cell and drinkers, as well as a unique waste removal system - everything is poured into one container.
Below is a photo of a drawing of a Mikhailov cage for rabbits, according to which you can make it yourself. 
Cell N.I. Zolotukhina
The main difference between this author’s nurseries and others is that instead of mesh or slats for the floor, they use plywood or flat slate, and there is no pallet. The floor is installed with a slight slope. A mesh is installed along the back wall, 10-20 cm wide. Feces and urine are removed through it, especially since in most cases rabbits relieve themselves against the back wall. 
The feeders used are tilting, to clean them, just tilt it towards you, and not remove it completely from the cage. It is imperative to divide it in half with a net so that the rabbits cannot crawl through. 
Zolotukhin also suggests not equipping the queen cell on summer time. It is enough just to fence off required size place a board up to 20 cm wide, and put hay in the corner. The rabbit will make a nest for herself. Thanks to this method of cultivation, living conditions in a rabbit cage are closest to natural. As a result, baby rabbits are born less susceptible to infectious diseases. As soon as they grow up, the board is removed, resulting in more space for walking. In winter, instead of a board, it is necessary to install a house for a female rabbit with offspring.
In the video below, Zolotukhin talks about the principle of operation of cages for rabbits, made with his own hands using the method he invented.
To build cells using the Zolotukhin method, you do not need to have specific skills or expensive building materials. Enough mesh, boards, flat slate or plywood, as well as sheet metal. The frame, nest doors and partitions are made of wood. The floor is made of slate or plywood and mesh. Mesh is also used for doors in feeders. Sheet metal beat bars and other protruding wooden seats to prevent rabbits from chewing them. There should not be much light or drafts entering the nest, so the door is made solid and not made of mesh. A threshold at least 10 cm high is nailed to the edge of the floor in the queen cell so that the rabbits cannot fall out when the door opens.
 Back wall upper tier it is made straight, and the lower ones inclined, so that waste from the upper one does not fall into other cells, but rolls down the wall outward.
Stages of creating a cage for rabbits
Step-by-step instructions on how to make your own rabbit cage with a built-in queen cell and feed bins:

- A cage roof and a sliding door with a handle for feeders are installed.
- Doors with mesh and solid doors for nests, as well as latches for them, are attached to the frame.
- If the nursery will be located on the street, then an additional waterproof roof should be made. To do this, a frame made of slats is nailed to the existing roof, and roofing material, for example, slate, is fixed to it. Don’t forget about the slope, so if the height of the nursery at the front is 70 cm, then at the back wall it should be 60 cm. This is necessary to drain precipitation from the roof.
Before you start making a rabbit cage, you need to make detailed drawings with dimensions.
The proposed option is convenient in that it has a large-capacity feeding hopper. It holds at least 6 kg of feed. Also similar design allows you to install additional tiers. The main thing is to place a tray between them to collect waste or an inclined surface along which they will roll into the container. But you shouldn’t make too many tiers, as the food is poured on top.
The mesh size for rabbit cages should not be larger than 2x2 cm, otherwise they may fall through and get stuck.
Before you start making a rabbit cage with your own hands, you should decide on a place to install the nursery. It must be protected from strong winds. It is not advisable to install a nursery on the south side, since in the summer the animals will be exposed to the heat of the sun all day. The size of the cage is also affected by the breed of rabbits, some of them are noticeably larger than others. Optimal size cages for rabbits of different colors - 150x70x70 cm. It varies depending on the number of animals. It is better to make the roof removable, this will make it much more convenient to disinfect the cage.
 If the rabbits will live in the nursery in winter, then it is better to make the floor from wood. Bottom part It is made solid in the form of a pallet, so it must be pulled out. And on top of it is installed a floor of slats, packed in increments of 1.5 cm. It is better to make feeders and drinking bowls removable to make them easier to clean. In order to prevent the offspring from freezing in winter, the walls should be additionally insulated with any thermal insulation, for example, polystyrene foam. The insulation must be hermetically sealed in film so that it does not absorb water. In the uterine section, you can lay a heating system with a warm floor or a heating pad.
For dwarf and decorative rabbits, other nurseries are made, and always with an aviary. A cage for such rabbits is most often built with your own hands in the form of a house, with many ladders and shelves. If the pet will live in the house, then it is best to purchase ready-made option because they have an attractive appearance.
Step-by-step instructions for building a cage for rabbits - video
In this article we will tell you how to make a rabbit cage with your own hands (step-by-step instructions). Creating cells with your own hands can easily be done from scrap materials, such as waste boards, pieces of plywood or chipboard, etc.
The design of the cages can vary greatly, but it is best to choose one whose construction will not take much time and will be suitable and practical for feeding rabbits, inspecting them and cleaning them.
Simple rabbit cage design
Most effective way breeding rabbits are Mikhailov's mini-farms, which can provide intensive breeding of rabbits with minimal time spent on animal care on the part of the farmer.
The design of Mikhailov's cages is very well thought out and provides for automatic cleaning and provision of food for animals, water heating in drinking bowls, which is really important in the cold season, as well as heating of the queen cell in order to increase the survival rate of newborns in the winter.
In order to start breeding rabbits you do not need any special costs: You can make rabbit cages, water bowls, and feeders yourself, hay and branches can be prepared in the summer, root crops and vegetables can be taken from your garden.
 Mikhailov cell design
 The largest part of the costs will go to vaccinating animals and concentrating feed.
It is best to place adult rabbits and female rabbits with baby rabbits in two-section cages. These dimensions are usually used as a guide for building cells: cell length one hundred twenty centimeters, cell height fifty centimeters, cell width seventy centimeters.
Young animals
The young should be kept in a large group cage, the size of which will correspond to the number of rabbits.
For example, for eight rabbits, a cage with the height and width as in the picture above is suitable. It is necessary to take into account the fact that in each cage you need to place rabbits of the same sex, approximately the same age and weight.
DIY rabbit cage step by step instructions:
 First you need to make a frame from wooden beams, its height should be 55 centimeters, its length 240 centimeters, its back thirty-five centimeters, and its front fifty-five centimeters;
It is necessary to provide for the presence of nesting compartments inside, where a queen cell for the rabbit will subsequently be inserted or a small house will be placed;
A partition with a hole for the passage of rabbits is placed between the nesting compartment and the feeding compartment;
- The roof is made on hinges so that it can be raised if necessary;
- In the nesting compartment the door must be made solid, made of wood, and
- in the aft compartment the doors are made of metal mesh with small cells;
- the floor must be laid with slats, with a gap of one and a half centimeters;
- in the nesting compartment the wooden floor must be solid;
- you need to install a tray under the cage;
- after making a cage for breeding rabbits, you need to equip it from the inside: feeders for grain are made, shelves and mangers are installed;
If rabbits are kept outdoors, the cages should be installed on bars so that they rise above the ground by about seventy centimeters. This should protect the rabbits from rodents and other animals.
 This is the step-by-step instructions for creating a cage for rabbits with your own hands. Through simple materials and a little effort, you can create your own rabbit farm and run a fairly successful farm.
There are special rules that should be taken into account when building a rabbitry, regardless of its size.
1. The size of the cage must be just such that the rabbits can move freely and do not interfere with each other to eat, sleep and especially play. If there is not enough space in the cage, the rabbits will begin to be lazy, and this will have a very negative impact on them. Perhaps such individuals will have no offspring at all.
2. For three to four rabbits, it is necessary to allocate a separate space. At the same time, it should be quite spacious. If a person decides to start breeding rabbits, he needs to keep the little rabbits with their mothers because they feed them.
3. One of the cages should always remain free, since not all rabbits reach the required size and weight. In order to fatten them up the right size they are simply housed and fattened separately, and this naturally requires a separate cage.
DIY rabbit cage video collection
https://youtu.be/addXcSFhn8g