Let's learn how to lay laminate flooring correctly. ⚠ How to lay laminate flooring with your own hands: step-by-step instructions and nuances of performing the work Proper care of laminate flooring
Today, laminate occupies a strong position in the market as the most popular floor covering.
Today we will learn how to lay laminate flooring and what tools are needed to complete this task.
Laminate flooring is increasingly found not only in ordinary apartments, but also in country houses, cottages, and public buildings. Why is he so attractive? The simplicity of the masonry and the work performed, because even a novice master can handle this material. So, let's look at how to properly lay laminate flooring with your own hands.

How to lay laminate flooring correctly. Before laying laminate flooring, it is necessary to prepare the floor covering.
Floor preparation
First, the master needs to prepare the floor surface, because with any unevenness, differences and roughness, the laying will not go completely smoothly, and roughly speaking, we can ruin the final result.
Let's consider some rules: let's measure how smooth our floor is with a regular level, but if there are visible unevennesses, you will need to use a sanding machine (we are talking about a wooden floor). Also, special attention should be paid to the board; if it is normal, we get to work, otherwise, we replace it.

Preparing the room for proper installation of laminate flooring
If the surface of your home is concrete, we work in a similar way: we measure the unevenness, level it by making new screeds, or use a floor leveler (floor leveler).
Underlay for laminate
The next step will be to apply the waterproofing material and the substrate. First you need to lay a waterproofing layer; more and more people are resorting to ordinary polyethylene, the priority is price and availability. When growing the film over the floor surface, make sure that the allowances on the walls are at least 20 cm.

waterproofing material - underlay for laminate
An overlap between the canvases themselves is possible, approximately 15 cm. After joining the polyethylene with adhesive tape, the master lays the backing. As you can see, there are no particular difficulties; you are required to be attentive and accurate. The substrate is foamed polyethylene, it is laid in the same way as film - gluing the pieces together with tape.
Rules for laying laminate flooring with your own hands
After purchasing building materials, do not rush to start work. After 24 hours, the laminate and other auxiliary material will adapt to the temperature and atmospheric conditions of your apartment, and only after that they will acquire a certain humidity, flexibility and length, and after that they can begin to be laid on the floor.It is also better to stock up on a certain set of tools in advance:
- roulette,
- pencil or marker,
- jigsaw (saw),
- hammer,
- stationery knife or scissors,
- wooden strip, about 20 cm long (for fitting panels).
It is easier to do the work using a jigsaw, because cutting by hand is a very labor-intensive process.

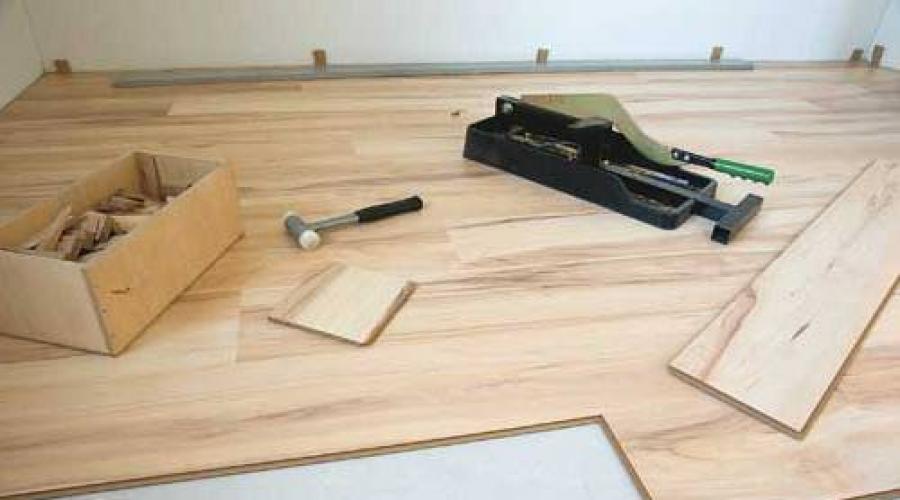
Basic tools for laying laminate flooring
Laying laminate using technology
After the master has completed the preparation for the actual laying of the material (laid the substrate and plastic film), we proceed to the following: we begin work from a more suitable angle for us. But, you should remember that laminate laying is done purely from left to right and nothing more!
Another important point in proper installation: take into account the angle of incidence of the sun's ray on the laminate. Therefore, we carry out the process of laying the laminate along the sunlight, this will ensure the invisibility of the joints between the panels.
It is necessary to take into account the angle of incidence of the sun's ray on the laminate
It is interesting that laminate is very sensitive to changes in atmospheric parameters (temperature, air humidity). Depending on this, it can either contract or, on the contrary, expand; this should also be taken into account. To do this, when laying, leave gaps (laminate-wall about 8-10 mm) and install special jumpers (pegs).
Also, an important rule for laying laminate flooring is the correct calculation of the rows; if the last row is smaller than usual, then the first and last rows are cut so that their widths match.
The first row is usually laid with tenons against the wall, cutting them with a saw or jigsaw. Special spacer pegs are also installed (approximate thickness 8-10 mm). The ends of the panels are installed and snapped into place with a locking connection on the narrow side.
- We recommend reading – Pros and cons
The tenons of the next laminate are inserted into the groove of the previous one with a slight slope, and the workpiece itself is pressed tightly to the floor.
When laying the next rows, you need to provide a shift of 25-30 cm, and use a jigsaw to cut to a certain length. Laying the remaining rows is done by analogy with rows 1-2, alternating and shifting them in the above order. Fix everything with a hammer and a wooden block.

In order to secure the panel more firmly and better, a clamp can be used in the last row. To avoid distortions and unevenness of the masonry, it is necessary to fit all panels of the row closely to each other.
There are different types of laminates
Laminate with lock and click locks are actually varieties of tongue and groove. The only difference is in the principle of their fixation.

Types of laminate locks
Laying laminate flooring with a “click” lock
Panels with this type of lock are installed at an angle (with a slope), then pressed to the floor and tapped with a wooden block using a hammer.
Laminate with lock lock
The panel with the “lok” lock is installed in the same way, with a smaller slope, also hammered with a wooden beam.
When laying laminate flooring, the question may arise: how to lay laminate flooring correctly if there are pipes or protruding walls in the room? It is possible that there will be a heating riser in your room, then the laminate is laid around the pipe.
The panel is applied to the pipe and the points of contact with the pipe are marked, then. Next, the distance from the center of the pipe to the wall is measured and everything is transferred to the panel. Thus, at the intersection of the lines we have marked, holes are drilled (more than the diameter of the pipe, about 2-3 mm), the smaller part of the panel is removed, and the larger part is laid and fixed with a hammer and a wooden block.
A cut piece of the panel is lubricated from the end with a special adhesive, then placed behind the pipe and applied to a large part of the panel, and the gaps that have formed can be masked using plugs.
In places where the laminate comes into contact with the door frame, it is laid as follows: flush with the doorway, taking into account the fact that the height of the cutout should not be more or less than the thickness of the laminate itself. The panel is cut so that it partially or completely fits under the threshold of the door frame; the final step is securing it with a clamp. For a more aesthetic appearance of the threshold itself and the absence of differences or flaws, it is necessary to use a special adhesive composition (for thresholds).
How to lay laminate flooring video
We offer an example of how to lay laminate flooring correctly. After all, its service life to its owner will depend on the correct installation of the laminate.
Repairing laminate flooring after damage
It would be wise to mention damage prevention and repair of laminate flooring.
Laminate is usually resistant to wear and tear, but there are no building materials that last forever. Soon various chips, scratches, cracks or swellings may appear on it. If the laminate laying technology has been violated, then the likelihood of defects increases.

We restore laminate flooring with our own hands
- Removing scratches. It happens that, while moving furniture, we accidentally scratched the laminate or dropped something heavy on the floor, leaving a mark. Don’t be upset because everything can be corrected and repaired. If the scratches or chips are too large, you need to replace the panel with a new one.
- If you want to avoid scratches, use special felt pads (stickers) that are fixed to the legs of furniture (sofas, walls, stools); you can also lay various rugs that will help preserve your floor.
- Clean your shoes before stepping on the laminate, as grains of sand and pebbles can stick to the sole, which can also cause scratches and chips on the laminate.
- Laminate flooring should be cleaned with special detergents recommended for these purposes, otherwise the coating may be damaged (if low-quality detergents are used, stains and streaks may appear).
- You can buy a laminate repair kit, but before you get started, make sure it can be repaired, otherwise you will have to replace the panel with a new one.
- There are special helpers in eliminating scratches: wax crayons (for minor defects), putty (for more severe damage). It is necessary to take into account the color of the laminate with the color of your putty, they should be identical or more similar. Fixing scratches with wax crayons will take you no more than 15 minutes. Wax crayons can be purchased at any hardware store or construction sites, also in online stores. If you don’t know what exactly you need, contact the sellers with a question about scratches on the laminate.
First, you need to clean the area of the scratch with a vacuum cleaner, then cover it with wax chalk, removing excess wax with a dry soft cloth, polish the area of minor repairs, and the problem is eliminated. If the scratch or chip is deeper, you need to use a special putty.
- We recommend reading -
To seal scratches with putty, take a piece of your laminate with you as a sample and go to a hardware store together, this will make it easier to choose the color of the putty, remember, the quality of the putty plays a huge role, especially if the chips or scratches are too deep.
First practice on the remaining piece, and only then start filling the defect in your coating. To do this, take a special spatula and a piece of soft, dry cloth. Fill the chip with scratch paste, wipe off the excess with a rag (soft cloth), and leave the repair area to dry for at least 2 hours. Once the fill area has dried, polish it using not too rough movements.
Next entry Installation of heated floors - comfort and savings
When creating the design of your apartment or house, you want to do everything stylishly and tastefully, using high-quality, innovative and aesthetically beautiful materials. If the question of choosing a floor arises, laminate coatings are most often used, which have a wide variety of textures and shades. Let's find out how to lay laminate flooring with your own hands.
On the construction market you can find a wide variety of laminate flooring. This material is classified according to several criteria.
Types of laminate by shape:
- Rectangular board. The main part of the coverings is made in the form of boards, the length of which is 1.2-2 meters. It is convenient to use such material when installing floors in large rooms. Laying laminate flooring yourself takes minimal time, and convenient connections greatly simplify installation.
- Tile. Many manufacturers have recently been producing lamination coatings in the form of square tiles, this makes it possible to create complex decorative patterns. It is more expensive, but has the advantage that it does not require a substrate. Laying such material is much more convenient, but there is one drawback: repairing tiles is somewhat more difficult than classic laminate.
The difference between the laminate and the top layer of its surface: the appearance of the coating largely depends on this. Various types of surface include: classic wood base, aged wood look, gloss, relief, natural surface, oil wood, country.
Designers use the versatility of their imagination, creating different types of laminate designs: classic wood, leather luxury, metallic shine, stone calm, designer laminate (decorated with original patterns and designs burned into wood).
We correctly calculate the amount of material
How to lay laminate flooring with your own hands so as not to make a mistake in its quantity and correct installation? There are several ways to calculate laminate flooring for a room, but they are not able to calculate the material without trimmings. This is due to the fact that the boards need to be trimmed during the installation process.
First method
To correctly calculate the quantity, you need to know the exact dimensions of the room. This method can be used for calculations not only at home, but also at industrial enterprises.
The knowledge gained at school will be useful for this. You can calculate the area of a rectangle by multiplying its length by its width. There are cases of non-standard room shapes, when the room has not very large spaces that cannot be taken into account as part of the total area. They need to be counted separately. After that, all individual areas are summed up and the total value is displayed.
Next you need to find out how much material is needed for the floor. The width of the laminate panel can be 185-195 mm, and the length is usually 1260-1380 mm. To get the area of one board, you will need to multiply its length and width. And to find out how much material you will need, you will need to divide the area of the room by the area of the panel, so you will find out the number of pieces that you will have to buy for the entire floor in the room. It is important to have material in reserve. Usually there are about 8 pieces in one package. Thus, you need to divide the total number of laminate boards by 8, and you will get the number of packs that you will need to buy to install the laminate yourself.
Second method
When calculating laminate flooring in a room where there are protrusions or columns, let’s say one 0.4 x 1.17 m, and the room has dimensions of 6.5 x 3.25 m, a laminate board - 0.185 x 1.26 m. To begin with, the length of the room is 6 We divide .5 m by the length of the board - 1.26 m, thus we find out the number of pieces that need to be taken. After this, divide the width of the room - 3.25 m by the width of the board and again we get pieces. We multiply the results and get the amount that is required to lay the laminate with your own hands. Be sure to add an existing piece of area measuring 0.4 × 1.17 m, dividing 0.4 m by 0.185 m, we get 2 more pieces. So, we add 2 more boards to the existing pieces, in this case we get 101 laminate panels. 101/8=12.625, or 12 packs and 5 pieces.
Recommendation. The second method differs from the first in that it focuses on the number of trims when installing a laminated coating, that is, this method will be more accurate and reliable. However, when counting using the first method, a sufficient amount of scraps remains, this will help save money when laying laminate flooring with your own hands in an adjacent room. This is very convenient, and, most importantly, pay attention to the fact that you need to step back 1-1.5 cm from the wall and perform the calculation manually, thanks to which you can see the real picture and calculate the required supply of material.
How to lay laminate flooring. Various flooring options
How to lay laminate flooring depending on the interior design project or the lighting conditions in the room? Laminate, like parquet, must be installed: parallel or perpendicular to the direction of the light rays, as well as diagonally - this means at an angle to them. The correct selection of the method and scheme for laying the material helps to visually change the geometry of the room, drawing attention to the advantages and hiding any structural flaws.

Most often, a direct method is chosen for laying laminate flooring, placing the panels parallel to the direction of the light rays. But, if the geometric structure of the room allows, it is possible to use other options: perpendicular.

Depending on the direction of the light flux, you need to choose one or another scheme for laying the laminate with your own hands; there are also three of them:
- classic version;
- brick or chessboard;
- diagonal flooring.

For any plank laying scheme, the main point remains to create the strength of the floor covering. This is ensured by the fact that each board in the next row moves no less than 15-20 cm in relation to the adjacent panel of the previous row. By achieving harmony in the combination of lighting and a schematic pattern of masonry, you can visually expand or narrow a room, hide or emphasize its unusual shape, or simply get a beautiful floor covering.
Instructions for proper installation of laminate flooring
The first major consideration when installing any type of laminate flooring is knowing how to install laminate flooring on the following types of surfaces: concrete, wood, ceramic tile and linoleum. Each of these coatings has its own characteristics that should be taken into account when installing the material.
Laminate on concrete floor. Laying nuances
Concrete screed is the best base for laminate flooring, but before proceeding with the installation of the coating, you must allow the concrete to dry completely. If the base has been poured for a long time, then before laying the laminate on the concrete floor, a thorough inspection should be carried out for cracks and chips. After thorough cleaning, a special polyethylene film is laid, and its edges can be secured with ordinary tape. Next, lay the substrate and the material itself. Choose the layout in accordance with the characteristics of the room, lighting and type of laminate.

Laying laminate flooring on a wooden floor
The old base for laminate flooring, made of wood, must be examined for the possible presence of fungal infections or cracks and various kinds of deflections of the boards. Parts that are susceptible to rotting will have to be replaced with new ones, securing them with self-tapping screws. If there are some unevennesses, you need to adjust the top layer and make the surface even.
It is permissible to install laminate flooring on a floor covered with linoleum or tiles, provided that the coating remains level and is installed in compliance with all the conditions required for proper installation of the material. In this case, you don’t need to use plastic film, but you will definitely need a backing. You can lay laminate flooring on the old laminate flooring without dismantling it. In this case, the main condition will be the mandatory evenness of the base.

Features of laying laminate flooring on a “warm floor” system
You need to know that a laminate that is suitable for this is laid on the “” system. This feature is determined by the manufacturer and indicated on the packaging of the material.
Before carrying out work, it is necessary to install the system itself. You will have to choose from several options: an electric floor using mats, cable or film; in addition, there is a water system, which involves installing special pipes where water circulates.
You can start laying the laminate with your own hands only when the screed is completely dry. You need to start work at a temperature not lower than 18-20 degrees. First you need to lay down a plastic film, securing it with tape. Then lay the underlay around the entire perimeter of the room, and lay the laminate on top.
When you shouldn’t lay laminate flooring:
- laminated panels are not placed on a base covered with carpets;
- laminate is not installed in bathrooms, bathhouses and other rooms with high humidity;
- For the kitchen and hallway, only special types of laminate flooring are used.
Methods for installing laminate panels
How to lay laminate using three installation methods: glue, Click-lock and Lok-lock?
The first option is used the least often, and it is similar to the parquet laying system. The process consists of covering the edges of the laminate boards with an adhesive solution and tightly connecting them to each other. This method is rarely used due to some of its disadvantages: installation is quite labor-intensive; short service life (adhesive mixtures dry out quickly); there is no possibility of repairing a separate part of the coating.
The most popular option is to install the laminate yourself using the “Click” locking system. This is due to the simple installation procedure. The boards are inserted into one another at an angle of 30 degrees and pressed against each other. After this, using a block and a hammer, one panel is slowly driven into the previous one.
Using the “Lok” locking system, the boards are laid horizontally. You need to leave a small gap between the panels. The tenon is aligned with the groove, continuing fastening until the lock is activated.
To make everything look aesthetically pleasing, you need to know how to lay laminate flooring correctly. You should adhere to the following rules:

By studying the features of choosing a material and the procedure for laying laminate flooring with your own hands, you can get a high-quality floor covering that will serve you for many years, remaining beautiful and durable.
Video instructions for laying laminate flooring
So, the choice in favor of a laminated floor has been made, the material in the required quantity has been purchased and delivered to the installation site.
All that remains is to invite a team of craftsmen and wait for the work to be completed. Is it really necessary to pay extra money for installation of the coating?
A good owner is quite capable of coping with such a task, of course, if he has certain basic skills and the proper level of accuracy and attentiveness.
The technology of laying laminate flooring cannot be rushed. To ensure that the installation of the coating itself does not cause difficulties, and that the resulting floor lasts a long time without losing its operational and decorative qualities, it is necessary to carry out thorough preparation for work.
Assessing the condition of the floor surface
 Usually, even before deciding to purchase a laminate, the condition of the “subfloor” is assessed and appropriate repair and restoration work is carried out.
By and large, a laminated floor can be laid on any surface subject to the main condition - it must be smooth, durable, and free from areas of dynamic deformation.
Otherwise, “weak” places will inevitably appear on the new coating, where surface integrity may be damaged, joints may diverge, and squeaks may appear.
Ideally, the floor should be strictly horizontal, with permissible differences of no more than 1-2 mm per linear meter.
- must not have significant cracks, gouges, peeling or crumbling areas. If it is impossible to correct the existing defects, installation on an uneven floor cannot be carried out. You'll have to update the screed - or. You can start laying the laminate only after the coating has completely hardened, in accordance with the deadlines established by the concrete technology.
- If it is expected, its entire surface must be carefully checked. If areas of “playing” or creaking boards are identified, they must be repaired or replaced. Possible irregularities can be processed with a plane or sanding machine, and existing cavities can be filled with wood putty.
- You can lay laminate, provided that there are no holes or bumps, delamination of joints, through wear, or areas of destruction of the concrete base. This coating cannot be repaired; it will be easier to remove the linoleum and carefully prepare the base for the laminate.
If funds allow, the ideal option would be to cover the entire floor surface with 10-12 mm, having previously laid them underneath with plastic film for water vapor barrier. The process of laying laminate flooring will be significantly simplified, and the sound and thermal insulation qualities of the floor will increase significantly.
We prepare the necessary materials and tools
Good advice to all novice craftsmen - before laying the laminate, after it is delivered from the store, it is worth unpacking the panels and letting them rest for 2-3 days in the room where the flooring will be carried out.
Equalizing the temperature and humidity levels of the material and the room will facilitate the installation process and eliminate the risk of warping of the laid coating.
This time can be devoted to preparing the necessary tools and materials.
First of all, you need to have the required quantity available, regardless of the type of base.
The underlay not only has a good insulating effect - it has a shock-absorbing effect and prevents friction between the laminate board and the rigid base, which ensures the longevity of the floor covering.
 The substrate can be polystyrene or polyurethane foam, with or without a foil heat-reflecting coating, produced in rolls or in the form of rectangular panels.
A more expensive, but very high-quality option is.
- The lining material is laid end-to-end, without overlaps, so to securely fix it to the floor you will need double-sided tape. You can also use regular adhesive tape to secure the rows of backing along the seams.
- It is worth immediately preparing a set of wooden wedges, 10-12 mm thick, for laying the laminate at the required distance from the walls of the room.
- You can cut laminated panels to the required size with a regular hacksaw or jigsaw.
- For high-quality joining of seams, you will need a hammer, preferably a rubber or wooden one (mallet). You can also use metal, but only through wooden spacers (bars).
- To install sections of the coating located near the walls, you need to have a small mount, or you can make a lever from a steel strip with a hook and a shoulder protruding upward, through which the force of the hammer can be transmitted.
In principle, the materials and tools for installation are ready. However, there are a few other things to consider before you get started.
How to avoid unwanted mistakes
It is best to precede the installation by drawing up a plan carefully drawn to scale - the required visibility and clarity will appear in further actions.
What is important to consider:

- When answering the question: how to lay laminate along or across, the following is important: the direction of the longitudinal joints should be parallel to the direction of the rays from the main source of natural light (windows) - in this case, the seams will be practically invisible.
- The laying direction is usually from the far left corner, straight. For the panels of the first row adjacent to the wall, the groove must be outward, and the tenon must be cut so that a smooth end is obtained. Longitudinal cutting of panels is best done using a circular or vertical hand-held power saw.
- On the plan, be sure to take into account that the last strip that completes the installation must have a width of at least 100 mm. If this does not work, you will have to reduce the width of the first row. The same should be taken into account if there are any internal corners in the room.
- The thickness of the laid coating should not interfere with the free opening of the doors. Sometimes you have to remove and trim the door leaf from below in advance.
- When planning, do not forget about the pipes passing through the thickness of the floor. To cut shaped grooves for them, you will definitely need a jigsaw.
After thinking through all the theoretical issues, you can proceed directly to installation.
Laminate installation process
Laminated floor panels are available in interlocking or adhesive versions. In turn, locks can be one of several systems - “Click”, “Lock”, “5G”.
How to lay laminate flooring correctly?
Each type of laminate has its own installation features.
Features of laying laminate flooring with the “Click” system
 Currently, this is the most common locking system among laminate manufacturers and popular among craftsmen.
Its main difference from others is that it is possible to insert a figured tenon into a complex groove only at a certain angle - for different manufacturers - from 25 to 45 degrees.
When the two panels are rotated in one plane, the lock securely snaps into place.
Another convenience is that disassembling the covering is also not difficult; when you turn the panel, the lock will “open.”
- Work begins with the assembly of the first row of panels. It is laid along the wall and wedged on both sides with 10-12 mm dies. This gap is necessary to compensate for the thermal expansion of the laminate flooring. The assembly process is simple - insert the tenon at the desired angle, accurately aligning the edges, lower the panel down until it clicks into place.
- The second row is assembled by ensuring that the transverse seams are displaced by half the length of the panels (30-40 cm is allowed). The strip along its entire length is assembled completely, and only then is it connected to the first row. This will most likely require an assistant. After fixing the second row, it is also wedged from the walls with blocks at both ends.
- Then the work continues in the same order until the room is completely covered.
It is imperative to monitor the cleanliness of the grooves so that no sawdust or other debris remains there.
If the material fits well, you most likely won't even need a hammer.
Features of laying laminate flooring with the “Lock” system
 This locking system is gradually falling out of use, although inexpensive laminate models can be produced with it.
The connection between the tenon and the groove occurs strictly in one plane, and the engagement occurs due to special protrusions and grooves.
The joint turns out to be much less durable, although disassembly, if necessary, is not easy - the tenon may be damaged.
- When assembling the first row, after connecting the end sides of the panels, to ensure that the tenon is completely inserted into the groove, tapping with a hammer is carried out through a wooden spacer. Wedging the row away from the wall is done in the same way as in the case of the “Click” system.
- The second row is assembled gradually, one panel at a time (also taking into account the displacement of the transverse seam by half the length of the board). The first panel is inserted into the groove of the first row, tapped with a hammer until it is completely connected, and then wedged away from the wall.
- The second panel is tapped on both the long and short sides for reliable fastening of the longitudinal and transverse lock. Further work continues in the same order.
- The most difficult thing is installing the last panel of the row adjacent to the wall. This will require either a pry bar or a curved lever.
The work is carried out in rows or “ladders”, to the end of the room. The last row is also carefully mounted with power transmitted through a lever.
It is very important to correctly measure the force of the hammer blow or the force on the lever so as not to damage the surface of the laminate or break the lock's tenons.
Features of laying adhesive laminate
Although such laminated panels are equipped with a tongue-and-groove system, they do not have a locking connection. Thus, the strength of the joint is ensured only by gluing.
Such floors are distinguished by good solidity and moisture resistance, but it will no longer be possible to dismantle or repair a separate section of the covering.
The installation process is more labor-intensive, and you will also need to purchase special glue. It is not recommended to use the usual PVA.
- The technology for laying laminate is generally similar to the “Lock” system - the sequence is the same. The difference is that each groove is generously coated with glue (in accordance with the instructions included with it). Excess glue that appears after the panels are joined is immediately removed with a clean, damp cloth.
- After laying the first three rows, be sure to take a break of at least 2 hours so that the glue has time to set. The same rule applies in the future, until the entire laminate is completely installed.
Master class on laying laminate flooring in video format
A video about how to properly lay laminate flooring, showing installation technology and preparatory work.
Let's finish the job
After the entire floor surface is covered with laminate, the spacer wedges at the walls are removed. The final stage will be the installation of skirting boards that will hide the expansion gaps.
It is important to remember that in no case are the skirting boards screwed to the laminated covering - only to the wall.
The transition to another covering at the junction of adjacent rooms can be covered with a decorative overlay or use.
In fact, the installation work is completed - you can move on to cleaning the room and decorating the interior of the room. As you can see, there is nothing overly complicated. The main thing is maximum attention, thoughtfulness of every action and the highest accuracy. Everything should work out!
Floors covered with laminate are considered one of the most practical, cheap, beautiful and easy to install. And this is true - you can cope with the task of laying them yourself, without even resorting to the help of specialists. The main thing is to have the desire and allocate time for work. But how to lay laminate? Let's look at this question in practice.
Laminate – a finishing floor covering, although considered easy to install and maintain, is quite delicate. It is demanding in terms of operating conditions and the installation process. If you neglect some of the features and rules for working with it, the coating will not last long.


The photo shows the process of laying laminate flooring.
Therefore, before starting work, it is worth ensuring the following conditions in the room:
- temperature range – 15-30 degrees above zero;
- air humidity – about 40-70%;
- level, cleared of debris and dried base;
- the room must be dry. If the humidity is high, you will have to buy more expensive moisture-resistant material;
- heaters and other heating devices cannot be turned on while working with laminate;
- It is recommended to close windows to avoid drafts.

Attention! Laminate flooring cannot be installed on sagging floors or cracked screeds. Otherwise, the material will not last long. The locks connecting the covering elements will break when the material flexes, which will ultimately damage the integrity of the base.

It is also important to remember that laminate flooring can be laid only 2 days after the material was delivered to the work site. It needs this time to “get used” to the new operating conditions - the laminate will absorb the necessary humidity, adapt to the temperature, so that during operation it will not change its dimensions excessively. It reacts sharply to changes in room conditions - the effect of thermal expansion may appear.

It is necessary to leave the purchased laminate in the room where you plan to install the floor. This is necessary for acclimatization. This process takes about 48 hours

When choosing a laminate, you should focus not only on the color, but also on the quality of the material. It is not worth purchasing low-quality products that are too thin or not suitable for operating conditions. Such a coating will last too little and will quickly lose its appearance. Packages with laminate must be sealed, and before installation it is important to inspect all boards for damage or chips. Damaged installation elements cannot be used.

Prices for Tarkett laminate
Tarquette laminate
The process of laying the material may differ depending on what type of lamellas are used. For example, there are three installation methods, each of which uses a different type of material: laminate with joints Click or Lock, as well as the type of coating that is installed using glue.


Installation of laminate flooring with a click lock
When using the adhesive method, the laminate is glued to the rough base using special compounds. The technology is similar to laying parquet. Glue can also be applied to the joints between individual planks, which are then tightly joined to each other. But this method is now practically not used, with the exception of decorating rooms with very high traffic or high humidity. It will not be possible to disassemble the laminate if necessary.
Installation of cover with type locks Lock involves connecting individual planks using the impact method. That is, during operation, the tenon on one side of the lamella is driven into a groove on the other lamella. This coating is already losing popularity due to its disadvantages - labor-intensive work and difficult disassembly if necessary.

Important! If material with this type of lock is used, the work should be done carefully - control the force of the impact and use a special rubber or wooden block, placing it at the point of impact.

Nowadays, laminate with joints is most often used for laying this type of flooring. Click. Here the joining occurs due to a tongue and groove, but of a special shape in which the elements are securely joined and connected to each other without the use of impact technology. The panels are joined at a certain angle, after which the lamella is lowered to the floor - at this moment the snapping occurs. This connection allows, if necessary, to easily disassemble the finish and re-install it.


Methods for arranging lamellas
Laminate flooring can be laid in different patterns, according to patterns. Here you can choose any option you like, the main thing is to follow the drawing. There are several most popular layout options. The material consumption will also depend on the choice of method.
Table. Laminate layout options.
| Layout option | Description |
|---|---|
| This is the most economical option, since the amount of trimmings and waste will be minimal. The first row is laid first, and the remaining trim from the last plank can be used to start the second. The main thing is that they are at least 30 cm long. The amount of waste in this case usually does not exceed 5% of the material. |
| If you look at a laminate laid in this way, the joints will form a special pattern that resembles a chessboard. In this case, the new row always begins with such a cutting length that the panel is shifted to the side by 1/2 from the previously laid one. The amount of waste in this case increases to 15%. |
| It resembles the classic installation option, only it is performed at an angle of 45 degrees relative to the walls of the room. It looks impressive, but the amount of waste becomes even greater - more than 15%. |


![]()
To avoid possible mistakes when creating a drawing, it is better to design the entire work in advance by sketching out a laying diagram on a piece of paper. And take into account that the minimum displacement of the joints should be 20 cm relative to the lamellas laid in the previously installed row.

Important! Regardless of which laminate is laid and according to what pattern, there should always be a compensation gap of about 1.5 cm between it and the wall. Otherwise, the material will be deformed. The area of 1 m2 of laminate under the influence of humidity and temperature can increase by approximately 1.5 mm.
When installing laminate flooring, it is important to consider light sources so that the gaps between the planks are less noticeable. That is, they are laid so that they are located perpendicular to the light source (for example, a window).

Also, pre-planning the installation will ensure that the planks in the last row will have sufficient width (100 mm). If it turns out that they will be smaller, then it is better to narrow the first row a little.
The choice of laminate as a floor covering is not accidental. It is beautiful in appearance, the cost is adequate for the quality, the material has simple instructions for installing it yourself. This will reduce the overall cost of floor repairs if it is not possible to order the work of professionals. How to lay laminate flooring correctly - this is described in this article
The choice of laminate as a floor covering is not accidental. It is beautiful in appearance, the price is adequate for the quality, the material has simple instructions for installing it yourself. This will reduce the overall cost of floor repairs if it is not possible to order the work of professionals. How to lay laminate flooring correctly is described in this article.
Methods for laying laminate flooring - choose a method
Foundation assessment
The final result of installation directly depends on the initial condition of the base. If this is not taken into account, the finishing coating will not only lie unevenly, but will also not last long due to the constant load on the lamellas. They will move, break, joints and seams will lose their tightness. How to properly lay laminate flooring with your own hands, depending on the type of base - wooden joists or concrete? The following are assessed:
Concrete slab
Before installing laminate flooring, it is important to evaluate the height difference. It is permissible no more than 3 mm - the substrate is designed to level out the difference. If for every 2 sq. m there is a significant change, then this is a reason to make a new concrete screed with careful dismantling of the old one.
When damage to strictly the base is insignificant, leveling mixtures are used to prepare a satisfactory level. It is not recommended to lay laminate on bare concrete if installation of a heated floor is not provided. A layer of plywood will be required. In addition to providing heat, it will provide stabilization to the coating and protect the new concrete base from damage due to pressure.
Wooden floors
With boards and joists the task is more painstaking. It is necessary to remove the entire covering in order to evaluate the load-bearing supports - joists - for fractures, as well as biological damage. Mold and rot, for example. The position of the wooden beams is also checked in advance, even if their condition is satisfactory. Afterwards the boards are evaluated - they may be clean, but crooked and humpbacked. They are changed or a scraping procedure is carried out to ensure compliance with the level. How is laminate flooring attached to plank floors? It is recommended to lay plywood. 
Choosing material
The main covering is laminate, classified according to tests for strength and wear resistance. Before solving the problem of how to lay laminate correctly, the class of the laminate and other quality parameters are important to choose.
Class selection
Classes 21 to 34 are recommended for specific rooms and loads - details here. Up to class 31, laminate flooring lasts no more than 4 years. The coating intended for commercial facilities - shops, halls - is considered optimal - reliable and durable. It is not forbidden to lay it in domestic household conditions, where it can remain in its original form for up to 20 years. In addition to classification, pay attention to the following:

Choosing the right laminate is not difficult - read more in this article.
Substrate
There are several types of underlay for laying laminate flooring. Each type has pros and cons. The price is accordingly.

A high-quality and correctly selected substrate is the key to an even laminate coating and overall ease of use.
Calculation of the number of boards
The simplest calculation to obtain the exact number of lamellas per covered area is as follows: S room/S lamellas. But the calculation is very approximate, since the final quantity depends on the following factors:
- Laying method. Deck or diagonal methods vary by up to 40% in total.
- Length of lamellas. The range from 1.3 to 2.66 m affects the number of boards required.
- Mastery. It is difficult for amateurs to do without defects and scraps the first time.
It is also important to take into account that the packaging contains a certain percentage of factory errors, so the final quantity when calculating is safely increased by 15–20%.
Laminate preparation
When the coating is purchased, it needs to be adapted to room temperature so that the laminate does not become deformed due to a sharp change in the future. To do this, the packages are opened and the slats are laid out on a horizontal surface for up to 3 days. It is recommended to do this when the base is completely prepared.
Methods for laying laminate flooring - choosing a method
When choosing the direction of installation, it is important to consider the flow of light from the windows. The rays falling on the transverse installation visually increase the area of the room. A similar effect is created by diagonal laying.
Direction
Which direction should I lay the laminate? Features of each installation:

If you have no experience in laying laminate, then the classic deck one is what you need. Diagonals require skill. If desired, it is possible to order the work from professionals with a guarantee of long-term operation.
Tools and auxiliary materials
Depending on the locking method chosen, tools will be required. What you need to install laminate:
- Mallet - a wooden or rubber mallet.
- Square, tape measure.
- Markers. It is important to choose washable ones, especially for light shades of laminate flooring.
- Hacksaw or jigsaw. The latter is preferable, as it accurately cuts contours if you need to go around pipes.
- Wedges for maintaining technological gaps between the wall and the slats. This is required for linear coverage extensions.
- Scotch tape for laying the backing.
The base should be ready by then - a concrete leveling mixture is poured or plywood is laid. See how to level the base here.
Instructions for laying laminate flooring
The finished surface of the subfloor is cleaned - there should be no sand, concrete chips, sawdust or other debris, otherwise the coating will not lie tightly. A vacuum cleaner is used for cleaning. Next, how to cover a laminate floor:

Do-it-yourself diagonal assembly of laminate has a similar principle. But the process is more labor-intensive, since it is necessary to carefully check the cutting of each board. Errors along the edges are allowed no more than 2 mm, in this case the edges will hide the baseboards.
Fulfilling the following points will allow you to enjoy long-lasting and beautiful results in the future:
- Before laying laminate flooring with your own hands, correctly lay out the boards in advance in the future drawing and number them. The material will rest, and the process will go faster.
- It is advisable to coat each board with locking systems with wax. The fastenings will become lighter and the protection against moisture will increase.
It’s easy to lay laminate flooring yourself with an explanatory video.
If you find an error, please highlight a piece of text and click Ctrl+Enter.